
IMPORTANT: For assistance with assembly, or to request
missing parts, please log on to our website at www.keter.com,
or contact Customer Service.
IMPORTANT : Pour bénéficier d'une assistance lors du
montage ou pour réclamer des pièces manquantes, veuillez
vous connecter sur notre site web www.keter.com ou contacter
le Service clients.
IMPORTANTE: Para recibir asistencia sobre el montaje o para
solicitar partes faltantes, ingrese a nuestra página de Internet
www.keter.com o contáctese con Atención al Cliente.
WICHTIG: Für Hilfe bei der Montage oder um fehlende Teile
anzufordern, loggen Sie bitten in unsere Internet Seite
www.keter.com ein oder kontaktieren Sie den Kundendienst.
BELANGRIJK: Ga voor hulp bij het monteren of voor het
aanvragen van onderbrekende onderdelen naar onze website
op www.keter.com of neem contact op met de Klantenservice.
IMPORTANTE: Per assistenza sull’assemblaggio o per
richiedere parti mancanti, collegarsi al nostro sito web
www.keter.com, oppure contattare il Servizio Clienti.
IMPORTANTE: Para obter assistência sobre a montagem ou
para solicitar peças registe-se no nosso site de Internet
www.keter.com ou contacte o serviço de assistência ao cliente.
MANOR
U.S.
Call Toll Free
: 1-(888)-374-4262
Fax: 317-575-4502 11495 North Pennsylvania St., Suite 110,
Carmel, Indiana, 46032, U.S.A .
Canada
Appel gratuit:
1-(800)-661-6721
Call Toll Free:
1-(800)-661-6721
United Kingdom:
Keter (UK) Ltd.
Unit 4, Woodgate Business Park, Clapgate Lane,
Birmingham, B32 3DB, United Kingdom.
Tel: 0121-5060008, Fax: 0121-4220808
Spain
Eduardo Cobo
SPV KETER
TLF:0034 949 27 74 21
FAX:0034 949 34 89 76
Scandinavia
Kim M. Nielsen [[email protected]]
+45 - 70 70 21 99
Germany
Phone: +49(0)6074-8931-0
Telefax: +49(0)6074-8931-11
Email: [email protected]
France
00 33 1 34 07 99 00
Other European Countries:
Keter Benelux
Ericssonstraat 17, Postbus 224, 5120 AE Rijen,
the Netherlands. Tel: 31-1612-28301,
Fax: 31-1612-28322
CUSTOMER SERVICE
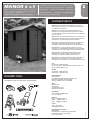
REQUIRED TOOLS
The following tools are required for shed assembly:
539918
ASSEMBLY INSTRUCTIONS | CONSIGNES DE MON-
TAGE | INSTRUCCIONES DE MONTAJE | MONTAGE-
ANLEITUNG | SAMLEVEJLEDNING | MONTAGE-
VOORSCHRIFTEN | ISTRUZIONI D’ASSEMBLAGGIO
| INSTRUÇÕES DE MONTAGEM
Manor Shed | Abri de rangement Manor | Cobertizo
Manor
| Manor Schuppen | Manor-schuurtje |
Deposito Manor
| Abrigo Manor
130W x 193D x 197.5H cm
| 51”L x 76”W x 78”H
WWW.KETER.COM
6' x 4'
A página está carregando...
A página está carregando...
A página está carregando...

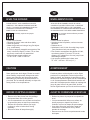
A montagem exige duas pessoas
NIVELAR O SOLO
POR FAVOR, ESCOLHA O LOCAL DE CONSTRUÇÃO
CUIDADOSAMENTE. A SUPERFÍCIE DO SOLO DEVE
SER NIVELADA. RECOMENDA-SE VIVAMENTE QUE
CONSTRUA UMA BASE DE MADEIRA OU DE CIMENTO
PARA USAR COMO FUNDAÇÕES.
ATENÇÃO
• Retire as pedras do local
• Retire todas as plantas, raízes e outros
obstáculos
• Alise o local
• Nivele o solo utilizando um objecto comprido e
plano (por exemplo, uma trave de madeira)
• De modo a montar correctamente algumas
partes do abrigo, deve permanecer a 27
polegadas / 70 cm de qualquer vedação ou
parede até que esteja totalmente montada.
• As medidas base externas são:
73''L x 50''P / 185L x 125P cm
Algumas peças têm extremidades de aço. Tenha
cuidado ao manusear este componentes. Utilize
sempre luvas e óculos de protecção, assim como
vestuário comprido ao montar ou efectuar
qualquer procedimento de manutenção no seu
abrigo de jardim. Não monte o abrigo de jardim
em dias de vento forte ou de baixas temperaturas.
ANTES DE INICIAR A MONTAGEM
• Retire todas as peças da embalagems e
coloque-as no chão.
• Recomenda-se o uso de uma superfície de
trabalho limpa para distribuir as peças e para os
passos de pré-montagem
• Leia todas as instruções antes de iniciar e
consulte-as durante a montagem.
• Siga atentamente os seguintes passos.
PT

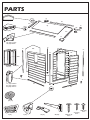
kc (x2)
rp
rc (x4)
cc (x
4) 1683mm
fc1 (x2) 1720mm
fc2 (x2) 1077mm
rc2
rc1
bw
fw
d
sw
rc
rc
rc
kc
cc
cc
cc
t
t
t
rc
2
fc1
fc1
fc2
wsw
rc
1
rc2
rc2
pls (x1)
v (x
1) t (x4) dl (x1)
fl (x
1)
dh (x
2)
s12b (x
21)
12mm
f-in (x1)
acw
f-out (x
1)
PARTS
s26b (x118)
26mm
sc15 (x7)
16mm
cc
rc1 (x2) 1716mm
rc2 (x4) 585mm

1
fc2
t
fc1
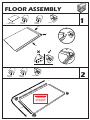
FLOOR ASSEMBLY
2
t (x1)fc2 (x
1)
1075mm
fc2 (x1)
1075mm
fc1 (x1)
1720mm
fl (x1)
1130x1770mm
A
B
fc1 (x1)
1720mm
t (x3)
fc2
t
t
fc1
t
IMPORTANT!
Fully fit the
panels inside
the profiles.

3
4
180
s26b (x10)
26mm
180
IMPORTANT!
Fully fit the
panels inside
the profiles.

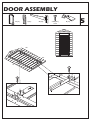
DOOR ASSEMBLY
5
dl (x1)dh (x2)
dh
dh
dl
d (x1)fw (x1)
s12b (x21)
12mm

IN
OUT
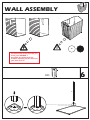
WALL ASSEMBLY
6
cc (x1)
1680mm
cc
On which side of the shed do you
want your window ?
Assemble the panel with the
window opening on the direction
you want it to be

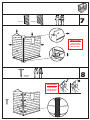
7
8
wsw (x1)bw (x1)
1 2
1 2
s26b (x8)
26mm
IMPORTANT!
Fully fit the
panels inside
the profiles.
IMPORTANT!
Fully fit the
panels inside
the profiles.

1 2
1 2
9
10
cc (x1)
1680mm
sw (x1)
cc (x1)
1680mm
fw+d (x1)
B
B
A
A
B
B
A
A
s26b (x8)
26mm
s26b (x8)
26mm
IMPORTANT!
Fully fit the
panels inside
the profiles.
IMPORTANT!
Fully fit the
panels inside
the profiles.

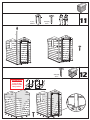
12
11
c
1 2
cc (x1)
1680mm
s26b (x8)
26mm
s26b (x8)
26mm
IMPORTANT!
Fully fit the
panels inside
the profiles.

14
13
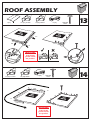
ROOF ASSEMBLY
rc (x1)
rc
1 (x1) 1716mm
r (x1)
rc
2 (x1) 585mm
rc
rc1
rc2
rc (x3)
rc
1 (x1) 1716mm
rc2 (x3) 585mm
r
r
rc
rc
rc
rc1
rc2
rc2
rc2
r
s26b (x8)
26mm
s26b (x8)
26mm
IMPORTANT!
Fully fit the
panels inside
the profiles.
IMPORTANT!
Fully fit the
panels inside
the profiles.

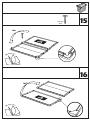
16
15
180
180
s26b (x8)
26mm

18
17
IN
x4
x2 x2
x2 x2
x4
1
2
s26b (x16)
26mm
IMPORTANT!
Fully fit the
panels inside
the profiles.

1 2
1 2
s26b (x4)
26mm
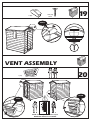
20
19
k (x2)
v (x2)
VENT ASSEMBLY
CLICK
x2
CLICK
Push vent into position. Your helper
holds the wall from the inside.
CLICK

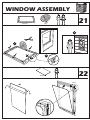
WINDOW ASSEMBLY
21
22
wt
wt (x1)
s (x1)
f-out (x1)
f-out
2
1
2
1
3
f-out
1 2
2

1 2
1 2
f-in (x1)
f-in
24
23
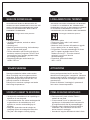
FOUNDATION ATTACHMENT
(Optional)
x1
x1
x1
x1
IN
30-40 mm
Wood
NOT INCLUDED
Concrete
sc16 (x7)
16mm
x7
-
 1
1
-
 2
2
-
 3
3
-
 4
4
-
 5
5
-
 6
6
-
 7
7
-
 8
8
-
 9
9
-
 10
10
-
 11
11
-
 12
12
-
 13
13
-
 14
14
-
 15
15
-
 16
16
-
 17
17
-
 18
18
-
 19
19


Keter 1612 Guia de instalação
- Categoria
- Máquinas de lavar louça
- Tipo
- Guia de instalação
em outras línguas
- español: Keter 1612 Guía de instalación
- français: Keter 1612 Guide d'installation
- italiano: Keter 1612 Guida d'installazione
- English: Keter 1612 Installation guide
- Nederlands: Keter 1612 Installatie gids
- Deutsch: Keter 1612 Installationsanleitung
Artigos relacionados
-
Keter 213413 Manual do usuário
-
tepro Kunststoff Gerätehaus MANOR 46 S - Farbe grau/weiß Instruções de operação
-
-
-
-
-
-
-
-