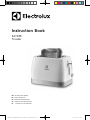
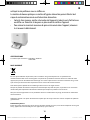
Electrolux EAT988 Manual do usuário
- Categoria
- Torradeiras
- Tipo
- Manual do usuário

Instruction Book
EAT988
Toaster
EN INSTRUCTION BOOK
FR MODE D’EMPLOI
NL GEBRUIKSAANWIJZING
ES LIBRO DE INSTRUCCIONES
PT MANUAL DE INSTRUÇÖES


Catalogue
Language of Introduction
English
French
Dutch
Spanish
Portuguese
1 - 5
6 - 11
12 - 17
18 - 22
23 - 28
Page

1
EN
WARNINGS
• This appliance is intended to be used in household and similar applications such as:
– sta kitchen areas in shops, oces and other working environments;
– farm houses;
– by clients in hotels, motels and other residential type environments;
– bed and breakfast type environments.
• If the supply cord is damaged, it must be replaced by the manufacturer, its service
agent or similarly qualied persons in order to avoid a hazard.
• This appliance can be used by children aged from 8 years and above and persons with
reduced physical, sensory or mental capabilities or lack of experience and knowledge
if they have been given supervision or instruction concerning use of the appliance
in a safe way and understand the hazards involved. Children shall not play with the
appliance. Cleaning and user maintenance shall not be made by children unless they
are older than 8 and supervised.
• Keep the appliance and its cord out of reach of children less than 8 years.
• The appliance is not intended to be operated by means of an external timer or separate
remote-control system.
• The outer surface may get hot when the appliance is operating.
• The bread may burn, therefore do not use the toaster near or below combustible
material such as curtains.
• The temperature of accessible surfaces may be high when the appliance is operating.
• Never insert slices of bread that are too thick into the toaster for they could jam the
popup mechanism and cause a re.
• Be sure to clean the crumb tray often for an accumulation of crumbs could eventually
cause a re hazard.
• Do not place the appliance in or near hot gas or electric burner, or permit to touch a
heated oven or mini oven.
• Regarding the instructions for cleaning surfaces in contact with food and the detail
information on how to remove breadcrumbs, refer to “Cleaning and maintenance” on
page 4 of the manual.
• The surfaces are liable to get hot during use.

2
EN
IMPORTANT SAFETY INSTRUCTIONS
Please read all instructions carefully and save them for future reference.
• Do not use outdoors.
• Place the appliance on a stable at surface before use.
• Check that the voltage marked on the appliance rating plate matches your local mains supply.
• Do not touch hot surfaces. Use knobs at all times.
• To protect against electrical shock, do not immerse the appliance or its lead in water or any other liquid.
• Disconnect the appliance from the mains socket when lling or emptying the toaster, before cleaning
and when it is not in use.
• When using this appliance, provide adequate air space above and on all sides for circulation.
• Do not let the power cord overhang the edge of the work surface or allow it to touch hot surfaces or
sources of heat or ame.
• The appliance is for household use only. Do not use the appliance for other than its intended use.
• Do not use accessories not recommended by the manufacturer to avoid danger of re, electric shock or
personal injury.
• Oversize food, metal foil packages or utensils must not be inserted in the appliance, as this may cause
re or electrical shock.
• Do not operate the appliance under or near curtains or other ammable materials or under wall
cabinets, as the bread may burn which constitutes a re hazard.
• Do not use the toaster without the crumb tray in place.
• To avoid possibility of re, do not leave the toaster unattended during use.
• Immediately press the stop button and unplug the appliance if re or smoke is observed. Do not use
or attempt to repair the appliance yourself, seek expert advice.
• If a slice of bread gets stuck inside the appliance, unplug the appliance and allow it to cool down before
removing the bread.
• Do not use metallic objects such as knives to dislodge food as these could make the metallic objects hot
or cause an electric shock.
• Do not place the appliance on a hot surface.
• Do not attempt to dislodge food when the appliance is in operation.
• Do not place foil wrapped articles in the toaster.
• Be sure to remove the bread carefully after toasting so as to avoid injuries.
• Do not use abrasive, caustic or oven cleaners when cleaning this appliance.
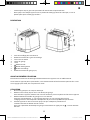
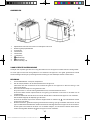
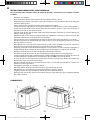
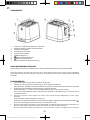
DESCRIPTION

3
EN
1. Roll & Croissant warming rack
2. Warming rack control knob
3. Crumb tray
4. Toast slots
5. Carriage lever
6. Stop button
7. Defrosting button
8. Reheating button
9. Browning control knob (1-6)
BEFORE FIRST USE
Remove all packaging materials and wipe the outside of the appliance with a damp cloth.
Before using the appliance for the rst time, it is recommended to let the appliance complete a few toasting
cycles without slices of bread on the highest browning setting in a properly ventilated room.
OPERATION
1. Plug the toaster into the mains socket.
2. Put the bread slice/slices into the slot(s) at the top of the appliance.
Make sure the crumb tray is fully in place by pushing it rmly into the appliance before using.
3. Turn the browning control knob to the desired setting.
There are 6 settings: “1” for the lightest setting, “6” for the darkest setting.
You will need to experiment with this setting depending on your browning colour preference and the
thickness of the bread.
4. Press carriage lever down vertically until it locks in the down position to switch the appliance on.
The indicator light on the stop button will illuminate.
Toasting process can be terminated at any time by pressing . The carriage lever will spring up.
5. Once the bread has been toasted to the selected setting, the bread will automatically pop up and the
carriage lever will automatically spring up to switch o the appliance.
During toasting, you may observe the toasting colour, if the browning setting is higher than required,
press to stop the operation at any time.
The indicator light on the stop button will go out.
6. Remove the bread from the slot.
IMPORTANT: If the bread gets stuck inside the appliance, do not attempt to dislodge the bread when the
appliance is plugged in. Remove the plug from the mains socket, allow the appliance to cool down and
carefully remove bread using wooden tongs.
7. Repeat steps 2 to 6 for additional toast as desired.
8. When all toasting is complete, unplug the toaster from the mains socket.
Caution:
• Do not toast the food with extremely runny ingredients such as butter.
• The toast slot is only able to toast regular bread slice. Do not try to insert slices that are too thick.
Reheating
To reheat cold toasted bread, press .
The indicator light on the reheating button will illuminate to indicate the appliance is in the reheating cycle.
In this mode toasting time is xed, after the time runs out, the carriage lever will automatically spring up to
end the reheating process.

4
EN
Defrosting
1. To toast frozen bread, turn the browning control knob to your desired setting.
2. Press the carriage lever down vertically until it latches in the down position.
3. Press .
The indicator light on the defrosting button will illuminate to indicate the appliance is in the defrosting
cycle.
Heating up rolls and croissants
1. Turn the warming rack control knob to unfold the warming rack.
2. Put the rolls or croissants on top of the warming rack.
Do not heat up more than 2 items at a time.
3. Turn browning control knob to the desired setting.
4. Press carriage lever down vertically until it locks in the down position to switch the appliance on.
CLEANING AND MAINTENANCE
• Unplug the appliance and allow it to cool completely before cleaning.
• Clean the outside of the appliance with a damp cloth. Dry thoroughly.
• Do not use abrasive or chemical cleaning agents.
Surfaces in contact with food should be cleaned regularly to avoid cross contamination from
dierent types of food, the use of a dry cloth is advisable when dealing with surfaces that
come into contact with food.
Correct food hygiene practices should always be followed at all times to avoid possibility of
food poisoning /cross contamination.
• Pull out the crumb tray located at the bottom of the appliance and empty it with a dry
cloth. Make sure the crumb tray is tted correctly before using the appliance again.
• To remove any pieces of bread remaining in the toaster, turn the toaster upside down
and gently shake.

5
EN
SPECIFICATIONS
Ratings: 220-240V~ 50/60 Hz
730-870W
DISPOSAL
As a responsible company we care about the environment.
As such we urge you to follow the correct disposal procedure for the appliance and packaging materials. This
will help conserve natural resources and ensure that it is recycled in a manner that protects health and the
environment.
You must dispose of this appliance and its packaging according to local laws and regulations.
Because this appliance contains electronic components, the appliance and its accessories must be disposed
of separately from household waste when the appliance reaches its end of life.
Contact your local authority to learn about disposal and recycling.
The appliance should be taken to your local collection point for recycling. Some collection points accept
appliance free of charge.
We apologise for any inconvenience caused by minor inconsistencies in these instructions, which may occur
as a result of product improvement and development.
ELECTROLUX 02 / 08 / 2017

6
FR
ATTENTION
• Cet appareil est destiné à être utilisé dans des applications domestiques et analogues
telles que:
− les coins cuisines réservés au personnel des magasins, bureaux et autres
environnements professionnels;
− les fermes;
− l’utilisation par les clients des hôtels, motels et autres environnements à
caractère résidentiel;
− les environnements de type chambres d’hôtes.
• Si le câble d'alimentation est endommagé, il doit être remplacé par le fabricant, son
service après-vente ou des personnes de qualication similaire an d'éviter un danger.
• Cet appareil peut être utilisé par des enfants à partir de 8 ans et plus et par des
personnes ayant des capacités physiques, sensorielles ou mentales réduites ou
un manque d’expérience et de connaissances à condition qu’elles aient reçu une
supervision ou des instructions concernant l’utilisation de l’appareil en toute sécurité
et qu’elles comprennent les dangers encourus. Les enfants ne doivent pas jouer avec
l’appareil. Le nettoyage et l’entretien par l’usager ne doivent pas être eectués par des
enfants, sauf s’ils ont plus de 8 ans et qu’ils sont surveillés.
• Maintenir l’appareil et son cordon hors de portée des enfants de moins de 8 ans.
• Cet appareil n’est pas destiné à être mis en fonctionnement au moyen d'une minuterie
extérieure ou par un système de commande à distance séparé.
• La surface extérieure peut devenir chaude lorsque l'appareil fonctionne.
• Le pain peut brûler, en conséquence, ne pas utiliser le grille-pain à proximité ou sous
des matériaux combustibles, tels que des rideaux.
• La température des surfaces accessibles peut être élevée lorsque l'appareil est en
fonctionnement.
• Ne jamais insérer de tranches de pain trop épaisses dans le grille-pain car cela pourrait
bloquer le mécanisme de remontée et provoquer un incendie.
• Assurez-vous de nettoyer fréquemment le plateau de récupération des miettes qui
pourrait brûler et causer un incendie.
• Ne pas placer l’appareil près de ou sur une gazinière ou une plaque chauante, ne le
posez pas sur un four ou un mini-four.
• En ce qui concerne les informations détaillées sur la manière de nettoyer les surfaces en
contact avec les aliments et sur la manière de retirer les miettes de pain, référez-vous à

7
FR
la section “NETTOYAGE ET ENTRETIEN” en page 9.
• Les surfaces sont susceptibles de devenir chaudes au cours de l'utilisation.
CONSIGNES DE SÉCURITÉ IMPORTANTES
Lisez attentivement le mode d'emploi dans son intégralité et gardez-le an de pouvoir vous y référer
ultérieurement.
• Ne pas utiliser en extérieur.
• L’appareil doit être placé sur une surface plane et stable avant d'être utilisé pour la première fois.
• Vériez que la tension indiquée sur la plaque signalétique de l’appareil correspond à celle des prises de
votre domicile.
• Ne touchez pas les surfaces chaudes. Utilisez toujours les boutons.
• An d’éviter tout risque d’électrocution, l'appareil et le l ne doivent pas être plongés dans l’eau ni dans
aucun autre liquide.
• Débranchez l'appareil avant de le remplir ou de le vider, avant de le nettoyer et quand vous avez ni de
l'utiliser.
• Veillez à laisser un espace susant autour de l'appareil et au-dessus lorsque vous l'utilisez, an de
permettre une bonne circulation de l'air.
• Ne laissez pas le câble d'alimentation pendre depuis le bord du plan de travail. Ne le laissez pas entrer
en contact avec une surface brûlante ou avec une source de chaleur ou de ammes.
• Cet appareil est conçu pour une utilisation exclusivement domestique. N’utilisez pas cet appareil à une
nalité autre que celle pour laquelle il a été conçu.
• L’utilisation d’accessoires non recommandés par le fabricant entraîne un risque d’incendie,
d’électrocution ou de blessures corporelles.
• N’insérez pas dans le four du papier d'aluminium, des ustensiles métalliques ou des aliments trop
volumineux : ceux-ci pourraient provoquer un incendie ou un choc électrique.
• Ne faites jamais fonctionner l'appareil dans un meuble mural, en dessous ou à proximité de rideaux ou
de tout autre matière inammable ; le pain peut prendre feu et constitue à ce titre un risque d'incendie.
• N'utilisez pas le grille-pain sans le tiroir ramasse-miettes en place.
• An d'éviter tout risque d'accident, ne laissez pas le grille-pain sans surveillance pendant qu'il
fonctionne.
• En cas de fumée ou de début d'incendie, appuyez immédiatement sur le bouton d'arrêt et
débranchez l'appareil. N'essayez pas de réparer l'appareil vous-même, faites toujours appel à un
professionnel.
• Si une tranche de pain se coince dans l'appareil, débranchez-le et attendez qu'il ait refroidi avant de
décoincer le pain.
• N'utilisez pas d'ustensiles métalliques (ex : couteau) pour décoincer le pain, vous risqueriez de vous
brûler ou de vous électrocuter.
• Ne mettez pas l'appareil sur une surface brûlante.
• N’essayez pas de décoincer les aliments pendant que l’appareil fonctionne.
• Ne mettez pas dans le grille-pain des aliments enveloppés dans du papier aluminium.

8
FR
• Sortez toujours le pain grillé avec précaution an d'éviter tout risque de blessure.
• N'essayez pas de nettoyer l'appareil avec un produit de nettoyage abrasif ou caustique, ni avec un
produit prévu pour le nettoyage des fours.
DESCRIPTION
1. Grille de chauage pour viennoiseries
2. Bouton de contrôle de la grille de chauage
3. Tiroir ramasse-miettes
4. Fentes de grillage
5. Levier
6. Bouton d’arrêt
7. Bouton décongélation
8. Bouton réchauage
9. Bouton de contrôle de grillage (1-6)
AVANT LA PREMIÈRE UTILISATION
Enlevez tous les matériaux d'emballage et frottez l'extérieur de l'appareil avec un chion humide.
Avant d’utiliser l’appareil pour la première fois, il est recommandé de le faire fonctionner plusieurs fois à vide
sur le réglage le plus élevé, dans une pièce bien aérée.
UTILISATION
1. Branchez le grille-pain sur une prise électrique.
2. Mettez la/les tranche(s) de pain dans la/les fente(s) de grillage.
Avant d’allumer l’appareil, mettez le tiroir ramasse-miettes en place en le poussant à fond dans l’appareil.
3. Mettez le bouton de contrôle de grillage sur le cran souhaité.
6 réglages sont disponibles : "1" est le réglage le plus bas, "6" est le réglage le plus élevé.
Le réglage correct à utiliser dépendra de l’épaisseur du pain et de vos préférences personnelles.
4. Allumez l’appareil en abaissant le levier jusqu’à ce qu’il se bloque en position basse.
Le témoin lumineux du bouton d'arrêt s'allume.
Vous avez la possibilité d'interrompre le grillage à tout moment en appuyant sur . Le levier remonte
tout seul.

9
FR
5. Une fois le pain grillé au degré choisi, l’appareil s’éteint, le pain est éjecté automatiquement et le levier
remonte tout seul.
Pendant le grillage, contrôlez le changement de couleur du pain ; s’il s’avère que le réglage de grillage
était trop fort, vous pouvez interrompre le processus à tout moment en appuyant sur .
Le témoin lumineux du bouton d'arrêt s'éteint.
6. Sortez le pain de l’appareil.
IMPORTANT: Si le pain reste coincé dans l'appareil, n'essayez pas de le décoincer tant que l'appareil est
branché. Débranchez l'appareil, attendez qu'il ait refroidi puis sortez délicatement le pain à l'aide d'une pince
en bois.
7. Répétez les étapes 2 à 6 pour toutes les autres tartines à griller.
8. Une fois tout le pain grillé, débranchez le grille-pain.
Attention :
• Ne tartinez jamais le pain avec des ingrédients très liquides (ex : du beurre) avant de le mettre au grille-
pain.
• La fente de l’appareil permet d’insérer des tranches de taille normale seulement. N'essayez pas d'insérer
des tranches trop épaisses.
Réchauer
Pour réchauer des tartines grillées refroidies, appuyez sur .
Le témoin situé à côté du bouton de réchauage s’allume, indiquant que l’appareil est en mode réchauage.
Dans ce mode, le temps de chauage est xe ; une fois la durée écoulée, l’appareil s’éteint et le levier remonte
automatiquement.
Décongélation
1. Pour décongeler du pain, mettez le bouton de contrôle de grillage sur le cran souhaité.
2. Abaissez le levier jusqu’à ce qu’il se bloque en position basse.
3. Appuyez sur .
Le témoin situé à côté du bouton de décongélation s’allume, indiquant que l’appareil est en mode
décongélation.
Chauage de viennoiseries
1. Déployez la grille de chauage à l’aide du bouton de contrôle.
2. Mettez les petits pains/croissants sur la grille de chauage.
N’essayez pas de chauer plus de 2 aliments à la fois.
3. Mettez le bouton de contrôle de grillage sur le cran souhaité.
4. Allumez l’appareil en abaissant le levier jusqu’à ce qu’il se bloque en position basse.
NETTOYAGE ET ENTRETIEN
• Débranchez l’appareil et attendez qu’il ait complètement refroidi avant de le nettoyer.
• Essuyez les surfaces extérieures avec un chion humide. Séchez bien.
• N'utilisez pas des produits de nettoyage chimiques ou abrasifs.
Les surfaces en contact avec les aliments doivent faire l’objet d’un nettoyage régulier
an d’éviter tout risque de contamination croisée entre les diérents types d’aliments ;

10
FR
nettoyez-les de préférence avec un chion sec.
Le maintien de bonnes pratiques en matière d’hygiène alimentaire permet d’éviter tout
risque de contamination croisée ou d’intoxication alimentaire.
• Sortez le tiroir ramasse-miettes situé en bas de l’appareil et videz-le en le frottant avec
un chion sec. Remettez-le toujours en place avant de réutiliser l’appareil.
• Pour enlever les éventuels morceaux de pain restés coincés dans l'appareil, retournez-
le et secouez-le délicatement.
SPÉCIFICATIONS
Caractéristiques nominales : 220-240V~ 50/60 Hz
730-870 W
MISE AU REBUT
En tant que distributeur responsable, nous accordons une grande importance à la protection de
l’environnement. Nous vous encourageons à respecter les procédures correctes de mise au rebut de votre
appareil, des piles et des éléments d’emballage. Cela aidera à préserver les ressources naturelles et à garantir
qu’il soit recyclé d’une manière respectueuse de la santé et de l’environnement.
Vous devez jeter ce produit et son emballage selon les lois et les règles locales.
Puisque ce produit contient des composants électroniques et parfois des piles, le produit et ses accessoires
doivent être jetés séparément des déchets domestiques lorsque le produit est en n de vie.
Pour plus de renseignements sur les procédures de mise au rebut et de recyclage, contactez les autorités de
votre commune.
Apportez l’appareil à un point de collecte local pour qu’il soit recyclé. Certains centres acceptent les produits
gratuitement.
Hotline Darty France
Quels que soient votre panne et le lieu d'achat de votre produit en France, avant de vous déplacer en magasin
Darty, appelez le 0 978 970 970 (prix d'un appel local) 7j/7 et 24h/24.

11
FR
Hotline Vanden Borre
Le service après-vente est joignable au +32 2 334 00 00, du lundi au vendredi de 8h à 18h et le samedi de 9h à
18h.
En raison des mises au point et améliorations constamment apportées à nos produits, de petites incohérences
peuvent apparaître dans ces instructions. Veuillez nous excuser pour la gêne occasionnée.
ELECTROLUX 02 / 08 / 2017

12
NL
WAARSCHUWINGEN
• Dit apparaat is uitsluitend bedoeld voor gebruik in huishoudelijke en gelijkaardige
toepassingen, zoals:
• − in personeelskeukens van winkels, kantoren en andere werkomgevingen;
• − in boerderijen;
• − door klanten van hotels, motels en andere omgevingen van het residentiële type;
• − bed-en-breakfasts en dergelijke.
• Een beschadigd netsnoer mag uitsluitend worden vervangen door de fabrikant, een
erkende reparatieservice of personen met gelijkwaardige kwalificaties om gevaar te
voorkomen.
• Dit apparaat mag worden gebruikt door kinderen vanaf 8 jaar en personen met een
beperkt lichamelijk, zintuiglijk of geestelijk vermogen of een gebrek aan ervaring of
kennis op voorwaarde dat zij onder toezicht staan of instructies betreende het veilige
gebruik van dit apparaat hebben ontvangen en inzicht hebben in de gevaren die het
gebruik ervan kan inhouden. Kinderen mogen niet met dit apparaat spelen. Reinigen
en onderhoud mogen alleen worden gedaan door kinderen als zij ouder zijn dan 8 jaar
en onder toezicht staan.
• Houd het apparaat en het snoer ervan buiten bereik van kinderen jonger dan 8 jaar.
• Dit apparaat is niet bedoeld om te worden bediend door middel van een externe timer
of een afzonderlijk aangekocht afstandsbedieningssysteem.
• De buitenkant van het apparaat kan zeer warm worden terwijl het apparaat is
ingeschakeld.
• Omdat brood kan branden, mag de broodrooster niet vlakbij of onder brandbare
materialen worden gebruikt.
• De temperatuur van toegankelijke onderdelen kan hoog zijn terwijl het apparaat in
werking is.
• Stop nooit te dikke sneeën brood in de broodrooster omdat hierdoor het
opspringmechanisme kan vastlopen, wat brandgevaar inhoudt.
• Reinig de kruimellade regelmatig omdat een ophoping van broodkruim brandgevaar
inhoudt.
• Zet dit apparaat niet in of vlakbij een warm gas- of elektrisch fornuis en laat het niet in
contact komen met een warme oven of magnetron.
• Verwijs naar de paragraaf “Reinigen en onderhoud” op pagina 15 van de handleiding
voor details over het reinigen van oppervlakken die in contact komen met

13
NL
levensmiddelen en hoe de broodkruimels te verwijderen.
• De buitenkant van het apparaat kan zeer warm worden terwijl het apparaat is
ingeschakeld.
BELANGRIJKE VEILIGHEIDSVOORZORGEN
Lees de volledige handleiding en bewaar voor toekomstig gebruik.
• Niet buitenhuis gebruiken.
• Zet het apparaat neer op een vlakke, stabiele ondergrond voordat u het inschakelt.
• Controleer of de spanning die op het typeplaatje van het apparaat overeenstemt met de netvoeding bij
u thuis.
• Raak geen warme oppervlakken aan. Raak alleen de knoppen van het ingeschakelde apparaat aan.
• Dompel het apparaat of het snoer niet onder in water of andere vloeistof om elektrische schokken te
voorkomen.
• Haal de stekker van de broodrooster uit het stopcontact voordat u deze gaat vullen, ledigen of reinigen
en wanneer hij niet wordt gebruikt.
• Zorg tijdens het gebruik van dit apparaat voor voldoende ruimte boven en rondom het apparaat voor
een goede luchtcirculatie.
• Laat het snoer niet over de rand van het aanrecht hangen en zorg ervoor dat het niet in contact komt
met verwarmde oppervlakken, warmtebronnen of vlammen.
• Dit apparaat is uitsluitend bedoeld voor huishoudelijk gebruik. Gebruik dit apparaat voor geen enkel
ander dan het beoogde doeleinde.
• Gebruik geen hulpstukken die niet door de fabrikant worden aanbevolen om een risico van brand,
elektrische schokken of verwonding te voorkomen.
• Doe geen te grote stukken voedsel, verpakkingen van metaalfolie of kookgerei in het apparaat omdat
dit een gevaar van brand of elektrische schokken inhoudt.
• Gebruik dit apparaat niet onder of vlakbij gordijnen of andere brandbare materialen, noch onder
keukenkasten omdat brood kan branden en een brandgevaar inhoudt.
• Gebruik de broodrooster niet zonder dat de kruimellade is ingezet.
• Laat de ingeschakelde broodrooster nooit onbeheerd achter om brandgevaar te voorkomen.
• Druk wanneer u vuur of rook ziet meteen op de stopknop en haal de stekker uit het stopcontact.
Probeer dit apparaat nooit zelf te repareren, doch raadpleeg daarvoor een gespecialiseerd elektricien.
• Wanneer een snee brood in het apparaat vastzit, haalt u de stekker uit het stopcontact en laat u het
apparaat afkoelen voordat u het brood verwijdert.
• Gebruik geen metalen voorwerpen zoals messen om voedsel los te wrikken, omdat deze voorwerpen
zeer warm kunnen worden of elektrische schokken kunnen veroorzaken.
• Zet dit apparaat niet neer op een verwarmde ondergrond.
• Probeer geen voedsel los te wrikken terwijl het apparaat is ingeschakeld.
• Zet geen in folie verpakte items in de broodrooster.
• Neem het geroosterde brood voorzichtig uit het apparaat om brandwonden te voorkomen.
• Gebruik geen schuur- of caustische reinigingsmiddelen, noch ovenreinigers voor het reinigen van dit
apparaat.

14
NL
ONDERDELEN
1. Opzethouder voor het verwarmen van broodjes & croissants
2. Bedieningsknop opzethouder
3. Kruimellade
4. Toastsleuven
5. Toasthendel
6. Stopknop
7. Ontdooiknop
8. Opwarmknop
9. Bruinkleurknop (1-6)
VOOR DE EERSTE INGEBRUIKNAME
Verwijder alle verpakkingsmateriaal en veeg de buitenkant van het apparaat schoon met een vochtige doek.
Als u het apparaat voor het eerst gebruikt is het raadzaam het apparaat in een goed geventileerde ruimte
enkele volledige roostercycli op de hoogste timerinstelling te laten doorlopen zonder sneeën brood.
BEDIENING
1. Sluit de broodrooster aan op een stopcontact.
2. Zet de snee(ën) brood in de sleuf/sleuven bovenin het apparaat.
Controleer voor het inschakelen of de kruimellade goed in het apparaat zit door het stevig in het
apparaat te duwen.
3. Draai de bruinstandknop naar de gewenste stand.
Er zijn 6 standen: “1” voor de lichtst geroosterde stand, “6” voor de donkerste stand.
U kunt met deze standen experimenteren naargelang uw voorkeur van bruinen en de dikte van de
sneeën brood.
4. Druk de broodrooster hendel verticaal neer tot deze onderin vastklikt om het apparaat in te schakelen.
Het controlelampje op de stopknop gaat branden.
U kunt het roosteren op eender moment stoppen door te drukken op . De broodrooster hendel
springt dan naar boven.
5. Nadat het brood is geroosterd op de geselecteerde instelling, springt het brood automatisch uit het
apparaat doordat de broodrooster hendel automatisch omhoog komt om het apparaat uit te schakelen.
U kunt tijdens het roosteren de kleur van uw brood nakijken, als het brood te donker wordt kunt u
eender welk ogenblik drukken op om het apparaat uit te schakelen.

15
NL
Het controlelampje van de stopknop dooft dan.
6. Neem het brood uit de sleuf.
BELANGRIJK: wanneer het brood in het apparaat vastzit mag u het niet proberen los te wrikken terwijl de
stekker van het apparaat in een stopcontact zit. Haal de stekker uit het stopcontact en laat het apparaat
afkoelen voordat u het brood met een houten tang verwijdert.
7. Herhaal indien gewenst de stappen 2 tot 6 voor meer toast.
8. Haal de stekker van de broodrooster uit het stopcontact wanneer u klaar bent met roosteren.
Let op:
• Rooster geen voedsel met zeer vloeibare ingrediënten zoals boter.
• De toastsleuven zijn uitsluitend geschikt voor gewone sneeën brood. Probeer geen te dikke sneeën
brood in het apparaat te zetten.
Opwarmen
Druk op om afgekoelde toast weer op te warmen.
Het controlelampje van de opwarmknop gaat branden, aangevend dat het apparaat in de opwarmmodus is
geschakeld.
In deze modus is de roostertijd niet instelbaar. Nadat de tijd is verstreken springt de broodrooster hendel
automatisch omhoog om het apparaat uit te schakelen.
Ontdooien
1. Draai de bruinkleurknop naar de gewenste stand om bevroren brood te roosteren.
2. Druk de toaster hendel verticaal neer tot hij onderin vastklikt.
3. Druk op .
Het controlelampje van de ontdooiknop gaat branden, aangevend dat het apparaat in de ontdooistand
is geschakeld.
Broodjes en croissants opwarmen
1. Draai de bedieningsknop van de opzethouder om de opzethouder uit te klappen.
2. Leg de broodjes of croissants bovenop de opzethouder.
Verwarm tegelijkertijd niet meer dan 2 items.
3. Draai de bruinkleurknop naar de gewenste stand.
4. Druk de toaster hendel verticaal neer tot hij onderin vastklikt om het apparaat in te schakelen.
REINIGEN EN ONDERHOUD
• Haal de stekker van het apparaat uit het stopcontact en laat het volledig afkoelen
voordat u het gaat reinigen.
• Reinig de buitenkant van het apparaat met een goed uitgewrongen doek. Droog
zorgvuldig.
• Gebruik nooit schurende of chemische reinigingsmiddelen.
Oppervlakken die in contact komen met levensmiddelen dienen regelmatig te worden
gereinigd om kruisbesmetting van verschillende soorten voedsel te voorkomen. Het gebruik
van een droge doek volstaat voor het reinigen van oppervlakken die in contact komen met

16
NL
levensmiddelen.
De correcte praktijken voor voedselhygiëne dienen te allen tijd te worden gerespecteerd om
een risico van voedselvergiftiging/kruisbesmetting te voorkomen.
• Trek de kruimellade onderin het apparaat uit, ledig en veeg schoon met een droge
doek. Zorg ervoor dat de kruimellade correct in het apparaat is teruggezet voordat u
het weer inschakelt.
• Draai de broodrooster ondersteboven en schud voorzichtig om vastzittende stukjes
brood uit de broodrooster te verwijderen.
TECHNISCHE GEGEVENS
Nominale waarden: 220-240V~ 50/60 Hz
730-870W
VERWIJDERING
Als verantwoordelijk bedrijf hechten wij waarde aan het milieu.
We moedigen u aan om de juiste verwijderingsprocedure voor uw apparaat en verpakkingsmateriaal te
volgen. Dit draagt bij tot het behoud van de natuurlijke rijkdommen door deze te recyclen zodat zowel de
menselijke gezondheid en het milieu worden beschermd.
Gooi dit apparaat en de verpakking weg in overeenstemming met de geldende wetgeving en voorschriften.
Aangezien dit apparaat elektronische componenten bevat moet het apparaat en toebehoren aan het einde
van hun levensduur afzonderlijk van het huisafval worden weggegooid.
Neem contact op met uw gemeente voor informatie over afdanking en recycling.
Lever het apparaat in bij het inzamelpunt van uw gemeente voor recycling. Bij sommige inzamelpunten kunt
u het apparaat gratis inleveren.
Hotline Vanden Borre
De dienst na verkoop is bereikbaar van maandag tot zaterdag op
+32 2 334 00 00

17
NL
Hulplijn Nederland
Hiervoor kunt u contact opnemen met het BCC Service Center:
0900 0555 (lokaal tarief ), geopend van maandag t/m vrijdag van
9.00 tot 17.00 uur.
We verontschuldigen ons voor enig ongemak veroorzaakt door kleine inconsistenties in deze
gebruikershandleiding, die kunnen ontstaan door productverbetering of –ontwikkeling.
ELECTROLUX 02 / 08 / 2017
A página está carregando ...
A página está carregando ...
A página está carregando ...
A página está carregando ...
A página está carregando ...
A página está carregando ...
A página está carregando ...
A página está carregando ...
A página está carregando ...
A página está carregando ...
A página está carregando ...
A página está carregando ...
-
 1
1
-
 2
2
-
 3
3
-
 4
4
-
 5
5
-
 6
6
-
 7
7
-
 8
8
-
 9
9
-
 10
10
-
 11
11
-
 12
12
-
 13
13
-
 14
14
-
 15
15
-
 16
16
-
 17
17
-
 18
18
-
 19
19
-
 20
20
-
 21
21
-
 22
22
-
 23
23
-
 24
24
-
 25
25
-
 26
26
-
 27
27
-
 28
28
-
 29
29
-
 30
30
-
 31
31
-
 32
32


Electrolux EAT988 Manual do usuário
- Categoria
- Torradeiras
- Tipo
- Manual do usuário
em outros idiomas
- español: Electrolux EAT988 Manual de usuario
- français: Electrolux EAT988 Manuel utilisateur
- English: Electrolux EAT988 User manual
- Nederlands: Electrolux EAT988 Handleiding
Artigos relacionados
-
Electrolux EAT 978 Manual do proprietário
-
-
-
-
-
-
-
-
-
Outros documentos
-
Black & Decker BXTO1000E Manual do usuário
-
Tefal TT8121 - Delight Manual do usuário
-
Proline THEO GP Manual do proprietário
-
UFESA TT7985 Manual do proprietário
-
Becken BT4606 torradeira Manual do proprietário
-
-
Sencor STS 5070SS Manual do usuário
-
Rowenta TP 500 Manual do proprietário
-
-