Logitech C910 Manual do usuário
- Categoria
- Webcams
- Tipo
- Manual do usuário
Este manual também é adequado para

Getting started with
Logitech
®
HD Pro Webcam C910

2
Logitech
®
HD Pro Webcam C910
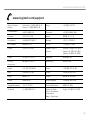
Contents
www.logitech.com/support. . . . . . . . . . . . . . . . . . . . . . . . . . . . 143
English . . . . . . . . . . . . . . . . . . . . . . . . . . . . . . . . . . . . . 3
Deutsch . . . . . . . . . . . . . . . . . . . . . . . . . . . . . . . . . . . . 13
Français . . . . . . . . . . . . . . . . . . . . . . . . . . . . . . . . . . . . 23
Español . . . . . . . . . . . . . . . . . . . . . . . . . . . . . . . . . . . . 33
Nederlands . . . . . . . . . . . . . . . . . . . . . . . . . . . . . . . . . . . 43
Italiano. . . . . . . . . . . . . . . . . . . . . . . . . . . . . . . . . . . . . 53
Svenska . . . . . . . . . . . . . . . . . . . . . . . . . . . . . . . . . . . . 63
Dansk . . . . . . . . . . . . . . . . . . . . . . . . . . . . . . . . . . . . . 73
Norsk . . . . . . . . . . . . . . . . . . . . . . . . . . . . . . . . . . . . . 83
Suomi . . . . . . . . . . . . . . . . . . . . . . . . . . . . . . . . . . . . . 93
Português . . . . . . . . . . . . . . . . . . . . . . . . . . . . . . . . . . 103
Ελληνικά . . . . . . . . . . . . . . . . . . . . . . . . . . . . . . . . . . . . . . . . . . . 113
Türkçe. ... ... ... ... ... ... ... ... ... ... ... ... ... ... ... ... ... ... ... ... ... ... ... ... ... ... ... ... ... ... ... ... ... ... ... ...123
. . . . . . . . . . . . . . . . . . . . . . . . . . . . . . . . . . . 142

English 3
Logitech
®
HD Pro Webcam C910
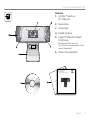
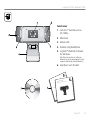
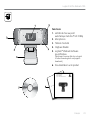
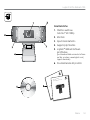
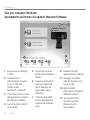
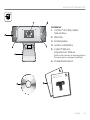
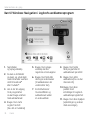
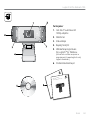
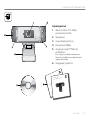
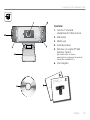
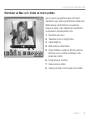
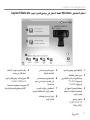
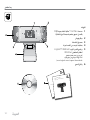
Features
1. Carl Zeiss® autofocus
HD 1080p lens
2. Microphones
3. Activity light
4. Flexible clip/base
5. Logitech® Webcam Software
for Windows
(Download the Mac version of
this software from www.logitech.com/
support-downloads.)
6. Product documentation
Important information
Safety, compliance, and warranty
Getting started with
Première utilisation
Logitech
®
HD Pro Webcam C910

4 English
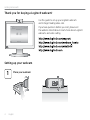
Getting started with
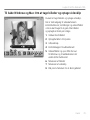
Thank you for buying a Logitech webcam!
Use this guide to set up your Logitech webcam
and to begin making video calls.
If you have questions before you start, please visit
the websites listed below to learn more about Logitech
webcams and video calling.
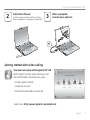
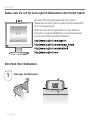
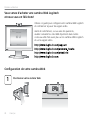
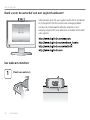
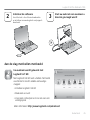
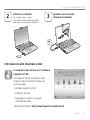
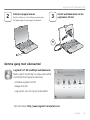
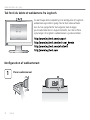
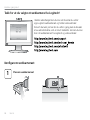
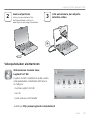
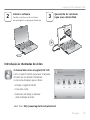
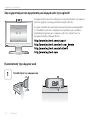
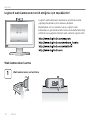
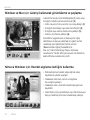
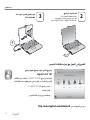
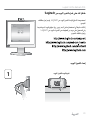
Setting up your webcam
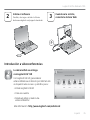
Place your webcam
1

English 5
Logitech
®
HD Pro Webcam C910
USB
2
3
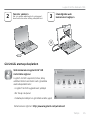
Install the software
For Mac, download and install the software
from www.logitech.com/support-downloads.
When prompted,
connect your webcam
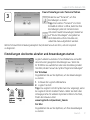
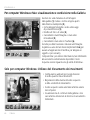
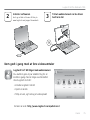
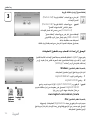
Getting started with video calling
Your webcam comes with Logitech Vid
™
HD
With Logitech Vid HD, video calling live over
the Internet takes only a few, easy steps:
•Install Logitech Vid HD
•Create an account
•Add a friend and make a video call
Learn more: http://www.logitech.com/whatisvid

6 English
Getting started with
1
2
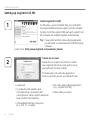
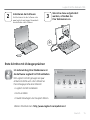
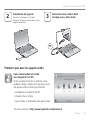
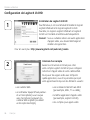
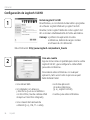
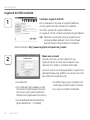
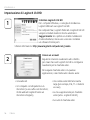
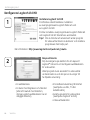
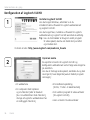
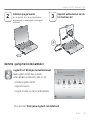
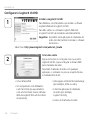
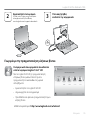
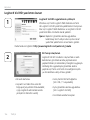
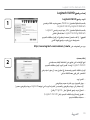
Setting up Logitech Vid HD
Install Logitech Vid HD
For Windows, we recommend that you install both
the Logitech Webcam and Logitech Vid HD software.
For Mac, both the Logitech Webcam and Logitech Vid
HD software are installed together automatically.
Tip: If you prefer another video-calling application,
you will need to download and install third-party
software.
Learn more: http://www.logitech.com/webcam_howto
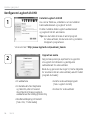
Create an account
Follow the on-screen instructions to create
your Logitech Vid HD account and to set up
your webcam for video calling.
To make video calls with any application,
both you and the person you call must have:
•A webcam
•A computer with speakers and
a microphone (or a headset with
a microphone; many Logitech webcams
have a built-in microphone)
•A broadband Internet connection
(e.g., DSL, T1, or cable)
•The same video-calling application
(e.g., Logitech Vid HD)
•Video calling accounts

English 7
Logitech
®
HD Pro Webcam C910
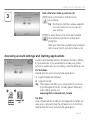
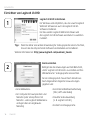
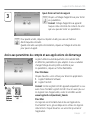
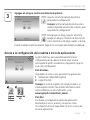
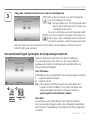
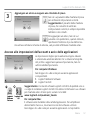
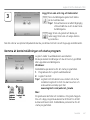
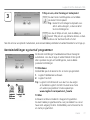
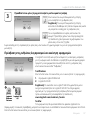
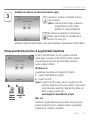
3
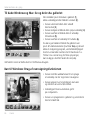
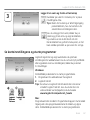
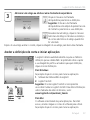
Click on the Practice Call tile to test
your settings.
Tip: The Practice Call tile is always available
on your Contact List so you can test
your settings.
To add a friend, click on the Add a Friend
tile and enter your friend’s e-mail when
prompted.
After your friend has accepted your invitation,
click on your friend’s picture to make a call.
Add a friend or make a practice call
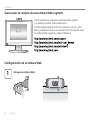
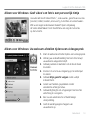
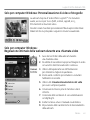
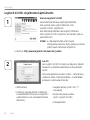
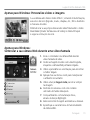
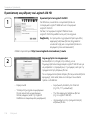
Accessing account settings and starting applications
Logitech automatically detects and adjusts the best settings
for your webcam. If you would like to re-take your profile
picture or update any of your settings, click the Settings icon.
For Windows
Double-click the icons to launch the applications.
1. Logitech Webcam Software
2. Logitech Vid HD
Tip: The Logitech Vid HD icon is only present if you chose
to install Logitech Vid HD. To learn about third-party
video calling, please visit:
www.logitech.com/webcam_howto
For Mac
Your software will be installed to the Applications folder. For
easy access, drag and drop the software icons to the Dock.
Double-click the icons to launch the applications.

8 English
Getting started with
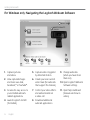
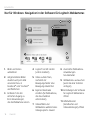
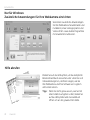
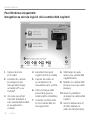
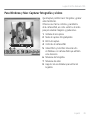
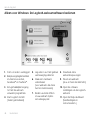
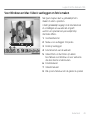
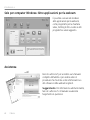
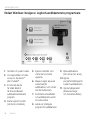
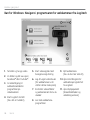
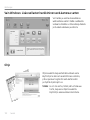
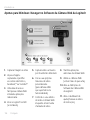
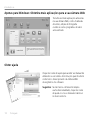
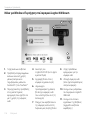
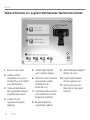
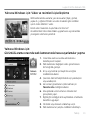
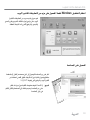
For Windows only: Navigating the Logitech Webcam Software
1. Capture pictures
and videos
2. View captured images
and share via e-mail,
Facebook,® or YouTube®.
3. An area for easy access to
your installed webcam-
related applications
4. Launch Logitech Vid HD
(if installed)
5. Capture videos triggered
by detected motion
6. Create your own custom
video mask (for webcams
that support this feature)
7. Control your video effects
and webcam while on
a video call
8. Download additional
webcam applications
9. Change webcams
(when you have more
than one)
10. Open Logitech Webcam
Software settings
11. Open help dashboard
(manuals and how-to
videos)

English 9
Logitech
®
HD Pro Webcam C910
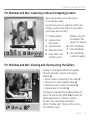
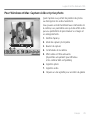
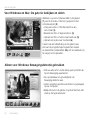
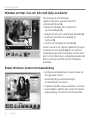
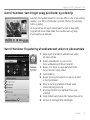
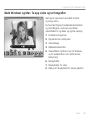
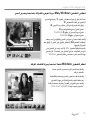
For Windows and Mac: Capturing video and snapping pictures
Quick Capture allows you to take photos
or record videos easily.
You have easy access to webcam controls and
settings as well as video effects to personalize
your images and recordings.
1. Preview window
2. Capture mode:
photo/video
3. Capture button
4. Webcam controls
5. Video effects and
fun filters are for
Windows only and
for webcams that
support this feature)
6. Photo thumbnails
7. Video thumbnails
8. Click a thumbnail
to enter the gallery
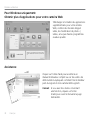
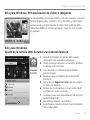
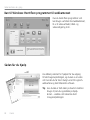
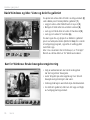
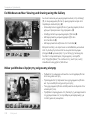
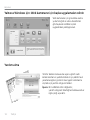
For Windows and Mac: Viewing and sharing using the Gallery
Clicking on an image thumbnail in the gallery
(1) opens the video or photo in the review
window (2).
•Attach a video or picture file to an e-mail (3)
•Edit a photo or splice together video (4)
•Upload a picture or video to Facebook (5)
•Upload a video to YouTube (6)
You may also drag and drop a gallery image onto
one of the function tiles (items 3-6) to launch an
editing application or to attach or upload.
For Mac: If you need more information,
refer to “Getting help”. The rest of this section
is for Windows users.

10 English
Getting started with
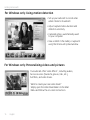
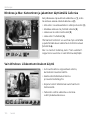
For Windows only: Using motion detection
•Set up your webcam to record video
when it detects movement.
•Adjust captured video duration and
detection sensitivity.
•Captured video is automatically saved
to your computer.
•View content in the Gallery or upload it
using the One-touch Upload window.
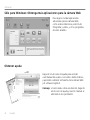
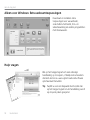
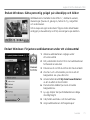
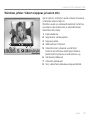
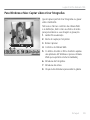
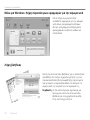
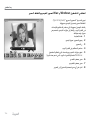
For Windows only: Personalizing videos and pictures
Your webcam offers Video Effects
™
, including avatars,
face accessories (mustache, glasses, hats, etc.),
fun filters, and video masks.
Want to create your own video mask?
Simply open the Video Mask Maker on the Main
Menu and follow the on-screen instructions.

English 11
Logitech
®
HD Pro Webcam C910
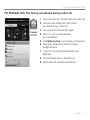
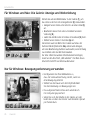
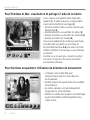
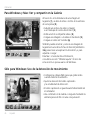
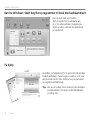
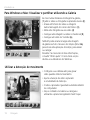
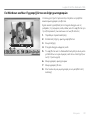
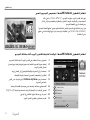
For Windows only: Fine tuning your webcam during a video call
1. Launch the webcam controller when on a video call.
2. Hide your video image with a photo while
your webcam stays connected.
3. Use pan and tilt to find the best angle.
4. Zoom in or out to include/exclude
your surroundings.
5. Use Follow my face so you’re always in the picture.
6. Enjoy clear conversations without annoying
background noise.
7. Correct for poor lighting environments using
RightLight.
8. Choose between auto- or manual focus.
9. Specify webcam operating characteristics.

12 English
Getting started with
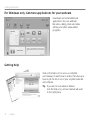
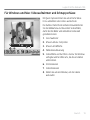
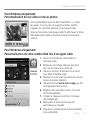
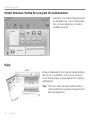
For Windows only: Get more applications for your webcam
Download and install additional
applications for your webcam,
like video calling, photo and video
editing, and other value-added
programs.
Getting help
Click on the help icon to access a complete
user manual, or watch how-to videos that show you
how to get the most out of your Logitech webcam
and software.
Tip: If you are not sure about a feature,
click the help icon, and our manual will open
to the right place.

Deutsch 13
Logitech
®
HD Pro Webcam C910
Funktionen
1. Carl Zeiss® Autofokus-Linse
HD 1080p
2. Mikrofone
3. Aktions-LED
4. Flexibler Clip/Standfläche
5. Logitech® WebCam Software
für Windows.
(Die Mac-Version dieser Software
können Sie unter www.logitech.com/
support-downloads herunterladen.)
6. Handbuch zum Produkt
Important information
Safety, compliance, and warranty
Getting started with
Logitech
®
HD Pro Webcam C910

14 Deutsch
Erste Schritte
Danke, dass Sie sich für eine Logitech-Webkamera entschieden haben!
Mit dieser Anleitung konfigurieren Sie Ihre Logitech-
Webkamera und führen nach ein paar einfachen Handgriffen
Ihr erstes Videogespräch.
Wenn Sie vorher noch Fragen klären möchten, finden Sie
Antworten zu Logitech-Webkameras und Videogesprächen
auf den nachstehend angeführten Websites.
Einrichten Ihrer Webkamera
Anbringen der Webkamera
1

Deutsch 15
Logitech
®
HD Pro Webcam C910
USB
2
3
Wenn Sie dazu aufgefordert
werden, schließen Sie
Ihre Webkamera an.
Erste Schritte mit Videogesprächen
Im Lieferumfang Ihrer Webkamera ist
die Software Logitech Vid
™
HD enthalten
Mit Logitech Vid HD genügen ein paar
einfache Schritte und schon führen Sie
Ihre Videogespräche über Internet:
•Logitech Vid HD installieren
•Konto erstellen
•Freund hinzufügen und Gespräch führen
Weitere Informationen: http://www.logitech.com/whatisvid
Installieren der Software
Für Mac können Sie die Software unter
www.logitech.com/support-downloads
herunterladen und installieren.

16 Deutsch
Erste Schritte
1
2
Einrichten von Logitech Vid HD
Logitech Vid HD installieren
Für Windows wird empfohlen, dass Sie sowohl Logitech
WebCam Software als auch die Logitech Vid HD-
Software installieren.
Für Mac werden Logitech WebCam Software und
die Logitech Vid HD-Software automatisch zusammen
installiert.
Weitere Informationen: http://www.logitech.com/webcam_howto
Konto erstellen
Befolgen Sie die Anweisungen auf dem Bildschirm,
um Ihr Logitech Vid HD-Konto zu erstellen und Ihre
Webkamera für Videogespräche einzurichten.
Für ein Videogespräch müssen beim Anrufer wie
beim Angerufenen folgende Voraussetzungen
gegeben sein:
•Eine Webkamera
•Ein Computer mit Lautsprechern und
Mikrofon (oder ein Kopfhörer mit
Mikrofon - viele Logitech-Webkameras
verfügen über ein eingebautes
Mikrofon)
•Eine Internet-Breitbandverbindung
(DSL, UMTS oder Kabel)
•Dieselbe Videoanwendung
(z. B. Logitech Vid HD)
•Konten für Videogespräche
Tipp: Wenn Sie lieber eine andere Anwendung für Videogespräche nutzen möchten,
müssen Sie die entsprechende Software herunterladen und installieren.

Deutsch 17
Logitech
®
HD Pro Webcam C910
3
Klicken Sie auf "Testanruf", um Ihre
Einstellungen zu testen.
Tipp: Die Funktion "Testanruf" ist in Ihrer
Kontaktliste immer sichtbar, damit Sie Ihre
Einstellungen jederzeit testen können.
Um einen Freund hinzuzufügen, klicken Sie
auf "Freund hinzufügen" und geben Sie
die E-Mail-Adresse Ihres Freundes ein,
sobald Sie dazu aufgefordert werden.
Freund hinzufügen oder Testanruf führen
Einstellungen des Kontos abrufen und Anwendungen starten
Logitech erkennt automatisch Ihre Webkamera und wählt
die am besten geeigneten Einstellungen aus. Wenn Sie
Ihr Profilfoto neu aufnehmen oder eine Einstellung ändern
möchten, klicken Sie auf das Symbol "Eigene Einstellungen".
Für Windows
Doppelklicken Sie auf die Symbole, um die Anwendungen
zu starten.
1. Software für Logitech-Webkamera
2. Logitech Vid HD
Tipp: Das Logitech Vid HD-Symbol wird nur angezeigt, wenn
Sie Logitech Vid HD installiert haben. Wenn Sie mehr über
Videogespräche mit anderen Systemen erfahren möchten,
finden Sie Hinweise unter:
www.logitech.com/webcam_howto
Für Mac
Doppelklicken Sie auf die Symbole, um Ihre Anwendungen
zu starten.
Wenn Ihr Freund Ihre Einladung akzeptiert hat, klicken Sie auf sein Foto, um ein Gespräch
zu beginnen.

18 Deutsch
Erste Schritte
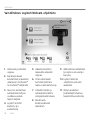
Nur für Windows: Navigation in der Software für Logitech-Webkameras
1. Bilder und Videos
aufnehmen
2. Aufgenommene Bilder
ansehen und per E-Mail
versenden bzw. in
Facebook® oder YouTube®
veröffentlichen
3. Ein Bereich für den
einfachen Zugang zu
Ihren Anwendungen,
die die Webkamera nutzen
4. Logitech Vid HD starten
(sofern installiert)
5. Videos aufzeichnen,
nachdem der
Bewegungsmelder eine
Bewegung erkannt hat
6. Eigene Videomaske
erstellen (für Webkameras,
die diese Funktion
unterstützen)
7. Videoeffekte und
Webkamera während eines
Videogesprächs steuern
8. Zusätzliche Webkamera-
Anwendungen
herunterladen
9. Webkameras austauschen
(wenn Sie über mehrere
verfügen)
10. Einstellungen der Software
für Logitech-Webkameras
öffnen
11. Hilfefunktionen
(Handbücher und
Videoanleitungen) öffnen

Deutsch 19
Logitech
®
HD Pro Webcam C910
Für Windows und Mac: Videoaufnahmen und Schnappschüsse
Mit Quick Capture können Sie auf einfache Weise
Fotos aufnehmen oder Videos aufzeichnen.
Die Funktion bietet Ihnen einfache Steuerelemente
für die Webkamera und besondere Videoeffekte,
damit Sie Ihre Bilder und Aufnahmen individuell
gestalten können.
1. Vorschaufenster
2. Erfassen-Modus: Foto/Video
3. Erfassen-Schaltfläche
4. Webkamera-Steuerung
5. Videoeffekte und Fun Filters sind nur für Windows
verfügbar und für Webcams, die diese Funktion
unterstützen.
6. Fotominiaturen
7. Videominiaturen
8. Klicken Sie auf eine Miniatur, um die Galerie
aufzurufen

20 Deutsch
Erste Schritte
Nur für Windows: Bewegungserkennung verwenden
•Konfigurieren Sie Ihre Webkamera so,
dass die Videoaufzeichnung startet, wenn sie
eine Bewegung erkennt
•Stellen Sie die Dauer und der Empfindlichkeit
für die Erkennung von Bewegungen ein.
•Das aufgezeichnete Video wird automatisch
im Computer gespeichert.
•Sehen Sie sich die Inhalte in der Galerie an oder
laden Sie sie über das Fenster zum direkten Upload
per Tastendruck
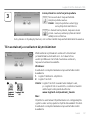
Für Windows und Mac: Die Galerie: Anzeige und Weiterleitung
Klicken Sie auf eine Bildminiatur in der Galerie (1), um
das Video oder Foto im Anzeigefenster (2) darzustellen.
•Hängen Sie ein Video oder ein Foto an eine E-Mail (3)
an.
•Bearbeiten Sie ein Foto oder schneiden Sie einen
Videoclip (4).
•Laden Sie ein Bild oder ein Video in Facebook (5) hoch.
•Stellen Sie ein Video in YouTube (6) ein.
Sie können auch ein Bild in der Galerie auf eines der
Funktionsfelder (Elemente 3-6) ziehen und ablegen,
um eine Bearbeitungsfunktion aufzurufen, einen Anhang
zu erstellen oder das Bild hochzuladen.
Für Mac: Wenn Sie weitere Informationen benötigen,
lesen Sie den Abschnitt „Hilfe abrufen“. Der Rest dieses
Abschnitts betrifft nur Windows-Benutzer.
A página está carregando ...
A página está carregando ...
A página está carregando ...
A página está carregando ...
A página está carregando ...
A página está carregando ...
A página está carregando ...
A página está carregando ...
A página está carregando ...
A página está carregando ...
A página está carregando ...
A página está carregando ...
A página está carregando ...
A página está carregando ...
A página está carregando ...
A página está carregando ...
A página está carregando ...
A página está carregando ...
A página está carregando ...
A página está carregando ...
A página está carregando ...
A página está carregando ...
A página está carregando ...
A página está carregando ...
A página está carregando ...
A página está carregando ...
A página está carregando ...
A página está carregando ...
A página está carregando ...
A página está carregando ...
A página está carregando ...
A página está carregando ...
A página está carregando ...
A página está carregando ...
A página está carregando ...
A página está carregando ...
A página está carregando ...
A página está carregando ...
A página está carregando ...
A página está carregando ...
A página está carregando ...
A página está carregando ...
A página está carregando ...
A página está carregando ...
A página está carregando ...
A página está carregando ...
A página está carregando ...
A página está carregando ...
A página está carregando ...
A página está carregando ...
A página está carregando ...
A página está carregando ...
A página está carregando ...
A página está carregando ...
A página está carregando ...
A página está carregando ...
A página está carregando ...
A página está carregando ...
A página está carregando ...
A página está carregando ...
A página está carregando ...
A página está carregando ...
A página está carregando ...
A página está carregando ...
A página está carregando ...
A página está carregando ...
A página está carregando ...
A página está carregando ...
A página está carregando ...
A página está carregando ...
A página está carregando ...
A página está carregando ...
A página está carregando ...
A página está carregando ...
A página está carregando ...
A página está carregando ...
A página está carregando ...
A página está carregando ...
A página está carregando ...
A página está carregando ...
A página está carregando ...
A página está carregando ...
A página está carregando ...
A página está carregando ...
A página está carregando ...
A página está carregando ...
A página está carregando ...
A página está carregando ...
A página está carregando ...
A página está carregando ...
A página está carregando ...
A página está carregando ...
A página está carregando ...
A página está carregando ...
A página está carregando ...
A página está carregando ...
A página está carregando ...
A página está carregando ...
A página está carregando ...
A página está carregando ...
A página está carregando ...
A página está carregando ...
A página está carregando ...
A página está carregando ...
A página está carregando ...
A página está carregando ...
A página está carregando ...
A página está carregando ...
A página está carregando ...
A página está carregando ...
A página está carregando ...
A página está carregando ...
A página está carregando ...
A página está carregando ...
A página está carregando ...
A página está carregando ...
A página está carregando ...
A página está carregando ...
A página está carregando ...
A página está carregando ...
A página está carregando ...
A página está carregando ...
A página está carregando ...
A página está carregando ...
-
 1
1
-
 2
2
-
 3
3
-
 4
4
-
 5
5
-
 6
6
-
 7
7
-
 8
8
-
 9
9
-
 10
10
-
 11
11
-
 12
12
-
 13
13
-
 14
14
-
 15
15
-
 16
16
-
 17
17
-
 18
18
-
 19
19
-
 20
20
-
 21
21
-
 22
22
-
 23
23
-
 24
24
-
 25
25
-
 26
26
-
 27
27
-
 28
28
-
 29
29
-
 30
30
-
 31
31
-
 32
32
-
 33
33
-
 34
34
-
 35
35
-
 36
36
-
 37
37
-
 38
38
-
 39
39
-
 40
40
-
 41
41
-
 42
42
-
 43
43
-
 44
44
-
 45
45
-
 46
46
-
 47
47
-
 48
48
-
 49
49
-
 50
50
-
 51
51
-
 52
52
-
 53
53
-
 54
54
-
 55
55
-
 56
56
-
 57
57
-
 58
58
-
 59
59
-
 60
60
-
 61
61
-
 62
62
-
 63
63
-
 64
64
-
 65
65
-
 66
66
-
 67
67
-
 68
68
-
 69
69
-
 70
70
-
 71
71
-
 72
72
-
 73
73
-
 74
74
-
 75
75
-
 76
76
-
 77
77
-
 78
78
-
 79
79
-
 80
80
-
 81
81
-
 82
82
-
 83
83
-
 84
84
-
 85
85
-
 86
86
-
 87
87
-
 88
88
-
 89
89
-
 90
90
-
 91
91
-
 92
92
-
 93
93
-
 94
94
-
 95
95
-
 96
96
-
 97
97
-
 98
98
-
 99
99
-
 100
100
-
 101
101
-
 102
102
-
 103
103
-
 104
104
-
 105
105
-
 106
106
-
 107
107
-
 108
108
-
 109
109
-
 110
110
-
 111
111
-
 112
112
-
 113
113
-
 114
114
-
 115
115
-
 116
116
-
 117
117
-
 118
118
-
 119
119
-
 120
120
-
 121
121
-
 122
122
-
 123
123
-
 124
124
-
 125
125
-
 126
126
-
 127
127
-
 128
128
-
 129
129
-
 130
130
-
 131
131
-
 132
132
-
 133
133
-
 134
134
-
 135
135
-
 136
136
-
 137
137
-
 138
138
-
 139
139
-
 140
140
-
 141
141
-
 142
142
-
 143
143
-
 144
144


Logitech C910 Manual do usuário
- Categoria
- Webcams
- Tipo
- Manual do usuário
- Este manual também é adequado para
em outros idiomas
- français: Logitech C910 Manuel utilisateur
- italiano: Logitech C910 Manuale utente
- dansk: Logitech C910 Brugermanual
- Türkçe: Logitech C910 Kullanım kılavuzu
Artigos relacionados
-
Logitech C615 Manual do usuário
-
Logitech C120 Manual do usuário
-
Logitech C910 Manual do usuário
-
-
-
-
Logitech C110 Manual do usuário
-
-
Logitech BRIO Manual do proprietário
-
Logitech C270 Manual do proprietário