Rowenta VITALITY II Manual do proprietário
- Categoria
- Desumidificadores
- Tipo
- Manual do proprietário
Este manual também é adequado para

VITALITY / VITALITY LINENDRY
DH3110 / DH4010-4020
NC00017828 - 23/10
Notice d'emploi
Instructions for use
Gebrauchsanweisung
Gebruiksaanwijzing
Instruzioni per l'uso
Modo de empleo
Instruções de utilização

2
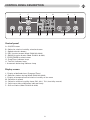
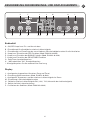
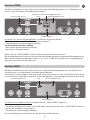
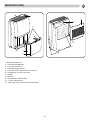
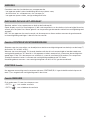
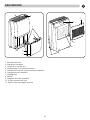
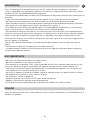
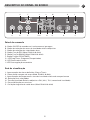
DESCRIPTIF PRODUIT
1 - Tableau de bord
2 - Poignée de transport
3 - Grille de sortie d’air
4 - Réservoir récupérateur d’eau
5 - Fenêtre indicatrice de remplissage du réservoir
6 - Poignées du réservoir
7 - Flotteur
8 - Roulettes
9 - Support pré-filtre amovible
10 - Grille d’entrée d’air
11 - Bouton d’ouverture pour drainage permanent
1
5
4
3
6
7
9
8
11
10
2
F

3
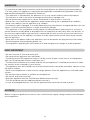
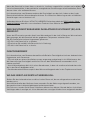
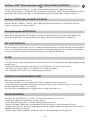
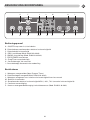
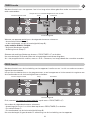
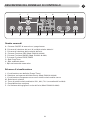
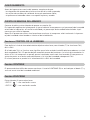
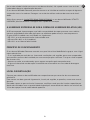
DESCRIPTIF TABLEAU DE BORD
Tableau de commande
A - Bouton ON/OFF de mise en marche / arrêt
B - Bouton de sélection des taux d’humidité relative objectifs
C - Bouton de sélection des vitesses d’air
D - Bouton Fonction DRY (Mod. DH4010 & 4020)
E - Bouton Fonction SWING (Mod. DH4010 & 4020)
F - Bouton Fonction PROG/TIMER
G - Témoin Prog/Timer
H - Témoin Réservoir plein
I - Témoin Dégivrage automatique
Ecran de visualisation
J - Affichage heures définies (Prog et Timer)
K - Sélection séchage du linge (Mod. DH4010 & 4020)
L - Affichage température et taux d’humidité relative de la pièce
M - Sélection 2 vitesses
N - Taux d’Humidité Relative objectif 50%, 60%, 70% (contrôle de l’humidité)
O - Déshumidification en continu
P - Oscillation de la grille de sortie d’air (Mod. DH4010 & 4020)
AD E KP N O
F
JL
M
HIG
BC
F

4
Un air trop humide rend une maison inconfortable et peut créer de nombreuses nuisances.
Votre déshumidificateur VITALITY permet d’évacuer l’air humide en recueillant l’excès de va-
peur d’eau en suspension dans l’air ambiant. Il protège votre habitat des effets néfastes d’une
humidité trop importante.
De plus, grâce à sa fonction DRY (Mod. DH4010-DH4020), votre déshumidificateur VITALITY
LINENDRY permet également de sécher plus rapidement votre linge.
L’HUMIDITÉ S’EXPRIME SOUS FORME D’HUMIDITÉ RELATIVE (RH).
L’humidité relative est le pourcentage indiquant la quantité de vapeur d’eau présente dans l’air
par rapport à la quantité maximale de vapeur d’eau que peut contenir l’air ambiant, à cette tem-
pérature.
L’humidité relative se mesure avec un hygromètre :
• RH <50% : l’air de la pièce est trop sec.
• RH entre 50 et 60% : l’air est sain.
• RH > 60% : l’air est trop humide.
PRINCIPE DE FONCTIONNEMENT
- L’air est aspiré par un système de ventilation puis passe dans un évaporateur qui recueille
l’excès d’humidité en le rafraîchissant. L’air sortant de l’évaporateur est sec et froid.
- Il traverse ensuite le condenseur qui le réchauffe et le diffuse dans la pièce.
- L’eau résultant de la condensation est recueillie dans le réservoir ou évacuée dans un tuyau
de drainage continu.
LIEU D’INSTALLATION
Placer le déshumidificateur d’abord dans la pièce nécessitant un traitement prioritaire.
Pour maintenir un bon degré d’hygrométrie, installer ensuite l’appareil dans un endroit central
du domicile.
Afin que l’air puisse circuler librement, veiller à ne pas placer l’appareil derrière des rideaux ou
proche de tout autre obstacle et laisser un minimum de 10 cm d’espace libre de chaque côté de
l’appareil.
F

5
AVERTISSEMENTS
Il est essentiel de lire attentivement cette notice et d'observer les recommandations suivantes:
• Pour votre sécurité, cet appareil est conforme aux normes et réglementations applicables (Direc-
tives Basse Tension, Compatibilité Electromagnétique).
• Cet appareil est destiné à un usage domestique uniquement. Il ne peut donc pas être utilisé pour
une application industrielle.
• La garantie sera annulée en cas d’éventuels dommages résultant d’une mauvaise utilisation.
• Ne faites pas fonctionner votre appareil dans un local empoussiéré ou un local présentant des
risques d’incendie.
• Avant chaque utilisation, vérifiez le bon état général de l’appareil, de la prise et du cordon.
• N’introduisez jamais d’objet à l’intérieur de l’appareil (ex : aiguilles…)
• Si le câble d’alimentation est endommagé, il doit être remplacé par le fabricant, son service après-
vente ou une personne de qualification similaire afin d’éviter tout danger.
• Cet appareil n’est pas prévu pour être utilisé par des personnes (y compris les enfants) dont les capa-
cités physiques, sensorielles ou mentales sont réduites, ou des personnes dénuées d’expérience ou de
connaissance, sauf si elles ont pu bénéficier, par l’intermédiaire d’une personne responsable de leur
sécurité, d’une surveillance ou d’instructions préalables concernant l’utilisation de l’appareil. Il
convient de surveiller les enfants pour s’assurer qu’ils ne jouent pas avec l’appareil.
• Ne pas tirer le câble d’alimentation ou l’appareil, même pour débrancher la prise de courant du
socle mural.
• Dérouler complètement le cordon avant chaque utilisation.
• Les règlementations concernant l’élimination de l’huile et de l’agent réfrigérant lorsque l’appareil
est mis au rebut doivent être respectées.
TRES IMPORTANT
• Ne pas couvrir les grilles d’entrée et/ou de sortie d’air.
• Ne pas toucher l'appareil avec les mains humides.
• La construction de cet appareil IP21 permet son utilisation dans toutes les pièces de la maison, y
compris celles présentant des risques de chutes d’eau verticales (cuisine, salle de bains, etc …).
• L’installation électrique de la pièce, l’installation de l’appareil et son utilisation doivent cependant
être conformes aux normes en vigueur dans votre pays.
• L’installation ne doit pas permettre que les boutons de commande soient touchés par une per-
sonne utilisant la baignoire ou la douche.
• Ne jamais utiliser l’appareil incliné ou couché. Placer l’appareil sur une surface plane et stable.
• Ne pas poser de choses lourdes ou d’enfants sur l’appareil.
• Ne rien introduire dans le réservoir.
• Arrêter votre appareil par le bouton On/Off avant de le débrancher.
• Arrêter et débrancher votre appareil avant de le déplacer.
• En cas d’absence prolongée : Arrêter l’appareil avec le bouton (A) et débrancher.
TENSION
Avant la première utilisation, vérifiez que la tension de votre installation corresponde bien à celle
marquée sur l’appareil.
F

6
FONCTIONNEMENT
Assurez-vous avant la mise en marche de votre appareil que :
- le positionnement de l’appareil décrit dans cette notice soit respecté,
- les grilles d’entrée et de sortie d’air soient totalement dégagées,
- l’appareil soit sur une surface plane et stable.
MISE EN MARCHE DE L’APPAREIL
Brancher le cordon et appuyer sur le bouton de Mise en marche (A)
Sur l’afficheur, le pictogramme (L) apparaît vous indiquant la température et le taux d’humidité rela-
tive de la pièce, ainsi que la vitesse et le taux d’humidité sélectionnés lors de la dernière utilisation
du produit.
Nota : Si l’appareil n’est pas en fonctionnement continu, le compresseur ne fonctionnera que si le
taux d’humidité sélectionné est inférieur à celui de la pièce.
Fonction CONTROLE DE L’HUMIDITE
Pour définir le taux d’humidité relative objectif, sélectionner à l’aide du bouton (B) les fonctions 70%
ou 60% ou 50%.
Si la fonction 70% est sélectionnée, cela signifie que l’air sera déshumidifié jusqu’à obtenir un taux
d’humidité de 70%. L’appareil s’arrêtera automatiquement de fonctionner si le taux d’humidité est
inférieur à 70% (le compresseur s’arrêtera, mais le ventilateur continuera à fonctionner). Le com-
presseur se remettra en marche automatiquement si le taux d’humidité dépasse 70%.
Le même processus se produira en cas de sélection de 60% ou 50% d’humidité.
Fonction CONTINUE
L’appareil déshumidifie la pièce en continu si la fonction CONTINUE (O) est activée par le bouton (B)
et ceci, quel que soit le taux d’humidité ambiante.
Fonction VITESSE
Appuyer sur la touche (C) pour sélectionner :
• PICTO « » : une ventilation douce
• PICTO « » : une ventilation moyenne
F

7
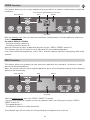
Fonction TIMER
Cette fonction vous permet d’utiliser votre appareil pendant une durée de 1 à 24H dans des condi-
tions préalablement établies :
Votre appareil étant en marche, vous pourrez sélectionner :
- la vitesse de ventilation (bouton C)
- et le taux d’humidité objectif (bouton B) ;
sur les modèles DH4010 / DH4020 :
- la fonction Sèche linge (bouton D)
- la fonction Swing (bouton E)
Sélectionner le nombre d’heures de fonctionnement en appuyant sur la touche « PROG/TIMER » (F).
Le voyant (G) s’allumera pendant toute la durée de fonctionnement programmée.
Si vous voulez sortir du programme, il faudra sélectionner « 00 H » et le voyant s’éteindra au bout
de quelques secondes.
Fonction PROG
Cette fonction vous permet un démarrage différé de votre appareil de 1 à 24H dans des conditions
préalablement établies.
Attention : Il n’est pas possible de sélectionner une heure d’arrêt mais l’appareil se régulera automa-
tiquement pour maintenir le taux d’humidité objectif.
Votre appareil étant à l’arrêt
, appuyer sur la touche « PROG/TIMER » (F).
Vous pourrez alors sélectionner :
- le nombre d’heures de fonctionnement de 1à 24H en appuyant sur le bouton PROG/TIMER (F)
- La vitesse (bouton C)
- Le taux d’humidité objectif (bouton B)
Le voyant (G) sera allumé dans l’attente de la mise en fonctionnement de l’appareil.
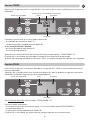
Voyant bleu allumé Timer Vitesse
Humidité
Température et humidité de la pièce
Voyant bleu allumé Prog Vitesse
Humidité
F

8
Fonction « DRY » SÉCHAGE DU LINGE ( ) (Mod DH4010 & DH4020)
Appuyer sur le bouton DRY (D) pour mettre en marche la fonction séchage du linge.
Une 3ème vitesse plus élevée, la déshumidification en continu et l’oscillation de la grille de sortie
d’air se mettront en marche automatiquement pour un meilleur séchage du linge.
Fonction SWING (Mod. DH4010 & DH4020)
Appuyer sur la touche « SWING »(E) : la grille de sortie d’air oscillera automatiquement, assurant
une meilleure diffusion de l’air asséché dans la pièce.
Voyant de DEGIVRAGE
Si le voyant (I) s’allume, le déshumidificateur est en mode dégivrage. Le compresseur s’arrête et se
remettra en marche 8 minutes après la phase de dégivrage.
Voyant FULL
L’appareil émet un bip sonore et le témoin (H) clignote quand le réservoir d’eau est plein. Le voyant
s’arrête de clignoter et le déshumidificateur se remet en marche dès que le réservoir est vidé puis
remis en place.
FILTRE
• Votre appareil est équipé d'un pré-filtre amovible et lavable qui doit être nettoyé régulièrement.
• Enlever le pré-filtre en le glissant vers l’extérieur et le laver à l’eau du robinet.
• Prendre toujours soin de faire sécher le filtre avant de le remettre en place.
• Ne jamais utiliser l'appareil sans son pré-filtre.
VIDANGE DU RESERVOIR
Quand le réservoir est plein :
- l’appareil s’arrête et le voyant témoin rouge FULL (H) s’allume,
- tirer le réservoir doucement hors de l’appareil, vider l’eau et remettre le réservoir en place dans
l’appareil.
Le voyant témoin rouge FULL (H) doit s’éteindre au bout de quelques secondes.
DRAINAGE CONTINU
Utiliser un tuyau PVC de 14 mm de diamètre.
- Enlever le réservoir de l’appareil.
- Dévisser le bouton (11) à l’arrière de l’appareil.
- Enlever le bouchon puis raccorder le tuyau à la sortie de drainage .
- S’assurer que la pente entre les 2 extrémités du tuyau permette un écoulement normal de l’eau.
- Remettre le réservoir en position, le voyant Full s’éteint.
F

9
ENTRETIEN
• Il est impératif d'arrêter votre appareil avec le bouton (A) et de le débrancher avant toute opération
d'entretien.
• Vous pouvez le nettoyer avec un chiffon légèrement humide.
• Important : Ne jamais utiliser de produits abrasifs qui risqueraient de détériorer l’aspect de votre
appareil.
TRANSPORT
Vérifier le niveau d’eau dans le réservoir avant transport, au besoin le vidanger.
- L’appareil est facile à déplacer grâce à ses roulettes.
- Attention : Votre appareil comporte un compresseur frigorifique, coucher l’appareil peut entraîner
des dysfonctionnements.
RANGEMENT
Si vous n’utilisez pas l’appareil, celui-ci doit être placé dans un local à l’abri de l’humidité.
Prenez soin de vider le réservoir d’eau.
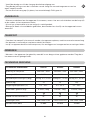
CARACTERISTIQUES TECHNIQUES
CARACTERISTIQUES DH3110 DH4010 DH4020
Tension et fréquence 220-240V / 50Hz 220-240V / 50Hz 220-240V / 50Hz
Puissance (W) 320W 320W 320W
Capacité d’absorption d’humidité (L/jour)
16L/jour 30°C, RH
80%
16L/jour 30°C, RH
80%
20L/jour 30°C, RH
80%
Poids (kg) 13 13 13,3
Température ambiante (°C) 5°C - 35°C 5°C - 35°C 5°C - 35°C
Agent réfrigérant / poids (a/g) R-410A / 160g R-410A / 160g R-410A / 160g
Filtre
Capacité du réservoir (L) 4L 4L 4L
Dimensions (cm) L36 x D24 x H59 L36 x D24 x H59 L36 x D24 x H59
Niveau sonore (dBA) 42 dBA 42 dBA 42 dBA
F

10
EN CAS DE PROBLEME
• Ne jamais démonter votre appareil vous-même. Un appareil mal réparé peut présenter des risques
pour l’utilisateur.
• Avant de contacter un Centre Service agrée de notre réseau, assurez-vous que l’appareil soit en po-
sition normale de fonctionnement et que les grilles d’entrée et de sortie d’air soient totalement dé-
gagées.
PARTICIPONS À LA PROTECTION DE L’ENVIRONNEMENT !
Votre appareil contient de nombreux matériaux valorisables ou recyclables. Il contient
également comme agent réfrigérant un gaz à effet de serre fluoré (R410A) relevant du
protocole de Kyoto, dont le potentiel de réchauffement planétaire est 1955 fois supérieur
au gaz carbonique (CO2). Le gaz à effet de serre fluoré contenu dans cet équipement ne
doit pas être dégazé dans l’atmosphère.
Confiez celui-ci dans un point de collecte ou à défaut dans un centre service agréé pour
que son traitement soit effectué.
Type de problème
Points de vérifier
L’appareil ne fonctionne pas à sa mise
en marche.
- Réservoir d’eau plein.
- Positionnement du réservoir.
- Branchement de l’appareil.
La capacité de déshumidification
est trop faible.
- Propreté du filtre.
- Niveau de température trop bas.
- Dégagement des grilles d’entrée et de sortie d’air.
Le confort recherché n’est pas
atteint après un long moment
de fonctionnement.
- Fermeture des portes et fenêtres.
- Propreté du filtre.
-
Présence éventuelle d’émanation de vapeur dans la pièce.
- Taille de la pièce trop grande.
L’appareil est trop bruyant.
- Appareil positionné sur une surface stable et plane ?
L’appareil s’arrête.
- Réservoir d’eau plein ou mal positionné
- Température trop important ou trop basse
- Sélection du taux d’humidité relative mal réglé
Le témoin réservoir plein est allumé.
- En cas de premier usage, réservoir mal positionné
- Réservoir d’eau plein
F

11
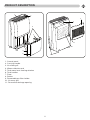
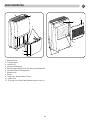
PRODUCT DESCRIPTION
1 - Control panel
2 - Carrying handle
3 - Air outlet grill
4 - Water collection tank
5 - Tank water level viewing window
6 - Tank handles
7 - Float
8 - Rollers
9 - Removable pre-filter holder
10 - Air entry grill
11 - Permanent drainage opening
1
5
4
3
6
7
9
8
11
10
2
GB

12
CONTROL PANEL DESCRIPTION
Control panel
A - ON/OFF button
B - Objective relative humidity selection button
C - Speed selection button
D - DRY function button (Mod. DH4010 & 4020)
E - SWING function button (Mod. DH4010 & 4020)
F - PROG/TIMER function button
G - Prog/Timer indicator lamp
H - Tank full indicator lamp
I - Automatic defrosting indicator lamp
Display screen
J - Display of defined times (Prog and Timer)
K - Selection clothes drying (Mod. DH4010 & 4020)
L - Display of temperature and relative humidity of the room
M - Selection 2 speeds
N - Objective relative humidity factor 50%, 60%, 70% (humidity control)
O - Continuous dehumidification indicator lamp
P - Grill oscillation (Mod. DH4010 & 4020)
AD E KP N O
F
JL
M
HIG
BC
GB

13
Excessive atmospheric humidity makes a house uncomfortable and can have adverse
consequences.
Your Vitality dehumidifier allows you to remove damp air from your home by collecting the ex-
cess water vapour suspended in the air. It protects your living environment from the damaging
effects of excessive humidity.
Drying clothes (Mod. DH4010-DH4020)
Thanks to its DRY function, your dehumidifier can also help you dry your washing even faster.
DAMPNESS IS EXPRESSED AS RELATIVE HUMIDITY (HR).
Relative humidity is a percentage indicating the quantity of water vapour in the air as a propor-
tion of the maximum amount of water vapour that the air is able to contain at that temperature.
Relative humidity is measured with a hygrometer:
• RH <50%: the air in the room is too dry.
• RH between 50 and 60%: this is considered healthy.
• RH >60%: the air is too humid.
OPERATING PRINCIPLE
- The air is drawn in by a fan system and then passes through a refrigerant evaporator where it
is cooled and the excess humidity is collected. The air leaving the refrigerant evaporator is dry
and cold.
- It then passes through the refrigerant condenser which warms it before it is dispersed through
the room.
- The condensed water is collected in the tank or removed through a hose for continuous drai-
nage.
LOCATION
First place the dehumidifier in the room requiring priority treatment.
To maintain a good level of humidity throughout the home, the dehumidifier should then be
installed in a central position.
The air must be allowed to circulate freely; ensure that the appliance is not installed behind cur-
tains or near any other obstruction and leave a minimum free space of 10 cm (4 in) on all sides
of the appliance.
GB

14
WARNINGS
It is essential to read these instructions carefully and to observe the following recommendations.
• For your safety, this appliance is compliant with applicable standards and regulations (Low (Vol-
tage and Electromagnetic Compatibility Directives).
• This appliance is intended only for domestic use. It may not be used for industrial purposes.
• The warranty is void in the event of damage resulting from improper use.
• Do not operate your appliance in a dusty atmosphere or where there is a fire risk.
• Before each use, check that the appliance, power cord and plug are in good general condition.
• Never insert objects into the appliance (e.g. needles).
• If the power cord is damaged, it must be replaced by the manufacturer, an approved after-sales ser-
vice or a similarly qualified person, in order to avoid any danger.
• This appliance is not intended for use by people (including children) whose physical, sensory or
mental capacities are disabled, or by people with no experience or familiarity with such devices, un-
less they are supervised by a person who is responsible for their security or have received instruc-
tions as to how to use the appliance. Children must be supervised to ensure that they do not play
with the appliance.
• Never pull on the power cord or the appliance, even to disconnect the plug from the wall socket.
• Unroll the power cord completely before use.
• The regulations regarding the elimination of oil and refrigerant for storage must be respected.
VERY IMPORTANT
• Do not cover the air inlet and outlet grills.
• Do not touch the appliance with wet hands.
• The design of this IP21 appliance means it can be used in all parts of the house, including those
with risks of falling water (kitchen, bathroom, etc.).
• The electrical installation of the room and the way the appliance is installed and used must howe-
ver conform to the standards in your country.
• The appliance must be installed such that the control buttons cannot be reached by a person using
the bath or shower.
• Never use the appliance in other than an upright position. Place the appliance on a flat and stable
surface.
• Do not place heavy objects or children on the appliance.
• Do not put anything in the tank.
• Stop your appliance with the On/Off button before disconnecting it.
• Turn off and disconnect the appliance before moving it.
• In case of prolonged absence: turn off the appliance with the button (A) and unplug it.
VOLTAGE
Before using your appliance for the first time, check that the supply voltage matches that indicated
on the appliance.
GB

15
GB
OPERATION
Before switching on your appliance, make sure that:
- the appliance is positioned in accordance with these instructions,
- the air inlet and outlet grills are completely unobstructed,
- the appliance is placed on a flat and stable surface.
START-UP OF THE APPLIANCE
Plug the lead in and press the start button (A).
On the display, the pictogram (L) appears indicating the temperature and relative humidity of the
room, as well as the speed and humidity selected the last time the appliance was used.
Note: If the appliance is not in continuous operation, the compressor will only work if the humidity
factor selected is lower than the room.
HUMIDITY CONTROL Function
To set the target relative humidity, select one of the values, 70%, 60% or 50%, using the button (B).
If the 70% function is selected, this means that the air will be dehumidified until the relative humidity
falls to 70%. The appliance will turn off automatically if the relative humidity is below 70% (the com-
pressor will stop but the fan will continue to operate). The compressor will start again if the relative
humidity exceeds 70%.
The same applies if 60% or 50% is selected.
CONTINUOUS function
The unit dehumidifies the room continuously if the CONTINUOUS function (O) is activated using
button (B), regardless of the ambient humidity.
SPEED Function
Press button (C) to select:
• « » : gentle ventilation
• « » : medium ventilation

16
GB
TIMER Function
This feature allows you to use your appliance for a period of 1 to 24 hours under previously defined
conditions:
With the appliance on, you can select the ventilation speed (button C) and the objective relative hu-
midity (button B).
On models DH4010 / DH4020
- The Dryer function (button D)
- The Swing function (button E)
Select the number of hours of operation by pressing the “PROG / TIMER” button (F).
The indicator light (G) will come on for the duration of the scheduled operation.
If you want to exit the programme, select “00 H” and the indicator light will stop lighting after a few
seconds.
PROG function
This feature allows you to delay the start-up of your appliance for a period of 1 to 24 hours under
previously defined conditions:
Note: You cannot select a time to stop the appliance, but it will automatically adjust itself to keep the
objective rate of humidity.
With the appliance off, press the “PROG / TIMER” (F) button.
• You can then select the number of hours of operation from 1 to 24H by pressing the «PROG /
TIMER” button (F).
• The speed (button C)
• The objective relative humidity (button B)
The indicator light (G) will come on while waiting for the appliance to switch on.
Blue light on Timer Speed
Humidity
Temperature and humidity of the room
Blue light on Prog
Speed
Humidity

17
GB
“DRY” Function for Drying clothes ( ) (Mod DH4010 & DH4020)
Press the DRY button (D) to turn on the laundry drying function.
A 3rd higher speed, continuous dehumidification and the oscillation of the air outlet grill will come
on automatically for improved clothes drying.
SWING Function (Mod. DH4010 & DH4020)
Press the “SWING” button (E): The air outlet grill will swing automatically, ensuring a better flow of
dry air into the room.
DEFROSTING INDICATOR LIGHT
If the indicator light (I) is lit, the dehumidifier is in defrost mode. The compressor stops and starts
again 8 minutes after the start of the defrost mode.
FULL indicator light
The appliance beeps and the indicator (H) blinks if the water tank is full. The indicator stops blinking
and the dehumidifier starts working again once the tank is emptied and replaced.
FILTER
• Your appliance is fitted with a removable, cleanable filter, which must be cleaned regularly.
• Remove the filter by sliding it outwards and wash it with tap water.
• Always take care to dry the filter before replacing it.
• Never use the appliance without its filter.
EMPTYING THE TANK
When the tank is full:
• The appliance stops and the red, FULL indicator (H) lights up.
• Pull the tank carefully out of the appliance, empty out the water and replace it in the unit.
The red FULL indicator light (H) should turn off after a few seconds.
CONTINUOUS DRAINAGE
Use a PVC pipe, 14 mm in diameter.
• Remove the tank from the appliance.
• Unscrew the button (11) at the rear of the unit.
• Remove the cap and connect the pipe to the drainage outlet.
• Ensure that the slope between the 2 ends of the pipe allows water to flow away normally.
• Replace the tank, the Full indicator light goes out.

GB
18
CARE
• It is imperative that you turn off your appliance using the button (A) and disconnect it before any
cleaning operation.
• It can be cleaned with a damp cloth.
• Important : Never use abrasive cleaners, these will damage the surfaces.
TRANSPORT
Check the water level in the tank before transport, empty it if need be.
• The appliance is easy to move, thanks to its rollers.
• Note : Your appliance includes a refrigeration compressor; laying the appliance on its side can
cause a malfunction.
STORAGE
When the appliance is not in use, it must be stored in a dry place. Take care to empty the water tank.
TECHNICAL CHARACTERISTICS
CHARACTERISTICS DH3110 DH4010 DH4020
Voltage and frequency 220-240V / 50Hz 220-240V / 50Hz 220-240V / 50Hz
Power (W) 320W 320W 320W
Humidity absorption capacity (l/day)
16L/day 30°C, RH 80% 16L/day 30°C, RH 80% 20L/day 30°C, RH 80%
Weight (kg) 13 13 13,3
Ambient temperature(°C) 5°C - 35°C 5°C - 35°C 5°C - 35°C
Refrigerant / weight (r / g) R-410A / 160g R-410A / 160g R-410A / 160g
Filter
Tank capacity (l) 4L 4L 4L
Dimensions (cm) L36 x D24 x H59 L36 x D24 x H59 L36 x D24 x H59
Noise level (dBA) 42 dBA 42 dBA 42 dBA

GB
19
IN CASE OF PROBLEM
• Never dismantle your appliance. A poorly repaired appliance may pose risks to the user.
• Before contacting an approved Service Centre in our network, ensure that the appliance is in a nor-
mal operating position and that the air inlet and outlet grills are completely unobstructed.
ENVIRONMENT PROTECTION FIRST!
Your appliance contains valuable materials which can be recovered or recycled. It also
contains a fluorinated greenhouse gas (R410A) as a cooling agent, which falls within the
Kyoto Protocol. The planetary heating potential of this gas is 1,955 times greater than
that of carbon dioxide (CO2). The fluorinated greenhouse gas contained in this appliance
must not be released into the atmosphere.
Leave it a local civic waste collection point.
Type of problem Points to check
The appliance does not work when
switched on.
- Water tank full.
- Positioning of the tank.
- Connection of the appliance.
The dehumidification capacity is too
low.
- That the filter is clean.
- The temperature is too low.
- Obstruction of the air inlet and outlet grills.
The desired level of comfort is not
reached after the appliance has been
operating for a long time.
- Doors and windows are closed.
- That the filter is clean.
- Source of steam in the room.
- Size of room too large.
The appliance is too noisy. - The appliance is placed on a flat and stable surface.
The appliance stops.
- Water tank full or not in place.
- Temperature too high or too low.
- Bad humidity setting.
The full indicator light is on.
- In case of first use, water tank not in place.
- Water tank is full.

20
BESCHREIBUNG
1 - Bedienfläche
2 - Transportgriff
3 - Luftaustritt
4 - Wasserauffangtank
5 - Befüllungsanzeigefenster des Wasserauffangtanks
6 - Griff des Wasserauffangtanks
7 - Schwimmer
8 - Rollen
9 - Träger des abnehmbaren Filters
10 - Lufteintritt
11 - Öffnung zum Ablauf des Kondensationswassers
1
5
4
3
6
7
9
8
11
10
2
D
A página está carregando...
A página está carregando...
A página está carregando...
A página está carregando...
A página está carregando...
A página está carregando...
A página está carregando...
A página está carregando...
A página está carregando...
A página está carregando...
A página está carregando...
A página está carregando...
A página está carregando...
A página está carregando...
A página está carregando...
A página está carregando...
A página está carregando...
A página está carregando...
A página está carregando...
A página está carregando...
A página está carregando...
A página está carregando...
A página está carregando...
A página está carregando...
A página está carregando...
A página está carregando...
A página está carregando...
A página está carregando...
A página está carregando...
A página está carregando...
A página está carregando...
A página está carregando...
A página está carregando...
A página está carregando...
A página está carregando...
A página está carregando...
A página está carregando...
A página está carregando...
A página está carregando...
A página está carregando...
A página está carregando...
A página está carregando...
A página está carregando...
A página está carregando...
-
 1
1
-
 2
2
-
 3
3
-
 4
4
-
 5
5
-
 6
6
-
 7
7
-
 8
8
-
 9
9
-
 10
10
-
 11
11
-
 12
12
-
 13
13
-
 14
14
-
 15
15
-
 16
16
-
 17
17
-
 18
18
-
 19
19
-
 20
20
-
 21
21
-
 22
22
-
 23
23
-
 24
24
-
 25
25
-
 26
26
-
 27
27
-
 28
28
-
 29
29
-
 30
30
-
 31
31
-
 32
32
-
 33
33
-
 34
34
-
 35
35
-
 36
36
-
 37
37
-
 38
38
-
 39
39
-
 40
40
-
 41
41
-
 42
42
-
 43
43
-
 44
44
-
 45
45
-
 46
46
-
 47
47
-
 48
48
-
 49
49
-
 50
50
-
 51
51
-
 52
52
-
 53
53
-
 54
54
-
 55
55
-
 56
56
-
 57
57
-
 58
58
-
 59
59
-
 60
60
-
 61
61
-
 62
62
-
 63
63
-
 64
64


Rowenta VITALITY II Manual do proprietário
- Categoria
- Desumidificadores
- Tipo
- Manual do proprietário
- Este manual também é adequado para
em outras línguas
- español: Rowenta VITALITY II El manual del propietario
- français: Rowenta VITALITY II Le manuel du propriétaire
- italiano: Rowenta VITALITY II Manuale del proprietario
- Nederlands: Rowenta VITALITY II de handleiding
- Deutsch: Rowenta VITALITY II Bedienungsanleitung
Artigos relacionados
Outros documentos
-
Taurus ALPATEC DH101 Manual do proprietário
-
 Celcia MDT3-10DMN3 Manual do usuário
-
Tristar DH-5419 Manual do usuário
-
Becken BDH998 Desumidificador 16L Manual do proprietário
-
Master DH716 720 Manual do proprietário
-
-
Orbegozo DH 1240 Manual do proprietário
-
Suntec KLIMATRONIC DryFix 1200 Manual do usuário
-
-
Bionaire BD20S-BM Manual do proprietário
