next audiocom C6B Pro Premium BT Ceiling Speaker Manual do usuário
- Tipo
- Manual do usuário

USER MANUAL
MANUAL DO UTILIZADOR
Coluna de Teto BT Premium
Premium BT Ceiling Speaker
v202210
www.nextaudiogroup.com

www.nextaudiogroup.com
CONTENTS
INTRODUCTION
GENERAL DESCRIPTION -1-
UNPACKING -1-
PACKAGING CONTENTS -1-
SAFETY FIRST -1-
WARNINGS -1-
GETTING STARTED
C6B PRO OVERVIEW -2-
CONNECTIONS -2-
WIRELESS (BT) -2-
WIRED/STEREO SYSTEM -2-
REMOTE CONTROL -2-
HANDS-ON
INSTALLATION -3-
GENERAL CONSIDERATIONS -3-
PREPARATION -3-
INSTALLATION INSTRUCTIONS -3-
PROJECT/SERVICE
RECOMMENDED CEILING SPEAKERS SPACING -4-
TROUBLESHOOTING -4-
WARRANTY POLICY -4-
CORRECT DISPOSAL -4-
TECHNICAL SPECIFICATIONS -4-

www.nextaudiogroup.com
ÍNDICE
INTRODUÇÃO
DESCRIÇÃO GERAL -5-
DESEMBALANDO -5-
CONTEÚDOS DA EMBALAGEM -5-
SEGURANÇA EM PRIMEIRO LUGAR -5-
AVISOS -5-
PRIMEIROS PASSOS
VISÃO GERAL C6B PRO -6-
LIGAÇÕES -6-
SEM-FIOS (BT) -6-
ENTRADA POR CABO/SISTEMA STEREO -6-
CONTROLO REMOTO -6-
MÃOS À OBRA
INSTALAÇÃO -7-
CONSIDERAÇÕES GERAIS -7-
PREPARAÇÃO -7-
INSTRUÇÕES DE INSTALAÇÃO -7-
PROJETO/MANUTENÇÃO
ESPAÇAMENTO RECOMENDADO ENTRE COLUNAS DE TETO -8-
RESOLUÇÃO DE PROBLEMAS -8-
POLÍTICA DE GARANTIA -8-
DESCARTE CORRETO DO PRODUTO -8-
ESPECIFICAÇÕES TÉCNICAS -8-

INTRODUCTION
1NEXT Audiocom | C Series
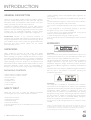
GENERAL DESCRIPTION
Thank you for purchasing a NEXT Audiocom C6B Pro speaker.
This user manual will provide you with useful and important
information about your equipment. Please devote some time
reading it and keep it at hand for future reference.
The C6B Pro is ideal for adding music to home, office, schools,
restaurants, or industrial environments. Offers a wide and uniform
dispersion as well as delivering high-quality sound over a greater
coverage area. An audiophile engineered crossover design
improves performance through a coaxial driver configuration.
ATTENTION! Because of the continuous evolution of
techniques and standards, NEXT Audiocom reserves the right to
change the specifications of its products without warning. For the
most updated version of this manual and general information
about this and other products, please visit our website
www.nextaudiocom.com.
UNPACKING
NEXT Audiocom’s products are built under strict quality
guidelines and supervision, according to the highest standards.
When unpacking your product, carefully examine it for any signs
of possible transit damage and inform your dealer immediately if
any such damage has occurred. It is suggested that you retain the
original packaging so that the product can be repacked in the
future when necessary. Please note that NEXT Audiocom and its
authorized distributors cannot accept any responsibility for
damage to any returned product using non-approved packaging.
PACKAGING CONTENTS:
• NEXT Audiocom C6B Pro MASTER
• NEXT Audiocom C6B Pro SLAVE
• Remote Control
• Power Adaptor
• Installation Tool
• Cutout Template
• User Manual
SAFETY FIRST
Please take some time to review the following statements
concerning safe use of your NEXT Audiocom C6B Pro.
• Read these instructions
• Keep these instructions
• Heed all warnings
• Follow all instructions
• Use the equipment only for its intended purpose as instructed
in this manual
• Before installing, observe the applicable safety regulations for
your country
• Always check if the equipment is installed securely and will not
fall
• Never install close to ignition or heat sources such as radiators,
ovens or any other apparatus that produce heat.
• Do not use or install the equipment near water or exposed to
rain
• If the equipment is not functioning properly or has been
damaged in any way, switch it off immediately
• Do not open or try to service the equipment. It may only be
repaired by authorized, qualified personnel
• Clean the equipment using only a clean dry cloth
• Do not operate the unit for an extended period with the sound
distorting
WARNINGS
CAUTION:
Never remove the cover, because otherwise there may be a risk
of electric shock. There are no user serviceable parts inside. Have
repairs carried out only by qualified service personnel.
The lightning flash with arrowhead symbol within an equilateral
triangle is intended to alert the user to the presence of
uninsulated “dangerous voltage” within the product’s enclosure
that may be of sufficient magnitude to constitute a risk of electrical
shock.
The exclamation mark within an equilateral triangle is intended to
alert the user to the presence of important operating and
maintenance instructions.
CAUTION:
This equipment is intended for professional use. Therefore,
commercial use of this equipment is subject to the respectively
applicable national accident prevention rules and regulations. As a
manufacturer, NEXT Audiocom is obligated to notify you
formally about the existence of potential health risks. Hearing
damage due to high volume and prolonged exposure: When in
use, this product is capable of producing high sound-pressure
levels (SPL) that can lead to irreversible hearing damage in
performers, employees, and audience members.
For this reason, avoid prolonged exposure to volumes in excess
of 90dB.
Hereby, CVA ELECTRONICA, LDA declares that this equipment type is in
compliance with the mandatory directives for the CE certification. The full text of
the EU declaration of conformity is available at the following internet address:
www.nextaudiogroup.com/en/apoio-ao-cliente/downloads

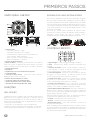
C6B PRO OVERVIEW
1. LED Indicator
Steady Red – Power On
Flashing Red – On Standby
Flashing Blue – Bluetooth waiting
Steady Blue – Bluetooth connected
Steady Purple – RCA connector is present
Flashing White – Resetting
2. IR Receiver
3. Reset Button - Long press to reset the speaker to factory
settings. When the process is completed there will be a tone
signal and the speaker will restart.
4. Pivoting Tweeter
5. Woofer
6. Built-in Amplifier and BT Driver
7. RCA plugs
8. Mono/Stereo Switch - Switch to Stereo when the Slave
speaker is connected.
9. Half/Full Power Selector
10. Easy Install Dog Leg Fixings
11. Slave Speaker Output
12. Power Inlet (DC 24V/2.5A)
CONNECTIONS
WIRELESS (BT)
Ensure the C6B Pro is connected to the power supply and turned
on. About 10 seconds after the speaker is powered on, the LED
indicator starts flashing blue. This indicates the C6B Pro is ready
to pair. Once successfully paired the LED turns solid blue.
1. Turn on BT on your player and search for devices
2. Click “NEXT C6B PRO” to pair with your speaker - PIN
“2020”
NOTE: Only one device can be paired at a time.
GETTING STARTED
2
NEXT Audiocom | C Series
WIRED INPUT/STEREO SYSTEM
To connect to devices that do not have wireless capability use the
RCA inputs. Ensure the C6B Pro is not paired through BT.
Bluetooth is prioritized over RCA inputs if connected
simultaneously. If this is the case, switch off Bluetooth on the
paired device and wait for about 10 seconds. The wired input
mode will be activated, and the LED will turn solid purple.
To create a stereo system (Pair) you will need the C6B Pro Slave
speaker. Connect it to the phoenix connector on the Master C6B
Pro and slide the “mono-stereo” switch (8) to the stereo
position. Ensure the connection polarity is correct.
REMOTE CONTROL
a. Power On/O - Press to turn the C6B Pro On or Off
b. Mute - Press to mute, press again to unmute
c. Volume Control - Press “+” to increase or “–“ to decrease the
volume. Speaker will beep when max/min volume is reached
d. Treble Control - Press “+” to increase high frequency response
or ”–“ to decrease it. The C6B Pro will play a beep when it
reaches either maximum or minimum levels
e. Bass Control - Press “+” to increase low frequency response
or ”–“ to decrease it. The C6B Pro will play a beep when it
reaches either maximum or minimum levels
f. Balance control - With the switch on stereo position
(mandatory), press the left or right button to balance the sound
between left and right speakers
g. Reset/Sound Eects (On Bluetooth Connection Only) -
Short press to select sound effects: Classical, Vocal Enhance, Flat,
Bass Enhance, Bass Cut, Treble Enhance, Treble Cut, Pop, Rock
or Jazz. Long press to resume the C6B Pro to the default settings
(Volume (26), Flat, Treble/Bass (0) and Balance (0)).
h. Previous (On Bluetooth Connection Only) - Short press to
play the previous track
i. Next - Short press to play the next track
j. Play/Pause - Short press to play or pause the selected track
Note: The customized volume and sound effects settings will not
be saved if the C6B Pro is unplugged from the mains directly
without powering off from the remote control first. The remote
control is powered by a CR2025 lithium battery.

HANDS-ON
3NEXT Audiocom | C Series
INSTALLATION
GENERAL CONSIDERATIONS
The NEXT Audiocom C6B Pro loudspeaker is equipped with
specially designed dog leg fixings that enable a safe and easy
installation of the speaker on walls and ceilings with a thickness
between 7 and 20mm. With the C6B Pro is supplied a template
for the cutout, and when installing the wires ensure that you leave
a minimum 30cm surplus wire to facilitate connection and work
in general. This will also prevent pulling the wires in case there is
need to take the speaker out for repair or other purposes.
PREPARATION
Listed below is the hardware equipment needed to install the
C6B Pro.
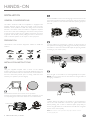
INSTALLATION INSTRUCTIONS
Using the supplied template make a cutout on the desired
location. Make sure you picked a structurally reliable location. The
cutout hole should be 210mm in diameter. Use the stud finder to
check for obstruction present prior to cutting. Install the wires
necessary for operation (Power+Signal).
Ensure all the switches are on their correct positions.
Connect the power adapter and RCA cables (if required) to the
corresponding parts. Ensure the cables are not overstretched.
Use the installation tool to arm the dog legs. Insert the tool on the
four holes, and push it inwards. The dog legs must be retracted to
allow the speaker to enter the hole. Insert the speaker gently into
the hole.
Lock the C6B Pro by pressing the 4 buttons on the front face of
the speaker and the dog legs will engage automatically. Check that
the C6B Pro is secure and will not fall. Adjust the pivoting tweeter
according to your needs (±10°).
Place the grill on the C6B Pro, it will magnetically fit into place.
NOTE: The logo badge can be removed from the grill, without
damaging, if needed.
TIPS:
• Before placing the grille on the speaker, it can be painted to
match the room decoration. Remove the grille’s inside fabric
before painting. Use a Latex or oil-based paint. Spray thinly to
ensure the grille holes are not blocked as this will have a negative
impact on the sound quality.
NOTE: NEXT Audiocom is not responsible for the quality of adhesion or finish of
non-factory-applied paints.
Pencil
Ladder
Power adapter

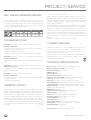
REC. CEILING SPEAKERS SPACING
When making a project for C6B Pro, as a rule of thumb, you can
use the following table to discover the speaker to speaker spacing
according to the ceiling’s height and project’s budget. Obviously
the low budget solution will not be so efficient, in terms of
coverage, as the higher budget solutions.
TROUBLESHOOTING
Problem: The C6B Pro has not been found during BT pairing
Action to Solution:
- Check the power cord is correctly connected to the speaker
- Check the LED is flashing blue
- Restart the system and try again
- Press reset button on the front of the speaker and try again
Problem: Unable to reconnect to a previously connected device
Action to Solution:
- Remove the C6B Pro from the list of your paired devices and try
again
Problem: Device is connected to C6B Pro but there is no sound
Action to Solution:
- Ensure your device volume is not muted. Increase the volume or
try with another device
Problem: The C6B Pro Slave is not working
Action to Solution:
- Check the connection wires are correctly fitted into both Master
and Slave speakers
- Replace the cables/wires
WARRANTY POLICY
NEXT Audiocom products are warranted, by NEXT Audiocom,
against manufacturing defects in materials or craftsmanship over a
period of 2 years counting from the date of original purchase for
final costumer. The original receipt of purchase is mandatory for
warranty validation purposes, and the product must have been
bought from a NEXT Audiocom authorized dealer. The warranty
can be transferred to a subsequent owner during the warranty
period, however, this cannot extend the warranty period beyond
the original warranty period of two years from the original date of
purchase stated
PROJECT/SERVICE
4
NEXT Audiocom | C Series
on the NEXT Audiocom’s invoice.
During the warranty period NEXT Audiocom will, at its own
discretion, either repair or replace a product which prove to be
defective provided that the product is returned in its original
packaging, shipping prepaid, to an authorized NEXT Audiocom
service agent or distributor.
NEXT Audiocom cannot be held responsible for defects caused
by unauthorized modifications, improper use, negligence,
exposure to inclement weather conditions, act of God or
accident, or any use of this product that is not in accordance with
the instructions provided by this manual and/or NEXT Audiocom.
NEXT Audiocom is not liable for consequential damages. This
warranty is exclusive, and no other warranty is expressed or
implied.
This warranty does not affect your statutory rights.
CORRECT DISPOSAL
When the C6B Pro is to be definitively discarded, take the
product to a local recycling plant for a disposal which is not
harmful to the environment. This equipment should not be
treated as general household waste.
Devices marked with this symbol must not be disposed of as
household waste. For more information, please contact your
retailer or local authorities.
TECHNICAL SPECIFICATIONS
Product Type: 2-Way BT Premium Ceiling Speakers
Frequency Response (-6dB): 62Hz - 20kHz
Nominal Coverage: 100° Conical
RMS Power: 60W
Program Power: 120W
Nominal Impedance: 8Ω (C6B Pro Slave)
Maximum SPL (Calculated): 107.8dB (2 Coupled Speakers)
LF Driver: 6.5" Polypropylene Cone Woofer
HF Driver: 0.75" Pivoting (±10°) Silk Dome Tweeter
Audio Signal Input: Stereo Bluetooth V5.0 aptX and 2 x RCA
Input Connectors: Gold Plated Binding Posts (Slave Speaker)
Special Features: Tool Free Install, Remote Control, 50% Level
Limiter, Mono-Stereo Switch
DSP Presets: 10 Presets
Wireless Connection System: BT v5.0 aptX LL
Wireless Range: >10m (32.8ft)
Grille: White Frameless Magnetic Grill (Paintable)
Dimensions (Ø x D): 234 x 105mm (9.21 x 4.1”)
Cutout Diameter: 209mm (8.2”)
Mounting Depth: 102mm (4”)
Wall/Ceiling Thickness: 7 to 20mm (0.28 to 0.79”)
Net Weight: Master - 1.5kg (3.3lb) | Slave - 1.5kg (3.3lb)
Shipping Weight: 4.5kg (9.9lb)
Accessories: Black Frameless Magnetic Grill

DESCRIÇÃO GERAL
Obrigado por ter adquirido uma C6B Pro da NEXT Audiocom.
Este manual do utilizador fornecer-lhe-á informações úteis e
importantes sobre o seu equipamento. Por favor, dedique algum
tempo a lê-lo e mantenha-o à mão para referência futura.
A C6B Pro é ideal para adicionar música à sua casa ou escritório,
a escolas, restaurantes ou ambientes industriais. Oferece uma
dispersão ampla e uniforme, bem como som de alta qualidade. O
crossover projetado por audiófilos melhora o desempenho
através de uma configuração coaxial dos transdutores. Usa um
altifalante de cone de polipropileno de 6,5" que fornece uma
resposta precisa emparelhado com um tweeter de 1" que produz
agudos com definição e clareza.
ATENÇÃO! Devido à evolução contínua de técnicas e padrões,
a NEXT Audiocom reserva-se o direito de alterar as
especificações dos seus produtos sem aviso prévio. Para obter a
versão mais atualizada deste manual e informações gerais sobre
este e outros produtos, visite o nosso website
www.nextaudiocom.com.
DESEMBALANDO
Os produtos NEXT Audiocom são construídos sob rigorosas
diretrizes de qualidade e supervisão, de acordo com os mais
elevados padrões. Ao desembalar o seu produto, examine
cuidadosamente se há sinais de possíveis danos de trânsito,
informe imediatamente o seu revendedor se ocorreram tais
danos. Sugere-se que mantenha a embalagem original para que o
produto possa ser embalado novamente no futuro, quando e se
necessário. Por favor note que a NEXT Audiocom e os seus
distribuidores autorizados não podem aceitar responsabilidade
por danos em qualquer produto devolvido usando embalagem
não aprovada.
CONTEÚDOS DA EMBALAGEM:
• NEXT Audiocom C6B Pro MASTER
• NEXT Audiocom C6B Pro SLAVE
• Controlo Remoto
• Fonte de Alimentação
• Ferramenta de Instalação
• Modelo de Corte
• Manual do Utilizador
SEGURANÇA EM PRIMEIRO LUGAR
Por favor, dedique algum tempo para rever as seguintes
declarações relativas à utilização segura da sua C6B Pro.
• Leia estas instruções
• Guarde estas instruções
• Preste atenção a todos os avisos
• Siga todas as instruções
• Utilize o equipamento apenas para o fim a que se destina,
conforme instruído neste manual
• Ao instalar, respeite as normas de segurança aplicáveis para o
seu país
• Verifique sempre se o equipamento está instalado de forma
segura
• Nunca instale perto de fontes de ignição ou de calor, tais como
radiadores, fornos ou qualquer outro aparelho que produza calor
• Não utilize nem instale o equipamento perto de água ou
exposto à chuva
• Se o equipamento não estiver a funcionar corretamente ou
tiver sido danificado de alguma forma, desligue-o imediatamente
• Limpe o equipamento usando apenas um pano limpo e seco
• Não opere a unidade por um período prolongado com o som
em distorção
AVISOS
CUIDADO:
Nunca remova a tampa, caso contrário, pode haver risco de
choque elétrico. Não existem peças reparáveis no interior. As
reparações devem ser realizadas apenas por pessoal de serviço
qualificado.
O símbolo de relâmpago com ponta de seta dentro de um
triângulo equilátero tem como objetivo alertar o utilizador sobre
a presença de "tensão perigosa" não isolada dentro do invólucro
do produto, que pode ser de magnitude suficiente para constituir
um risco de choque elétrico.
O ponto de exclamação dentro de um triângulo equilátero tem o
objetivo de alertar o usuário sobre a presença de instruções
importantes de operação e manutenção.
CUIDADO:
Este equipamento destina-se ao uso profissional. Portanto, o uso
comercial deste equipamento está sujeito às regras e
regulamentos nacionais aplicáveis de prevenção de acidentes.
Como fabricante, a NEXT Audiocom é obrigada a notificá-lo
formalmente sobre a existência de potenciais riscos à saúde.
Danos à audição devido a alto volume e exposição prolongada:
Quando em uso, este produto é capaz de produzir altos níveis de
pressão sonora (SPL) que podem levar a danos auditivos
irreversíveis em artistas, funcionários e membros da audiência.
Por esse motivo, evite a exposição prolongada a volumes acima
de 90dB.
INTRODUÇÃO
5NEXT Audiocom | C Series
Por este meio, a CVA ELECTRONICA, LDA declara que este tipo de
equipamento está em conformidade com as diretivas necessárias à certificação
CE. O texto completo da declaração de conformidade da UE está disponível no
seguinte endereço: www.nextaudiogroup.com/pt/apoio-ao-cliente/downloads

PRIMEIROS PASSOS
6
NEXT Audiocom | C Series
VISÃO GERAL C6B PRO
1. Indicador LED
Vermelho constante – Ligada
Vermelho intermitente - em “standby”
Azul intermitente - Bluetooth em emparelhamento
Azul constante - Bluetooth ligado
Roxo constante – Conector RCA presente
Branco intermitente – A reiniciar
2. Recetor de Infravermelhos
3. Botão de Reset - Mantenha pressionado até o LED passar a
branco para repor as definições de fábrica. Quando o processo
estiver concluído, haverá um sinal de tom e a C6B Pro reiniciará.
4. Tweeter Orientável
5. Altifalante
6. Amplificador com controlador BT incorporado
7. Conectores RCA
8. Interruptor Mono/Stereo - Mude para Stereo quando o
altifalante “Slave” estiver conectado.
9. Seletor de Potência (50% ou Total)
10. Grampos rápidos de instalação fácil
11. Saída de potência para coluna “Slave”.
12. Entrada de alimentação (DC 24V/2.5A)
LIGAÇÕES
SEM-FIOS (BT)
Certifique-se de que a C6B Pro está conectada à alimentação e
ligada. Cerca de 10 segundos após ligar, o indicador LED irá
acender intermitentemente em cor azul. Isto indica a C6B Pro
está pronta para emparelhar. Uma vez emparelhada com sucesso,
o LED passa a azul constante.
1. Ligue o BT no seu reprodutor e procure dispositivos
2. Clique em "NEXT C6B PRO" para emparelhar - PIN "2020"
NOTA: Apenas pode emparelhar um dispositivo de cada vez.
ENTRADA POR CABO/SISTEMA STEREO
Para conectar dispositivos que não têm capacidade de ligação
sem-fios, utilize as entradas RCA. Certifique-se de que a C6B Pro
não está emparelhada através de BT. O Bluetooth tem prioridade
sobre as entradas RCA se ligado simultaneamente. Se for este o
caso, desligue o Bluetooth do dispositivo emparelhado e aguarde
cerca de 10 segundos. O modo de sinal cablado ativará e o LED
irá acender roxo sólido.
Para criar um sistema stereo necessitará da C6B Pro Slave.
Conecte-a no conector Phoenix da C6B Pro Master e deslize o
interruptor "mono-stereo" (8) para a posição stereo.
Certifique-se de que a polaridade da ligação está correta.
CONTROLO REMOTO
a. Ligar/Desligar - Prima para ligar ou desligar a C6B Pro
b. Mute - Pressione para silenciar, pressione novamente para
desativar
c. Controlo de Volume - Prima "+" para aumentar o volume ou
"-" para diminuir o volume. A C6B Pro reproduzirá um sinal
sonoro quando atingir o volume máximo ou mínimo
d. Controlo de Agudos - Pressione "+" para aumentar a resposta
de agudos ou "-" para diminuir. A C6B Pro emitirá um sinal
sonoro quando atingir níveis máximos ou mínimos
e. Controlo de Graves - Pressione "+" para aumentar a resposta
de graves ou "-" para diminuir. O C6B Pro emitirá um sinal
sonoro quando atingir níveis máximos ou mínimos
f. Controlo de Panorâmica - Com o interruptor na posição
stereo (obrigatório), pressione o botão esquerdo ou direito para
equilibrar o som entre os altifalantes esquerdo e direito
g. Reset/Efeitos (Apenas Bluetooth) - Prima para selecionar os
efeitos sonoros. (1)Clássico, (2)Realce Vocal, (3)Flat, (4)Realce de
Graves, (5)Corte de Graves, (6)Realce de Agudos, (7)Corte de
Agudos, (8)Pop, (9)Rock, (10)Jazz.
Pressione alguns segundos para repor as definições de fábrica.
(Volume 26, Flat, Agudos/Graves a 0 e Panorâmica 0).
h. Anterior - Pressione para tocar a faixa anterior
i. Próximo - Pressione para tocar a próxima faixa
j. Reprodução/Pausa - Prima para reproduzir ou fazer uma
pausa na faixa selecionada
Nota: As definições personalizadas de volume e efeitos sonoros
não serão guardadas se a C6B Pro for desligada diretamente sem
desligar primeiro no telecomando. O telecomando é alimentado
por uma bateria de lítio CR2025.

MÃOS À OBRA
7NEXT Audiocom | C Series
INSTALAÇÃO
CONSIDERAÇÕES GERAIS
A C6B Pro da NEXT Audiocom está equipada com grampos
rápidos de fixação fácil especialmente concebidos que permitem
uma instalação segura e fácil da C6B PRO, em paredes e tetos
falsos com uma espessura entre 7 e 20mm. Com a C6B Pro é
fornecido um modelo para o recorte, e ao instalar os fios
certifique-se de que deixa um fio excedentário mínimo de 30cm
para facilitar a ligação e o trabalho em geral. Isto também evitará
puxar os fios em caso de necessidade de retirar a coluna para
reparação ou outros fins.
PREPARAÇÃO
Listado abaixo está o equipamento necessário para instalar a C6B
Pro.
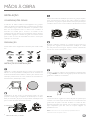
INSTRUÇÕES DE INSTALAÇÃO
Utilizando o modelo fornecido faça um recorte com 210mm de
diâmetro no local pretendido. Certifique-se de ter escolhido um
local estruturalmente fiável. Utilize o detetor para verificar se há
obstrução presente antes do corte. Instale os fios necessários ao
funcionamento (alimentação e sinal).
Certifique-se de que todos os interruptores estão nas suas
posições corretas. Ligue o adaptador de alimentação e os cabos
RCA (se necessário) às peças correspondentes. Certifique-se de
que os cabos não estão demasiado esticados.
Utilize a ferramenta de instalação para armar os grampos rápidos.
Insira a ferramenta em cada um dos quatro orifícios e empurre
para dentro. Os grampos rápidos devem retrair para permitir que
a C6B Pro entre no furo. Insira a C6B Pro suavemente no buraco.
Bloqueie a C6B Pro premindo os 4 botões na face frontal e os
grampos irão engatar-se automaticamente. Verifique se a C6B
Pro está presa de forma segura. Ajuste o tweeter orientável de
acordo com as suas necessidades (±10°).
Coloque a grelha na C6B Pro, que irá bloquear magneticamente
no lugar. NOTA: O emblema do logótipo pode ser removido da
grelha sem a danificar, se necessário.
DICAS:
• Antes de colocar a grelha na coluna, ela pode ser pintada para
combinar com a decoração da sala. Remova o tecido interno da
grelha antes de pintar. Use tinta de látex ou à base de óleo.
Pulverize levemente para garantir que os orifícios da grelha não
sejam bloqueados, pois isso terá um impacto negativo na
qualidade do som.
NOTA: A NEXT Audiocom não se responsabiliza pela qualidade de adesão ou
acabamento dos tintas não aplicadas na fábrica.
Fonte Alimentação

PROJETO/MANUTENÇÃO
8
NEXT Audiocom | C Series
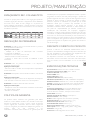
ESPAÇAMENTO REC. COLUNAS TETO
Ao fazer um projeto para a C6B Pro, como regra geral, pode usar
a tabela a seguir para descobrir o espaçamento entre altifalantes
de acordo com a altura do teto (Heigth) e o orçamento do
projeto (Budget). Obviamente, a solução de baixo orçamento
não será tão eficiente, em termos de cobertura, como as soluções
de elevado orçamento.
RESOLUÇÃO DE PROBLEMAS
Problema: A C6B Pro não foi encontrada durante o processo
de emparelhamento Bluetooth
Ação para a Solução:
- Verifique se o cabo de alimentação está conectado
corretamente ao altifalante.
- Verifique se o LED está a piscar em azul
- Reinicie o sistema e tente novamente
- Pressione o botão reset na frente do altifalante e tente
novamente
Problema: Não foi possível reconectar a um dispositivo
conectado anteriormente
Ação para a Solução:
- Remova a C6B Pro da lista dos seus dispositivos emparelhados
e tente novamente
Problema: O dispositivo está conectado à C6B Pro, mas não há
som
Ação para a Solução:
- Certifique-se de que o volume do seu dispositivo não esteja em
mute. Aumente o volume ou tente com outro dispositivo
Problema: A C6B Pro Slave não está a funcionar
Ação para a Solução:
- Verifique se os fios de conexão estão encaixados corretamente
nas colunas Master e Slave
- Substitua os cabos/fios
POLÍTICA DE GARANTIA
Os produtos NEXT Audiocom são garantidos, pela NEXT
Audiocom, contra defeitos de fabrico em materiais ou execução
durante um período de 2 anos a contar a partir da data de
compra original para consumidor final. O recibo original de
compra é obrigatório para efeitos de validação da garantia, e o
produto deve ter sido comprado a um
revendedor autorizado NEXT Audiocom. A garantia pode ser
transferida para um proprietário subsequente durante o período
de garantia, no entanto, esta não pode prolongar o período de
garantia original de dois anos a partir da data original de compra
indicada na fatura. Durante o período de garantia, a NEXT
Audiocom reparará ou substituirá um produto que se revele
defeituoso desde que o produto seja devolvido na sua
embalagem original, enviando pré-pago, a um agente ou
distribuidor autorizado NEXT Audiocom. A NEXT Audiocom
não pode ser responsabilizada por defeitos causados por
modificações não autorizadas, uso impróprio, negligência,
exposição a condições meteorológicas inclementes, ato de Deus
ou acidente, ou qualquer utilização deste produto que não esteja
de acordo com as instruções fornecidas por este manual e/ou a
NEXT Audiocom. A NEXT Audiocom não se responsabiliza por
danos consequentes. Esta garantia é exclusiva e nenhuma outra
garantia está expressa ou implícita. Esta garantia não elimina os
seus direitos legais.
DESCARTE CORRETO DO PRODUTO
Quando a C6B Pro for descartada definitivamente, leve o
produto a uma unidade de reciclagem local para um descarte que
não seja prejudicial ao meio ambiente. Este equipamento não
deve ser tratado como lixo doméstico geral.
Os dispositivos marcados com este símbolo não devem ser
descartados como lixo doméstico. Para obter mais informações,
entre em contato com seu revendedor ou com as autoridades
locais.
ESPECIFICAÇÕES TÉCNICAS
Tipo de Produto: Colunas de Teto 2 Vias BT Premium
Frequência de Resposta (-6dB): 62Hz - 20kHz
Cobertura Nominal: 100° Cónica
Potência RMS: 60W
Potência Nominal: 120W
Impedância Nominal: 8Ω (C6B Pro Slave)
SPL Máximo (Calculado): 107.8dB (2 Altifalantes Acoplados)
Altifalante Graves: Altifalante 6.5” c/ Cone de Polipropileno
Tweeter: Tweeter de 0.75" Ajustável (±10°) Cúpula de Seda
Entrada de Sinal Áudio: Bluetooth Stereo V5.0 aptX e 2 x
RCA
Conectores de Entrada: Bornes Ligação Banhados Ouro
Funcionalidades Especiais: Instalação sem Ferramenta,
Controlo Remoto, Limitador, Interruptor Mono-Stereo
Presets DSP: 10 Presets
Sistema de Ligação sem Fios: BT V5.0 aptX LL
Alcance sem Fios: >10m (32.8ft)
Grelha: Grelha Mágnetica sem Aro Branca (Pintável)
Dimensões (Ø x P): 234 x 105mm (9.21 x 4.1”)
Diâmetro do Furo de Corte: 209mm (8.2”)
Profundidade Útil do Furo: 102mm (4”)
Espessura da Parede/Teto: 7 a 20mm (0.28 a 0.79”)
Peso Líquido: Master - 1.5kg (3.3lb) | Slave - 1.5kg (3.3lb)
Peso Bruto: 4.5kg (9.9lb)
Acessórios: Grelha Mágnetica sem Aro Preta

-
 1
1
-
 2
2
-
 3
3
-
 4
4
-
 5
5
-
 6
6
-
 7
7
-
 8
8
-
 9
9
-
 10
10
-
 11
11
-
 12
12


next audiocom C6B Pro Premium BT Ceiling Speaker Manual do usuário
- Tipo
- Manual do usuário
em outras línguas
Artigos relacionados

Outros documentos
-
WEG SSW900-PT100-W Instruções de operação
-
Next MX350 Manual do usuário
-
Hitachi RAC-18GH5 Manual do usuário
-
Roland FC-300 Manual do usuário
-
Socomec DIRIS A80 Instruções de operação
-
Philips DVP3350V/01 Manual do usuário
-
Philips DVP3055V/01 Manual do usuário
-
-
Behringer PK110A Guia rápido
-
Behringer B15X Guia rápido