Infiniton HSM-83NC60 Manual do proprietário
- Categoria
- Microondas
- Tipo
- Manual do proprietário

MINI OVEN
INSTRUCTION MANUAL
MODEL NO.: HSM-81C60B
HSM-83NC60
Please read this manual carefully before use.
HOUSEHOLD USE ONLY

1
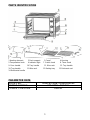
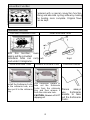
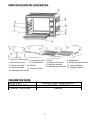
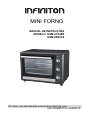
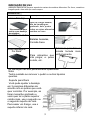
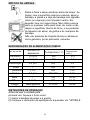
PARTS IDENTIFICATION
1.Heating element
2.Rack support
3.Panel
4.Housing
5.Temperature knob
6.Indicatro light
7. Switch knob
8. Timer knob
9. Door handle
10.Tray handle
11. Wire rack
12. Tray handle
10.Tray handle
11.Wire rack
12.Baking tray
13.Rotisserie set
14.Rotisserie handle
PARAMETER DATA
MODEL NO.
HSM-81C60B / HSM-83NC60
POWER SUPPLY
220-240V~ 50/60Hz
POWER CONSUME
2000W

2
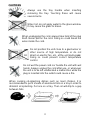
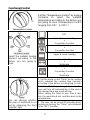
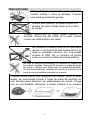
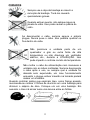
CAUTIONS
Always use the tray handle when inserting
removing the tray. Touching these will cause
severe burns.
When hot, do not apply water to the glass window.
It may cause the glass to break.
When unplugging the cord, always take hold of the plug
itself. Never pull on the cord. Doing so could break the
wires inside the cord.
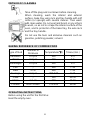
Do not position the unit close to a gas burner or
other source of high temperature or do not
direct an electric fan, etc, at the unit during USE.
Doing so could prevent correct temperature
control.
Do not wet the power cord nor handle the unit with wet
hands. Always unplug the cord after use, or whenever
the unit is to be left unattended a malfunction while the
plug is inserted into the outlet could cause a fire.
When cooking oil-splashing dishes such as roast chicken, it is
recommended to put 2 sheets of aluminum foils on a tray in order to
diminish oil splashing. Put one on a tray. Then oil will drip to a gap
between foils.

3
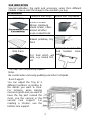
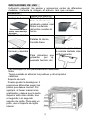
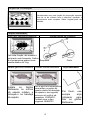
USE INDICATION
Special indication: the parts and accessory varies from different
models. Please refer the image to the real item you buy.
Accessories
Food(For Ref. only)
How to use Tray Handle
Bake Tray
*Recommended to use
it as crumb tray.
Roast Chicken
Wings, Hamburg
steak, Gratin, Cake,
almost all other
oven-cooked foods
Wire Rack
Baked potatoes, Dry
food
Bake Tray and
Wire Rack
For food which will
drip, e.g. boiled fish,
etc.
Rotisserie to make the
food toasted more
evenly
The trays are not perfectly square.
Note:
Be careful when removing pudding and other hot liquids.
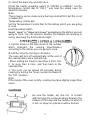
Rack Support
You can adjust the Tray at 3
different positions according to
the dishes you want to cook.
For instance, when making
macaroni gratin and you want to
have the top part cooked the
most, use the second or the
second rack support. For
roasting a chicken, use the
bottom rack support.

4
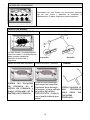
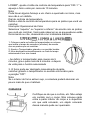
Convection Function
Featured with a special convection function,
strong and absolute cycling airflow by making
the heating more complete. Original flavor
can be kept.
Rotisserie Function
Use with Rotisserie Forks Install Rotisserie Forks
With this function, even
baking will be provided.
Rotisserie forks can carry
food under 3 kilograms. Left Right
Install Rotisserie Forks Remove Rotisserie Forks Rotisserie Handle
Install the Rotisserie Forks
to the rotisserie hole, and
then put it to the rotisserie
tray.
Use Rotisserie Handle to
take out the Rotisserie
Forks from the rotisserie
tray, and then remove it
from the rotisserie hole.
CAUTION: Beware of HOT
dripping oil!
Please always
use Rotisserie
Handle to take
out the Rotisserie
Forks.

5
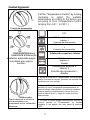
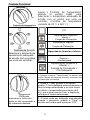
Functional Control
Temperature Control
Set the “Temperature Control” by turning
clockwise to select the suitable
temperature according to the dishes you
are going to cook. (Temperature Control
ranging from 90℃ to 230℃)
Function Control
Select the suitable heating
element according to the
dishes you are going to
cook.
OFF
Upper & Lower Heating
+
Convection Function
Upper Heating
+
Convection Function
Upper & Lower Heating
Upper Heating
+
Rotisserie
Upper & Lower Heating
+
Convection Function
+
Rotisserie
Timer
You can observe whether
the oven is switched on or
not by observing the front
Indicator light.
1. Set the arrow on the “Timer” to the number
which indicates the cooking time (minutes)
according to the dishes you are going to cook.
2. Set the “Timer” by turning it clockwise. The
oven will turn off automatically at the end of
the selected time and a bell will ring.
When setting the Timer to less than 5 min,
turn it to more than 6 min. and then back to the
selected time.
3. The oven can be turned off manually during
cooking by turning the “Timer” anti-clockwise
to the "OFF" position.

6
METHOD OF CLEANING
Take off the plug and cool down before cleaning.
When cleaning, wash the interior and exterior
surface, bake tray, wire rack and tray handle with soft
cotton (or sponge) with neutral cleaner. Then wash
with clean water. Do not use hard brush or any others
to wash, so as not to scrape the interior surface of the
oven, and to protector of the bake tray, the wire rack
and the tray handle.
Do not use the toxic and abrasive cleaners such as
gasoline, polishing powder, solvent.
BAKING REFERENCE OF COMMON FOOD
Type of food Number or
thickness Temperature(℃) Timer«(min.)
Sandwich 2-3 pcs 200 2-3
Toast 2-4 pcs 230 2-5
Hamburger 2-3 pcs 200 3-5
Fish / 200 7-10
Ham 2 cm 200 7-12
Sausage 3-4 pcs 200-230 8-10
Cake / 150 20-30
Steak 1-2 cm 230 10-15
Chicken Half chicken 175-200 30-40
OPERATING INSTRUCTIONS
Before using the unit for the first time:
Heat the empty oven.

7
(1) Insert the bake tray and wire rack.
(2)Set the heater operating switch to "UPPER & LOWER", set the
temperature control dial to "230℃" and heat the empty oven for
about 10 minutes.
Note:
There may be some smoke and a burning smell at first, but this is not
a malfunction.
Temperature control dial
Set the Temperature Control Dial for the dishes which you are going
to cook
Heat Operating Switch
Select “upper” or "Upper and Lower" according to the dishes you are
going to cook. You can observe whether the heaters are working or
not by observing the front Indicator light.
1. Set the arrow on the timer knob to the number
which indicates the cooking time(minutes)
according to the dishes you are going to cook.
2. Set the Timer by turning it clockwise.
The oven will turn off automatically at the end of
the selected time and a bell will ring
•When setting the Timer to less than 5 mins, turn
it to more than 6 mins. and then back to the
selected time
3. The oven can be turned off manually during
cooking by turning the Timer counter-clockwise to
the "0FF" position.
Note:
If the inside of the oven is dirty, cooking may take slightly longer than
usual.
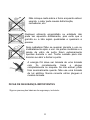
CAUTIONS
Be sure the curtain, etc. Are not in contact
with the body Do not put anything between the
bottom of the body and the surface on which it
is set, an object so placed could be burned.

8
Do not put anything on the oven while using it, the
heat could cause deformation, cracking, etc.
Any bottled or tinned food can not be heated directly
as prevent the bottle or tin would be broken out and
scald the person.
Be careful! Not to burn yourself during use or
immediately after use. The metal parts and glass
window of the door become extremely hot during
use. Be careful not to touch them when opening and
closing the door.
AC power must be taken from a properly wired
outlet. Insert the plug completely into the socket. If
it is not, it could become abnormally hot. Do not
use an electric light outlet. Never connect multiple
plugs to the same outlet.
IMPORTANT SAFEGUARDS
Follow basic safety precautions, including:

9
1. Read all instructions.
2. Do not touch hot surfaces. Use handles or knobs.
3. To protect against risk of electrical shock, do not immerse cord, plugs or cooking unit
in water or other liquid.
4. Close supervision is necessary when any appliance is used by or near children.
5. The appliance is not intended for use by young children or infirm persons without
supervision.
6. Young children should be supervised to ensure that they do not play with the
appliance.
7. Unplug from outlet when not in use and before cleaning. Allow to cool before
putting on or taking off parts and before cleaning the appliance.
8. Do not operate any appliance with a damaged cord or plug or after the appliance
malfunctions, or is dropped or damaged in any manner. Return appliances to the
nearest authorized service facility for examination, repair, electrical or mechanical
adjustment.
9. The use of accessory attachments, not recommended or sold by the appliance
manufacturer, may cause hazards.
10. Do not use outdoors.
11. Do not allow the cord to hang over the edge of a table or counter, or touch hot
surfaces.
12. Do not place on or near a hot gas or electric burner, or in a heated oven.
13. Extreme caution must be used when moving an appliance containing hot oil or
other hot substances.
14. To disconnect, remove plug from wall outlet.
15. Do not use appliance other than for its intended use.
16. If the external flexible cable or cord of this appliance is damaged, it shall be
exclusively replaced by the manufacture or his service agent or a similar qualified
person in order to avoid a hazard.
17. This appliance is not intended for use by persons (including children) with reduced
physical, sensory or mental capabilities, or lack of experience and knowledge, unless
they have been given supervision or instruction concerning use of the appliance
by a person responsible for their safety. Children should be supervised to ensure
that they do not play with the appliance.
18. This appliance is not intended to be operated by means of an external timer or
separate remote-control system.
19. This appliance is for household use only.
20. No user-serviceable parts inside. Refer servicing to qualified service
personnel.
21. A short power-supply cord is provided to reduce the hazards resulting from
entanglement or tripping over a long cord. An extension cord may be used with care,
however, the marked electrical rating should be at least as great
as the electrical rating of this appliance. The extension cord should not be
allowed to drape over the counter or tabletop where it can be pulled by
children or tripped over.
22. This appliance can be used by children aged from 8 year and above and
persons with reduced physical, sensory or mental capabilities or lack of
experience and knowledge if they have been given supervision or
instruction concerning use of the appliance in a safe way and understand
the hazards involved. Cleaning and user maintenance shall not be made by
children unless they are older than 8 and supervised. This appliance and its
cord must be kept out of reach of children less than 8 years.
Warning: Do not immerse in water or any liquid.

10
CAUTION FOR CHILDREN
This appliance is not intended for use by persons(including children) with
reduced physical, sensory or mental capabilities, or lack of experience and
knowledge, unless they have been given supervision or instruction concerning
use of the appliance by a person responsible for their safety)
WARNING:
If the supply cord is damaged, the manufacturer or its service agent
or a similarly qualified person in order to avoid a hazard must
replace it.
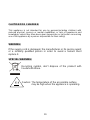
SPECIAL WARNING:
Recycling symbol, don’t dispose of the product with
household refuse.
Caution: The temperature of the accessible surface
may be high when the appliance is operating.

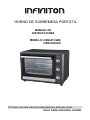
HORNO DE SOBREMESA PORTÁTIL
MANUAL DE
INSTRUCCIONES
MODELO: HSM-81C60B
HSM-83NC60
Por favor, lea este manual cuidadosamente antes de usarlo.
SOLO PARA USO EN EL HOGAR

1
IDENTIFICACIÓN DE LAS PARTES
1. Elemento de calentamiento
5. Perilla de temperatura.
2. Soporte en rack
6. Luz indicadora
4. Alojamiento
8. Perilla del temporizador
9. Tirador de puerta
10. asa de bandeja
10. Manija
11. Rack de cables
3. Panel
7. perilla de interruptor
11. rejilla de alambre
12. Bandeja para hornear 12. asa de bandeja
13. Juego de asador
14. Manejador del asador.
PARAMETER DATA
MODEL NO.
HSM-81C60B / HSM-83NC60
POWER SUPPLY
220-240V~ 50/60Hz
POWER CONSUME
2000W

1
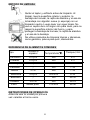
PRECAUCIONES
Utilice siempre el tenedor para alimentos
cuando inserte o retire la bandeja. Tocarlos
provocará quemaduras graves.
Cuando esté caliente, no aplique agua a la
ventana de vidrio. Puede hacer que el vidrio
se rompa.
Cuando desenchufe el cable, sujete siempre el
enchufe. Nunca tire del cable. Si lo hace, podría
romper los cables dentro del cable.
No coloque la unidad cerca de un quemador
de gas u otra fuente de alta temperatura o no
dirija un ventilador eléctrico, etc. a la unidad
durante el USO. De lo contrario se podría
evitar un correcto control de la temperatura.
No moje el cable de alimentación ni manipule la unidad con
las manos mojadas. Desenchufe siempre el cable después
de usarlo o siempre que deba dejar la unidad desatendida.
Un mal funcionamiento mientras se inserta el enchufe en la
toma de corriente podría provocar un incendio.
Cuando cocine platos que salpiquen con aceite, como el pollo
asado, se recomienda colocar 2 hojas de papel de aluminio en
una bandeja para disminuir las salpicaduras de aceite. Ponga
uno en una bandeja. Entonces el aceite goteará a un espacio
entre las láminas.

3
INDICACIONES DE USO
Indicación especial: las piezas y accesorios varían de diferentes
modelos. Consulte la imagen al artículo real que compra.
Accesorios
Comida (solo como ref.) Cómo usar el mango de la bandeja
Bandeja de hornear
* Recomendado para
usarlo como bandeja
de migas.
Alitas de pollo asado,
filete de Hamburgo,
gratinado, pastel, casi
todos los demás
alimentos cocidos al
horno
Estante de alambre
Patatas Al Horno,
Comida Seca
Bandeja de
hornear y alambre
Para alimentos que
gotearán, por ej.
pescado hervido, etc.
Rotisserie para hacer
la comida tostada más
uniformemente.
Las bandejas no son perfectamente cuadradas.
Nota:
Tenga cuidado al eliminar los pudines y otros líquidos
calientes.
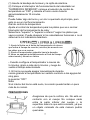
Soporte de rack
Puede ajustar la bandeja en 3
posiciones diferentes según los
platos que desee cocinar. Por
ejemplo, al hacer macarrones
gratinados y desea que la parte
superior esté más cocida, use
el segundo o el segundo
soporte de rejilla. Para asar un
pollo, use el soporte de rejilla
inferior.

4
Función de convección
Presentado con una función de convección especial,
flujo de aire fuerte y absoluto al completar el
calentamiento. El sabor original se puede mantener.
Función de asador
Usar con los tenedores Rotisserie Instalar las horquillas Rotisserie
Con esta función, se proporcionará
incluso la cocción. Las horquillas de
asador pueden transportar
alimentos de menos de 3
kilogramos.
izquierda derecha
Instalar las horquillas Rotisserie Eliminar Rotisserie Tenedores Asador
Instale las horquillas
de rotisserie en el
orificio de rotisserie y
luego colóquelas en la
bandeja de rotisserie.
Utilice el asa Rotisserie
para sacar las horquillas
Rotisserie de la bandeja
del asador, y luego retírela
del orificio del asador.
PRECAUCIÓN: ¡Cuidado
con el aceite caliente que
gotea!
Utilice siempre el
asa Rotisserie
para sacar las
horquillas
Rotisserie.

5
Control funcional
Control de temperatura
Set the “Temperature Control” by turning
clockwise to select the suitable
temperature according to the dishes you
are going to cook. (Temperature Control
ranging from 90℃ to 230℃)
Control de funciones
Seleccione el elemento
calefactor adecuado según
los platos que vaya a
cocinar.
OFF
Calefacción superior e
inferior +
Función de convección
Calentamiento superior
+
Función de convección
Calefacción superior e inferior
Calefacción
superior +
Asador
Calefacción superior e
inferior +
Función de convección +
Asador
Temporizador
Puede observar si el horno
está encendido o no
observando la luz indicadora
delantera.
1. Ajuste la flecha en el "Temporizador" al número que
indica el tiempo de cocción (minutos) de acuerdo con
los platos que va a cocinar.
2. Ajuste el "Temporizador" girándolo hacia la
derecha. El horno se apagará automáticamente al
final del tiempo seleccionado y sonará una campana.
Cuando ajuste el temporizador a menos de 5 min,
gírelo a más de 6 min. y luego de vuelta a la hora
seleccionada.
3. El horno se puede apagar manualmente durante la
cocción girando el "Temporizador" en sentido
contrario a las agujas del reloj hasta la posición
"OFF".

6
MÉTODO DE LIMPIEZA
Quitar el tapón y enfriarlo antes de limpiarlo. Al
limpiar, lave la superficie interior y exterior, la
bandeja de hornear, la rejilla de alambre y el asa de
la bandeja con algodón suave (o esponja) con un
limpiador neutro. Luego lavar con agua limpia. No
use un cepillo duro ni ningún otro para lavar, para no
raspar la superficie interior del horno, y para
proteger la bandeja de hornear, la rejilla de alambre
y el asa de la bandeja.
No utilice productos de limpieza tóxicos y abrasivos,
como gasolina, polvos para pulir, disolventes.
REFERENCIA DE ALIMENTOS COMUNES
Tipo Número o
espesor Temperatura(℃)Tiempo«(min.)
Sandwich 2-3 pcs 200 2-3
Tostada 2-4 pcs 230 2-5
Hamburguesa 2-3 pcs 200 3-5
Pescado / 200 7-10
Jamón 2 cm 200 7-12
Salchicha 3-4 pcs 200-230 8-10
Bizcocho / 150 20-30
Ternera 1-2 cm 230 10-15
Pollo Medio pollo 175-200 30-40
INSTRUCCIONES DE OPERACIÓN
Antes de usar la unidad por primera
vez: calentar el horno vacío.

7
(1) Inserte la bandeja de hornear y la rejilla de alambre.
(2) Coloque el interruptor de funcionamiento del calentador en
"SUPERIOR E INFERIOR", coloque el selector de control de
temperatura en "230" y caliente el horno vacío durante
aproximadamente 10 minutos.
Nota:
Puede haber algo de humo y un olor a quemado al principio, pero
esto no es un mal funcionamiento.
Dial de control de temperatura
Ajuste el control de temperatura para los platos que va a cocinar.
Interruptor de funcionamiento de calor
Seleccione "superior" o "superior e inferior" según los platos que
vaya a cocinar. Puede observar si los calentadores funcionan o no al
observar la luz indicadora delantera.
1. Ajuste la flecha en el botón del temporizador al número
que indica el tiempo de cocción (minutos) de acuerdo con
los platos que va a cocinar.
2. Ajuste el temporizador girándolo hacia la derecha.
El horno se apagará automáticamente al final del tiempo
seleccionado y sonará un timbre
•Cuando configure el temporizador a menos de
5 minutos, gírelo a más de 6 minutos. y luego de
vuelta al tiempo seleccionado.
3. El horno se puede apagar manualmente durante
cocina girando el temporizador en sentido contrario a las agujas del
reloj para
la posición "0FF".
Nota:
Si el interior del horno está sucio, la cocción puede tardar un poco
más de lo normal.
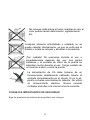
PRECAUCIONES
Asegúrese de que la cortina, etc. No esté en
contacto con el cuerpo No coloque nada
entre la parte inferior del cuerpo y la
superficie sobre la que está colocado, ya que
un objeto colocado de esta manera podría
quemarse.

8
No coloque nada sobre el horno mientras lo usa, el
calor podría causar deformación, agrietamiento,
etc.
Cualquier alimento embotellado o enlatado no se
puede calentar directamente, ya que se evita que la
botella o la lata se rompan y escalden a la persona.
¡Ten cuidado! No quemarse durante el uso o
inmediatamente después del uso. Las partes
metálicas y la ventana de vidrio de la puerta se
calientan mucho durante el uso. Tenga cuidado de
no tocarlos al abrir y cerrar la puerta.
La alimentación de CA debe tomarse de un
tomacorriente debidamente cableado Inserte el
enchufe completamente en el zócalo. Si no lo es,
podría volverse anormalmente caliente. No utilice
un tomacorriente eléctrico. Nunca conecte
múltiples enchufes a la misma toma de corriente.
CONSEJOS IMPORTANTES DE SEGURIDAD
Siga las precauciones básicas de seguridad, que incluyen:
A página está carregando...
A página está carregando...
A página está carregando...
A página está carregando...
A página está carregando...
A página está carregando...
A página está carregando...
A página está carregando...
A página está carregando...
A página está carregando...
A página está carregando...
A página está carregando...
A página está carregando...
A página está carregando...
A página está carregando...
A página está carregando...
A página está carregando...
A página está carregando...
-
 1
1
-
 2
2
-
 3
3
-
 4
4
-
 5
5
-
 6
6
-
 7
7
-
 8
8
-
 9
9
-
 10
10
-
 11
11
-
 12
12
-
 13
13
-
 14
14
-
 15
15
-
 16
16
-
 17
17
-
 18
18
-
 19
19
-
 20
20
-
 21
21
-
 22
22
-
 23
23
-
 24
24
-
 25
25
-
 26
26
-
 27
27
-
 28
28
-
 29
29
-
 30
30
-
 31
31
-
 32
32
-
 33
33
-
 34
34
-
 35
35
-
 36
36
-
 37
37
-
 38
38


Infiniton HSM-83NC60 Manual do proprietário
- Categoria
- Microondas
- Tipo
- Manual do proprietário
em outras línguas
Artigos relacionados
Outros documentos
-
Becken BMO4760 MINI FORNO 60L Manual do proprietário
-
-
-
-
-
Oster TSSTTVFDXL Manual do usuário
-
Black & Decker CTO7100B Use And Care Book Manual
-
Hamilton Beach 31103 Manual do usuário
-
Tristar OV-1413 Manual do usuário
-
Hamilton Beach 31154 Guia de usuario