Canon Pixma TS5100 series - Mac Manual do proprietário

Categoria
Impressão
Tipo
Manual do proprietário
Aloitusopas
Lue Turvallisuus ja tärkeitä tietoja
(lisähuomautus) ensin.
Før du begynder
Læs Sikkerhedsoplysninger og vigtige
oplysninger (tillæg) først.
Komme i gang
Les Sikkerhetsinformasjon og viktig
informasjon (tillegg) først.
Uppstartsguide
Läs Information om säkerhet och annan
viktig information (bilaga) först.
Ξεκινώντας
Διαβάστε πρώτα τις Πληροφορίες για την ασφάλεια
και σημαντικές πληροφορίες (συμπλήρωμα).
Guía de inicio
Lea primero Información de seguridad
e información importante (apéndice).
Para Começar
Leia Informações Importantes e Sobre
Segurança (adendo) primeiro.
Guida Rapida
Leggere preventivamente le Informazioni
importanti e sulla sicurezza (appendice).
Aan de Slag-gids
Lees eerst Veiligheidsinformatie en belangrijke
informatie (addendum).
Inbetriebnahme
Lesen Sie Sicherheitsinformationen
und wichtige Hinweise (Anhang) zuerst.
Démarrage
Lire Sécurité et informations importantes
(addendum) en premier.
Getting Started
Read Safety and Important Information
(addendum) rst.
1
2
Tulostimen asennus ......................................................................................... sivu 1
Yhdistäminen tietokoneeseen ja älypuhelimeen/tablet-tietokoneeseen ........... sivu 4
Tulostimen pitäminen
Havainnollistavat videot
Installation af printeren .....................................................................................side 1
Tilslutning med computer og smartphone/tablet ...............................................side 4
Sådan holder du printeren
Forklarende lm
Installere skriveren ...........................................................................................side 1
Koble til datamaskin og smarttelefon/nettbrett .................................................side 4
Hvordan holde skriveren
Forklarende lmer
Installera skrivaren ...........................................................................................sida 1
Ansluta med dator och smarttelefon/surfplatta ................................................. sida 4
Hur du håller skrivaren
Förklarande lmer
Εγκατάσταση του εκτυπωτή .........................................................................σελίδα 1
Σύνδεση με υπολογιστή και Smartphone/Tablet ........................................... σελίδα 4
Πώς να κρατάτε τον εκτυπωτή
Επεξηγηματικές ταινίες
Instalación de la impresora...........................................................................página 1
Conexión con el ordenador y con el teléfono inteligente o la tableta ...........página 4
Cómo sujetar la impresora
Películas explicativas
Instalando a impressora ...............................................................................página 1
Conectando a um computador e smartphone/tablet ....................................página 4
Como segurar a impressora
Filmes explicativos
Installazione della stampante .......................................................................pagina 1
Connessione con computer e smartphone/tablet .........................................pagina 4
Come sospendere la stampante
Filmati esplicativi
De printer installeren ....................................................................................pagina 1
Verbinden met een computer en smartphone/tablet.....................................pagina 4
De printer vasthouden
Films met uitleg
Installation des Druckers ................................................................................ Seite 1
Herstellen einer Verbindung mit einem Computer und Smartphone/Tablet ....... Seite 4
Halten des Druckers
Anleitungsvideos
Installation de l'imprimante ..............................................................................page 1
Connexion avec un ordinateur et un smartphone ou une tablette ...................page 4
Manipulation de l'imprimante
Vidéos explicatives
Installing the Printer .........................................................................................page 1
Connecting with Computer and Smartphone/Tablet ........................................page 4
How to Hold Printer
Explanatory Movies
1
ENGLISH
1. Checking Included Items
Power cord FINE cartridge
Safety and Important Information
Getting Started (this manual)Setup CD-ROM for
Windows PC
2. Removing Packing
Materials / Turning on
Printer
1
Remove the packing materials (such as orange
tape and protective lm on the LCD) from outside
the printer.
2
Hook the hollows on the both sides of the printer
with your ngers and open the scanning unit /
cover.
3
Remove the orange tape and the protective
material and discard them.
4
Close the scanning unit / cover.
5
Connect the power cord diagonally from the back.
Back
Do not connect any cables except the power cord
yet.
6
Lift the operation panel and press the ON button.
7
Use the { or } button to select a language, and
then press the OK button.
8
Press the OK button.
For details about information that is sent to Canon,
refer to "Sending Data To Canon" in Safety and
Important Information.
9
Use the { or } button to select Agree or Do not
agree, and then press the OK button.
10
Read the messages and press the OK button.
2
3. Installing FINE Cartridge
1
Open the scanning unit / cover.
Do not touch the FINE cartridge holder (A) until it
stops.
(A)
2
Pinch and open the ink cartridge locking cover on
the left side
.
Install the Color FINE cartridge on the left side
and the Black FINE cartridge
on the right side.
3
aTake out the Color FINE cartridge from the
package.
bRemove the protective tape.
a
b
Do not touch.
Be careful of ink on the protective tape.
4
Set the Color FINE cartridge on the FINE cartridge
holder on the left side
.
Do not bump it against the
surrounding parts.
5
Push down in the ink cartridge locking cover
rmly until it snaps into place to close it completely.
6
Repeat steps 2 to 5 and install the Black FINE
cartridge as well, on the right.
7
Close the scanning unit / cover.
If an error message appears on the screen, make
sure the FINE Cartridges are installed correctly.
3
ENGLISH
4. Loading Paper
1
aPull out the cassette.
bRemove the cassette cover.
a
b
2
Open the paper guides, and then align the guide in
front with the mark of LTR or A4.
3
aLoad plain LTR or A4 size paper with the print
side facing down.
bSlide the right paper guide to align it with the
side of the paper stack.
cAlign the paper stack with the paper guide in
front.
a
b
c
4
Attach the cassette cover and insert the cassette.
The following gure shows the state after the
cassette is inserted.
Side
5
aPull out the paper output tray.
bOpen the output tray extension.
b
a
6
If the following screen appears, select OK with the
[ or ] button, and then press the OK button.
4
6-A. Connecting to Computer
Mac OS
Windows
You need a connection setup for each computer. Proceed with the setup from step 1 for each computer.
1
Start the setup le for either method or method .
5. Preparing for Connection
In the following description, smartphones and tablet
devices are collectively described as smartphone.
1
Press the OK button.
2
Make sure that the following screen appears.
From here on, proceed to a step according to how you use
the printer.
Use Only Printer
aPress the Stop button on the printer.
bSelect Do not connect > Yes in this order with
the {, }, [, or ] button, and then press the OK
button.
The setup is now complete.
aOpen a web browser ( etc.) on your computer.
bInput the following URL and access the Canon
website.
cSelect Set Up.
dInput the model name of your printer and click OK.
You can select a model name from the list.
eClick Setup.
The procedures for Windows and Mac OS are shown
below. If you are using a computer with an OS other
than Windows or Mac OS, such as a Chrome OS, do
the setup according to the on-screen instructions.
fClick Download and download the setup le.
gExecute the downloaded le.
Proceed to step on the next page to
continue.
Downloading from the Internet
To use the printer by connecting only to a computer or both to a computer and smartphone
"6-A. Connecting to Computer"
To use the printer by connecting only to a smartphone
"6-B. Connecting to Smartphone" on page 6
To use the printer without connecting to a computer or smartphone
"Use Only Printer"
5
ENGLISH
Using Setup CD-ROM (Windows Only)
aLoad the Setup CD-ROM in your computer.
When using Windows 10 or Windows 8.1:
bWhen the following message appears on the right
side of your computer screen, click it.
cIf the following screen appears, click Run
Msetup4.exe.
dIf the User Account Control dialog box appears,
click Yes.
When This Message Does Not Appear (or Has
Disappeared)
1. Click File Explorer on the taskbar.
or
2. Click This PC on the left side of the opened window.
3. Double-click the
CD-ROM icon on the right side of
the window.
If the contents of the CD-ROM appear, double-click
Msetup4.exe.
4. Proceed to step d.
When using Windows 7:
b When the AutoPlay screen appears, click Run
Msetup4.exe.
c If the User Account Control dialog box appears,
click Continue.
When AutoPlay Screen Does Not Appear
1. Click Computer from the start menu.
2. Double-click the
CD-ROM icon on the right side of
the opened window.
If the contents of the CD-ROM appear, double-click
Msetup4.exe.
Proceed to step to continue.
2
Click Start Setup.
The connection with your computer is now complete. You can print from your
computer.
If the following screen appears, click Exit.
Follow the on-screen
instructions to proceed
with the setup.
6
6-B. Connecting to Smartphone
Android
iOS
You need a connection setup for each smartphone. Proceed with the setup from step 1 for each smartphone.
Preparation
Turn on Wi-Fi on your smartphone.
If you have a wireless router, connect your smartphone to the wireless router you want to connect to the printer.
* For operations, refer to manuals of your smartphone and the wireless router or contact those manufacturers.
1
Install the application software Canon PRINT Inkjet/SELPHY in your smartphone.
: Search "Canon PRINT" in App Store.
: Search "Canon PRINT" in Google Play.
Or access the Canon website by scanning the QR code.
* You may not connect your smartphone to the Internet wirelessly during connecting the printer to the smartphone directly.
In that case, you may be charged depending on the contract with your service provider.
* Up to 5 devices can be connected to the printer via wireless LAN connection directly.
2
Check the display on the printer.
The screen turns off when no operation is made for about 10 minutes. Press one of the buttons on the operation
panel (except for the ON button) to display the screen.
If the following screen appears:
Check the icon on the lower left, and then proceed
to
or .
If appears, the printer cannot communicate
by wireless LAN connection. For details, access
"http://ij.start.canon" to see Frequently Asked Questions.
If the following screen appears:
Proceed to
.
No (Proceed to
.)
YES
aTap the installed application software.
bFollow the on-screen instructions to register the
printer.
cMake sure that the following screen appears.
The connection with your smartphone is
now complete. You can print from your
smartphone.
To print photos, load photo paper. Proceed to "Loading
Photo Paper" on page 8.
The following icon appears.
(The printer is connected to a network.)
7
ENGLISH
Procedures below vary depending on iOS or Android. Select your operating system and proceed to its
procedure.
aTap Settings on your smartphone's home screen,
and tap Canon_ij_XXXX in the Wi-Fi settings.
If Canon_ij_XXXX does not appear on the list,
see "Preparation for Printer" below to operate the
printer, and then repeat step a.
bTap the installed application software.
cFollow the on-screen instructions to register the
printer.
Follow the on-screen instructions to proceed
with the setup.
If you select Auto Select Conn. Method
(recommended) on the connection method
selecting screen, the appropriate connection
method is selected automatically depending on
your environment.
dMake sure that the right
screen appears.
aTap the installed application software.
bFollow the on-screen instructions to register the
printer.
If a message saying "Printer is not registered.
Perform printer setup?" does not appear, see
"Preparation for Printer" below to operate the
printer, and then wait for a while until the message
appears.
Follow the on-screen instructions to proceed
with the setup.
The appropriate connection method is selected
depending on your environment.
If two printer names appear on the Register
Printer screen as shown below, select A.
A) TS5100 series (xxx.xxx.xxx.xxx)
B) Direct-xxxx-TS5100series
cMake sure that the right
screen appears.
The connection with your smartphone is now complete. You can print from your
smartphone.
To print photos, load photo paper. Proceed to "Loading Photo Paper" on page 8.
aPress the HOME button on the printer.
bUse the {, }, [, or ] button to select the icon
on the lower left of the Home screen, and then
press the OK button.
cIf the following screen appears, select No with the
[ or ] button, and then press the OK button.
dUse the {, }, [, or ] button to select LAN
settings > Wireless LAN > Wireless LAN setup
> Easy wireless connect in order, and then press
the OK button.
eUse the [ or ] button to select Yes, and then
press the OK button.
fReturn to the operation of your smartphone.
Preparation for Printer
8
Load photo paper in the rear tray.
1
Open the rear tray cover and pull out the paper
support.
2
aOpen the feed slot cover.
bSlide the right paper guide to the end.
a
b
1
Make sure the printer is turned on.
2
Load several sheets of photo paper.
3
Use the {, }, [, or ] button to select Copy
on the Home screen, and then press the OK
button.
4
Use the { or } button to select Photo copy,
and then press the OK button.
5
Read the messages and then press the OK
button.
6
Follow the on-screen instructions to load the
printed photo on the platen glass, and then
press the OK button.
3
aLoad several sheets of photo paper with the
print side facing up.
bSlide the right paper guide to align it with the
side of the paper stack.
a
b
4
Close the feed slot cover.
Read the message on the printer's screen and
register the information of the loaded paper.
5
aPull out the paper output tray.
bOpen the output tray extension.
b
a
7
Specify the print settings as necessary.
8
Press the Color button for color copying.
Press the Black button for black & white
copying.
The printer starts printing.
Loading Photo Paper
Copying Photos
You can scan the printed photo and print it. You can also scan several photos and print them at once.
1
FRANÇAIS
1. Vérication des éléments fournis
Cordon d'alimentation Cartouche FINE
Sécurité et informations
importantes
Démarrage (ce manuel)CD-ROM d'installation
pour Windows PC
2. Retrait des matériaux
d'emballage / Mise sous
tension de l'imprimante
1
Retirez le matériel d'emballage (comme la bande
orange et le lm protecteur sur l'écran LCD)
de l'extérieur de l'imprimante.
2
Placez vos doigts dans les cavités de
chaque côté de l'imprimante et ouvrez l'unité
de numérisation / capot.
3
Retirez la bande orange et le matériau protecteur
et jetez-les.
4
Fermez l'unité de numérisation / capot.
5
Branchez le cordon d'alimentation en diagonale
à partir de l'arrière.
Arrière
Ne branchez aucun câble pour le moment,
à l'exception du cordon d'alimentation.
6
Levez le panneau de contrôle et appuyez sur
le bouton MARCHE (ON).
7
Utilisez le bouton { ou } pour sélectionner une
langue, puis appuyez sur le bouton OK.
8
Appuyez sur le bouton OK.
Pour plus de détails sur les informations envoyées
à Canon, reportez-vous à « Envoi De Données
A Canon » dans Sécurité et informations
importantes.
9
Utilisez le bouton { ou } pour sélectionner
J'accepte ou Je refuse et appuyez sur le bouton OK.
10
Lisez les messages et appuyez sur le bouton OK.
2
3. Installation
de la cartouche FINE
1
Ouvrez l'unité de numérisation / capot.
Ne touchez pas le porte-cartouche FINE (A) avant
son arrêt.
(A)
2
Pincez et ouvrez le couvercle de verrouillage
de cartouche d'encre à gauche
.
Installez la cartouche FINE Couleur à gauche
et la cartouche FINE Noire
à droite.
3
aSortez la cartouche FINE couleur de la boîte.
bRetirez la bande protectrice.
a
b
Ne pas toucher.
Faites attention à l'encre se trouvant sur le ruban
protecteur.
4
Installez la cartouche FINE Couleur dans
le porte-cartouche FINE à gauche
.
Ne cognez pas la cartouche
contre les bords.
5
Poussez fermement vers le bas le couvercle
de verrouillage de cartouche d'encre jusqu'au
déclic pour le fermer complètement.
6
Répétez les étapes 2 à 5 et installez également
la cartouche FINE Noire, à droite.
7
Fermez l'unité de numérisation / capot.
Si un message d'erreur apparaît à l'écran, assurez-
vous que les cartouches FINE sont correctement
installées.
3
FRANÇAIS
4. Chargement du papier
1
aRetirez la cassette.
bRetirez le couvercle de la cassette.
a
b
2
Ouvrez les guides papier, puis alignez le guide
avant avec la marque LTR ou A4.
3
aChargez du papier ordinaire au format LTR
ou A4 face à imprimer vers le bas.
bFaites glisser le guide papier droit de manière
à l'aligner avec le côté de la pile de papier.
cAlignez la pile de papier avec le guide papier
avant.
a
b
c
4
Attachez le couvercle de la cassette et insérez
la cassette.
Dans la gure suivante, la cassette est insérée.
Côté
5
aRetirez le bac de sortie papier.
bOuvrez l'extension du bac de sortie papier.
b
a
6
Si l'écran suivant s'afche, sélectionnez OK
à l'aide du bouton [ ou ], puis appuyez sur
le bouton OK.
4
6-A. Connexion à un ordinateur
Mac OS
Windows
Vous devez congurer une connexion pour chaque ordinateur. Poursuivez la conguration à partir de l'étape 1 pour
chaque ordinateur.
1
Démarrez le chier de conguration pour la méthode ou la méthode .
5. Préparation de la connexion
Dans la description suivante, les smartphones et les
tablettes sont regroupés sous le terme smartphone.
1
Appuyez sur le bouton OK.
2
Assurez-vous que l'écran suivant s'afche.
Poursuivez avec l'étape correspondant à la manière dont
vous utilisez l'imprimante.
Utiliser uniquement l'imprimante
aAppuyez sur le bouton Arrêt (Stop) de l'imprimante.
bSélectionnez Ne pas connecter > Oui dans cet
ordre à l'aide du bouton {, }, [ ou ], puis
appuyez sur le bouton OK.
La conguration est terminée.
aOuvrez un navigateur Web ( etc.) sur votre
ordinateur.
bEntrez l'URL suivante et accédez au site Web Canon.
cSélectionnez Conguration.
dEntrez le nom de modèle de votre imprimante
et cliquez sur OK.
Vous pouvez sélectionner un nom de modèle à partir
de la liste.
eCliquez sur Conguration.
Les procédures pour Windows et Mac OS sont
présentées ci-dessous. Si vous utilisez un ordinateur
équipé d'un système d'exploitation autre que
Windows ou Mac OS (Chrome OS, par exemple)
procédez à la conguration en fonction des
instructions qui s'afchent à l'écran.
fCliquez sur Télécharger et téléchargez le chier
de conguration.
gExécutez le chier téléchargé.
Poursuivez avec l'étape à la page
suivante pour continuer.
Téléchargement depuis Internet
Pour utiliser l'imprimante en la connectant uniquement à un ordinateur, ou à la fois à un ordinateur et à un smartphone
« 6-A. Connexion à un ordinateur »
Pour utiliser l'imprimante en la connectant uniquement à un smartphone
« 6-B. Connexion à un smartphone » à la page 6
Pour utiliser l'imprimante sans la connecter à un ordinateur ou à un smartphone
« Utiliser uniquement l'imprimante »
5
FRANÇAIS
Utilisation du CD-ROM d'installation (Windows uniquement)
aChargez le CD-ROM d'installation dans votre ordinateur.
Si vous utilisez Windows 10 ou Windows 8.1 :
bLorsque le message suivant apparaît sur la droite
de l'écran de l'ordinateur, cliquez dessus.
cSi l'écran suivant s'afche, cliquez sur Exécuter
Msetup4.exe.
dSi la boîte de dialogue Contrôle de compte
d'utilisateur apparaît, cliquez sur Oui.
Lorsque ce message n'apparaît pas (ou n'est plus afché)
1. Cliquez sur Explorateur de chiers dans la barre
des tâches.
ou
2. Cliquez sur Ce PC dans la partie gauche de la
fenêtre ouverte.
3. Double-cliquez sur
l'icône CD-ROM dans la partie
droite de la fenêtre.
Si le contenu du CD-ROM s'afche, double-cliquez
sur Msetup4.exe.
4. Passez à l'étape d.
Si vous utilisez Windows 7 :
b Lorsque l'écran Lecture automatique apparaît,
cliquez sur Exécuter Msetup4.exe.
c Si la boîte de dialogue Contrôle de compte
d'utilisateur apparaît, cliquez sur Continuer.
Lorsque l'écran Lecture automatique ne s'afche pas
1. Cliquez sur Ordinateur à partir du menu Démarrer.
2. Double-cliquez sur
l'icône CD-ROM dans la partie
droite de la fenêtre ouverte.
Si le contenu du CD-ROM s'afche, double-cliquez
sur Msetup4.exe.
Poursuivez avec l'étape pour continuer.
2
Cliquez sur Commencer la conguration.
La connexion avec votre ordinateur est terminée. Vous pouvez imprimer à partir
de votre ordinateur.
Si l'écran suivant s'afche, cliquez sur Quitter.
Suivez les instructions
à l'écran pour poursuivre
la conguration.
6
6-B. Connexion à un smartphone
Android
iOS
Vous devez congurer une connexion pour chaque smartphone. Poursuivez la conguration à partir de l'étape 1 pour
chaque smartphone.
Préparation
Activez Wi-Fi sur votre smartphone.
Si vous avez un routeur sans l, connectez votre smartphone au routeur sans l que vous voulez connecter à l'imprimante.
* Pour le fonctionnement, reportez-vous aux manuels de votre smartphone et du routeur sans l ou prenez contact avec les fabricants.
1
Installez le logiciel d'application Canon PRINT Inkjet/SELPHY sur votre smartphone.
: Recherchez « Canon PRINT » dans App Store.
: Recherchez « Canon PRINT » dans Google Play.
Vous pouvez également accéder au site Web Canon en numérisant le code QR.
* Il se peut que vous ne parveniez pas à connecter votre smartphone via une connexion sans l à Internet lorsque
l'imprimante est connectée directement au smartphone. Dans ce cas, vous risquez de devoir payer des frais en fonction
du contrat avec votre fournisseur de services.
* Jusqu'à 5 périphériques peuvent être connectés directement à l'imprimante via une connexion réseau sans l.
2
Vériez l'afchage sur l'imprimante.
L'écran s'éteint si aucune action n'est effectuée pendant environ 10 minutes. Appuyez sur un des boutons
du panneau de contrôle (sauf sur le bouton MARCHE (ON)) pour afcher l'écran.
Si l'écran suivant s'afche :
Vériez l'icône dans la partie inférieure gauche,
puis passez à l'étape
ou .
Si apparaît, l'imprimante ne peut pas communiquer
via une connexion réseau sans l. Pour plus de détails,
accédez à « http://ij.start.canon » pour consulter la section
Foire aux questions.
Si l'écran suivant s'afche :
Passez à l'étape
.
Non (Passez à l'étape
.)
OUI
aTouchez le logiciel d'application installé.
bSuivez les instructions à l'écran pour enregistrer
l'imprimante.
cAssurez-vous que l'écran suivant s'afche.
La connexion avec votre smartphone
est terminée. Vous pouvez imprimer
à partir de votre smartphone.
Pour imprimer des photos, chargez du papier photo. Passez
à la section « Chargement de papier photo », à la page 8.
L'icône suivante s'afche.
(L'imprimante est connectée à un réseau.)
7
FRANÇAIS
Les procédures ci-dessous varient selon que vous utilisez iOS ou Android. Sélectionnez votre système
d'exploitation et poursuivez avec la procédure s'y rapportant.
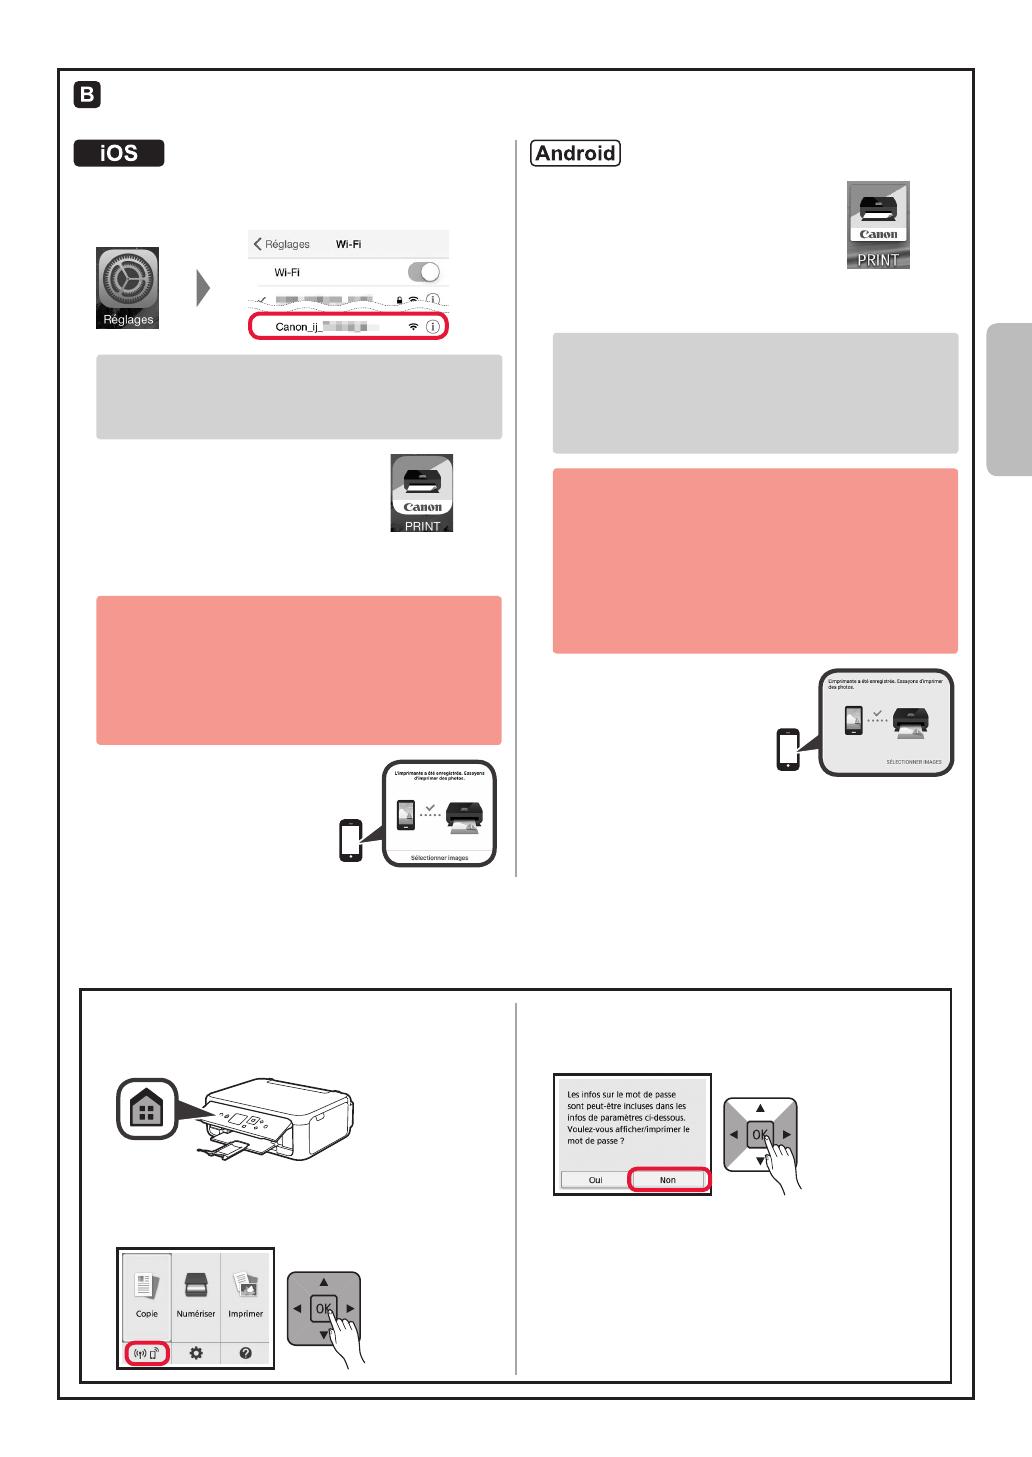
aTouchez Réglages sur l'écran d'accueil du smartphone,
puis touchez Canon_ij_XXXX dans les réglages Wi-Fi.
Si Canon_ij_XXXX n'apparaît pas dans la liste,
reportez-vous à la section « Préparation de
l'imprimante » ci-dessous pour faire fonctionner
l'imprimante, puis répétez l'étape a.
bTouchez le logiciel d'application
installé.
cSuivez les instructions à l'écran pour enregistrer
l'imprimante.
Suivez les instructions à l'écran pour
poursuivre la conguration.
Si vous sélectionnez Méthode sél. auto conn.
(recommandé) dans l'écran de sélection de la
méthode de connexion, la méthode de connexion
appropriée est sélectionnée automatiquement selon
votre environnement.
dAssurez-vous que l'écran
de droite s'afche.
aTouchez le logiciel d'application
installé.
bSuivez les instructions à l'écran pour enregistrer
l'imprimante.
Si le message « L'imprimante n'est pas
enregistrée. Congurer l'imprimante ? »
ne s'afche pas, reportez-vous à la section
« Préparation de l'imprimante » ci-dessous pour
faire fonctionner l'imprimante et attendez que le
message s'afche.
Suivez les instructions à l'écran pour
poursuivre la conguration.
La méthode de connexion appropriée est
sélectionnée selon votre environnement.
Si deux noms d'imprimantes apparaissent sur
l'écran Enreg. imprimante comme indiqué
ci-dessous, sélectionnez A.
A) TS5100 series (xxx.xxx.xxx.xxx)
B) Direct-xxxx-TS5100series
cAssurez-vous que l'écran
de droite s'afche.
La connexion avec votre smartphone est terminée. Vous pouvez imprimer à partir
de votre smartphone.
Pour imprimer des photos, chargez du papier photo. Passez à la section « Chargement de papier photo », à la page 8.
aAppuyez sur le bouton ACCUEIL (HOME)
de l'imprimante.
bUtilisez le bouton {, }, [ ou ] pour sélectionner
l'icône dans la partie inférieure gauche de l'écran
d'Accueil, puis appuyez sur le bouton OK.
cSi l'écran suivant s'afche, sélectionnez Non
à l'aide du bouton [ ou ], puis appuyez sur le
bouton OK.
dUtilisez le bouton {, }, [ ou ] pour sélectionner
Param. réseau > Réseau sans l > Cong. du
réseau sans l > Connexion facile sans l dans
cet ordre, puis appuyez sur le bouton OK.
eUtilisez le bouton [ ou ] pour sélectionner Oui
et appuyez sur le bouton OK.
fRevenez au fonctionnement de votre smartphone.
Préparation de l'imprimante
8
Chargez du papier photo dans le réceptacle arrière.
1
Ouvrez le couvercle du réceptacle arrière
et retirez le support papier.
2
aOuvrez le couvercle de la fente
d'alimentation.
bFaites glisser le guide papier de droite vers
l'extrémité.
a
b
1
Assurez-vous que l'imprimante est sous tension.
2
Chargez plusieurs feuilles de papier photo.
3
Utilisez le bouton {, }, [ ou ] pour
sélectionner Copie sur l'écran d'Accueil, puis
appuyez sur le bouton OK.
4
Utilisez le bouton { ou } pour sélectionner
Copie photo et appuyez sur le bouton OK.
5
Lisez les messages, puis appuyez sur
le bouton OK.
6
Suivez les instructions à l'écran pour placer
la photo imprimée sur la vitre d'exposition,
puis appuyez sur le bouton OK.
3
aChargez plusieurs feuilles de papier photo
face à imprimer vers le haut.
bFaites glisser le guide papier droit de manière
à l'aligner avec le côté de la pile de papier.
a
b
4
Fermez le couvercle de la fente d'alimentation.
Lisez le message sur l'écran de l'imprimante
et enregistrez les informations du papier chargé.
5
aRetirez le bac de sortie papier.
bOuvrez l'extension du bac de sortie papier.
b
a
7
Spéciez les paramètres d'impression selon
les besoins.
8
Appuyez sur le bouton Couleur (Color) pour
effectuer une copie couleur.
Appuyez sur le bouton Noir (Black) pour
effectuer une copie en noir et blanc.
L'imprimante lance l'impression.
Chargement de papier photo
Copie de photos
Vous pouvez numériser la photo imprimée et l'imprimer. Vous pouvez également numériser plusieurs photos et les
imprimer en même temps.
1
DEUTSCH
1. Überprüfen des Lieferumfangs
Netzkabel FINE-Patrone
Sicherheitsinformationen
und wichtige Hinweise
Inbetriebnahme (dieses Handbuch)Installations-CD-ROM fü
Windows-PCs
2. Entfernen des
Verpackungsmaterials/
Anschalten des Druckers
1
Entfernen Sie das Verpackungsmaterial
(z. B. orangefarbenes Klebeband und Schutzfolie
auf dem LCD) außen am Drucker.
2
Greifen Sie mit Ihren Fingern in die Öffnungen
an beiden Seiten des Druckers und öffnen Sie das
Scan-Modul/die Abdeckung.
3
Entfernen Sie das orangefarbene Klebeband und
das Schutzmaterial und entsorgen Sie dieses.
4
Schließen Sie Scan-Modul/Abdeckung.
5
Schließen Sie das Netzkabel diagonal
an der Rückseite an.
Rückseite
Schließen Sie außer dem Netzkabel noch keine
Kabel an.
6
Heben Sie das Bedienfeld an und drücken Sie auf
die Taste EIN (ON).
7
Verwenden Sie die Taste { oder }, um
eine Sprache auszuwählen, und drücken Sie
anschließend auf die Taste OK.
8
Drücken Sie die Taste OK.
Nähere Angaben dazu, welche Informationen an
Canon gesendet werden, nden Sie unter „Daten
an Canon senden” in Sicherheitsinformationen
und wichtige Hinweise.
9
Verwenden Sie die Taste { oder },
um Akzeptieren (Agree) oder Nicht akzept.
(Do not agree) auszuwählen, und drücken Sie
dann die Taste OK.
10
Lesen Sie die Meldungen und drücken Sie auf die
Taste OK.
2
3. Installation der FINE-
Patrone
1
Öffnen Sie das Scan-Modul/die Abdeckung.
Berühren Sie die FINE-Patronen-Halterung (A)
nicht, solange sie sich bewegt.
(A)
2
Drücken und öffnen Sie die Verriegelung der
Tintenpatronen auf der linken Seite
.
Setzen Sie die farbige FINE-Patrone auf der
linken Seite und die schwarze FINE-Patrone
auf
der rechten Seite ein.
3
aNehmen Sie die farbige FINE-Patrone aus
der Verpackung.
bEntfernen Sie das Schutzband.
a
b
Nicht berühren.
Achten Sie auf Tintenspuren auf dem Schutzband.
4
Setzen Sie die farbige FINE-Patrone in die FINE-
Patronen-Halterung auf der linken Seite ein
.
Stoßen Sie mit der
Patrone nicht gegen die
umgebenden Teile.
5
Drücken Sie in der Verriegelung der
Tintenpatronen fest nach unten, bis es einrastet,
um diese vollständig zu schließen.
6
Wiederholen Sie die Schritte 2 bis 5 und setzen
Sie auch die schwarze FINE-Patrone auf der
rechten Seite ein.
7
Schließen Sie Scan-Modul/Abdeckung.
Wenn eine Fehlermeldung auf dem Bildschirm
angezeigt wird, stellen Sie sicher, dass die
FINE-Patronen ordnungsgemäß eingesetzt sind.
  • Page 1 1
  • Page 2 2
  • Page 3 3
  • Page 4 4
  • Page 5 5
  • Page 6 6
  • Page 7 7
  • Page 8 8
  • Page 9 9
  • Page 10 10
  • Page 11 11
  • Page 12 12
  • Page 13 13
  • Page 14 14
  • Page 15 15
  • Page 16 16
  • Page 17 17
  • Page 18 18
  • Page 19 19
  • Page 20 20
  • Page 21 21
  • Page 22 22
  • Page 23 23
  • Page 24 24
  • Page 25 25
  • Page 26 26
  • Page 27 27
  • Page 28 28
  • Page 29 29
  • Page 30 30
  • Page 31 31
  • Page 32 32
  • Page 33 33
  • Page 34 34
  • Page 35 35
  • Page 36 36
  • Page 37 37
  • Page 38 38
  • Page 39 39
  • Page 40 40
  • Page 41 41
  • Page 42 42
  • Page 43 43
  • Page 44 44
  • Page 45 45
  • Page 46 46
  • Page 47 47
  • Page 48 48
  • Page 49 49
  • Page 50 50
  • Page 51 51
  • Page 52 52
  • Page 53 53
  • Page 54 54
  • Page 55 55
  • Page 56 56
  • Page 57 57
  • Page 58 58
  • Page 59 59
  • Page 60 60
  • Page 61 61
  • Page 62 62
  • Page 63 63
  • Page 64 64
  • Page 65 65
  • Page 66 66
  • Page 67 67
  • Page 68 68
  • Page 69 69
  • Page 70 70
  • Page 71 71
  • Page 72 72
  • Page 73 73
  • Page 74 74
  • Page 75 75
  • Page 76 76
  • Page 77 77
  • Page 78 78
  • Page 79 79
  • Page 80 80
  • Page 81 81
  • Page 82 82
  • Page 83 83
  • Page 84 84
  • Page 85 85
  • Page 86 86
  • Page 87 87
  • Page 88 88
  • Page 89 89
  • Page 90 90
  • Page 91 91
  • Page 92 92
  • Page 93 93
  • Page 94 94
  • Page 95 95
  • Page 96 96
  • Page 97 97
  • Page 98 98
  • Page 99 99
  • Page 100 100

Canon Pixma TS5100 series - Mac Manual do proprietário

Categoria
Impressão
Tipo
Manual do proprietário