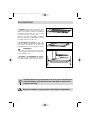
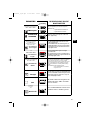
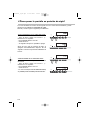
De Dietrich DME499XD1 Manual do proprietário
- Categoria
- Microondas
- Tipo
- Manual do proprietário

Le guide d’utilisation de votre four
Using your oven
Bedienungsanleitung Ihres Backofens
Gebruiksaanwijzing van uw oven
Betjeningsvejledning til ovnen
Instrucciones de uso de su horno
O guia de utilização do seu forno
DME499*
FR
EN
DE
NL
DA
ES
PT
99639761_A_ML.QXP 01/06/2006 14:41 Page 1

2
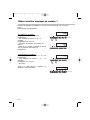
Tout au long de la notice,
vous signale les consignes de sécurité,
vous signale les conseils et les astuces
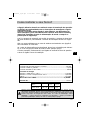
Edito p.3
Conseils p.4
Comment se présente votre four ? p.5
Accessoires p.6
Comment installer votre four ?
Raccordement p.7
Dimensions utiles pour encastrer votre four p.8
Comment utiliser votre four ?
Comment mettre à l’heure votre four ? p.9
Comment utiliser le mode micro-ondes ? p.10
Décongélation automatique au micro-ondes p.11-12
Comment utiliser le mode combiné ? p.13
Comment utiliser le mode traditionnel p.14
Comment personnaliser la température de cuisson ? p.15-16
Comment faire une cuisson différée ? p.17-18
Comment utiliser la minuterie ? p.19
Comment utiliser la sécurité enfant ? p.19
Comment mettre en veille votre afficheur ? p.20
Modes de cuisson du four p.21
Comment nettoyer la cavité de votre four ? p.22
Que faire en cas d’anomalies de fonctionnement ? p.23
Qui contacter ? p.24
Sommaire
99639761_A_ML.QXP 01/06/2006 14:41 Page 2
A página está carregando...
A página está carregando...

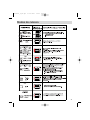
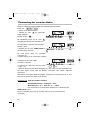
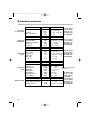
5
FR
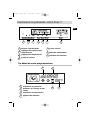
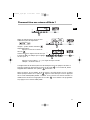
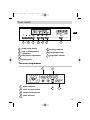
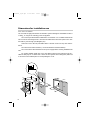
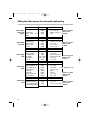
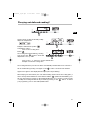
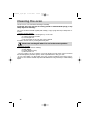
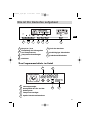
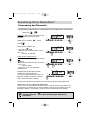
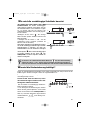
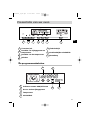
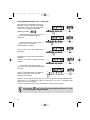
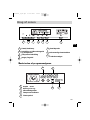
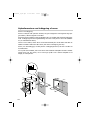
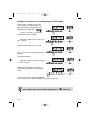
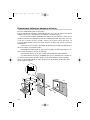
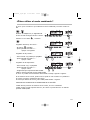
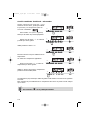
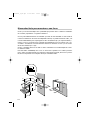
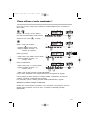
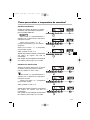
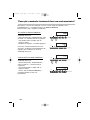
Comment se présente votre four ?
Bouton : Marche/Arrêt
Réglages des temps et des
températures
Réglage des températures
Durée de cuisson
Fin de cuisson
Minuteur indépendant
Sélecteur de fonctions
1
2
3
4
5
6
7
Le détail de votre programmateur
w
1
2
3
4
1
2
3
4
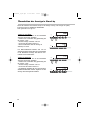
Indicateur de puissance
Afficheur de l’horloge et des
temps
Indicateur de température
Symbole du minuteur
w
START
STOP
AUTO
1
3
2
4
5
6
7
99639761_A_ML.QXP 01/06/2006 14:41 Page 5
A página está carregando...
A página está carregando...
A página está carregando...

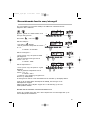
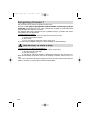
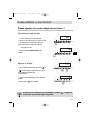
9
FR
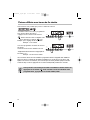
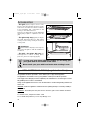
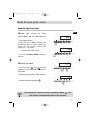
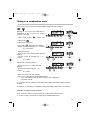
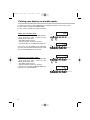
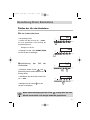
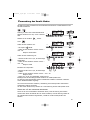
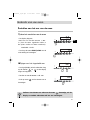
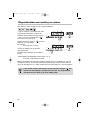
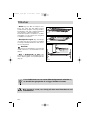
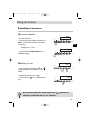
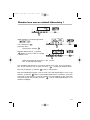
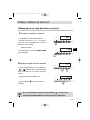
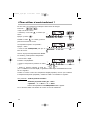
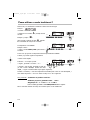
Comment mettre à l'heure votre four ?
S’il n’y a pas de validation par la touche , l’enregistrement
est automatique au bout de quelques secondes.
START
STOP
Comment utiliser votre four ?
START
STOP
START
STOP
START
STOP
Remise à l’heure de l’horloge
• Appuyez simultanément sur les touches
et pendant quelques secondes
jusqu’à faire clignoter l’affichage.
• Ajustez le réglage de l’heure avec les
touches + ou -.
• Appuyez sur la touche pour valider.
A la mise sous tension
• L’afficheur clignote.
• Réglez l’heure en appuyant sur les
touches + ou - (le maintien du doigt
sur la touche permet d’obtenir un
défilement rapide)
Exemple:12h30.
• Appuyez sur la touche START/STOP
pour valider.
99639761_A_ML.QXP 01/06/2006 14:42 Page 9
A página está carregando...
A página está carregando...

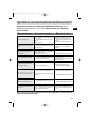
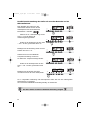
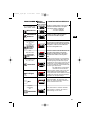
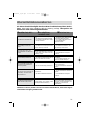
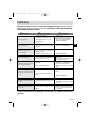
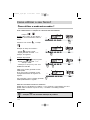
12
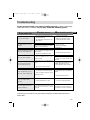
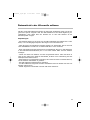
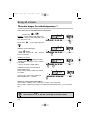
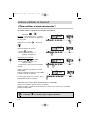
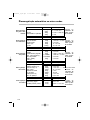
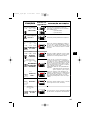
Décongélation
pains et pâtes
Aliments
pain baguette
pain boule
pâte feuilletée ou brisée
Quantité
100g
200g
400g
300g
Temps
45 s à 55 s
1 à 1 min 30 s
2 min à 2 min 30 s
1 min
Aliments
coquilles St Jacques (noix)
crevettes décortiquées
crevettes roses entières
gambas (10)
langoustines
Quantité
500g
100g
200g
500g
1000g
Temps
5 min
1 min 30 s à 2 min
5 à 7 min
11 à 13 min
10 à 11 min
Aliments
filets de cabillaud ou d’é-
glefin
merlans, colinots
soles, carrelets (2)
tranches de colin
lieu, saumon
truites (3)
Quantité
400g
500g
300g
1 unité
4 unités
540g
Temps
3 à 4 min
3 à 4 min
2 min à 2 min 30 s
1 min 30 s à 2 min
4 à 5 min
4 à 5 min
Aliments
coquelets, pigeon
escalope de poulet (2)
cuisses de poulet (4)
poulet entier
côtes de veau
rôti de boeuf
steaks hachés (4)
viandes en morceaux
Quantité
500g à 600g
200g
1000g
1000g
600g
1000g
360g
600g
Temps
5 à 7 min
3 à 4 min
7 à 9 min........
11 à 13 min
5 min
10 min
3 à 4 min
6 à 7 min
Aliments
fraises
framboises, griottes
groseilles, myrtilles, cassis
Quantité
250g
250g
250g
Temps
2 à 3 min
2 à 3 min
2 min 3 s à 4 min
Décongélation
crustacés
Décongélation
poissons
Décongélation
viandes
Décongélation
fruits
poser dans le
plat verre posé
sur la sole
poser dans le
plat verre posé
sur la sole
.....retounez à mi-temps
poser dans le
plat verre posé
sur la sole
poser dans le
plat verre posé
sur la sole
poser dans le
plat verre posé
sur la sole
Décongélation automatique au micro-ondes
99639761_A_ML.QXP 01/06/2006 14:42 Page 12
A página está carregando...
A página está carregando...
A página está carregando...
A página está carregando...
A página está carregando...
A página está carregando...
A página está carregando...
A página está carregando...

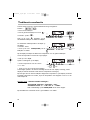
21
Modes de cuisson
FR
35°C
99639761_A_ML.QXP 01/06/2006 14:42 Page 21
A página está carregando...
A página está carregando...
A página está carregando...

25
EN
99639761_A_ML.QXP 01/06/2006 14:42 Page 25

26
Throughout this manual,
indicates safety recommendations,
indicates advice to help you make the
best use of your oven
Introduction p.27
Recommendations p.28
Your oven p.29
Accessories p.30
How to install your oven
Electrical connections p.31
Dimensions for installation use p.32
How to use your oven
How to set the clock p.33
Using the microwave p.34
Using the Microwave for automatic defrosting p.35-36
Using as a combination oven p.37
Using as a conventional oven p.38
Entering your own choice of cooking temperature p.39-40
Carrying out deferred cooking? p.41-42
How to use the timer p.43
Using the child safety p.43
Putting your display on standby mode p.44
Cooking methods p.45
Cleaning the oven cavity p.46
Troubleshooting p.47
How to contact us p.48
Contents
99639761_A_ML.QXP 01/06/2006 14:42 Page 26
A página está carregando...
A página está carregando...

29
EN
Your oven
START/STOP button
Time and temperature
adjustment
Temperature adjustment
Cooking time
Cooking complete
Independent timer
Programme selector
1
2
3
4
5
6
7
The oven programmer
w
1
2
3
4
1
2
3
4
Power indicator
Clock and time display
Temperature indicator
Timer indicator
w
START
STOP
AUTO
1
3
2
4
5
6
7
99639761_A_ML.QXP 01/06/2006 14:43 Page 29
A página está carregando...
A página está carregando...

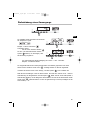
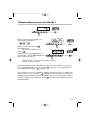
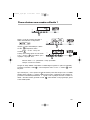
32
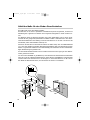
Dimensions for installation use
Your oven is for built in.
The oven has an high-performance air circulation system which gives remarkable results for
cooking , as long as the following points are applied:
The oven may be fitted either underneath a work surface or in a suitable sized column
unit. Cut a hole measuring 50 mm x 50 mm in the back wall of the insert space for the elec-
tric cable to pass through (See diagram, left).
Centre the oven in the unit, and make that it is at least 2 mm from any other unit be-
side it.
The unit must be heat-resistant (or covered with heat-resistant material).
The oven must be disconnected from the power supply while it is being installed in the
unit.
For greater stability, attach the oven to the cabinet with 2 screws using the holes pro-
vided for this purpose on either side of the front inner panels. Before doing this, drill 2 x Ø
3 mm holes in the cabinet panel to avoid splitting the wood.
560
595
540
22
376
380
560-580
20
50
10
50
550
mini
560-580
550 mini
400
310
390
99639761_A_ML.QXP 01/06/2006 14:43 Page 32
A página está carregando...
A página está carregando...
A página está carregando...

36
Using the Microwave for automatic defrosting
Defrosting-
bread and
pastry
Food
pain baguette
round loaves
crusty and puff
pastry
Quantity
100g
200g
400g
300g
Time
45 s to 55 s
1 to 1 min 30 s
2 min to 2 min 30 s
1 min
Food
scallops
peeled shrimps
whole shrimps
gambas (10)
prawns
Quantity
500g
100g
200g
500g
1000g
Time
5 min
1 min 30 s to 2 min
5 to 7 min
11 to 13 min
10 to 11 min
Food
cod or haddock fillets
whiting, codling
sole, plaice (2)
fish steaks
hake salmon
trout (3)
Quantity
400g
500g
300g
1 at a time
4 at a time
540g
Time
3 to 4 min
3 to 4 min
2 min to 2 min 30 s
1 min 30 s to 2 min
4 to 5 min
4 to 5 min
Food
small cockerel,pigeon
chicken escalope (2)
legs of chicken (4)
whole chicken,
veal chops
roast beef
minced steaks (4)
meat in pieces
Quantity
500g to 600g
200g
1000g
1000g
600g
1000g
360g
600g
Time
5 to 7 min
3 to 4 min
7 to 9 min......
11 to 13 min
5 min
10 min
3 to 4 min
6 to 7 min
Food
strawberries
raspberries,cherries
red currants,myrtle
berries,black currants
Quantity
250g
250g
250g
Time
2 to 3 min
2 to 3 min
2 min 3 s to 4 min
Defrosting
sea food
Defrosting
fish
Defrosting
meat
Defrosting
fruit
place in a glass
dish on the
bottom
place in a glass
dish on the
bottom
place in a glass
dish on the
bottom
place in a glass
dish on the
bottom
place in a glass
dish on the
bottom
.....turn, halfway through
99639761_A_ML.QXP 01/06/2006 14:43 Page 36
A página está carregando...
A página está carregando...
A página está carregando...
A página está carregando...
A página está carregando...
A página está carregando...
A página está carregando...
A página está carregando...

45
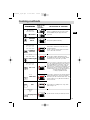
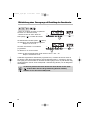
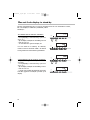
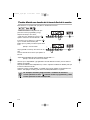
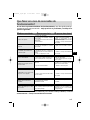
Cooking methods
Temperature
Preset
35°
Temperature
Min./ Preset / max
40° / 200° / 250°
1 to 4
1 to 4
1 to 4
100w / 200w / 500w
Power
100w / 200w / 350w
Temperature
Min./ Preset / max
40° / 190° / 210°
Power
Min./ Preset / max
100w / 1000w / 1000w
Keeping warm
Gril
Fan oven
Combined grill
Combined
microwave
Automatic
defrost
Microwave
Turbo Gril
PROGRAMS
Parts of the
oven in
operation
Cooking
Heating
DESCRIPTION OF FEATURES
Energy is supplied by the microwave system
and is distributed by the upper and lower
generators
This position optimises defrosting
This position combines the microwave with
ventilated heating.
Hot air cooks the outside and the microwave
goes to the heart of the dish
This position combines grill and microwave.
The grill browns the food on the outside and the
microwave goes to the heart of your dish.
Heat comes from a resistor at the bottom of the
oven; the centrally placed fan sucks up the hot
air and redistributes it on all sides of the oven.
Preheating is unnecessary except for dishes
with very short cooking times (shortbread) or for
dishes that need to be seared (roast beef).The
ventilated heat system is especially suitable for:
- Keeping white meat tender.
- Cooking vegetables and fish
This position combines the fan and the grill: The
grill sends infrared rays onto the food and the
air blown by the fan moderates their effect. This
position enables you to grill and roast without
using a rotisserie.
This position is for grilling toast, chops, thick
grills, sausages etc.
Hot air is blown around your dishes by the fan.
EN
99639761_A_ML.QXP 01/06/2006 14:44 Page 45
A página está carregando...
A página está carregando...

48
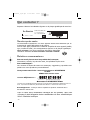
Copy here the details that are on your oven manufacturer's plate:
How to contact us
MADE IN FRANCE
220 - 240V ~ 50 Hz
BRANDT APPLIANCES SAS
7 rue Henri Becquerel
92500 RUEIL MALMAISON
De Dietrich
99639761_A_ML.QXP 01/06/2006 14:44 Page 48

49
DE
99639761_A_ML.QXP 01/06/2006 14:44 Page 49

50
In der Gebrauchsanweisung
geben Ihnen die Zeichen,
Sicherheitshinweise und,
Ratschläge und Tips.
Vorwort s.51
Empfehlungen s.52
Präsentierung Ihres Backofens s.53
Zubehör s.54
Backofeninstallation
Anschluss s.55
Nützliche Maße für den Einbau Ihres Backofens s.56
Benutzung Ihres Backofens
Stellen der Uhr des Backofens s.57
Verwendung der Mikrowelle s.58
Automatisch in der Mikrowelle auftauen s.59-60
Verwendung des Kombi-Modus s.61
Verwendung des normalen Modus s.62
Wie programmieren Sie Temperaturen nach Ihren
persönlichen Bedürfnissen s.63-64
Aufschiebung eines Garvorgangs s.65-66
Wie wird die unabhängige Schaltuhr benutzt s.67
Wie wird die Kindersicherung betätigt s.67
Umschalten der Anzeige in Stand-by s.68
Die Garfunktionen des Backofens s.68-69
Reinigung des Garraums Ihres Backofens s.70
Was bei Betriebsanomalien tun s.71
Kontaktaufnahme s.72
Inhalt
99639761_A_ML.QXP 01/06/2006 14:44 Page 50
A página está carregando...
A página está carregando...

53
DE
Wie ist Ihr Backofen aufgebaut
Knopf An / Aus
Einstellung der Zeitangaben
und Temperaturen
Temperatureinstellungen
Gardauer
Ende der Gardauer
Unabhängiger Zeitschalter
Funktionswählschalter
1
2
3
4
5
6
7
Ihre Programmschaltuhr im Detail
w
1
2
3
4
1
2
3
4
Leistungsanzeige
Anzeigefeld der Uhr und der
Zeitangaben
Temperaturanzeiger
Symbol des Kurzzeitweckers
w
START
STOP
AUTO
1
3
2
4
5
6
7
99639761_A_ML.QXP 01/06/2006 14:44 Page 53
A página está carregando...
A página está carregando...
A página está carregando...
A página está carregando...
A página está carregando...
A página está carregando...

60
Automatisch in der Mikrowelle auftauen
Auftauen von
Brot und
Teigwaren
Lebensmittel
pain baguette
Rundes Brot
Blätter- und Mürbeteig
Menge
100g
200g
400g
300g
Zeit
45 s - 55 s
1 - 1 min 30 s
2 min - 2 min 30 s
1 min
Lebensmittel
Jakobsmuscheln (ohne
Schale)
Krabben, geschält
rosa Krabben, ungeschält
Gambas (10 Stück)
Langustinen
Menge
500g
100g
200g
500g
1000g
Zeit
5 min
1 min 30 s - 2 min
5 -7 min
11 - 13 min
10 - 11 min
Lebensmittel
Kaubeljau- und
Schellfischfilet
Wittling, Kohlfisch
Scholle, Heilbutt (2 Stück)
Kohlfisch in Scheiben,
Lachs, Dorsch
Forelle (3 Stück)
Menge
400g
500g
300g
1 Stück
4 Stücke
540g
Zeit
3 - 4 min
3 - 4 min
2 min - 2 min 30 s
1 min 30 s - 2 min
4 - 5 min
4 - 5 min
Lebensmittel
Hähnchen, Tauben,
Putenschnitzel (2 Stück)
Hähnchenkeulen (4 Stück)
ganzes Hähnchen;
Kalbskotelett
Rinderbraten
Hackfleisch (4 Stück)
Fleisch in Stücken
Menge
500g - 600g
200g
1000g
1000g
600g
1000g
360g
600g
Zeit
5 - 7 min
3 - 4 min
7 - 9 min........
11 - 13 min
5 min
10 min
3 - 4 min
6 - 7 min
Lebensmittel
Erdbeeren
Himbeeren, Kirschen
Johannisbeeren,
Heidelbeeren
Menge
250g
250g
250g
Zeit
2 - 3 min
2 - 3 min
2 min 3 s - 4 min
Auftauen von
Weich- und
Krustentieren
Auftauen von
Fisch
Auftauen von
Fleisch
Auftauen von
Früchten
in die auf den
Boden des
Backofens
gestellte
Glasschale legen
in die auf den
Boden des
Backofens
gestellte
Glasschale legen
.....bei Halbzeit umdrehen
in die auf den
Boden des
Backofens
gestellte
Glasschale
legen
in die auf den
Boden des
Backofens
gestellte
Glasschale legen
in die auf den
Boden des
Backofens
gestellte
Glasschale legen
99639761_A_ML.QXP 01/06/2006 14:44 Page 60
A página está carregando...
A página está carregando...
A página está carregando...
A página está carregando...
A página está carregando...
A página está carregando...
A página está carregando...
A página está carregando...
A página está carregando...
A página está carregando...
A página está carregando...

72
Notieren Sie hier die auf dem Geräteschild Ihrer Abzugshaube stehenden Angaben:
Kontaktaufnahme
MADE IN FRANCE
220 - 240V ~ 50 Hz
BRANDT APPLIANCES SAS
7 rue Henri Becquerel
92500 RUEIL MALMAISON
De Dietrich
99639761_A_ML.QXP 01/06/2006 14:45 Page 72

73
NL
99639761_A_ML.QXP 01/06/2006 14:45 Page 73

74
In deze gebruikshandlei-
ding geeft symbol
veiligheidsaanwijzingen en symbool,
tips en praktische richtlijnen aan
Inleiding p.75
Praktische tips p.76
Presentatie van uw oven p.77
Overzicht van de oventoebehoren p.78
Installatie van uw oven
Aansluiting p.79
Nuttige afmetingen voor de inbouw van uw oven p.80
Gebruik van uw oven
Instellen van het uur van de oven p.81
Gebruik van de microgolf p.82
Automatisch ontdooien p.83-84
Gecombineerde functie oven/microgolf p.85
Traditionele ovenfunctie p.86
Instellen van persoonlijke vaste baktemperatuur p.87-88
Uitgesteld bakken p.89-90
Gebruik van de schakelklok p.91
Kinderbeveiliging p.91
Hoe zet ik de display in stand-by p.92
Bakwijzen van de oven p.92-93
Reiniging van de binnenzijde van de oven p.94
Problemen en oplossingen p.95
Contactpersoon p.96
Inhoud
99639761_A_ML.QXP 01/06/2006 14:45 Page 74
A página está carregando...
A página está carregando...
A página está carregando...
A página está carregando...
A página está carregando...
A página está carregando...
A página está carregando...
A página está carregando...
A página está carregando...
A página está carregando...
A página está carregando...
A página está carregando...
A página está carregando...
A página está carregando...
A página está carregando...
A página está carregando...
A página está carregando...
A página está carregando...
A página está carregando...
A página está carregando...
A página está carregando...
A página está carregando...
A página está carregando...
A página está carregando...
A página está carregando...
A página está carregando...
A página está carregando...
A página está carregando...
A página está carregando...
A página está carregando...
A página está carregando...
A página está carregando...
A página está carregando...
A página está carregando...
A página está carregando...
A página está carregando...
A página está carregando...
A página está carregando...
A página está carregando...
A página está carregando...
A página está carregando...
A página está carregando...
A página está carregando...
A página está carregando...
A página está carregando...
A página está carregando...
A página está carregando...
A página está carregando...
A página está carregando...
A página está carregando...
A página está carregando...
A página está carregando...
A página está carregando...
A página está carregando...
A página está carregando...
A página está carregando...
A página está carregando...
A página está carregando...
A página está carregando...
A página está carregando...
A página está carregando...
A página está carregando...
A página está carregando...
A página está carregando...
A página está carregando...
A página está carregando...
A página está carregando...
A página está carregando...
A página está carregando...
A página está carregando...
A página está carregando...
A página está carregando...
A página está carregando...
A página está carregando...
A página está carregando...
A página está carregando...
A página está carregando...
A página está carregando...
A página está carregando...
A página está carregando...
A página está carregando...
A página está carregando...
A página está carregando...
A página está carregando...
A página está carregando...
A página está carregando...
A página está carregando...
A página está carregando...
A página está carregando...
A página está carregando...
A página está carregando...
A página está carregando...
A página está carregando...
A página está carregando...
-
 1
1
-
 2
2
-
 3
3
-
 4
4
-
 5
5
-
 6
6
-
 7
7
-
 8
8
-
 9
9
-
 10
10
-
 11
11
-
 12
12
-
 13
13
-
 14
14
-
 15
15
-
 16
16
-
 17
17
-
 18
18
-
 19
19
-
 20
20
-
 21
21
-
 22
22
-
 23
23
-
 24
24
-
 25
25
-
 26
26
-
 27
27
-
 28
28
-
 29
29
-
 30
30
-
 31
31
-
 32
32
-
 33
33
-
 34
34
-
 35
35
-
 36
36
-
 37
37
-
 38
38
-
 39
39
-
 40
40
-
 41
41
-
 42
42
-
 43
43
-
 44
44
-
 45
45
-
 46
46
-
 47
47
-
 48
48
-
 49
49
-
 50
50
-
 51
51
-
 52
52
-
 53
53
-
 54
54
-
 55
55
-
 56
56
-
 57
57
-
 58
58
-
 59
59
-
 60
60
-
 61
61
-
 62
62
-
 63
63
-
 64
64
-
 65
65
-
 66
66
-
 67
67
-
 68
68
-
 69
69
-
 70
70
-
 71
71
-
 72
72
-
 73
73
-
 74
74
-
 75
75
-
 76
76
-
 77
77
-
 78
78
-
 79
79
-
 80
80
-
 81
81
-
 82
82
-
 83
83
-
 84
84
-
 85
85
-
 86
86
-
 87
87
-
 88
88
-
 89
89
-
 90
90
-
 91
91
-
 92
92
-
 93
93
-
 94
94
-
 95
95
-
 96
96
-
 97
97
-
 98
98
-
 99
99
-
 100
100
-
 101
101
-
 102
102
-
 103
103
-
 104
104
-
 105
105
-
 106
106
-
 107
107
-
 108
108
-
 109
109
-
 110
110
-
 111
111
-
 112
112
-
 113
113
-
 114
114
-
 115
115
-
 116
116
-
 117
117
-
 118
118
-
 119
119
-
 120
120
-
 121
121
-
 122
122
-
 123
123
-
 124
124
-
 125
125
-
 126
126
-
 127
127
-
 128
128
-
 129
129
-
 130
130
-
 131
131
-
 132
132
-
 133
133
-
 134
134
-
 135
135
-
 136
136
-
 137
137
-
 138
138
-
 139
139
-
 140
140
-
 141
141
-
 142
142
-
 143
143
-
 144
144
-
 145
145
-
 146
146
-
 147
147
-
 148
148
-
 149
149
-
 150
150
-
 151
151
-
 152
152
-
 153
153
-
 154
154
-
 155
155
-
 156
156
-
 157
157
-
 158
158
-
 159
159
-
 160
160
-
 161
161
-
 162
162
-
 163
163
-
 164
164
-
 165
165
-
 166
166
-
 167
167
-
 168
168


De Dietrich DME499XD1 Manual do proprietário
- Categoria
- Microondas
- Tipo
- Manual do proprietário
em outras línguas
- español: De Dietrich DME499XD1 El manual del propietario
- français: De Dietrich DME499XD1 Le manuel du propriétaire
- English: De Dietrich DME499XD1 Owner's manual
- Nederlands: De Dietrich DME499XD1 de handleiding
- Deutsch: De Dietrich DME499XD1 Bedienungsanleitung
- dansk: De Dietrich DME499XD1 Brugervejledning
Artigos relacionados
-
De Dietrich DME388XE1 Manual do proprietário
-
 De Dietrich DME488XD1 Manual do proprietário
-
 De Dietrich DME1188X Manual do usuário
-
 De Dietrich DME488XE1 Manual do proprietário
-
 De Dietrich DCI1202X Manual do proprietário
-
-
 De Dietrich DOP100BE1 Manual do proprietário
-
De Dietrich DKC7340X Guia de instalação
-
 De Dietrich DKC7340BB-3 Manual do proprietário
-
 De Dietrich DKE7335BB-1 Manual do proprietário


