
GAS RANGE
USE AND CARE GUIDE
CLEANING, MAINTENANCE, AND MORE

2
|
Wolf Customer Care 800.222.7820
Contents
4 Safety Precautions
6 Gas Range Features
7 Oven Operation
9 Surface Operation
13 Care Recommendations
14 Troubleshooting
15 Wolf Warranty
GAS RANGE

wolfappliance.com
|
3
Customer Care
The model and serial number are printed on the enclosed
product registration card. Both numbers are also listed on
the product rating plate. Refer to page 6 for rating plate
location. For warranty purposes, you will also need the date
of installation and name of your authorized Wolf dealer.
Record this information below for future reference.
SERVICE INFORMATION
Model Number
Serial Number
Date of Installation
Certied Service Name
Certied Service Number
Authorized Dealer
Dealer Number
If your product ever needs attention, be sure to use a Wolf
Factory Certied Service provider recommended by our
customer care center, or select one from our list of providers
available at wolfappliance.com/locator. All Factory Certi-
ed Service providers are carefully selected and thoroughly
trained by us.
GAS RANGE
Important Note
To ensure this product is installed and operated as safely
and efciently as possible, take note of the following types
of highlighted information throughout this guide:
IMPORTANT NOTE highlights information that is especially
important.
CAUTION indicates a situation where minor injury or product
damage may occur if instructions are not followed.
WARNING states a hazard that may cause serious injury or
death if precautions are not followed.
IMPORTANT NOTE: Throughout this guide, dimensions in
parentheses are millimeters unless otherwise specied.

4
|
Wolf Customer Care 800.222.7820
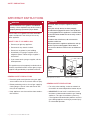
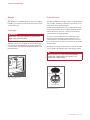
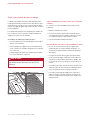
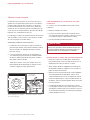
WARNING
A child or adult can tip this appliance and be
killed.
Verify the anti-tip device has been properly
installed and engaged. Ensure the anti-tip device
is re-engaged when this appliance is moved. Refer
to the illustrations below for how to verify correct
installation.
To reduce the risk of burns, do not move this
appliance while hot.
Do not operate this appliance without the anti-tip
device in place and engaged. Failure to do so
can result in death or serious burns to children or
adults.
SAFETY PRECAUTIONS
IMPORTANT INSTRUCTIONS
WARNING
If the information in this guide is not followed
exactly, a re or explosion may result, causing
property damage, personal injury or death.
Do not store or use gasoline or other ammable
vapors and liquids in the vicinity of this or any
other appliance.
WHAT TO DO IF YOU SMELL GAS:
• Do not try to light any appliance.
• Do not touch any electrical switch.
• Do not use any phone in your building.
• Immediately call your gas supplier from a
neighbor’s phone. Follow the gas supplier’s
instructions.
• If you cannot reach your gas supplier, call the
re department.
This appli ance must be properly installed and ser-
viced by a qualied installer, service agency or gas
supplier and grounded by a qualied technician.
GENERAL SAFETY PRECAUTIONS
• For safety when cooking, set burner controls so
ame does not extend beyond the bottom of pan.
•
IMPORTANT: Do not install a ventilation system
that blows air downward toward this gas cooking
appliance. This type of ventilation system may
cause ignition and combustion problems with this
gas cooking appliance resulting in personal injury
or unintended operation.
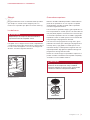
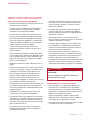
ANTI-TIP
DEVICE
ANTI-TIP
DEVICE
ENGAGED
Anti-tip device location
Anti-tip device engaged
GENERAL SAFETY PRECAUTIONS
• Read this guide carefully before using this appli-
ance to reduce risk of re, electric shock or injury.
• Before performing service, shut off gas supply by
closing the gas shut-off valve and shut off elec-
tricity to this appliance.
• Keep appliance area clear and free from combus-
tible material.

wolfappliance.com
|
5
SAFETY PRECAUTIONS
• Do not leave children alone or unattended in the
area where this appliance is in use. Never allow
children to sit or stand on the appliance.
• Do not store items of interest to children above or
at the back of this appliance, as they could climb
on the appliance to reach items and be injured.
• Do not use water on grease res. Smother the ame
or use a dry chemical or foam-type extinguisher.
• Never leave this appliance unattended when in use.
Boilovers and greasy spills may smoke or ignite.
• Do not heat unopened food containers, such as
baby food jars and cans. Pressure build-up may
cause the container to burst and cause injury.
• Do not store ammable materials near burners or
let grease or other ammable substances accumu-
late on this appliance.
WARNING
PROPOSITION 65 FOR CALIFORNIA RESIDENTS
Cancer and Reproductive Harm—
www.P65Warnings.ca.gov
COMMONWEALTH OF MASSACHUSETTS
• Installations and repairs must be performed by a
qualied or licensed contractor, plumber or gas
tter, qualied or licensed by the state, province or
region where this appliance is being installed.
• Use only gas shut-off valves approved for use
within the state, province or region where this
appliance is being installed.
• A exible gas connector, when used, must not
exceed 3' (.9 m).
IMPORTANT INSTRUCTIONS
GENERAL SAFETY PRECAUTIONS
• Do not use aluminum foil to line any part of this
appliance.
• Never use this appliance to warm or heat the room.
Doing so may result in carbon monoxide poisoning.
• Be sure the oven cool air intake (above the door)
and oven exhaust vent (below the door) are unob-
structed at all times.
• Wear proper apparel. Loose-tting or hanging
garments should never be worn while using this
appliance.
• Use extreme caution when moving a grease kettle
or disposing of hot grease.
• Always use dry pot holders when removing pans
from this appliance. Wet or damp pot holders can
cause steam burns. Do not use a towel or bulky
cloth in place of pot holders.
• Clean only those parts listed in this guide.
• Exercise caution when opening oven door. Let hot
air or steam escape before looking or reaching into
oven.
• Position oven racks in desired locations when oven
is cool. If a rack must be repositioned after the
oven is already hot, be sure pot holder does not
contact a hot heating element in the oven.
• Do not repair or replace any part of this appli-
ance unless specically recommended in literature
accompanying this appliance.
• Do not obstruct the ow of air to ensure proper
combustion and ventilation.
• When using this appliance, do not touch grates,
burner caps, burner bases or any other parts in
proximity to the ame. These components may be
hot enough to cause burns.
• Do not clean oven gasket; rubbing or moving the
gasket may compromise the door seal.

6
|
Wolf Customer Care 800.222.7820
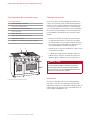
GAS RANGE FEATURES
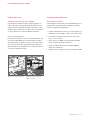
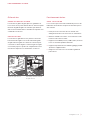
Gas Range Features
FEATURES
1
Product Rating Plate
2
Oven Control Knob
3
Convection Fan and Lights
4
Convection Oven
5
Surface Burner
6
Optional Charbroiler
7
Optional Griddle
8
Optional French Top (not shown)
48" gas range shown
2
4
7
5
1
6
3
Getting Started
We know you are eager to start cooking, but before you
do, please take some time to read this use & care guide.
Whether you are an occasional cook or an expert chef, it
will be to your benet to familiarize yourself with the safety
practices, features, operation and care recommendations of
your Wolf gas range.
• Clean the range thoroughly with hot water and mild
detergent. Rinse and dry with a soft cloth to remove
any residual oil and grease left from the manufacturing
process. Refer to care recommendations on page 13.
• Verify surface burner components are assembled
correctly.
• Optional charbroiler, griddle and French top require
special attention. Refer to pages 10–12.
CAUTION
Do not place cookware on oven oor or use aluminum
foil or other material to line oven oor or side walls.
Failure to adhere to this notice will damage the porce-
lain interior and will void your warranty.
Accessories
Bake stone and dehydration kits and other accessories
are avail able through an authorized Wolf dealer. For local
dealer information, visit the nd a showroom section of our
website, wolfappliance.com.

wolfappliance.com
|
7
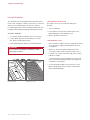
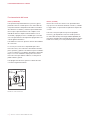
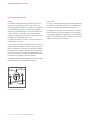
Oven Racks
OVEN RACK GUIDES
To insert the rack guides, place the guide into the oblong
holes on the oven side walls. Rotate the bottom of the rack
guide inward then lower into the bottom holes on the oven
oor. Refer to the illustration below.
OVEN RACKS
To insert a rack in the oven, place the rack anti-tip lock
under the side rack guide rails. Slide the rack back and lift
up to clear the rack stops. Continue to slide the rack back
until completely inside the oven. Refer to the illustration
below.
OVEN OPERATION
Oven Operation
PRIOR TO USE
To ensure all residual oil from the manufacturing process
has been removed, each oven must go through the fol-
lowing procedure.
1 Clean oven thoroughly with hot water and a mild deter-
gent. Rinse and dry with a soft cloth.
2 Turn on ventilation. Some smoke and odor is normal.
3 Set oven to BAKE 500°F (260°C) and allow oven to heat
for 30 minutes.
4 Set oven temperature to BROIL for an additional 30
minutes.
5 Turn oven off and allow it to cool with the door closed.
BOTTOM
HOLE
OBLONG
HOLE
ANTI-TIP
LOCK
RACK STOP
Oven rack guides
Oven rack anti-tip lock

8
|
Wolf Customer Care 800.222.7820
OVEN OPERATION
BROIL
The convection oven has an infrared broiler that cooks food
by searing the exterior and sealing in juices. Rack position
affects doneness.
To broil, place the rack in the appropriate position. Push and
turn the control knob counterclockwise to BROIL. Do not
preheat. Always use the two-piece broiler pan supplied with
the range and broil with the oven door closed.
Oven Operation
BAKE
To set the oven temperature, press and turn the oven con-
trol knob counterclockwise to the desired temperature. The
oven indicator light illuminates and preheat begins. Once
preheat is complete, the oven indicator light is no longer
illuminated. The light will cycle on and off as more heat is
required to maintain set temperature. Refer to the illustration
below.
To utilize convection, press the convection fan button.
Convection cooking is preferred for tender cuts of meat
and poultry, air-leavened baked foods, breads, cakes and
cookies. For best results, cook foods uncovered in low-
sided pans. Standard cooking is best for less tender cuts of
meat that should be covered, covered one-dish recipes and
pizzas.
To turn the oven light on, press the light button. Refer to the
illustration below.
INDICATOR LIGHT
CONVECTION
FAN
OVEN
LIGHT
Oven control knob

wolfappliance.com
|
9
SURFACE OPERATION
Sabbath
This appliance is certied by Star-K to meet strict religious
regulations in conjunction with specic instructions found
on www.star-k.org.
Oven Light
WARNING
Verify power is disconnected from the electrical box
before replacing the light bulb.
Allow the oven to cool completely, then unscrew the light
lens and remove the light bulb by unscrewing it from the
socket. Replace with a 40-watt halogen bulb. Refer to the
illustration below.
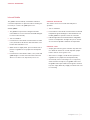
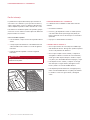
Surface Burners
The dual-stacked burner design combines all burner parts in
one assembly. The burner cap must be seated atly on the
burner. Refer to the illustration below.
To light a burner, push and turn the corresponding control
knob counterclockwise to HI. The igniter will begin to click
until the burner is lit. Once lit, continue to turn the knob
counterclockwise to desired setting.
To select a simmer setting, turn the control knob to the
detent at the lowest setting. Push and continue to turn
counterclockwise. The ame will transition to the second
tier on the burner cap. Continue to turn the knob to desired
simmer setting.
During a power outage, surface burners can be lit manually.
Turn the knob to HI and light using a multi-purpose lighter.
CAUTION
Never leave pans on a high setting unattended. Be
careful when cooking food in fat or grease; it can
become hot enough to ignite.
IGNITERBURNER
CAP
SEALED BURNER
Dual-stacked burner
LIGHT
LENS
Light bulb replacement

10
|
Wolf Customer Care 800.222.7820
Infrared Charbroiler
The charbroiler has an infrared burner that transfers intense
heat to food, searing the outside to seal in juices. Cook food
directly on the charbroiler grate, do not use cookware.
For optimal performance of the charbroiler and provide even
cooking, install the blank-off plate provided with the range.
Assemble charbroiler:
1 To assemble, position charbroiler frame on the range.
2 Position blank-off plate centered directly on ceramic
tiles. Refer to the illustration below.
3 Install charbroiler grate. Refer to the illustration below.
CAUTION
Use care when assembling the charbroiler to avoid
contact with the igniter.
CHARBROILER OPERATION
The stainless steel cover must be removed prior to
operation.
1 Turn on ventilation.
2 Push and turn control knob counterclockwise to HI.
Igniter will begin to click until burner is lit.
3 Allow to preheat for 10 minutes.
CHARBROILER CARE
• After cooking is complete, allow the charbroiler to remain
on for 10 minutes. High heat will help burn off excess
food particles.
• When cool, remove the grate and place in the sink.
Cover with wet dish towels and pour hot water over it
to help loosen residue. Clean with soap and a scouring
pad. Rinse and dry.
• To clean the frame, remove and place in the sink. Soak
in hot water and mild detergent. Wash thoroughly and
scrub with a scouring pad.
• To clean the blank-off plate, remove and use a soap-
lled scouring pad to remove residue. Clean with hot
water and mild detergent.
IGNITER
BLANK-OFF
PLATE
CHARBROILER
GRATE
Blank-off plate
Charbroiler grate
SURFACE OPERATION

wolfappliance.com
|
11
SURFACE OPERATION
Infrared Griddle
The griddle is thermostatically controlled to maintain a
consistent temperature. To prevent food from sticking, it is
necessary to “season” the griddle prior to use.
Season griddle:
1 The griddle has a protective coating that must be
removed before use. Use hot water and mild detergent
to remove. Rinse and dry.
2 Turn on ventilation.
3 Push and turn control knob counterclockwise to 350°F
(175°C) and heat for 30 minutes. After 30 minutes, turn
knob to OFF and allow to cool.
4 While surface is slightly warm, pour a small amount of
peanut or vegetable oil on a paper towel and spread
evenly.
5 Push and turn control knob to 350°F (175°C). Heat until
griddle begins to smoke, then turn knob to OFF and
allow to cool. Once cool, wipe off any excess oil.
GRIDDLE OPERATION
The stainless steel cover must be removed prior to
operation.
1 Turn on ventilation.
2 Push and turn control knob counterclockwise to desired
temperature. Igniter will begin to click until burner is lit.
Double griddle has separate controls for each side.
3 Indicator light above the knob illuminates until griddle
reaches set temperature. The light will cycle on and off
as more heat is required to maintain set temperature.
GRIDDLE CARE
• Scrape grease into the grease collection tray after each
use. When the surface has cooled, wipe with a paper
towel to remove excess grease or oil.
• After each use, reapply a small amount of peanut or
vegetable oil on a paper towel and spread evenly.
• Occasionally, remove seasoning. Pour
1
/2 cup (120 ml)
warm water and 1 teaspoon
(5 ml) griddle cleaner onto
the griddle and scrape residue into the grease collection
tray, then empty. When dry, reapply a small amount of oil
for seasoning.

12
|
Wolf Customer Care 800.222.7820
SURFACE OPERATION
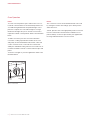
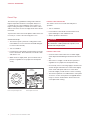
French Top
The French top is a graduated cooking surface with the
highest temperature under the center plate. Always use
cookware, do not cook food directly on the surface. For
higher cooking heat, place cookware closer to the center
and for lower heat, closer to the edges. Refer to the illustra-
tion below.
To protect the surface from food splatters and moisture, it is
necessary to “season” the French top prior to use.
Season French top:
1 The French top has a protective coating that must be
removed before use. Use hot water and mild detergent
to remove. Rinse and dry.
2 Turn on ventilation.
3 Push and turn control knob counterclockwise to HI and
heat for 30 minutes. After 30 minutes, turn knob to OFF
and allow to cool.
4 While surface is slightly warm, pour a small amount of
peanut or vegetable oil on a paper towel and spread
evenly.
HIGH
HIGH
HIGH
LOW
LOW
LOW
LOW
MED MED
CENTER
PLATE HOOK
French top heating zones
Center plate removal
FRENCH TOP OPERATION
The stainless steel cover must be removed prior to
operation.
1 Turn on ventilation.
2 Push and turn control knob counterclockwise to HI.
Igniter will begin to click until burner is lit.
3 Allow to preheat for 30 minutes.
CAUTION
Never leave pans on a high heat zone unattended.
Be careful when cooking food in fat or grease; it can
become hot enough to ignite.
FRENCH TOP CARE
• Clean the entire surface after each use while slightly
warm. Wipe with mild detergent and water. Rinse and
dry.
• After each use, reapply a small amount of peanut or
vegetable oil on a paper towel and spread evenly.
• Occasionally, remove seasoning. Apply a small amount
of white vinegar and water to the surface while slightly
warm. Scrub and repeat until excess oil has been
removed. Reapply a small amount of oil for seasoning.
• The French top burner is located below the center plate.
To remove, use the center plate hook supplied with the
range as shown in the illustration. Never remove the
center plate while cooking.

wolfappliance.com
|
13
CARE RECOMMENDATIONS
Care Recommendations
CLEANING
Stainless steel Use a nonabrasive stainless steel cleaner and apply with a soft lint-free cloth. To bring out the natural luster,
lightly wipe surface with a water-dampened microber cloth followed by a dry polishing chamois. Always
follow the grain of stainless steel.
Burner grates
Oven rack guides
Remove and place on a at surface near the sink. Clean with hot water and mild detergent or paste of
baking soda and water. Do not immerse in water. Towel dry.
Burner pan Remove surface debris before cleaning to help speed up the cleaning process and decrease the chance of
scratching the surface during cleaning. Using mild abrasive cleaners or spray degreasers, clean and rinse
the surface and dry immediately to avoid streaking. To clean hard water stains, use white vinegar and water.
Rinse and dry immediately.
Surface burners Allow to cool. Use mild detergent or spray degreaser to clean. Rinse with water and towel dry.
Charbroiler
Griddle
French top
Refer to pages 10–12 for care recommendations.
Control knobs
Bezels
Using a damp cloth, wipe with a mild detergent or spray degreaser; rinse and dry. Do not place in
dishwasher.
Oven interior Use mild abrasive cleaners, spray degreasers. Use a razor blade to gently lift baked on foods from oven
cavity and window. For stubborn stains, spray with a mild abrasive cleaner or spray degreaser. Wash the
entire oven cavity with soap and water to remove all cleaning chemicals.
Broiler pan To clean the upper rack, use mild detergent and a scouring pad. Rinse and dry. To clean the bottom pan,
discard grease and wash with hot water and mild detergent. Rinse and dry. The stainless steel upper rack is
dishwasher safe, however, do not place any porcelain-coated rack or pan in dishwasher.

14
|
Wolf Customer Care 800.222.7820
TROUBLESHOOTING
Troubleshooting
OPERATION
Range does not operate.
• Verify power is on.
• Verify electrical power to range and home circuit breaker
is on.
OVEN
Oven temperature issue.
• Contact Wolf customer care at 800-222-7820 for
recommendations.
Oven ‘pops’ or ‘bangs’ during preheat or cool down.
• Normal with new oven cavity expansion and contraction.
• If it persists, contact Wolf customer care at
800-222-7820.
RANGE SURFACE
Erratic ame, poor ignition or no ignition.
• Verify burner caps are positioned properly.
• Clean burner and igniter properly.
• If water spilled over recently, let area dry completely.
Use hair dryer, if desired.
• If burner cap secures to burner head, verify it is tightly
fastened.
• Push in knob, then release. Verify knob springs back.
Charbroiler clicks continually.
• Verify knob is set fully at HI.
Oven or griddle indicator light ashes.
• Turn knob off, then back on. Flame was lost and unit
entered safety lock-out mode.
SERVICE
• Maintain the quality built into your product by contacting
Wolf Factory Certied Service. For the name of the
nearest Wolf Factory Certied Service, check the contact
& support section of our website, wolfappliance.com or
call Wolf customer care at 800-222-7820.
• When contacting service, you will need the model and
serial number of your product. Both numbers are listed
on the product rating plate. Refer to page 6 for rating
plate location.
• For warranty purposes, you will also need the date of
installation and name of your authorized Wolf dealer. This
information should be recorded on page 3 of this guide.
Sub-Zero, Sub-Zero & Design, Sub-Zero & Snowake Design, Dual Refrigeration, The Living Kitchen, Great American Kitchens The Fine Art of Kitchen Design, Wolf, Wolf &
Design, Wolf Gourmet, W & Design, red colored knobs, Cove, and Cove & Design are registered trademarks and service marks of Sub-Zero Group, Inc. and its subsidiaries.
All other trademarks are property of their respective owners in the United States and other countries.

Wolf Appliance Residential Limited Warranty
FOR RESIDENTIAL USE
FULL TWO YEAR WARRANTY*
For two years from the date of original installation, this Wolf Appliance product warranty covers all parts
and labor to repair or replace, under normal residential use, any part of the product that proves to be
defective in materials or workmanship. All service provided by Wolf Appliance under the above warranty
must be performed by Wolf factory certied service, unless otherwise specied by Wolf Appliance, Inc.
Service will be provided during normal business hours.
LIMITED FIVE YEAR WARRANTY
For ve years from the date of original installation, Wolf Appliance will repair or replace the following
parts that prove to be defective in materials or workmanship: gas burners (excludes appearance), electric
heating elements, blower motors (ventilation hoods), electronic control boards, magnetron tubes and
induction generators. If the owner uses Wolf factory certied service, the service provider will repair or
replace these parts with the owner paying for all other costs, including labor. If the owner uses non-certi-
ed service, the owner must contact Wolf Appliance, Inc. (using the information below) to receive repaired
or replacement parts. Wolf Appliance will not reimburse the owner for parts purchased from non-certied
service or other sources.
TERMS APPLICABLE TO EACH WARRANTY
The warranty applies only to products installed for normal residential use. The warranty applies only to
products installed in any one of the fty states of the United States, the District of Columbia or the ten
provinces of Canada. This warranty does not cover any parts or labor to correct any defect caused by
negligence, accident or improper use, maintenance, installation, service or repair.
THE REMEDIES DESCRIBED ABOVE FOR EACH WARRANTY ARE THE ONLY ONES THAT WOLF APPLIANCE,
INC. WILL PROVIDE, EITHER UNDER THIS WARRANTY OR UNDER ANY WARRANTY ARISING BY OPERATION
OF LAW. WOLF APPLIANCE, INC. WILL NOT BE RESPONSIBLE FOR ANY CONSEQUENTIAL OR INCIDEN-
TAL DAMAGES ARISING FROM THE BREACH OF THIS WARRANTY OR ANY OTHER WARRANTY, WHETHER
EXPRESS, IMPLIED OR STATUTORY.
Some states do not allow the exclusion or limitation of incidental or consequential damages, so the above
limitation or exclusion may not apply to you. This warranty gives you specic legal rights and you may also
have other legal rights that vary from state to state.
To receive parts and/or service and the name of Wolf factory certied service nearest you, contact Wolf
Appliance, Inc., P.O. Box 44848, Madison, WI 53744; check the contact & support section of our website,
wolfappliance.com, email us at [email protected] or call 800-222-7820.
*Stainless steel (doors, panels, handles, product frames and interior surfaces) are covered by a limited
60-day parts and labor warranty for cosmetic defects.
*Replacement lters for ventilation hood recirculating kits are not covered by the product warranty.

2
|
Atención al cliente de Wolf 800.222.7820
Contenido
4 Precauciones de seguridad
6 Funciones de la estufa de gas
7 Funcionamiento del horno
9 Funcionamiento de la supercie
13 Recomendaciones sobre el cuidado
14 Resolución de problemas
15 Garantía de Wolf
ESTUFAS DE GAS

wolfappliance.com
|
3
Atención al cliente
El modelo y número de serie están impresos en la tarjeta
de registro del producto adjunta. Los dos números también
aparecen en la placa de datos del producto. Consulte la
página 6 para encontrar la placa de datos. Para nes de la
garantía, usted también necesitará la fecha de instalación y
el nombre de su distribuidor autorizado de Wolf. Anote esta
información abajo para referencia futura.
INFORMACIÓN PARA SERVICIO
Número de modelo
Número de serie
Fecha de instalación
Nombre de servicio certicado
Número de servicio certicado
Distribuidor autorizado
Número de distribuidor
Si su producto alguna vez necesita servicio asegúrese de
usar un proveedor de servicios certicado por Wolf y
recomendado por nuestro centro de atención al cliente,
o seleccione uno de nuestra lista de proveedores en
wolfappliance.com/locator. Todos los proveedores de los
centros de servicio autorizados han sido cuidadosamente
seleccionados y entrenados a fondo por nosotros.
ESTUFAS DE GAS
Aviso importante
Para garantizar que este producto se instale y opere de
la forma más segura y eciente posible, tome nota de los
siguientes tipos de información resaltada en esta guía:
AVISO IMPORTANTE señala la información que es especial-
mente importante.
PRECAUCIÓN indica una situación en la que se pueden
sufrir heridas leves o provocar daños al producto si no se
siguen las instrucciones.
ADVERTENCIA indica peligro de que se produzcan heridas
graves o incluso la muerte si no se siguen las precauciones.
AVISO IMPORTANTE: en toda esta guía, las dimensiones
entre paréntesis son milímetros, a menos que se especique
lo contrario.

4
|
Atención al cliente de Wolf 800.222.7820
ADVERTENCIA
Si un niño o un adulto jalan el electrodoméstico
este puede volcarse y causarles la muerte.
Compruebe que el dispositivo antivuelco haya
sido instalado y esté enganchado correctamente.
Asegúrese de volver a enganchar el disposi-
tivo antivuelco después de cambiar el electro-
doméstico de lugar. Consulte las ilustraciones
siguientes para saber cómo comprobar su insta-
lación correcta.
Para reducir el riesgo de quemaduras, no mueva
el electrodoméstico mientras está caliente.
No opere este electrodoméstico sin el dispositivo
antivuelco en posición y enganchado. No seguir
esta instrucción puede resultar en la muerte o en
graves quemaduras en niños o adultos.
PRECAUCIONES DE SEGURIDAD
INSTRUCCIONES IMPORTANTES
ADVERTENCIA
Si no se sigue la información de esta guía al
pie de la letra se puede provocar un incendio o
una explosión, y causar daños a la propiedad,
lesiones personales o incluso la muerte.
No almacene ni utilice gasolina u otros vapores o
líquidos ignífugos en las proximidades de este o
cualquier otro electrodoméstico.
QUÉ HACER SI PERCIBE OLOR A GAS:
• No intente encender ningún electrodoméstico.
• No toque ningún interruptor eléctrico.
• No utilice ningún teléfono en su edicio.
• Llame inmediatamente a su proveedor de gas
desde el teléfono de un vecino. Siga las instruc-
ciones del proveedor de gas.
• Si no puede contactar a su proveedor de gas,
llame al departamento de bomberos.
Este electrodoméstico debe ser instalado y
reparado por un técnico calicado, una agencia
de servicio o un proveedor de gas y conectado a
tierra por un técnico calicado.
PRECAUCIONES GENERALES DE SEGURIDAD
• Para mayor seguridad al cocinar, programe los
controles del quemador de manera que la llama no
se extienda más allá del fondo de la sartén.
•
IMPORTANTE: no instale un sistema de ventilación
que sople aire hacia abajo en dirección al aparato
de cocción de gas. Este tipo de sistema de ven-
tilación puede ocasionar problemas de ignición y
combustión con este aparato de cocción de gas
y causar lesiones personales o funcionamiento
accidental.
ANTI-TIP
DEVICE
ANTI-TIP
DEVICE
ENGAGED
Ubicación del dispositivo
antivuelco
Dispositivo antivuelco
enganchado
DISPOSITIVO
ANTIVUELCO
DISPOSITIVO
ANTIVUELCO
ENGANCHADO
PRECAUCIONES GENERALES DE SEGURIDAD
• Lea este manual con atención antes de utilizar
este electrodoméstico para reducir el riesgo de
incendio, descarga eléctrica o lesiones.
• Antes de dar servicio, cierre el suministro de gas
mediante la llave de paso de gas y desconecte el
electrodoméstico de la corriente eléctrica.
• Mantenga el área del electrodoméstico limpia y
libre de materiales combustibles.

wolfappliance.com
|
5
PRECAUCIONES DE SEGURIDAD
• No deje a los niños menores solos ni desatendidos
en el área donde se utiliza este electrodoméstico.
Nunca permita que los niños se sienten o paren
sobre el electrodoméstico.
• No almacene artículos que puedan llamar la aten-
ción de niños menores arriba o detrás de este
electrodoméstico, ya que podrían subirse al electro-
doméstico para alcanzar los objetos y sufrir lesiones.
• No utilice agua en incendios causados por grasas.
Sofoque el fuego o utilice extinguidor químico seco
o de espuma.
• Nunca deje este electrodoméstico desatendido
cuando se encuentre en uso. El rebosamiento por
ebullición y los derrames de grasa pueden generar
humo o incendiarse.
• No caliente recipientes de comida cerrados, como
frascos de alimentos para bebés o enlatados. La
acumulación de presión puede hacer que el recipi-
ente explote y cause lesiones.
• No almacene materiales ignífugos cerca de los
quemadores y tampoco permita la acumulación
de grasa u otras sustancias ignífugas en este
electrodoméstico.
ADVERTENCIA
PROPUESTA 65 PARA RESIDENTES DE
CALIFORNIA
Cáncer y Daño Reproductivo—
www.P65Warnings.ca.gov
MANCOMUNIDAD DE MASSACHUSETTS
• Las instalaciones y reparaciones deben ser real-
izadas por un contratista, plomero o un instalador
de gas autorizado o calicado por el estado, la
provincia o región donde se va a instalar este
electrodoméstico.
• Utilice únicamente llaves de paso para gas apro-
badas para su uso dentro del estado, provincia o
región donde se va a instalar este electrodoméstico.
• Un conector de gas exible, cuando se utilice, no
debe sobrepasar 3' (.9 m).
INSTRUCCIONES IMPORTANTES
PRECAUCIONES GENERALES DE SEGURIDAD
• No utilice papel de aluminio para forrar ninguna
parte de este electrodoméstico.
• Nunca utilice este electrodoméstico para entibiar
o calentar la habitación. Hacerlo puede resultar en
intoxicación por monóxido de carbono.
• Asegúrese de que la entrada de aire fresco del
horno (arriba de la puerta) y la rejilla de ventilación
del horno (abajo de la puerta) estén libres de obs-
táculos en todo momento.
• Utilice ropa adecuada. Nunca debe utilizar ropa
holgada ni con aplicaciones sueltas al utilizar este
electrodoméstico.
• Tenga mucho cuidado al mover un hervidor con
grasa o desechar la grasa caliente.
• Utilice siempre guantes de cocina secos al retirar las
cacerolas de este electrodoméstico. Los guantes de
cocina húmedos o mojados pueden provocar que-
maduras por vapor. No utilice una toalla ni un paño
voluminoso en lugar de los guantes de cocina.
• Limpie solamente las partes enumeradas en este
manual.
• Tenga cuidado al abrir la puerta del horno. Deje
salir el aire caliente o el vapor antes de mirar o
meter las manos dentro del horno.
• Coloque las rejillas del horno a la altura deseada
cuando el horno esté frío. Si debe cambiar una
rejilla de posición cuando el horno esté caliente,
asegúrese de que el guante de cocina no entre en
contacto con un elemento calefactor caliente al
interior del horno.
• No intente reparar ni cambiar parte alguna de este
electrodoméstico a menos que esté especíca-
mente recomendado en la documentación que
acompaña a este electrodoméstico.
• No obstruya el ujo de aire para asegurar una
combustión y ventilación adecuadas.
• Cuando utilice este electrodoméstico, no toque las
rejillas, las tapas de los quemadores, las bases de
los quemadores o cualquier otra parte en proxim-
idad a la llama. Estos componentes pueden estar
lo sucientemente calientes como para causar
quemaduras.
• No limpie el empaque del horno, ya que frotar o
mover el empaque puede comprometer el sello de
la puerta.

6
|
Atención al cliente de Wolf 800.222.7820
FUNCIONES DE LAS ESTUFAS DE GAS
Funciones de las estufas de gas
CARACTERÍSTICAS
1
Placa de datos del producto
2
Perilla de control del horno
3
Ventilador de convección y luces
4
Horno de convección
5
Quemador superior
6
Parrilla opcional
7
Plancha opcional
8
Encimera francesa opcional (no representada)
Representación de la estufa de gas de 48"
2
4
7
5
1
6
3
Primeros pasos
Sabemos que está ansioso por empezar a cocinar, pero
antes de hacerlo, dedique un poco de tiempo a leer este
manual de uso y cuidado. Si usted es un cocinero ocasional
o un chef experto, se beneciará de familiarizarse con las
prácticas de seguridad, características, funcionamiento y
recomendaciones de cuidado de su estufa de gas de Wolf.
• Limpie cuidadosamente la estufa con agua caliente y
detergente suave. Enjuague y seque con un paño suave
para eliminar los residuos de aceite y grasa residual que
dejó el proceso de fabricación. Consulte las recomenda-
ciones sobre el cuidado en la página 13.
• Compruebe que los componentes del quemador supe-
rior estén ensamblados correctamente.
• La parrilla, plancha y la encimera francesa opcionales
requieren de atención especial. Consulte las páginas
10 a 12.
PRECAUCIÓN
No coloque utensilios de cocina sobre el piso del horno
ni utilice papel de aluminio u otro material para recubrir
el piso o las paredes laterales del horno. Si hace caso
omiso de este aviso se dañará el interior de porcelana
y se anulará la garantía.
Accesorios
Los kits de piedra para hornear y de deshidratación y otros
accesorios están disponibles a través de un distribuidor
autorizado de Wolf. Para obtener más información acerca
de los distribuidores locales, visite la sección para encontrar
una sala de exposición de nuestro sitio web, wolfappliance.
com.
A página está carregando...
A página está carregando...
A página está carregando...
A página está carregando...
A página está carregando...
A página está carregando...
A página está carregando...
A página está carregando...
A página está carregando...
A página está carregando...
A página está carregando...
A página está carregando...
A página está carregando...
A página está carregando...
A página está carregando...
A página está carregando...
A página está carregando...
A página está carregando...
A página está carregando...
A página está carregando...
A página está carregando...
A página está carregando...
A página está carregando...
A página está carregando...
-
 1
1
-
 2
2
-
 3
3
-
 4
4
-
 5
5
-
 6
6
-
 7
7
-
 8
8
-
 9
9
-
 10
10
-
 11
11
-
 12
12
-
 13
13
-
 14
14
-
 15
15
-
 16
16
-
 17
17
-
 18
18
-
 19
19
-
 20
20
-
 21
21
-
 22
22
-
 23
23
-
 24
24
-
 25
25
-
 26
26
-
 27
27
-
 28
28
-
 29
29
-
 30
30
-
 31
31
-
 32
32
-
 33
33
-
 34
34
-
 35
35
-
 36
36
-
 37
37
-
 38
38
-
 39
39
-
 40
40
-
 41
41
-
 42
42
-
 43
43
-
 44
44


em outras línguas
- español: Sub-Zero GR304 Guía del usuario
- français: Sub-Zero GR304 Mode d'emploi
- English: Sub-Zero GR304 User guide
Artigos relacionados
-
Sub-Zero DF606F Guia de usuario
-
Sub-Zero IR304TE/S/TH Guia de usuario
-
Wolf SO24TE/S/TH Manual do usuário
-
Sub-Zero CSO30CM/B/TH Guia de usuario
-
Sub-Zero CW24/B Guia de usuario
-
Sub-Zero CG243TF/S/LP Manual do proprietário
-
Sub-Zero DO30PM/S/PH Guia de usuario
-
-
Sub-Zero OG30 Guia de usuario
-
Outros documentos
-
LG LRGL5825D Guia de usuario
-
-
Vulcan VCRG48-T Manual do proprietário
-
-
 Blackstone 22″ Tabletop Griddle Manual do usuário
-
Wolf CG365TSX Manual do usuário
-
 Blackstone 1818 Manual do proprietário
-
 Blackstone 1554 Manual do proprietário
-
-
 Blackstone 1863 Manual do proprietário


