
Need help for your product?
Visit Jabra.com/help/elite25h
Other inquiries:
Jabra.com/contact
Faites passer votre son dans une autre dimension
Jabra.com/register | Lleve el sonido a un nuevo nivel
Jabra.com/register | Leve o seu som para o próximo nível
Jabra.com/register
81-04492 B

MOVE YOUR SOUND TO THE NEXT LEVEL
Jabra.com/register
GET STARTED
Jabra Elite 25h
Need help for your product?
Visit Jabra.com/help/elite25h
Other inquiries:
Jabra.com/contact

1
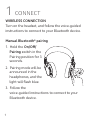
1 CONNECT
Manual Bluetooth
®
pairing
1. Hold the On/O/
Pairing switch in the
Pairing position for 3
seconds.
2. Pairing mode will be
announced in the
headphones, and the
light will flash blue.
3. Follow the
voice-guided instructions to connect to your
Bluetooth device.
WIRELESS CONNECTION
Turn on the headset, and follow the voice-guided
instructions to connect to your Bluetooth device.

2
EN
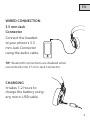
WIRED CONNECTION
3.5 mm Jack
Connector
Connect the headset
to your phone’s 3.5
mm Jack Connector
using the audio cable.
TIP: Bluetooth connections are disabled when
connected to the 3.5 mm Jack Connector.
CHARGING
It takes 1-2 hours to
charge the battery using
any micro-USB cable.

3
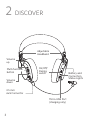
2 DISCOVER
Micro-USB Port
(charging only)
Adjustable
Headband
Volume
up
Volume
down
Multi-function
button
3.5 mm
Jack Connector
Battery and
Connection
Status Lights
On/O/
Pairing
switch

4
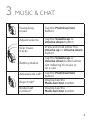
3 MUSIC & CHAT
Pause/play
music
Tap the Multi-function
button
Adjust volume
Tap the Volume up or
Volume down button
Skip music
tracks
Press and hold either the
Volume up or Volume down
button
Battery status
Tap the Volume up or
Volume down button when
not listening to music or
on a call
Answer/end call*
Tap the Multi-function
button
Reject call*
Double-tap the
Multi-function button
Redial last
number*
Double-tap the
Multi-function button

5
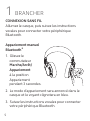
1 BRANCHER
CONNEXION SANS FIL
Allumez le casque, puis suivez les instructions
vocales pour connecter votre périphérique
Bluetooth.
Appariement manuel
Bluetooth
®
1. Glissez le
commutateur
Marche/Arrêt/
Appariement
à la position
Appariement
pendant 3 secondes.
2. Le mode d’appariement sera annoncé dans le
casque et le voyant clignotera en bleu.
3. Suivez les instructions vocales pour connecter
votre périphérique Bluetooth.

6
FRCA
BRANCHEMENT PAR CÂBLE
Prise de 3,5 mm
Connectez le casque
à la prise de votre
téléphone 3,5 mm à
l'aide du câble audio.
CONSEIL: Les connexions
Bluetooth sont désactivées
lorsque le casque est connecté
à la prise 3,5 mm.
CHARGE
Une pile peut prendre de
1 à 2 heures pour être
chargée via un câble
micro-USB.

7
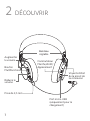
Port micro-USB
(uniquement pour le
chargement)
Bandeau
réglable
Augmenter
le volume
Réduire le
volume
Bouton
Multifonctions
Prise de 3,5 mm
Voyants d’état
de la pile et de
la connexion
2 DÉCOUVRIR
Commutateur
Marche/Arrêt/
Appariement

8
3
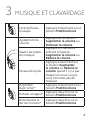
MUSIQUE ET CLAVARDAGE
Lecture/Pause
musique
Appuyez brièvement sur le
bouton Multifonctions
Ajustement du
volume
Appuyez sur le bouton
Augmenter le volume ou
Diminuer le volume
Sauter les pistes
de musique
Appuyez et maintenez
enfoncé le bouton
Augmenter le volume ou
Réduire le volume
Niveau de la pile
Appuyez brièvement sur
le bouton Augmenter
le volume ou Réduire le
volume quand il n'y a pas
d'appel en cours ou que
vous n'écoutez pas de
musique
Répondre/
Raccrocher*
Appuyez brièvement sur le
bouton Multifonctions
Refuser un appel*
Appuyez deux fois sur le
bouton Multifonctions
Recomposez le
dernier numéro*
Appuyez deux fois sur le
bouton Multifonctions

9
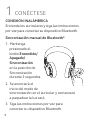
1 CONÉCTESE
Sincronización manual de Bluetooth
®
1. Mantenga
presionado el
botón Encendido/
Apagado/
Sincronización
en la posición de
Sincronización
durante 3 segundos.
2. Se anunciará el
inicio del modo de
sincronización en el auricular y comenzará
a parpadear la luz azul.
3. Siga las instrucciones por voz para
conectar su dispositivo Bluetooth.
CONEXIÓN INALÁMBRICA
Encienda los auriculares y siga las instrucciones
por voz para conectar su dispositivo Bluetooth.

10
ESMX
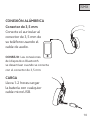
CONEXIÓN ALÁMBRICA
Conector de 3,5 mm
Conecte el auricular al
conector de 3,5mm de
su teléfono usando el
cable de audio.
CONSEJO: Las conexiones
del dispositivo Bluetooth
se desactivan cuando se conecta
con el conector de 3,5 mm.
CARGA
Lleva 1-2 horas cargar
la batería con cualquier
cable microUSB.

11
Puerto microUSB
(solo carga)
Volumen +
Volumen -
Conector de 3,5 mm
Botón En-
cendido/
Apagado/
Sincroni-
zación
2 DESCUBRA
Cinta ajustable
para la cabeza
Botón
Multifuncional
Luces indicado-
ras del estado
de conexión y
batería

12
3 MÚSICA Y PLÁTICAS
Pausar/reproducir
música
Pulse el botón
Multifuncional.
Ajustar del
volumen
Pulse el botón de Volumen
+ o Volumen -.
Saltar pistas de
música
Mantenga presionado el
botón de
Volumen + o el de Volu-
men -.
Estado de la
batería
Pulse el botón de Volu-
men + o
Volumen - cuando no esté
en una llamada o escuchan-
do música.
Responder/fina-
lizar llamadas*
Pulse el botón Multifun-
cional.
Rechazar
llamadas*
Pulse dos veces el botón
Multifuncional.
Volver a marcar el
último número*
Pulse dos veces el botón
Multifuncional.

13
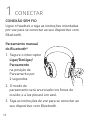
1 CONECTAR
Pareamento manual
do Bluetooth
®
1. Segure o interruptor
Ligar/Desligar/
Pareamento
na posição de
Pareamento por
2 segundos.
2. O modo de
pareamento será anunciado nos fones de
ouvido, e a luz piscará em azul.
3. Siga as instruções de voz para se conectar ao
seu dispositivo com Bluetooth.
CONEXÃO SEM FIO
Ligue o headset, e siga as instruções orientadas
por voz para se conectar ao seu dispositivo com
Bluetooth.

14
PTBR
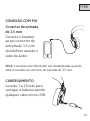
CONEXÃO COM FIO
Conector de entrada
de 3,5 mm
Conecte o headset
ao seu conector de
entrada de 3,5 mm
do telefone usando o
cabo de áudio.
DICA: Conexões com Bluetooth são desabilitadas quando
está conectado ao conector de entrada de 3,5 mm.
CARREGAMENTO
Leva de 1 a 2 horas para
carregar a bateria usando
qualquer cabo micro-USB.

15
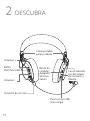
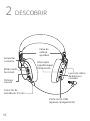
Porta micro-USB
(apenas carregamento)
Faixa de
cabeça
ajustável
Aumentar
o volume
Diminuir
volume
Conector de
entrada de 3,5 mm
Luzes de status
da bateria e
conexão
Interruptor
Ligar/Desligar/
Pareamento
2 DESCOBRIR
Botão multi-
funcional

16
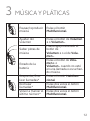
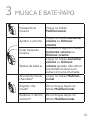
3 MÚSICA E BATEPAPO
Pausar/tocar
música
Toque no botão
Multifuncional
Ajustar o volume
Toque no botão Aumentar
volume ou Diminuir
volume
Pular faixas de
música
Pressione e segure o botão
Aumentar volume ou
Diminuir volume
Status da bateria
Toque no botão Aumentar
volume ou Diminuir
volume quando não estiver
escutando música nem
estiver em uma chamada
Atender/terminar
chamada*
Toque no botão Multifun-
cional
Rejeitar cha-
mada*
Dê um toque duplo no
botão Multifuncional
Rediscar o último
número*
Dê um toque duplo no
botão Multifuncional

17
Warning and Declarations
Corded and Wireless- North America
Please read through all applicable sections.
For your protection and comfort, GN Audio USA, Inc. (“GN”) has imple-
mented protective measures in this product designed to maintain safe
volume levels and ensure that the product operates in compliance with
government safety standards.
AUDIO PRODUCT WARNING!
PERMANENT HEARING LOSS MAY RESULT FROM LONG-TERM EXPOSURE
TO SOUNDS AT HIGH VOLUMES. USE AS LOW A VOLUME AS POSSIBLE.
This product might be capable of delivering sounds at loud volumes and
high pitched tones.
Under certain circumstances, exposure to such sounds can result in perma-
nent hearing loss damage. The volume level may vary based on conditions
such as the phone you are using, its reception and volume settings, and the
environment.
Avoid prolonged use of headsets at excessive sound pressure levels.
Please read the Safety Guidelines below prior to using this product.
You can reduce the risk of hearing damage by following these safety
guidelines:
1. Prior to using this product follow these steps
• Before using the product, turn the volume control to its lowest level,
• Put the headset on, if applicable
• Slowly adjust the volume control to a comfortable level.
2. During the use of this product
• Keep the volume at the lowest level possible and avoid using the product
in noisy environments where you may be inclined to turn up the volume;
• If increased volume is necessary, adjust the volume control slowly;
• Ringing in the ears may indicate that the sound levels are too high;
• If you experience discomfort or ringing in your ears, immediately discon-
tinue using the product and consult a physician; and

18
EN
• Stop using the product if it causes great discomfort.
With continued use at high volume, your ears may become accus-
tomed to the sound level, which may result in permanent damage to
your hearing without any noticeable discomfort.
GENERAL SAFETY INFORMATION!
• Use of a headset will impair your ability to hear other sounds. Use
caution when you are engaging in any activity that requires your full
attention.
• If you have a pacemaker or other electrical medical devices, consult your
physician before using this product.
• This package contains small parts that may be hazardous to children
and should be kept out of reach from children. This product is not a toy
– never allow children to play with this product. Always store the product
out of reach from children. The bags themselves or the many small parts
they contain may cause choking if ingested.
• Never try to dismantle the product yourself, or push objects of any kind
into the product, as this may cause short circuits which could result in a
fire or electric shock.
• None of the components can be replaced or repaired by users. Only
authorized dealers or service centers may open the product. If any parts
of your product require replacement for any reason, including normal
wear and tear or breakage, contact your dealer.
• Avoid exposing your product to rain, moisture or other liquids to protect
against damage to the product or injury to you.
• If the product has ear tips, the ear tips should rest against, but not enter
the ear canal.
• Keep all products, cords, and cables away from operating machinery.
• Observe all signs and instructions that require an electrical device or RF
radio product to be switched o in designated areas such as hospitals,
blasting areas, potentially explosive atmospheres, or aircrafts.
• If the product overheats, if the product has been dropped or damaged,
if the product has a damaged cord or plug, or if the product has been
dropped in a liquid, discontinue use and contact GN Audio USA, Inc.
• Never mount or store the product over any airbag deployment area, as
serious injury may result when an airbag deploys.
A página está carregando...
A página está carregando...
A página está carregando...
A página está carregando...
A página está carregando...
A página está carregando...
A página está carregando...
A página está carregando...
A página está carregando...
A página está carregando...
A página está carregando...
A página está carregando...
A página está carregando...
A página está carregando...
A página está carregando...
A página está carregando...
A página está carregando...
A página está carregando...
A página está carregando...
A página está carregando...
A página está carregando...
A página está carregando...
A página está carregando...
A página está carregando...
A página está carregando...
A página está carregando...
A página está carregando...
A página está carregando...
-
 1
1
-
 2
2
-
 3
3
-
 4
4
-
 5
5
-
 6
6
-
 7
7
-
 8
8
-
 9
9
-
 10
10
-
 11
11
-
 12
12
-
 13
13
-
 14
14
-
 15
15
-
 16
16
-
 17
17
-
 18
18
-
 19
19
-
 20
20
-
 21
21
-
 22
22
-
 23
23
-
 24
24
-
 25
25
-
 26
26
-
 27
27
-
 28
28
-
 29
29
-
 30
30
-
 31
31
-
 32
32
-
 33
33
-
 34
34
-
 35
35
-
 36
36
-
 37
37
-
 38
38
-
 39
39
-
 40
40
-
 41
41
-
 42
42
-
 43
43
-
 44
44
-
 45
45
-
 46
46
-
 47
47
-
 48
48


em outras línguas
- español: Jabra Elite 25h Guía de inicio rápido
- français: Jabra Elite 25h Guide de démarrage rapide
- English: Jabra Elite 25h Quick start guide
Artigos relacionados
-
Jabra Move Wireless Red Guia rápido
-
Jabra Step Wireless Guia rápido
-
Jabra Talk 30 Guia rápido
-
Jabra Talk 5 Guia rápido
-
Jabra Talk 15 Guia rápido
-
Jabra Talk 35 Guia rápido
-
Jabra Talk 55 Guia rápido
-
-
Jabra Sport Pulse Special Edition Guia rápido
-
Jabra Sport Wireless Guia rápido