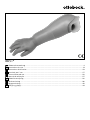
Ottobock 8K5=* Physo Passive Hands Instruções de operação
- Categoria
- Brinquedos
- Tipo
- Instruções de operação
Este manual também é adequado para

8K5=*
Gebrauchsanweisung ����������������������������������������������������������������������������������������������������������� 4
Instructions for use ��������������������������������������������������������������������������������������������������������������� 8
Instructions d‘utilisation �������������������������������������������������������������������������������������������������������13
Istruzioni per l’uso ���������������������������������������������������������������������������������������������������������������17
Instrucciones de uso �����������������������������������������������������������������������������������������������������������22
Manual de utilização ������������������������������������������������������������������������������������������������������������27
Gebruiksaanwijzing �������������������������������������������������������������������������������������������������������������31
Bruksanvisning �������������������������������������������������������������������������������������������������������������������36
Brugsanvisning �������������������������������������������������������������������������������������������������������������������40
Οδηγίες χρήσης ������������������������������������������������������������������������������������������������������������������44

2 | Ottobock 8K5=*
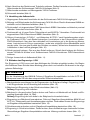
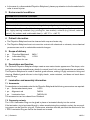
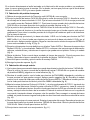
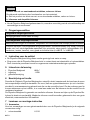
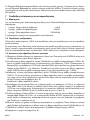
1
9
7
65
8
32
4

Ottobock | 38K5=*
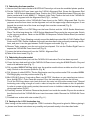
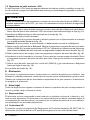
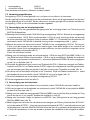
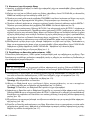
18
14
16
15
17
13
1211
10
19

4 | Ottobock 8K5=*
1 Verwendungszweck Deutsch
Datum der letzten Aktualisierung: 2021-06-14
•
Lesen Sie dieses Dokument vor Gebrauch des Produkts aufmerksam durch und beachten
Sie die Sicherheitshinweise.
• Weisen Sie den Benutzer in den sicheren Gebrauch des Produkts ein.
•
Wenden Sie sich an den Hersteller, wenn Sie Fragen zum Produkt haben oder Probleme
auftreten.
•
Melden Sie jedes schwerwiegende Vorkommnis im Zusammenhang mit dem Produkt, insbe-
sondere eine Verschlechterung des Gesundheitszustands, dem Hersteller und der zuständigen
Behörde Ihres Landes.
• Bewahren Sie dieses Dokument auf.
1.1 Medizinischer Zweck
Die 8K5=* Physolino Babyhand ist ausschließlich zur exoprothetischen Versorgung der oberen
Extremitäten einzusetzen.
1.2 Anwendung
Die 8K5=* Physolino Babyhand kann für Personen mit ein- oder beidseitiger Ober- und Unterarm-
amputation oder mit Dysmelie eingesetzt werden. Die Physolino Babyhand ist ausschließlich für
Babys und Kleinkinder einzusetzen.
1.3 Einsatzbedingungen
Die 8K5=* Physolino Babyhand kann im Innen- und Außenbereich getragen werden.
1.4 Qualikation des Orthopädie-Technikers
Die Versorgung eines Patienten mit der 8K5=* Physolino Babyhand darf nur von Orthopädie-Tech-
nikern vorgenommen werden.
2 Sicherheitshinweise
VORSICHT
Kontakt mit Kälte, Hitze, Glut oder Feuer
Verletzungen (z. B. Verbrennungen) und Schäden am Produkt durch unzulässige Umgebungs-
bedingungen
Halten Sie das Produkt von offenem Feuer, Glut oder anderen Hitzequellen fern.
Setzen Sie das Produkt keinen unzulässigen Umgebungsbedingungen aus (siehe Kapitel
„Umgebungsbedingungen“).
Informieren Sie den Patienten.
HINWEIS
Nichtbeachtung der Reinigungsanweisungen
Schäden und dauerhafte Verschmutzungen am Produkt durch ungeeignete Reinigungsmittel
Reinigen Sie das Produkt nur gemäß den Reinigungsanweisungen in der Gebrauchsanweisung.
Informieren Sie den Patienten.

Ottobock | 58K5=*
HINWEIS
Nichtbeachtung der zulässigen Umgebungsbedingungen
Schäden und Verschmutzungen am Produkt durch unzulässige Umgebungsbedingungen
Setzen Sie das Produkt keinen unzulässigen Umgebungsbedingungen aus (siehe Kapitel
„Umgebungsbedingungen“).
Wenn das Produkt unzulässigen Umgebungsbedingungen ausgesetzt war, prüfen Sie es auf
Verschmutzungen und Schäden.
Bei Verschmutzungen reinigen Sie das Produkt umgehend gemäß dem Kapitel „Patienten-
hinweise“, um dauerhafte Verschmutzungen zu vermeiden.
Verwenden Sie das Produkt bei offensichtlichen Schäden oder im Zweifelsfall nicht weiter.
Informieren Sie den Patienten.
HINWEIS
Unvorsichtiger Gebrauch des Produkts
Schäden am Produkt durch Kontakt mit spitzen oder scharfkantigen Gegenständen
Verhindern Sie den Kontakt des Produkts mit den oben erwähnten Gegenständen.
Informieren Sie den Patienten.
HINWEIS
Kontakt mit fett- und säurehaltigen Mitteln, Salben und Lotionen
Unzureichende Stabilisierung durch Funktionsverlust des Materials
Setzen Sie das Produkt keinen fett- und säurehaltigen Mitteln, Salben und Lotionen aus.
Informieren Sie den Patienten.
•
Bei demontierter Physolino Babyhand auf den Gewindezapfen achten, um Verletzungen zu ver-
meiden.
3 Umgebungsbedingungen
Zulässige Umgebungsbedingungen
Reinigungsmittel: warmes Wasser und Seife
Unzulässige Umgebungsbedingungen
Mechanische Vibrationen oder Stöße, Berühren von scharfkantigen oder spitzen Gegenständen
Kontakt mit Säuren, unzulässigen Reinigungsmitteln, abrasiven Medien (z. B. Sand), feuchter
Erde, Staub, Schmutz, stark färbenden Materialen (z. B. mit Druckerfarbe, neuen Textilien), Lö-
sungsmitteln (z. B. Verdünner, Aceton, Benzin), Feuer, Glut und unzulässiger Hitze (> +60 °C /
> +140 °F)
4 Patientenhinweise
• Die Physolino Babyhand darf nur mit Wasser und Seife gereinigt werden.

6 | Ottobock 8K5=*
•
Die Physolino Babyhand nicht mit Chemikalien oder Lösungsmitteln in Berührung bringen, infolge
chemischer Prozesse kann es zu unerwünschten Veränderungen des Materials kommen.
5 Lieferumfang
1 St. Physolino Babyhand 8K5=*
1 St. Eingussring 11D31
1 St. Gebrauchsanweisung
6 Beschreibung und Funktion
Die Ottobock Physolino Babyhand entspricht durch ihr natürliches Aussehen dem Wunsch der
Wiederherstellung des äußeren Erscheinungsbildes. Form, Farbe und Oberächenstruktur sind der
natürlichen Hand bis ins Detail nachgebildet. Zur individuellen Versorgung stehen je ein Modell für
die linke und die rechte Extremität zur Verfügung.
Die Physolino Babyhand wurde aus medizinischem Silikon gefertigt. Das Kauen und Beißen an der
Physolino Babyhand sind absolut unbedenklich. Medizinisches Silikon zeichnet sich außerdem durch
hohe Elastizität, Wasserfestigkeit sowie UV-Stabilität aus.
7 Laminier- und Montagehinweise
7.1 Zubehör
Zur Herstellung eines laminierten Schaftes für die Physolino Babyhand wird folgendes Zubehör benötigt:
1 St. Gelenksockel 11S12
1 St. Montagestab 743Y41
1 St. Schäumeinsatz 743Y42=24
Das Zubehör kann bei Ottobock bestellt werden.
7.2 Verarbeitungsvarianten
Der 11D31 Eingussring eignet sich sowohl zum Einkleben als auch zum direkten Einlaminieren.
Wird der Eingussring bei der Herstellung des Prothesenschaftes direkt einlaminiert, kann die um-
laufende Nut zum Abbinden verwendet werden. Des weiteren ist darauf zu achten, dass das distale
Ende des Eingussrings 11D31 sowie das Gewinde abgedeckt werden.
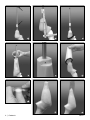
7.3 Herstellung des Schaumpositivs
1) Über das modellierte Gipspositiv den Interimschaft aus ThermoLyn soft 616T53=8 tiefziehen.
2)
Schäumeinsatz 743Y42=24 auf Montagestab 743Y41 aufstecken. Montagestab in Gelenkso-
ckel 11S12 einschrauben. Gelenksockel 11S12 auf Interimschaft ausrichten und mit Ottobock
Leichtspachtel 636K17=* befestigen. Stiftschraube des Schäumeinsatz 743Y42=24 zum Mon
-
tagestab richtungsgleich positionieren (Abb. 1, Pfeile).
3) Position des Schäumeinsatz 743Y42=24 auf Montagestab 743Y41 bestimmen. Dazu Schäum-
einsatz auf dem Montage-Stab verschieben, bis die Oberkante ca. 5 mm über dem Sollmaß der
zu erhaltenden Unterarmlänge steht (Abb. 2). Schäumeinsatz xieren.
4)
Interimschaft und Gelenksockel 11S12 mit PVC-Folienschlauch 99B71=60×11×4 überziehen. Foli-
enschlauch über dem Gelenksockel 11S12 und am Vakuumrohr abbinden. Unterdruck einschalten.
Neopren-Zellkautschukband 627B5=19 (wie gekennzeichnet in Abb. 2) aufkleben (Abb. 3).
5) Trolenfolie 616T3=1 konisch um den Dentivschaft wickeln. 617H12=* Pedilen-Hartschaum und
Pedilen-Härter 617P21 gemäß beiliegender Verarbeitungsanleitung anrühren, gut vermischen und
in den Hohlraum zwischen Trolenfolie und Modell gießen (Abb. 4).

Ottobock | 78K5=*
6)
Nach Abschluss der Reaktionszeit Trolenfolie entfernen. Pedilen-Hartschaum einschneiden und
Stiftschraube des Schäumeinsatz 743Y42=24 freilegen (Abb. 5).
7) Stiftschraube ausdrehen und Montagestab 743Y41 entfernen.
8) Schaumteil abziehen (Abb. 6).
7.4 Herstellung des Außenschafts
1) Abgezogenen Schaumteil beschleifen bis der Schäumeinsatz 743Y42=24 freigelegt ist
2) Bohrung und Stiftschraube des Schäumeinsatz 743Y42=24 mit Plastilin-Knetmasse 636K6 ver-
schließen und mit Klebeband abkleben (Abb. 7).
3) Positivmodell mit eingeweichtem PVA-Folienschlauch 99B81 überziehen und faltenfrei proximal
abbinden. Unterdruck einschalten (Abb. 8).
4)
Positivmodell mit 4 Lagen Perlon-Trikotschlauch weiß 623T3=* überziehen. Positivmodell mit
eingeweichtem PVA-Folienschlauch 99B81 überziehen (Abb. 9).
5)
Orthocryl-Laminierharz 617H19=* und Härtepulver 617P37=* nach Herstellerangaben misch-
en. Farbpaste 617Z2=* nach Bedarf beimengen, Laminierharz in den Folienschlauch gießen.
PVA-Folienschlauch über dem Harz abbinden und Laminierharz gut in die Armierung einmas-
sieren. Laminierharz mit Schnur ausstreichen, wobei eine möglichst dünne Wandstärke erzielt
werden sollte. Um eine gute Qualität des Schaftes zu erzielen, dürfen beim Ausstreichen keine
Luftbläschen in das Laminat gelangen (Abb. 10).
6)
Schaft proximal freilegen. Gips aus dem Schaft entfernen. Schaft distal freilegen bis Schäum-
einsatz 743Y42=24 sichtbar wird. Schäumeinsatz 743Y42=24 entfernen. PVA-Folienschlauch
entfernen.
7) Fertiger Innenschaft mit Außenschaft (Abb. 11).
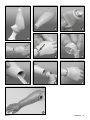
7.5 Einkleben des Eingussrings 11D31
Der Eingussring 11D31 muss nach dem Ablängen des Schaftes eingeklebt werden. Vor Beginn
des Einklebens lesen Sie bitte diese Anleitung genau durch und verfahren Sie danach in der ange-
gebenen Reihenfolge.
INFORMATION
Vor der Verarbeitung des 636K18 Orthocryl Siegelharz-Kompaktkleber und der 617P14=*
Härterpaste lesen Sie bitte das entsprechende Sicherheitsdatenblatt.
1)
Babyhandstulpe umschlagen bis die Eingussmutter der Babyhand freiliegt. Eingussring 11D31
in die Eingussmutter bis auf Anschlag fest eindrehen (Abb. 12).
2)
Babyhand mit Eingussring in den Schaft einschieben (Abb. 13).
Achtung: Eingussring nicht einkleben.
3)
Babyhand in die gewünschte Position drehen und Position mit Markierstift auf Schaft und Ein-
gussring übertragen (Abb. 14, Pfeil).
Achtung: Eingussring darf sich dabei in der Babyhand nicht verdreht haben.
4)
Eingussring aus Babyhand herausdrehen. Orthocryl Siegelharz-Kompaktkleber 636K18 und
617P14=* Härterpaste nach Herstellerangaben mischen. Gerändelten Ansatz des Eingussrings
mit Siegelharz-Kompaktkleber bestreichen (Abb. 15).
5) Schaftinnenseite aufrauhen und mit Siegelharz-Kompaktkleber bestreichen (Abb. 16).
6)
Eingussring in Schaft einschieben. Darauf achten, dass die Markierungen zueinander uchten.
Überschüssigen Siegelharz-Kompaktkleber entfernen. Klebung aushärten lassen (Abb. 17).

8 | Ottobock 8K5=*
7)
Gewinde des Eingussrings mit 636K13 Loctite 241 einstreichen und Babyhand bis auf Anschlag
handfest aufdrehen (Abb. 18).
8) Die fertige Prothese (Abb. 19).
8 Entsorgung
Das Produkt darf nicht überall mit unsortiertem Hausmüll entsorgt werden. Eine unsachgemäße
Entsorgung kann sich schädlich auf die Umwelt und die Gesundheit auswirken. Beachten Sie die
Angaben der zuständigen Behörde Ihres Landes zu Rückgabe, Sammel- und Entsorgungsverfahren.
9 Rechtliche Hinweise
Alle rechtlichen Bedingungen unterliegen dem jeweiligen Landesrecht des Verwenderlandes und
können dementsprechend variieren.
9.1 Haftung
Der Hersteller haftet, wenn das Produkt gemäß den Beschreibungen und Anweisungen in diesem
Dokument verwendet wird. Für Schäden, die durch Nichtbeachtung dieses Dokuments, insbeson-
dere durch unsachgemäße Verwendung oder unerlaubte Veränderung des Produkts verursacht
werden, haftet der Hersteller nicht.
9.2 CE-Konformität
Das Produkt erfüllt die Anforderungen der Verordnung (EU) 2017/745 über Medizinprodukte. Die
CE-Konformitätserklärung kann auf der Website des Herstellers heruntergeladen werden.
1 Intended use English
Last update: 2021-06-14
•
Please read this document carefully before using the product and observe the safety notices.
• Instruct the user in the safe use of the product.
•
Please contact the manufacturer if you have questions about the product or in case of problems.
• Report each serious incident in connection with the product, in particular a worsening of the
state of health, to the manufacturer and to the relevant authority in your country.
• Please keep this document for your records.
1.1 Medical purpose
The 8K5=* Physolino Babyhand is to be used solely for the prosthetic tting of the upper limbs.
1.2 Indications for use
The 8K5=* Physolino Babyhand can be used for children with uni- or bilateral above or below el-
bow amputation or dysmelia. The Physolino Babyhand is to be used solely for babies and infants.
1.3 Application conditions
The 8K5=* Physolino Babyhand can be used indoors and outdoors.
1.4 Qualied prosthetists
Fitting of a patient with the 8K5=* Physolino Babyhand must solely be carried out by orthopedic
technicians.

Ottobock | 98K5=*
2 Safety instruction
CAUTION
Contact with cold, heat, embers or re
Injuries (e.g. burns) and damage to the product
Keep the product away from open ame, embers and other sources of heat.
Do not expose the product to unallowable environmental conditions (see section „Environ-
mental Conditions“).
Inform the patient.
NOTICE
Non-observance of cleaning instructions
Damage to product and permanent soiling due to use of improper cleaning agents
Only clean the product according to the cleaning instructions provided in the instructions for use.
Inform the patient.
NOTICE
Non-observance of allowable environmental conditions
Schäden und Verschmutzungen am Produkt durch unzulässige Umgebungsbedingungen
Do not expose the product to unallowable environmental conditions (see the section „Envi-
ronmental conditions“).
If the product has been exposed to unallowable environmental conditions, check it for soiling
and damage.
Clean the product immediately if it gets dirty, following the instructions in the section „Patient
information“, in order to prevent permanent soiling.
If damage is apparent or in case of doubt, do not continue using the product.
Inform the patient.
NOTICE
Careless use of the product
Damage to the product due to contact with pointed or sharp-edged objects
Do not allow the product to come into contact with the above mentioned objects.
Inform the patient.
NOTICE
Contact with salves, lotions or other products that contain oils or acids
Insufcient stabilisation due to loss of material functionality
Do not expose the product to salves, lotions or other products that contain oils or acids.
Inform the patient.

10 | Ottobock 8K5=*
• In the case of a disassembled Physolino Babyhand, please pay attention to the threaded stud in
order to avoid injuries.
3 Environmental conditions
Allowable environmental conditions
Cleaning agents: warm water and soap
Unallowable environmental conditions
Mechanical vibrations or impacts, touching of sharp-edged or pointed objects
Contact with acids, unallowable cleaning agents, abrasive media (e.g. sand), damp soil, dust,
dirt, highly staining materials (e.g. printing ink, new textiles), solvents (e.g. thinner, acetone,
petrol), re, embers and unallowable heat (> +60 °C / > +140 °F)
4 Patient information
• The Physolino Babyhand must be cleaned with soap and water only.
• The Physolino Babyhand must not come into contact with chemicals or solvents, since chemical
processes can result in undesirable material changes.
5 Scope of delivery
1 pc. Physolino Babyhand 8K5=*
1 pc. Lamination Ring 11D31
1 pc. Instructions for use
6 Description and function
The Ottobock Physolino Babyhand helps create a more natural outer appearance.The shape, color
and surface structure resemble every detail of a natural hand. Left- and right-hand sides are available.
The Physolino Babyhand is made of medical grade silicone, making it highly resistant to biting and
chewing. Medical grade silicone is also highly elastic, water resistant, and does not break down
under UV rays.
7 Lamination and assembly information
7.1 Accessories
To manufacture a laminated socket for the Physolino Babyhand the following accessories are required:
1 pc. Socket attachment piece 11S12
1 pc. Alignment rod 743Y41
1 pc. Lamination form 743Y42=24
The accessories can be ordered from Ottobock.
7.2 Processing variants
The 11D31 Lamination Ring can be glued in place or laminated directly into the socket.
If the lamination ring is laminated directly in when manufacturing the prosthetic socket, the surround-
ing groove can be used for tying off. Furthermore, attention must be paid that the distal end of the
11D31 Lamination Ring as well as the thread are covered

Ottobock | 118K5=*
7.3 Fabricating the foam positive
1) Vacuum form the interim socket of 616T53=8 ThermoLyn soft over the modelled plaster positive
2)
Put the 743Y42=24 Foam Insert onto the 743Y41 Alignment Rod. Screw the Alignment Rod
into the 11S12 Socket Attachment Piece. Position the 11S12 Socket Attachment Piece onto the
interim socket and x with 636K17=* Ottobock Light Putty. Position the bolt of the 743Y42=24
Foam Insert congruent with the Alignment Rod (Fig. 1, arrows).
3)
Determine the position of the 743Y42=24 Foam Insert on the 743Y41 Alignment Rod. For this
purpose move the foam insert on the alignment rod until the upper edge reaches approx. 5 mm
beyond the nominal size of the lower arm length that must be conserved (Fig. 2).
Fix the foam insert
4)
Pull the 99B71=60×11×4 PVC-Bag over the Inner Socket and the 11S12 Socket Attachment
Piece. Tie off the bag above the 11S12 Socket Attachment Piece and at the vacuum tube. Switch
on the vacuum pressure. Paste on the 627B5=19 Neoprene Cellular Rubber Band (as marked
in Fig. 2/(Fig.3)
5)
Wrap 616T3=1 Trolen Sheeting conically around the denitive socket. Mix 617H12 Pedilen Rigid
Foam and 617P21 Pedilen Hardener thoroughly as described in the enclosed processing instruc-
tions, and pour it into the gap between Trolen wrapper and model (Fig. 4).
6)
Remove Trolen wrapper once the curing time has elapsed. Cut into the Pedilen Rigid Foam to
expose the 743Y42=24 Foam Insert bolt (Fig. 5).
7) Loosen the bolt and remove it from the 743Y41 Alignment Rod
8) Take off the foam insert (Fig. 6).
7.4 Fabricating the outer socket
1) Sand the removed foam part until the 743Y42=24 Lamination Form has been exposed.
2) Cover the bore hole and bolt of the 743Y42=24 Foam insert using the 636K6 Plastilin Clay and
mask with adhesive tape (Fig. 7).
3) Pull a soaked 99B81PVA Bag tightly over the positive model without wrinkles and tie off proxi-
mally. Switch on the vacuum pressure (Fig. 8).
4) Pull 4 layers of white 623T3=* Perlon-Stockinette over the positive model. Pull a soaked 99B81
PVA Bag tightly over the positive model (Fig. 9).
5)
Mix 617H19 Orthocryl Laminating Resin and 617P37 Hardener as per manufacturer instruc-
tions. Add 617Z2=* Color Paste as required. Pour the laminating resin into the foil bag.
Tie off the PVA bag above resin level and work the resin into the reinforcement layer. Spread
laminating resin using a length of cord in order to keep the wall thickness as thin as possible.
In order to create a high quality socket, there must be no air bubbles inside the laminating resin
during application (Fig10).
6) Proximally uncover the socket. Remove the plaster from inside the socket. Expose the socket at
the distal end until the 743Y42=24 foam insert becomes visible. Remove the 743Y42=24 Foam
Insert.
7) Finished inner socket with outer socket (Fig. 11).
7.5 Pasting in the 11D31 lamination ring
After having cut the socket to length the 11D31 Lamination Ring must be glued in. Before glueing it
in, please read these instructions very carefully and proceed exactly in the described order.

12 | Ottobock 8K5=*
INFORMATION
Before processing the 636K18 Orthoctryl Sealing Resin Compact Glue and the hardening
paste, rst read the corresponding safety data sheet
1)
Reect the cuff of the Babyhand just enough to expose the lamination nut of the Babyhand. Screw
the 11D31 Lamination Ring to the lamination nut up to the stop (Fig. 12).
2)
Slide the Babyhand with lamination ring into the socket (Fig. 13).
Attention: Do not paste in the lamination ring.
3) Turn the Babyhand into the desired position and using a marker pen transfer the position to the
socket and lamination ring (Fig. 14, arrow).
Attention: Make sure that the lamination ring does not twist out of place during this process!
4) Unscrew the lamination ring from the Babyhand. Mix 636K18 Orthocryl Sealing Resin Compact
Glue and 617P14=* Hardening Paste according to the manufacturer‘s specications. Apply Seal-
ing Resin Compact Glue to the knurled edge of the lamination ring (Fig. 15).
5) Roughen the inner surface of the socket and apply sealing resin compact glue (Fig. 16).
6) Insert the lamination ring into the socket. Take care that the markings line up facing one another.
Remove excessive sealing resin compact glue. Let the bonding dry (Fig. 17).
7)
Coat the threads of the lamination ring with 636K13 Loctite and turn the Silicone Baby Hand
handtight up to the stop. (Fig. 18)
8) The nished prosthesis (Fig. 19)
8 Disposal
In some jurisdictions it is not permissible to dispose of the product with unsorted household waste.
Improper disposal can be harmful to health and the environment. Observe the information provided
by the responsible authorities in your country regarding return, collection and disposal procedures.
9 Legal information
All legal conditions are subject to the respective national laws of the country of use and may vary
accordingly.
9.1 Liability
The manufacturer will only assume liability if the product is used in accordance with the descrip-
tions and instructions provided in this document. The manufacturer will not assume liability for
damage caused by disregard of this document, particularly due to improper use or unauthorised
modication of the product.
9.2 CE conformity
The product meets the requirements of Regulation (EU) 2017/745on medical devices. The CE
declaration of conformity can be downloaded from the manufacturer’s website

Ottobock | 138K5=*
1 Indications Français
Date de la dernière mise à jour: 2021-06-14
•
Veuillez lire attentivement l’intégralité de ce document avant d’utiliser le produit ainsi que
respecter les consignes de sécurité.
• Apprenez à l’utilisateur comment utiliser son produit en toute sécurité.
•
Adressez-vous au fabricant si vous avez des questions concernant le produit ou en cas de problèmes.
•
Signalez tout incident grave survenu en rapport avec le produit, notamment une aggravation
de l’état de santé, au fabricant et à l’autorité compétente de votre pays.
• Conservez ce document.
1.1 Indication médicale
La Physolino Babyhand 8K5=* est uniquement destinée à l’appareillage exoprothétique des
membres supérieurs.
1.2 Utilisation
La Physolino Babyhand 8K5=* peut être utilisée pour des patients présentant une amputation du
bras ou de l’avant-bras unilatérale ou bilatérale, ou atteints d‘une agénésie. La Physolino Baby hand
ne peut être utilisée que pour des bébés et des enfants en bas âge.
1.3 Conditions d’utilisation
La Physolino Babyhand 8K5=* peut être portée aussi bien à la maison qu’à l’extérieur.
1.4 Qualication du technicien orthopédiste
Seul un technicien orthopédiste est autorisé à appareiller un patient avec la Physolino Babyhand 8K5=*.
2 Consignes de sécurité
PRUDENCE
Contact avec le froid, la chaleur, une substance incandescente ou une amme
Blessures (brûlures, par ex.) et dégradation du produit
Tenez le produit éloigné d‘une amme nue, d‘une substance incandescente ou d‘autres
sources de chaleur.
N‘exposez pas le produit à des conditions d‘environnement non autorisées (voir chapitre «
Conditions d‘environnement »).
Informez le patient.
AVIS
Non-respect des consignes de nettoyage
Dommages et salissures permanentes sur le produit en raison de l’utilisation de nettoyants
inadaptés
Nettoyez le produit uniquement en suivant les consignes de nettoyage énoncées dans les
instructions d’utilisation.
Informez le patient.

14 | Ottobock 8K5=*
AVIS
Non-respect des conditions d’environnement autorisées
Dommages et salissures sur le produit dus à des conditions d’environnement non autorisées
N’exposez pas le produit à des conditions d’environnement non autorisées (voir chapitre «
Conditions d’environnement »).
En cas d’exposition à des conditions d’environnement non autorisées, vériez que le produit
ne présente aucune salissure et n’a subi aucun dommage.
En cas de salissures, nettoyez immédiatement le produit conformément au chapitre « Consignes
pour les patients » an d’éviter des salissures permanentes.
Cessez d’utiliser le produit en cas de dommages évidents ou en cas de doute.
Informez le patient.
AVIS
Utilisation imprudente du produit
Dommages sur le produit dus à un contact avec des objets pointus ou coupants
Empêchez tout contact du produit avec les objets mentionnés ci-dessus.
Informez le patient.
AVIS
Contact avec des produits gras et acides, des crèmes et des lotions
Stabilisation insufsante en raison de la perte de fonctionnalité de la matière du produit
Évitez tout contact avec des produits gras et acides, des crèmes et des lotions.
Informez le patient.
•
An d’éviter toute blessure, faire attention aux goupilles letées lorsque la Physolino Babyhand
est démontée.
3 Conditions d’environnement
Conditions d’environnement autorisées
Nettoyants : eau chaude et savon
Conditions d’environnement non autorisées
Vibrations mécaniques ou chocs, contact avec des objets coupants ou pointus
Contact avec des acides, des produits de nettoyage non autorisés, des substances abrasives
(par ex. du sable), de la terre humide, de la poussière, des saletés, des matières très colorantes
(par ex. encre d’imprimante, habits neufs), des solvants (par ex. diluants, acétone, essence), le
feu, la braise et une source de chaleur non autorisée (> +60 °C / > +140 °F)

Ottobock | 158K5=*
4 Consignes pour les patients
• Pour nettoyer la Physolino Babyhand, utiliser uniquement de l’eau et du savon.
• Eviter tout contact de la Physolino Babyhand avec des produits chimiques ou des solvants sus-
ceptibles de provoquer des réactions chimiques pouvant altérer le matériau.
5 Eléments livrés
1 pièce. Physolino Babyhand 8K5=*
1 pièce. Bague à couler 11D31
1 pièce. Instructions d‘utilisation
6 Description et fonctionnement
Grâce à son aspect naturel, la Physolino Babyhand de Ottobock permet au patient de retrouver
son apparence. Sa forme, sa couleur et sa surface reproduisent l’apparence d’une main naturelle
dans les moindres détails. Elle existe en côté gauche et en côté droit.
La Physolino Babyhand est en silicone médicale. Le bébé peut mâcher et mordre sa Physolino
Babyhand sans aucun risque. Cette silicone médicale se caractérise en outre par sa grande élas-
ticité, sa résistance à l’eau ainsi qu’aux UV.
7 Consignes de stratication et de montage
7.1 Accessoires
Les accessoires suivants sont nécessaires pour réaliser une emboîture stratiée destinée à la Phy-
solino Babyhand :
1 pièce Socle d’articulation 11S12
1 pièce Tige de montage 743Y41
1 pièce Insert en mousse 743Y42=24
Il est possible de commander les accessoires auprès de Ottobock.
7.2 Variantes de traitement
La bague à couler 11D31 peut être collée ou stratiée directement.
Si la bague à couler est directement stratiée dans l’avant-bras, il est possible d’utiliser la rainure
circulaire pour réaliser un noeud. Veiller également à recouvrir l’extrémité distale de la bague à
couler 11D31 ainsi que le letage.
7.3 Réalisation du positif en mousse synthétique
1) Thermoformer l’emboîture provisoire en ThermoLyn soft 616T53=8 sur le positif plâtré.
2) Placer le gabarit 743Y42=24 sur la tige de montage 743Y41. Visser la tige de montage dans le
support 11S12. Aligner le support 11S12 sur l’emboîture provisoire et le xer à l’aide de la pâte
à spatuler légère 636K17=*. Placer la vis du gabarit 743Y42=24 dans le même sens que la tige
de montage (ill. 1, èches).
3)
Déterminer la position du gabarit 743Y42=24 sur la tige de montage 743Y41. Déplacer le
gabarit sur la tige de montage de façon à ce que le bord supérieur dépasse d’env. 5 mm la
mesure de base de la longueur de l’avant-bras sain (ill. 2).
Fixer le gabarit.

16 | Ottobock 8K5=*
4)
Passer un bas n 99B25, puis un lm tubulaire en PVC 99B71=60×11×4 sur l’emboîture provisoire
et le support 11S12. Nouer le lm tubulaire au dessus du support 11S12 et sur le tube à vide.
Enclencher la dépression. Coller une bande de caoutchouc cellulaire en néoprène 627B5=19
(comme sur l’ill. 2) (ill. 3).
5)
Envelopper l’emboîture dénitive d’une feuille de Trolen 616T3=1 en formant un cône. Préparer la
mousse dure en Pedilen 617H12=* et le durcisseur au Pedilen 617P21 en suivant les instructions
jointes, bien mélanger et verser dans l’interstice entre le Trolen et le modèle (ill. 4).
6)
Retirer le lm Trolen à la n du temps de réaction. Découper la mousse dure en Pedilen et dégager
la vis du gabarit 743Y42=24 (ill. 5).
7) Desserrer la vis et retirer la tige de montage 743Y41.
8) Retirer la mousse Pedilen (ill. 6).
7.4 Réalisation de l’emboîture extérieure
1)
Poncer la partie en mousse Pedilen ayant été retirée de manière à dégager le gabarit 743Y42=24.
2)
Boucher les vis du gabarit 743Y42=24 avec de la Plastilin 636K6 puis coller du ruban adhésif
(ill. 7).
3)
Enler un lm tubulaire en PVA 99B81 préalablement trempé dans l’eau sur le modèle positif puis
nouer au niveau proximal sans faire de pli. Enclencher la dépression (ill. 8).
4) Passer 4 couches de tricot tubulaire en perlon blanc 623T3=* sur le positif. Passer un lm tubu-
laire en PVA 99B81 préalablement trempé dans l’eau sur le modèle positif (ill. 9).
5)
Mélanger la résine à stratier Orthocryl 617H19=* et le durcisseur en poudre 617P37=* selon
les indications du fabricant. Ajouter de la pâte colorante 617Z2=* selon les besoins puis verser
la résine dans le lm tubulaire. Nouer le lm tubulaire en PVA au dessus de la résine et bien faire
pénétrer la résine dans les bres par des mouvements de massage. Etaler la résine à l’aide
d’un l en essayant d’obtenir une épaisseur de paroi la plus ne possible. Pour obtenir une bonne
nition, veiller à ce qu’il n’ait aucune bulle d’air dans la résine à stratier (ill. 10).
6) Dégager l’emboîture au niveau proximal. Retirer le plâtre de l’emboîture. Dégager l’emboîture au
niveau distal de manière à voir le gabarit 743Y42=24. Retirer le gabarit 743Y42=24. Retirer le
lm tubulaire en PVA.
7) Emboîture intérieure dotée d’une emboîture extérieure une fois réalisée (ill. 11).
7.5 Collage de la bague à couler 11D31
Il faut coller la bague à couler 11D31 après avoir raccourci l’emboîture. Veuillez lire attentivement
cette notice avant de procéder au collage et effectuez les opérations dans l’ordre indiqué.
INFORMATION
Veuillez lire la che de sécurité de la colle compacte en pâte Siegelharz 636K18 et du durcisseur
en pâte 617P14=* avant de les utiliser.
1)
Rabattre le revers de la main pour bébé de manière à dégager le pas de vis de la Babyhand.
Visser fermement la bague à couler 11D31 dans l’écrou à couler jusqu’à la butée (ill. 12 ).
2)
Introduire la Babyhand dotée de la bague à couler dans l’emboîture (ill. 13).
Attention : ne pas coller la bague à couler.
3) Tourner la Babyhand de manière à la placer dans la position souhaitée puis reporter cette posi-
tion sur l’emboîture et la bague à couler à l’aide d’un marqueur (ill. 14, èche).
Attention : veiller à ne pas tordre la bague à couler dans la Babyhand au cours de cette opération.

Ottobock | 178K5=*
4) Retirer la bague à couler de la Babyhand. Mélanger la colle en pâte Siegelharz 636K18 avec le
durcisseur en pâte 617P14=* selon les indications du fabricant. Enduire de colle la partie moletée
de la bague à couler (ill. 15).
5) Poncer l’intérieur de l’emboîture et l’enduire de colle (ill. 16).
6) Introduire la bague à couler dans l’emboîture. Veiller à ce que les repères soient alignés. Retirer
l’excédent de colle compacte à la résine. Laisser sécher le collage (ill. 17).
7) Enduire le letage de la bague à couler de Loctite 636K13 ref. 41 et serrer la Babyhand jusqu’à
la butée sans utiliser d’outil (ill. 18).
8) Prothèse une fois réalisée (ill. 19).
8 Mise au rebut
Il est interdit d’éliminer ce produit n’importe où avec des ordures ménagères non triées. Une mise
au rebut non conforme peut avoir des répercussions négatives sur l’environnement et la santé.
Respectez les prescriptions des autorités compétentes de votre pays concernant les procédures
de retour, de collecte et de recyclage des déchets.
9 Informations légales
Toutes les conditions légales sont soumises à la législation nationale du pays d’utilisation concerné
et peuvent donc présenter des variations en conséquence.
9.1 Responsabilité
Le fabricant est responsable si le produit est utilisé conformément aux descriptions et instructions
de ce document. Le fabricant décline toute responsabilité pour les dommages découlant d’un
non-respect de ce document, notamment d’une utilisation non conforme ou d’une modication
non autorisée du produit.
9.2 Conformité CE
Ce produit répond aux exigences du Règlement (UE) 2017/745 relatif aux dispositifs médicaux.
La déclaration de conformité CE peut être téléchargée sur le site Internet du fabricant.
1 Campo d’impiego Italiano
Data dell‘ultimo aggiornamento: 2021-06-14
•
Leggere attentamente il presente documento prima di utilizzare il prodotto e osservare le
indicazioni per la sicurezza.
• Istruire l’utente sull’utilizzo sicuro del prodotto.
• Rivolgersi al fabbricante in caso di domande sul prodotto o all’insorgere di problemi.
•
Segnalare al fabbricante e alle autorità competenti del proprio paese qualsiasi incidente
grave in connessione con il prodotto, in particolare ogni tipo di deterioramento delle condi-
zioni di salute.
• Conservare il presente documento.
1.1 Scopo medico
La mano da bambino 8K5=* Physolino Babyhand è indicata esclusivamente per l’esoprotesizza-
zione di arto superiore.

18 | Ottobock 8K5=*
1.2 Applicazione
La mano 8K5=* Physolino Babyhand può essere utilizzata per persone con amputazioni mono- o
bilaterali di braccio e avambraccio, o affette da dismelia. La mano Physolino Babyhand è indicata
esclusivamente per neonati e bambini.
1.3 Condizioni d’impiego
La mano 8K5=* Physolino Babyhand è idonea all’utilizzo in ambienti interni ed esterni.
1.4 Qualica dei Tecnici ortopedici
L‘applicazione della mano 8K5=* Physolino Babyhand al paziente deve essere effettuata esclusi-
vamente da tecnici ortopedici.
2 Indicazioni per la sicurezza
CAUTELA
Contatto con freddo, fonti di calore, brace o fuoco
Lesioni (per es. ustioni) e danni al prodotto
Non esporre il prodotto a fuoco, brace o ad altre fonti di calore.
Non sottoporre il prodotto a condizioni ambientali inammissibili (vedere il capitolo „Condi-
zioni ambientali“).
Informare il paziente.
AVVISO
Mancato rispetto delle istruzioni di pulizia
Danni e sporcizia permanente al prodotto causati da detergenti non adatti
Pulire il prodotto esclusivamente in conformità alle istruzioni di pulizia riportate nelle istruzioni
per l‘uso.
Informare il paziente.
AVVISO
Mancato rispetto delle condizioni ambientali consentite
Danni e sporcizia al prodotto causati da condizioni ambientali non consentite
Non sottoporre il prodotto a condizioni ambientali non consentite (vedere il capitolo „Con-
dizioni ambientali“).
Se il prodotto è stato sottoposto a condizioni ambientali non consentite, controllare se è
sporco o danneggiato.
In presenza di sporcizia pulire immediatamente il prodotto secondo quanto indicato nel ca-
pitolo „Indicazioni per il paziente“ per evitare che le impurità permangano.
Non utilizzare più il prodotto in caso di danni evidenti o in casi dubbi.
Informare il paziente.

Ottobock | 198K5=*
AVVISO
Utilizzo incauto del prodotto
Danni al prodotto causati dal contatto con oggetti appuntiti o spigolosi
Evitare il contatto del prodotto con gli oggetti sopracitati.
Informare il paziente.
AVVISO
Contatto con sostanze contenenti acidi o grassi, creme e lozioni
Stabilizzazione insufciente dovuta ad usura del prodotto
Evitare il contatto tra il prodotto e sostanze contenenti acidi o grassi, creme e lozioni.
Informare il paziente.
• Quando la mano è smontata, prestate attenzione al perno lettato, per evitare il rischio di ferirvi.
3 Condizioni ambientali
Condizioni ambientali consentite
Detergenti: acqua calda e sapone
Condizioni ambientali non consentite
Vibrazioni meccaniche o urti, contatto con oggetti spigolosi o appuntiti
Contatto con acidi, detergenti non consentiti, mezzi abrasivi (p. es. sabbia), terra umida,
polvere, sporcizia, materiali che perdono colore (p. es. con colori per stampa, nuovi tessuti),
solventi (p. es. diluenti, acetone, benzina), fuoco, oggetti incandescenti e temperature elevate
non consentite (> +60 °C / > +140 °F)
4 Indicazioni per il paziente
• Per la pulizia della mano Physolino Babyhand vanno utilizzati esclusivamente acqua e sapone.
•
Evitate che la mano Physolino Babyhand entri in contatto con prodotti chimici o solventi: in seguito
a processi chimici indesiderati potrebbero vericarsi mutamenti del materiale.
5 Contenuto della spedizione
1 pz. Physolino Babyhand 8K5=*
1 pz. Anello di laminazione 11D31
1 pz. Istruzioni d’uso
6 Descrizione e funzionamento
La mano Physolino Babyhand Ottobock è stata concepita per riprodurre nel modo più naturale
possibile la sionomia della mano. Forma, colore e struttura di supercie sono riprodotti nei minimi
dettagli. Per favorire le esigenze individuali sono disponibili un modello per l’arto destro ed uno per
quello sinistro.

20 | Ottobock 8K5=*
La mano Physolino Babyhand è stata realizzata in silicone medicale. Il contatto della mano Physolino
Babyhand con la bocca (ad es. mordendo) non comporta alcun genere di rischi. Il silicone medi-
cale si distingue inoltre per l’elevata elasticità, la resistenza all’acqua e alle radiazioni ultraviolette.
7 Indicazioni per la laminazione ed il montaggio
7.1 Accessori
Per la realizzazione di un’invasatura laminata per la mano Physolino Babyhand sono necessari i
seguenti accessori:
1 pezzo Parte di collegamento all’invasatura 11S12
1 pezzo Asta di allineamento 743Y41
1 pezzo Modello polso per laminazione 743Y42=24
Tali accessori possono essere ordinati presso la Ottobock.
7.2 Varianti di lavorazione
L’anello di laminazione 11D31 si adatta sia al ssaggio con colla, sia alla laminazione diretta nell’in-
vasatura. Per il ssaggio nell’anello di laminazione 11D31, la realizzazione dell’invasatura protesica
è descritta qui di seguito.
Nel caso di laminazione diretta dell’anello di colata nel realizzare l’invasatura, è possibile utilizzare
la scanalatura per il ssaggio. È necessario inoltre accertarsi che l’estremità distale dell’anello di
colata 11D31 e il letto vengano ricoperti.
7.3 Realizzazione del positivo in schiuma
1)
Procedete alla termoformatura dell’invasatura provvisoria in ThermoLyn soft 616T53=8 sul modello
positivo di gesso.
2) Inlate il modello di polso per laminazione 743Y42=24 sull’asta di allineamento 743Y41. Avvita-
te l’asta di allineamento nella parte di collegamento 11S12. Collocate la parte di collegamento
all‘invasatura 11S12 all’invasatura provvisoria e ssate con mastice leggero 636K17=* Ottobock.
Posizionate la vite del modello di polso per laminazione 743Y42=24 verso l’asta di allineamento,
nella medesima direzione (g. 1, frecce).
3)
Denite la posizione del modello di polso per laminazione 743Y42=24 sull’asta di allineamento
743Y41. Per fare questo, spostate il modello di polso per laminazione sull’asta di allineamento
nché il margine superiore si trovi circa 5 mm oltre il valore nominale della lunghezza dell’avam-
braccio da ottenere (g. 2).
Fissate il modello di polso per laminazione.
4)
Eseguite la termoformatura con un cono di PVC 99B71=60x11x4 sull’invasatura provvisoria e
sulla parte di collegamento all’invasatura 11S12. Fissate il cono sopra la parte di collegamento
all’invasatura 11S12 e al tubo del vacuum. Accendete l’aspirazione. Applicate il nastro di neo-
prene 627B5=19 (come da g. 2) (g. 3).
5)
Avvolgete il foglio Trolen 616T3=1 intorno all’invasatura denitiva. Mescolate la schiuma dura
Pedilen 617H12=* e l’indurente Pedilen 617P21 come descritto nelle istruzioni allegate e versate
il mix nello spazio compreso tra il foglio di Trolen e il modello (g. 4).
6) Al termine del tempo di risposta, rimuovete il foglio di Trolen. Intagliate la schiuma rigida Pedilen
e scoprite la vite del modello di polso per laminazione 743Y42=24 (g. 5).
7) Svitate la vite e rimuovete l’asta di allineamento 743Y41.
8) Rimuovete la parte in schiuma (g. 6).
A página está carregando ...
A página está carregando ...
A página está carregando ...
A página está carregando ...
A página está carregando ...
A página está carregando ...
A página está carregando ...
A página está carregando ...
A página está carregando ...
A página está carregando ...
A página está carregando ...
A página está carregando ...
A página está carregando ...
A página está carregando ...
A página está carregando ...
A página está carregando ...
A página está carregando ...
A página está carregando ...
A página está carregando ...
A página está carregando ...
A página está carregando ...
A página está carregando ...
A página está carregando ...
A página está carregando ...
A página está carregando ...
A página está carregando ...
A página está carregando ...
A página está carregando ...
A página está carregando ...
A página está carregando ...
A página está carregando ...
A página está carregando ...
-
 1
1
-
 2
2
-
 3
3
-
 4
4
-
 5
5
-
 6
6
-
 7
7
-
 8
8
-
 9
9
-
 10
10
-
 11
11
-
 12
12
-
 13
13
-
 14
14
-
 15
15
-
 16
16
-
 17
17
-
 18
18
-
 19
19
-
 20
20
-
 21
21
-
 22
22
-
 23
23
-
 24
24
-
 25
25
-
 26
26
-
 27
27
-
 28
28
-
 29
29
-
 30
30
-
 31
31
-
 32
32
-
 33
33
-
 34
34
-
 35
35
-
 36
36
-
 37
37
-
 38
38
-
 39
39
-
 40
40
-
 41
41
-
 42
42
-
 43
43
-
 44
44
-
 45
45
-
 46
46
-
 47
47
-
 48
48
-
 49
49
-
 50
50
-
 51
51
-
 52
52


Ottobock 8K5=* Physo Passive Hands Instruções de operação
- Categoria
- Brinquedos
- Tipo
- Instruções de operação
- Este manual também é adequado para
em outros idiomas
- español: Ottobock 8K5=* Physo Passive Hands Instrucciones de operación
- français: Ottobock 8K5=* Physo Passive Hands Mode d'emploi
- italiano: Ottobock 8K5=* Physo Passive Hands Istruzioni per l'uso
- Nederlands: Ottobock 8K5=* Physo Passive Hands Handleiding
- Deutsch: Ottobock 8K5=* Physo Passive Hands Bedienungsanleitung
- dansk: Ottobock 8K5=* Physo Passive Hands Betjeningsvejledning
Artigos relacionados
-
Ottobock 5R2 Manual do usuário
-
Ottobock 7E5 Manual do usuário
-
Ottobock 7E10 Instruções de operação
-
Ottobock 4R160=1 Delrin KISS Kit Shuttle Lock Lanyard Systems Manual do usuário
-
Ottobock 3R80 Manual do usuário
-
-
-
Ottobock 4R1 Manual do usuário
-