


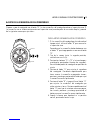
JUDGE®II INSTRUCTION MANUAL 01
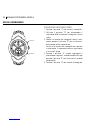
JUDGE® II
The precision of ten-jewel Swiss movement is matched with an oscillator circuit that counts each second as
32,768 vibrations of a crystal tuning fork. This true chronograph features a sub dial for measuring elapsed min-
utes and hours, plus a sweeping second hand that accelerates to the current moment when pause is released.
The band is available in natural leather or the highest grade of surgical stainless steel with a filled backing of
Unobtainium® for the comfort of reduced weight.The instrument also features a large date display, a 48-month
endurance battery and the hardest crystal utilized in watchmaking, pure sapphire, with a magnifying window
to optimize the viewing of the sub dial.
SETTING THE DATE AND TIME
For normal use, the crown rests against the case
to maintain a protective seal. The crown can be
pulled out to two click positions for setting the date
and time.
To ensure that the date-change function activates at
midnight (and not at noon), synchronize the timepiece
by doing the following:
TO SET THE DATE AND TIME:
1. Pull the crown out to the first click position (a).
2. Turn the crown clockwise and set the date to
yesterday’s date.
3. Pull the crown out to the second click position
(b).
4. Turn the hands forward until today’s date appears,
then continue forward until the current time is
reached. If the current time is in the afternoon or
evening, move the hour hand all the way around
the dial to pass 12 o’clock noon.
5. Push the crown back down against the case.
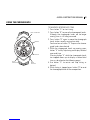
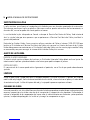
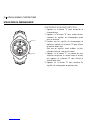
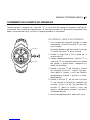
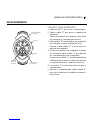
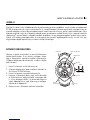
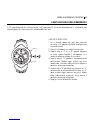
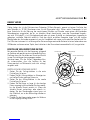
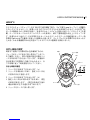
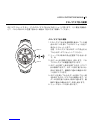
POS A POS B
Button B
Button A
Hour hand
p1
Chrono
minute hand Chrono hour
hand
Minute hand
Chrono second hand
Crown
Button B
Button A
p4
AB
Button B
Button A
p5
Button B
Button A
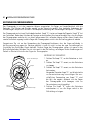
p2-3
Chrono
minute hand Chrono
hour hand
Chrono second hand

02 JUDGE®II INSTRUCTION MANUAL
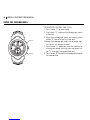
USING THE CHRONOGRAPH
The chronograph includes three separate hands. A hand on the main dial face counts seconds. Minutes and
hours are counted on the sub dial. One complete rotation of the minute hand represents 30 minutes. One
complete rotation of the hour hand represents 12 hours.
The chronograph is controlled with two push buttons. Button “A” starts and stops the timer. Button “B” has four
functions. In addition to pausing the display at the current intermediate time, it allows the chronograph hands
to catch up to the ongoing time being measured; it displays a second time total; and it resets the chronograph
hands to the zero position.
Before using the chronograph functions, ensure that the crown is fully against the case and not at one of the
click positions used for setting time and date. The three chronograph hands should align precisely at the zero
position. If they do not, see the section on page 5 on Adjusting the Chronograph Hands.
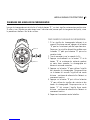
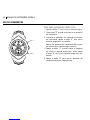
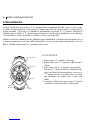
POS A POS B
Button B
Button A
Hour hand
p1
Chrono
minute hand Chrono hour
hand
Minute hand
Chrono second hand
Crown
Button B
Button A
p4
AB
Button B
Button A
p5
Button B
Button A
p2-3
Chrono
minute hand Chrono
hour hand
Chrono second hand
TO MEASURE ACCUMULATED TIME:
1. Press button “A” to start timing.
2. Press button “A” again to stop timing.
3. Press button “A” again to restart timing.
Continue to use button “A” to add time intervals to
the total measure of time. When using button “A”
only, intermediate time (while the chronograph
hands are not moving) is not added to the total
measure of time.
4. While timing is stopped, press button “B” to reset
the chronograph hands to the zero position.

JUDGE®II INSTRUCTION MANUAL 03
USING THE CHRONOGRAPH
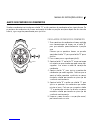
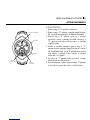
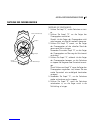
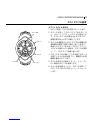
POS A POS B
Button B
Button A
Hour hand
p1
Chrono
minute hand Chrono hour
hand
Minute hand
Chrono second hand
Crown
Button B
Button A
p4
AB
Button B
Button A
p5
Button B
Button A
p2-3
Chrono
minute hand Chrono
hour hand
Chrono second hand
TO MEASURE INTERMEDIATE TIME:
1. Press button “A” to start timing.
2. Press button “B” to pause the chronograph hands.
Although the chronograph hands are no longer
moving, time is still being measured.
3. Press button “B” again to move the chronograph
hands to the currently running time total.
Continue to use button “B” to pause the chrono-
graph hands when desired.
4. While the chronograph hands are moving, press
button “A” to fully stop timing and display the total
measured time.
(Pressing button “A” while the chronograph hands
are stopped allows you to display a second total
time, as described on the following page.)
5. Use button “A” to restart and stop timing as
desired.
6. While timing is stopped, press button “B” to reset
the chronograph hands to the zero position.

04 JUDGE® II INSTRUCTION MANUAL
USING THE CHRONOGRAPH
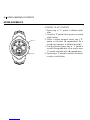
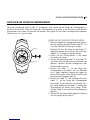
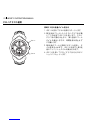
POS A POS B
Button B
Button A
Hour hand
p1
Chrono
minute hand Chrono hour
hand
Minute hand
Chrono second hand
Crown
Button B
Button A
p4
AB
Button B
Button A
p5
Button B
Button A
p2-3
Chrono
minute hand Chrono
hour hand
Chrono second hand
TO MEASURE A SECOND TIME TOTAL:
1. Press button “A” to start timing.
2. Use button “B” to pause the chronograph hands
as desired.
3. While the chronograph hands are moving, press
button “B” to display the first time total.
Although the chronograph hands are no longer mov-
ing, time is still being measured.
4. Press button “A” when you reach the moment for
marking the second finishing time, then press but-
ton “B” to display the second time total.
5. Press button “B” to reset the chronograph hands to
the zero position.

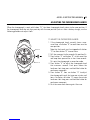
TO ADJUST THE CHRONOGRAPH HANDS:
1. If the chronograph hands currently show a mea-
sured time, use button “B” to reset them near the
zero position.
Note that the hands must be stopped with button
“A” to allow button “B” to reset them.
2. Pull the crown out to the second click position (b).
3. Press button “A” and button “B” at the same time
and keep them pressed for at least two seconds.
This puts the chronograph in correction mode.
4. Press button “A” to adjust the chronograph hand
that measures seconds. Each press moves the
hand one short step; press and hold the button for
continuous movement.
5. Press button “B” then use button “A” to adjust
the chronograph hands that measure minutes and
hours. Each press of button “A” moves the minute
hand one short step; press and hold the button for
continuous movement.
6. Push the crown back down against the case.
POS A POS B
Button B
Button A
Hour hand
p1
Chrono
minute hand Chrono hour
hand
Minute hand
Chrono second hand
Crown
Button B
Button A
p4
AB
Button B
Button A
p5
Button B
Button A
p2-3
Chrono
minute hand Chrono
hour hand
Chrono second hand
JUDGE® II INSTRUCTION MANUAL 05
ADJUSTING THE CHRONOGRAPH HANDS
When the chronograph is reset with button “B,” the three chronograph hands return to the zero position. If
the chronograph hands do not align precisely with the zero position (such as after a battery change), use the
following procedure to adjust them.

06 JUDGE® II INSTRUCTION MANUAL
BATTERY REPLACEMENT
The miniature battery that powers the chronograph is designed to last approximately four years. However,
because the battery is inserted at the factory for extensive performance checks, its actual life, once in your
possession, may be less.
Battery replacement may be performed only by an Authorized Oakley Service Center. Any attempt to open the
watch case by persons other than Authorized Oakley Service Professionals will void the product warranty.
Within the United States, call Oakley global headquarters at 1-800-403-7449 to find an Authorized Oakley
Timepiece Dealer or Service Professional near you. Customers outside the United States should contact their
local Authorized Oakley Timepiece Dealer or visit the Oakley website at www.oakley.com for the number of
the nearest Oakley distributor.
BAND ADJUSTMENT
STAINLESS STEEL BRACELET MODEL
If links need to be added or removed from the band, the adjustment should be done by an Authorized Oakley
Timepiece Dealer. Do not attempt to shorten the band by removing links yourself, as this may result in damage
to the bracelet.
LEATHER STRAP MODEL
The natural leather of the strap may stretch slightly during break-in, so adjust the fit accordingly.
CLEANING
Use a soft, clean cloth to wipe off any moisture that adheres to the case or band. Made of high-grade stainless
steel, the metal bracelet version of Judge®II will become soiled with dust and perspiration due to contact with skin.
Failure to keep the watch and case clean may result in a skin rash.
LEATHER CARE
Even the highest quality leather has a finite lifespan that may be reduced by excess wear and tear, exposure to the
natural acids in perspiration, and exposure to the environment. To maximize the longevity of leather components,
avoid direct contact with solvents and other chemicals; avoid prolonged exposure to sunlight; and avoid soaking
the components in water.

JUDGE® II INSTRUCTION MANUAL 07
COMPOSITION
CASE BODY ......................................................................................................................................Stainless steel
CASE BACK ................................................................................................... Stainless steel / screw-down design
MANUFACTURING ............................................................................Impact forged, high-precision CNC machined
CRYSTAL .................................................................... Sapphire with anti-reflective coating and inlaid magnifying window
CROWNS ........................................................................................................... Dual sealed for water resistance
StainleSS Steel Bracelet Model
BRACELET COMPOSITION .......................................................... Stainless steel with filled Unobtainium® backing
KINETICS......................................................................................Micro adjustment links for maximized flexibility
CLOSURE ...............................................................................Stainless steel deployment clasp with locking cover
leather Strap Model
STRAP COMPOSITION ...................................................................................................................Genuine leather
ATTACHMENT ....................................................................................Articulating stainless steel attachment link
CLOSURE ........................................................................................................Impact forged stainless steel buckle
SPECIFICATIONS
TYPE OF OSCILLATOR .........................................................................................................................Quartz Tuning Fork
FREQUENCY OF OSCILLATOR ....................................................................................................... 32,768 cycles per sec.
DRIVE SYSTEM ............................................................................................................Two-Pole Step Motor (180º/sec.)
ACCURACY ......................................................................................................................................-10 /+20 sec. per mo.
THERMAL OPERATING MIN ..............................................................................................................................0ºC (32ºF)
THERMAL OPERATING MAX .........................................................................................................................50ºC (122ºF)
WATER RESISTANCE ................................................................................IO Bar; Equivalent to a depth of 100m/330ft
BATTERY ....................................................................................................................Silver Oxide No. 395 (SR 927 SW)
BATTERY LIFE ......................................................................................................................................Approx. 48 months

08 JUDGE® II INSTRUCTION MANUAL
SAFEGUARDING
WATER EXPOSURE
Rated at 10-bar hydrophobic, the timepiece may be worn during bathing, swimming and shallow diving. It is
not designed for scuba or saturation diving. Before exposing the timepiece to moisture, be sure the crown is
pushed in fully against the case. Do not pull out the crown or press the chronograph buttons if the timepiece is
wet. If used in seawater, rinse the timepiece with fresh water and dry completely. For the leather strap version
of Judge®II, avoid prolonged exposure to water, as this may damage the strap.
TEMPERATURE
For precision timekeeping, normal operating temperature is 0°C to 50°C (32°F to 122°F).
MAGNETISM
Strong magnetic fields can have an adverse affect on the timepiece. Keep it away from magnetic objects.
CHEMICALS
The timepiece may become discolored or damaged if exposed to cosmetic spray, detergents, adhesives,
solvents, or paints.
SHOCK WAVE
Although the timepiece resists shock damage, impact against a hard surface may cause damage to the move-
ment or crystal.
PERIODIC MAINTENANCE
To ensure that the case, crown, crystal seal, and gasket remain resistant to water exposure, it is recommended
that the timepiece be inspected once every 2 to 3 years at an Authorized Oakley Service Center.

JUDGE®II INSTRUCTION MANUAL 09
OAKLEY WARRANTY POLICY
All authentic Swiss Made Oakley timekeeping instruments are warranted against manufacturer’s defects for
two full years from the date of purchase. Coverage is valid only with proof of purchase from an Authorized Oakley
Timepiece Dealer.
IMPORTANT
This limited warranty does not cover the crystal, strap/band/bracelet, or attachments. The deterioration of
leather components is not covered, nor are scratches to the case caused by use, nor is moisture damage if the
timepiece is a non-hydrophobic model, nor is damage caused by natural disaster such as fire, flood, or earth-
quake. We reserve the right to relinquish all responsibility under this guarantee for repair of damage when mis-
use or abuse is evident, including defects related to tampering or servicing done by agents other than Authorized
Oakley Service Facilities. This warranty does not affect specific legal rights of the consumer.
To qualify for service under the above guarantee, valid proof of purchase — which clearly shows the purchase
date and the name of the Authorized Oakley Timepiece Dealer — must be presented if a repair claim is made
during the warranty period.
REGISTRATION
The cutting-edge technology within each Oakley timepiece serves as validation for its authenticity. By register-
ing your timepiece via mail or online at www.oakley.com, you provide further credentials by allowing us to
document your purchase.
HOW TO MAKE A WARRANTY CLAIM
To qualify for service under the above guarantee, valid proof of purchase - which clearly shows the the purchase
date and the name of the Authorized Oakley Timepiece Dealer - must be presented if a repair claim is made
during warranty period.
Within the United States, telephone our global headquarters at 1 (800) 403-7449 with your purchase information.
Customers outside the United States should contact their local Authorized Oakley Timepiece Dealer or visit the
Oakley website at www.oakley.com for the number of the nearest Oakley distributor.
Legal rights under applicable national law governing the sale of consumer goods are not affected by this warranty.

10 JUDGE®II INSTRUCTION MANUAL
HOW TO MAKE A WARRANTY CLAIM
Oakley Global Headquarters, USA: 1 (800) 403-7449
Oakley Africa: +27 41 501 0200
Oakley Brasil Ltda.: 0800-770-7822 ou 0xx11-4197-9999 (Grande São Paulo e celular)
Oakley Canada: 1-877-625-5396
Oakley Japan: 0120 009 146
Oakley México: 52) 55 59503643
Oakley South Pacific (Australia): 1 800 637 001
Oakley South Pacific (New Zealand): 0800 696 255

JUDGE®II MANUAL DE INSTRUCCIONES 11
JUDGE®II
La precisión de este mecanismo suizo de diez rubíes se une a un circuito de oscilación que cuenta cada segundo
como 32.768 vibraciones de un diapasón de cristal. Este cronógrafo genuino está provisto de una esfera auxiliar
para medir las horas y minutos transcurridos, más un segundero rápido que mide los tiempos intermedios.
Disponible con correa de cuero natural o pulsera de acero inoxidable quirúrgico de la más alta calidad, con un
refuerzo relleno de Unobtainium®, proporcionando el confort de su poco peso. El instrumento tiene también una
gran esfera para la fecha, una pila con una autonomía de 48 meses y el cristal más duro utilizado en la fabricación
de relojes: zafiro puro, con una lupa para mejorar la visibilidad de la subesfera.
AJUSTE DE FECHA Y HORA
En uso normal, la corona está presionada contra la
caja, proporcionando un sellado protector. La corona
puede extraerse hasta dos posiciones, señaladas con
un clic, para ajustar la fecha y la hora.
Para asegurarse de que la función de cambio de fecha
se active a medianoche (y no a mediodía), sincronice el
reloj de la siguiente manera:
PARA AJUSTAR FECHA Y HORA:
1. Tire de la corona hasta que ajuste con un clic en la
primera posición (a).
2. Gire la corona haciendo avanzar la fecha hasta la
fecha de ayer.
3. Tire de la corona hasta que ajuste con un clic en la
segunda posición (b).
4. Haga avanzar las manecillas hasta que aparezca la
fecha de hoy, luego continúe hasta alcanzar la hora
actual. Si la hora actual es por la tarde o la noche,
gire la manecilla horaria una vuelta completa de la
esfera hasta pasar las doce del mediodía.
5. Presione la corona hasta su posición normal, apoya-
da contra la caja.
POS A POS B
Botón B
Botón A
Manecilla horaria
p1
Manecilla horaria
del cronómetro
Minutero del cronómetro
Minutero
Segundero del cronómetro
Corona
Botón B
Botón A
Manecilla horaria
del cronómetro
Minutero del cronómetro
Segundero del cronómetro
Botón B
Botón A
AB
Botón B
Botón A
p4 p5p2-3

12 JUDGE®II MANUAL DE INSTRUCCIONES
USO DEL CRONÓGRAFO
El cronógrafo tiene tres manecillas independientes. La manecilla de la esfera principal cuenta los segundos. En
la esfera auxiliar se cuentan los minutos y las horas. Una vuelta completa del minutero representa 30 minutos.
Una vuelta completa de la manecilla horaria representa 12 horas.
El cronógrafo se controla con dos botones. El botón “A” detiene y pone en marcha el cronógrafo. El botón “B”
tiene cuatro funciones. Además de detener la indicación en el tiempo parcial actual, permite a las manecillas
del cronógrafo midar el tiempo intermedio, indicar un segundo tiempo total y poner a cero las manecillas del
cronógrafo.
Antes de utilizar el cronógrafo, asegúrese de que la corona está completamente presionada contra la caja y no
en una de las posiciones utilizadas para ajustar la fecha y la hora. Las tres manecillas del cronógrafo deberán
encontrarse exactamente en la posición cero. Si no es así, lea el procedimiento que se describe más adelante
Ajuste de las manecillas del cronógrafo (página 15).
POS A POS B
Botón B
Botón A
Manecilla horaria
p1
Manecilla horaria
del cronómetro
Minutero del cronómetro
Minutero
Segundero del cronómetro
Corona
Botón B
Botón A
Manecilla horaria
del cronómetro
Minutero del cronómetro
Segundero del cronómetro
Botón B
Botón A
AB
Botón B
Botón A
p4 p5p2-3
PARA MEDIR EL TIEMPO TRANSCURRIDO:
1. Presione el botón “A” para poner en marcha el
cronógrafo.
2. Presione el botón “A” de nuevo para detener el
cronógrafo.
3. Presione el botón “A” de nuevo para volver a poner
en marcha el cronógrafo.
Continúe utilizando el botón “A” para añadir
intervalos de tiempo al tiempo total medido. Si
se utiliza solamente el botón “A”, no se pueden
añadir tiempos parciales (con las manecillas del
cronógrafo detenidas) al tiempo total medido.
4. Con el cronometraje detenido, presione el
botón “B” para poner a cero las manecillas del
cronógrafo.

JUDGE®II MANUAL DE INSTRUCCIONES 13
USO DEL CRONÓGRAFO
POS A POS B
Botón B
Botón A
Manecilla horaria
p1
Manecilla horaria
del cronómetro
Minutero del cronómetro
Minutero
Segundero del cronómetro
Corona
Botón B
Botón A
Manecilla horaria
del cronómetro
Minutero del cronómetro
Segundero del cronómetro
Botón B
Botón A
AB
Botón B
Botón A
p4 p5p2-3
PARA MEDIR TIEMPOS INTERMEDIOS:
1. Presione el botón “A” para poner en marcha el
cronógrafo.
2. Presione el botón “B” para detener las manecillas
del cronógrafo.
Aunque las manecillas del cronógrafo estén
detenidas, el tiempo seguirá contando.
3. Vuelva a presionar el botón “B” para llevar las
manecillas del cronógrafo al tiempo total actual-
mente en curso.
Vuelva a utilizar el botón “B” para detener el
cronógrafo cuando desee.
4. Con las manecillas del cronógrafo en funciona-
miento, presione el botón “A” para detener com-
pletamente el cronometraje y mostrar el tiempo
total medido.
(Presionando el botón “A” con las manecillas del
cronógrafo detenidas, se puede mostrar un segundo
tiempo total, como se indica más adelante.)
5. Utilice el botón “A” para volver a poner en marcha
y detener el cronometraje cuando desee.
6. Con el cronometraje detenido, presione el botón
“B” para poner las manecillas del cronógrafo a
cero.

14 JUDGE®II MANUAL DE INSTRUCCIONES
USO DEL CRONÓGRAFO
POS A POS B
Botón B
Botón A
Manecilla horaria
p1
Manecilla horaria
del cronómetro
Minutero del cronómetro
Minutero
Segundero del cronómetro
Corona
Botón B
Botón A
Manecilla horaria
del cronómetro
Minutero del cronómetro
Segundero del cronómetro
Botón B
Botón A
AB
Botón B
Botón A
p4 p5p2-3
PARA MEDIR UN SEGUNDO TIEMPO TOTAL:
1. Presione el botón “A” para poner en marcha el
cronógrafo.
2. Utilice el botón “B” para detener las manecillas
del cronógrafo cuando desee.
3. Con las manecillas del cronógrafo en funciona-
miento, presione el botón “B” para mostrar el
primer tiempo total.
Aunque las manecillas del cronógrafo estén
detenidas, el tiempo seguirá contando.
4. Presione el botón “A” cuando llegue el momento
de marcar el segundo tiempo final, entonces pre-
sione el botón “B” para mostrar el segundo tiempo
total.
5. Presione el botón “B” para poner a cero las man-
ecillas del cronógrafo.

PARA AJUSTAR LAS MANECILLAS DEL CRONÓGRAFO:
1. Si las manecillas del cronógrafo están indicando el
tiempo actual, utilice el botón “B” para acercarlas
a la posición cero.
Recuerde que las manecillas deben detenerse con
el botón “A” para luego ponerlas a cero con el botón
“B”.
2. Tire de la corona hasta la segunda posición,
señalada con un clic (b).
3. Presione los botones “A” y “B” al mismo tiempo y
manténgalos presionados durante dos segundos.
De este modo pondrá el cronógrafo en posición de
ajuste.
4. Presione el botón “A” para ajustar el segundero
del cronógrafo. Presiónelo repetidamente para
hacer avanzar la manecilla en pequeños tramos;
presione y mantenga presionado el botón para que
la manecilla avance rápidamente.
5. Presione el botón “B” y luego utilice el botón “A”
para ajustar las manecillas del cronógrafo que
miden minutos y horas. Presione repetidamente el
botón “A” para que el minutero avance en peque-
ños tramos; presione y mantenga presionado el
botón para que la manecilla avance rápidamente.
6. Empuje la corona para devolverla a su posición
normal, presionada contra la caja.
POS A POS B
Botón B
Botón A
Manecilla horaria
p1
Manecilla horaria
del cronómetro
Minutero del cronómetro
Minutero
Segundero del cronómetro
Corona
Botón B
Botón A
Manecilla horaria
del cronómetro
Minutero del cronómetro
Segundero del cronómetro
Botón B
Botón A
AB
Botón B
Botón A
p4 p5p2-3
JUDGE®II MANUAL DE INSTRUCCIONES 15
AJUSTE DE LAS MANECILLAS DEL CRONÓGRAFO
Al poner a cero el cronógrafo con el botón “B”, las tres manecillas del cronógrafo vuelven a la posición cero. Si
las manecillas no se alinean exactamente con la posición cero (como después de un cambio de pila), proceda
de la siguiente manera para ajustarlas:

16 JUDGE®II MANUAL DE INSTRUCCIONES
SUSTITUCIÓN DE LA PILA
La pila miniatura que alimenta el cronógrafo está diseñada para una duración aproximada de cuatro años.
Sin embargo, puesto que la pila se coloca en fábrica para realizar pruebas exhaustivas de funcionamiento, su
duración real, una vez en poder del cliente, podría ser menor.
La sustitución de la pila sólo puede ser llevada a cabo por el Servicio Post-Venta de Oakley. Todo intento de
abrir la caja del reloj por otras personas que no pertenezcan al Servicio Post-Venta de Oakley invalidará la
garantía del producto.
Dentro de los Estados Unidos, llame a nuestras oficinas centrales de Oakley al número 1-800-403-7449 para
localizar el Distribuidor o el Servicio Post-Venta de Oakley más cercano. Los clientes de fuera de los Estados
Unidos deben ponerse en contacto con su Distribuidor Autorizado Oakley o visitar nuestra página web de Oakley
en www.oakley.com para conseguir el número del distribuidor Oakley más cercano.
AJUSTE DE LA PULSERA
PULSERA DE ACERO INOXIDABLE
Si necesita añadir o quitar eslabones de la pulsera, un Distribuidor Autorizado Oakley deberá realizar el ajuste. No
intente acortar la pulsera quitando eslabones usted mismo, pues podría estropear la pulsera.
CORREA DE CUERO
El cuero natural de la correa puede estirar ligeramente al ponérsela, con el fin de que quede adecuadamente
ajustada.
LIMPIEZA
Utilice un paño suave y limpio para quitar la humedad adherida a la caja o la pulsera. La pulsera, de la versión
metálica del reloj Judge®II, hecha de acero inoxidable de alta calidad, se ensuciará con el polvo y el sudor debido
al contacto con la piel. La falta de limpieza del reloj y la caja podría provocar erupciones cutáneas.
CUIDADOS DEL CUERO
Incluso el cuero de la más alta calidad tiene una duración limitada que puede verse reducida por un desgaste natural
excesivo, la exposición a los ácidos naturales de la transpiración y la exposición a los elementos. Para extender al
máximo la longevidad de los componentes del cuero, evite el contacto directo con disolventes y otros productos
químicos, la exposición prolongada a la luz del sol y sumergir los componentes en agua.
A página está carregando...
A página está carregando...
A página está carregando...
A página está carregando...
A página está carregando...
A página está carregando...
A página está carregando...
A página está carregando...
A página está carregando...
A página está carregando...
A página está carregando...
A página está carregando...
A página está carregando...
A página está carregando...
A página está carregando...
A página está carregando...
A página está carregando...
A página está carregando...
A página está carregando...
A página está carregando...
A página está carregando...
A página está carregando...
A página está carregando...
A página está carregando...
A página está carregando...
A página está carregando...
A página está carregando...
A página está carregando...
A página está carregando...
A página está carregando...
A página está carregando...
A página está carregando...
A página está carregando...
A página está carregando...
A página está carregando...
A página está carregando...
A página está carregando...
A página está carregando...
A página está carregando...
A página está carregando...
A página está carregando...
A página está carregando...
A página está carregando...
A página está carregando...
A página está carregando...
A página está carregando...
A página está carregando...
A página está carregando...
A página está carregando...
A página está carregando...
A página está carregando...
A página está carregando...
A página está carregando...
A página está carregando...
A página está carregando...
A página está carregando...
A página está carregando...
A página está carregando...
A página está carregando...
A página está carregando...
A página está carregando...
A página está carregando...
A página está carregando...
A página está carregando...
A página está carregando...
A página está carregando...
-
 1
1
-
 2
2
-
 3
3
-
 4
4
-
 5
5
-
 6
6
-
 7
7
-
 8
8
-
 9
9
-
 10
10
-
 11
11
-
 12
12
-
 13
13
-
 14
14
-
 15
15
-
 16
16
-
 17
17
-
 18
18
-
 19
19
-
 20
20
-
 21
21
-
 22
22
-
 23
23
-
 24
24
-
 25
25
-
 26
26
-
 27
27
-
 28
28
-
 29
29
-
 30
30
-
 31
31
-
 32
32
-
 33
33
-
 34
34
-
 35
35
-
 36
36
-
 37
37
-
 38
38
-
 39
39
-
 40
40
-
 41
41
-
 42
42
-
 43
43
-
 44
44
-
 45
45
-
 46
46
-
 47
47
-
 48
48
-
 49
49
-
 50
50
-
 51
51
-
 52
52
-
 53
53
-
 54
54
-
 55
55
-
 56
56
-
 57
57
-
 58
58
-
 59
59
-
 60
60
-
 61
61
-
 62
62
-
 63
63
-
 64
64
-
 65
65
-
 66
66
-
 67
67
-
 68
68
-
 69
69
-
 70
70
-
 71
71
-
 72
72
-
 73
73
-
 74
74
-
 75
75
-
 76
76
-
 77
77
-
 78
78
-
 79
79
-
 80
80
-
 81
81
-
 82
82
-
 83
83
-
 84
84
-
 85
85
-
 86
86


em outras línguas
- français: Oakley JUDGE II Manuel utilisateur
- italiano: Oakley JUDGE II Manuale utente
- Deutsch: Oakley JUDGE II Benutzerhandbuch
- 日本語: Oakley JUDGE II ユーザーマニュアル
Artigos relacionados
Outros documentos
-
Bulova M BLK DIAL CHRONO Manual do usuário
-
Timex World Time Guia de usuario
-
-
-
-
-
-
Prochem E675 Instruções de operação