V TAC V-TAC VT-5157 Outdoor WiFi Camera Manual do usuário
- Tipo
- Manual do usuário

WEEE Number: 80133970
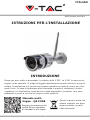
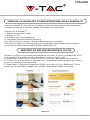
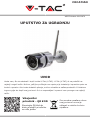
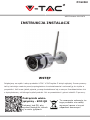
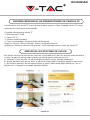
INSTALLATION INSTRUCTION
Multi-Language
Manual - QR CODE
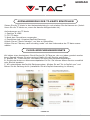
Please scan the QR code
to access the manual in
multiple languages.
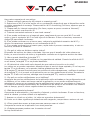
INTRODUCTION
Thank you for selecting and buying V-TAC product. V-TAC will serve you the best.
Please read these instructions carefully before starting the installation and keep this
manual handy for future reference. If you have any another query, please contact
our dealer or local vendor from whom you have purchased the product. They are
trained and ready to serve you at the best.
This marking indicates that
this product should not be
disposed of with other
household wastes.
ENGLISH
OUTDOOR WIFI CAMERA
[VT-5157]

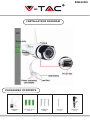
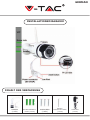
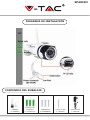
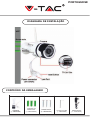
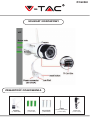
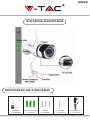
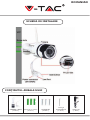
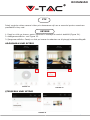
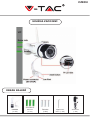
INSTALLATION DIAGRAM
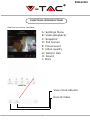
PACKAGING CONTENTS
ENGLISH
CAMERA
(1PC)
SCREW NUTS
(3PCS)
SCREWS
(3PCS)
ADAPTER
(1PC)
HEX KEY
(1PC)

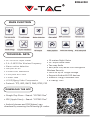
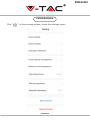
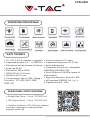
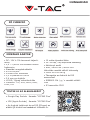
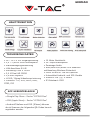
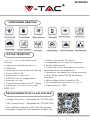
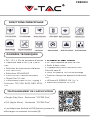
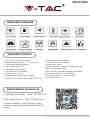
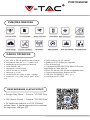
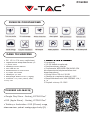
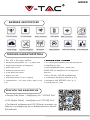
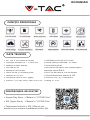
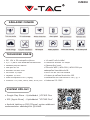
MAIN FUNCTION
TECHNICAL DATA
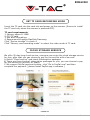
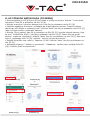
DOWNLOAD THE APP
• Google Play Store - Search “YCC365 Plus”
• IOS (Apple Store) - Search “YCC365 Plus”
• Android phones and IOS(Iphone) can
download by scanning the following QR codes.
• 10 meters Night Vision
• 25–30fps Frame Rate
• Two way Audio
• WEP/WPA-PSK/WPA2-PSK encryption
Wireless Security
• Micro SD up to 128gb Storage
• Supports Android & IOS devices
• IEEE802.11b/g/n Wireless LAN
• IP Rating: IP65
• DC:12V±5% Input Power
• 2.4~2.4835 Ghz Wireless Frequency
• Alarm motion detection
• Lan port RJ-45
• 2304x1296P Resolution
• 3.0M pixel HD CMOS
• 3.6mm Lens
• H.265/Mjpeg Video Compression
• Protocol: TCP, UDP, DHCP, DNS, RTSP, P2P
ENGLISH

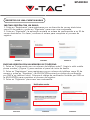
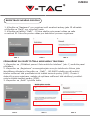
FIGURE 1 FIGURE 2 FIGURE 3
FIGURE 4 FIGURE 6FIGURE 5
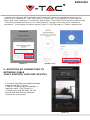
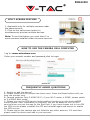
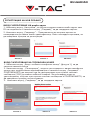
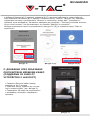
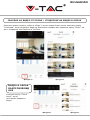
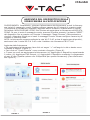
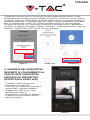
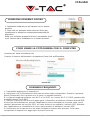
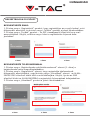
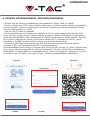
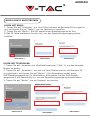
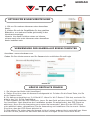
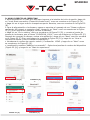
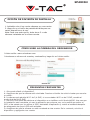
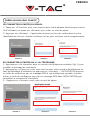
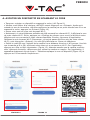
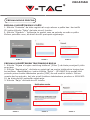
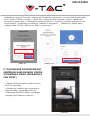
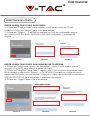
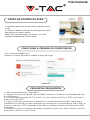
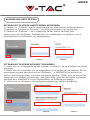
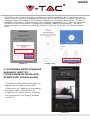
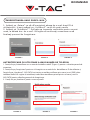
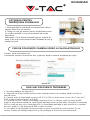
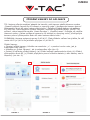
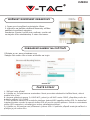
REGISTER NEW ACCOUNT
LOGIN USING EMAIL
1. Tap on “Sign Up” to register with your email address as user ID and tap on
“Next” to create a password.
2. Tap on “Next” - The APP will send a confirmation link to your email ID. Please
confirm the link to complete the registarion process.
LOGIN USING PHONE NO.
1. Tap on “Login in with mobile phone number” (fig 1) to change the login panel
2. Tap on “Sign Up” to register with your phone number as user ID and tap on
“Next” - The APP will send a SMS verification code to your mobile phone. Please
input the SMS verification code in the APP to complete the registarion process.
3. Tap on “Next” to create a password.
ENGLISH

FIGURE 7 FIGURE 8 FIGURE 9
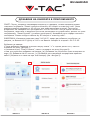
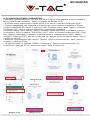
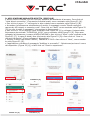
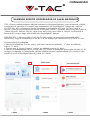
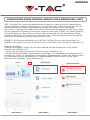
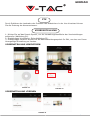
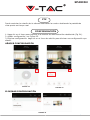
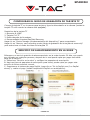
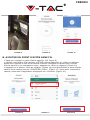
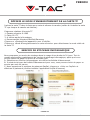
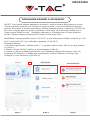
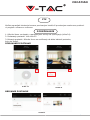
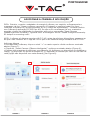
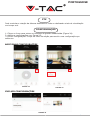
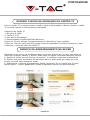
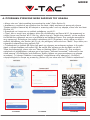
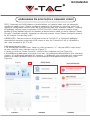
ADDING CAMERA DEVICE TO THE APP
TIP: First, connect the power adapter to the camera, then the camera will sound
"Please configure camera by AP hotspot or by scanning code" then using the YCC365
Plus APP start adding the camera to the APP. If you do not hear the sound, press and
hold the "RESET" button on the device until you hear the sound "Reset Success". Please
wait until you hear the sound "Please configure camera by AP hotspot or by scanning
code"
NOTE: The camera only supports 2.4G Wi-Fi, before adding devices, make sure your
router is 2.4G Wi-Fi, and your phone is connected to 2.4G Wi-Fi.
Add Camera
• Add camera Tap on top right corner “+” sign as shown below (figure 7)
• Tap on “Smart Camera” as shown below(Figure 8)
• There are three ways for adding the camera: (a) Device adding by scanning code (b)
Addition of AP hotspot (c) Addition by connecting to network cable(This feature is not
available for this camera) (Refer to Figure 9)
ENGLISH

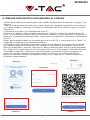
FIGURE 10 FIGURE 11
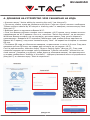
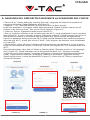
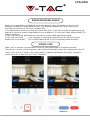
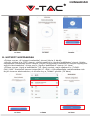
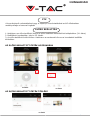
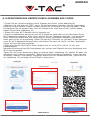
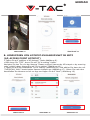
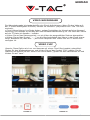
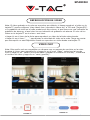
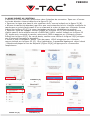
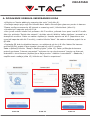
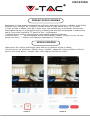
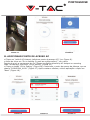
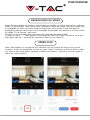
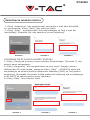
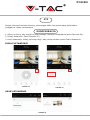
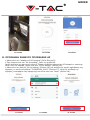
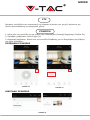
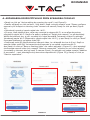
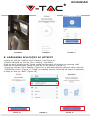
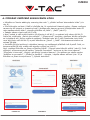
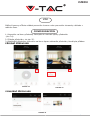
A. DEVICE ADDING BY SCANNING THE CODE
• Tap on “device adding by scanning the code” (Ref Figure 9).
• Please refer to "TIP" before tapping on Next.
After you hear the sound from camera "Please configure camera by AP hotspot or by
scanning code" tap on Next (Figure 10)
• Enter your Wi-Fi Name and Password.
• Now if your mobile phone is already connected to network Wi-Fi, it will show your
network Wi-Fi name. If not, press “Switch the network” to open your phone’s WLAN
and connect to your available network. Then go back to the app. Input Wi-Fi pass-
word (note: this password must be your network Wi-Fi password), and then click
“Next”. A QR code will show on phone screen.
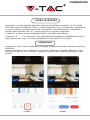
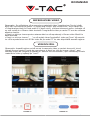
• Place the QR code towards the camera lens at a distance of around 4-8 inches.
After the camera reads the QR, it will sound with “two beeps” and Wi-Fi connecting.
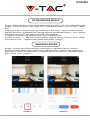
Now on the App, tap on “Beep or flashing lights” (Figure 12). Then wait till the
camera confirms with “Internet connected” “welcome to use cloud camera”. On app it
will also show “Addition is successful”- Select/type the device name (Figure 15) and
tap on “Start to experience”.
FIGURE 12
ENGLISH

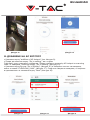
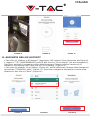
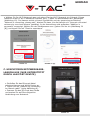
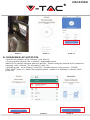
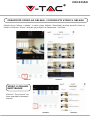
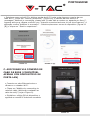
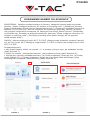
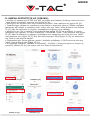
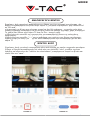
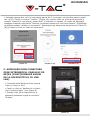
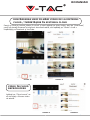
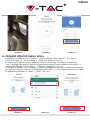
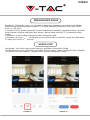
B. ADDITION OF AP HOTSPOT
• Tap on “addition of AP Hotspot” (Ref Figure 9).
• Please refer to "TIP" before tapping on "Go to setting".
After you hear the sound from camera "Please configure camera by AP hotspot or by
scanning code" tap on "Go to setting" (Figure 10)
• Tap on “Go to Setting" (Figure 16) button then Select the camera hotspot named with
“CLOUDCAM_XXXX” (Figure 17). After connecting the camera then go back to the app and
Tap on “Next” (Figure 18).
FIGURE 14 FIGURE 15
FIGURE 16 FIGURE 18
FIGURE 17
FIGURE 13
ENGLISH

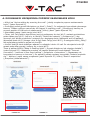
• Connect the Ethernet cable between
camera and Wi-Fi router.
• Tap on “Addition by connecting to
network cable” (Ref Figure 9).
• Please scan the QR code on the
device and wait for the network
connection to succeed.
FIGURE 19
FIGURE 21
FIGURE 20 [A] FIGURE 20 [B]
C. ADDITION BY CONNECTING TO
NETWORK CABLE
(ONLY SUPPORT LAN PORT DEVICE)
• Select your network Wi-Fi and input Wi-Fi password (note: this password must be your
network Wi-Fi password). Then Tap “confirm” [Figure 19], the camera will sound with two
beeps and voice “Network is connecting, please wait”. Then wait till the camera confirms with
“Internet connected welcome to use cloud camera”. On app it will also show “Addition is
successful”- Select/type the device name (Figure 20 [B]) and tap on “Start to experience".
ENGLISH

FIGURE 22 [A] FIGURE 22 [B] FIGURE 22 [C] FIGURE 22 [D]
FIGURE 22 [F]FIGURE 22 [E] FIGURE 22 [G] FIGURE 22 [H]
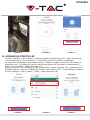
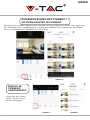
D. AP DIRECT MODE (SPECIAL)
• Open the YCC365 plus APP to enter the login interface. Tap on "Local direct connection" as
shown in Figure 22[A]
• Tap on plus sign on the top right hand corner as shown in Figure 22[B].
• Power up the camera and wait until you hear the voice "Please configure camera by AP
hotspot or scanning code" and Tap on "Next" as shown in Figure 22[C] (if you don't hear the
voice, reset the camera
• Tap on "Go to setting" as shown in Figure 22[D] and connect the camera hotspot named
with “CLOUDCAM_XXXX" as shown in Figure 22[E]. After connecting the camera go back to
the APP and tap on "Next" as shown in Figure 22[F]. If unsure please refer to Figure 22[D]
and tap on "How to connect the device".
• Enter the User name: admin | Password: 12345 and tap on “Next”, as shown in Figure
22[G].
• On app it will also show “Addition is successful”- Select/type the device name (Figure
22[H]) and tap on “Start to experience"
ENGLISH

8
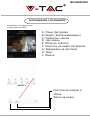
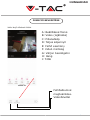
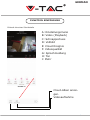
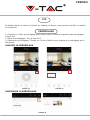
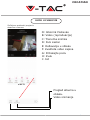
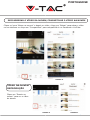
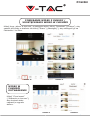
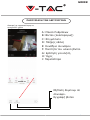
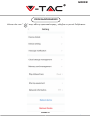
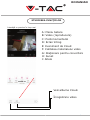
FUNCTION INTRODUCTION
Real-time preview interface
A: Settings Menu
B: Video(playback)
C: Snapshot
D: Full Screen
E: Cloud event
F: Video quality
G: Hold to talk
H: Sound
I: More
View cloud albums.
Record Video
FIGURE 22
FIGURE 23
ENGLISH

8
1. Click the preset icon to enter the preset management interface (Figure 24).
2. Adding presets. Refer Figure 25.
3. Delete the preset: Click the edit icon to delete the preset that has been added.
ADD THE PRESET
DELETE THE PRESET
By sliding steering wheel or sliding the screen on the live preview you can
control the camera's rotation.
FIGURE 25
FIGURE 26
FIGURE 24
PTZ
PRESET
ENGLISH

8
FIGURE 27 FIGURE 28
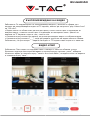
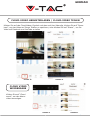
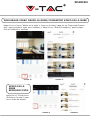
VIDEO PLAYBACK
VIDEO CLIP
Note: Video playback by default is cloud recording, if you want to playback the
video on the TF card, you can switch “play videos from” to “SD card”.
• Cloud video has color variations, dark blue indicates the alarm recording and
light blue indicates non-alarm recording. TF card video color is uniform light blue.
• Click the date icon to playback the video of the selected date.
• Click “ ” icon to adjust the cloud video playback speed, please note the TF card
playback does not support this function.
Note: Only the cameras with cloud service package have this feature.
Drag the playback cursor and click the clip icon, select start time and click “save to
the cloud album ” , enter the video name and click “save”.
Lorem ipsum
Lorem ipsum
ENGLISH

8
Click the cloud album icon and click the video clip, click “Download” to save the
video to your phone or click “Share” to share your Video on Facebook and
YouTube.
Click “Cloud event” to
view the alarm video
DOWNLOAD CLOUD VIDEO / SHARE CLOUD VIDEO
CLOUD VIDEO
PLAYBACK
FIGURE 29 FIGURE 30
FIGURE 31 FIGURE 32
ENGLISH

8
ENGLISH
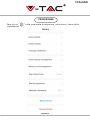
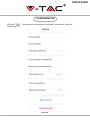
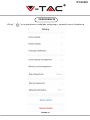
Click “ “ in the preview screen, check the settings menu
PREFERENCES
FIGURE 33

8
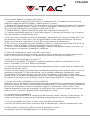
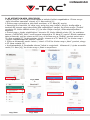
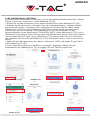
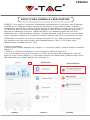
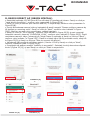
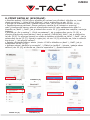
We offer 30-day-long cloud service, everyone can enjoy the cloud storage service
for free, after that you can choose to pay for the service with a low cost.
A Select “Cloud service” and check Subscription packages
B There are three kinds of subscription packages for you, you can choose to pay
for this service by monthly or yearly.
C We support PayPal payment system, click “Go to PayPal now” and then
complete the payment ( please install PayPal app in advance )
CLOUD STORAGE SERVICE
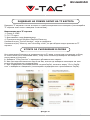
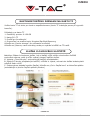
SET TF CARD RECORDING MODE
Insert the TF card into the card slot and power on the camera. (Ensure to install
the TF card only when the camera is powered OFF).
TF card requirements
1 Memory space 8-128G
2 C10 TF card
3 Use after formatting.
4 Recommend Kingston/SanDisk/Samsung
Click “Device storage” to check it
Click “Memory card recording mode” to select the video mode of TF card.
FIGURE 34
ENGLISH

8
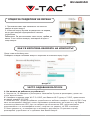
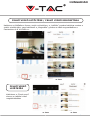
1. Unable to add the device?
A. Please make sure the camera has been reset. Press the Reset button until you
hear the prompt tone.
B. Camera supports Only 2.4GHZ Wi-Fi, if your Wi-Fi router is 5GHZ, please switch
to 2.4/5GHZ dual mode.
C. Please turn on the GPS service before adding the device on the Android/IOS
mobile phone. After installation is complete, you will be asked to turn on GPS
service when you use the app for the first time, if you have chosen not to turn ON
the GPS service please uninstall the APP and reinstall again and ensure to enable
the GPS service.
D. Please ensure the camera was not linked to any other account. If it was then
please reset the device and add to your account.
FIGURE 35
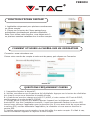
Log In: www.ucloudcam.com
Enter your account number and password,click to Login
HOW TO USE THE CAMERA ON A COMPUTER
FREQUENTLY ASKED QUESTIONS
1. Applicable only for multiple cameras under
the same account.
2. Click on the split screen button to
simultaneously preview multiple devices.
Note: To use this feature you must have 2 or
more cameras installed under the same account.
SPLIT SCREEN FEATURE
FIGURE 36
ENGLISH

8
There are four voice prompts in the progress
(1) “Please configure camera by AP hotspot or scanning code”
(2) Select your Wi-Fi and login with your password, after the device makes a noise
like “beep” you will hear this “Please wait for Wi-Fi connecting”.
(3)“Please wait for internet connecting” after getting the Internet IP address.
(4)“Internet connected welcome to use cloud camera”
A. If you cannot go to the second step, please ensure your Wi-Fi channel is not
hidden, and the Wi-Fi router is not placed far from the camera. If this way doesn’t
work, please scan the QR code to add the camera.
B. If you cannot go to the third step, please reduce the number of the Wi-Fi users,
and delete the special characters of your Wi-Fi password.
C. If you cannot go to the fourth step, please repeat the entire process again, if it
still doesn’t work, please contact the seller.
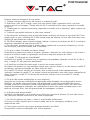
2. Why does the video recording split into multiple videos?
The size of the video file is limited. Once the video size reaches its limit, the video
file will be created and the next video will continue to be recorded.
3. The TF card can’t be identified?
Please check the TF card if it meets the quality requirements. When the Wi-Fi
signal is not good, the TF Card will not be identified.
4. The video recording timeline is blank after the cloud service expired?
The video cannot be replayed after cloud service is expired, if there is no TF card
in the camera, the video cannot be recorded.
If the TF card is always working, but the video files disappear, please check the TF
card state, if it is normal in the App but no video has been recorded, please format
the TF card. If it still doesn’t work, please get a new TF card and try again.
5. Why can't I get notifications on my phone?
Make sure the APP notification is enabled in the phone settings, when you are
watching the real-time video in the App, there is no warning notifications, because
it’s unnecessary to send notifications when you are watching the video online.
Advanced message push system, the warning notifications won’t be notified to
your phone all the time but it will record all the messages and videos.
6. Camera disconnected?
Please check the power and the Internet then restart the camera. If this way does
not work please remove the camera and add it again in the App.
7. Circle in the video, video is running slowly?
Circle in the video means it’s still loading, please check your network environment.
8. How can I give access to other people to watch the video?
Share the App account with the other people.
9. How many people can use the account simultaneously?
There is no theoretical limit.
10. Why adding camera to another account would fail?
One camera one account, if the other account needs to be added with the camera,
please remove the camera from the current account and add it to the new account.
ENGLISH

8
11. How can I get my camera connected to the other Wi-Fi?
Two ways:
A When you need to change to another Wi-Fi without moving the place.
Setting Menu >> Wi-Fi Network >> select the Wi-Fi
B: When the camera is moved to another place, please start the camera, you will
see the “Device disconnected” on the main page, and then click “TROUBLESHOOT”
to connect to the Wi-Fi again.
ENGLISH

WEEE Number: 80133970
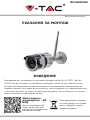
УКАЗАНИЯ ЗА МОНТАЖ
Многоезично
ръководство - QR
КОД
Моля, сканирайте QR
кода, за да получите
достъп до ръководството
на няколко езика.
ВЪВЕДЕНИЕ
Благодарим ви, че избрахте и закупихте продукт на Ви-Тек (V-TAC). Ви-Тек
(V-TAC) ще ви послужи по най-добрия възможен начин. Моля прочетете тези
инструкции внимателно преди инсталация и съхранявайте ръководството за
бъдещи справки. Ако имате други въпроси, моля свържете се с нашия дилър или
с местния търговец, от който сте закупили продукта. Те са обучени и са готови
да ви послужат по най-добрия начин.
Тази маркировка показва,
че този продукт не трябва
да се изхвърля с други
битови отпадъци
BULGARIAN

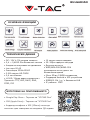
МОНТАЖНА СХЕМА
СЪДЪРЖАНИЕ НА ОПАКОВКАТА
BULGARIAN
КАМЕРА
(1 БРОЙ)
ВИНТОВИ ГАЙКИ
(3 БРОЯ)
ВИНТОВЕ
(3 БРОЯ)
АДАПТЕР
(1 БРОЙ)
ШЕСТОСТЕН
(1 БРОЙ)
A página está carregando...
A página está carregando...
A página está carregando...
A página está carregando...
A página está carregando...
A página está carregando...
A página está carregando...
A página está carregando...
A página está carregando...
A página está carregando...
A página está carregando...
A página está carregando...
A página está carregando...
A página está carregando...
A página está carregando...
A página está carregando...
A página está carregando...
A página está carregando...
A página está carregando...
A página está carregando...
A página está carregando...
A página está carregando...
A página está carregando...
A página está carregando...
A página está carregando...
A página está carregando...
A página está carregando...
A página está carregando...
A página está carregando...
A página está carregando...
A página está carregando...
A página está carregando...
A página está carregando...
A página está carregando...
A página está carregando...
A página está carregando...
A página está carregando...
A página está carregando...
A página está carregando...
A página está carregando...
A página está carregando...
A página está carregando...
A página está carregando...
A página está carregando...
A página está carregando...
A página está carregando...
A página está carregando...
A página está carregando...
A página está carregando...
A página está carregando...
A página está carregando...
A página está carregando...
A página está carregando...
A página está carregando...
A página está carregando...
A página está carregando...
A página está carregando...
A página está carregando...
A página está carregando...
A página está carregando...
A página está carregando...
A página está carregando...
A página está carregando...
A página está carregando...
A página está carregando...
A página está carregando...
A página está carregando...
A página está carregando...
A página está carregando...
A página está carregando...
A página está carregando...
A página está carregando...
A página está carregando...
A página está carregando...
A página está carregando...
A página está carregando...
A página está carregando...
A página está carregando...
A página está carregando...
A página está carregando...
A página está carregando...
A página está carregando...
A página está carregando...
A página está carregando...
A página está carregando...
A página está carregando...
A página está carregando...
A página está carregando...
A página está carregando...
A página está carregando...
A página está carregando...
A página está carregando...
A página está carregando...
A página está carregando...
A página está carregando...
A página está carregando...
A página está carregando...
A página está carregando...
A página está carregando...
A página está carregando...
A página está carregando...
A página está carregando...
A página está carregando...
A página está carregando...
A página está carregando...
A página está carregando...
A página está carregando...
A página está carregando...
A página está carregando...
A página está carregando...
A página está carregando...
A página está carregando...
A página está carregando...
A página está carregando...
A página está carregando...
A página está carregando...
A página está carregando...
A página está carregando...
A página está carregando...
A página está carregando...
A página está carregando...
A página está carregando...
A página está carregando...
A página está carregando...
A página está carregando...
A página está carregando...
A página está carregando...
A página está carregando...
A página está carregando...
A página está carregando...
A página está carregando...
A página está carregando...
A página está carregando...
A página está carregando...
A página está carregando...
A página está carregando...
A página está carregando...
A página está carregando...
A página está carregando...
A página está carregando...
A página está carregando...
A página está carregando...
A página está carregando...
A página está carregando...
A página está carregando...
A página está carregando...
A página está carregando...
A página está carregando...
A página está carregando...
A página está carregando...
A página está carregando...
A página está carregando...
A página está carregando...
A página está carregando...
A página está carregando...
A página está carregando...
A página está carregando...
A página está carregando...
A página está carregando...
A página está carregando...
A página está carregando...
A página está carregando...
A página está carregando...
A página está carregando...
A página está carregando...
A página está carregando...
A página está carregando...
A página está carregando...
A página está carregando...
A página está carregando...
A página está carregando...
A página está carregando...
A página está carregando...
A página está carregando...
A página está carregando...
A página está carregando...
A página está carregando...
A página está carregando...
A página está carregando...
A página está carregando...
A página está carregando...
A página está carregando...
A página está carregando...
A página está carregando...
A página está carregando...
A página está carregando...
A página está carregando...
A página está carregando...
A página está carregando...
A página está carregando...
A página está carregando...
A página está carregando...
A página está carregando...
A página está carregando...
A página está carregando...
A página está carregando...
A página está carregando...
A página está carregando...
A página está carregando...
A página está carregando...
A página está carregando...
A página está carregando...
A página está carregando...
A página está carregando...
A página está carregando...
A página está carregando...
A página está carregando...
A página está carregando...
A página está carregando...
A página está carregando...
A página está carregando...
A página está carregando...
A página está carregando...
A página está carregando...
-
 1
1
-
 2
2
-
 3
3
-
 4
4
-
 5
5
-
 6
6
-
 7
7
-
 8
8
-
 9
9
-
 10
10
-
 11
11
-
 12
12
-
 13
13
-
 14
14
-
 15
15
-
 16
16
-
 17
17
-
 18
18
-
 19
19
-
 20
20
-
 21
21
-
 22
22
-
 23
23
-
 24
24
-
 25
25
-
 26
26
-
 27
27
-
 28
28
-
 29
29
-
 30
30
-
 31
31
-
 32
32
-
 33
33
-
 34
34
-
 35
35
-
 36
36
-
 37
37
-
 38
38
-
 39
39
-
 40
40
-
 41
41
-
 42
42
-
 43
43
-
 44
44
-
 45
45
-
 46
46
-
 47
47
-
 48
48
-
 49
49
-
 50
50
-
 51
51
-
 52
52
-
 53
53
-
 54
54
-
 55
55
-
 56
56
-
 57
57
-
 58
58
-
 59
59
-
 60
60
-
 61
61
-
 62
62
-
 63
63
-
 64
64
-
 65
65
-
 66
66
-
 67
67
-
 68
68
-
 69
69
-
 70
70
-
 71
71
-
 72
72
-
 73
73
-
 74
74
-
 75
75
-
 76
76
-
 77
77
-
 78
78
-
 79
79
-
 80
80
-
 81
81
-
 82
82
-
 83
83
-
 84
84
-
 85
85
-
 86
86
-
 87
87
-
 88
88
-
 89
89
-
 90
90
-
 91
91
-
 92
92
-
 93
93
-
 94
94
-
 95
95
-
 96
96
-
 97
97
-
 98
98
-
 99
99
-
 100
100
-
 101
101
-
 102
102
-
 103
103
-
 104
104
-
 105
105
-
 106
106
-
 107
107
-
 108
108
-
 109
109
-
 110
110
-
 111
111
-
 112
112
-
 113
113
-
 114
114
-
 115
115
-
 116
116
-
 117
117
-
 118
118
-
 119
119
-
 120
120
-
 121
121
-
 122
122
-
 123
123
-
 124
124
-
 125
125
-
 126
126
-
 127
127
-
 128
128
-
 129
129
-
 130
130
-
 131
131
-
 132
132
-
 133
133
-
 134
134
-
 135
135
-
 136
136
-
 137
137
-
 138
138
-
 139
139
-
 140
140
-
 141
141
-
 142
142
-
 143
143
-
 144
144
-
 145
145
-
 146
146
-
 147
147
-
 148
148
-
 149
149
-
 150
150
-
 151
151
-
 152
152
-
 153
153
-
 154
154
-
 155
155
-
 156
156
-
 157
157
-
 158
158
-
 159
159
-
 160
160
-
 161
161
-
 162
162
-
 163
163
-
 164
164
-
 165
165
-
 166
166
-
 167
167
-
 168
168
-
 169
169
-
 170
170
-
 171
171
-
 172
172
-
 173
173
-
 174
174
-
 175
175
-
 176
176
-
 177
177
-
 178
178
-
 179
179
-
 180
180
-
 181
181
-
 182
182
-
 183
183
-
 184
184
-
 185
185
-
 186
186
-
 187
187
-
 188
188
-
 189
189
-
 190
190
-
 191
191
-
 192
192
-
 193
193
-
 194
194
-
 195
195
-
 196
196
-
 197
197
-
 198
198
-
 199
199
-
 200
200
-
 201
201
-
 202
202
-
 203
203
-
 204
204
-
 205
205
-
 206
206
-
 207
207
-
 208
208
-
 209
209
-
 210
210
-
 211
211
-
 212
212
-
 213
213
-
 214
214
-
 215
215
-
 216
216
-
 217
217
-
 218
218
-
 219
219
-
 220
220
-
 221
221
-
 222
222
-
 223
223
-
 224
224
-
 225
225
-
 226
226
-
 227
227
-
 228
228
-
 229
229
-
 230
230
-
 231
231
-
 232
232
-
 233
233
-
 234
234


V TAC V-TAC VT-5157 Outdoor WiFi Camera Manual do usuário
- Tipo
- Manual do usuário
em outras línguas
- español: V TAC V-TAC VT-5157 Outdoor WiFi Camera Manual de usuario
- français: V TAC V-TAC VT-5157 Outdoor WiFi Camera Manuel utilisateur
- italiano: V TAC V-TAC VT-5157 Outdoor WiFi Camera Manuale utente
- slovenčina: V TAC V-TAC VT-5157 Outdoor WiFi Camera Používateľská príručka
- română: V TAC V-TAC VT-5157 Outdoor WiFi Camera Manual de utilizare
Outros documentos
-
GOCLEVER NANNY EYE 2 Guia rápido
-
woox R4040 Guia de usuario
-
 V-TAC VT-5555 Manual do usuário
-
woox R9044 Guia de usuario
-
Stanley TLM99SI Manual do usuário
-
Trendnet TV-IP662WI Quick Installation Guide
-
Acme Made 078055 Manual do usuário
-
Stanley STHT1-77032RC Manual do usuário
-
ACME STI Manual do usuário
-
UFESA Totalchef RK7 Manual do usuário
