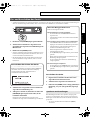
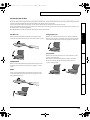
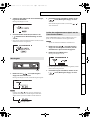
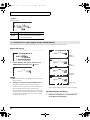
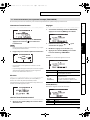
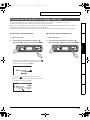
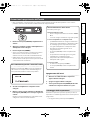
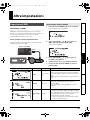
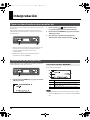
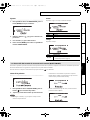
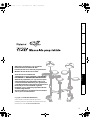
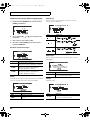
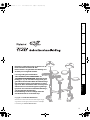
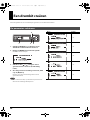
Roland TD-4KP Manual do proprietário
- Categoria
- Sintetizador
- Tipo
- Manual do proprietário
Este manual também é adequado para

Owner’s Manual
Bedienungsanleitung
Mode d’emploi
Manuale dell’utente
Manual del usuario
Manual do proprietário
Gebruikershandleiding
Português NederlandsDeutsch Français Italiano EspañolEnglish


1
Deutsch Français Italiano Español Português NederlandsEnglish
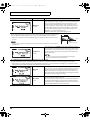
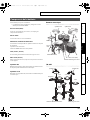
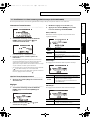
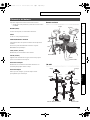
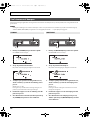
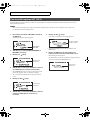
Thank you, and congratulations on your
choice of the Roland V-Drums Portable TD-4KP.
Before using this unit, carefully read
the sections entitled: “USING THE UNIT
SAFELY” and “IMPORTANT NOTES” (Owner’s
manual p. 2–3; p. 4). These sections provide
important information concerning the
proper operation of the unit.
Additionally, in order to feel assured that you
have gained a good grasp of every feature of
your new unit, read Setup guide 1, 2 and
Owner’s manual in its entirety. This manual
should be saved and kept on hand as a
convenient reference.
Copyright ©2012 ROLAND CORPORATION
All rights reserved. No part of this publication may be
reproduced in any form without the written permission of
ROLAND CORPORATION.
This document is the owner’s manual for
the TD-4 Percussion Sound Module.
TD-4_e.book 1 ページ 2012年9月10日 月曜日 午後1時43分

2
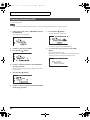
USING THE UNIT SAFELY
Concerning the Auto Off function
001-70
• The power to this unit will be turned off automatically
after a predetermined amount of time has passed
since it was last used for playing music, or its buttons
or controls were operated (Auto Off function). If you
do not want the power to be turned off automatically,
disengage the Auto Off function (p. 36).
....................................................................................................................
Do not disassemble or modify by yourself
002c
• Do not open (or modify in any way) the unit or its AC
adaptor.
....................................................................................................................
Do not repair or replace parts by yourself
003
• Do not attempt to repair the unit, or replace parts
within it (except when this manual provides specific
instructions directing you to do so). Refer all servicing
to your retailer, the nearest Roland Service Center, or
an authorized Roland distributor, as listed on the
“Information” page.
....................................................................................................................
Do not use or store in the following types of locations
004
• Subject to temperature extremes (e.g., direct sunlight
in an enclosed vehicle, near a heating duct, on top of
heat-generating equipment); or are
• Damp (e.g., baths, washrooms, on wet floors); or are
• Exposed to steam or smoke; or are
• Subject to salt exposure; or are
•Humid; or are
• Exposed to rain; or are
• Dusty or sandy; or are
• Subject to high levels of vibration and shakiness.
....................................................................................................................
Do not place in an unstable location
007
• Make sure you always have the unit placed so it is level
and sure to remain stable. Never place it on stands
that could wobble, or on inclined surfaces.
....................................................................................................................
Use only the supplied AC adaptor and the correct voltage
008c
• Be sure to use only the AC adaptor supplied with the
unit. Also, make sure the line voltage at the installation
matches the input voltage specified on the AC
adaptor’s body. Other AC adaptors may use a different
polarity, or be designed for a different voltage, so their
use could result in damage, malfunction, or electric shock.
....................................................................................................................
Use only the supplied power cord
008e
• Use only the attached power-supply cord. Also, the
supplied power cord must not be used with any other
device.
....................................................................................................................
Do not bend the power cord or place heavy objects on it
009
• Do not excessively twist or bend the power cord, nor
place heavy objects on it. Doing so can damage the
cord, producing severed elements and short circuits.
Damaged cords are fire and shock hazards!
....................................................................................................................
Avoid extended use at high volume
010
• This unit, either alone or in combination with an
amplifier and headphones or speakers, may be
capable of producing sound levels that could cause
permanent hearing loss. Do not operate for a long
period of time at a high volume level, or at a level that
is uncomfortable. If you experience any hearing loss or
ringing in the ears, you should immediately stop using
the unit, and consult an audiologist.
....................................................................................................................
Don’t allow foreign objects or liquids to enter unit;
never place containers with liquid on unit
011
• Do not place containers containing liquid (e.g., flower
vases) on this product. Never allow foreign objects
(e.g., flammable objects, coins, wires) or liquids (e.g.,
water or juice) to enter this product. Doing so may
cause short circuits, faulty operation, or other malfunc-
tions.
....................................................................................................................
Used for instructions intended to alert the
user to the risk of injury or material
damage should the unit be used
improperly.
* Material damage refers to damage or
other adverse eects caused with
respect to the home and all its
furnishings, as well to domestic animals
or pets.
Used for instructions intended to alert the
user to the risk of death or severe injury
should the unit be used improperly.
The
●
symbol alerts the user to things that must be
carried out. The specic thing that must be done is
indicated by the design contained within the circle. In the
case of the symbol at left, it means that the power-cord
plug must be unplugged from the outlet.
The symbol alerts the user to important instructions or
warnings.The specic meaning of the symbol is
determined by the design contained within the triangle. In
the case of the symbol at left, it is used for general
cautions, warnings, or alerts to danger.
The symbol alerts the user to items that must never be
carried out (are forbidden). The specic thing that must not
be done is indicated by the design contained within the
circle. In the case of the symbol at left, it means that the
unit must never be disassembled.
TD-4_e.book 2 ページ 2012年9月10日 月曜日 午後2時45分

3
Deutsch Français Italiano Español Português NederlandsEnglish
Turn off the unit if an abnormality or malfunction
occurs
012b
• Immediately turn the unit off, remove the AC adaptor
from the outlet, and request servicing by your retailer,
the nearest Roland Service Center, or an authorized
Roland distributor, as listed on the “Information” page
when:
• The AC adaptor, the power-supply cord, or the plug
has been damaged; or
• If smoke or unusual odor occurs; or
• Objects have fallen into, or liquid has been spilled
onto the unit; or
• The unit has been exposed to rain (or otherwise has
become wet); or
• The unit does not appear to operate normally or
exhibits a marked change in performance.
....................................................................................................................
Adults must provide supervision in places where
children are present
013
• When using the unit in locations where children are
present, be careful so no mishandling of the unit can
take place. An adult should always be on hand to
provide supervision and guidance.
....................................................................................................................
Do not drop or subject to strong impact
014
• Protect the unit from strong impact.
(Do not drop it!)
....................................................................................................................
Do not share an outlet with an unreasonable number of
other devices
015
• Do not force the unit’s powersupply cord to share an
outlet with an unreasonable number of other devices.
Be especially careful when using extension cords.the
total power used by all devices you have connected to
the extension cord’s outlet must never exceed the
power rating (watts/amperes) for the extension cord.
Excessive loads can cause the insulation on the cord to
heat up and eventually melt through.
....................................................................................................................
Do not use overseas
016
• Before using the unit in overseas, consult with your
retailer, the nearest Roland Service Center, or an
authorized Roland distributor, as listed on the
“Information” page.
....................................................................................................................
Place in a well ventilated location
101b
• The unit and the AC adaptor should be located so
their location or position does not interfere with their
proper ventilation.
....................................................................................................................
When disconnecting an AC adaptor, grasp it by the
plug
102c
• To prevent conductor damage, always grasp the AC
adaptor by its plug when disconnecting it from this
unit or from a power outlet.
....................................................................................................................
Periodically clean the AC adaptor’s plug
103b
• At regular intervals, you should unplug the AC adaptor
and clean it by using a dry cloth to wipe all dust and
other accumulations away from its prongs. Also,
disconnect the power plug from the power outlet
whenever the unit is to remain unused for an
extended period of time. Any accumulation of dust
between the power plug and the power outlet can
result in poor insulation and lead to fire.
....................................................................................................................
Manage cables for safety
104
• Try to prevent cords and cables from becoming
entangled. Also, all cords and cables should be placed
so they are out of the reach of children.
....................................................................................................................
Avoid climbing on top of the unit, or placing heavy
objects on it
106
• Never climb on top of, nor place heavy objects on the
unit.
....................................................................................................................
Do not connect or disconnect the AC adaptor with wet
hands
107c
• Never handle the AC adaptor or its plugs with wet
hands when plugging into, or unplugging from, an
outlet or this unit.
....................................................................................................................
Disconnect everything before moving the unit
108b
• Before moving the unit, disconnect the AC adaptor
and all cords coming from external devices.
....................................................................................................................
Unplug the AC adaptor from the outlet before cleaning
109b
• Before cleaning the unit, turn it off and unplug the AC
adaptor from the outlet.
....................................................................................................................
If there is a possibility of lightning strike, disconnect
the AC adaptor from the outlet
110b
• Whenever you suspect the possibility of lightning in
your area, disconnect the AC adaptor from the outlet.
....................................................................................................................
Take care so as not to get fingers pinched
116b
• When handling the stand’s moving parts, take care so
as not to get fingers, etc., pinched. An adult should
always be in charge of handling these items.
....................................................................................................................
Keep small items out of the reach of children
118d
• To prevent accidental ingestion of the parts listed
below, always keep them out of the reach of small
children.
•Removable Parts
nuts, washers, bolts
....................................................................................................................
TD-4_e.book 3 ページ 2012年9月10日 月曜日 午後2時45分

4
IMPORTANT NOTES
Power Supply
301
• Do not connect this unit to same electrical outlet that is being used by
an electrical appliance that is controlled by an inverter or a motor (such
as a refrigerator, washing machine, microwave oven, or air conditioner).
Depending on the way in which the electrical appliance is used, power
supply noise may cause this unit to malfunction or may produce audible
noise. If it is not practical to use a separate electrical outlet, connect a
power supply noise filter between this unit and the electrical outlet.
302
• The AC adaptor will begin to generate heat after long hours of consec-
utive use. This is normal, and is not a cause for concern.
307
• To prevent malfunction and equipment failure, always make sure to turn
off the power on all your equipment before you make any connections.
Placement
351
• Using the unit near power amplifiers (or other equipment containing
large power transformers) may induce hum. To alleviate the problem,
change the orientation of this unit; or move it farther away from the
source of interference.
352a
• This device may interfere with radio and television reception. Do not use
this device in the vicinity of such receivers.
352b
• Noise may be produced if wireless communications devices, such as cell
phones, are operated in the vicinity of this unit. Such noise could occur
when receiving or initiating a call, or while conversing.
Should you experience such problems, you should relocate such
wireless devices so they are at a greater distance from this unit, or switch
them off.
354a
• Do not expose the unit to direct sunlight, place it near devices that
radiate heat, leave it inside an enclosed vehicle, or otherwise subject it
to temperature extremes. Excessive heat can deform or discolor the unit.
355b
• When moved from one location to another where the temperature and/
or humidity is very different, water droplets (condensation) may form
inside the unit. Damage or malfunction may result if you attempt to use
the unit in this condition. Therefore, before using the unit, you must
allow it to stand for several hours, until the condensation has
completely evaporated.
360
• Depending on the material and temperature of the surface on which
you place the unit, its rubber feet may discolor or mar the surface. You
can place a V-Drums Mat (sold separately) or cloth under the rubber feet
to prevent this from happening. If you do so, please make sure that the
unit will not slip or move accidentally.
361
• Do not place containers or anything else containing liquid on top of this
unit. Also, whenever any liquid has been spilled on the surface of this
unit, be sure to promptly wipe it away using a soft, dry cloth.
Maintenance
401a
• For everyday cleaning wipe the unit with a soft, dry cloth or one that has
been slightly dampened with water. To remove stubborn dirt, use a
cloth impregnated with a mild, non-abrasive detergent. Afterwards, be
sure to wipe the unit thoroughly with a soft, dry cloth.
402
• Never use benzine, thinners, alcohol or solvents of any kind, to avoid the
possibility of discoloration and/or deformation.
Repairs and Data
452
• Please be aware that all data contained in the unit’s memory may be lost
when the unit is sent for repairs. Important data should always be
written down on paper (when possible). During repairs, due care is
taken to avoid the loss of data. However, in certain cases (such as when
circuitry related to memory itself is out of order), we regret that it may
not be possible to restore the data, and Roland assumes no liability
concerning such loss of data.
Additional Precautions
551
• Please be aware that the contents of memory can be irretrievably lost as
a result of a malfunction, or the improper operation of the unit. To
protect yourself against the risk of loosing important data, we
recommend that you periodically save a backup copy of important data
you written down on paper.
552
• Unfortunately, it may be impossible to restore the contents of data that
was stored in the unit’s memory once it has been lost. Roland Corpo-
ration assumes no liability concerning such loss of data.
553
• Use a reasonable amount of care when using the unit’s buttons, sliders,
or other controls; and when using its jacks and connectors. Rough
handling can lead to malfunctions.
554
• Never strike or apply strong pressure to the display.
556
• When disconnecting all cables, grasp the connector itself—never pull
on the cable. This way you will avoid causing shorts, or damage to the
cable’s internal elements.
558
• To avoid disturbing others nearby, try to keep the unit’s volume at
reasonable levels.
558d
• This instrument is designed to minimize the extraneous sounds
produced when it’s played. However, since sound vibrations can be
transmitted through floors and walls to a greater degree than expected,
take care not to allow these sounds to become a nuisance others
nearby.
559a
• When you need to transport the unit, package it in the box (including
padding) that it came in, if possible. Otherwise, you will need to use
equivalent packaging materials.
562
• Some connection cables contain resistors. Do not use cables that incor-
porate resistors for connecting to this unit. The use of such cables can
cause the sound level to be extremely low, or impossible to hear. For
information on cable specifications, contact the manufacturer of the
cable.
567
• When adjusting or folding up the stand, take due care so as not to get
your fingers pinched between the movable parts and this unit. In places
where small children are present, make sure that an adult provides
supervision and guidance.
• The rubber portion of the striking surface is treated with a preservative
to maintain its performance. With the passage of time, this preservative
may appear on the surface as a white stain, or reveal how the pads were
struck during product testing. This does not affect the performance or
functionality of the product, and you may continue using it with confi-
dence.
• Continuous playing may cause dis-coloration of the pad, but this will not
affect the Pad’s function.
985
• The explanations in this manual include illustrations that depict what
should typically be shown by the display. Note, however, that your unit
may incorporate a newer, enhanced version of the system (e.g., includes
newer sounds), so what you actually see in the display may not always
match what appears in the manual.
Trademarks
3a
• Roland, V-Drums are either registered trademarks or trademarks of
Roland Corporation in the United States and/ or other countries.
T-01
• Company names and product names appearing in this document are
registered trademarks or trademarks of their respective owners.
TD-4_e.book 4 ページ 2012年9月10日 月曜日 午後2時45分

5
Deutsch Français Italiano Español Português NederlandsEnglish
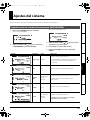
Contents
USING THE UNIT SAFELY.......................... 2
IMPORTANT NOTES.................................. 4
Panel Descriptions ................................... 6
Front Panel ...........................................................................6
Side Panel .............................................................................7
Rear Panel .............................................................................7
Bottom Panel......................................................................7
Getting Ready to Play .............................. 8
Connecting Your Audio Equipment............................8
Turning the Power On/Off..............................................9
Saving Your Settings...........................................................................9
Playing..................................................... 10
Hearing What the Kits Sound Like ............................ 10
Selecting a Drum Kit ......................................................10
About the “DRUM KIT” screen....................................................... 10
Drum Set Elements.........................................................11
The Basics of Playing...................................................... 12
Quickly Tuning or Muffling..........................................14
TUNING.................................................................................................. 14
MUFFLING ............................................................................................ 14
Playing Along with a Portable Audio Player ......... 15
Practicing ................................................ 16
Playing with the Metronome......................................16
Quick Recording and Playback (QUICK REC)......... 16
Recording............................................................................................. 16
Playback................................................................................................ 17
Using Time Check to Check Your Recorded Performance . 17
Practicing in Coach Mode ............................................18
Selecting a Practice Menu.............................................................. 18
<1> WARM UPS.................................................................................. 19
<2> Correctly Playing in Time with the Beat
(TIME CHECK) ......................................................................................21
<3> Continuing to play at a steady tempo
(TEMPO CHECK).................................................................................. 22
<4> Developing Internal Timing Sense (QUIET COUNT) .... 23
<5> Gradually raising and lowering the tempo
(AUTO UP/DOWN)............................................................................. 25
Creating a Drum Kit ................................26
Selecting the Parameters ............................................. 26
Editing Instrument Parameters (INSTRUMENT) ... 27
Adjusting the volume of the pads or drum kit
(MIXER)................................................................................ 28
Using the Onboard Effects (AMBIENCE) ................. 29
Naming a Drum Kit (KIT NAME).................................. 29
Copying a Drum Kit (COPY).........................................30
Exchanging Drum Kits (EXCHANGE) ........................ 31
Restoring a Drum Kit (RESTORE)................................ 32
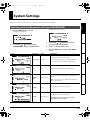
System Settings.......................................33
Specifying How the Metronome will Sound
(METRONOME)................................................................. 33
Editing the pad settings (PAD SETTINGS) .............. 34
Specifying the Type of Pad ............................................................34
Setting the Pad Sensitivity .............................................................34
Specifying How the CR2 Trigger Cable will be Used ............35
Other Settings (OPTIONS) ............................................ 35
Adjusting the Display Contrast (LCD Contrast) ......................36
Adjusting the Brightness of the Backlight (LCD Bright) ...... 36
Adjusting the Button Operating Sound
(Keypad Sound)..................................................................................36
Allowing the Head and Rim Settings to be Edited
Separately (Head/Rim Link) ...........................................................36
Having the Power Turn Off Automatically (Auto Off)...........36
Restoring the Factory Settings (Factory Reset).......................36
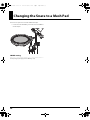
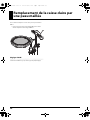
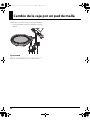
Changing the Snare to a Mesh Pad........38
Other Settings .........................................39
MIDI Settings ....................................................................39
MIDI-related Settings.......................................................................39
Detailed Settings for Trigger Parameters...............40
Protecting Modified Kits and Settings
(Edit Lock) .......................................................................... 43
Troubleshooting .....................................44
Error Messages ........................................46
Drum Kit/Instrument List .......................47
MIDI Implementation Chart ...................49
Specifications ..........................................50
Index ........................................................51
TD-4_e.book 5 ページ 2012年9月10日 月曜日 午後1時43分

6
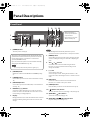
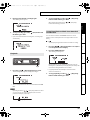
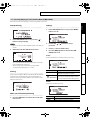
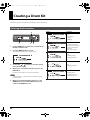
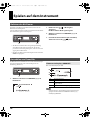
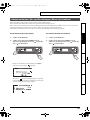
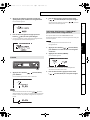
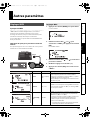
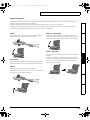
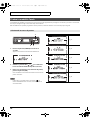
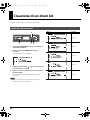
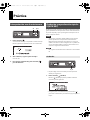
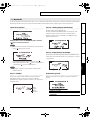
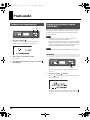
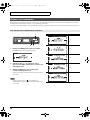
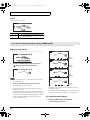
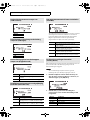
Panel Descriptions
fig.FrontP.eps
1. [POWER] button
Turns the power on/off (p. 9).
2. [VOLUME] knob
Adjusts the volume from the OUTPUT and PHONES jacks (p.
9).
3. [TUNING] button
Use this when you want to tune each instrumental sound (p.
14).
4. [MUFFLING] button
Use this when you want to muffle (mute) each instrumental
sound (p. 14).
5. DRUM KIT [<] [>] buttons
Use these to switch drum kits (p. 10). You’ll also use these
buttons to return to the drum kit screen from other screens
(except during recording/playback).
6. Display
During performance, this shows the drum kit name and other
information. During editing, this shows the contents of the
settings.
The backlight will automatically dim when no panel
operations have been performed for a certain period of time.
7. [MENU] button
Use this when you want to make various settings for the TD-
4, such as editing the settings of a drum kit or adjusting the
pads.
8.SEL [] [] button
Use this to select a menu item when using the Coach
function, or to select parameters when making various
settings for the TD-4.
9. [-/+] dial
Use this dial to edit a value.
Use this to adjust a value. Turning the dial toward “+” will
increase the value, and turning it toward “-” will decrease the
value.
10. [OK] button
Use this to confirm a menu item to use with the Coach
function, or to confirm a value you’ve edited.
11. [COACH] button
Press this when you want to use the Coach function (p. 18).
12. [ ] (Metronome) button
This turns the metronome on (sounding) or off (silent) (p. 16).
13. QUICK REC [ ] (Rec) button
Use this to record your playing (p. 16).
14. QUICK REC [ ] (Play/Stop) button
Play back what you recorded (p. 17).
Front Panel
1
2
354 6 8101314
7 9 11 12
With some buttons, a
sound is produced when
you press them.
If you want, you can turn
off this sound (p. 36).
The power to this unit will be turned off automatically after
a predetermined amount of time has passed since it was last
used for playing music, or its buttons or controls were
operated (Auto Off function).
If you do not want the power to be turned off automatically,
disengage the Auto Off function (p. 36).
To restore power, turn the power on again (p. 9).
TD-4_e.book 6 ページ 2012年9月10日 月曜日 午後1時43分

7
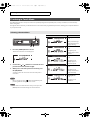
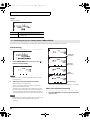
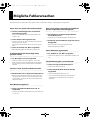
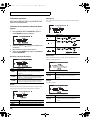
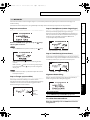
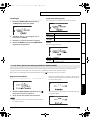
Panel Descriptions
Deutsch Français Italiano Español Português NederlandsEnglish
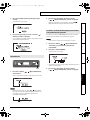
fig.SideP.eps
15. MIDI OUT connector
Use this when you want to use the pads to play external MIDI
sound sources or for recording with sequencers (p. 39).
16. MIX IN jack
For connecting an external audio source such as MP3 or CD
players (p. 15). All sound input here is also sent from the
OUTPUT and PHONES jacks.
* To adjust the volume, use the controls of the external device
connected to MIX IN.
17. PHONES jack
For connecting stereo headphones (p. 8).
Using the headphone jack will not mute the main OUTPUT
jacks.
fig.RearP.epss
18. DC IN jack
Connect the included AC adaptor here (p. 8).
19. TRIGGER INPUT connector
Connecting the special cable connects the pads and pedals
to the TD-4.
20. OUTPUT jacks (L/MONO, R)
All sounds of the TD-4 are output here. Use for connecting to
an amp or other external audio equipment.
If you’re working in mono, only use the L/MONO jack.
fig.BottomP.eps
21. Sound module mounting plate attachment holes
Attach the TD-4 to the stand’s mounting plate.
22. Security Slot ( )
http://www.kensington.com/
Side Panel
15 16 17
Rear Panel
18 19 20
Bottom Panel
2221
TD-4_e.book 7 ページ 2012年9月10日 月曜日 午後1時43分

8
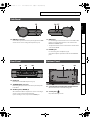
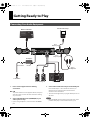
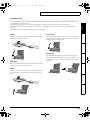
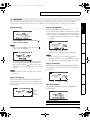
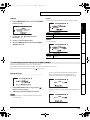
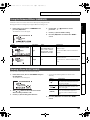
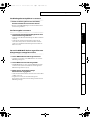
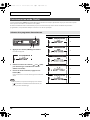
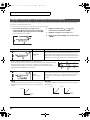
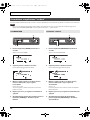
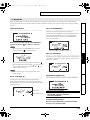
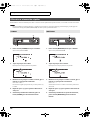
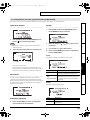
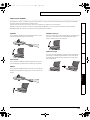
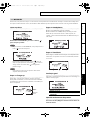
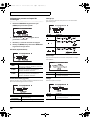
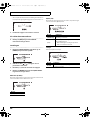
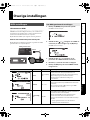
Getting Ready to Play
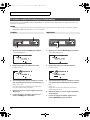
fig.Connection.eps
1. Power-off all equipment before making
connections.
To prevent malfunction and equipment failure, always turn
down the volume, and turn off all the units before making
any connections.
2. Connect the OUTPUT jacks (L/MONO, R) to your
audio system or amp.
*If you’re using headphones, connect them to the PHONES
jack.
3. Connect the included AC adaptor to the DC IN jack.
Place the AC adaptor so the side with the indicator (see
illustration) faces upwards and the side with textual
information faces downwards.
* The indicator will light when you plug the AC adaptor into an
AC outlet.
Using the MIX IN jack allows playing along with music from a
portable audio player or other external sources (p. 15).
Connecting Your Audio Equipment
MIDI IN
Stereo
1/4” phone plug
Stereo
miniature plug
Stereo
Headphones
Audio Set, etc
Powered Amp, etc
Indicator
To AC Outlet
AC Adaptor
Power Cord
Portable Audio Player
MIDI Sound Module
TD-4_e.book 8 ページ 2012年9月10日 月曜日 午後1時43分

9
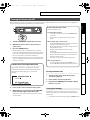
Getting Ready to Play
Deutsch Français Italiano Español Português NederlandsEnglish
Once everything is properly connected (p. 8), be sure to follow the procedure below to turn on their power. If you turn on equipment in
the wrong order, you risk causing malfunction or equipment failure.
fig.P-PowerOn.eps
1. Turn the [VOLUME] knob all the way to the left.
2. Minimize the volume of the connected amp or
audio system.
3. Press the [POWER] button.
* Before turning the unit on/off, always be sure to turn the
volume down. Even with the volume turned down, you might
hear some sound when switching the unit on/off. However,
this is normal and does not indicate a malfunction.
* This unit is equipped with a protection circuit. A brief interval
(a few seconds) after turning the unit on is required before it
will operate normally.
4. Power-on the connected amp or audio system.
5. While hitting a pad, gradually turn the [VOLUME]
knob toward the right to adjust the volume.
Adjust the volume of the connected amp/ audio system to
the desired level.
Turning the Power Off
1. Turn the volume down on the TD-4 and any
connected equipment.
2. Power-off the connected equipment.
3. Hold down the [POWER] button until the display
indicates “See you!”
The TD-4 does not have a specific “operation” for saving your
settings. Any changes you’ve made will be saved when you turn
off the power.
* You must turn off the power by pressing the [POWER] button.
Turning the Power On/Off
1
3
Caution when Turning On the Power
After you turn on the power, do NOT touch any pads or
pedals until the drum kit name (the illustration below) has
appeared in the display. Doing so can cause various
problems.
ig.d-OpenKitNo1.eps
Saving Your Settings
If you don’t hear any sound
Check the following points.
Pad and Pedal Connections
• Is the cable correctly connected to the TRIGGER INPUT
connector?
• Are the cables correctly connected to each pad or
pedal?
When Using an Amp or Audio System
• Are the TD-4’s OUTPUT jacks connected correctly to the
input jacks of your amp/audio system?
• Are the input selections and volume settings correct on
that amp/audio system?
• Possible problem with the connection cables
themselves?
• Isn’t the [VOLUME] knob turned all the way to the left?
• Have the input select settings of your audio system or
amp been made correctly?
• Is the amp or audio system volume setting correct?
When using headphones
• Are your headphones plugged into PHONES jack?
• Isn’t the [VOLUME] knob turned all the way to the left?
TD-4_e.book 9 ページ 2012年9月10日 月曜日 午後1時43分

10
Playing
After turning the power on, you can play the demo patterns.
Here’s how you can listen to the sounds by switching drum kits
while playing the demo patterns.
fig.P-Demo.eps
* All rights reserved. Unauthorized use of this material for
purposes other than private, personal enjoyment is a
violation of applicable laws.
* No data for the demo patterns that is played will be output
from MIDI OUT.
1. Press the [ ] (Play/Stop) button.
The demo patterns will play.
2. Press the DRUM KIT [<] [>] buttons to select drum
kit.
3. To stop demo pattern playback, press the
[ ] button once again.
When you press the [ ] (Rec) button to start recording
your performance (p. 16), the demo patterns will temporarily
be erased. The next time you turn on the power, you will
again be able to play the demo patterns.
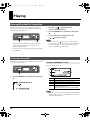
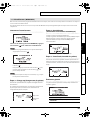
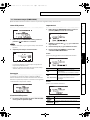
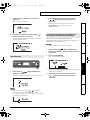
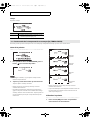
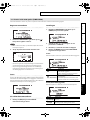
A drum kit is a combination of the sounds & settings for each pad
and pedal, as well as ambience.
fig.P-DrumKit.eps
1. Press the DRUM KIT [<] [>] buttons to select drum
kit.
fig.d-KitScreen.eps
This is the TD-4’s basic screen.
fig.d-KitNo1.eps
Regardless of the screen that is displayed, pressing the DRUM
KIT [<] [>] buttons will access the “DRUM KIT” screen (except
during recording/playback).
Hearing What the Kits Sound Like
2 1, 3
Selecting a Drum Kit
1
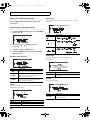
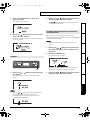
About the “DRUM KIT” screen
A Drum kit number
B Drum kit name
C This shows the metronome tempo (p. 16).
D Strength of the pad strike displayed in 6 levels.
E
This is shown if the cross-stick technique can be
used with the snare (p. 28).
(When Xstick Volume is anything other than OFF)
A
B
D
C
E
TD-4_e.book 10 ページ 2012年9月10日 月曜日 午後1時43分

11
Playing
Deutsch Français Italiano Español Português NederlandsEnglish
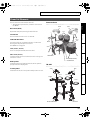
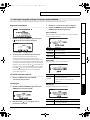
Here are some basic terms related to drum sets.
* The indications in parentheses ( ) show the names used on
the TD-4KP.
Bass Drum (Kick)
Played with a kick pedal, it’s the largest drum in the kit.
Snare Drum
The snare drum is the main “voice” of a drum kit.
Hi-Hat/Hi-Hat Pedal
An acoustic hi-hat uses 2 cymbals mounted on a hi-hat stand.
Pressing the hi-hat pedal opens and closes it.
The TD-4KP uses a single pad.
Tom (Tom 1, Tom 2)
These are usually mounted above the bass drum.
Floor Tom (Tom 3)
Sometimes called a bass tom, it either stands on it’s own legs or is
mounted on a stand.
Ride Cymbal
Usually mounted on the right side of the kit, the ride cymbal is
principle elements in keeping time.
Crash Cymbal
Smaller than the ride, the crash cymbal is mainly used for accents.
Acoustic Drum
TD-4KP
Drum Set Elements
Hi-Hat Pedal
Kick (Bass Drum)
Floor
Tom
Snare
Hi-hat
Tom
Crush
Ride
Kick Pedal
Hi-Hat Control Pedal
Kick Pedal
Snare
Hi-Hat
Tom 1
Tom 2
Crush
Ride
Tom 3
TD-4_e.book 11 ページ 2012年9月10日 月曜日 午後1時43分

12
Playing
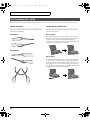
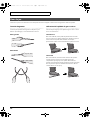
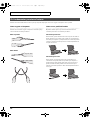
Drums are played using both hands and both feet. Here we’ll explain how to hold the sticks and use the pedals.
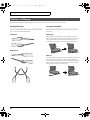
Holding the Sticks
The most common way to hold the sticks is called the “matched
grip” as shown in the illustrations below.
Left hand
Right hand
Using the Kick Pedal
The kick pedal can be pressed in either of two ways: “heel up” or
“heel down.”
Heel down
In this method, the entire bottom of your foot from heel to toe
stays in contact with the pedal. Use your ankle joint to make your
toes push down the pedal. This method allows more precise
control of the volume, and is often used in jazz and bossa nova.
Heel up
In this method, your heel floats above the pedal. With your heel off
the pedal, lower your entire foot to push down the pedal. This
method applies the full weight of your foot to the pedal, making it
easier for you to produce a stronger sounds than the heel down
method. This is often used in rock and pop.
The Basics of Playing
TD-4_e.book 12 ページ 2012年9月10日 月曜日 午後1時43分

13
Playing
Deutsch Français Italiano Español Português NederlandsEnglish
Using the hi-hat
In an acoustic drum set, the hi-hat consists of two cymbals placed facing each other vertically on a hi-hat stand. The two cymbals can be
closed together by pressing the pedal.
A variety of playing techniques are possible, such as playing the cymbals with the pedal and/or playing them with sticks.
When you press the pedal, the two cymbals will come together (closed). When you release the pedal, the two cymbals will separate
(opened).
The TD-4KP lets you use five different hi-hat performance techniques.
Closed
With the hi-hat pedal pressed firmly, strike the pad with a stick. A
short “chick” sound will be heard.
Half-open
With the hi-hat pedal pressed gently, strike the pad with a stick. A
slightly longer “swish” sound will be heard.
Open
With the hi-hat pedal completely released, strike the pad with a
stick. An even longer “sound” than the half-open sound will be
heard.
Foot closed
Just press the pedal without using a stick. This sound will be softer
and shorter than the closed sound played with a stick. Useful for
keeping time with this tight sound.
Foot splash
Press and immediately release the pedal without using a stick.
This is equivalent to momentarily clashing the two cymbals of an
acoustic hi-hat. It produces a “splash” sound that is softer than the
open strike.
TD-4_e.book 13 ページ 2012年9月10日 月曜日 午後1時43分

14
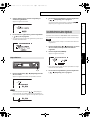
Playing
You can use dedicated buttons to quickly tune or muffle the sound. When you press the button, the sound you selected will be heard.
You cannot make tuning or muffling settings for pads to which an instrument (p. 27) in the cymbal-type instrument group (HIHAT,
CRASH, RIDE) is assigned. For such pads, the display will indicate “- - -.”
fig.P-Tuning.eps
1. Press the [TUNING] button so it’s lit.
The TUNING screen appears.
The selected pad will sound at this time.
fig.d-Tuning-1.eps
2. Strike the pad that you want to tune.
The pad you struck will blink in the screen.
fig.d-Tuning-2.eps
3. While striking the pad to hear the sound, turn the [-
/+] dial to adjust the tuning.
Value: -600–0–+600
A negative (-) value will lower the pitch, and a positive (+)
value will raise the pitch.
4. Repeat steps 2–3 to adjust the tuning of each pad.
5. When you’ve finished tuning, press the [TUNING]
button to turn it off.
fig.P-Muffling.eps
1. Press the [MUFFLING] button so it’s lit.
The MUFFLING screen appears.
The selected pad will sound at this time.
fig.d-Muffling-1.eps
2. Strike the pad that you want to muffle.
The pad you struck will blink in the screen.
fig.d-Muffling-2.eps
3. While striking the pad to hear the sound, turn the
[-/+] dial to adjust the muffling.
Value: 0–10
Raising this value reduces the resonance and decay (length)
of the sound.
4. Repeat steps 2–3 to adjust the muffling of each
pad.
5. When you’ve finished adjusting the muffling, press
the [MUFFLING] button to turn it off.
Quickly Tuning or Muffling
TUNING
1, 5
3
MUFFLING
1, 5
3
TD-4_e.book 14 ページ 2012年9月10日 月曜日 午後1時43分

15
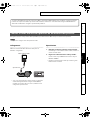
Playing
Deutsch Français Italiano Español Português NederlandsEnglish
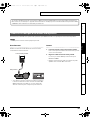
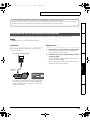
By connecting a portable audio/CD player to the MIX IN jack you can play the TD-4 with your favorite songs.
You can connect other audio devices as well.
Connections
Lower the volume of the TD-4 and your audio player before
making connections.
fig.Connect-iPod.eps
* If a connection cable has built-in resistors, the volume level of
the source connected to the TD-4 (MIX IN) may be too low. If
this occurs, use connection cables that do not contain
resistors.
Playback
1. Start the music on your portable audio player.
For details on how to use your audio player, refer to its
owner’s manual.
2. Then adjust the volume of your portable audio
player.
Sounds received at the MIX IN jack are output from the
OUTPUT and PHONES jacks.
* Adjust the volume on the audio player to get the right
balance between it and the TD-4.
3. Adjust the volume of the TD-4.
Playing Along with a Portable Audio Player
If Head/Rim Link (p. 36) is “ON,” both the HEAD and the RIM settings will be edited simultaneously.
In some cases, you may see an “*” in the right side of the screen; this indicates that the tuning/muffling values specified for the
HEAD and the RIM are different.
Stereo
miniature plug
Portable Audio Player
TD-4_e.book 15 ページ 2012年9月10日 月曜日 午後1時43分

16
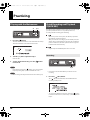
Practicing
fig.P-Metronome.eps
1. Press the [ ] button.
The metronome starts and the screen will indicate the tempo.
The button will blink in time with the metronome.
fig.d-Metro.eps
2. Turn the [-/+] dial to adjust the tempo.
Value: 40–260
3. To turn off the metronome, press the [ ] button
to turn it off.
Even without pressing the [ ] button, you can change the
tempo by turning the [-/+] dial in the Drum Kit screen.
You can change the way that the metronome sounds (p. 33).
The TD-4 provides a Quick Rec function that lets you easily record
your own performance. This is a very useful practice tool,
recording and then checking your drumming.
Whenever you turn on the power, the TD-4 is prepared for
the playback of its demo patterns.
After you’ve made a recording, if you turn off the power, the
data for the recording will be erased. Then, the next time the
power is switched on, the demo patterns will once again be
loaded in from internal memory.
A signal input via the MIX IN jack won’t be recorded.
fig.P-QuickRec.eps
* First: Please select the drum kit that you want to use for
recording.
1. Press the [ ] (Rec) button.
The [ ] (Rec) button will blink, and the TD-4 will enter
recording-standby mode.
fig.d-Rec-1.eps
• To record along with the metronome, press the [ ] button
to turn the metronome on, and use the [-/+] dial to adjust the
tempo.
Playing with the Metronome
1, 32
Quick Recording and Playback
(QUICK REC)
Recording
1, 3
TD-4_e.book 16 ページ 2012年9月10日 月曜日 午後1時43分

17
Practicing
Deutsch Français Italiano Español Português NederlandsEnglish
2. Hit any pad/pedal and recording begins.
The following screen appears.
fig.d-Rec-2.eps
3. To stop recording, press the [ ] (Rec) button and
the button goes dark.
* If you exceed the maximum recording time, recording stops
automatically.
fig.d-Rec-3.eps
fig.P-QuickPlay.eps
1. Press the [ ] (Play/Stop) button so it’s lit.
The following screen appears, and playback begins.
fig.d-RecPlay-1.eps
* The recorded performance data is not transmitted from MIDI
OUT.
By holding down the [ ] (Play/Stop) button for about
one second, you can select loop playback; the recorded
performance will play repeatedly.
fig.d-LoopPlay.eps
2. To stop playback, press the [ ] (Play/Stop)
button and the button goes dark.
When playback has finished, the [ ] (Play/Stop)
button automatically goes dark.
You can use Coach mode’s “TIME CHECK” function to check
whether your recorded performance was played with accurate
timing.
You must play along with the metronome when recording.
1. Press the [ ] (Play/Stop) button so it’s lit; the
recorded performance will play.
2. Press the [COACH] button.
The following screen appears.
fig.d-RecCheck.eps
During playback, you can change the playback tempo by
turning the [-/+] dial. When you stop playback, the tempo will
revert to the setting at which it was recorded.
* Loop playback will automatically be selected and the
metronome will turn on.
3. To stop playback, press the [ ] (Play/Stop)
button and the button goes dark.
Playback
1, 2
Loop Playback
Using Time Check to Check Your Recorded
Performance
TD-4_e.book 17 ページ 2012年9月10日 月曜日 午後1時43分

18
Practicing
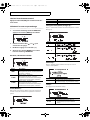
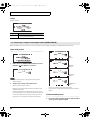
The TD-4’s Coach mode is a unique set of exercises specifically designed to help build speed, accuracy and stamina, as well as develop
better timing skills.
Throughout the Coach modes, you will discover that some of them have programmable parameters, allowing you to adapt the functions
to your specific needs.
fig.P-CoachMenu.eps
1. Press the [COACH] button so it’s lit.
The Coach mode menu screen will appear.
fig.d-Tr-Menu-1.eps
2. Use the SEL [ ] [ ] buttons to select the desired
practice menu item (shown at right).
3. When you’ve selected a practice menu item, press
the [OK] button.
You’ll proceed to the start screen of the selected practice
menu item.
Or you can just press the [ ] button to immediately start
practicing without calling up the start screen.
In the start screen of the Practice menu, you can press the
[MENU] button and make settings for each menu item.
Practicing in Coach Mode
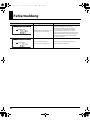
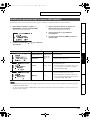
Selecting a Practice Menu
1
23
Menu Explanation
Warm Ups
p. 19
When you want to get
w ar me d u p b e fo re yo u
begin practicing.
Time Check
p. 21
Strengthens your
ability to play accurate
rhythms.
Tempo Check
p. 22
Strengthens your
ability to play at a
consistent speed.
Quiet Count
p. 23
Strengthens your
ability to maintain the
tempo internally.
Auto Up/Down
p. 25
Strengthens your
endurance.
TD-4_e.book 18 ページ 2012年9月10日 月曜日 午後1時43分
A página está carregando...
A página está carregando...
A página está carregando...
A página está carregando...
A página está carregando...
A página está carregando...
A página está carregando...
A página está carregando...
A página está carregando...
A página está carregando...
A página está carregando...
A página está carregando...
A página está carregando...
A página está carregando...
A página está carregando...
A página está carregando...
A página está carregando...
A página está carregando...
A página está carregando...
A página está carregando...
A página está carregando...
A página está carregando...
A página está carregando...
A página está carregando...
A página está carregando...
A página está carregando...
A página está carregando...
A página está carregando...
A página está carregando...
A página está carregando...
A página está carregando...
A página está carregando...
A página está carregando...
A página está carregando...
A página está carregando...
A página está carregando...
A página está carregando...
A página está carregando...
A página está carregando...
A página está carregando...
A página está carregando...
A página está carregando...
A página está carregando...
A página está carregando...
A página está carregando...
A página está carregando...
A página está carregando...
A página está carregando...
A página está carregando...
A página está carregando...
A página está carregando...
A página está carregando...
A página está carregando...
A página está carregando...
A página está carregando...
A página está carregando...
A página está carregando...
A página está carregando...
A página está carregando...
A página está carregando...
A página está carregando...
A página está carregando...
A página está carregando...
A página está carregando...
A página está carregando...
A página está carregando...
A página está carregando...
A página está carregando...
A página está carregando...
A página está carregando...
A página está carregando...
A página está carregando...
A página está carregando...
A página está carregando...
A página está carregando...
A página está carregando...
A página está carregando...
A página está carregando...
A página está carregando...
A página está carregando...
A página está carregando...
A página está carregando...
A página está carregando...
A página está carregando...
A página está carregando...
A página está carregando...
A página está carregando...
A página está carregando...
A página está carregando...
A página está carregando...
A página está carregando...
A página está carregando...
A página está carregando...
A página está carregando...
A página está carregando...
A página está carregando...
A página está carregando...
A página está carregando...
A página está carregando...
A página está carregando...
A página está carregando...
A página está carregando...
A página está carregando...
A página está carregando...
A página está carregando...
A página está carregando...
A página está carregando...
A página está carregando...
A página está carregando...
A página está carregando...
A página está carregando...
A página está carregando...
A página está carregando...
A página está carregando...
A página está carregando...
A página está carregando...
A página está carregando...
A página está carregando...
A página está carregando...
A página está carregando...
A página está carregando...
A página está carregando...
A página está carregando...
A página está carregando...
A página está carregando...
A página está carregando...
A página está carregando...
A página está carregando...
A página está carregando...
A página está carregando...
A página está carregando...
A página está carregando...
A página está carregando...
A página está carregando...
A página está carregando...
A página está carregando...
A página está carregando...
A página está carregando...
A página está carregando...
A página está carregando...
A página está carregando...
A página está carregando...
A página está carregando...
A página está carregando...
A página está carregando...
A página está carregando...
A página está carregando...
A página está carregando...
A página está carregando...
A página está carregando...
A página está carregando...
A página está carregando...
A página está carregando...
A página está carregando...
A página está carregando...
A página está carregando...
A página está carregando...
A página está carregando...
A página está carregando...
A página está carregando...
A página está carregando...
A página está carregando...
A página está carregando...
A página está carregando...
A página está carregando...
A página está carregando...
A página está carregando...
A página está carregando...
A página está carregando...
A página está carregando...
A página está carregando...
A página está carregando...
A página está carregando...
A página está carregando...
A página está carregando...
A página está carregando...
A página está carregando...
A página está carregando...
A página está carregando...
A página está carregando...
A página está carregando...
A página está carregando...
A página está carregando...
A página está carregando...
A página está carregando...
A página está carregando...
A página está carregando...
A página está carregando...
A página está carregando...
A página está carregando...
A página está carregando...
A página está carregando...
A página está carregando...
A página está carregando...
A página está carregando...
A página está carregando...
A página está carregando...
A página está carregando...
A página está carregando...
A página está carregando...
A página está carregando...
A página está carregando...
A página está carregando...
A página está carregando...
A página está carregando...
A página está carregando...
A página está carregando...
A página está carregando...
A página está carregando...
A página está carregando...
A página está carregando...
A página está carregando...
A página está carregando...
A página está carregando...
A página está carregando...
A página está carregando...
A página está carregando...
A página está carregando...
A página está carregando...
A página está carregando...
A página está carregando...
A página está carregando...
A página está carregando...
A página está carregando...
A página está carregando...
A página está carregando...
A página está carregando...
A página está carregando...
A página está carregando...
A página está carregando...
A página está carregando...
A página está carregando...
A página está carregando...
A página está carregando...
A página está carregando...
A página está carregando...
A página está carregando...
A página está carregando...
A página está carregando...
A página está carregando...
A página está carregando...
A página está carregando...
A página está carregando...
A página está carregando...
A página está carregando...
A página está carregando...
A página está carregando...
A página está carregando...
A página está carregando...
A página está carregando...
A página está carregando...
A página está carregando...
A página está carregando...
A página está carregando...
A página está carregando...
A página está carregando...
A página está carregando...
A página está carregando...
A página está carregando...
A página está carregando...
A página está carregando...
A página está carregando...
A página está carregando...
A página está carregando...
A página está carregando...
A página está carregando...
A página está carregando...
A página está carregando...
A página está carregando...
A página está carregando...
A página está carregando...
A página está carregando...
A página está carregando...
A página está carregando...
A página está carregando...
A página está carregando...
A página está carregando...
A página está carregando...
A página está carregando...
A página está carregando...
A página está carregando...
A página está carregando...
A página está carregando...
A página está carregando...
A página está carregando...
A página está carregando...
A página está carregando...
A página está carregando...
A página está carregando...
A página está carregando...
A página está carregando...
A página está carregando...
A página está carregando...
A página está carregando...
A página está carregando...
A página está carregando...
A página está carregando...
A página está carregando...
A página está carregando...
A página está carregando...
A página está carregando...
A página está carregando...
A página está carregando...
A página está carregando...
A página está carregando...
A página está carregando...
A página está carregando...
A página está carregando...
A página está carregando...
A página está carregando...
A página está carregando...
A página está carregando...
A página está carregando...
A página está carregando...
A página está carregando...
A página está carregando...
A página está carregando...
A página está carregando...
A página está carregando...
A página está carregando...
A página está carregando...
A página está carregando...
A página está carregando...
A página está carregando...
A página está carregando...
A página está carregando...
A página está carregando...
A página está carregando...
A página está carregando...
A página está carregando...
A página está carregando...
A página está carregando...
A página está carregando...
A página está carregando...
A página está carregando...
A página está carregando...
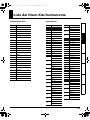
-
 1
1
-
 2
2
-
 3
3
-
 4
4
-
 5
5
-
 6
6
-
 7
7
-
 8
8
-
 9
9
-
 10
10
-
 11
11
-
 12
12
-
 13
13
-
 14
14
-
 15
15
-
 16
16
-
 17
17
-
 18
18
-
 19
19
-
 20
20
-
 21
21
-
 22
22
-
 23
23
-
 24
24
-
 25
25
-
 26
26
-
 27
27
-
 28
28
-
 29
29
-
 30
30
-
 31
31
-
 32
32
-
 33
33
-
 34
34
-
 35
35
-
 36
36
-
 37
37
-
 38
38
-
 39
39
-
 40
40
-
 41
41
-
 42
42
-
 43
43
-
 44
44
-
 45
45
-
 46
46
-
 47
47
-
 48
48
-
 49
49
-
 50
50
-
 51
51
-
 52
52
-
 53
53
-
 54
54
-
 55
55
-
 56
56
-
 57
57
-
 58
58
-
 59
59
-
 60
60
-
 61
61
-
 62
62
-
 63
63
-
 64
64
-
 65
65
-
 66
66
-
 67
67
-
 68
68
-
 69
69
-
 70
70
-
 71
71
-
 72
72
-
 73
73
-
 74
74
-
 75
75
-
 76
76
-
 77
77
-
 78
78
-
 79
79
-
 80
80
-
 81
81
-
 82
82
-
 83
83
-
 84
84
-
 85
85
-
 86
86
-
 87
87
-
 88
88
-
 89
89
-
 90
90
-
 91
91
-
 92
92
-
 93
93
-
 94
94
-
 95
95
-
 96
96
-
 97
97
-
 98
98
-
 99
99
-
 100
100
-
 101
101
-
 102
102
-
 103
103
-
 104
104
-
 105
105
-
 106
106
-
 107
107
-
 108
108
-
 109
109
-
 110
110
-
 111
111
-
 112
112
-
 113
113
-
 114
114
-
 115
115
-
 116
116
-
 117
117
-
 118
118
-
 119
119
-
 120
120
-
 121
121
-
 122
122
-
 123
123
-
 124
124
-
 125
125
-
 126
126
-
 127
127
-
 128
128
-
 129
129
-
 130
130
-
 131
131
-
 132
132
-
 133
133
-
 134
134
-
 135
135
-
 136
136
-
 137
137
-
 138
138
-
 139
139
-
 140
140
-
 141
141
-
 142
142
-
 143
143
-
 144
144
-
 145
145
-
 146
146
-
 147
147
-
 148
148
-
 149
149
-
 150
150
-
 151
151
-
 152
152
-
 153
153
-
 154
154
-
 155
155
-
 156
156
-
 157
157
-
 158
158
-
 159
159
-
 160
160
-
 161
161
-
 162
162
-
 163
163
-
 164
164
-
 165
165
-
 166
166
-
 167
167
-
 168
168
-
 169
169
-
 170
170
-
 171
171
-
 172
172
-
 173
173
-
 174
174
-
 175
175
-
 176
176
-
 177
177
-
 178
178
-
 179
179
-
 180
180
-
 181
181
-
 182
182
-
 183
183
-
 184
184
-
 185
185
-
 186
186
-
 187
187
-
 188
188
-
 189
189
-
 190
190
-
 191
191
-
 192
192
-
 193
193
-
 194
194
-
 195
195
-
 196
196
-
 197
197
-
 198
198
-
 199
199
-
 200
200
-
 201
201
-
 202
202
-
 203
203
-
 204
204
-
 205
205
-
 206
206
-
 207
207
-
 208
208
-
 209
209
-
 210
210
-
 211
211
-
 212
212
-
 213
213
-
 214
214
-
 215
215
-
 216
216
-
 217
217
-
 218
218
-
 219
219
-
 220
220
-
 221
221
-
 222
222
-
 223
223
-
 224
224
-
 225
225
-
 226
226
-
 227
227
-
 228
228
-
 229
229
-
 230
230
-
 231
231
-
 232
232
-
 233
233
-
 234
234
-
 235
235
-
 236
236
-
 237
237
-
 238
238
-
 239
239
-
 240
240
-
 241
241
-
 242
242
-
 243
243
-
 244
244
-
 245
245
-
 246
246
-
 247
247
-
 248
248
-
 249
249
-
 250
250
-
 251
251
-
 252
252
-
 253
253
-
 254
254
-
 255
255
-
 256
256
-
 257
257
-
 258
258
-
 259
259
-
 260
260
-
 261
261
-
 262
262
-
 263
263
-
 264
264
-
 265
265
-
 266
266
-
 267
267
-
 268
268
-
 269
269
-
 270
270
-
 271
271
-
 272
272
-
 273
273
-
 274
274
-
 275
275
-
 276
276
-
 277
277
-
 278
278
-
 279
279
-
 280
280
-
 281
281
-
 282
282
-
 283
283
-
 284
284
-
 285
285
-
 286
286
-
 287
287
-
 288
288
-
 289
289
-
 290
290
-
 291
291
-
 292
292
-
 293
293
-
 294
294
-
 295
295
-
 296
296
-
 297
297
-
 298
298
-
 299
299
-
 300
300
-
 301
301
-
 302
302
-
 303
303
-
 304
304
-
 305
305
-
 306
306
-
 307
307
-
 308
308
-
 309
309
-
 310
310
-
 311
311
-
 312
312
-
 313
313
-
 314
314
-
 315
315
-
 316
316
-
 317
317
-
 318
318
-
 319
319
-
 320
320
-
 321
321
-
 322
322
-
 323
323
-
 324
324
-
 325
325
-
 326
326
-
 327
327
-
 328
328
-
 329
329
-
 330
330
-
 331
331
-
 332
332
-
 333
333
-
 334
334
-
 335
335
-
 336
336
-
 337
337
-
 338
338
-
 339
339
-
 340
340
-
 341
341
-
 342
342
-
 343
343
-
 344
344
-
 345
345
-
 346
346
-
 347
347
-
 348
348
-
 349
349
-
 350
350
-
 351
351
-
 352
352
-
 353
353
-
 354
354
-
 355
355
-
 356
356


Roland TD-4KP Manual do proprietário
- Categoria
- Sintetizador
- Tipo
- Manual do proprietário
- Este manual também é adequado para
em outras línguas
- español: Roland TD-4KP El manual del propietario
- français: Roland TD-4KP Le manuel du propriétaire
- italiano: Roland TD-4KP Manuale del proprietario
- Nederlands: Roland TD-4KP de handleiding
- Deutsch: Roland TD-4KP Bedienungsanleitung
Artigos relacionados
-
Roland V-Drums Portátil TD-4KP Manual do usuário
-
Roland TD-4 Manual do proprietário
-
-
-
-
-
-
Roland TD-9 Manual do proprietário
-
-
Roland RMP-5 Manual do usuário
Outros documentos
-
Panasonic SC-MC07 Manual do proprietário
-
Yamaha DTX700 Manual do proprietário
-
-
-
-
Yamaha PSR-S910 Manual do proprietário
-
Lexibook K610 Manual do usuário
-
Ascon tecnologic X3 Manual do proprietário
-
Ascon tecnologic M5 Manual do proprietário
-
Eaton HHIR-LCD-PROG Basic Operations