Nokia 7.2 Guia de usuario
- Categoria
- Alto-falantes da barra de som
- Tipo
- Guia de usuario

Nokia 7.2
Manual do utilizador
Edição 2019-12-01 pt-BR

Nokia 7.2 Manual do utilizador
1 Acerca deste manual do utilizador
Important: For important information on the safe use of your device and battery,
read “For your safety” and “Product Safety” info in the printed user guide, or at
www.nokia.com/support before you take the device into use. To find out how to get started
with your new device, read the printed user guide.
© 2019 HMD Global Oy. Todos os direitos reservados. 2

Nokia 7.2 Manual do utilizador
Índice
1 Acerca deste manual do utilizador 2
2 Índice 3
3 Introdução 6
Keep your phone up to date . . . . . . . . . . . . . . . . . . . . . . . . . . . . . . . . . . 6
Keys and parts . . . . . . . . . . . . . . . . . . . . . . . . . . . . . . . . . . . . . . . . . . 6
Insert SIM and memory card . . . . . . . . . . . . . . . . . . . . . . . . . . . . . . . . . . 7
Charge your phone . . . . . . . . . . . . . . . . . . . . . . . . . . . . . . . . . . . . . . . 8
Ligar e configurar seu telefone . . . . . . . . . . . . . . . . . . . . . . . . . . . . . . . . . 9
Configurações do Dual SIM . . . . . . . . . . . . . . . . . . . . . . . . . . . . . . . . . . . 9
Bloquear ou desbloquear o telefone . . . . . . . . . . . . . . . . . . . . . . . . . . . . . . 10
Usar a tela touch . . . . . . . . . . . . . . . . . . . . . . . . . . . . . . . . . . . . . . . . . 11
4 Recursos básicos 15
Personalizar o telefone . . . . . . . . . . . . . . . . . . . . . . . . . . . . . . . . . . . . . 15
Notificações . . . . . . . . . . . . . . . . . . . . . . . . . . . . . . . . . . . . . . . . . . . 15
Controlar volume . . . . . . . . . . . . . . . . . . . . . . . . . . . . . . . . . . . . . . . . 16
FM Radio . . . . . . . . . . . . . . . . . . . . . . . . . . . . . . . . . . . . . . . . . . . . . 17
Automatic text correction . . . . . . . . . . . . . . . . . . . . . . . . . . . . . . . . . . . . 17
The Google Assistant . . . . . . . . . . . . . . . . . . . . . . . . . . . . . . . . . . . . . . 18
Capturas de tela . . . . . . . . . . . . . . . . . . . . . . . . . . . . . . . . . . . . . . . . . 19
Acessibilidade . . . . . . . . . . . . . . . . . . . . . . . . . . . . . . . . . . . . . . . . . . 19
Vida útil da bateria . . . . . . . . . . . . . . . . . . . . . . . . . . . . . . . . . . . . . . . . 20
5 Conectar-se com seus amigos e família 21
Chamadas . . . . . . . . . . . . . . . . . . . . . . . . . . . . . . . . . . . . . . . . . . . . 21
Contatos . . . . . . . . . . . . . . . . . . . . . . . . . . . . . . . . . . . . . . . . . . . . . 21
Enviar e receber mensagens . . . . . . . . . . . . . . . . . . . . . . . . . . . . . . . . . . 22
E-mail . . . . . . . . . . . . . . . . . . . . . . . . . . . . . . . . . . . . . . . . . . . . . . . 22
Entrar nas redes sociais . . . . . . . . . . . . . . . . . . . . . . . . . . . . . . . . . . . . . 23
© 2019 HMD Global Oy. Todos os direitos reservados. 3

Nokia 7.2 Manual do utilizador
6 Câmera 24
Camera basics . . . . . . . . . . . . . . . . . . . . . . . . . . . . . . . . . . . . . . . . . . 24
Record a video . . . . . . . . . . . . . . . . . . . . . . . . . . . . . . . . . . . . . . . . . . 25
Use your camera like a pro . . . . . . . . . . . . . . . . . . . . . . . . . . . . . . . . . . . 25
Salvar suas fotos e seus vídeos em um cartão de memória . . . . . . . . . . . . . . . . . 27
Suas fotos e vídeos . . . . . . . . . . . . . . . . . . . . . . . . . . . . . . . . . . . . . . . 27
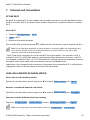
7 Internet and connections 29
Ativar Wi-Fi . . . . . . . . . . . . . . . . . . . . . . . . . . . . . . . . . . . . . . . . . . . . 29
Usar uma conexão de dados móveis . . . . . . . . . . . . . . . . . . . . . . . . . . . . . . 29
Navegar na Web . . . . . . . . . . . . . . . . . . . . . . . . . . . . . . . . . . . . . . . . . 30
Bluetooth . . . . . . . . . . . . . . . . . . . . . . . . . . . . . . . . . . . . . . . . . . . . . 31
NFC . . . . . . . . . . . . . . . . . . . . . . . . . . . . . . . . . . . . . . . . . . . . . . . . 33
VPN . . . . . . . . . . . . . . . . . . . . . . . . . . . . . . . . . . . . . . . . . . . . . . . . 34
8 Organize your day 36
Data e hora . . . . . . . . . . . . . . . . . . . . . . . . . . . . . . . . . . . . . . . . . . . . 36
Relógio e alarme . . . . . . . . . . . . . . . . . . . . . . . . . . . . . . . . . . . . . . . . . 36
Calendário . . . . . . . . . . . . . . . . . . . . . . . . . . . . . . . . . . . . . . . . . . . . 37
9 Maps 38
Localizar lugares e obter direções . . . . . . . . . . . . . . . . . . . . . . . . . . . . . . . 38
Baixar e atualizar mapas no Android . . . . . . . . . . . . . . . . . . . . . . . . . . . . . . 39
Utilizar os serviços de localização . . . . . . . . . . . . . . . . . . . . . . . . . . . . . . . 39
10 Apps, updates, and backups 40
Google Play . . . . . . . . . . . . . . . . . . . . . . . . . . . . . . . . . . . . . . . . . . . . 40
Atualizar o software de seu telefone . . . . . . . . . . . . . . . . . . . . . . . . . . . . . 40
Fazer backup de dados . . . . . . . . . . . . . . . . . . . . . . . . . . . . . . . . . . . . . 41
Restaurar configurações originais . . . . . . . . . . . . . . . . . . . . . . . . . . . . . . . 41
Armazenamento . . . . . . . . . . . . . . . . . . . . . . . . . . . . . . . . . . . . . . . . . 42
© 2019 HMD Global Oy. Todos os direitos reservados. 4

Nokia 7.2 Manual do utilizador
11 Proteger seu telefone 43
Proteger seu telefone com um bloqueio de tela . . . . . . . . . . . . . . . . . . . . . . . 43
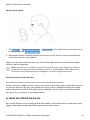
Protect your phone with your fingerprint . . . . . . . . . . . . . . . . . . . . . . . . . . . 43
Protect your phone with your face . . . . . . . . . . . . . . . . . . . . . . . . . . . . . . . 43
Alterar seu código PIN do SIM . . . . . . . . . . . . . . . . . . . . . . . . . . . . . . . . . 44
Códigos de acesso . . . . . . . . . . . . . . . . . . . . . . . . . . . . . . . . . . . . . . . . 45
12 Product and safety information 47
Para sua segurança . . . . . . . . . . . . . . . . . . . . . . . . . . . . . . . . . . . . . . . 47
Serviços de rede e custos . . . . . . . . . . . . . . . . . . . . . . . . . . . . . . . . . . . . 50
Chamadas de emergência . . . . . . . . . . . . . . . . . . . . . . . . . . . . . . . . . . . . 51
Cuidar do seu dispositivo . . . . . . . . . . . . . . . . . . . . . . . . . . . . . . . . . . . . 51
Reciclagem . . . . . . . . . . . . . . . . . . . . . . . . . . . . . . . . . . . . . . . . . . . . 52
Símbolo do contentor de lixo riscado . . . . . . . . . . . . . . . . . . . . . . . . . . . . . 53
Informações sobre bateria e carregador . . . . . . . . . . . . . . . . . . . . . . . . . . . 53
Crianças . . . . . . . . . . . . . . . . . . . . . . . . . . . . . . . . . . . . . . . . . . . . . . 54
Dispositivos médicos . . . . . . . . . . . . . . . . . . . . . . . . . . . . . . . . . . . . . . 54
Dispositivos médicos implantados . . . . . . . . . . . . . . . . . . . . . . . . . . . . . . . 55
Audição . . . . . . . . . . . . . . . . . . . . . . . . . . . . . . . . . . . . . . . . . . . . . . 55
Proteger seu dispositivo contra conteúdo prejudicial . . . . . . . . . . . . . . . . . . . . 55
Veículos . . . . . . . . . . . . . . . . . . . . . . . . . . . . . . . . . . . . . . . . . . . . . . 56
Ambientes com risco de explosão . . . . . . . . . . . . . . . . . . . . . . . . . . . . . . . 56
Dados sobre a certificação (SAR) . . . . . . . . . . . . . . . . . . . . . . . . . . . . . . . 56
Sobre o gerenciamento de direitos digitais . . . . . . . . . . . . . . . . . . . . . . . . . . 57
Copyrights and notices . . . . . . . . . . . . . . . . . . . . . . . . . . . . . . . . . . . . . 57
© 2019 HMD Global Oy. Todos os direitos reservados. 5

Nokia 7.2 Manual do utilizador
3 Introdução
KEEP YOUR PHONE UP TO DATE
Your phone software
Keep your phone up to date and accept available software updates to get new and enhanced
features for your phone. Updating the software may also improve your phone’s performance.
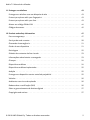
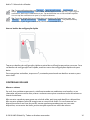
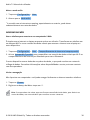
KEYS AND PARTS
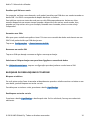
Explore the keys and parts of your new phone.
Your phone
This user guide applies to following models: TA-1196, TA-1181, TA- 1178, and TA-1193.
1. Fingerprint sensor
2. Camera
3. Microphone
4. Flash
5. SIM and memory card slot
6. The Google Assistant/Google Search key
1
7. Front camera
8. Earpiece
© 2019 HMD Global Oy. Todos os direitos reservados. 6

Nokia 7.2 Manual do utilizador
9. Headset connector
10. Volume keys
11. Power/Lock key
12. USB connector
13. Microphone
14. Loudspeaker
Some of the accessories mentioned in this user guide, such as charger, headset, or data cable,
may be sold separately.
Important: The device screen and back cover is made of glass. This glass can break if the
device is dropped on a hard surface or receives a substantial impact. If the glass breaks,
do not touch the glass parts of the device or attempt to remove the broken glass from the
device. Stop using the device until the glass is replaced by authorized service personnel.
Parts and connectors, magnetism
Do not connect to products that create an output signal, as this may damage the device. Do
not connect any voltage source to the audio connector. If you connect an external device
or headset, other than those approved for use with this device, to the audio connector, pay
special attention to volume levels.
Parts of the device are magnetic. Metallic materials may be attracted to the device. Do not
place credit cards or other magnetic stripe cards near the device for extended periods of time,
since the cards may be damaged.
1
The Google Assistant is available in selected markets and languages. Where not
available the Google Assistant is replaced by Google Search. Check availability at
https://support.google.com/assistant.
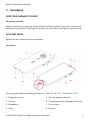
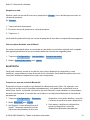
INSERT SIM AND MEMORY CARD
Insert SIM and memory card
© 2019 HMD Global Oy. Todos os direitos reservados. 7

Nokia 7.2 Manual do utilizador
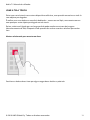
1. Open the SIM and memory card tray: push the tray opener pin in the tray hole and slide the
tray out. Only use the tray opener pin provided in the sales package. Other tray opener pins
may harm the device.
2. Put the nano-SIM in slot 1 on the tray with the contact area face down. If you have a dual-
SIM phone, slide the second SIM in slot 2 with the contact area face down.
3. Put the memory card in the memory card slot.
4. Slide the tray back in.
1
Use only compatible memory cards approved for use with this device. Incompatible cards may
damage the card and the device and corrupt data stored on the card.
Important: Do not remove the memory card when an app is using it. Doing so may damage
the memory card and the device and corrupt data stored on the card.
Tip: Use a fast, up to 512 GB microSD memory card from a well-known manufacturer.
1
Use only original nano-SIM cards. Use of incompatible SIM cards may damage the card or the
device, and may corrupt data stored on the card.
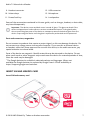
CHARGE YOUR PHONE
Charge the battery
1. Plug a compatible charger into a wall outlet.
2. Connect the cable to your phone.
Your phone supports the USB-C cable. You can also charge your phone from a computer with a
USB cable, but it may take a longer time.
If the battery is completely discharged, it may take several minutes before the charging
indicator is displayed.
© 2019 HMD Global Oy. Todos os direitos reservados. 8

Nokia 7.2 Manual do utilizador
LIGAR E CONFIGURAR SEU TELEFONE
Quando você ligar o telefone pela primeira vez, ele fornecerá orientações para configurar
conexões de rede e as configurações do telefone.
Ligar o telefone
1. Para ligar o telefone, pressione e segure o botão Liga/Desliga até que o telefone vibre.
2. Quando o telefone for ligado, escolha seu idioma e região.
3. Siga as instruções mostradas no telefone.
Transferir dados do seu telefone anterior
Você pode transferir dados de um dispositivo anterior para o seu dispositivo por meio da sua
conta do Google .
Para fazer backup dos dados do seu telefone antigo para a conta do Google , consulte o
manual do usuário do telefone antigo.
1. Toque em Configurações > Contas > Google .
2. Selecione quais dados que você deseja que sejam restaurados em seu telefone. A
sincronização iniciará automaticamente assim que seu telefone estiver conectado à
Internet.
Restaurar configurações do aplicativo do seu telefone Android anterior
Se seu dispositivo anterior era um Android , e o backup na conta do Google estiver habilitado
nele, você poderá restaurar as configurações do aplicativo e as senhas do Wi-Fi.
1. Toque em Configurações > Backup e redefinição .
2. Ativar o carregamento automático .
CONFIGURAÇÕES DO DUAL SIM
Você pode ter dois SIMs no telefone como, por exemplo, um para uso comercial e outro para o
pessoal.
© 2019 HMD Global Oy. Todos os direitos reservados. 9

Nokia 7.2 Manual do utilizador
Escolher qual SIM a ser usado
Por exemplo, ao fazer uma chamada, você poderá escolher qual SIM deve ser usado tocando no
botão SIM 1 ou SIM 2 correspondente depois de discar o número.
Seu telefone mostra o status da rede para os dois SIMs separadamente. Ambos os chips
estarão disponíveis ao mesmo tempo quando o dispositivo não estiver sendo usado, mas,
quando um chip estiver ativo, por exemplo, fazendo uma chamada, talvez o outro esteja
indisponível.
Gerenciar seus SIMs
Não quer que o trabalho atrapalhe o lazer? Ou tem uma conexão de dados mais barata em um
SIM? Você pode decidir qual SIM deseja usar.
Toque em Configurações > Gerenciamento de SIM .
Renomear um cartão SIM
Toque no SIM que deseja renomear e digite o nome que deseja.
Selecionar o SIM que desejar usar para fazer ligações ou conexão de dados
Em SIM preferencial para , toque a configuração que deseja alterar e selecionar o SIM.
BLOQUEAR OU DESBLOQUEAR O TELEFONE
Bloquear o telefone
Se você quiser evitar fazer chamadas acidentalmente quando o telefone estiver no bolso ou em
uma bolsa, poderá bloquear as teclas e a tela.
Para bloquear as teclas e a tela, pressione o botão Liga/Desliga .
Desbloquear as teclas e a tela
Pressione o botão Liga/Desliga e deslize pela tela. Se for solicitado, forneça as credenciais
adicionais.
© 2019 HMD Global Oy. Todos os direitos reservados. 10

Nokia 7.2 Manual do utilizador
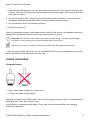
USAR A TELA TOUCH
Evite tocar na tela touch com outros dispositivos elétricos, usar pressão excessiva ou tocá-la
com objetos pontiagudos.
É melhor usar seus dedos ou acessório dedicados - nunca use um lápis, uma caneta comum
nem qualquer outro objeto pontiagudo na tela touch.
Deixar a tela touch ligada por um longo período pode resultar em atraso de imagens
(descoloramento da tela). Bloqueie a tela quando não estiver usando o telefone para evitar
isso.
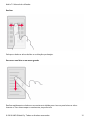
Manter selecionado para arrastar um item
Posicione o dedo sobre o item por alguns segundos e deslize-o pela tela.
© 2019 HMD Global Oy. Todos os direitos reservados. 11

Nokia 7.2 Manual do utilizador
Deslizar
Coloque o dedo na tela e deslize-o na direção que desejar.
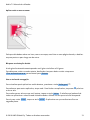
Percorrer uma lista ou um menu grande
Deslize rapidamente o dedo em um movimento rápido para cima ou para baixo na tela e
levante-o. Para interromper o movimento, toque na tela.
© 2019 HMD Global Oy. Todos os direitos reservados. 12

Nokia 7.2 Manual do utilizador
Aplicar mais ou menos zoom
Coloque dois dedos sobre um item, como um mapa, uma foto ou uma página da web, e deslize-
os para perto ou para longe um do outro.
Bloquear a orientação da tela
A tela girará automaticamente quando você girar o telefone a 90 graus.
Para bloquear a tela no modo retrato, deslize de cima para baixo na tela e toque em
Girar automaticamente para alternar para Retrato .
Use as teclas de navegação.
Para visualizar quais aplicativos estão abertos, pressione a tecla Visão geral .
Para alternar para outro aplicativo, toque nele. Para fechar um aplicativo, toque em X próximo
a ele na tela.
Para voltar para a tela em que você estava, toque na tecla Voltar . O telefone se lembrará de
todos os aplicativos e sites da web visitados desde a última vez em que a tela foi bloqueada.
Para ir para a tela inicial , toque na tecla inicial . O aplicativo em que você estava fica em
segundo plano.
© 2019 HMD Global Oy. Todos os direitos reservados. 13

Nokia 7.2 Manual do utilizador
Your phone display
Do you watch videos, photos, read online books or play games using your phone? To see the
screen better, switch on the dynamic mode to automatically adjust the color, contrast, and
brightness according to your usage.
Tap Settings > Display > Advanced > PureDisplay , and switch Dynamic modes on.
To select which apps use the dynamic mode, tap Settings > Display > Advanced >
PureDisplay > Dynamic modes . Select mode, for example, Photo and enable the apps on
the list.
If you want to improve the quality of the colors on your screen in challenging lightning
conditions, switch on the Auto white balance .
If you want to see more details on your screen, switch on SDR to HDR (standard dynamic
range to high dynamic range). This transforms all your SDR video content into HDR quality in
real time.
© 2019 HMD Global Oy. Todos os direitos reservados. 14

Nokia 7.2 Manual do utilizador
4 Recursos básicos
PERSONALIZAR O TELEFONE
Saiba como personalizar a tela Inicial e como alterar os toques.
Alterar o papel de parede
1. Toque em Configurações .
2. Toque em Display .
3. Toque em Papel de parede .
Alterar o toque do telefone
1. Toque em Configurações > Som .
2. Toque em Toque do telefone SIM1 ou Toque do telefone SIM2 para selecionar o toque
para os respectivos SIMs.
Alterar o som de notificação da sua mensagem
1. Toque em Configurações .
2. Toque em Som .
3. Toque em Som de notificação padrão .
NOTIFICAÇÕES
Continue conectado com o que está acontecendo em seu telefone com as notificações.
Usar o painel de notificações
Quando você recebe novas notificações, como mensagens ou chamadas perdidas, os
ícones indicadores são exibidos na barra de status na parte superior da tela. Para ver mais
informações sobre os ícones, abra o painel de notificações e visualize os detalhes.
Para abrir o painel de notificações, arraste a barra de status para baixo. Para fechar o painel de
notificações, deslize para cima na tela.
© 2019 HMD Global Oy. Todos os direitos reservados. 15

Nokia 7.2 Manual do utilizador
Tip: To see notification dots, tap Settings > Apps & notifications > Notifications and
switch Allow notification dots to on. A small dot will appear on the app icon, if you’ve got a
notification, but haven’t attended to it yet. Tap and hold the icon to see available options.
You can tap the notification to open it, or swipe to dismiss.
Tip: To set the power/lock key to blink when you receive notifications from apps, tap
Settings > Apps & notifications > Advanced > Notification light . The power/lock key
will blink when you’ve got a notification, but haven’t attended to it yet.
Usar os botões de configuração rápida
Toque nos botões de configuração rápida no painel de notificações para ativar recursos. Para
ver botões de configuração mais rápida, arraste o menu de configurações rápida mais para
baixo.
Para reorganizar os botões, toque em , mantenha pressionado um botão e arraste-o para
outro local.
CONTROLAR VOLUME
Alterar o volume
Se você tiver problemas para ouvir o telefone tocando em ambientes com barulho, ou as
chamadas estiverem muito altas, altere o volume como quiser usando as teclas de volume na
lateral do telefone.
Não conecte a produtos que geram um sinal de saída, pois isso pode danificar o dispositivo.
Não conecte qualquer fonte de energia com o conector de áudio. Se você conectar um
dispositivo externo ou fone de ouvido, exceto aqueles aprovados para uso com este
dispositivo, ao conector de áudio, preste atenção especial aos níveis de volume.
© 2019 HMD Global Oy. Todos os direitos reservados. 16

Nokia 7.2 Manual do utilizador
Alterar o volume para mídia e aplicativos
Pressione uma tecla de volume na lateral do telefone para exibir a barra de status de volume,
toque em e arraste o controle deslizante na barra de volume para mídia e aplicativos à
esquerda ou direita.
Definir o telefone como silencioso
Pressione uma tecla de volume na lateral do telefone e toque em para mudar para
silencioso.
Dica: Não deseja manter seu telefone no modo silencioso, mas não pode atender
no momento? Para silenciar uma chamada recebida, pressione o botão de
diminuição do volume .
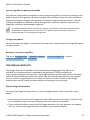
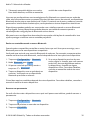
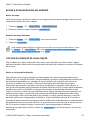
FM RADIO
To listen to the radio, you need to connect a compatible headset to the phone. The headset
acts as an antenna.
Listen to FM radio
After you have connected the headset, tap FM Radio .
• To switch the radio on, tap
• To find radio stations, tap > Scan .
• To switch to another station, slide the
channel frequency row left or right.
• To save a station, tap .
• To listen to a radio station using the
phone’s speakers, tap . Keep the
headset connected.
• To switch the radio off, tap .
Troubleshooting tip: If the radio doesn’t work, make sure the headset is connected properly.
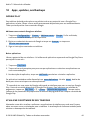
AUTOMATIC TEXT CORRECTION
Learn how to write text quickly and efficiently using the keyboard text correction.
© 2019 HMD Global Oy. Todos os direitos reservados. 17

Nokia 7.2 Manual do utilizador
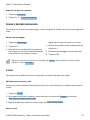
Usar as sugestões de palavras do teclado
Seu telefone sugere palavras enquanto você escreve para ajudá-lo a escrever de maneira mais
rápida e precisa. As sugestões de palavras podem não estar disponíveis em todos os idiomas.
Quando você começa a digitar uma palavra, seu telefone sugere palavras possíveis. Quando
a palavra desejada for mostrada na barra de sugestões, selecione a palavra. Para ver mais
sugestões, mantenha pressionada a sugestão.
Se a palavra sugerida estiver marcada em negrito, seu telefone a utilizará automaticamente
para substituir a palavra que você escreveu. Se a palavra estiver incorreta, mantenha-a
pressionada para ver mais algumas sugestões.
Corrigir uma palavra
Se você perceber que digitou uma palavra incorretamente, toque nela para ver sugestões para
corrigir a palavra.
Desativar o corretor ortográfico
Toque em Configurações > Idiomas e entrada > Corretor ortográfico e mude o
Corretor ortográfico para Desligado .
THE GOOGLE ASSISTANT
The Google Assistant is available in selected markets and languages only. Where not
available, the Google Assistant is replaced by Google Search. Check availability at
https://support.google.com/assistant. The Google Assistant can help you search information
online, translate words and sentences, make notes and calendar appointments, for example.
You can use the Google Assistant even when your phone is locked. However, the Google
Assistant asks you to unlock your phone before accessing your private data.
Use the Google Assistant key
To access the Google Assistant services, use the Google Assistant key on the side of your
phone:
• Press the key once to start the Google Assistant. When you press the key for the first time,
you are asked to sign in with your Google account or create a new account.
• Press and hold the key to speak with the Google Assistant. Ask your question and release
the key. You see the Google Assistant’s answer on your phone’s display.
© 2019 HMD Global Oy. Todos os direitos reservados. 18

Nokia 7.2 Manual do utilizador
If your country or region does not support the Google Assistant, you can still use the Google
Assistant key:
• Press the key once to open Google Search
• Press and hold the key to use Google voice search. Ask your question and release the key.
You see Google’s answer on your phone’s display.
Switch off the Google Assistant key
To switch off the Google Assistant, tap Settings > Google > Search, Assistant & Voice >
Google Assistant . At the top of the screen, tap Assistant , select your device, and switch
Google Assistant off.
CAPTURAS DE TELA
Tirar uma captura de tela
Mantenha pressionado o botão Liga/Desliga e a tecla Diminuir volume simultaneamente. É
possível ver as imagens capturadas nas Fotos .
Não é possível fazer uma captura de tela ao usar alguns aplicativos e recursos.
ACESSIBILIDADE
Você pode alterar várias configurações para facilitar o uso do telefone.
Aumentar ou diminuir o tamanho da fonte
Deseja ter fontes maiores no seu telefone?
1. Toque em Configurações > Acessibilidade .
2. Toque em Tamanho da fonte . Para aumentar ou diminuir o tamanho da fonte, arraste o
controle deslizante de Nível de tamanho de fonte .
Aumentar ou diminuir o tamanho da tela
Deseja tornar os itens da tela menores ou maiores?
1. Toque em Configurações > Acessibilidade .
2. Toque em Tamanho da exibição e, para ajustar o tamanho da exibição, arraste o controle
deslizante Nível de tamanho da exibição .
© 2019 HMD Global Oy. Todos os direitos reservados. 19

Nokia 7.2 Manual do utilizador
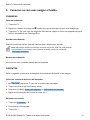
VIDA ÚTIL DA BATERIA
Aproveite ao máximo seu telefone e desfrute da vida útil da bateria que você precisa. Você
pode tomar certas medidas para economizar a energia de seu telefone.
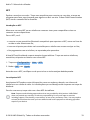
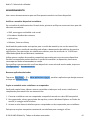
Extend battery life
To save power:
1. Always charge the battery fully.
2. Mute unnecessary sounds, such
as touch sounds. Tap Settings >
Sound > Advanced , and under
Other sounds and vibrations , select which
sounds to keep.
3. Use wired headphones, rather than the
loudspeaker.
4. Set the phone screen to switch off after
a short time. Tap Settings > Display >
Advanced > Sleep and select the time.
5. Tap Settings > Display >
Brightness level . To adjust the
brightness, drag the brightness
level slider. Make sure that
Adaptive brightness is disabled.
6. Stop apps from running in the background:
swipe up the home key and swipe up the
app you want to close.
7. Enable Adaptive Battery . Limit battery
for apps that you don’t use often.
The notifications may be delayed for
these apps. Tap Settings > Battery >
Adaptive Battery .
8. Switch on the power saver: tap Settings
> Battery > Battery saver , and switch to
On .
9. Use location services selectively:
switch location services off when you
don’t need them. Tap Settings >
Security & Location > Location , and
disable Use location .
10. Use network connections selectively:
switch Bluetooth on only when needed.
Use a Wi-Fi connection to connect to
the internet, rather than a mobile data
connection. Stop your phone scanning
for available wireless networks. Tap
Settings > Network & Internet > Wi-Fi ,
and disable Wi-Fi . If you’re listening to
music or otherwise using your phone, but
don’t want to make or receive calls, switch
the airplane mode on. Tap Settings >
Network & Internet > Airplane mode .
Airplane mode closes connections to the mobile network and switches your device’s wireless
features off.
© 2019 HMD Global Oy. Todos os direitos reservados. 20
A página está carregando...
A página está carregando...
A página está carregando...
A página está carregando...
A página está carregando...
A página está carregando...
A página está carregando...
A página está carregando...
A página está carregando...
A página está carregando...
A página está carregando...
A página está carregando...
A página está carregando...
A página está carregando...
A página está carregando...
A página está carregando...
A página está carregando...
A página está carregando...
A página está carregando...
A página está carregando...
A página está carregando...
A página está carregando...
A página está carregando...
A página está carregando...
A página está carregando...
A página está carregando...
A página está carregando...
A página está carregando...
A página está carregando...
A página está carregando...
A página está carregando...
A página está carregando...
A página está carregando...
A página está carregando...
A página está carregando...
A página está carregando...
A página está carregando...
A página está carregando...
A página está carregando...
-
 1
1
-
 2
2
-
 3
3
-
 4
4
-
 5
5
-
 6
6
-
 7
7
-
 8
8
-
 9
9
-
 10
10
-
 11
11
-
 12
12
-
 13
13
-
 14
14
-
 15
15
-
 16
16
-
 17
17
-
 18
18
-
 19
19
-
 20
20
-
 21
21
-
 22
22
-
 23
23
-
 24
24
-
 25
25
-
 26
26
-
 27
27
-
 28
28
-
 29
29
-
 30
30
-
 31
31
-
 32
32
-
 33
33
-
 34
34
-
 35
35
-
 36
36
-
 37
37
-
 38
38
-
 39
39
-
 40
40
-
 41
41
-
 42
42
-
 43
43
-
 44
44
-
 45
45
-
 46
46
-
 47
47
-
 48
48
-
 49
49
-
 50
50
-
 51
51
-
 52
52
-
 53
53
-
 54
54
-
 55
55
-
 56
56
-
 57
57
-
 58
58
-
 59
59


Nokia 7.2 Guia de usuario
- Categoria
- Alto-falantes da barra de som
- Tipo
- Guia de usuario