STIHL RMI 522.0 C Manual do usuário
- Categoria
- Cortadores de grama
- Tipo
- Manual do usuário

STIHL RMI 522 C
Instruction manual
Manual de instrucciones
Manual de utilização
Navodila za uporabo
Návod na obsluhu
Návod k použití
EN
ES
PT
SL
SK
CS
RMI 522.0 C
A

0478 131 9265 A. A21. Eco. DS-2021-01 © 2021 STIHL Tirol GmbH

1
0478 131 9265 A
1

0478 131 9265 A
2
2

ENES
3
PTSLSKCS
0478 131 9265 A - EN
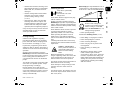
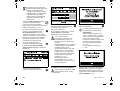
Dear Customer,
Thank you for choosing STIHL. We
develop and manufacture our quality
products to meet our customers'
requirements. The products are designed
for reliability even under extreme
conditions.
STIHL also stands for premium service
quality. Our specialist dealers guarantee
competent advice and instruction as well
as comprehensive service support.
We thank you for your confidence in us
and hope you will enjoy working with your
STIHL product.
Dr. Nikolas Stihl
IMPORTANT: READ BEFORE USE AND
KEEP IN A SAFE PLACE.
Printed on chlorine-free bleached paper. Paper is recyclable. Cover is halogen free.
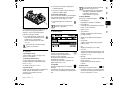
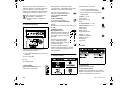
1. Table of contents
Notes on the instruction manual 4
General 4
Country-specific versions 4
Instructions for reading the
instruction manual 5
Machine overview 6
Robotic mower 6
Docking station 7
Display 8
How the robotic mower works 9
Operating principle 9
Safety devices 10
STOP button 10
Disabling device 10
Protective covers 10
Impact sensor 10
Lifting protection 11
Tilt sensor 11
Display illumination 11
PIN request 11
GPS protection 11
For your safety 11
General 11
Clothing and equipment 12
Warning – dangers caused by
electrical current 13
Battery 13
Transporting the machine 14
Before initial operation 14
Programming 15
During operation 15
Maintenance and repairs 16
Storage for prolonged periods
without operation 16
Disposal 17
Description of symbols 17
Standard equipment 18
Initial installation 18
Notes on the docking station 22
Docking station connections 24
Connecting the power cable to the
docking station 25
Installation material 26
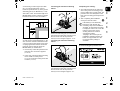
Adjusting the cutting height 26
Notes on initial installation 26
Setting the language, date and
time 27
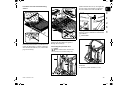
Installing the docking station 27
Routing the perimeter wire 28
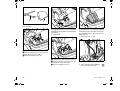
Connecting the perimeter wire 31
Linking the robotic mower and
docking station 35
Checking installation 36
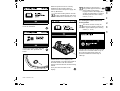
Programming the robotic mower 38
Completing initial installation 39
First mowing operation after initial
installation 39
iMOW® app 39
Menu 40
Operating instructions 40
Status screen 41
Information area 42
Main menu 43
Start 43
Drive home 43
Mowing plan 43
More 45
Settings 45
iMOW® – machine settings 45
Setting the rain sensor 46
Configuring the status screen 46

0478 131 9265 A - EN
4
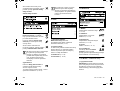
2.1 General
This instruction manual constitutes
original manufacturer’s instructions in
the sense of EC Directive 2006/42/EC.
STIHL is continually striving to further
develop its range of products; we therefore
reserve the right to make alterations to the
form, technical specifications and
equipment level of our standard
equipment.
For this reason, the information and
illustrations in this manual are subject to
alterations.
This instruction manual may describe
models that are not available in all
countries.
This instruction manual is protected by
copyright. All rights reserved, especially
the right of reproduction, translation and
processing using electronic systems.
2.2 Country-specific versions
STIHL supplies machines with different
plugs and switches, depending on the
country of sale.
Machines with European plugs are shown
in the illustrations. Machines with other
types of plug are connected to the mains in
a similar way.
Installation 46
Setting starting points 47
Direct drive home 48
Safety 49
Service 50
Information 50
Perimeter wire 51
Planning routing of the perimeter
wire 52
Making a sketch of the mowing
area 52
Routing the perimeter wire 53
Connecting the perimeter wire 53
Wire clearances – use
iMOW® Ruler 53
Acute corners 54
Confined areas 54
Installing linking sections 55
No-go areas 55
Secondary areas 56
Corridors 56
Guide loops for offset drive home 58
Accurate mowing along edges 59
Sloping terrain along the perimeter
wire 59
Installing reserve wire 60
Using wire connectors 60
Narrow edge clearances 60
Docking station 61
Docking station controls 61
Notes on mowing 62
General 62
Mulching 62
Active times 62
Mowing duration 62
Home area 63
Operating the machine 63
Preparation 63
Flap 63
Adapting the programming 63
Automatic mowing 64
Mowing independently of active
times 64
Docking the robotic mower 65
Charging the battery 65
Maintenance 66
Maintenance schedule 66
Cleaning the machine 66
Checking the mowing blade wear
limits 67
Removing and installing the
mowing blade 67
Sharpening the mowing blade 68
Removing and installing the carrier
plate 68
Finding a wire break 69
Storage and winter break 70
Removing the docking station 70
Standard spare parts 71
Accessories 71
Minimising wear and preventing
damage 71
Environmental protection 72
Removing the battery 72
Transport 73
Lifting or carrying the machine 74
Securing the machine (lashing) 74
EU - Declaration of conformity 74
Cordless electric robotic mower
(RMI) with docking station (ADO) 74
Technical specifications 75
Messages 76
Troubleshooting 82
Service schedule 86
Handover confirmation 86
Service confirmation 86
Installation examples 87
Open source software 91
2. Notes on the instruction
manual

ENES
5
PTSLSKCS
0478 131 9265 A - EN
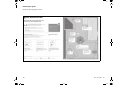
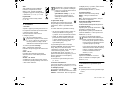
2.3 Instructions for reading the
instruction manual
Illustrations and texts describe specific
operating steps.
All symbols which are affixed to the
machine are explained in this instruction
manual.
Viewing direction:
Viewing direction when "left" and "right"
are used in the instruction manual:
the user is standing behind the machine
and is looking forwards in the direction of
travel.
Section reference:
References to relevant sections and
subsections for further descriptions are
made using arrows. The following example
shows a reference to a section: (Ö 3.)
Designation of text passages:
The instructions described can be
identified as in the following examples.
Operating steps which require intervention
on the part of the user:
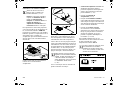
● Release bolt (1) using a screwdriver,
operate lever (2)...
General lists:
– Use of the product for sporting or
competitive events
Texts with added significance:
Text passages with added significance are
identified using the symbols described
below in order to especially emphasise
them in the instruction manual:
Texts relating to illustrations:
Some Illustrations which are necessary for
use of the machine can be found at the
front of this instruction manual.
The camera symbol serves to link
the figures on the illustration pages
with the corresponding text
passages in the instruction manual.
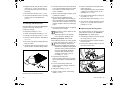
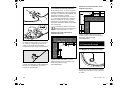
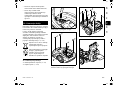
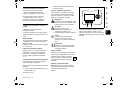
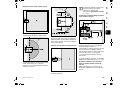
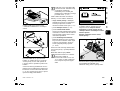
Illustrations with text passages:
Operating steps relating directly to the
illustration can be found immediately after
the illustration, with a corresponding
reference to the item numbers.
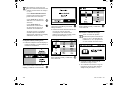
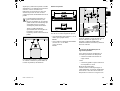
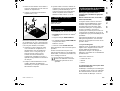
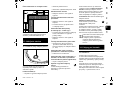
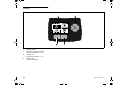
Example:
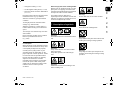
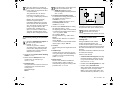
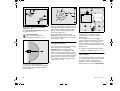
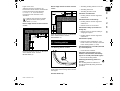
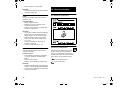
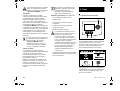
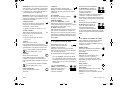
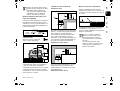
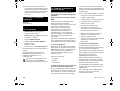
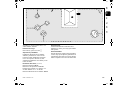
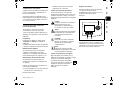
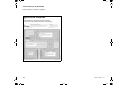
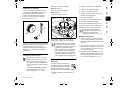
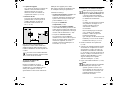
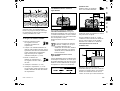
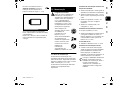
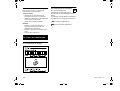
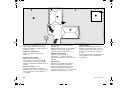
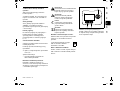
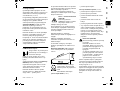
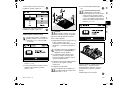
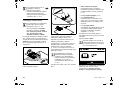
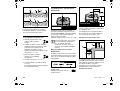
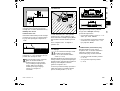
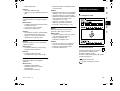
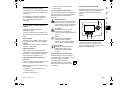
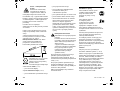
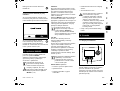
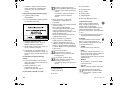
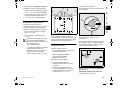
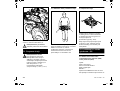
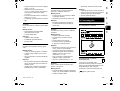
The control pad (1) serves for navigation in
the menus. Settings are confirmed and
menus opened using the OK button (2).
Menus can be exited again using the Back
button (3).
Danger
Risk of accident and severe injury
to persons. A certain type of
behaviour is necessary or must be
avoided.
Warning
Risk of injury to persons. A certain
type of behaviour prevents possible
or probable injuries.
Caution
Minor injuries or material damage
can be prevented by a certain type
of behaviour.
Note
Information for better use of the
machine and in order to avoid
possible operating errors.
1

0478 131 9265 A - EN
6
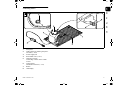
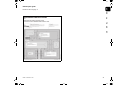
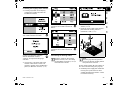
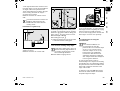
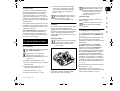
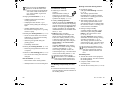
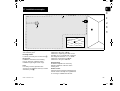
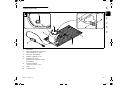
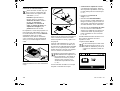
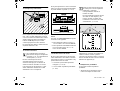
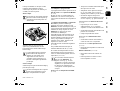
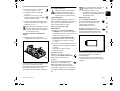
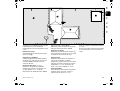
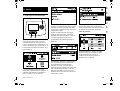
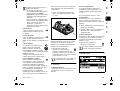
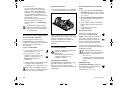
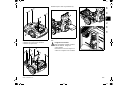
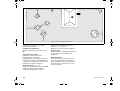
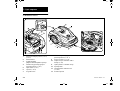
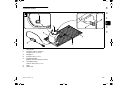
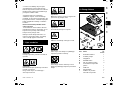
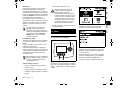
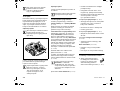
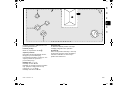
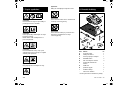
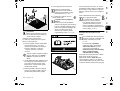
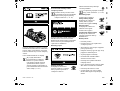
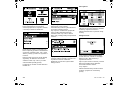
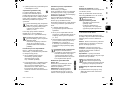
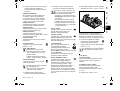
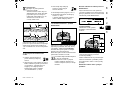
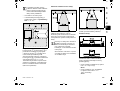
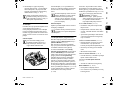
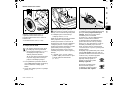
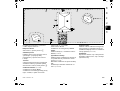
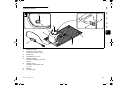
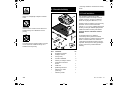
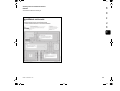
3.1 Robotic mower
3. Machine overview
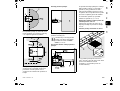
1 Movably mounted hood (Ö 5.4),
(Ö 5.5)
2 Impact protector
3 Charging contacts:
Connecting contacts to the docking
station
4 Front carrying handle (integrated in
the movable hood) (Ö 21.1)
5 STOP button (Ö 5.1)
6 Flap (Ö 15.2)
7 Drive wheel
8 Rear carrying handle (integrated in
the movable hood) (Ö 21.1)
9 Rain sensor (Ö 11.10)
10 Rotary handle for cutting height
adjustment (Ö 9.5)
11 Identification plate with machine
number
12 Front wheel
13 Dual-ground mowing blade (Ö 16.4)
14 Mowing deck


ENES
9
PTSLSKCS
0478 131 9265 A - EN
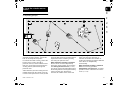
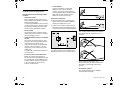
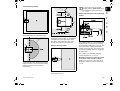
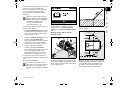
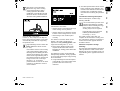
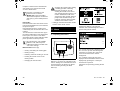
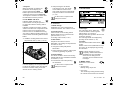
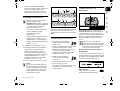
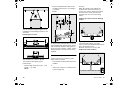
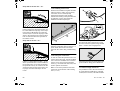
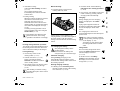
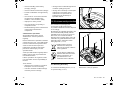
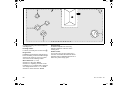
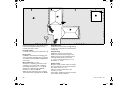
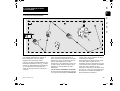
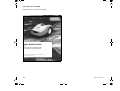
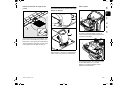
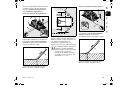
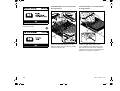
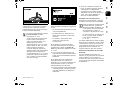
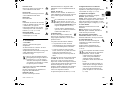
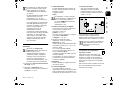
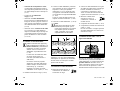
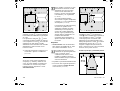
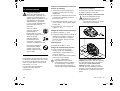
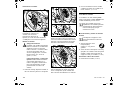
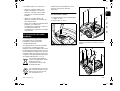
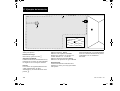
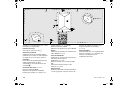
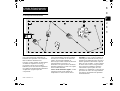
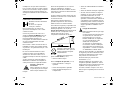
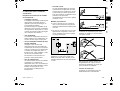
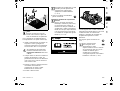
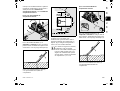
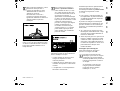
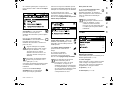
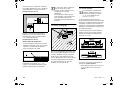
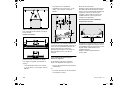
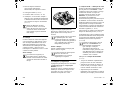
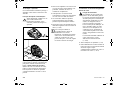
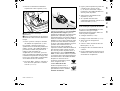
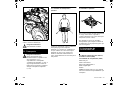
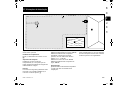
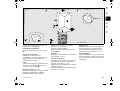
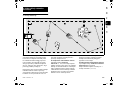
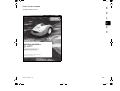
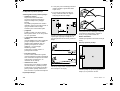
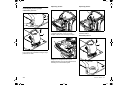
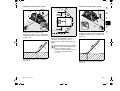
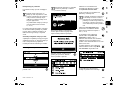
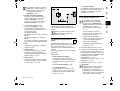
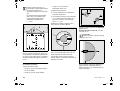
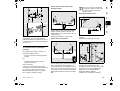
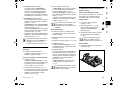
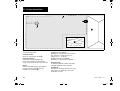
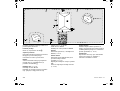
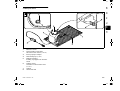
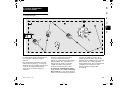
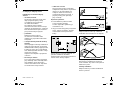
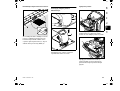
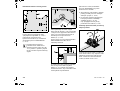
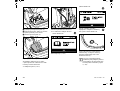
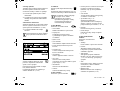
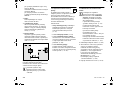
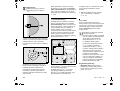
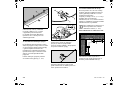
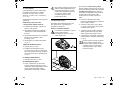
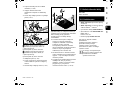
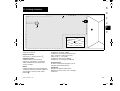
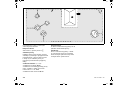
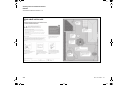
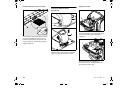
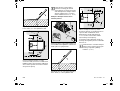
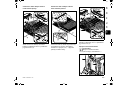
4.1 Operating principle
The robotic mower (1) is designed for the
automatic mowing of lawns. It mows the
lawn in randomly selected paths.
In order for the robotic mower to detect the
borders of the mowing area A, a
perimeter wire (2) must be routed around
that area. A wire signal generated by the
docking station (3) flows through this
perimeter wire.
Solid obstacles (4) in the mowing area are
reliably detected by the robotic mower by
means of an impact sensor. Areas (5) that
the robotic mower is not to enter and
obstacles that need to be avoided must be
separated from the remaining mowing
area using the perimeter wire.
When automatic mowing is switched
on, the robotic mower independently
leaves the docking station and mows the
lawn during the active times (Ö 14.3).
The robotic mower automatically travels to
the docking station to recharge the battery.
If the mow plan type "Standard" is
selected, the robotic mower mows and
charges throughout the entire active time.
If the mow plan type "Dynamic" is
selected, the number and duration of
mowing and charging operations within the
active times are adapted fully
automatically.
When automatic mowing is switched
off and for mowing operations
independent of active times, a mowing
operation can be activated in the "Start"
menu. (Ö 11.5)
4. How the robotic mower
works

0478 131 9265 A - EN
10
The STIHL robotic mower
can be operated reliably
and without interference
in close vicinity to other
robotic mowers. The wire
signal meets the EGMF
(European Garden
Machinery Federation) standard with
regard to electromagnetic emissions.
The machine is equipped with several
safety devices for safe operation and for
the prevention of improper use.
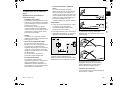
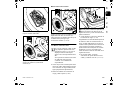
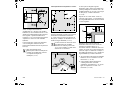
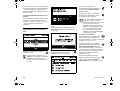
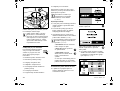
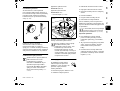
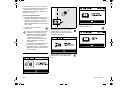
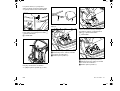
5.1 STOP button
When the red STOP button on the top of
the robotic mower is pressed, operation of
the machine is stopped immediately. The
mowing blade comes to a standstill within
a few seconds and the message "STOP
button pressed" appears on the display.
The robotic mower cannot be operated
and is safe while the message is active.
(Ö 24.)
When automatic mowing is
switched on, following
confirmation of the message with
OK, the system enquires
whether automatic operation is to be
continued.
If the response is Yes, the robotic mower
continues to mow the mowing area in
accordance with the mowing plan.
If the response is No, the robotic mower
remains stationary in the mowing area and
automatic mowing is switched off. (Ö 15.4)
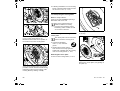
5.2 Disabling device
The robotic mower must be
disabled prior to any
maintenance or cleaning work,
prior to transportation and prior
to inspection.
The robotic mower cannot be operated
when the disabling device is activated.
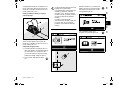
Activating the disabling device:
– Press and hold the STOP button
– in the More menu,
– in the Safety menu.
Activating the disabling device via the
More menu:
● In the "More" menu, select the "Lock
iMOW®" entry and confirm with the OK
button. (Ö 11.8)
Activating the disabling device via the
Safety menu:
● In the "More" menu, open the "Settings"
and "Safety" submenus. (Ö 11.16)
● Select the "Disab. device" entry and
confirm with the OK button.
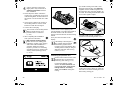
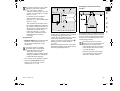
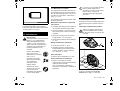
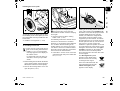
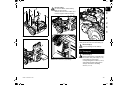
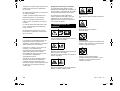
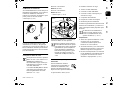
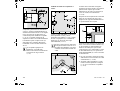
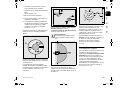
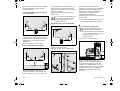
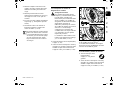
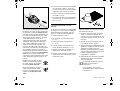
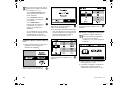
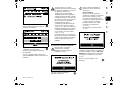
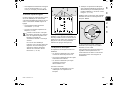
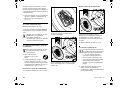
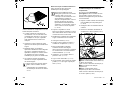
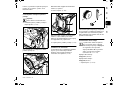
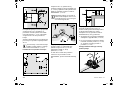
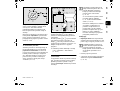
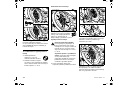
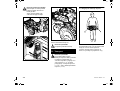
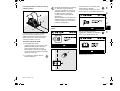
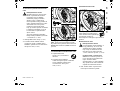
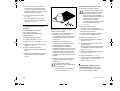
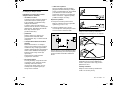
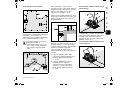
Deactivating the disabling device:
● When required, wake up the machine
by pressing any button.
● Unlock the robotic mower using
the illustrated button
combination. For this purpose,
press the OK button and the
Back button in the sequence
shown on the display.
5.3 Protective covers
The robotic mower is equipped with
protective covers that prevent inadvertent
contact with the mowing blade and the
clippings.
These include, in particular, the hood.
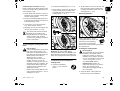
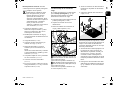
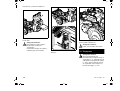
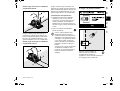
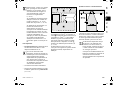
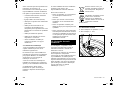
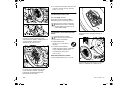
5.4 Impact sensor
The robotic mower is equipped with a
movable hood which serves as an impact
sensor. During automatic operation, it
immediately comes to a standstill if it
contacts a solid obstacle which has a
specific minimum height (8 cm) and is
firmly attached to the ground. It then turns
to face another direction and continues
mowing. If the impact sensor is triggered
too frequently, the mowing blade is also
stopped.
5. Safety devices
Risk of injury!
If a safety device is found to be
defective, the machine must not be
operated. Consult a specialist
dealer; STIHL recommends STIHL
specialist dealers.
Pressing and holding the STOP
button also activates the disabling
device. (Ö 5.2)
Impacts against obstacles occur
with a certain force. Sensitive
obstacles, e.g. light objects such as
small flower pots, can therefore be
knocked over or damaged.
STIHL recommends removing
obstacles or blocking them off by
means of no-go areas. (Ö 12.9)

ENES
11
PTSLSKCS
0478 131 9265 A - EN
5.5 Lifting protection
If the robotic mower is lifted by the hood,
mowing is stopped immediately. The
mowing blade comes to a standstill within
a few seconds.
5.6 Tilt sensor
If the permissible slope inclination is
exceeded during operation, the robotic
mower immediately changes its direction
of travel. In the event of a rollover, the self-
propulsion and mowing motor are
switched off.
5.7 Display illumination
The display illumination is activated during
operation. Thanks to this illumination, the
robotic mower is easily recognisable, even
in darkness.
5.8 PIN request
When the PIN request is activated, an
alarm signal sounds when the robotic
mower is lifted unless the PIN code is
entered within one minute. (Ö 11.16)
The robotic mower can only be operated in
conjunction with the docking station
supplied. A further docking station must be
linked with the robotic mower. (Ö 11.16)
5.9 GPS protection
The robotic mower is equipped with a GPS
receiver. When GPS protection is
activated, the owner of the machine is
notified if the machine is operated outside
the home area. The PIN code is also
requested on the display. (Ö 14.5)
6.1 General
These safety regulations must
be observed when working with
the machine.
Read the entire instruction
manual before using the
machine for the first time. Keep
the instruction manual in a safe
place for future reference.
These safety precautions are essential for
your safety, however the list is not
exhaustive. Always use the machine in a
reasonable and responsible manner and
be aware that the user is responsible for
accidents involving third parties or their
property.
The term "use" covers all work on the
robotic mower, the docking station and the
perimeter wire.
A "user" is defined as:
– A person who reprograms the robotic
mower or changes the existing
programming.
– A person who performs work on the
robotic mower.
– A person who activates or operates the
machine.
– A person who installs or removes the
perimeter wire or docking station.
The use of the iMOW® app also falls
under the term "use" for the purpose of this
instruction manual.
The machine must only be operated by
persons who are well rested and in good
physical and mental condition. If your
health is impaired, you should consult your
doctor to determine whether working with
the machine is possible. The machine
should not be operated after the
consumption of alcohol, drugs or
medications which impair reactions.
Make sure that you are familiar with the
controls and use of the machine.
The machine must only be used by
persons who have read the instruction
manual and are familiar with operation of
the machine. The user should seek expert
and practical instruction prior to initial
operation. The user must receive
instruction on safe use of the machine
from the vendor or another expert.
During this instruction, the user should be
made aware that the utmost care and
concentration are required for working with
the machine.
Residual risks persist even if you operate
this machine according to the instructions.
STIHL recommends that one of the
safety levels "Low", "Medium" or
"High" be set. This ensures that
unauthorised people cannot
operate the robotic mower using
other docking stations and are
unable to change settings or the
programming.
Recommendation:
Always activate GPS protection.
(Ö 11.16)
6. For your safety
Risk of death from suffocation!
Packaging material is not a toy -
danger of suffocation! Keep
packaging material away from
children.

0478 131 9265 A - EN
12
Only give or lend the machine to persons
who are familiar with this model and how to
operate it. The instruction manual forms
part of the machine and must always be
provided to persons operating it.
Make sure that the user is physically,
sensorily and mentally capable of
operating the machine and working with it.
If the user is physically, sensorily or
mentally impaired, the machine must only
be used under supervision or following
instruction by a responsible person.
Make sure that the user is of legal age or
being trained under supervision in a
profession in accordance with national
regulations.
Children must be kept away
from the machine and
mowing area during mowing
operation.
Dogs and other pets must be
kept away from the machine
and mowing area during
mowing operation.
For safety reasons, any
modification to the machine, except the
proper installation of accessories or
attachments approved by STIHL, is
forbidden and results in voiding of the
warranty cover. Information regarding
approved accessories and attachments
can be obtained from your STIHL
specialist dealer.
In particular, any tampering with the
machine which increases the power output
or speed of the motors is forbidden.
It is not permissible to make any
modifications to the machine that could
lead to increased noise emissions.
For safety reasons, the machine software
must never be modified or tampered with.
Particular care is required during use in
public green spaces, parks, sports fields,
along roads and in agricultural and forestry
businesses.
It is not permitted to transport objects,
animals or persons, particularly children,
on the machine.
Never allow people, particularly children,
to ride or sit on the robotic mower.
Caution – risk of accident!
The robotic mower is intended for
automatic lawn care. Its use for other
purposes is not permitted and may be
dangerous or result in damage to the
machine.
Due to the physical danger to the user, the
machine must not be used for the following
applications (incomplete list):
– for trimming bushes, hedges and
shrubs,
– for cutting creepers,
– for the care of lawn roofs and balcony
boxes,
– for shredding or chipping tree or hedge
cuttings,
– for clearing paths (vacuuming,
blowing),
– for levelling earth mounds, e.g. mole
hills.
6.2 Clothing and equipment
Wear sturdy footwear with high-
grip soles and never work
barefoot or when wearing e.g.
sandals
– when approaching the robotic mower
during operation.
Wear suitable work clothes
during installation, maintenance
operations and all other work on
the machine and docking
station.
Never wear loose clothes which may
become caught on moving parts – do not
wear jewellery, ties or scarves.
In particular, wear long trousers
– when approaching the robotic mower
during operation.
Always wear thick gloves during
maintenance and cleaning
operations, when laying and
removing wires and when
securing the docking station.
In particular, protect the hands when
working on the mowing blade and when
driving in the fixing pins or the docking
station pegs.
Long hair must always be tied up and
secured (headscarf, cap, etc.) when
working on the machine.
Suitable safety glasses must be
worn when driving in the fixing
pins and the docking station
pegs.
Caution - risk of accident!

ENES
13
PTSLSKCS
0478 131 9265 A - EN
6.3 Warning – dangers caused by
electrical current
Only use an original power supply unit.
The power supply unit must not be used:
– if it is damaged or worn,
– if the cables are damaged or worn.
Check the power cable in particular for
damage and ageing.
Maintenance and repair work on power
cables and power supply units must only
be performed by specially qualified
technicians.
Danger of electric shock!
Do not connect a damaged cable to the
mains and only touch a damaged cable
once it has been disconnected from the
mains.
The electric cable on the power supply unit
must not be modified (e.g. shortened). The
cable between the power supply unit and
docking station must not be extended.
The power supply unit plug must only be
connected to the docking station
electronics in dry and clean condition.
The power supply unit and cable must not
be left on wet ground for prolonged
periods.
Danger of electric shock!
Damaged cables, connectors and plugs,
or electric cables which do not conform
with regulations may not be used.
Always ensure that the power cables used
are adequately protected by a fuse.
Detach electric cables at the plug and
socket and not by pulling on the electric
cable.
Only connect the machine to a power
supply that is protected by means of a
residual current-operated protective
device with a release current of a
maximum of 30 mA. Your electrician can
provide further information.
If the power supply unit is connected to the
mains supply outside a building, the socket
must be approved for outdoor use. Your
electrician can provide further information
about country-specific legislation.
It must be noted that current fluctuations
can damage the machine when it is
connected to a power generator.
6.4 Battery
Only use original batteries.
The battery is intended exclusively for
fixed installation in a STIHL robotic mower.
There, it is optimally protected and is
charged when the robotic mower is in the
docking station. No other charger must be
used. The use of an unsuitable charger
can result in danger due to electric shock,
overheating or escaping corrosive battery
fluid.
Never open the battery.
Do not drop the battery.
Never use a defective or deformed battery.
Store the battery out of reach of children.
Only use or store the battery at
temperatures from -10°C to max.
+50°C.
Protect the battery against rain
and moisture – do not immerse
in liquids.
Do not subject the battery to
microwaves or high pressure.
Never connect the battery terminals with
metallic objects (short-circuit). The battery
can be damaged through short circuits.
Keep the unused battery away from
metallic objects (e.g. nails, coins,
jewellery). Do not use metallic transport
containers – explosive and fire hazard!
Fluid may escape from the battery due to
improper use – avoid contact! In the case
of inadvertent contact, rinse with water.
Seek medical attention if the fluid comes
into contact with the eyes. Escaping
battery fluid can cause skin irritation and
burns.
Do not insert any objects in the ventilation
slots of the battery.
For further safety instructions, see
http://www.stihl.com/safety-data-sheets
Warning:
Risk of electric shock!
Particularly important for
electrical safety are an
intact power cable and
mains plug on the power
supply unit. Damaged cables,
connectors and plugs, or electric
cables that do not conform to
regulations must not be used, to
prevent any risk of electric shocks.
Therefore, check the electric cable
regularly for signs of damage or
ageing (brittleness).
Explosive hazard!
Protect the battery
against direct sunlight,
heat and fire – never
throw it into a fire.

0478 131 9265 A - EN
14
6.5 Transporting the machine
Before transporting, and especially before
lifting the robotic mower, activate the
disabling device. (Ö 5.2)
Allow the machine to cool down before
transporting.
Avoid contact with the mowing blade when
lifting and carrying the machine. The
robotic mower must only be lifted at both
carrying handles. Never reach under the
machine.
Take the weight of the machine into
account and use suitable loading aids
(lifters) if required.
Secure the machine and other machine
parts being transported (e.g. docking
station) on the load floor using fastening
materials (straps, ropes, etc.) of an
adequate size at the fastening points
described in this instruction manual.
(Ö 21.)
When transporting the machine, always
observe regional legislation, especially
regarding load security and the transport
of objects on load floors.
Do not leave the battery inside a vehicle
and never expose it to direct sunlight.
Lithium-ion batteries must be treated with
special care during transport. In particular,
short-circuit protection must be ensured.
Only transport the battery in the robotic
mower.
6.6 Before initial operation
It must be ensured that all persons who
use the machine are familiar with the
instruction manual.
Carefully follow the instructions for
installing the docking station (Ö 9.1) and
perimeter wire (Ö 12.).
The perimeter wire and the power cable
must be securely fastened to the ground
so that they do not present a tripping
hazard. Avoid routing the perimeter wire
and power cable over edges (e.g. edges of
pathways or paving stones). When routing
the perimeter wire and power cable on
ground into which the supplied fixing pins
cannot be driven (e.g. paving stones,
pathways), a cable duct must be used.
Correct routing of the perimeter wire and
power cable must be regularly checked.
To prevent the risk of stumbling, always
drive in the fixing pins all the way.
Do not install the docking station in a place
where it is difficult to see and could
become a tripping hazard (e.g. around the
corner of a house).
If possible, install the docking station out of
the reach of pests such as ants or slugs –
in particular avoid the area around anthills
and composting units.
Areas in which the robotic mower cannot
operate safely (e.g. due to danger of
falling) must be blocked off through
appropriate routing of the perimeter wire.
STIHL recommends that the robotic
mower is only operated on lawns and
surfaced paths (e.g. paved drives).
The robotic mower does not detect any
sudden drops such as edges, steps,
swimming pools or ponds. If the perimeter
wire is routed along potential sudden
drops, a clearance of at least 1m must be
maintained between the perimeter wire
and the danger area for safety reasons.
Regularly inspect the area on which the
machine is to be used and remove any
sticks, stones, wires, bones and all other
foreign objects that could be thrown up by
the machine.
After installing the perimeter wire,
particularly remove all tools from the
mowing area. Broken or damaged fixing
pins must be removed from the lawn and
disposed of.
Regularly check the area to be mown for
uneven areas and level them out.
Never use the machine with damaged
safety devices or with safety devices
removed.
The switch and safety devices installed in
the machine must not be removed or
bypassed.
All faulty, worn or damaged parts must be
replaced before using the machine.
Replace any illegible or damaged danger
signs and warnings on the machine. Your
STIHL specialist has a supply of
replacement stickers and all the other
spare parts.
Before initial operation, it must be ensured
– that the machine is in good operational
condition. This means that the covers,
guards and the flap must be in place
and in good condition.
– that the docking station is in a safe
operating condition. Here, all covers
must be properly installed and be in
good condition.
– that the power supply unit has been
connected to a properly installed
socket.
– that the insulation of the electric cable
and the mains plug on the power supply
unit is in good condition.

ENES
15
PTSLSKCS
0478 131 9265 A - EN
– that the entire machine (housing, hood,
flap, fastening elements, mowing blade,
blade shaft, etc.) is neither worn nor
damaged.
– that the mowing blade and the blade
fastening are in proper condition
(secure seating, damage, wear).
(Ö 16.3)
– that all screws, bolts, nuts and other
fastening elements are in place and
properly tightened. Tighten any loose
screws, bolts and nuts prior to initial
operation (observe tightening torques).
Carry out any necessary work or consult a
specialist dealer. STIHL recommends
STIHL specialist dealers.
6.7 Programming
Observe local regulations regarding
permitted operating times for gardening
power tools with motors and programme
the active times accordingly. (Ö 14.3)
In particular, programming must also be
adapted so that no children, spectators or
animals are in the area to be mown during
operation.
Changing the programming using the
iMOW® app can result in activities that will
not be expected by other people. Changes
to the mowing plan must therefore be
communicated in advance to all affected
people.
The robotic mower must not operate at the
same time as a sprinkler system. Adapt
the programming accordingly.
Ensure that the correct date and the
correct time are set on the robotic mower.
Correct the settings if necessary. Incorrect
values may cause the robotic mower to
start up unintentionally.
6.8 During operation
Keep others, particularly
children
and animals, out of the
danger area.
Never allow children to approach or play
with the robotic mower.
Starting a mowing operation using the
iMOW® app may not be expected by third
parties. Affected people must therefore be
notified in advance about possible activity
of the robotic mower.
Never allow the robotic mower to operate
if you know that animals or people,
particularly children, are in the vicinity.
When operating the robotic mower in
public places, signs with the following
notice must be affixed around the mowing
area:
"Warning! Automatic lawn mower! Keep
away from the machine! Children must be
supervised!"
Caution – risk of injury!
Never put hands or feet on or
underneath rotating parts.
Never touch the rotating
blade.
Before thunderstorms, or if there is a
danger of lightning strikes, disconnect the
power supply unit from the mains. The
robotic mower must not be operated.
The robotic mower must never be tilted or
lifted when the motor is running.
Never attempt to change settings on the
machine when one of the motors is
running.
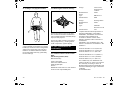
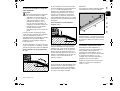
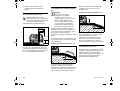
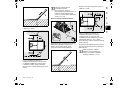
For safety reasons, the machine must not
be used on slopes with an incline of more
than 21,8° (40 %).
Risk of injury! A slope inclination of 21,8°
corresponds to a vertical height increase
of 40 cm for a 100 cm horizontal distance.
Beware of the cutting tool
running on for several seconds
before coming to a standstill.
Press the STOP button (Ö 5.1)
during running operation
– before opening the flap.
Activate the disabling device (Ö 5.2)
– before lifting or carrying the machine,
– before transporting the machine,
– before removing blockages,
– before carrying out any work on the
mowing blade,
– before checking or cleaning the
machine,
– after hitting a foreign object or if the
robotic mower begins to vibrate
excessively. In these cases, check the
machine, in particular the cutting unit
(blade, blade shaft, blade fastening) for
damage and carry out the necessary
repairs before restarting and working
with the machine.

0478 131 9265 A - EN
16
Before leaving the machine unattended,
the safety settings of the robotic mower
must be adapted so that it cannot be
operated by unauthorised persons. (Ö 5.)
Do not lean forward and always ensure
that you maintain your balance and a firm
footing on inclines when operating the
machine and its peripherals. Always walk,
do not run.
Never operate the machine in the vicinity
of naked flames.
6.9 Maintenance and repairs
Before starting cleaning, repair
or maintenance operations,
activate the disabling device
and park the robotic mower on
firm and level ground.
Disconnect the mains plug of
the power supply unit before
performing any work on the
docking station and the
perimeter wire.
Allow the robotic mower to cool down for
approx. 5 minutes before performing any
maintenance operations.
The power cable must only be repaired or
replaced by authorised electricians.
Following any work on the machine, check
and, if necessary, correct the
programming of the robotic mower before
putting it back into operation. In particular,
the date and time must be set.
Cleaning:
The complete machine must be cleaned
carefully at regular intervals. (Ö 16.2)
Never spray water (particularly high-
pressure cleaners) onto motor
components, seals, electric components
or bearing points. This may result in
damage and expensive repairs. Do not
clean the machine under running water
(e.g. using a garden hose). Do not use
aggressive cleaning agents. These can
damage plastics and metals, impairing the
safe operation of your STIHL machine.
Maintenance operations:
Only maintenance operations described in
this instruction manual may be carried out.
Have all other work performed by a
specialist dealer.
If you do not have the necessary expertise
or auxiliary equipment, please always
contact a specialist dealer.
STIHL recommends that you have
maintenance operations and repairs
performed exclusively by a STIHL
specialist dealer.
STIHL specialist dealers regularly attend
training courses and are provided with
technical information.
Only use tools, accessories or
attachments approved for this machine by
STIHL or technically identical parts.
Otherwise, there may be a risk of
accidents resulting in personal injury or
damage to the machine. If you have any
questions, please consult a specialist
dealer.
The characteristics of original STIHL tools,
accessories and spare parts are optimally
adapted to the machine and the user's
requirements. Genuine STIHL spare parts
can be recognised by the STIHL spare
parts number, by the STIHL lettering and,
if present, by the STIHL spare parts
symbol. On smaller parts, only the symbol
may be present.
Always keep warning and information
stickers clean and readable. Damaged or
missing stickers must be replaced by new,
original plates from your STIHL specialist
dealer. If a component is replaced with a
new component, ensure that the new
component is provided with the same
stickers.
Only perform work on the cutting unit when
wearing thick work gloves and exercising
extreme care.
Ensure that all screws and nuts, especially
all screws and fastening elements of the
cutting unit, are securely tightened, so that
the machine is in a safe operating
condition.
Check the entire machine for wear or
damage on a regular basis, particularly
before extended periods when the
machine is not in use (e.g. over winter).
For safety reasons, worn or damaged
parts must be replaced immediately to
ensure that the machine is always in a safe
operating condition.
Components or guards that are removed
for maintenance operations must be
properly reinstalled immediately.
6.10 Storage for prolonged periods
without operation
Before putting into storage
Risk of injury!
Strong vibration is normally an
indication of a fault.
In particular, the robotic mower
must not be operated with a
damaged or bent blade shaft or
mowing blade.
If you do not have the appropriate
expertise, have the necessary
repairs carried out by a specialist
dealer (STIHL recommends STIHL
specialist dealers).

ENES
17
PTSLSKCS
0478 131 9265 A - EN
– Charge the battery (Ö 15.7)
– Set the highest safety level (Ö 11.16)
– Place the robotic mower in hibernation
(Ö 11.17)
Ensure that the machine is protected from
unauthorised use (e.g. by children).
Store the machine in good operational
condition.
Thoroughly clean the machine before
storage (e.g. winter break).
Allow the machine to cool for approx. 5
minutes before storing it in an enclosed
space.
The storage room must be dry, frost-free
and lockable.
Never store the machine close to naked
flames or powerful heat sources
(e.g. oven).
6.11 Disposal
Waste products can be harmful to people,
animals and the environment. They must
consequently be disposed of properly.
Consult your recycling centre or your
specialist dealer for information on the
proper disposal of waste products. STIHL
recommends STIHL specialist dealers.
Ensure that old machines are properly
disposed of. Render the machine
unusable prior to disposal. In particular,
remove the power cable of the power
supply unit, as well as the battery of the
robotic mower in order to prevent
accidents.
Risk of injury due to the mowing blade!
Always store an old lawn mower in a safe
place prior to scrapping. Ensure that the
machine and particularly the mowing blade
are kept out of the reach of children.
The battery must be disposed of
separately from the machine. Ensure that
batteries are disposed of safely and in an
environmentally friendly manner.
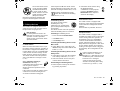
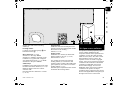
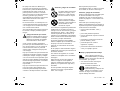
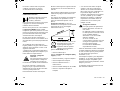
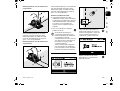
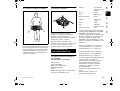
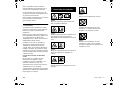
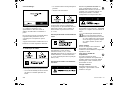
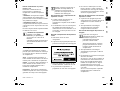
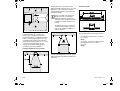
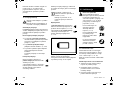
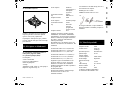
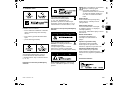
Warning!
Read the instruction manual before initial
use.
Warning!
Keep a safe distance from the machine
during operation.
Keep other persons out of the danger
area.
Warning!
Disable the machine before lifting it and
before working on it.
Warning!
Do not climb onto or sit on the machine.
Warning!
Never touch the rotating blade.
Warning!
Keep children away from the machine and
mowing area during mowing operation.
Warning!
Keep dogs and other pets away from the
machine and mowing area during mowing
operation.
7. Description of symbols

0478 131 9265 A - EN
18
* must be separated from the cardboard
insert in the packaging.
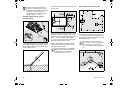
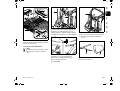
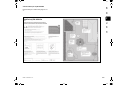
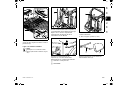
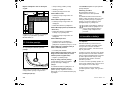
For a quick, easy and robust installation,
read and comply with the specifications
and instructions, especially the wire
clearance of 28 cm during routing. (Ö 12.)
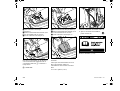
It is possible to increase the mown area by
routing the perimeter wire closer to the
edge. (Ö 12.17) For reliable operation, the
wire clearance must be adapted to the on-
site conditions during routing.
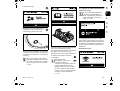
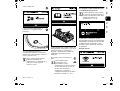
iMOW® quick guide
A separate quick guide on installing the
docking station and routing the perimeter
wire is enclosed with the robotic mower to
assist you. More detailed information can
be found in the respective chapters of this
instruction manual. Always use the quick
guide in combination with the instruction
manual for the robotic mower.
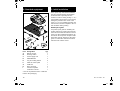
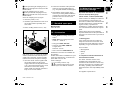
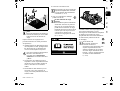
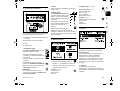
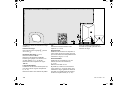
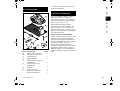
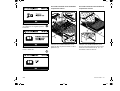
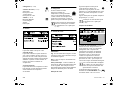
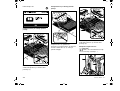
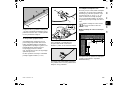
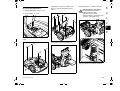
8. Standard equipment
Item Designation Qty.
A Robotic mower 1
B Docking station 1
C Power supply unit 1
D iMOW® Ruler* 2
E Peg for docking station 4
F Puller for carrier plate 1
G AKM 100 1
H Wire connector 2
I Corridor template* 1
Instruction manual 1
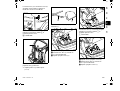
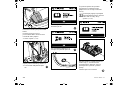
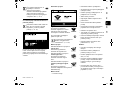
9. Initial installation
A página está carregando...
A página está carregando...
A página está carregando...
A página está carregando...
A página está carregando...
A página está carregando...
A página está carregando...
A página está carregando...
A página está carregando...
A página está carregando...
A página está carregando...
A página está carregando...
A página está carregando...
A página está carregando...
A página está carregando...
A página está carregando...
A página está carregando...
A página está carregando...
A página está carregando...
A página está carregando...
A página está carregando...
A página está carregando...
A página está carregando...
A página está carregando...
A página está carregando...
A página está carregando...
A página está carregando...
A página está carregando...
A página está carregando...
A página está carregando...
A página está carregando...
A página está carregando...
A página está carregando...
A página está carregando...
A página está carregando...
A página está carregando...
A página está carregando...
A página está carregando...
A página está carregando...
A página está carregando...
A página está carregando...
A página está carregando...
A página está carregando...
A página está carregando...
A página está carregando...
A página está carregando...
A página está carregando...
A página está carregando...
A página está carregando...
A página está carregando...
A página está carregando...
A página está carregando...
A página está carregando...
A página está carregando...
A página está carregando...
A página está carregando...
A página está carregando...
A página está carregando...
A página está carregando...
A página está carregando...
A página está carregando...
A página está carregando...
A página está carregando...
A página está carregando...
A página está carregando...
A página está carregando...
A página está carregando...
A página está carregando...
A página está carregando...
A página está carregando...
A página está carregando...
A página está carregando...
A página está carregando...
A página está carregando...
A página está carregando...
A página está carregando...
A página está carregando...
A página está carregando...
A página está carregando...
A página está carregando...
A página está carregando...
A página está carregando...
A página está carregando...
A página está carregando...
A página está carregando...
A página está carregando...
A página está carregando...
A página está carregando...
A página está carregando...
A página está carregando...
A página está carregando...
A página está carregando...
A página está carregando...
A página está carregando...
A página está carregando...
A página está carregando...
A página está carregando...
A página está carregando...
A página está carregando...
A página está carregando...
A página está carregando...
A página está carregando...
A página está carregando...
A página está carregando...
A página está carregando...
A página está carregando...
A página está carregando...
A página está carregando...
A página está carregando...
A página está carregando...
A página está carregando...
A página está carregando...
A página está carregando...
A página está carregando...
A página está carregando...
A página está carregando...
A página está carregando...
A página está carregando...
A página está carregando...
A página está carregando...
A página está carregando...
A página está carregando...
A página está carregando...
A página está carregando...
A página está carregando...
A página está carregando...
A página está carregando...
A página está carregando...
A página está carregando...
A página está carregando...
A página está carregando...
A página está carregando...
A página está carregando...
A página está carregando...
A página está carregando...
A página está carregando...
A página está carregando...
A página está carregando...
A página está carregando...
A página está carregando...
A página está carregando...
A página está carregando...
A página está carregando...
A página está carregando...
A página está carregando...
A página está carregando...
A página está carregando...
A página está carregando...
A página está carregando...
A página está carregando...
A página está carregando...
A página está carregando...
A página está carregando...
A página está carregando...
A página está carregando...
A página está carregando...
A página está carregando...
A página está carregando...
A página está carregando...
A página está carregando...
A página está carregando...
A página está carregando...
A página está carregando...
A página está carregando...
A página está carregando...
A página está carregando...
A página está carregando...
A página está carregando...
A página está carregando...
A página está carregando...
A página está carregando...
A página está carregando...
A página está carregando...
A página está carregando...
A página está carregando...
A página está carregando...
A página está carregando...
A página está carregando...
A página está carregando...
A página está carregando...
A página está carregando...
A página está carregando...
A página está carregando...
A página está carregando...
A página está carregando...
A página está carregando...
A página está carregando...
A página está carregando...
A página está carregando...
A página está carregando...
A página está carregando...
A página está carregando...
A página está carregando...
A página está carregando...
A página está carregando...
A página está carregando...
A página está carregando...
A página está carregando...
A página está carregando...
A página está carregando...
A página está carregando...
A página está carregando...
A página está carregando...
A página está carregando...
A página está carregando...
A página está carregando...
A página está carregando...
A página está carregando...
A página está carregando...
A página está carregando...
A página está carregando...
A página está carregando...
A página está carregando...
A página está carregando...
A página está carregando...
A página está carregando...
A página está carregando...
A página está carregando...
A página está carregando...
A página está carregando...
A página está carregando...
A página está carregando...
A página está carregando...
A página está carregando...
A página está carregando...
A página está carregando...
A página está carregando...
A página está carregando...
A página está carregando...
A página está carregando...
A página está carregando...
A página está carregando...
A página está carregando...
A página está carregando...
A página está carregando...
A página está carregando...
A página está carregando...
A página está carregando...
A página está carregando...
A página está carregando...
A página está carregando...
A página está carregando...
A página está carregando...
A página está carregando...
A página está carregando...
A página está carregando...
A página está carregando...
A página está carregando...
A página está carregando...
A página está carregando...
A página está carregando...
A página está carregando...
A página está carregando...
A página está carregando...
A página está carregando...
A página está carregando...
A página está carregando...
A página está carregando...
A página está carregando...
A página está carregando...
A página está carregando...
A página está carregando...
A página está carregando...
A página está carregando...
A página está carregando...
A página está carregando...
A página está carregando...
A página está carregando...
A página está carregando...
A página está carregando...
A página está carregando...
A página está carregando...
A página está carregando...
A página está carregando...
A página está carregando...
A página está carregando...
A página está carregando...
A página está carregando...
A página está carregando...
A página está carregando...
A página está carregando...
A página está carregando...
A página está carregando...
A página está carregando...
A página está carregando...
A página está carregando...
A página está carregando...
A página está carregando...
A página está carregando...
A página está carregando...
A página está carregando...
A página está carregando...
A página está carregando...
A página está carregando...
A página está carregando...
A página está carregando...
A página está carregando...
A página está carregando...
A página está carregando...
A página está carregando...
A página está carregando...
A página está carregando...
A página está carregando...
A página está carregando...
A página está carregando...
A página está carregando...
A página está carregando...
A página está carregando...
A página está carregando...
A página está carregando...
A página está carregando...
A página está carregando...
A página está carregando...
A página está carregando...
A página está carregando...
A página está carregando...
A página está carregando...
A página está carregando...
A página está carregando...
A página está carregando...
A página está carregando...
A página está carregando...
A página está carregando...
A página está carregando...
A página está carregando...
A página está carregando...
A página está carregando...
A página está carregando...
A página está carregando...
A página está carregando...
A página está carregando...
A página está carregando...
A página está carregando...
A página está carregando...
A página está carregando...
A página está carregando...
A página está carregando...
A página está carregando...
A página está carregando...
A página está carregando...
A página está carregando...
A página está carregando...
A página está carregando...
A página está carregando...
A página está carregando...
A página está carregando...
A página está carregando...
A página está carregando...
A página está carregando...
A página está carregando...
A página está carregando...
A página está carregando...
A página está carregando...
A página está carregando...
A página está carregando...
A página está carregando...
A página está carregando...
A página está carregando...
A página está carregando...
A página está carregando...
A página está carregando...
A página está carregando...
A página está carregando...
A página está carregando...
A página está carregando...
A página está carregando...
A página está carregando...
A página está carregando...
A página está carregando...
A página está carregando...
A página está carregando...
A página está carregando...
A página está carregando...
A página está carregando...
A página está carregando...
A página está carregando...
A página está carregando...
A página está carregando...
A página está carregando...
A página está carregando...
A página está carregando...
A página está carregando...
A página está carregando...
A página está carregando...
A página está carregando...
A página está carregando...
A página está carregando...
A página está carregando...
A página está carregando...
A página está carregando...
A página está carregando...
A página está carregando...
A página está carregando...
A página está carregando...
A página está carregando...
A página está carregando...
A página está carregando...
A página está carregando...
A página está carregando...
A página está carregando...
A página está carregando...
A página está carregando...
A página está carregando...
A página está carregando...
A página está carregando...
A página está carregando...
A página está carregando...
A página está carregando...
A página está carregando...
A página está carregando...
A página está carregando...
A página está carregando...
A página está carregando...
A página está carregando...
A página está carregando...
A página está carregando...
A página está carregando...
A página está carregando...
A página está carregando...
A página está carregando...
A página está carregando...
A página está carregando...
A página está carregando...
A página está carregando...
A página está carregando...
A página está carregando...
A página está carregando...
A página está carregando...
A página está carregando...
A página está carregando...
A página está carregando...
A página está carregando...
A página está carregando...
A página está carregando...
A página está carregando...
A página está carregando...
A página está carregando...
A página está carregando...
A página está carregando...
A página está carregando...
A página está carregando...
A página está carregando...
A página está carregando...
A página está carregando...
A página está carregando...
A página está carregando...
A página está carregando...
A página está carregando...
A página está carregando...
A página está carregando...
A página está carregando...
A página está carregando...
A página está carregando...
A página está carregando...
A página está carregando...
A página está carregando...
A página está carregando...
A página está carregando...
A página está carregando...
A página está carregando...
A página está carregando...
A página está carregando...
A página está carregando...
A página está carregando...
A página está carregando...
A página está carregando...
A página está carregando...
A página está carregando...
A página está carregando...
A página está carregando...
A página está carregando...
A página está carregando...
A página está carregando...
A página está carregando...
A página está carregando...
A página está carregando...
A página está carregando...
A página está carregando...
A página está carregando...
A página está carregando...
A página está carregando...
A página está carregando...
A página está carregando...
A página está carregando...
A página está carregando...
A página está carregando...
A página está carregando...
A página está carregando...
A página está carregando...
A página está carregando...
A página está carregando...
A página está carregando...
A página está carregando...
A página está carregando...
A página está carregando...
A página está carregando...
A página está carregando...
A página está carregando...
A página está carregando...
A página está carregando...
A página está carregando...
A página está carregando...
A página está carregando...
A página está carregando...
A página está carregando...
A página está carregando...
A página está carregando...
A página está carregando...
A página está carregando...
A página está carregando...
A página está carregando...
A página está carregando...
A página está carregando...
A página está carregando...
A página está carregando...
A página está carregando...
A página está carregando...
A página está carregando...
A página está carregando...
A página está carregando...
A página está carregando...
A página está carregando...
A página está carregando...
A página está carregando...
A página está carregando...
A página está carregando...
A página está carregando...
A página está carregando...
A página está carregando...
A página está carregando...
A página está carregando...
A página está carregando...
A página está carregando...
A página está carregando...
A página está carregando...
A página está carregando...
A página está carregando...
A página está carregando...
A página está carregando...
A página está carregando...
A página está carregando...
A página está carregando...
A página está carregando...
A página está carregando...
A página está carregando...
A página está carregando...
A página está carregando...
A página está carregando...
-
 1
1
-
 2
2
-
 3
3
-
 4
4
-
 5
5
-
 6
6
-
 7
7
-
 8
8
-
 9
9
-
 10
10
-
 11
11
-
 12
12
-
 13
13
-
 14
14
-
 15
15
-
 16
16
-
 17
17
-
 18
18
-
 19
19
-
 20
20
-
 21
21
-
 22
22
-
 23
23
-
 24
24
-
 25
25
-
 26
26
-
 27
27
-
 28
28
-
 29
29
-
 30
30
-
 31
31
-
 32
32
-
 33
33
-
 34
34
-
 35
35
-
 36
36
-
 37
37
-
 38
38
-
 39
39
-
 40
40
-
 41
41
-
 42
42
-
 43
43
-
 44
44
-
 45
45
-
 46
46
-
 47
47
-
 48
48
-
 49
49
-
 50
50
-
 51
51
-
 52
52
-
 53
53
-
 54
54
-
 55
55
-
 56
56
-
 57
57
-
 58
58
-
 59
59
-
 60
60
-
 61
61
-
 62
62
-
 63
63
-
 64
64
-
 65
65
-
 66
66
-
 67
67
-
 68
68
-
 69
69
-
 70
70
-
 71
71
-
 72
72
-
 73
73
-
 74
74
-
 75
75
-
 76
76
-
 77
77
-
 78
78
-
 79
79
-
 80
80
-
 81
81
-
 82
82
-
 83
83
-
 84
84
-
 85
85
-
 86
86
-
 87
87
-
 88
88
-
 89
89
-
 90
90
-
 91
91
-
 92
92
-
 93
93
-
 94
94
-
 95
95
-
 96
96
-
 97
97
-
 98
98
-
 99
99
-
 100
100
-
 101
101
-
 102
102
-
 103
103
-
 104
104
-
 105
105
-
 106
106
-
 107
107
-
 108
108
-
 109
109
-
 110
110
-
 111
111
-
 112
112
-
 113
113
-
 114
114
-
 115
115
-
 116
116
-
 117
117
-
 118
118
-
 119
119
-
 120
120
-
 121
121
-
 122
122
-
 123
123
-
 124
124
-
 125
125
-
 126
126
-
 127
127
-
 128
128
-
 129
129
-
 130
130
-
 131
131
-
 132
132
-
 133
133
-
 134
134
-
 135
135
-
 136
136
-
 137
137
-
 138
138
-
 139
139
-
 140
140
-
 141
141
-
 142
142
-
 143
143
-
 144
144
-
 145
145
-
 146
146
-
 147
147
-
 148
148
-
 149
149
-
 150
150
-
 151
151
-
 152
152
-
 153
153
-
 154
154
-
 155
155
-
 156
156
-
 157
157
-
 158
158
-
 159
159
-
 160
160
-
 161
161
-
 162
162
-
 163
163
-
 164
164
-
 165
165
-
 166
166
-
 167
167
-
 168
168
-
 169
169
-
 170
170
-
 171
171
-
 172
172
-
 173
173
-
 174
174
-
 175
175
-
 176
176
-
 177
177
-
 178
178
-
 179
179
-
 180
180
-
 181
181
-
 182
182
-
 183
183
-
 184
184
-
 185
185
-
 186
186
-
 187
187
-
 188
188
-
 189
189
-
 190
190
-
 191
191
-
 192
192
-
 193
193
-
 194
194
-
 195
195
-
 196
196
-
 197
197
-
 198
198
-
 199
199
-
 200
200
-
 201
201
-
 202
202
-
 203
203
-
 204
204
-
 205
205
-
 206
206
-
 207
207
-
 208
208
-
 209
209
-
 210
210
-
 211
211
-
 212
212
-
 213
213
-
 214
214
-
 215
215
-
 216
216
-
 217
217
-
 218
218
-
 219
219
-
 220
220
-
 221
221
-
 222
222
-
 223
223
-
 224
224
-
 225
225
-
 226
226
-
 227
227
-
 228
228
-
 229
229
-
 230
230
-
 231
231
-
 232
232
-
 233
233
-
 234
234
-
 235
235
-
 236
236
-
 237
237
-
 238
238
-
 239
239
-
 240
240
-
 241
241
-
 242
242
-
 243
243
-
 244
244
-
 245
245
-
 246
246
-
 247
247
-
 248
248
-
 249
249
-
 250
250
-
 251
251
-
 252
252
-
 253
253
-
 254
254
-
 255
255
-
 256
256
-
 257
257
-
 258
258
-
 259
259
-
 260
260
-
 261
261
-
 262
262
-
 263
263
-
 264
264
-
 265
265
-
 266
266
-
 267
267
-
 268
268
-
 269
269
-
 270
270
-
 271
271
-
 272
272
-
 273
273
-
 274
274
-
 275
275
-
 276
276
-
 277
277
-
 278
278
-
 279
279
-
 280
280
-
 281
281
-
 282
282
-
 283
283
-
 284
284
-
 285
285
-
 286
286
-
 287
287
-
 288
288
-
 289
289
-
 290
290
-
 291
291
-
 292
292
-
 293
293
-
 294
294
-
 295
295
-
 296
296
-
 297
297
-
 298
298
-
 299
299
-
 300
300
-
 301
301
-
 302
302
-
 303
303
-
 304
304
-
 305
305
-
 306
306
-
 307
307
-
 308
308
-
 309
309
-
 310
310
-
 311
311
-
 312
312
-
 313
313
-
 314
314
-
 315
315
-
 316
316
-
 317
317
-
 318
318
-
 319
319
-
 320
320
-
 321
321
-
 322
322
-
 323
323
-
 324
324
-
 325
325
-
 326
326
-
 327
327
-
 328
328
-
 329
329
-
 330
330
-
 331
331
-
 332
332
-
 333
333
-
 334
334
-
 335
335
-
 336
336
-
 337
337
-
 338
338
-
 339
339
-
 340
340
-
 341
341
-
 342
342
-
 343
343
-
 344
344
-
 345
345
-
 346
346
-
 347
347
-
 348
348
-
 349
349
-
 350
350
-
 351
351
-
 352
352
-
 353
353
-
 354
354
-
 355
355
-
 356
356
-
 357
357
-
 358
358
-
 359
359
-
 360
360
-
 361
361
-
 362
362
-
 363
363
-
 364
364
-
 365
365
-
 366
366
-
 367
367
-
 368
368
-
 369
369
-
 370
370
-
 371
371
-
 372
372
-
 373
373
-
 374
374
-
 375
375
-
 376
376
-
 377
377
-
 378
378
-
 379
379
-
 380
380
-
 381
381
-
 382
382
-
 383
383
-
 384
384
-
 385
385
-
 386
386
-
 387
387
-
 388
388
-
 389
389
-
 390
390
-
 391
391
-
 392
392
-
 393
393
-
 394
394
-
 395
395
-
 396
396
-
 397
397
-
 398
398
-
 399
399
-
 400
400
-
 401
401
-
 402
402
-
 403
403
-
 404
404
-
 405
405
-
 406
406
-
 407
407
-
 408
408
-
 409
409
-
 410
410
-
 411
411
-
 412
412
-
 413
413
-
 414
414
-
 415
415
-
 416
416
-
 417
417
-
 418
418
-
 419
419
-
 420
420
-
 421
421
-
 422
422
-
 423
423
-
 424
424
-
 425
425
-
 426
426
-
 427
427
-
 428
428
-
 429
429
-
 430
430
-
 431
431
-
 432
432
-
 433
433
-
 434
434
-
 435
435
-
 436
436
-
 437
437
-
 438
438
-
 439
439
-
 440
440
-
 441
441
-
 442
442
-
 443
443
-
 444
444
-
 445
445
-
 446
446
-
 447
447
-
 448
448
-
 449
449
-
 450
450
-
 451
451
-
 452
452
-
 453
453
-
 454
454
-
 455
455
-
 456
456
-
 457
457
-
 458
458
-
 459
459
-
 460
460
-
 461
461
-
 462
462
-
 463
463
-
 464
464
-
 465
465
-
 466
466
-
 467
467
-
 468
468
-
 469
469
-
 470
470
-
 471
471
-
 472
472
-
 473
473
-
 474
474
-
 475
475
-
 476
476
-
 477
477
-
 478
478
-
 479
479
-
 480
480
-
 481
481
-
 482
482
-
 483
483
-
 484
484
-
 485
485
-
 486
486
-
 487
487
-
 488
488
-
 489
489
-
 490
490
-
 491
491
-
 492
492
-
 493
493
-
 494
494
-
 495
495
-
 496
496
-
 497
497
-
 498
498
-
 499
499
-
 500
500
-
 501
501
-
 502
502
-
 503
503
-
 504
504
-
 505
505
-
 506
506
-
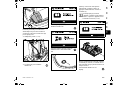 507
507
-
 508
508
-
 509
509
-
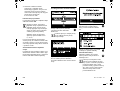 510
510
-
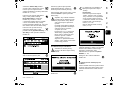 511
511
-
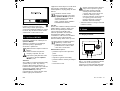 512
512
-
 513
513
-
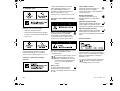 514
514
-
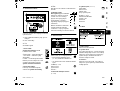 515
515
-
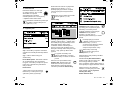 516
516
-
 517
517
-
 518
518
-
 519
519
-
 520
520
-
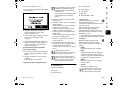 521
521
-
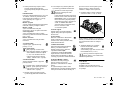 522
522
-
 523
523
-
 524
524
-
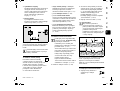 525
525
-
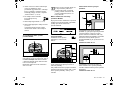 526
526
-
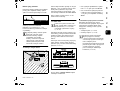 527
527
-
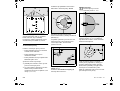 528
528
-
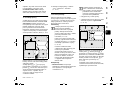 529
529
-
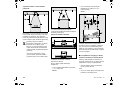 530
530
-
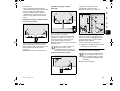 531
531
-
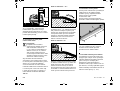 532
532
-
 533
533
-
 534
534
-
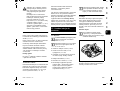 535
535
-
 536
536
-
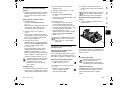 537
537
-
 538
538
-
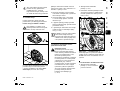 539
539
-
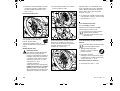 540
540
-
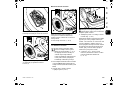 541
541
-
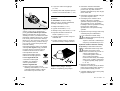 542
542
-
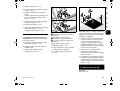 543
543
-
 544
544
-
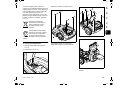 545
545
-
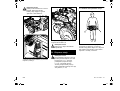 546
546
-
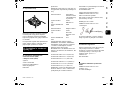 547
547
-
 548
548
-
 549
549
-
 550
550
-
 551
551
-
 552
552
-
 553
553
-
 554
554
-
 555
555
-
 556
556
-
 557
557
-
 558
558
-
 559
559
-
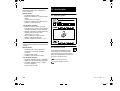 560
560
-
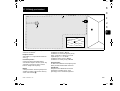 561
561
-
 562
562
-
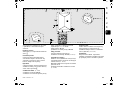 563
563
-
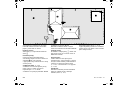 564
564
-
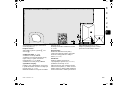 565
565
-
 566
566
-
 567
567
-
 568
568


STIHL RMI 522.0 C Manual do usuário
- Categoria
- Cortadores de grama
- Tipo
- Manual do usuário
em outras línguas
- español: STIHL RMI 522.0 C Manual de usuario
- English: STIHL RMI 522.0 C User manual
- slovenčina: STIHL RMI 522.0 C Používateľská príručka
- čeština: STIHL RMI 522.0 C Uživatelský manuál
Artigos relacionados
Outros documentos
-
 LX 35 Robot Lawn Mower Manual do proprietário
-
 JBM 52598 Guia de usuario
-
Makita DRC200Z Manual do usuário
-
-
Bosch Indego l Original Instructions Manual
-
Greenworks Optimow 10 Manual do proprietário
-
Landxcape LX792 Manual do proprietário
-
Husqvarna AUTOMOWER 440 Manual do usuário
-
McCulloch 967059805 Instruções de operação
-
Husqvarna Automower 550 EPOS Robotic Lawn Mower Guia de usuario

