Becken BTE2675 Emissor termico Manual do proprietário
- Tipo
- Manual do proprietário

AF Manual Instruções Emissores A5 EN.indd 1 30/08/16 10:34

Dear client,
Thank you for purchasing this product.
The quality of this appliance has been certied by several
laboratory tests. This instructions manual is provided to
simplify the use of the appliance as well as to guarantee a
safe use.
Please read carefully the instructions and safety measures
described in this manual.
We sincerely hope you will be satised when using your new
appliance.
AF Manual Instruções Emissores A5 EN.indd 2 30/08/16 10:34

3
EN
Ceramic Radiator | Emisor Térmico | Emissor Térmico
INDEX
1. SAFETY INSTRUCTIONS 4
1.1. Power Supply 5
1.2. Power Cord and Other Cables 5
1.3. Humidity and Water 5
1.4. Cleaning 6
1.5. General Precautions 6
2. OPERATING INSTRUCTIONS 10
2.1. Product Description 10
2.2 Using the Product 12
2.3. Maintenance 27
2.4. Troubleshooting 28
3. TECHNICAL SPECIFICATIONS 29
AF Manual Instruções Emissores A5 EN.indd 3 30/08/16 10:34

4
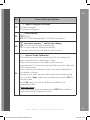
1. SAFETY INSTRUCTIONS
Important Warnings
Before using your appliance read this instructions manual carefully and
keep it in a safe place as you may need to consult it in the future.
Before turning on your appliance, and to ensure a safe and correct
operation, do not use if:
• It has fallen to the ground;
• You notice any evidence of damage;
• Any anomaly occurs during its operation.
To avoid hazards or deterioration of your appliance through incorrect
use it is advisable to read these instructions thoroughly.
Your appliance may not be used for other purposes than the ones
intended and solely for household use. Any damage resulting from
using the appliance outside this scope, any incorrect use, as well as
any manual modications to the product will not be covered and
automatically voids the warranty.
WARNING
RISK OF ELECTRIC SHOCK
DO NOT OPEN
Warning: to avoid the risk of electric shock, do not
remove the cover. The interior does not contain any parts
that can be repaired by the user. Ask for assistance from
qualied personnel.
AF Manual Instruções Emissores A5 EN.indd 4 30/08/16 10:34

5
EN
Ceramic Radiator | Emisor Térmico | Emissor Térmico
Assistance
In case of malfunction, take your appliance to a qualied technician for
assistance.
This appliance can be used by children from the age of 8 and by
people with reduced physical, sensorial or mental capabilities and/or
lack of experience and knowledge if they have been given instructions
on using the appliance safely and if they understand the hazards
involved. Children may not play with the appliance. Cleaning and
maintenance must not be carried out by children without supervision.
These instructions are also available at www.suporteworten.pt
1.1. Power Supply
Make sure the main voltage is compatible with the appliance’s. If this is
not the case please consult the Customer Support Service.
1.2. Power Cord and Other Cables
Do not tangle the cord or pull it to disconnect the appliance. Also, keep
the cord away from warm surfaces.
Never use the appliance if it has a damaged cable or socket.
Take it to the Technical Support Service for replacement.
1.3. Humidity and Water
Do not use your appliance in humid places. Do not allow the appliance
to become wet under any circumstances as this may be dangerous.
To avoid re hazard or electric shock do not expose your appliance
to humidity or water. Furthermore, do not place your appliance under
water (e.g. for cleaning).
AF Manual Instruções Emissores A5 EN.indd 5 30/08/16 10:34

6
1.4. Cleaning
Before cleaning, be sure to switch o the appliance and remove the
plug from the main power supply. Always allow the unit to cool down
before cleaning.
To clean the exterior of the product use a dry soft cloth only.
1.5. General Precautions
• Please follow the instructions in the user manual which help to
properly install and operate this product and enjoy its advanced
features. Please keep the instructions for future reference.
• Read all instructions before using the product.
• Maintenance and service operations are only to be carried out by
authorized professionals.
• Any damage caused by manual modications to the product is not
covered by the warranty.
• If this product is used for other purposes than the ones originally
intended, or if it is not correctly connected, the product may become
damaged and the warranty will be voided.
• The warranty will cease to be valid if the recommendations of this
manual are not followed.
• Before connecting the appliance, make sure the mains voltage is 230
Volts, and that it corresponds to what is marked on the nameplate of
the appliance.
• Check that the power is suicient to supply the appliances. The total
draw of the radiators’ currents must not exceed the capacity of the
circuit breaker that protects them.
AF Manual Instruções Emissores A5 EN.indd 6 30/08/16 10:34

7
EN
Ceramic Radiator | Emisor Térmico | Emissor Térmico
• This radiator cannot be used in rooms with presence of gases or
other ammable products (glues, etc...).
• WARNING: To prevent overheating,
do not cover the device. Do not use
the device to dry clothes.
• Make sure the power cable or other objects do not come into
contact with the radiator surface while in operation.
• If the power cable becomes damaged it must be replaced by the
manufacturer or a suitably qualied trades person. Failure to comply
may danger your safety and voids your warranty.
• Check the device and the supply cord regularly. Do not turn the
device on if it is damaged.
• PRECAUTION: Some parts of this product can reach very high
temperatures and cause burns. Pay special attention when children
or vulnerable people are around.
• Do not place the device straight under a power socket.
• Children under the age of three should not be allowed to touch or
play with the radiator and should be supervised at all times.
• This device can be used by children under 8 years of age, as well as
by people with reduced physical, sensory or mental capabilities when
suitably supervised and only when they have been provided the
instructions regarding the use of the device and have understood
the risks that could derive from it. Cleaning must only be carried out
by an appropriate adult.
• Children between 3 and 8 years of age should not turn the device
on or o, unless it is installed or placed in a normal position and that
children are under proper supervision or have received instructions
AF Manual Instruções Emissores A5 EN.indd 7 30/08/16 10:34

8
regarding the safe use of the device and they have perfectly
understood the potential dangers. Children between 3 and 8 years of
age should not connect, adjust or clean the appliance or perform any
maintenance measure.
• WARNING: Do not use this heater near baths, showers or swimming
pools. It should not be possible to access the device’s controls from
the bath, shower or any other surface that is in contact with water.
(Its use in zones 0 or 1 in bathrooms is totally prohibited: seek advice
from a qualied electrician).
• For greater safety, this appliance is provided with a device that
interrupts its operation in case of overheating.
• This radiator has been designed exclusively to be xed to the wall.
For further information on the xing systems, consult the section
“WALL MOUNT INSTALLATION” of this manual.
• Do not use accessories that have not been recommended by the
manufacturer, as they could entail a potential risk to the user, and
damage the device. Use original accessories only.
• Keep all the packaging elements (plastic bags, cardboard and
polyethylene) out of the reach of children, as they can cause
potentially dangerous situations.
• Use this device only for domestic / light commercial use and the
tasks for which it has been designed. This device has not been
designed for industrial use. It must not be used outdoors, in
greenhouses or for animal husbandry. Keep it away from heat,
direct sunlight, humidity and cutting tools. Do not under any
circumstances immerse in water or use this device with wet hands. In
the case of humidity or water in the device, immediately disconnect
the power supply and do not touch the wet parts.
AF Manual Instruções Emissores A5 EN.indd 8 30/08/16 10:34

9
EN
Ceramic Radiator | Emisor Térmico | Emissor Térmico
• Do not attempt to service the device yourself. Contact a qualied
technician.
• To disconnect the transmitter from the mains pull the plug, never
the supply cord.
• Respect the “SPECIFIC SAFETY INSTRUCTIONS FOR THIS
APPLIANCE” listed below
• The appliance must remain in a vertical position.
• Make sure the appliance is secured at all times. Please adhere to the
installation distances indicated in this guide.
• Do not hang any object in front or on top of the device.
• Always ensure that the inlet and outlet areas are not obstructed.
• Always install the device so that it cannot enter into contact with any
combustible material such as curtains or towels (take into account
the gusts of wind).
• To clean the device, consult the instructions in the “MAINTENANCE”
section, because if water enters the air grilles it could seriously
damage the device.
• Do not insert any object through the grille or inside the device.
• This radiator is designed to be connected by plug to the electric
installation and xed to the wall. Follow the instructions in
“INSTALLATION”.
• The warranty will not apply if these instructions have not been
observed.
AF Manual Instruções Emissores A5 EN.indd 9 30/08/16 10:34

10
2. OPERATING INSTRUCTIONS
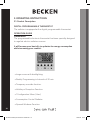
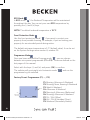
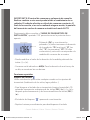
2.1. Product Description
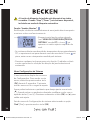
The radiator is equipped with a digital, programmable thermostat.
OPERATION GUIDE
Presentation
The programmable electronic thermostat has been specially designed
to regulate electric radiators screens.
It will become your best ally to optimise its energy consumption
while increasing your comfort.
• Large screen with backlighting.
• Weekly Programming in Intervals of 30 min.
• Temporary override function.
• Holiday or Reception Function.
• 1 Conguration Menu (User).
• Consumption Control Radiator.
• Opened Windows Function.
AF Manual Instruções Emissores A5 EN.indd 10 30/08/16 10:34

11
EN
Ceramic Radiator | Emisor Térmico | Emissor Térmico
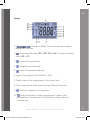
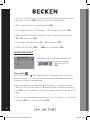
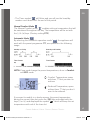
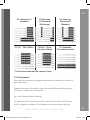
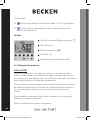
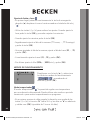
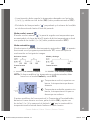
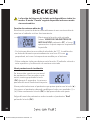
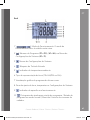
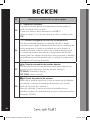
Screen
1. “ ” Operation Mode. The active operation mode is
displayed in the box.
2. “ ” Programme Number (P1 to P9), (U1 to U4) or System Settings
Menu (01 to 11).
3. “ ” System Settings Menus.
4. “ ” Keypad Lock Activated.
5. “ ” Room Temperature Indicator.
6. Type of time display (12h AM/PM or 24h).
7. Graphic view of the programme of the current day.
8. Time, temperature and System Settings Menu setting area.
9. “ ” Indicator of appliance in operation.
10. “ ” Help pictogram to create programmes / Status of the
programme in normal mode / Control Menu of the radiator’s
consumption.
AF Manual Instruções Emissores A5 EN.indd 11 30/08/16 10:34

12
11. Current day.
12. “ ” Temporary cancellation function activated, or “ITCS” if ashing.
13. “ ” Window Opened Function (see section 5, System Settings
Menu 07).
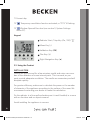
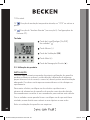
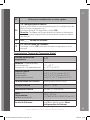
Keypad
Radiator Start / Stop Key (On / O) “ “
Minus Key (-)
Validation Key (OK)
Plus Key (+)
Right Navigation Key ( u)
2.2. Using the Product
INSTALLATION
During the rst use and for a few minutes, smells and noise can occur
due to the dilatation of some internal parts. This is normal, so you
must provide adequate ventilation. The smells are momentary and will
dissipate quickly.
For greater eiciency, make sure to calculate the power or the number
of elements of the appliance according to the surface of the room. We
recommend contacting your dealer to make this calculation.
Fix the radiator to a rm wall and make sure it is well-levelled, in a room
with no furniture and no objects around.
Avoid installing the appliance in corners.
AF Manual Instruções Emissores A5 EN.indd 12 30/08/16 10:34

13
EN
Ceramic Radiator | Emisor Térmico | Emissor Térmico
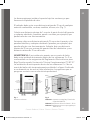
We advise against installing the appliance under the windows, because
it favours the loss of heat.
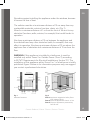
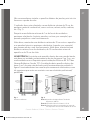
The radiator must be at a minimum distance of 15 cm away from any
combustible materials, curtains, furniture, chairs, etc. (Fig. 1).
Allow for a minimum distance of 1 m from the front of the unit to any
obstacles (furniture, walls, curtains, for example) that could hinder its
operation.
Also keep a minimum distance of 15 cm between the appliance and
the side walls and any other obstacles (walls, for example) that may
aect its operation. Also keep a minimum distance of 35 cm above the
appliance free of obstacles and a minimum distance of 15 cm from the
oor.
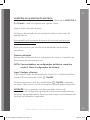
WARNING: If this appliance is installed in a bathroom, it must be
installed only within Zones 2 or Outside Zones (Zone 3), according
to BS 7671 Requirements for Electrical Installations, Section 701. The
installation of this appliance within Zones 0 or 1 of a bathroom is totally
prohibited. Figure 2 below is for information purposes only; we suggest
you contact a professional electrician.
Fig. 1
Minimum Distances
Fig. 2
Zone 1: Appliances supplied to Safety Extra
Low Voltage (SELV).
Zone 2: Electrical Appliances Class II - IP X4
Zone 3: Electrical Appliances protected by
RCD 30 mA
Self possible
Floor
Min 35 cm
Min 15 cm
Wall or
object
nearest
Wall or
object
nearest
Min 15 cm Min 15 cm
Zone 3
Zone 2
60 cm
3 m
60 cm
60 cm
Zone 1
AF Manual Instruções Emissores A5 EN.indd 13 30/08/16 10:34

14
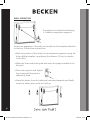
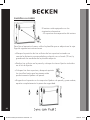
Secure the appliance to the wall, you should use the template attached
to the box. Follow these instructions:
• Mark the position of the holes for the suspension supports using the
holes drilling template, considering the distance (15 cm) in relation
to the oor.
• Make the holes and locking tab and insert the plugs included in the
xing kit.
• Place the supports and tighten
the screws until the piece is
suiciently xed.
• Hang the device from the safely wall-mounted supports and nally
screw the safety piece as far as it will go.
The appliance includes the following:
• 2 radiator suspension supports.
AF Manual Instruções Emissores A5 EN.indd 14 30/08/16 10:34

15
EN
Ceramic Radiator | Emisor Térmico | Emissor Térmico
ELECTRIC SUPPLY CONNECTION
This appliance is equipped with a supply cord
and a bipolar plug without earthing contact.
Connect the plug to the base outlet.
Check the condition of your electrical installation and connection
cables.
This appliance doesn’t require an earth connection, since it has double
electrical insulation.
Contact a licensed electrician for assistance.
First Use
This section will guide you when putting the device into operation for
the rst time.
NOTE: To restore the factory settings, consult section 5 “System
Energy Supply
Your radiator can be Activated/Start (On mode) and Deactivated/Stop
(O mode) by pressing ().
Press the On/O key once: The appliance will emit two short beeps
and the screen will turn o for a few seconds.
ATTENTION: In case the device is disconnected from the power
source, the saved settings will be memorised for approximately one
hour. After that time, we recommend checking the settings installed.
Setting the Time and Date
- First of all, move the cursor by pressing the right navigation key (u)
until the symbol with a watch “ ” is selected.
AF Manual Instruções Emissores A5 EN.indd 15 30/08/16 10:34

16
- Use the (-) and (+) keys to adjust the hours. When the correct time
has been set press (OK) and proceed to set the minutes.
- When you have set the minutes press (OK).
- Then adjust the Day (“1” Monday, … , “7” Sunday) and press (OK).
- When the Day of the Week has been set, set the Day of the Month
(01 to 31) and press (OK).
- Then adjust the day Month (01, … ,12) and press (OK).
- Finally, set the Year (2016, … , 2020, etc.) and press (OK).
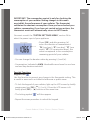
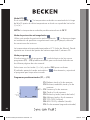
Press u to move along the display and
select the dierent operation modes
“ ”, selecting the one
required and press (OK).
The Timer mode “ ” will allow setting a temperature for a specic
amount of time. You can use this mode during a holiday period or to
temporarily cancel a programme.
- First, you must set the duration with the keys (-) and (+), the time
“H” up to 24 h. and the days in “d” onwards and conrm by pressing
the (OK) key. The duration can be set anywhere from 1 hour up to 44
days.
- Then, set the temperature required with keys (-) and (+), and conrm
with the (OK) key (Factory setting 21ºC).
AF Manual Instruções Emissores A5 EN.indd 16 30/08/16 10:34

17
EN
Ceramic Radiator | Emisor Térmico | Emissor Térmico
- The Timer symbol “ ” will icker and you will see the hour/day
number count down until the end of the period.
The Manual Comfort mode “ ” enables setting a temperature that will
be maintained throughout the day. The temperature will be set with
the (-) & (+) keys. (Factory setting 21ºC)
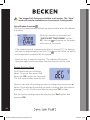
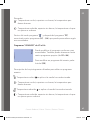
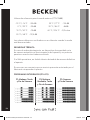
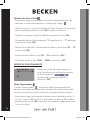
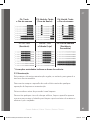
By selecting the Automatic operation mode “ ”, the appliance will
work with the preset programme “P1”, as explained in the following
image.
Time Frames Time Frames
Saturday and Sunday
NOTE: If you need change the preset temperatures, do so in Comfort
and ECO mode.
If you want to modify, in a timely manner, the preset temperature
during the current time slot, press the (OK) key and adjust with the
keys (-) or (+) and displayed the symbol “ ” which will keep the set
temperature until end of the time slot.
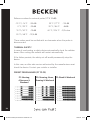
= Comfort Temperature, space
with bars, Tª that you want to
achieve.
= Reduced Temperature, space
without bars, Tª that you don’t
want to be reduced.
Day
Programme
of the day
Time
AF Manual Instruções Emissores A5 EN.indd 17 30/08/16 10:34

18
In ECO mode “ ”, the Reduced Temperature will be maintained
throughout the day. You can set your own ECO temperature by
pressing the (-) and (+) keys.
NOTE: The default reduced temperature is 18 °C.
Use this frost protection mode “ ”, if you want to protect your
property from possible freezing, for example, if you are leaving your
property for an extended period during winter.
The default minimum temperature is 5 °C (default value). It can be set
on the System Settings menu section 5, number 05.
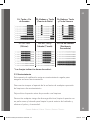
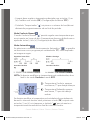
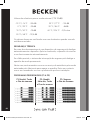
Once you have selected the Program mode “ ”, you can choose
between nine preset programmes (P1 to P9). These are dened on the
last pages of this manual.
Select with the keys (-) and (+) and press (OK) to conrm.
The radiator will go straight into Automatic mode “ ” and run the
programme by you selected.
Factory Preset Programmes (P1, … , P9)
P1: Morning, Afternoon & Weekend
P2: Morning, Noon, Evening & Weekend
P3: Week & Weekend
P4: Afternoon & Weekend
P5: Morning & Afternoon (Bathroom)
P6: Morning, Afternoon & Weekend
P7: 7H - 19H (Oice)
P8: 8H - 19H & Saturday (Shop)
P9: Weekend (Secondary House)
Day
Programme
of the day
Program
No.
AF Manual Instruções Emissores A5 EN.indd 18 30/08/16 10:34

19
EN
Ceramic Radiator | Emisor Térmico | Emissor Térmico
Remember:
= Comfort Temperature, space with bars, Tª that you want to
achieve.
= Reduced Temperature, space without bars, Tª that you don’t want
to be reduced.
In Programme mode “ ”, after the “P9”, programme, there are
four programmes (U1 to U4). These are programmes that you can
personalise according to your needs.
You can modify the programme according to
your needs. You can also store up to 4 of your
own programmes (U1 to U4).
To modify a user programme, press the (OK)
key.
The following symbols will be shown when making your own
programme:
Comfort Temperature applied to the selected half-hour.
= Comfort Temperature, space with bars, Tª that you want to
achieve.
Reduced Temperature applied to the selected half-hour.
= Reduced Temperature, space without bars, Tª that you don’t want
to be reduced.
AF Manual Instruções Emissores A5 EN.indd 19 30/08/16 10:34

20
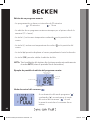
How to edit a user programme:
- The programming is carried out in 30 minute slots.
= 30 minutes = 1 hour
- The programme editing always starts on the rst day of the week
(01 = Monday).
- The (-) key activates a reduced temperature in the selected time
slot.
- The (+) key activates a comfort temperature in the selected time
slot.
- The (u) key advances the selected time slot.
- The (OK) key conrms the programme you have entered for that day.
NOTE: After conrming the seventh day, the system automatically
returns to AUTO mode (see section Automatic Mode).
Day select
Order for the
interval selected
Interval time selected
Program
number
Follow thePogramme Mode “ ” and after
press (u), nd the Consumption Control
Mode “ ” which enables you to check
and control the consumption of your
radiator.
AF Manual Instruções Emissores A5 EN.indd 20 30/08/16 10:34
A página está carregando...
A página está carregando...
A página está carregando...
A página está carregando...
A página está carregando...
A página está carregando...
A página está carregando...
A página está carregando...
A página está carregando...
A página está carregando...
A página está carregando...
A página está carregando...
A página está carregando...
A página está carregando...
A página está carregando...
A página está carregando...
A página está carregando...
A página está carregando...
A página está carregando...
A página está carregando...
A página está carregando...
A página está carregando...
A página está carregando...
A página está carregando...
A página está carregando...
A página está carregando...
A página está carregando...
A página está carregando...
A página está carregando...
A página está carregando...
A página está carregando...
A página está carregando...
A página está carregando...
A página está carregando...
A página está carregando...
A página está carregando...
A página está carregando...
A página está carregando...
A página está carregando...
A página está carregando...
A página está carregando...
A página está carregando...
A página está carregando...
A página está carregando...
A página está carregando...
A página está carregando...
A página está carregando...
A página está carregando...
A página está carregando...
A página está carregando...
A página está carregando...
A página está carregando...
A página está carregando...
A página está carregando...
A página está carregando...
A página está carregando...
A página está carregando...
A página está carregando...
A página está carregando...
A página está carregando...
A página está carregando...
A página está carregando...
A página está carregando...
A página está carregando...
A página está carregando...
A página está carregando...
A página está carregando...
A página está carregando...
-
 1
1
-
 2
2
-
 3
3
-
 4
4
-
 5
5
-
 6
6
-
 7
7
-
 8
8
-
 9
9
-
 10
10
-
 11
11
-
 12
12
-
 13
13
-
 14
14
-
 15
15
-
 16
16
-
 17
17
-
 18
18
-
 19
19
-
 20
20
-
 21
21
-
 22
22
-
 23
23
-
 24
24
-
 25
25
-
 26
26
-
 27
27
-
 28
28
-
 29
29
-
 30
30
-
 31
31
-
 32
32
-
 33
33
-
 34
34
-
 35
35
-
 36
36
-
 37
37
-
 38
38
-
 39
39
-
 40
40
-
 41
41
-
 42
42
-
 43
43
-
 44
44
-
 45
45
-
 46
46
-
 47
47
-
 48
48
-
 49
49
-
 50
50
-
 51
51
-
 52
52
-
 53
53
-
 54
54
-
 55
55
-
 56
56
-
 57
57
-
 58
58
-
 59
59
-
 60
60
-
 61
61
-
 62
62
-
 63
63
-
 64
64
-
 65
65
-
 66
66
-
 67
67
-
 68
68
-
 69
69
-
 70
70
-
 71
71
-
 72
72
-
 73
73
-
 74
74
-
 75
75
-
 76
76
-
 77
77
-
 78
78
-
 79
79
-
 80
80
-
 81
81
-
 82
82
-
 83
83
-
 84
84
-
 85
85
-
 86
86
-
 87
87
-
 88
88


Becken BTE2675 Emissor termico Manual do proprietário
- Tipo
- Manual do proprietário
em outras línguas
Artigos relacionados
-
Becken Emissor termico BTE3512 Manual do proprietário
-
-
-
-
-
-