A página está carregando...

TWA-1
2CSM204365R1341
TWA-2
2CSM204375R1341
System pro M
ELECTRONIC ASTRONOMICAL CLOCK
+ PROGRAMMING KEY
OROLOGIO ASTRONOMICO ELETTRONICO
+ CHIAVE DI PROGRAMMAZIONE
HORLOGE ASTRONOMIQUE ÉLECTRONIQUE
+ CLÉ DE PROGRAMMATION
ELEKTRONISCHE ASTRO-WOCHENZEITSCHALTUHR
+ PROGRAMMIERSCHLÜSSEL
PROGRAMADOR ASTRONÓMICO ELECTRÓNICO
+ LLAVE DE PROGRAMACIÓN
PROGRAMADOR ASTRONÓMICO ELECTRÓNICO
+ CHAVE DE PROGRAMAÇÃO
Электронный
астрономический
таймер
+ ключ программирования
RU
P
E
D
F
GB
I
-1-
-
12-
-23-
-34-
-46-
-57-
-68-


1
Product description
Astronomical clocks TWA-1 and TWA-2 are electronic weekly programming
clocks designed to control various loads automatically according to sunrise
and sunset times.
Examples of applications: street lighting, neon signs, store windows,
monuments, frontages…
- Astronomical clock TWA-1, 1-channel operates in astronomical mode:
It is pre-programmed according to times of sunrise and sunset, but this
mode allows the user adding On and Off program steps to customize the
program.
The following programming orders are available in the expert mode: On / Off /
On (= astronomical On ) and Off (= astronomical Off).
- Astronomical clock TWA-2, 2-channel makes it possible to associate the
desired operating mode to each channel: expert mode or astronomical mode.
Programming of longitude and latitude parameters (using the provided chart)
based on geographical location of your project allows automatic commutation
of controlled circuit according to sunrise and sunset times.
A key is provided to save user programming.
Technical specifications
Product delivered with current time and date set.
Automatic change of winter/summer time .
Programming key
- for permanent waivers,
- or program copy or save.
Programming for day or group of days.
56 program steps On, Off ,On , or Off .
Astronomic mode 1 or 2 channel.
Permanent overrides On or Off ( permanent light on).
Temporary overrides On or Off, On 15, On 30, On 60, ( flashing).
Display bar graph of daily profile for both channels.
Keyboard locking possible .
Programmable with power off
GB

2
Electrical characteristics
Supply voltage: 230 V AC ± 15%
Frequency: 50/60 Hz
Power consumption: max. 6 VA to 50 Hz
Output TWA-1: 1 changeover volt free contact.
Output TWA-2: 2 changeover volt free contacts.
Maximum load: AC1 µ16A 250 V~
Cos = 0,6 µ10A 250 V~
Minimum current: AC1 100 mA 250 V~
Galvanic insulation between power supply and output: < 4 kV
Functional characteristics
Programming capacity: 56 steps to be distributed on the 2 channels.
Minimum time between 2 steps: 1 minute
Running accuracy: ± 1,5 Sec / 24 h
Astronomical time accuracy: ±10 minutes
Operating reserve: lithium battery provides 5 years of backup.
The product is set in standby mode (display is off) if power goes off.
It is set back in auto mode when power is back on. With power off, the screen
display is turned on when striking any key. After one minute, it is turned off.
Protection degree: IP 20
The products need to be protected according to the standards NFC 15 100
and/or IEC60 364-1
Operating temperature: -10 °C to +55 °C
Storage temperature: -20 °C to +60 °C
230 V
2300 W 2300 W 500 W
compensated //
(max. 45 µF)
400 W
non compensated,
compensated
in series
1000 W
Lighting
loads

3
1
—>
6 mm
2
1,5
—>
10 mm
2
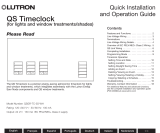
Cable connection
Connection diagram
L / +
N / -
1357
246
8
TWA-1
1 channel
L
N
1357
246
8
TWA-2
2 channels
Program reset:
the program may be completely cleared by simultaneously pressing the
3 following keys: menu, enter,.
The time and the date will be kept.
Total reset:
pressing simultaneously the -, +, enter, menu, keys lets you clear the entire
contents of the product.
Following a total reset it is necessary to reset the time and day of the device.

4
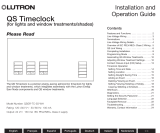
Keys:
➀
menu : selection of operating mode.
auto : mode of running according to the program selected.
prog : new for programming mode.
prog : modif to modify an existing program.
: checking of the program.
: modification of time, date and selection of
the winter/summer timechange mode
astro : astronomical mode.
: indicates that the channel is in astronomical mode.
➁
+ and - : navigation or setting of values.
- (TWA-1)
C1 , C2 (TWA-2) : in auto mode, selection of overrides,
or waivers.
➂
enter : to validate flashing information on display.
➃
: to return to the previous step.
enter
menu
+
C2
C1
enter
menu
+
3
1
4
2
DT-VK
TWA-2TWA-1
You may return
into auto mode
at any moment
using menu.
If no action is
taken for 1 min.,
the switch
returns into auto
mode.

5
Setting time and day
Winter/summer time change
Select the mode with menu then enter.
Modify the day, month, year, the hour and the minutes using + or - and enter.
The time switch next suggests the winter / summer time changes .
Select the type of change desired using + or -.
Validate with enter.
The type of change depends on the geographical zone.
Types available: (
*
= type according defect)
The change always takes place between 2:00 and 3:00 a.m.
Note:
For United Kingdom, use the geographical area Euro.
When the USER type is selected:
1. Enter the day then the month of the date of change of the summer time
(+1h) with + or - and enter.
2. Enter the day then the month of the date of change of the winter time
(–1h) with + or - and enter
The time switch will check which days of which weeks correspond to these
dates and will apply changes to the same periods for the following years
independently of the date.
Type Start of time Start of time Zone of
change Summer change Winter application
Euro Last Sunday Last Sunday European
of March of October Union
USA Second Sunday First Sunday North America
of March of November
AUS Last Sunday Last Sunday Australia
of October of March
USER Date freely Date freely
programmed programmed
No No No
change change
*

6
Configuration of astronomical mode
It is imperative to do the following settings when installing the clock
according to the geographical location of your project.
You may use the chart provided with the product to help you define precisely
your geographical location.
These data will allow the clock to calculate automatically sunrise/sunset
times.
1. In order to set longitude and latitude,
select the astro mode using the menu
then validate by enter.
2. Set longitude “Lo” using keys + and -.
The setting values range from 180°E (East)
to 180°W (West).
Validate by enter.
3. Set latitude “LAt” using keys + and -.
The setting values range from 90°N (North)
to 90°S (South).
Validate by enter.
4. Set the time zone “Udt” using keys + and - :
-12.00 to +12.00 compared to the Greenwich
meridian line. UDT (= universal day time).
Validate by enter.
The 2 following steps will allow you to perform a
permanent time correction in order to more precisely
set sunrise/sunset times of your project location.
The range of possible correction is –120 to +120 minutes.
5. Set the time correction of sunset time “RI”
using + and - keys, then validate by enter.

7
Programming
Programming may be done for each day or for a group of days.
In this case instructions are common to several days.
Days: 1 = Monday, 2 = Tuesday, 3 = Wednesday... 7 = Sunday.
1. Select the prog mode using menu, then enter.
2. Select the channel (C1 or C2) using + or -, then press enter.
(Only applicable to 2-channel clock: TWA-2).
The number of remaining program steps appears for a short time.
3. new flashes, press enter to validate this new program steps.
4. Choose the day(s) using + or -. Validate with enter.
5. ok flashes. Use enter to validate the group of days.
- or makes it possible to reset the group of days if necessary.
6. Using + or -, select instruction state:
On or Off if your are in automatic astronomical mode.
On, Off, On or Off if your are in expert mode.
6. Set the time correction of sunset time “Set”
using + and -, then validate by enter.
7. Activate the astro mode by selecting On
using + and - then enter to have the product
switch on the control circuit automatically
according to the astronomical parameters.
8. For 2-way clock, select channel C1 or C2
using + or - and validate with enter.
The symbol on main display will indicate
if the channel is in astro mode.

8
7. Enter the time of switch-on using + or -. Validate with enter.
8. Enter minutes with + or -. Validate with enter.
Program the other instructions of the group of days by repeating operations
3 to 8.
The day or the group of days may be modified at the during step 3 by
pressing the + , - or .
At the end of programming return to auto mode using the menu button.
To set the program of the other channel, return to prog mode and proceed
according to steps 2 to 8.
In this mode it is also possible to add an instruction to the program set up.
Proceed as described above.
Limit of operation in astronomical mode
In this mode the clock is pre-programmed according to sunrise and sunset
hours.
On and Off interrupt steps can be added to customize the program.
The programming is disabled between Astro Off and Astro On.
Programming
disabled
0 h
24 h
Astro
On
Astro
Off

9
Display:
To check the daily profile set up without the risk of modification or
deletion:
Select the mode using menu and press enter.
Select the channel (C1 or C2) using + or - and press enter.
The first step of Monday is displayed as well as the daily profile.
Two options available for display:
1. Pressing repeatedly + or -: lets you shift days.
In this case only the first daily step is displayed as well as the daily
profile.
2. Pressing enter: all steps of each day appear one after the other.
Modification or clearing of a program step: prog modif
Select the prog mode with menu and press enter.
DT2-IK: Select the channel (C1 or C2) using + or - and press enter.
Select the modif mode with + or -.
Validate with enter.
The number of remaining program steps appears for a short time.
The first step of the first day or group of days appears.
Repeatedly pressing the enter key displays all programmed steps one at a
time.
Any flashing field (state, hour, minutes) may be modified using + or - ,
then validated with enter.
When the cursor is positioned on ok located behind the group of days, you
may display successively the days or the groups of days and switch directly
to the one that has to be modified using + or -.
To remove a program step:
select the state of the channel (On, Off, On or Off ), press
simultaneously + and -.
Clear.appears on the screen.
Validate with enter.
Key
As soon as the key appears on the switch appear on the screen.
Two types of operation:

10
A. Permanent override:
Insert the key into the switch.
After 10 seconds the program contained in the key will be executed without
clearing the program contained in the time switch.
As soon as the key is removed the program of the time switch is again valid.
B. Copy (load) / Save (save):
The key makes it possible to save a program contained in the time switch.
It is also possible to copy the contents (program + settings Astro) of the key
into the clock.
1. Insert the key and wait for 2 sec.
2. Using menu, select the mode:
save : to save a program contained in the time switch,
load : to load the program of the key into the time switch,
: to check the program contained in the key.
3. Validate the selection with enter.
4. For save and load reconfirm with enter.
The following error messages may appear on the screen:
no prog : the key is empty, it does not contain any program.
Error : incompatible key type.
In these two cases:
Only the save mode is possible.
The error message remains on display as long as the key is present, but
in this case the program of the time switch is executed.
Override - waivers
TWA-1 : by pressing repeatedly on - for channel C1
TWA-2 : by pressing repeatedly on - for channel C1 and on + for
channel C2.
If the state of the output is On:
1
st
pressure: temporary waiver. Off and flash. The next program step
will let you return to the automatic mode.
2
nd
pressure: permanent override. On and are permanent.
This overridemust be cancelled manually.
3
rd
pressure: temporary override 15 minutes. On, and 15 are permanent.
The return to automatic mode will take place after 15 min.

11
4
th
pressure: temporary override 30 minutes. On, and 30 are permanent.
The return to automatic mode will take place after 30 min.
5
th
pressure: temporary override 60 minutes. On, and 60 are permanent.
The return to automatic mode will take place after 60 min.
6
th
pressure: permanent override. Off, and are permanent. This override
must be cancelled manually.
7
th
pressure: return to the automatic mode.
Locking
To prevent all undesirable actions, the keyboard of the time switch may be
locked using a key DT-LK.
Unlocking is done in the same way.
Full product reset remains feasible when the keyboard is locked.
Dimensions
1
23 4
5
67
8
85
35,8
60
52
43,8
45

12
Presentazione del prodotto
Gli orologi astronomici TWA- 1 e TWA- 2 sono orologi di programmazione
elettronica settimanale che consentono di comandare automaticamente
diversi carichi in base all’ora in cui sorge o tramonta il sole.
Gli esempi di applicazione includono l’illuminazione pubblica, le insegne
luminose, le vetrine di negozi, monumenti, facciate…
- L’orologio astronomico TWA- 1 a 1 canale funziona in modalità
astronomica o base: in modalità astronomica, viene preprogrammato in
base all’ora in cui sorge o tramonta il sole; in modalità expert le sequenze
di programmazione possibili sono On / Off / On (= On astronomica) e
Off (= Off astronomica).
- L’orologio astronomico TWA- 2 a 2 canali permette di associare a ciascun
canale la modalità di funzionamento desiderata: la modalità astronomica o
la modalità expert.
La programmazione dei parametri di longitudine e di latitudine (che potete
effettuare utilizzando le istruzioni fornite assieme al prodotto) in base all’area
geografica del vostro progetto di applicazione permette la commutazione
automatica del circuito comandato a seconda dell’ora in cui sorge o
tramonta il sole.
Utilizzando la chiave in dotazione è anche possibile salvare la programma-
zione effettuata.
Caratteristiche tecniche
Prodotto consegnato con impostazione dell’ora e del giorno correnti.
Cambiamento automatico orario estivo/invernale .
Chiave di programmazione
- per le deroghe permanenti,
- per la copia o la salvaguardia del programma.
Programmazione per giorno o per gruppi di giorni.
56 passi di programma, On/Off On, Off ,On , o Off .
Modalità astronomica a 1 o 2 canali.
Impostazioni personali permanenti On e Off ( fisso).
Deroghe temporanee On o Off, On 15, On 30, On 60, ( lampeggiante).
Barra di visualizzazione del programma giornaliero per i due canali.
Possibilità di bloccare la tastiera .
Programmabile senza alimentazione.
I

13
Caratteristiche elettriche
Tensione d'alimentazione: 230 V AC ± 15%
Frequenza: 50/60 Hz
Consumo: max. 6 VA a 50 Hz
Uscita TWA-1: 1 contatto in deviazione libero da potenziale
Uscita TWA-2: 2 contatti in deviazione libero da potenziale
Portata del contatto max.: AC1 µ16A 250 V~
Cos = 0,6 µ10A 250 V~
Portata del contatto minima:AC1 100 mA 250 V~
Isolamento galvanico tra alimentazione ed uscita: < 4 kV
Caratteristiche funzionali
Capacità di programmazione: 56 passi da suddividere sui due canali.
Tempo minimo tra due passi: 1 minuto
Precisione di funzionamento: ± 1,5 Sec / 24 ore
Precisione orario astronomico: ±10 minuti
Riserva di carica: pila al litio con riserva di 5 anni senza alimentazione.
Il prodotto passa in standby (display spento) in caso d'assenza di tensione,
ritorna in modo auto un secondo dopo il ritorno della tensione.
Fuori tensione, la visualizzazione si attiva premendo un tasto.
Passa in standby un minuto dopo l’ultima pressione.
Grado di protezione: IP 20
I prodotti devono essere protetti conformemente alle norme NFC 15 100 e/o
IEC 60 364-1
T
a
di funzionamento: -10 °C a +55 °C
T
a
di stoccaggio: -20 °C a +60 °C
230 V
2300 W 2300 W 500 W
rifasati //
(max. 45 µF)
400 W
non rifasati,
rifasati in serie
1000 W
Tipo
di carica

1414
1
—>
6 mm
2
1,5
—>
10 mm
2
Collegamento tramite morsetti a gabbia
Collegamento
L / +
N / -
1357
246
8
TWA-1
1 canale
L
N
1357
246
8
TWA-2
2 canali
Resettaggio del programma:
il programma può essere totalmente cancellato premendo simultaneamente i
tre tasti seguenti: menu, enter,.
L'ora e la data verranno mantenute.
Resettaggio totale:
premendo simultaneamente i tasti -, +, enter, menu, vengono annullati tutti i
programmi memorizzati dell’orologio.
Dopo un resettaggio totale, è necessario reimpostare l’ora e la data
dell’orologio.

15
enter
menu
+
C2
C1
enter
menu
+
3
1
4
2
DT-VK
TWA-2TWA-1
E’ possibile
ritornare alla
modalità auto
in qualsiasi
momento
conmenu
Se non vengono
eseguite
operazioni per
un minuto,
l’orologio
ritornerà in
modalità auto.
I tasti:
➀
menu : selezione modalità di funzionamento.
auto : funzionamento secondo programma stabilito.
prog : new per la programmazione.
prog : modif per modificare il programma esistente.
: verifica del programma.
: modifica dell'ora, della data e selezione della
modalità di cambiamento orario estivo/ invernale .
astro : modalità astronomica.
: indica che il canale si trova in modalità astronomica.
➁
+ e - : navigazione o regolazione dei valori.
- (TWA-1)
C1 , C2 (TWA-2) : in modalità auto, selezione delle
impostazioni o delle deroghe.
➂
enter : per convalidare le informazioni lampeggianti.
➃
: per ritornare alla fase precedente.

16
Impostazione dell’ora e della data
Modifica orario estivo/invernale
Selezionare la modalità mediante menu quindi enter.
Modificare il giorno, il mese, l'anno, l'ora ed i minuti utilizzando + o - poi
enter.
L’orologio proporrà ora le modifiche di orario estivo/invernale .
Selezionare il tipo di modifica desiderata utilizzando + o -.
Convalidare con enter.
Il tipo di modifica dipenderà dall’area geografica in cui ci si trova.
Tipi disponibili: (
*
= Tipo per difetto.)
Tipo Inizio dell’ora Inizio dell’ora Zona
estiva invernale d’applicazione
Euro Ultima domenica Ultima domenica Unione
di marzo di ottobre Europea
USA Secondo domenica Prima domenica Nord
di marzo di novembre America
AUS Ultima domenica Ultima domenica Australia
di ottobre di marzo
USER Data liberamente Data liberamente
programmata programmata
No Nessuna Nessuna
modifica modifica
*
La modifica avviene sempre tra le 2 e le 3 del mattino.
Nota:
Per la Granbretagna, utilizzare l’aera geografica Euro.
Se viene selezionato il tipo USER:
1. Inserire il giorno, poi il mese della data di modifica dell’ora estiva
(+ 1 ora) mediante + o - e enter.
2. Inserire il giorno, poi il mese della data di modifica dell’ora invernale
(- 1 ora) mediante + o - e enter.
L’orologio verificherà a quali giorni di quali settimane corrispondono queste
date e applicherà le modifiche agli stessi periodi gli anni seguenti
indipendentemente dalla data.

17
Configurazione della modalità astronomica
E’ fondamentale effettuare le seguenti regolazioni al momento dell’installazione
dell’orologio in funzione della vostra situazione geografica.
Per definire la situazione geografica del vostro progetto di applicazione in
maniera precisa, potete servirvi della carta che trovate assieme al prodotto.
Questi dati permetteranno all’orologio di calcolare le ore in cui sorge e
tramonta il sole in maniera automatica.
1. Per fissare la longitudine e la latitudine, selezionare
la modalità astro utilizzando il menu
quindi convalidare con enter.
2. Fissare la longitudine “Lo” con i tasti + e -.
Il campo di regolazione si estende da 180°E (est)
a 180°W (ovest).
Convalidare con enter.
3. Fissare la latitudine “LAt” con i tasti + e -.
Il campo di regolazione si estende da 90°N (nord)
a 90°S (sud).
Convalidare con enter.
4. Regolare il fuso orario “Udt” con i tasti + e - : da
-12 ore a +12 ore rispetto al meridiano di Greenwich.
UDT (= universal day time).
Convalidare con enter.
Le due operazioni che seguono permettono di
effettuare una correzione oraria permanente così da
affinare l’ora in cui sorge e/o tramonta il sole del
luogo del vostro progetto di applicazione.
La spiaggia di correzione possibile si estende da -120 + a 120 minuti.
5. Fissare la correzione oraria “RI” dell’ora in cui
sorge il sole utilizzando + e -, quindi convalidare
con enter.

18
6. Fissare la correzione oraria “Set” dell’ora
in cui tramonta il sole utilizzando + e -,
quindi convalidare con enter.
7. Attivare la modalità astro selezionando On
con + e - quindi enter così che il prodotto
commuti il circuito comandato automaticamente
in base ai parametri astronomici.
8. Per l’orologio a due canali, selezionare il canale C1
o el C2 con + o - e convalidare con enter.
ll simbolo sul menu principale indica se il
canale si trova in modalità astro.
Programmazione:
La programmazione può essere effettuata per giorno o per gruppo di giorni.
In questo caso le istruzioni sono comuni a più giorni.
I giorni: 1= lunedì, 2 = martedì, 3 = mercoledì … 7 = domenica.
1. Selezionare la modalità prog utilizzando il menu quindi enter.
2. Selezionare il canale (C1 o C2) utilizzando + o - quindi enter (solo per lo
TWA-2).
Il numero di passi liberi di programma appare per alcuni secondi.
3. new lampeggia. Premere enter per la convalida di questo nuovo passo
di programma.
4. Scegliere il/i giorno/i utilizzando + o - quindi convalidare con enter.
5. ok lampeggia. Convalidare il gruppo di giorni con il tasto enter.
Il tasto - oppure permette di modificare il gruppo di giorni, se
necessario.
1/84