
DJM-250MK2
DJ MIXER
TABLE DE MIXAGE
DJ-MISCHPULT
MIXER PER DJ
DJ MENGPANEEL
MESA DE MEZCLAS DJ
MESA DE MISTURA PARA DJ
DJ микшерный пульт
http://pioneerdj.com/support/
http://rekordbox.com/
The Pioneer DJ site shown above offers FAQs, information on software, and various other types of information
and services to allow you to use your product in greater comfort.
Le site Pioneer DJ indiqué ci-dessus propose une FAQ, des informations sur le logiciel et divers types
d’informations et de services qui permettent une utilisation plus confortable de ce produit.
Die oben angegebene Pioneer DJ-Website enthält häufig gestellte Fragen, Informationen über Software und
andere wichtige Informationen und Dienste, die Ihnen helfen, Ihr Produkt optimal zu verwenden.
Il sito Pioneer DJ indicato qui sopra offre una sezione FAQ, informazioni sul software ed informazioni e servizi
di vario tipo, per permettere un uso più confortevole dei nostri prodotti.
Op bovengenoemde Pioneer DJ website vindt u FAQ's, informatie over software, en andere informatie en
diensten voor nog meer gebruiksgemak van uw product.
El sitio de asistencia Pioneer DJ mostrado arriba ofrece las preguntas frecuentes, información del software y
varios otros tipos de información y servicios que le permitirán usar su producto con mayor confort.
O site de suporte da Pioneer DJ mostrado acima oferece FAQs, informações sobre o software e outros tipos
de informações e serviços para permitir utilizar o produto com um maior conforto.
На указанном выше сайте поддержки Pioneer DJ содержатся раздел часто задаваемых вопросов,
информация по программному обеспечению, а также различные другие типы информации и услуг,
позволяющие использовать ваше изделие более лучшим образом.
Operating Instructions (Quick Start Guide)
Mode d’emploi (Guide de démarrage rapide)
Bedienungsanleitung (Kurzanleitung)
Istruzioni per l’uso (Guida di avvio veloce)
Handleiding (Snelstartgids)
Manual de instrucciones (Guía de inicio rápido)
Manual de instruções (Guia de início rápido)
Инструкции по эксплуатации (Краткое руководство пользователя)
Français Deutsch
English
Italiano Nederlands Español Português
Русский

2
En
Thank you for buying this Pioneer DJ product. Please read through these operating instructions so you will know how to operate your model properly.
After you have finished reading the instructions, put them away in a safe place for future reference.
In some countries or regions, the shape of the power plug and power outlet may sometimes differ from that shown in the explanatory drawings.
However the method of connecting and operating the unit is the same.
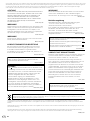
CAUTION
TO PREVENT THE RISK OF ELECTRIC SHOCK, DO NOT
REMOVE COVER (OR BACK). NO USER-SERVICEABLE
PARTS INSIDE. REFER SERVICING TO QUALIFIED
SERVICE PERSONNEL.
D3-4-2-1-1_B1_En
WARNING
This equipment is not waterproof. To prevent a fire or
shock hazard, do not place any container filled with
liquid near this equipment (such as a vase or flower
pot) or expose it to dripping, splashing, rain or
moisture.
D3-4-2-1-3_A1_En
WARNING
To prevent a fire hazard, do not place any naked flame
sources (such as a lighted candle) on the equipment.
D3-4-2-1-7a_A1_En
Operating Environment
Operating environment temperature and humidity:
+5 °C to +35 °C (+41 °F to +95 °F); less than 85 %RH
(cooling vents not blocked)
Do not install this unit in a poorly ventilated area, or in
locations exposed to high humidity or direct sunlight (or
strong artificial light).
D3-4-2-1-7c*_A2_En
CAUTION
The switch on this unit will not completely shut off
all power from the AC outlet. Since the power cord
serves as the main disconnect device for the unit,
you will need to unplug it from the AC outlet to shut
down all power. Therefore, make sure the unit has
been installed so that the power cord can be easily
unplugged from the AC outlet in case of an accident.
To avoid fire hazard, the power cord should also be
unplugged from the AC outlet when left unused for a
long period of time (for example, when on vacation).
D3-4-2-2-2a*_A1_En
When using this product, confirm the safety
information shown on the bottom of the unit.
D3-4-2-2-4_B1_En
POWER-CORD CAUTION
Handle the power cord by the plug. Do not pull out the
plug by tugging the cord and never touch the power
cord when your hands are wet as this could cause a
short circuit or electric shock. Do not place the unit, a
piece of furniture, etc., on the power cord, or pinch the
cord. Never make a knot in the cord or tie it with other
cords. The power cords should be routed such that they
are not likely to be stepped on. A damaged power cord
can cause a fire or give you an electrical shock. Check
the power cord once in a while. When you find it
damaged, ask your nearest service center or your
dealer for a replacement.
S002*_A1_En
VENTILATION CAUTION
When installing this unit, make sure to leave space
around the unit for ventilation to improve heat radiation
(at least 5 cm at rear, and 3 cm at each side).
D3-4-2-1-7d*_A1_En
If you want to dispose this product, do not mix it with general household waste. There is a separate collection system for used
electronic products in accordance with legislation that requires proper treatment, recovery and recycling.
Private households in the member states of the EU, in Switzerland and Norway may return their used electronic products free of charge to
designated collection facilities or to a retailer (if you purchase a similar new one).
For countries not mentioned above, please contact your local authorities for the correct method of disposal.
By doing so you will ensure that your disposed product undergoes the necessary treatment, recovery and recycling and thus prevent potential
negative effects on the environment and human health.
K058b_A1_En
WARNING
Store small parts out of the reach of children and
infants. If accidentally swallowed, contact a doctor
immediately.
D41-6-4_A1_En
The graphical symbol placed on the product
means alternating current.
The graphical symbol placed on the product
means direct current.
The graphical symbol placed on the product
means Class II equipment.
D3-8-2-4_A1_En
CAUTION
This product is evaluated in moderate and tropical
climate condition.
D3-8-2-1-7a_A1_En

3
En
English
Contents
How to read this manual
Thank you for buying this Pioneer DJ product.
Be sure to read this manual and the Operating Instructions that is
available on the Pioneer DJ site. Both documents include important
information that you should understand before using this product.
In particular, be sure to read “IMPORTANT SAFETY INSTRUCTIONS.”
Furthermore, be sure to keep this manual together with “Warranty”.
! In this manual, names of channels and buttons indicated on the
product, names of menus in the software, etc., are indicated within
square brackets ([ ]). (e.g. [MASTER] channel, [ON/OFF], [Start]
menu)
! Please note that the screens and specifications of the software
described in this manual as well as the external appearance and
specifications of the hardware are currently under development and
may differ from the final specifications.
! Please note that depending on the operating system version, web
browser settings, etc., operation may differ from the procedures
described in this manual.
! Please note that the language on the screens of the software
describes in this guide may differ from the language on your
screens.
This manual provides brief descriptions regarding the names of parts
of this unit and the connections between this unit and peripherals.
For more detailed instructions on using this unit, see the Operating
Instructions for this unit.
! For how to obtain the Operating Instructions for this unit, see Viewing
the Operating Instructions on page 4.
Before start
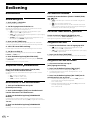
Features ........................................................................................................ 4
What’s in the box ......................................................................................... 4
Viewing the Operating Instructions ........................................................... 4
Part names and functions
Rear panel .................................................................................................... 5
Control Panel ............................................................................................... 6
Connections
Connecting input terminals ........................................................................ 8
Connecting output terminals ..................................................................... 9
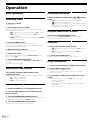
Operation
Basic Operation ......................................................................................... 10
Additional information
Troubleshooting ......................................................................................... 11
Changing the settings ...............................................................................12
About trademarks and registered trademarks .......................................12
Cautions on copyrights ............................................................................. 12
Specifications.............................................................................................12

4
En
Before start
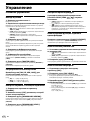
Features
This unit is a 2 channel DJ mixer. It is the next in the DJM series from
Pioneer DJ, the world standard in the disco and club scene. This unit
is equipped with an internal sound card, enabling you to perform with
DVS control using turntables and CDJs. Also, it can support various DJ
performances with its panel layout for scratching and using the MAGVEL
FADER.
What’s in the box
! Power cord
! AC adaptor
! USB cable
! Operating Instructions (Quick Start Guide) (This document)
! Warranty
! License key card (rekordbox dj, rekordbox dvs)
Note
Please keep the license key because it cannot be provided again.
Viewing the Operating Instructions
Various instructions are sometimes provided as files in the PDF
format.
Adobe® Reader® must be installed in order to view PDF format files.
1 Launch a web browser on the computer and access
the Pioneer DJ site below.
http://www.pioneerdj.com/
2 Click [Support].
3 Click the [FIND TUTORIALS & MANUALS].
4 Click the [DJM-250MK2] in the [DJ MIXER]
category.
5 Click on the desired language from the list.

5
En
English
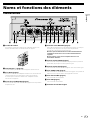
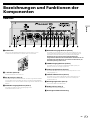
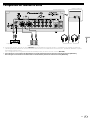
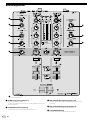
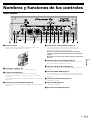
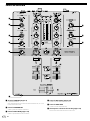
Part names and functions
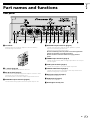
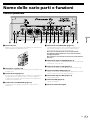
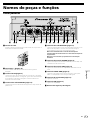
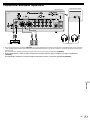
Rear panel
1 2 3 54 6 7 8 6 7 7 9 a
b
1 Cord hook
Hook the power cord of the AC adaptor to avoid accidentally
disconnecting it from the unit.
2 switch (page 10 )
This switch is between off and on for this unit.
3 DC IN terminal (page 8)
Connect the DC plug of the supplied AC adaptor. Connect all other
equipment, then connect the power cord.
Only use the power cord and AC adapter supplied with this unit.
4 MASTER2 output terminals (page 9 )
Connect to the analog input terminals of a power amplifier, etc.
5 MASTER1 output terminals (page 9 )
Connect your equipment, such as a power speaker or a power
amplifier, to the analog input terminal.
Use these terminals as balanced output.
Do not accidentally insert the power cord of the supplied AC
adaptor or the power cord of the equipment.
Do not connect to a terminal which can supply phantom
power.
6 PHONO input terminals (page 8 )
Connect to a phono level (MM cartridge) output device. Do not input
line level signals.
7 LINE input terminals (page 8 )
Connect to a DJ player or a line level output component.
8 SIGNAL GND terminal (page 8 )
Connect an analog player’s ground wire. This helps reduce noise
when the analog player is connected.
9 MIC input terminal (page 8 )
Connect a microphone.
a USB terminal (page 8)
Connect to a computer.
b Kensington security slot

6
En
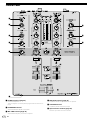
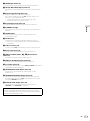
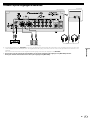
Control Panel
5
4
3
2
6
1
b
8
9
6
7
8
6
a
d
a
7
f
e
f
e
g
h
i
c c
l
k
j
1 PHONES terminal (page 9 )
Connect headphones.
This unit supports 1/4” stereo phone plugs and 3.5 mm stereo mini
plugs.
2 PARAMETER control
Adjust the SOUND COLOR FX parameter.
3 MIC TONE control (page 10)
Adjust the sound quality from the microphone.
4 MIC LEVEL control (page 10 )
Adjust the volume to output from the microphone.
5 AUX TRIM control
Adjust the volume from the AUX input.
6 Input selector switches (page 10 )
Select an input source on each channel.

7
En
English
7 TRIM control (page 10 )
Adjust the volume from each channel.
8 ISO (HI, MID, LOW) controls (page 10 )
Adjust the sound quality of the respective channels.
9 Master Level indicator (page 10 )
It shows the volume from the MASTER output.
When the volume is too loud, the [CLIP] indicator flashes. In this
case, turn down the volume.
— Slow flashing: sound will become distorted.
— Fast flashing: sound is distorted.
a Channel Level indicator (page 10 )
It shows the volume before passing the channel fader.
b STANDBY indicator
This indicator is lit when the unit is in the standby state.
c COLOR control
Change the parameters of the SOUND COLOR FX of the different
channels.
d FILTER button
Turn on/off the SOUND COLOR FX effects.
— WAKE UP: Press this button to cancel the standby state.
e CUE button (page 10 )
Press the [CUE] button for the channel you want to monitor.
f Channel Fader (page 10 )
Adjust the volume of each channel.
g CROSS F.CURVE (THRU, , ) selector switch
(page 10 )
This switches the cross fader curve characteristics.
h CROSS F. REVERSE switch (page 10)
Turn on/off the cross fader reverse function.
i Cross fader (page 10 )
Sound outputs following the curve selected by the [CROSS F.CURVE]
selector switch.
j HEADPHONES LEVEL control (page 10 )
Adjust the level of audio signals output from the headphones.
k HEADPHONES MIXING control (page 10 )
Adjust the monitor volume balance of the sound of channels for
which the [CUE] button is pressed and the sound of the [MASTER]
channel.
l MASTER LEVEL control (page 10 )
Adjust the level of audio signals from the [MASTER1] or [MASTER2]
output.
Do not pull on the channel fader and cross fader knobs with excessive
force. The knobs have a structure by which they cannot be pulled off
easily. Pulling the knobs strongly may result in damaging the unit.

8
En
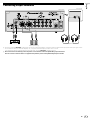
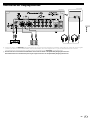
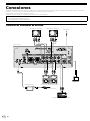
Connections
Be sure to turn off the power and unplug the power cord from the power outlet whenever making or changing connections.
Connect the power cord after all the connections between devices have been completed.
Be sure to use the included power cord.
Refer to the operating instructions for the component to be connected.
! Connect this unit and the computer directly using a USB cable.
! Use USB cables that conform to USB 2.0.
! USB hubs cannot be used.
Connecting input terminals
Computer
Analog player Analog player
Microphone
Rear panel
Pioneer DJ’s DJ player
AC adaptor
To power outlet
Pioneer DJ’s sampler, etc.

9
En
English
Connecting output terminals
Headphones
Rear panel
Front panel
Power amplifier 1
Power speakers 1
1 Be sure to use the [MASTER1] output terminals only for a balanced output. Connection with an unbalanced input (such as RCA) using an XLR to
RCA converter cable (or converter adapter), etc., may lower the sound quality and/or result in noise.
For connection with an unbalanced input (such as RCA), use the [MASTER2] output terminals.
2 Be careful not to accidentally insert the power cord of another unit to the [MASTER1] output terminals.
Do not connect a terminal which is supplied with phantom power to the [MASTER1] output terminals.

10
En
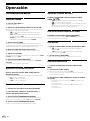
Operation
Basic Operation
Outputting sound
1 Press the switch.
Turn on the unit.
2 Set the input selector switches.
Select the input sources for the different channels from among the
devices connected to this unit.
— [ ]: Audio from a computer connected to the [USB] terminal is
selected.
— [LINE]: Audio from a device connected to the [LINE] input
terminal is selected.
— [PHONO]: Audio from analog players connected to the [PHONO]
input terminals is selected.
3 Turn the [TRIM] control.
Adjust the level of audio signals input for each channel.
The corresponding channel level indicator lights when audio signals are
being properly input to that channel.
4 Move the channel fader up.
Adjust the level of audio signals output for each channel.
5 Set the cross fader.
This operation is not necessary when the [CROSS F.CURVE] selector
switch is set to [THRU].
6 Turn the [MASTER LEVEL] control.
Audio signals are output from the [MASTER1] and [MASTER2] output
terminals.
The master level indicator lights.
Adjusting the sound quality
Turn the [ISO (HI, MID, LOW)] controls for the
respective channels.
The adjustable ranges for the respective controls are as shown below.
— [HI]: –∞ dB to +6 dB (20 kHz)
— [MID]: –∞ dB to +6 dB (1 kHz)
— [LOW]: –∞ dB to +6 dB (20 Hz)
Monitoring sound with headphones
1 Connect headphones to the [PHONES] terminal.
2 Press the [CUE] button(s) for the channel(s) you
want to monitor.
3 Turn the [HEADPHONES MIXING] control.
Adjust the monitor volume balance of sound from channels for which
the [CUE] button is pressed and the [MASTER] channel.
4 Turn the [HEADPHONES LEVEL] control.
Adjust the level of audio signals for the headphones.
Setting the fader curve
Switch the [CROSS F.CURVE (THRU, , )] selector
switch.
— [THRU]: Set to this option when not using the cross fader.
— [ ]: The curve is increased slowly.
— [ ]: The curve is increased steeply. (If the cross fader is moved
from the extreme left or right position, output sound is changed
to the opposite side immediately.)
Using the fader reverse function
Turn on the [CROSS F.REVERSE] switch.
When turning on the [CROSS F.REVERSE] switch, the operating
direction of the cross fader is reversed.
Using AUX
1 Set the input selector switch for AUX.
— [ ]: Audio from a computer connected to the [USB] terminal is
selected.
— [LINE]: Audio from a device connected to the [LINE] input
terminal is selected.
2 Turn the [AUX TRIM] control.
Adjust the level of audio signal input for the AUX channel.
Using a microphone
1 Connect a microphone to the [MIC] input terminal.
2 Turn the [MIC LEVEL] control.
Adjust the volume from the [MIC] input terminal.
! If the control is turned to the extreme right position, the sound
output will be too loud.
3 Turn the [MIC TONE] control to adjust the sound
quality.
— When turning the control to the [LOW] position, the high
frequency is attenuated.
0 to -12 dB (10 kHz)
— When turning the control to the [HI] position, the low frequency
is attenuated.
0 to -12 dB (100 Hz)

11
En
English
Additional information
Troubleshooting
! If you think that there is something wrong with this unit, check the items below, and check [FAQ] for [DJM-250MK2] on the Pioneer DJ site.
http://pioneerdj.com/support/
Also, check the connected devices. If the problem cannot be resolved, ask your nearest Pioneer authorized service center or your dealer to carry out
repair work.
! This unit may not operate properly due to static electricity or other external influences. In such cases, normal operation may be restored by
unplugging the power cord then plugging it back in.
Problem Check Remedy
There is no sound or the volume is
too low.
Is the input selector switch set to the proper
position?
Set the input selector switch to the input source for the channel. (page 10 )
Are the connection cables properly connected? Connect the connection cables properly. (page 8 )
Are the terminals and plugs dirty? Clean the terminals and plugs before making connections.
Is [MASTER OUT ATT.] set to [-6 dB], etc? Set [MASTER OUT ATT.] on the [UTILITY].*
Sound is distorted. Is the sound level output from the [MASTER]
channel appropriately set?
Adjust the [MASTER LEVEL] control so that the master channel level indicator
lights at around [0 dB] at the peak level. (page 10 )
Set [MASTER OUT ATT.] on the [UTILITY] to [-6 dB] or [-12 dB].*
Is the level of audio input to each channel properly
set?
Adjust the [TRIM] control so that the channel level indicator lights at about [0
dB] at the peak level.
Cross fade does not work. Is the [CROSS F. CURVE] selector switch set
properly?
If [THRU] is selected, cross fader does not work. Set the [CROSS F. CURVE]
selector switch properly. (page 10 )
Sound is distorted when an analog
player is connected to this unit’s
[PHONO] terminals.
Or, lighting of the channel level
indicator does not change even when
the [TRIM] control is turned.
Have you connected an analog player with a
built-in phono equalizer?
Connect the analog player with built-in phono equalizer to the [LINE] input
terminals. (page 8 )
If the analog player with built-in phono equalizer has a PHONO/LINE selector
switch, set it to PHONO.
Is an audio interface for computers connected
between the analog player and this unit?
If the output of the audio interface for computers is line level, connect it to the
[LINE] input terminals. (page 8 )
If the analog player has a PHONO/LINE selector switch, set it to PHONO.
* For details on how to change the settings on the [UTILITY], see “Changing the settings” in the Operating Instructions.

12
En
Changing the settings
! For details on how to change the settings of this unit, see “Changing
the settings” in the Operating Instructions.
About trademarks and registered
trademarks
! Pioneer DJ is a trademark of PIONEER CORPORATION, and is used
under license. rekordbox is a trademark or registered trademark of
the Pioneer DJ Corporation.
The names of companies and products mentioned herein are
trademarks or registered trademarks of their respective owners.
Cautions on copyrights
rekordbox restricts playback and duplication of copyright-protected
music contents.
! When coded data, etc., for protecting the copyright is embedded in
the music contents, it may not be possible to operate the program
normally.
! When rekordbox detects that coded data, etc., for protecting the
copyright is embedded in the music contents, processing (playback,
reading, etc.) may stop.
Recordings you have made are for your personal enjoyment and
according to copyright laws may not be used without the consent of the
copyright holder.
! Music recorded from CDs, etc., is protected by the copyright laws
of individual countries and by international treaties. It is the full
responsibility of the person who has recorded the music to ensure
that it is used legally.
! When handling music downloaded from the Internet, etc., it is the
full responsibility of the person who has downloaded the music to
ensure that it is used in accordance with the contract concluded
with the download site.
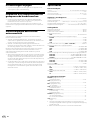
Specifications
AC adapter
Power ............................................................ AC 100 V to 240 V, 50 Hz/60 Hz
Rated current ......................................................................................... 0.6 A
Rated output ............................................................................... DC 12 V, 2 A
Power consumption (standby) ............................................................ 0.5 W
General - Main Unit
Power consumption ............................................................DC 12 V, 600 mA
Main unit weight ...................................................................................3.0 kg
Max. dimensions
......................... 230 mm (width) × 107.9 mm (height) × 319.5 mm (depth)
Tolerable operating temperature ........................................+5 °C to +35 °C
Tolerable operating humidity ...................... 5 % to 85 % (no condensation)
Audio Section
Sampling rate ......................................................................................48 kHz
MASTER D/A converter .......................................................................24 bits
Other A/D and D/A converters ............................................................24 bits
Frequency characteristic
LINE ................................................................................. 20 Hz to 20 kHz
S/N ratio (rated output)
PHONO............................................................................................ 80 dB
LINE ................................................................................................. 94 dB
MIC .................................................................................................. 77 dB
AUX ................................................................................................. 90 dB
Total harmonic distortion (LINE — MASTER1) ................................0.005 %
Standard input level / Input impedance
PHONO.............................................................................–52 dBu/47 kW
LINE ..................................................................................–12 dBu/47 kW
MIC .................................................................................. –52 dBu/8.5 kW
AUX .................................................................................. –12 dBu/47 kW
Standard output level / Load impedance / Output impedance
MASTER1 .................................................. +6 dBu/10 kW/1 kW or lower
MASTER2 ................................................ +2 dBu/10 kW/390 W or lower
PHONES ..................................................... +8.0 dBu/32 W/2 W or lower
Rated output level / Load impedance
MASTER1 ........................................................................ +25 dBu/10 kW
MASTER2 ........................................................................ +21 dBu/10 kW
Crosstalk (LINE) .................................................................................... 90 dB
Channel equalizer characteristic
HI ......................................................................–∞ dB to +6 dB (20 kHz)
MID .................................................................... –∞ dB to +6 dB (1 kHz)
LOW .................................................................. –∞ dB to +6 dB (20 Hz)
Microphone equalizer characteristic
LOW ...................................................................0 dB to –12 dB (10 kHz)
HI ........................................................................0 dB to –12 dB (100 Hz)
Input / Output terminals
PHONO input terminal
RCA pin jack ....................................................................................2 sets
LINE input terminal
RCA pin jack ....................................................................................2 sets
MIC input terminal
1/4” TS jack ........................................................................................ 1 set
AUX input terminal
RCA pin jack ......................................................................................1 set
MASTER output terminal
XLR connector...................................................................................1 set
RCA pin jack ......................................................................................1 set
PHONES output terminal
1/4” stereo phone jack ...................................................................... 1 set
3.5 mm stereo mini jack ...................................................................1 set
USB terminal
B type ................................................................................................. 1 set
! The specifications and design of this product are subject to change
without notice.
! © 2017 Pioneer DJ Corporation. All rights reserved.


2
Fr
Nous vous remercions d’avoir acquis un produit Pioneer DJ. Veuillez lire attentivement ce mode d’emploi afin de connaître la manière d’utiliser
l’appareilcomme il convient. Cela fait, conservez le mode d’emploi de façon à pouvoir vous y référer en cas de nécessité.
Dans certains pays ou certaines régions, la forme de la fiche et de la prise d’alimentation est un peu différente de ce qui est montré dans les
illustrations. Toutefois, l’appareil se raccorde et fonctionne de la même façon.
ATTENTION
POUR ÉVITER TOUT RISQUE D’ÉLECTROCUTION, NE
PAS ENLEVER LE COUVERCLE (NI LE PANNEAU
ARRIÈRE). AUCUNE PIÈCE RÉPARABLE PAR
L’UTILISATEUR NE SE TROUVE À L’INTÉRIEUR.
CONFIER TOUT ENTRETIEN À UN PERSONNEL
QUALIFIÉ UNIQUEMENT.
D3-4-2-1-1_B1_Fr
AVERTISSEMENT
Cet appareil n’est pas étanche. Pour éviter les risques
d’incendie et de décharge électrique, ne placez près de
lui un récipient rempli d’eau, tel qu’un vase ou un pot
de fleurs, et ne l’exposez pas à des gouttes d’eau, des
éclaboussures, de la pluie ou de l’humidité.
D3-4-2-1-3_A1_Fr
AVERTISSEMENT
Pour éviter les risques d’incendie, ne placez aucune
flamme nue (telle qu’une bougie allumée) sur
l’appareil. D3-4-2-1-7a_A1_Fr
AVERTISSEMENT
Gardez les pièces de petite taille hors de la portée des
bébés et des enfants. En cas d’ingestion accidentelle,
veuillez contacter immédiatement un médecin.
D41-6-4_A1_Fr
Milieu de fonctionnement
Température et humidité du milieu de fonctionnement :
De +5 °C à +35 °C (de +41 °F à +95 °F) ; Humidité
relative inférieure à 85 % (orifices de ventilation non
obstrués)
N’installez pas l’appareil dans un endroit mal ventilé ou
un lieu soumis à une forte humidité ou en plein soleil
(ou à une forte lumière artificielle).
D3-4-2-1-7c*_A1_Fr
ATTENTION
L’interrupteur de cet appareil ne coupe pas
complètement celui-ci de sa prise secteur. Comme le
cordon d’alimentation fait office de dispositif de
déconnexion du secteur, il devra être débranché au
niveau de la prise secteur pour que l’appareil soit
complètement hors tension. Par conséquent, veillez à
installer l’appareil de telle manière que son cordon
d’alimentation puisse être facilement débranché de
la prise secteur en cas d’accident. Pour éviter tout
risque d’incendie, le cordon d’alimentation sera
débranché au niveau de la prise secteur si vous
prévoyez une période prolongée de non utilisation
(par exemple avant un départ en vacances).
D3-4-2-2-2a*_A1_Fr
Lorsque vous utilisez ce produit, vérifiez les
informations concernant la sécurité sous l’appareil.
D3-4-2-2-4_B1_Fr
PRÉCAUTION DE VENTILATION
Lors de l’installation de l’appareil, veillez à laisser un
espace suffisant autour de ses parois de manière à
améliorer la dissipation de chaleur (au moins 5 cm à
l’arrière et 3 cm de chaque côté).
D3-4-2-1-7d*_A1_Fr
Si vous souhaitez vous débarrasser de cet appareil, ne le mettez pas à la poubelle avec vos ordures ménagères. Il existe un système de
collecte séparé pour les appareils électroniques usagés, qui doivent être récupérés, traités et recyclés conformément à la législation.
Les habitants des états membres de l’UE, de Suisse et de Norvège peuvent retourner gratuitement leurs appareils électroniques usagés aux
centres de collecte agréés ou à un détaillant (si vous rachetez un appareil similaire neuf).
Dans les pays qui ne sont pas mentionnés ci-dessus, veuillez contacter les autorités locales pour savoir comment vous pouvez vous débarrasser
de vos appareils.
Vous garantirez ainsi que les appareils dont vous vous débarrassez sont correctement récupérés, traités et recyclés et préviendrez de cette façon
les impacts néfastes possibles sur l’environnement et la santé humaine.
K058b_A1_Fr
NOTE IMPORTANTE SUR LE CABLE
D’ALIMENTATION
Tenir le câble d’alimentation par la fiche. Ne pas
débrancher la prise en tirant sur le câble et ne pas
toucher le câble avec les mains mouillées. Cela risque
de provoquer un court-circuit ou un choc électrique. Ne
pas poser l’appareil ou un meuble sur le câble. Ne pas
pincer le câble. Ne pas faire de noeud avec le câble ou
l’attacher à d’autres câbles. Les câbles d’alimentation
doivent être posés de façon à ne pas être écrasés. Un
câble abîmé peut provoquer un risque d’incendie ou un
choc électrique. Vérifier le câble d’alimentation de
temps en temps. Contacter le service après-vente le
plus proche ou le revendeur pour un remplacement.
S002*_A1_Fr
Le symbole graphique indiqué sur le produit
représente le courant alternatif.
Le symbole graphique indiqué sur le produit
représente le courant continu.
Le symbole graphique indiqué sur le produit
représente un équipement de Classe II.
D3-8-2-4_A1_Fr
ATTENTION
Ce produit a été testé dans des conditions de climats
tempéré et tropical.
D3-8-2-1-7a_A1_Fr

3
Fr
Français
Sommaire
Comment lire ce manuel
Merci d’avoir acheté ce produit Pioneer DJ.
Veillez à lire ce manuel et le mode d’emploi disponible sur le site Pioneer
DJ. Ces deux documents comprennent des informations importantes
que vous devez connaître avant d’utiliser ce produit.
En particulier, veillez à lire les « CONSIGNES DE SÉCURITÉ
IMPORTANTES ». En outre, veillez à conserver ce manuel avec la
« Garantie ».
! Dans ce manuel, les noms de canaux et de touches indiqués sur le
produit, les noms de menus dans le logiciel, etc. sont indiqués entre
crochets ([ ]). (ex. : canal [MASTER], [ON/OFF], menu [Démarrer])
! Veuillez noter que les écrans et les caractéristiques techniques
du logiciel décrit dans ce manuel, ainsi que l’aspect externe et
les caractéristiques techniques du matériel sont en cours de
développement de sorte que les caractéristiques finales peuvent être
différentes.
! Veuillez noter que selon la version du système d’exploitation, les
réglages du navigateur web, etc., le fonctionnement peut être
différent des marches à suivre indiquées dans ce mode d’emploi.
! Veuillez noter que la langue sur les écrans du logiciel décrit dans ce
guide peut être différente de celle s’affichant sur les écrans.
Ce manuel décrit brièvement les noms des éléments de cet appareil et
les raccordements entre cet appareil et des périphériques. Pour des
instructions plus détaillées sur l’utilisation de cet appareil, reportez-vous
au mode d’emploi de cet appareil.
! Pour en savoir plus sur l’obtention du mode d’emploi de cet appareil,
reportez-vous à la page 4, Consulter le mode d’emploi.
Informations préliminaires
Caractéristiques ........................................................................................... 4
Contenu du carton d’emballage ................................................................ 4
Consulter le mode d’emploi ........................................................................ 4
Noms et fonctions des éléments
Panneau arrière ........................................................................................... 5
Panneau de commande .............................................................................. 6
Raccordements
Raccordement des prises d’entrée ............................................................ 8
Raccordement des prises de sortie ........................................................... 9
Fonctionnement
Opérations de base ....................................................................................10
Informations complémentaires
En cas de panne ........................................................................................11
Changement des réglages ........................................................................ 12
À propos des marques commerciales et des marques déposées ........ 12
Précautions concernant les droits d’auteur ...........................................12
Spécifications.............................................................................................12

4
Fr
Informations préliminaires
Caractéristiques
Cet appareil est une table de mixage DJ à 2 voies. Il s’agit de la dernière
née de la série DJM de Pioneer DJ, la référence mondiale pour les
discothèques et les clubs. Cet appareil est équipé d’une carte son
interne qui vous permet de réaliser des prestations avec un contrôle
DVS à l’aide de platines DJ et de CDJ. Par ailleurs, il prend en charge
diverses performances DJ grâce à sa disposition de panneau idéale pour
le scratch et l’usage du MAGVEL FADER.
Contenu du carton d’emballage
! Cordon d’alimentation
! Adaptateur secteur
! Câble USB
! Mode d’emploi (Guide de démarrage rapide) (ce document)
! Garantie
! Carte de clé de licence (rekordbox dj, rekordbox dvs)
Remarque
Gardez précieusement la clé de licence, car nous ne pourrons vous la
fournir à nouveau.
Consulter le mode d’emploi
Les différents modes d’emploi sont parfois fournis sous forme de
fichiers PDF.
Adobe® Reader® doit être installé pour pouvoir consulter les fichiers
au format PDF.
1 Lancez votre navigateur web sur l’ordinateur et
accédez au site Pioneer DJ suivant.
http://www.pioneerdj.com/
2 Cliquez sur [Aide].
3 Cliquez sur [TROUVER LES TUTORIELS &
MANUELS].
4 Cliquez sur [DJM-250MK2] dans la catégorie
[TABLE DE MIXAGE DJ].
5 Cliquez sur la langue souhaitée dans la liste.

5
Fr
Français
Noms et fonctions des éléments
Panneau arrière
1 2 3 54 6 7 8 6 7 7 9 a
b
1 Crochet de cordon
Accrochez le cordon d’alimentation de l’adaptateur secteur afin
d’éviter de le débrancher accidentellement de l’appareil.
2 Commutateur (page 10)
Ce commutateur permet de mettre cet appareil en/hors service.
3 Prise DC IN (page 8)
Branchez la fiche CC de l’adaptateur secteur fourni. Branchez tous
les autres appareils, puis branchez le cordon d’alimentation.
N’utilisez que le cordon d’alimentation et l’adaptateur secteur
fournis avec cet appareil.
4 Prises de sortie MASTER2 (page 9)
Pour raccorder aux prises d’entrées analogiques d’un amplificateur
de puissance, etc.
5 Prises de sortie MASTER1 (page 9)
Raccordez vos appareils à la prise d’entrée analogique, par exemple
un haut-parleur amplifié ou un amplificateur de puissance.
Utilisez ces prises comme sortie symétrique.
N’insérez pas accidentellement le cordon d’alimentation de
l’adaptateur secteur fourni ou le cordon d’alimentation de
l’appareil.
Ne pas brancher à une prise susceptible de fournir une
alimentation fantôme.
6 Prises d’entrée PHONO (page 8 )
Pour raccorder un dispositif de sortie de type platine DJ (cartouche
phono MM). Ne pas pourvoir des signaux de ligne.
7 Prises d’entrée LINE (page 8)
Pour raccorder un lecteur DJ ou un appareil avec sortie niveau ligne.
8 Prise SIGNAL GND (page 8 )
Pour raccorder le fil de terre d’un lecteur analogique. Ceci permet de
réduire le bruit lorsqu’un lecteur analogique est raccordé.
9 Prise d’entrée MIC (page 8)
Pour raccorder un microphone.
a Prise USB (page 8)
Pour raccorder un ordinateur.
b Fente de sécurité Kensington

6
Fr
Panneau de commande
5
4
3
2
6
1
b
8
9
6
7
8
6
a
d
a
7
f
e
f
e
g
h
i
c c
l
k
j
1 Prise PHONES (page 9)
Pour raccorder un casque.
Cet appareil prend en charge les jacks stéréo de 1/4” et les minijacks
stéréo de 3,5 mm.
2 Commande PARAMETER
Pour ajuster le paramètre SOUND COLOR FX.
3 Commande MIC TONE (page 10)
Pour ajuster la qualité sonore provenant du microphone.
4 Commande MIC LEVEL (page 10)
Pour ajuster le volume de la sortie du microphone.
5 Commande AUX TRIM
Pour ajuster le volume de l’entrée AUX.
6 Sélecteurs d’entrée (page 10)
Pour sélectionner une source d’entrée sur chaque canal.

7
Fr
Français
7 Commande TRIM (page 10)
Pour ajuster le volume de chaque canal.
8 Commandes ISO (HI, MID, LOW) (page 10)
Pour ajuster la qualité sonore des différents canaux.
9 Indicateur Master Level (page 10)
Il indique le volume de la sortie MASTER.
Lorsque le volume est trop fort, l’indicateur [CLIP] clignote. Dans ce
cas, baissez le volume.
— Clignote lentement : le son se déforme.
— Clignote rapidement : le son est déformé.
a Indicateur de niveau de canal (page 10)
Il indique le volume avant de passer par les faders de canaux.
b Indicateur STANDBY
Cet indicateur est allumé lorsque l’appareil est en état de veille.
c Commande COLOR
Pour changer les paramètres de SOUND COLOR FX des différents
canaux.
d Touche FILTER
Pour activer/désactiver les effets SOUND COLOR FX.
— WAKE UP : appuyez sur cette touche pour annuler l’état de veille.
e Touche CUE (page 10)
Appuyez sur la touche [CUE] du canal que vous voulez surveiller.
f Fader de canal (page 10)
Pour ajuster le volume de chaque canal.
g Sélecteur CROSS F.CURVE (THRU, , )
(page10)
Pour commuter les caractéristiques de la courbe du crossfader.
h Commutateur CROSS F. REVERSE (page 10)
Pour activer/désactiver la fonction inverse du crossfader.
i Crossfader (page 10)
Le son est émis suivant la courbe sélectionnée par le sélecteur
[CROSS F.CURVE].
j Commande HEADPHONES LEVEL (page 10)
Pour ajuster le niveau des signaux audio provenant du casque
d’écoute.
k Commande HEADPHONES MIXING (page 10)
Pour ajuster la balance du volume de contrôle du son des canaux
pour lesquels la touche [CUE] est enfoncée et le son du canal
[MASTER].
l Commande MASTER LEVEL (page 10)
Pour ajuster le niveau des signaux audio de la sortie [MASTER1] ou
[MASTER2].
Ne tirez pas trop fort sur les boutons du fader de canal et du
crossfader. Ces boutons ont une structure qui ne permet pas de les
tirer aisément. Si vous tirez trop fort sur ces boutons, vous risquez
d’endommager l’appareil.

8
Fr
Raccordements
Veillez à toujours éteindre les appareils et à débrancher le cordon d’alimentation de la prise secteur avant de raccorder un appareil ou de changer les
liaisons.
Lorsque tous les appareils ont été raccordés, vous pouvez brancher le cordon d’alimentation.
Veillez à utiliser le cordon d’alimentation fourni.
Reportez-vous au mode d’emploi de l’appareil devant être raccordé.
! Raccordez cet appareil et l’ordinateur directement avec un câble USB.
! Utilisez les câbles USB conformes à USB 2.0.
! Les concentrateurs USB ne peuvent pas être utilisés.
Raccordement des prises d’entrée
Ordinateur
Lecteur analogique Lecteur analogique
Microphone
Panneau arrière
Lecteur DJ de Pioneer DJ
Adaptateur secteur
À une prise d’alimentation
Sampler de Pioneer DJ, etc.
A página está carregando...
A página está carregando...
A página está carregando...
A página está carregando...
A página está carregando...
A página está carregando...
A página está carregando...
A página está carregando...
A página está carregando...
A página está carregando...
A página está carregando...
A página está carregando...
A página está carregando...
A página está carregando...
A página está carregando...
A página está carregando...
A página está carregando...
A página está carregando...
A página está carregando...
A página está carregando...
A página está carregando...
A página está carregando...
A página está carregando...
A página está carregando...
A página está carregando...
A página está carregando...
A página está carregando...
A página está carregando...
A página está carregando...
A página está carregando...
A página está carregando...
A página está carregando...
A página está carregando...
A página está carregando...
A página está carregando...
A página está carregando...
A página está carregando...
A página está carregando...
A página está carregando...
A página está carregando...
A página está carregando...
A página está carregando...
A página está carregando...
A página está carregando...
A página está carregando...
A página está carregando...
A página está carregando...
A página está carregando...
A página está carregando...
A página está carregando...
A página está carregando...
A página está carregando...
A página está carregando...
A página está carregando...
A página está carregando...
A página está carregando...
A página está carregando...
A página está carregando...
A página está carregando...
A página está carregando...
A página está carregando...
A página está carregando...
A página está carregando...
A página está carregando...
A página está carregando...
A página está carregando...
A página está carregando...
A página está carregando...
A página está carregando...
A página está carregando...
A página está carregando...
A página está carregando...
A página está carregando...
A página está carregando...
A página está carregando...
A página está carregando...
A página está carregando...
A página está carregando...
A página está carregando...
A página está carregando...
-
 1
1
-
 2
2
-
 3
3
-
 4
4
-
 5
5
-
 6
6
-
 7
7
-
 8
8
-
 9
9
-
 10
10
-
 11
11
-
 12
12
-
 13
13
-
 14
14
-
 15
15
-
 16
16
-
 17
17
-
 18
18
-
 19
19
-
 20
20
-
 21
21
-
 22
22
-
 23
23
-
 24
24
-
 25
25
-
 26
26
-
 27
27
-
 28
28
-
 29
29
-
 30
30
-
 31
31
-
 32
32
-
 33
33
-
 34
34
-
 35
35
-
 36
36
-
 37
37
-
 38
38
-
 39
39
-
 40
40
-
 41
41
-
 42
42
-
 43
43
-
 44
44
-
 45
45
-
 46
46
-
 47
47
-
 48
48
-
 49
49
-
 50
50
-
 51
51
-
 52
52
-
 53
53
-
 54
54
-
 55
55
-
 56
56
-
 57
57
-
 58
58
-
 59
59
-
 60
60
-
 61
61
-
 62
62
-
 63
63
-
 64
64
-
 65
65
-
 66
66
-
 67
67
-
 68
68
-
 69
69
-
 70
70
-
 71
71
-
 72
72
-
 73
73
-
 74
74
-
 75
75
-
 76
76
-
 77
77
-
 78
78
-
 79
79
-
 80
80
-
 81
81
-
 82
82
-
 83
83
-
 84
84
-
 85
85
-
 86
86
-
 87
87
-
 88
88
-
 89
89
-
 90
90
-
 91
91
-
 92
92
-
 93
93
-
 94
94
-
 95
95
-
 96
96
-
 97
97
-
 98
98
-
 99
99
-
 100
100


Pioneer DJM-250MK2 Manual do usuário
- Categoria
- Controladores de DJ
- Tipo
- Manual do usuário
em outras línguas
- español: Pioneer DJM-250MK2 Manual de usuario
- français: Pioneer DJM-250MK2 Manuel utilisateur
- italiano: Pioneer DJM-250MK2 Manuale utente
- English: Pioneer DJM-250MK2 User manual
- русский: Pioneer DJM-250MK2 Руководство пользователя
- Nederlands: Pioneer DJM-250MK2 Handleiding
- Deutsch: Pioneer DJM-250MK2 Benutzerhandbuch
Artigos relacionados
-
Pioneer DJM-750MK2 Guia rápido
-
-
Pioneer XDJ-RX3 Guia rápido
-
Pioneer DJM-900NXS Manual do proprietário
-
-
-
Pioneer VM-80 Guia rápido
-
Pioneer VM-70 Guia rápido
-
-
Pioneer DDJ-RZ Guia rápido