
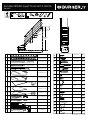
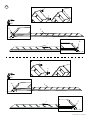
Escalier SPARK quart tournant à droite
Réf 880
réf. 880_MAJ_21/12/15_1/10
2717mm
max
2898mm
max
207mm
186mm
806 mm
1
32x190x2916 mm
x1
2
32x190x2916 mm
x1
x1
x1
x1
x1
3
8x17x1850 mm
x4
4
5x17x1850 mm
70352
70242
70244
70244
70244
70243
20885
20886
20870
20871
20887
20889
70848
70845
70844
x4
5
5x8x4000 mm
x2
x2
x2
6
3x73x204 mm
x1
7
3x65x103 mm
x1
8
3x72.5x204 mm
3x72.5x204 mm
x1
9
x1
10
27.6x220x735 mm
27.6x220x735 mm
65x65x775.5 mm
32x245x897 mm
x1
20888
32x261x907 mm
x1
20865
27.6x482x735 mm
x1
20866
20867
27.6x486x1019 mm
x1
27.6x489x735 mm
x9
11
21x29x221 mm
x1
12
13
14
15
45x90x640mm
x1
70244
72035
72135
72534
72066
72533
72529
72136
A
Ø3x15 mm
x8
B
Ø4x30 mm
x8
C
Ø6x50 mm
Ø6x70 mm
Ø6x100 mm
Ø6x80 mm
x28
D
Ø19x18 mm -M8
x12
E
x2
72532
Ø7x70 mm
F
x2
70339
M8
G
x2
72078
M8
H
x2
70841
Ø35
I
x2
70850
Ø15
J
x2
70849
Ø12
K
L
M
N
O
P
Q
R
M8x25 mm
x6
Ø10.5
Ø6
Ø4
Ø2

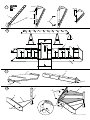
réf. 880_MAJ_21/12/15_2/10
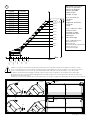
1
H
a
b
2691(13)
2484(12)
2277(11)
2070(10)
1863(9)
1656(8)
1449(7)
1242(6)
1035(5)
828(4)
2717(13)
H(Nb)
R(Nb)
2345(11)
2159(10)
1973(9)
1787(8)
1415(6)
1229(5)
1043(4)
1601(7)
25 mm
85 mm
Q
Q
R
R
2531(12)
X
X (mm) H (mm)
2691 ≤ X ≤ 2898
2484
≤ X ≤ 2691
2277
≤ X ≤ 2484
2070
≤ X ≤ 2277
1863
≤ X ≤ 2070
1656
≤ X ≤ 1863
1449
≤ X ≤ 1656
1242
≤ X ≤ 1449
1035
≤ X ≤ 1242
828
≤ X ≤ 1035
2691
2484
2277
2070
1863
1656
1449
1242
1035
828
H
Nb: Nombre de marche
Número de peldaños
Número de degraus
Numero di gradini
Aantal treden
Number of steps
R
(mm): Reculement
Desarrollo
Recuo
Lunghezza orizzontale
Terugloop
Going
H(mm): Hauteur escalier
Altura escalera
Altura da escada
Altezza della scala
Traphoogte
Staircase height
X(mm): Hauteur Sol/sol
Altura suelo/suelo
Altura solo/solo
Altezza pavimento/pavimento
Hoogte vloer/vloer
Floor-to-oor height
Prendre en compte les deux positions possibles des platines pour choisir la hauteur des points de xation en haut de l’escalier.
Tener en cuenta las dos posiciones posibles de las placas para elegir la altura de los puntos de jación en lo alto de la escalera.
Tet em conta as duas posições possíveis das placas para determinar a altura dos pontos de xação no topo da escada.
Per denire l'altezza dei punti di ssaggio nella parte superiore della scala, considerare le due possibili posizioni delle piastre.
Bij het kiezen van de hoogte van de bevestigingspunten bovenaan de trap moet u ermee rekening houden dat de platen twee
mogelijke posities kunnen innemen.
Take into account the two possible positions of the plates when choosing the heights of the fastening points at the top of the staircase.

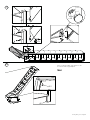
réf. 880_MAJ_21/12/15_3/10
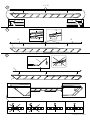
2
3
11
11 + 12
2
12
12
11 + 12
H (mm)
9
-
8
7
6
5
4
3
2
1
2691
2484
2277
2070
1863
1656
1449
1242
1035
828
90°
1 + 2
2
1
34 mm
Protéger le limon avec du scotch avant de le scier
Proteja la zanca con cinta antes de serrar o cortar
Proteger a langorina com tacola antes de serrar
Proteggere il lato con l'adesivo prima di segare
Bescherm de trapboom met tape vooraleer deze te zagen
Protect the string board with scothtape before sawing it
9
8
7
6
5
4
3
2
1

réf. 880_MAJ_21/12/15_4/10
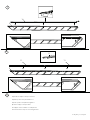
11 + 12
11 + 12
2
2
2
4
5
11
12
12
12
12
6
13
13
11 + 12

réf. 880_MAJ_21/12/15_5/10
2
2
13
7
13
8
9
11
11
11
Reprendre les étapes 3 à 8 pour le limon 1
Repita los pasos 3 a 8 para la zanca 1
Repetir os passs 3 a 8 para a longarina 1
Ripetere le tappe 3 a 8 per il lato 1
De stappen 3 tot 8 herhalen voor trapboom 1
Come back to the steps 3 to 8 for string board 1

réf. 880_MAJ_21/12/15_6/10
1
1
2
Q
2x A
2x A
2x A
2x A
Q
R
R
10
Ø2
Ø2
a
Q
R
b
Q
R
2

réf. 880_MAJ_21/12/15_7/10
1
11
12
13
14
81 mm
10 mm
45 mm
150 mm
Ø6
1
6
O
7
9
10
B
2x F
3x B
2x K
5
P
6
8
B
5
C
2x A
2x A
4
9x 3
20x B
2
2x E

réf. 880_MAJ_21/12/15_8/10
15
16
Ø11
2x H
2x I
2x G
Fixer l’escalier à la dalle et au mur avec des
accessoires d’ancrage adaptés.
TRAD
Ø11
Ø4mm
2x D
2x J

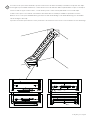
réf. 880_MAJ_21/12/15_9/10
Si vous avez choisi l’option «Télécommande», reportez-vous à la notice de la télécommande pour installer le récepteur à cette étape.
Si ha elegido la opción «Mando a distancia», consulte las instrucciones del mando a distancia para instalar el receptor en esta etapa.
Se tiver escolhido a opção "Controlo remoto", consulte as instruções do controlo remoto para instalar o recetor nesta etapa.
Se avete scelto l'opzione "Telecomando", fare riferimento al manuale del telecomando per installare in questa fase il ricevitore.
Wanneer u koos voor de optie «Afstandsbediening» verwijzen we naar de handleiding voor de afstandsbediening voor de installatie
van de ontvanger in deze stap.
If you have selected the optional remote control, please refer to the instructions for the remote control to install the receiver at this stage.
17
4
14
L
90 mm
59 mm 31 mm
( =>230V)
15
6x L
a
cd
b

réf. 880_MAJ_21/12/15_10/10
38mm
70mm
55mm
Ø10.5mm
!
b
a
Ne pas détériorer les câbles éléctriques
No dañar los cables electricos
Não danicar os cabos electricos
Non deteriorare i cavi elettrici
De elektriciteitskabels niet beschadigen
Don't damage the electric cables
Poursuivre le montage en vous reportant à la notice fournie avec le rampant
Continuar el montaje siguiendo las indicaciones del manual suministrado con " la subida
Seguir a instalação seguinte as instruções fornecidas com a subida
Proseguire il montaggio riportandovi alle istruzioni fornite con la salita scala
Zet de montage voort en kijk hierbij in de handleiding geleverd bij het hellende vlak
Go on with the montage reading the instructions provided with the stairwells
18
12x M
6x N
Rampant SPARK ou UNIVERSO
Subida SPARK O UNIVERSO
Subida SPARK ou UNIVERSO
Salita scala SPARK o UNIVERSO
Hellend vlak SPARK of UNIVERSO
Stairwells SPARK or UNIVERSO
-
 1
1
-
 2
2
-
 3
3
-
 4
4
-
 5
5
-
 6
6
-
 7
7
-
 8
8
-
 9
9
-
 10
10


