
Page
1
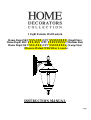
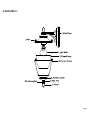
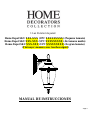
1 Light Exterior Wall Lantern
Home Depot SKU XXX-XXX (UPC XXXXXXXXX) (Small Size)
Home Depot SKU XXX-XXX (UPC XXXXXXXXX) (Medium Size)
Home Depot SKU XXX-XXX (UPC XXXXXXXXX) (Large Size)
(Mossoro Walnut With Silver Accents)
INSTRUCTION MANUAL

Page
2
Thank you for purchasing this
Home Decorators Collection
exterior wall
lantern. This product has been manufactured with the highest standards of
safety and quality. The finish of this lantern is weather resistant but over time
will naturally weather and fade.
FEATURES:
1. Easy and Economic Maintenance.
2. Weather Resistant Body.
3. ETL listed for Wet Location.
4. Easy to Install.
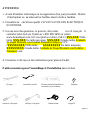
QUESTIONS, PROBLEMS, MISSING PARTS:
Before returning to your local Home Depot, please call our Customer Service
Team at 1-800-986-3460 or visit www.homedepot.com. Please reference your
SKU (XXX-XXX small size, XXX-XXX medium size, XXX-XXX large size)
Mossoro Walnut with Silver Accents fixture or UPC ( XXXXXXXXX small
size, XXXXXXXXX medium size, XXXXXXXXX large size) Mossoro
Walnut with Silver Accents fixture.

Page
3
CAUTION:
1. Before starting installation of this fixture or removal of a previous fixture,
disconnect the power by turning off the circuit breaker or by removing the
fuse at the fuse box.
2. CONSULT A QUALIFIED ELECTRICIAN IF YOU HAVE ANY
ELECTRICAL QUESTIONS.
3. If you have any non-electrical questions about this fixture, please contact
our Customer Service Team at 1-800-986-3460 or visit
www.homedepot.com. Please reference your SKU (XXX-XXX small size,
XXX-XXX medium size, XXX-XXX large size) Mossoro Walnut with
Silver Accents fixture or UPC ( XXXXXXXXX small size,
XXXXXXXXX medium size, XXXXXXXXX large size) Mossoro
Walnut with Silver Accents fixture.
4. Keep your receipt and these Instructions for Proof of Purchase.
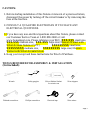
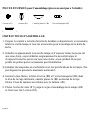
TOOLS REQUIRED FOR ASSEMBLY & INSTALLATION
(Not included):
Wrench Safety goggles Silicon Rubber Sealant Wire strippers
for exterior use
Flathead screwdriver Phillips screwdriver Electrical tape Wire cutters

Page
4
PARTS INCLUDED FOR ASSEMBLY (parts are not to scale):
4 Nut (#1) 1 Finial (#2) 1 Bottom cover( #9) 1 Hex nut( #3) 1 Lock washer(#8)
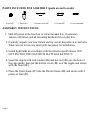
ASSEMBLY INSTRUCTIONS:
1. Shut off power at the fuse box or circuit breaker box, if necessary
remove old fixture and all mounting hardware from outlet box.
2. Carefully unpack your new fixture and lay out all the parts on a
clear area,
Take care not to lose any small parts necessary for installation.
3. Install light bulbs in accordance with the fixtures specifications. (DO
NOT EXCEED THE MAXIMUM WATTAGE RATING!!)
4. Insert the nipple with lock washer (#8) and hex nut (#3) into the hole of
the cage inside, then put the bottom cover (#9) over the nipple and secure
with the finial (#2).
5. Place the Glass shade (#7) into the Fixture frame (#4) and secure with 2
pieces of Nut (#1).

Page
5
ASSEMBLY:

Page
6
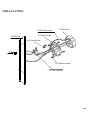
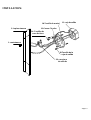
PARTS INCLUDED FOR INSTALLATION (parts are not to scale):
1 Ground Screw (#14) 2 Outlet Box Screws (#15) 2 Mounting Screws (#10)
1 Circular strap (#11) 3 Wire Connectors (#12)
INSTALLATION INSTRUCTIONS:
1. Screw the two Mounting Screws (#10) into the circular strap (#11). Mount the circular
strap (#11) to the Outlet Box (#13) using the two provided Outlet Box Screws (#15).
[Make sure the threads of the Mounting Screws (#10) are facing outside when the circular
strap (#11) is attached to the Outlet Box (#13).]
2. Connect the white wire from the fixture to the white wire from the Outlet Box (#13), and
the black wire from the fixture to the black wire from the Outlet Box (#13). Cover the two
wire connections using the two provided Wire Connectors (#12). Wrap the two wire
connections with electrical tape for a more secure connection. If your outlet box has a
ground wire (green or bare copper), connect fixture ’s ground wire to it using the wire
connector (#12). Otherwise connect the copper ground from the fixture to Ground screw
(#14) on the Circular Strap (#11). Note: If you have electrical questions, consult your
local electrical code for approved grounding methods.
3. Mount the body of the fixture on the wall by aligning the protruding Mounting Screws
(#10) all the way through the holes on the Wall Plate (#5). Be careful not to pinch any of
the wires between the fixture and the Outlet Box (#13). Tighten the fixture to the wall by
screwing the two Nuts (#1) onto the two protruding Mounting Screws (#10).
4. Once the fixture is mounted on the wall, caulk the space between the wall and the upper
3/4 area of the Wall Plate (#5) to prevent water seeping into the Outlet Box (#13). Leave
the bottom 1/4 area un-caulked for drainage of any water which might leak into the
enclosure.
5. Installation is complete. Turn on the power at the circuit breaker or fuse box. Turn the
light switch on to activate the fixture.

Page
7
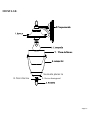
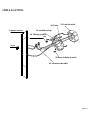
INSTALLATION:
14.Ground screw
15. Outlet box screw
10.Mounting screw
11.Circular strap
13.Outlet box
5.Wall plate

Page
8
TROUBLESHOOTING:
PRODUCT MAINTENANCE:
1. To clean the outsid
e of the fixture, use a dry or slightly dampened clean cloth (use clean
water, never a solvent) to wipe the glass and surface of the fixture.
2.
To clean the inside of the fixture, first disconnect power to the fixture by turning off the
circuit breaker or b
y removing the fuse at the fuse box. Next, use a dry or slightly
dampened clean cloth (use clean water, never a solvent) to wipe the inside glass and interior
surface of the fixture.
3. Do not use any cleaners with chemicals, solvents or harsh abrasives. Us
e only a dry soft
cloth to dust or wipe carefully.
LIMITED WARRANTY
The manufacturer warrants this lighting fixture to be free from defects in materials and workmanship for a period
of three (3) years from date of purchase. This warranty applies only to
the original consumer purchaser and only to
products used in normal use and service. If this product is found to be defective, the manufacturer ’s only
obligation, and your exclusive remedy, is the repair or replacement of the product at the manufacturer’s
discretion,
provided that the product has not been damaged through misuse, abuse, accident, modifications, alterations,
neglect or mishandling. This warranty shall not apply to any product that is found to have been improperly
installed, set-up, or used in
any way not in accordance with the instructions supplied with the product. This
warranty shall not apply to a failure of the product as a result of an accident, misuse, abuse, negligence, alteration,
or faulty installation, or any other failure not relati
ng to faulty material or workmanship. This warranty shall not
apply to the finish on any portion of the product, such as surface and/or weathering, as this is considered normal
wear and tear. The manufacturer does not warrant and specially disclaims any wa
rranty, whether express or
implied, of fitness for a particular purpose, other than the warranty contained herein. The manufacturer
specifically disclaims any liability and shall not be liable for any consequential or incidental loss or damage,
including but not limited to any labor / expense costs involved in the replacement or repair of said product.
Possible Cause Corrective Action
1. Bulb is burned out. 1. Replace light bulb.
2. Power is off. 2. Make sure power
supply is on.
3. Faulty wire connection. 3. Check wiring.
Bulb will not light.
4. Faulty switch. 4. Test or replace switch.
Fuse blows or circuit
breaker trips when light
is turned on.
Crossed wires or power wire
is grounding out.
Check wire connections.

Page
9
1 Luz Exterior de pared
Home Depot SKU XXX-XXX (UPC XXXXXXXXX) (Pequeño tamaño)
Home Depot SKU XXX-XXX (UPC XXXXXXXXX) (De tamaño medio)
Home Depot SKU XXX-XXX (UPC XXXXXXXXX) (De gran tamaño)
(Fini noyer mossoro avec touches argent)
MANUAL DE INSTRUCCIONES

Page
10
Gracias por la compra de este accesorio
Home Decorators Collection
Linterna
de pared para el exterior Este producto ha sido fabricado con los más altos
niveles de seguridad y calidad. El acabado de esta linterna es resistente a la
intemperie, pero con el tiempo se va ir desvaneciendo naturalmente.
CARACTERÍSTICAS:
1. Fácil y económico mantenimiento.
2. Resistente a la intemperie.
3. ETL para lugares mojados
4. Fácil de instalar
Preguntas, problemas, piezas faltantes:
Antes de regresar a su oficina local de Home Depot, llame a nuestro Servicio
de Atenci ón al 1-800-986-3460 o visite www.homedepot.com. Por favor,
referir a SKU ( XXX-XXX Pequeño tamaño, XXX-XXX De tama ño medio,
XXX-XXX De gran tamaño) Fini noyer mossoro avec touches argent lanterne
or UPC (XXXXXXXXX Pequeño tamaño, XXXXXXXXX De tamaño medio
,
XXXXXXXXX De gran tama ño) Fini noyer mossoro avec touches argent
lanterne.

Page
11
PRECAUCIÓN:
1. Antes de comenzar la instalación de este lampara o eliminación de una luz
anterior desconecte la alimentaci ón apagando el interruptor o quitando el
fusible en la caja de fusibles.
2. CONSULTE CON UN ELECTRICISTA SI TIENE ALGUNA
PREGUNTAS ELÉCTRICAS.
3. Si usted tiene cualquier pregunta no el éctrica de esta, luz por favor,
póngase en contacto con nuestro Servicio de Atenci ón al 1-800-986-3460
o visite www.homedepot.com. Por favor, referir a SKU ( XXX-XXX
Pequeño tama ño, XXX-XXX De tama ño medio, XXX-XXX De gran
tamaño) Fini noyer mossoro avec touches argent lanterne or UPC
(XXXXXXXXX Peque ño tama ño, XXXXXXXXX De tama ño medio,
XXXXXXXXX De gran tamaño) Fini noyer mossoro avec touches argent
lantern.
4. Guarde su recibo y las instrucciones para la prueba de compra.
HERRAMIENTAS necesarias para el montaje y la instalación
(no incluidos):
Llave inglesa gafas de seguridad Sellador de caucho de silicio para pelacables
uso exterior
destornillador de cabeza plana Phillips de cabeza plana Cinta aislante Cortaalambres

Page
12
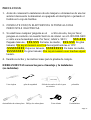
PIEZAS INCLUIDAS PARA LA ASAMBLEA (partes no están a escala):
4 tuerca (# 1) 1 florón (# 2) 1 tapa del fondo (#9) 1 tuerca hexagonal (#3)
1 arandela de bloqueo (#8)
INSTRUCCIONES DE MONTAJE:
1. Apagar la corriente en la caja de fusibles o caja de interruptores de circuito,
si es necesario, remueva la lámpara vieja y todos los accesorios de montaje
de la caja de salida
2.
Desempaque con cuidado la nueva lámpara y exponer todas las piezas sobre
una zona clara, Tenga cuidado de no perder las piezas pequeñas necesarias
para la instalación.
3. Instalar bombillas de conformidad con las especificaciones de la lámpara.
(No sobrepasar la potencia nominal máximo!)
4. Inserte el enganche con la arandela de bloqueo (#8) y la tuerca hexagonal
(#3) en el agujero interior de la jaula, luego coloque la tapa del fondo (#9)
sobre el enganche y asegure todo con el tope (#2).
5. Coloque la pantalla de vidrio (# 7) hasta el conjunto de la l ámpara (# 4) y
asegúrelos con las 2 tuercas (# 1).

Page
13
ASAMBLEA:

Page
14
PIEZAS INCLUIDAS para la instalación (las partes no están a escala):
1 tornillos de rosca de tierra(#14) 2 tornillos de la caja de salida (#15) 2 ea tornillo de montaje (#10)
1 correa circular (# 11) 2 conectores de cable de (#12)
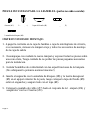
Instrucciones de instalación:
1. Atornille los dos tornillos de montaje (# 10) en el correa circular (# 11). Monte el correa
circular (# 11) a la caja de salida (# 13) con los dos tornillos de caja de salida proveído (#
15). [Asegúrese de que las roscas de los tornillos de montaje (# 10) se salgan fuera del
correa circular (# 11) se adjunta a la caja de salida (# 13).]
2. Conecte el cable blanco del la lámpara al cable blanco de la caja de salida (#13), y el cable
negro de la lámpara al cable negro de la caja de salida (#13). Cubra las dos conexiones de
cable con los dos Conectores de alambre previstos (#12). Envuelva las dos conexiones de
los cables con cinta aislante para una conexi ón más segura. Si su caja de salida tiene un
cable de tierra (verde o desnudo de cobre), conecte el cable de tierra accesorio a la misma
utilizando el conector de cable (#12). De otra manera conecte el alambre de cobre al
tornillo de tierra (#14) en la correa Circular (#11).Nota: Si usted tiene preguntas eléctricas,
consulte a su código de electricidad local por los métodos aprobados de puesta a tierra.
3. Monte el conjunto de la l ámpara en la pared, alineando los tornillos de montaje (# 10) a
través de los orificios de la placa de pared (# 5). Tenga cuidado de no pellizcar cualquiera
de los cables entre el aparato y la caja de salida (# 13). Apriete la fijaci ón a la pared
atornillando el dos tuercas de bloqueo (# 3) sobresale en los dos tornillos de montaje (#
10).
4. Una vez que el aparato está montado en la pared, masilla el espacio entre la pared y el la
¾ parte superior de área de la placa de pared (# 5) para evitar filtraciones de agua en la
caja de salida (# 13). Deja la parte inferior ¼ una área calafateada para el drenaje de toda
el agua que pueda filtrarse en el recinto.
5. La instalación está completa. Encienda la energía en la caja de fusibles. Encienda el
interruptor de la luz para activar el aparato

Page
15
INSTALACIÓN:
11.Correa Circular
5. la placa trasera
1. contratuerca
14. Tornillos de
rosca de tierra
12. conectores
de cable de
15.Tornillo de la
caja de salida
10.Tornillo de montaj
13. caja de salida

Page
16
SOLUCIÓN DE PROBLEMAS:
Mantenimiento de productos:
1.
Para limpiar el exterior del aparato, utilice un seca o ligeramente h úmeda tela (use agua
limpia, nunca un disolvente) para limpiar el vidrio y la superficie de la lámpara.
2. Para limpiar
el interior del aparato, primero desconecte la alimentaci ón de la l ámpara de
apagar el interruptor de circuito o quitando el fusible de la caja de fusibles. A continuaci ón,
utilice una tela seca o ligeramente h úmeda (use agua limpia, nunca un disolvente)
para
limpiar el cristal en el interior y la superficie interior de la lámpara.
3.
No utilice limpiadores con productos qu ímicos, solventes o abrasivos severos. Utilice s ólo
un paño suave y seco para el polvo o limpiar con cuidado
GARANTÍALIMITADA
El fabricante garantiza que este accesorio de iluminación a estar libre de defectos en materiales y mano de obra
durante un período de cinco (3) años a partir de la fecha de compra. Esta garantía se aplica sólo al comprador
original y sólo a los productos utilizados en condiciones normales de uso y servicio. Si se encuentra que este
producto está defectuoso, la única obligación del fabricante, y su solución exclusiva, es la reparación o sustitución
del producto, a discreción del fabricante, siempre que el producto no ha sido dañado por el mal uso, abuso,
accidentes, modificaciones, alteraciones , negligencia o mal manejo. Esta garantía no se aplicará a cualquier
producto que se demuestre que ha sido instalado incorrectamente, puesta a punto, o utilizado en cualquier manera
no conforme con las instrucciones suministradas con el producto. Esta garantía no se aplicará a una falla del
producto como consecuencia de un accidente, mal uso, abuso, negligencia, alteración o instalación defectuosa, o
cualquier otro fallo que no se refieran a los materiales o ejecución defectuosa. Esta garantía no se aplicará a la
meta en cualquier parte del producto, tales como la superficie y / o la intemperie, ya que se considera uso y
desgaste normal.
El fabricante no garantiza y especialmen
te niega cualquier garantía, expresa o implícita, de aptitud para un
propósito particular, excepto la garantía contenida en este documento. El fabricante rechaza
específicamente cualquier responsabilidad y no será responsable por cualquier pérdida consecuente o
incidental o daños, incluyendo pero no limitado a cualquier mano de obra Gastos de gastos que implica la
sustitución o reparación de dicho producto.
Posible causa de Acción Correctiva
1. Bombilla está quemada 1. Reemplace la bombilla.
2. Está apagada 2. Aseg úrese de que el poder la
oferta está encendido
3. Conexión del cable
defectuoso
3. Asegúrese de que el poder la
oferta está encendido
Bombilla no se
encenderá.
4. Interruptor defectuoso 4. Pruebe o cambiar el interruptor.
Funde un fusible o
circuito viajes
interruptor cuando la
luz está encendida
Cables cruzados o cables
de alimentación
es tierra hacia fuera.
Compruebe las conexiones de
cables.

Page
17
1 Light mur extérieur
Home Depot SKU XXX-XXX (UPC XXXXXXXXX) (Petite taille)
Home Depot SKU XXX-XXX (UPC XXXXXXXXX) (De taille moyenne)
Home Depot SKU XXX-XXX (UPC XXXXXXXXX ) (Grande taille)
(Acabado de Nogal Mossoro con Detalles Plateados)
MANUEL D'INSTRUCTIONS

Page
18
Nous vous remercions d'avoir achet é ce
Home Decorators Collection
Lanterne pour mur ext érieur. Ce produit a été fabriqué avec des niveaux
plus élevés de sécurité et de qualité. La finale de cette lampe de poche est
résistante aux intemp éries, mais avec le temps il sera la d écoloration
naturelle..
CARACTÉRISTIQUES:
1. Facile et un entretien peu coûteux.
2. Résistant aux intempéries.
3. ETL pour les endroits humides
4. Facile à installer
Questions, des problèmes, des pièces manquantes:
Avant de retourner à votre Home Depot local, appelez notre Service Center au
1-800-986-3460 ou visitez www.homedepot.com. S'il vous pla ît se r éférer à
SKU ( XXX-XXX Petite taille, XXX-XXX De taille moyenne, XXX-XXX
Grande taille) Acabado de Nogal Mossoro con Detalles Plateados Lampe or
UPC ( XXXXXXXXX Petite taille, XXXXXXXXX De taille moyenne,
XXXXXXXXX Grande taille) Acabado de Nogal Mossoro con Detalles
Plateados Lampe

Page
19
ATTENTION
:
1. Avant d'installer cette lampe ou la suppression d'un jour précédent , Mettez
l'interrupteur ou en enlevant les fusibles dans la boîte à fusibles.
2. Consultez un électricien qualifi é SI VOUS AVEZ DES ELECTRIQUE
QUESTIONS.
3. Si vous avez des questions, ce pouvoir, de la lumi ère s'il vous pla ît
contacter notre Service Center au 1-800-986-3460 ou visitez
www.homedepot.com. S'il vous plaît se référer à SKU (XXX-XXX Petite
taille, XXX-XXX De taille moyenne, XXX-XXX Grande taille) Acabado
de Nogal Mossoro con Detalles Plateados Lampe or UPC
(XXXXXXXXX Petite taille, XXXXXXXXX De taille moyenne,
XXXXXXXXX Grande taille) Acabado de Nogal Mossoro con Detalles
Plateados Lam.
4. Conservez votre reçu et des instructions pour preuve d'achat.
Outils nécessaires pour l'assemblage et l'installation (non inclus)
Clé anglaise lunettes de sécurité Silicone produit d'étanchéité en Strippers
caoutchouc pour l'extérieur
tournevis à tête plate Phillips à tête plate Ruban isolant Coupe-fil

Page
20
PIÈCES FOURNIES pour l'assemblage (pièces ne sont pas à l'échelle):
4 écrous (# 1) 1 rosette (# 2) 1 ensuite placez le (#9) 1 l’écrou hexagonal (#3)
1 frein d’écrou (#8)
INSTRUCTIONS D'ASSEMBLAGE:
1.
Coupez le courant à la boîte de boîte de fusibles ou disjoncteurs, si nécessaire,
retirez la vieille lampe et tous les accessoires pour le montage de la boîte de
sortie
2. Déballez soigneusement la nouvelle lampe et d’exposer toutes le pièces sur
une zone claire, soyez déballez soigneusement la nouvelle lampe et
d’exposer toutes les pièces sur une zone claire, soyez prudent de ne pas
perdre les petites pièces nécessaires pour Installation.
3. Installez des ampoules en conformité avec les spécifications de la lampe.
(Ne
pas dépasser la puissance maximale nominale!)
4. Insérez la tige filetée, le frein d’écrou (#8) et l’écrou hexagonal (#3) dans
le trou de la cage intérieure, ensuite placez le (#9) au-dessus de la tige
filetée. Fixez de manière sécuritaire avec le faîteau. (#2).
5. Placez l'écran de verre (# 7) jusqu'à ce que l'assemblage de la lampe (# 4)
et fixer avec les 2 écrous (# 1).
A página está carregando ...
A página está carregando ...
A página está carregando ...
A página está carregando ...
-
 1
1
-
 2
2
-
 3
3
-
 4
4
-
 5
5
-
 6
6
-
 7
7
-
 8
8
-
 9
9
-
 10
10
-
 11
11
-
 12
12
-
 13
13
-
 14
14
-
 15
15
-
 16
16
-
 17
17
-
 18
18
-
 19
19
-
 20
20
-
 21
21
-
 22
22
-
 23
23
-
 24
24


Home Decorators Collection 23452 Instruções de operação
- Tipo
- Instruções de operação
em outros idiomas
Artigos relacionados
Outros documentos
-
Dale Tiffany TH70118 Guia de instalação
-
Decor Living 104993GB-15 Guia de instalação
-
-
Signature Hardware 440646 3-Light 23.9-Inch Black Bronze Outdoor Wall Light Manual do proprietário
-
 Dorcy 41-1081 Guia de instalação
-
Progress Lighting P7035-20WB Guia de instalação
-
 Commercial Electric CETR22BL30WD Instruções de operação
-
Heath Zenith none Manual do usuário
-
Invacare P402 Aventia Manual do usuário
-
Facom E.5000 Manual do proprietário

