
RGB IN
DC14V
LEFT
UP
RIGHT
PRESS(ENTER)
DOWN
Return
Quick Setup Guide
Guide d’installation rapide
Manual de configuração rápida
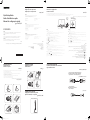
Checking the Contents
Vérification des composants
Verificação dos componentes
Attaching the Stand
Fixation du socle
Prender o suporte
Removing the Stand
Démontage du pied
Retirar a base
Adjusting the Product Tilt
Réglage de l’inclinaison du produit
Ajustar a inclinação do produto
Control Panel
Panneau de configuration
Controlo do Painel
Connecting and Using a PC
Connexion et utilisation d’un ordinateur
Ligar e utilizar um PC
SF350 SERIES
English
The color and the appearance may differ depending on the product, and the specifications are
subject to change without prior notice to improve the performance.
Français
La couleur et l’aspect du produit peuvent varier en fonction du modèle, et ses spécifications
peuvent être modifiées sans préavis pour des raisons d’amélioration des performances.
Português
A cor e o aspecto podem diferir consoante o produto e as especificações estão sujeitas a
alterações sem aviso prévio para melhorar o desempenho.
English
- Contact the dealer from whom you purchased the product if any item is missing.
The appearance of the components may differ from the images shown.
Components may vary depending on the country.
Quick Setup Guide
Regulatory guide
Power cable
D-SUB cable (optional)
Stand neck
Warranty card (Not available in some locations)
User manual (optional)
Power adapter (Detachable)
Stand base
Français
- En cas d’élément manquant, contactez le vendeur auprès duquel vous avez acheté le produit.
Les composants peuvent être différents de ceux illustrés ici.
Les composants peuvent être différents suivant la région.
Guide de configuration rapide
Guide réglementaire
Câble d’alimentation
Câble D-SUB (en option)
Connecteur de support
Carte de garantie (Non disponible dans certains pays)
Manuel d’utilisation (en option)
Adaptateur secteur (amovible)
Support de base
Português
- Contacte o revendedor onde comprou o produto, se algum dos itens estiver em falta.
O aspecto dos componentes pode ser diferente das imagens apresentadas.
Os componentes podem variar em locais diferentes.
Manual de configuração rápida
Guia de regulamentação
Cabo de alimentação
Cabo D-SUB (opcional)
Conector padrão
Cartão de garantia (Não disponível nalguns locais)
Manual do utilizador (opcional)
Transformador de corrente (amovível)
Base
The color and shape of parts may differ from what is shown. Specifications are subject to change without notice to improve quality
La couleur et la forme des pièces peuvent différer de ce qui est illustré. Les spécifications sont communiquées sous réserve de modifications sans préavis dans le but d’améliorer la qualité.
A cor e a forma das peças pode ser diferente do apresentado. As características técnicas estão sujeitas a alterações sem aviso prévio de forma a melhorar a qualidade.
Power LED
Voyant d’alimentation
Alimentação LED
LED
English
JOG Button
Multi directional button that helps navigate.
The JOG button is located on the rear left side of the product. The button can be used to move up, down, left or right, or as Enter.
This LED is power status indicator and works as
- Power on (Power button): Off / Power saving mode: Blinking / Power Off (Power button): On
Function Key Guide
Press the JOG button when the screen is turned on. The Function Key Guide will appear.
To access the onscreen menu when the guide is displayed, press the corresponding direction button again.
Select [ ] by moving the JOG button in the function key guide screen.
The OSD (On Screen Display) of your Monitor’s feature appears.
Select [ ] to adjust the brightness by moving the JOG button in the Function Key Guide screen.
Select [ ] by moving the JOG button in the function key guide screen.
Press to enable or disable Eye Saver Mode which is also Low Blue Light Mode.
Select [ ] to turn the Monitor off by moving the JOG button in the function key guide screen.
Français
Bouton JOG
Bouton multidirectionnel qui facilite la navigation.
Le bouton JOG se situe à l’arrière du produit, du côté gauche. Le bouton peut être orienté vers le haut, le bas, la gauche, la droite ou appuyer (entrer).
Ce voyant est l’indicateur d’état d’alimentation et fonctionne en tant que
- Marche (bouton d’alimentation) : Arrêt / Mode d’économie d’énergie: Clignotant / Arrêt (bouton d’alimentation): Activé
Guide des touches de fonction
Appuyez sur le bouton JOG lorsque l’écran est allumé. Le Guide des touches de fonction apparaît. Pour accéder au menu à l’écran alors que
le guide est affi ché, appuyez de nouveau sur le bouton de direction correspondant.
Permet de sélectionner [ ] en orientant le bouton JOG à l’écran du guide des touches de fonction. Le menu d’affichage à l’écran de votre
fonction Écran apparaît.
Sélectionnez [ ] pour ajuster la luminosité en déplaçant le bouton JOG sur l’écran Guide des touches de fonctions.
Permet de sélectionner [ ] en orientant le bouton JOG à l’écran du guide des touches de fonction. Appuyez pour active ou désactiver le
mode Préservation des yeux, qui est aussi le mode à faible lumière bleue.
Permet de sélectionner [ ] pour éteindre l’écran en orientant le bouton JOG dans l’écran Guide des touches de fonction.
Português
Botão JOG
Botão multidireccional que ajuda a navegar.
O botão JOG situa-se no lado esquerdo da parte traseira do produto. O botão pode ser utilizado para mover para cima, para baixo, para
a esquerda, para a direita ou como enter.
Este LED indica o estado de energia e funciona como
- Alimentação ligada (Botão de alimentação): Desligar / Modo de poupança de energia: A piscar / Alimentação desligada (Botão de alimentação): Ligado
Função Guia de Teclas
Prima o botão JOG quando liga o ecrã. A função guia de teclas aparece. Para aceder ao menu no ecrã quando o guia é apresentado, prima
novamente o botão de direcção correspondente.
Selecciona [ ] ao mover o botão JOG no ecrã da função guia de teclas.
Aparece o OSD (Visualização no ecrã) da função do seu monitor.
Selecciona [ ] para ajustar o brilho movendo o botão JOG na tela do Guia da tecla de função.
Selecciona [ ] ao mover o botão JOG no ecrã da função guia de teclas. Prima para ativar ou desativar o Modo de Proteção de Visão que é
também o Modo de Luz Azul Baixa.
Selecciona [ ] para desligar o monitor ao mover o botão JOG para o ecrã da função guia de teclas.
LED
-
)(
[
- Before assembling the product, place the product down on a flat and stable surface so that the screen is facing downwards.
The exterior may differ depending on the product.
Do not hold the product upside down only by the stand.
- Avant de monter l’appareil, posez-le sur une surface plane et stable, de telle façon que l’écran soit orienté vers le bas.
L’aspect extérieur peut varier en fonction du produit.
Ne soulevez pas le produit à l’envers en le tenant par le socle.
- Antes de montar o produto, pouse-o numa superfície plana e estável, com o ecrã virado para baixo.
O aspecto exterior pode ser diferente, dependendo do produto.
Não segure o produto de cabeça para baixo apenas pelo suporte.
-
Connection Using the D-SUB Cable (Analog Type)
Branchement par câble D-SUB (type analogique)
Ligar utilizando o cabo D-SUB (tipo analógico)
D-SUB
Connecting the Power
Branchement de l’alimentation
Ligar a alimentação
RGB IN
DC14V
1
2
3
4
5
12
34
-2.0° (±2.0°) ~ 22.0° (±2.0°)
2002460448T
LS19F350HN 中东向QSG_20160206_CS6.indd 1 2016/2/14 14:48:44

Contact SAMSUNG WORLD WIDE
Comment contacter Samsung dans le monde
Contacte a Samsung Internacional
SAMSUNG
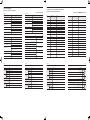
Troubleshooting Guide
Guide de dépannage
Guia de resolução de problemas
English
Issues Solutions
The screen keeps switching on and off.
Check the cable connection between the product and PC, and ensure
the connectors are locked.
The power LED is off.
The screen will not switch on.
Check that the power cable is connected properly.
The message Check Signal Cable appears.
Check that the cable is properly connected to the product.
Check that the device connected to the product is powered on.
Not Optimum Mode is displayed.
This message appears when the signal from the graphics card exceeds
the maximum resolution or frequency for the product.
Change the maximum resolution and frequency to suit the product
performance, referring to Standard Signal Mode Table.
The images on the screen look distorted. Check the cable connection to the product.
There is no image on the screen and the power
LED blinks every 0.5 to 1 second.
The product is operating in power-saving mode.
Press any key on the keyboard or move the mouse to return to normal
operating mode.
A beeping sound is heard when my PC is
booting.
If a beeping sound is heard when your PC is booting, have your PC
serviced.
English
Specifications
Model Name S19F350HN*
Panel
Size
19 Class
(18.5 Inches / 47.0 cm)
Display area 409.8 mm (H) x 230.4 mm (V)
Pixel Pitch 0.3 mm (H) x 0.3 mm (V)
Resolution
Optimum
Resolution
1366 x 768 @ 60 Hz
Maximum
Resolution
1366 x 768 @ 60 Hz
VESA Mounting Interface
75.0 mm x 75.0 mm
(For use with Specialty(Arm) Mounting hardware.)
Power Supply
AC 100 - 240 V – (+/- 10 %), 50/60 Hz ± 3 Hz
Refer to the label at the back of the product as the standard voltage can vary in
different countries.
Environmental
considerations
Operating
Temperature : 0°C – 40°C (32°F – 104°F)
Humidity : 20 % – 80 %, non-condensing
Storage
Temperature : -20°C – 60°C (-4°F – 140°F)
Humidity : 10 % – 90 %, non-condensing
- This device is a Class B digital apparatus.
Português
Características técnicas
Nome do modelo S19F350HN*
Painel
Tamanho
Classe 19
(18,5 polegadas / 47,0 cm)
Área de
visualização
409,8 mm (H) x 230,4 mm (V)
Densidade dos
pixels
0,3 mm (H) x 0,3 mm (V)
Resolução
Resolução ideal 1366 x 768 @ 60 Hz
Resolução
máxima
1366 x 768 @ 60 Hz
Interface de montagem VESA
75,0 mm x 75,0 mm
(para utilizar com hardware de montagem especializada (braço articulado).)
Fonte de alimentação
CA 100 - 240 V – (+/- 10 %), 50/60 Hz ± 3 Hz
Consulte a etiqueta na parte posterior do produto pois a tensão padrão pode variar
em países diferentes.
Características
ambientais
Funcionamento
Temperatura : 0˚C – 40˚C (32˚F – 104˚F)
Humidade : 20 % – 80 %, sem condensação
Armazenamento
Temperatura : -20˚C – 60˚C (-4˚F – 140˚F )
Humidade : 10 % – 90 %, sem condensação
- Este dispositivo é um aparelho digital de Classe B.
4
-
Français
Caractéristiques techniques
Nom du modèle
S19F350HN*
Panneau
Taille
Classe 19
(18,5 pouces / 47,0 cm)
Surface
d’achage
409,8 mm (H) x 230,4 mm (V)
Pas des pixels 0,3 mm (H) x 0,3 mm (V)
Résolution
Résolution
optimale
1366 x 768 à 60 Hz
Résolution
maximale
1366 x 768 à 60 Hz
Interface de xation VESA
75,0 mm x 75,0 mm
(destinée à du matériel de fixation spécialisé (Arm))
Alimentation
CA 100 - 240 V – (+/- 10 %), 50/60 Hz ± 3 Hz
Reportez-vous à l’étiquette apposée au dos du produit, car la tension standard
peut varier en fonction du pays.
Considérations
environnementales
Fonctionnement
Température : 0˚C – 40˚C (32˚F – 104˚F)
Humidité : 20 % à 80 %, sans condensation
Stockage
Température : -20˚C – 60˚C (-4˚F – 140˚F)
Humidité : 10 % à 90 %, sans condensation
- Ce périphérique est un appareil numérique de ClasseB.
Português
Problemas Soluções
O ecrã está continuamente a ligar e a desligar.
Verifique se o cabo está correctamente ligado ao produto e ao PC e se
os conectores estão firmemente encaixados.
O LED de alimentação está desligado. O ecrã
não liga.
Verifique se o cabo de alimentação está correctamente ligado.
A mensagem Verif. cabo de sinal é
apresentada.
Verifique se o cabo está correctamente ligado ao produto.
Verifique se o dispositivo ligado ao produto está ligado.
A mensagem Modo não otimizado é
apresentada.
Esta mensagem é apresentada quando o sinal da placa gráfica excede a
resolução ou a frequência máxima do produto.
Altere a resolução e a frequência máximas para que se adeqúem ao
desempenho do produto, consultando a Tabela dos modos de sinal padrão.
As imagens do ecrã parecem distorcidas. Verifique a ligação do cabo ao produto.
Não existe imagem no ecrã e o LED de
alimentação pisca a cada 0,5 a 1 segundo.
O produto está no modo de poupança de energia.
Carregue em qualquer tecla do teclado ou mova o rato para voltar ao
ecrã anterior.
Ouve-se um sinal sonoro quando o meu PC
está a arrancar.
Se ouvir um sinal sonoro durante o arranque do PC, contacte a
respectiva assistência técnica.
Français
Problèmes Solutions
L’écran s’allume et s’éteint continuellement.
Vérifiez que le câble est correctement branché entre le produit et le PC
et que les connecteurs sont bien verrouillés.
Le voyant d’alimentation est éteint.
L’écran ne s’allume pas.
Vérifiez que le câble d’alimentation est correctement branché.
Le message Vérif. câble signal apparaît.
Vérifiez que le câble est correctement branché au produit.
Assurez-vous que le périphérique connecté à l’appareil est sous tension.
Mode non optimal est affiché.
Ce message apparaît si le signal de la carte graphique dépasse la
résolution ou la fréquence maximale acceptée pour le produit.
Modifiez la résolution et la fréquence maximales pour qu’elles
correspondent aux performances du produit, en vous référant au
Tableau des modes de signal standard.
Les images affichées à l’écran sont déformées. Vérifiez le branchement des câbles au produit.
Aucune image n’est visible sur l’écran et le
voyant d’alimentation clignote toutes les 0,5 à
1 seconde.
L’appareil est en mode d’économie d’énergie.
Appuyez sur une touche du clavier ou déplacez la souris pour revenir à
l’écran précédent.
Un bip est émis au démarrage de mon
ordinateur.
Si un signal sonore (bip) est émis pendant le démarrage de l’ordinateur,
faites-le réparer.
.
.
LED
Country
Pays
País
Customer Care Center
Service client
Centro de Assistência ao Cliente
Website
Site Web
Website
ALGERIA 3004 (Toll Free) http://www.samsung.com/n_africa/support
ANGOLA 917 267 864 http://www.samsung.com/support
BAHRAIN 8000-GSAM (8000-4726)
http://www.samsung.com/ae/support (English)
http://www.samsung.com/ae_ar/support (Arabic)
BOTSWANA 8007260000 http://www.samsung.com/support
BURUNDI 200 http://www.samsung.com/support
CAMEROON 7095-0077 http://www.samsung.com/africa_fr/support
COTE D’ IVOIRE 8000 0077 http://www.samsung.com/africa_fr/support
DRC 499999 http://www.samsung.com/support
EGYPT
08000-7267864
16580
http://www.samsung.com/eg/support
GHANA
0800-10077
0302-200077
http://www.samsung.com/africa_en/support
IRAN 021-8255 [CE] http://www.samsung.com/iran/support
JORDAN
0800-22273
06 5777444
http://www.samsung.com/Levant
KENYA 0800 545 545 http://www.samsung.com/support
KUWAIT 183-CALL (183-2255)
http://www.samsung.com/ae/support (English)
http://www.samsung.com/ae_ar/support (Arabic)
LEBANON 961 1484 999 http://www.samsung.com/Levant
MAURITIUS 800 2550 http://www.samsung.com/support
MOROCCO 080 100 22 55 http://www.samsung.com/n_africa/support
MOZAMBIQUE 847267864 / 827267864 http://www.samsung.com/support
NAMIBIA 08 197 267 864 http://www.samsung.com/support
Country
Pays
País
Customer Care Center
Service client
Centro de Assistência ao Cliente
Website
Site Web
Website
NIGERIA 0800-726-7864 http://www.samsung.com/africa_en/support
OMAN 800-SAMSUNG (800 - 726 7864)
http://www.samsung.com/ae/support (English)
http://www.samsung.com/ae_ar/support (Arabic)
PAKISTAN 0800-Samsung (72678) http://www.samsung.com/pk/support
QATAR 800-CALL (800-2255)
http://www.samsung.com/ae/support (English)
http://www.samsung.com/ae_ar/support (Arabic)
REUNION 0262 50 88 80 http://www.samsung.com/support
RWANDA 9999 http://www.samsung.com/support
SAUDI ARABIA 800 247 3457 (800 24/7 HELP)
http://www.samsung.com/sa/home
http://www.samsung.com/sa_en
SENEGAL 800-00-0077 http://www.samsung.com/africa_fr/support
SOUTH AFRICA 0860 SAMSUNG (726 7864) http://www.samsung.com/support
SUDAN 1969 http://www.samsung.com/support
SYRIA 18252273 http://www.samsung.com/Levant
TANZANIA 0800 755 755 / 0685 889 900 http://www.samsung.com/support
TUNISIA 80 1000 12 http://www.samsung.com/n_africa/support
U.A.E 800-SAMSUNG (800 - 726 7864)
http://www.samsung.com/ae/support (English)
http://www.samsung.com/ae_ar/support (Arabic)
UGANDA 0800 300 300 http://www.samsung.com/support
ZAMBIA 0211 350370 http://www.samsung.com/support
LS19F350HN 中东向QSG_20160206_CS6.indd 2 2016/2/14 14:48:44
-
 1
1
-
 2
2


Samsung S19F350HNA Guia de usuario
- Tipo
- Guia de usuario
- Este manual também é adequado para
em outras línguas
- français: Samsung S19F350HNA Mode d'emploi
- English: Samsung S19F350HNA User guide
Artigos relacionados
-
Samsung S19F355HNL Guia de usuario
-
Samsung TC242W Guia rápido
-
Samsung HW-Q60R Guia rápido
-
Samsung HW-Q70R Manual do usuário
-
Samsung HW-MS650 Manual do usuário
-
-
-
Samsung HW-MS6501 Manual do usuário
-
-
Samsung HW-M4501 Guia rápido