Bose Wave® music system IV Manual do proprietário
- Categoria
- Tocadores de CD
- Tipo
- Manual do proprietário
Este manual também é adequado para

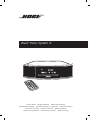
Wave
®
Music System IV
Owner’s Guide • Brugervejledning • Bedienungsanleitung
Gebruikershandleiding • Guía del propietario • Käyttöopas • Notice d’utilisation
Manuale di istruzioni • Kezelési útmutató • Brukerveiledning
Podręcznik użytkownika • Manual do proprietário • Bruksanvisning
®

2 - English
Important Safety Instructions
Please read this owner’s guide carefully and save it for
future reference.
The lightning flash with arrowhead symbol within an
equilateral triangle alerts the user to the presence of
uninsulated dangerous voltage within the system enclo-
sure that may be of sufficient magnitude to constitute a
risk of electrical shock.
The exclamation point within an equilateral triangle, as
marked on the system, is intended to alert the user to the
presence of important operating and maintenance
instructions in this owner’s guide.
WARNINGS:
• To reduce the risk of fire or electrical shock, do not expose the
product to rain or moisture.
• Do not expose this apparatus to dripping or splashing, and do
not place objects filled with liquids, such as vases, on or near the
apparatus. As with any electronic products, use care not to spill
liquids into any part of the system. Liquids can cause a failure
and/or a fire hazard.
• Keep new and used batteries away from children. Do not ingest
battery, chemical burn hazard. The remote control supplied with
this product contains a coin/button cell battery. If the coin/but-
ton cell battery is swallowed it can cause severe internal burns
in just 2 hours and can lead to death. If the battery compartment
does not close securely, stop using the product and keep it away
from children. If you think the battery may have been swallowed
or placed inside any part of the body seek immediate medical
attention. May explode or cause a fire or chemical burn if incor-
rectly replaced or mishandled. Do not recharge, disassemble,
heat above 212°F (100°C), or incinerate. Replace only with an
agency approved (ex. UL) CR2032 or DL2032 3-volt lithium bat-
tery. Dispose of used batteries promptly.
• Do not place any naked flame sources, such as lighted candles,
on or near the apparatus.
• To prevent electric shock, match the wide blade of the line cord
plug to the wide slot of the AC (mains) receptacle. Insert fully.
WARNING: This product contains magnetic material.
Contact your physician if you have questions on whether
this might affect the operation of your implantable medical
device.
WARNING: Contains small parts which may be a choking
hazard. Not suitable for children under age 3.
CAUTIONS:
• Make no modifications to the system or accessories. Unauthor-
ized alterations may compromise safety, regulatory compliance,
and system performance.
• Long-term exposure to loud music may cause hearing damage.
It is best to avoid extreme volume when using headphones,
especially for extended periods.
• Use of controls or adjustments or performance of procedures
other than those specified herein may result in hazardous
radiation exposure from the internal laser component. The
compact disc player should not be adjusted or repaired by
anyone except properly qualified service personnel.
• The DAB antenna connector on this unit is not intended to be
connected to a CATV system.
Notes:
• The product label is located on the bottom of the product.
• The product must be used indoors. It is neither designed nor
tested for use outdoors, in recreational vehicles, or on boats.
• Where the mains plug or appliance coupler is used as the
disconnect device, such disconnect device shall remain readily
operable.
Please dispose of used batteries properly, following any
local regulations. Do not incinerate.
Class 1 laser product
This CD player is classified as a CLASS 1 LASER PRODUCT
according to EN/IEC 60825. The CLASS 1 LASER PRODUCT label
is located on the bottom of the unit.
CLASS 1 LASER PRODUCT
KLASSE 1 LASER PRODUKT
LUOKAN 1 LASER LAITE
KLASS 1 LASER APPARAT
Important Safety Instructions
1. Read these instructions.
2. Keep these instructions.
3. Heed all warnings.
4. Follow all instructions.
5. Do not use this apparatus near water.
6. Clean only with a dry cloth.
7. Do not block any ventilation openings. Install in accordance
with the manufacturer’s instructions.
8. Do not install near any heat sources, such as radiators, heat
registers, stoves or other apparatus (including amplifiers) that
produce heat.
9. Protect the power cord from being walked on or pinched,
particularly at plugs, convenience receptacles, and the point
where they exit from the apparatus.
10. Only use attachments/accessories specified by the
manufacturer.
11.
Use only with the cart, stand, tripod, bracket, or table
specified by the manufacturer, or sold with the
apparatus. When a cart is used, use caution when
moving the cart/apparatus combination to avoid
injury from tip-over.
12. Unplug this apparatus during lightning storms or when unused
for long periods of time.
13. Refer all servicing to qualified service personnel. Servicing is
required when the apparatus has been damaged in any way:
such as power supply cord or plug is damaged; liquid has
been spilled or objects have fallen into the apparatus; the
apparatus has been exposed to rain or moisture, does not
operate normally, or has been dropped.
Bose Corporation hereby declares that this product is in
compliance with the essential requirements and other
relevant provisions of Directive 2014/53/EU and all other
applicable EU directive requirements. The complete
declaration of conformity can be found at:
www.Bose.com/compliance

English - 3
Regulatory Information
NOTE: This equipment has been tested and found to comply
with the limits for a Class B digital device, pursuant to Part 15 of
the FCC rules. These limits are designed to provide reasonable
protection against harmful interference in a residential installation.
This equipment generates, uses, and can radiate radio frequency
energy and, if not installed and used in accordance with the
instructions, may cause harmful interference to radio communica-
tions. However, this is no guarantee that interference will not occur
in a particular installation. If this equipment does cause harmful
interference to radio or television reception, which can be deter-
mined by turning the equipment off and on, you are encouraged
to try to correct the interference by one or more of the following
measures:
• Reorient or relocate the receiving antenna.
• Increase the separation between the equipment and receiver.
• Connect the equipment to an outlet on a different circuit than the
one to which the receiver is connected.
• Consult the dealer or an experienced radio/TV technician for
help.
Changes or modifications not expressly approved by Bose
Corporation could void the user’s authority to operate this
e quipment.
This device complies with part 15 of the FCC Rules. Operation is
subject to the condition that this device does not cause harmful
interference.
This device complies with part 15 of the FCC Rules. Operation is
subject to the following two conditions: (1) This device may not
cause harmful interference, and (2) this device must accept any
interference received, including interference that may cause unde-
sired operation.
This Class B digital apparatus complies with Canadian ICES-003.
CAN ICES-3(B)/ NMB-3(B)
This device complies with FCC and Industry Canada RF radiation
exposure limits set forth for general population. It must not be co-
located or be operating in conjunction with any other antennas or
transmitters.
This device complies with Industry Canada licence-exempt RSS
standard(s). Operation is subject to the following two conditions:
(1) This device may not cause interference, and (2) this device must
accept any interference, including interference that may cause
undesired operation of the device.
This equipment should be installed and operated with a minimum
distance of 8 in. (20 cm) between this device and your body.
Product data loger
This system features a product data logger that is designed to help
Bose better understand product usage and performance over time.
The product data logger records certain technical data and usage
history, including but not limited to volume levels, on/off data, user
settings, source inputs, power output, and setup data. We may use
this data to provide you with better service and support on your
system and to improve product design in the future. Special equip-
ment is required to read the data stored by the product data logger
and such data can only be retrieved by Bose if your system is re-
turned to Bose for service or as returned merchandise. The product
data logger does not collect any personally identifiable information
about you and does not record title, genre or other information
about the media content you access while using your system.
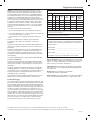
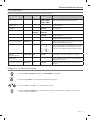
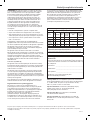
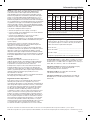
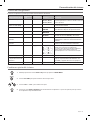
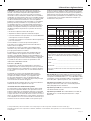
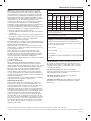
Names and Contents of Toxic or Hazardous Substances or Elements
Toxic or Hazardous Substances and Elements
Part
Name
Lead
(Pb)
Mercury
(Hg)
Cadmium
(Cd)
Hexava-
lent
(CR(VI))
Polybrominat-
ed Biphenyl
(PBB)
Polybromi-
nated diph-
enylether
(PBDE)
PCBs X O O O O O
Metal
parts
X O O O O O
Plastic
parts
O O O O O O
Speakers X O O O O O
Cables X O O O O O
This table is prepared in accordance with the provisions of SJ/T 11364.
O: Indicates that said hazardous substance contained in all of the homogeneous materials for this part
is below the limit requirement of GB/T 26572.
X: Indicates that said hazardous substance contained in at least one of the homogeneous materials
used for this part is above the limit requirement of GB/T 26572.
Please complete and retain for your records
Record the serial number of your new Wave
®
Music System IV in
the space below. The serial and model numbers can be found on
the bottom panel.
Serial number: _____________________________________________
Model number: ____________________________________________
Purchase date: _____________________________________________
We suggest you keep your receipt with this owner’s guide.
Date of manufacture: The four bolded digits in the serial number
indicate the date of manufacture. The first digit is the year of manu-
facture; “5” is 2005 or 2015. Digits 2-4 are the month and date;
“001” is January 1 and “365” is December 31.
China Importer: Bose Electronics (Shanghai) Company Limited,
Part C, Plan 9, No. 353 North Riying Road, China (Shanghai) Pilot
Free Trade Zone
EU Importer: Bose Products B.V., Gorslaan 60,
1441 RG Purmerend, The Netherlands
Taiwan Importer: Bose Taiwan Branch, Room 905, 9F, Worldwide
House, 131 Min Sheng East Rd, Section 3, Taipei, Taiwan, 105
The distinctive design of the Wave music system is a registered trademark of Bose Corporation in the U.S. and other countries.
©2017 Bose Corporation. No part of this work may be reproduced, modified, distributed or otherwise used without prior written permission.

4 - English
Introduction
About your Wave
®
Music System IV ..................................................... 4
System Features .............................................................................. 4
e demonstration CD .................................................................... 4
e benefits of research ................................................................. 4
Unpacking ................................................................................................. 4
Setting Up the System
Placing the system .................................................................................. 5
Connecting to power ............................................................................... 5
Setting the clock ...................................................................................... 5
Using the System
Remote control buttons ......................................................................... 6
Touch pad .................................................................................................. 7
Reading the display ................................................................................. 7
Powering on or off the system .............................................................. 7
Controlling the volume .......................................................................... 7
Setting the Sleep timer .......................................................................... 7
Listening to Other Sources
Listening to FM or AM radio................................................................... 8
Tuning to an FM/AM station ......................................................... 8
Storing FM/AM radio station Presets .......................................... 8
Improving FM reception ................................................................. 8
Listening to DIGITAL RADIO ................................................................... 8
Browsing available stations .......................................................... 8
Storing digital radio station presets ............................................ 8
Primary stations and secondary services ................................... 9
Re-scanning digital radio stations ............................................... 9
Displaying station information ..................................................... 9
Displaying station signal strength............................................... 9
Playing audio CDs .................................................................................... 9
Playing MP3 CDs .............................................................................. 10
CD Play Modes .................................................................................. 10
Setting and Using the Alarms
Alarm buttons and indicators ............................................................... 11
Using the Alarm buttons ............................................................... 11
Alarm status indicators .................................................................. 11
Setting the alarms ................................................................................... 11
Using the alarms...................................................................................... 11
Turning an alarm on or off ............................................................. 11
Snoozing an alarm .......................................................................... 11
Connecting Other Equipment
System connections ............................................................................... 12
Using the AUX IN connector .................................................................. 12
Using a cable to connect an audio device ................................... 12
Using headphones .................................................................................. 12
Using an external antenna .................................................................... 13
Installing an external FM radio antenna ..................................... 13
Installing an external DIGITAL RADIO antenna ......................... 13
Personalizing the System
e setup menu ....................................................................................... 14
Changing a system setting .................................................................... 14
Care and Maintenance
Troubleshooting ...................................................................................... 15
Replacing the remote control battery ................................................. 16
Cleaning ..................................................................................................... 16
Customer service ..................................................................................... 16
Limited warranty ..................................................................................... 16
Technical information ............................................................................. 16
Contents

English - 5
Introduction
About your Wave
®
Music System IV
Your Wave
®
Music System IV provides an elegant way to bring high
quality sound into any room.
System Features
• Display provides access to system settings and information.
• AUX connector enables playback from an audio device.
• Headphone connector for private listening.
• FM/AM tuner delivers precise radio reception.
• CD drive provides access to even more music.
• Remote control for point-and-click control from up to
20 feet away.
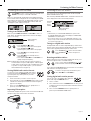
e demonstration CD
We encourage you to listen to the
demonstration music CD included
in the carton. Simply insert the
demonstration disc and your Wave
®
Music System IV will play the CD
automatically. For more details, see
“Playing audio CDs” on page 10.
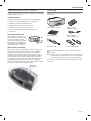
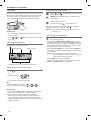
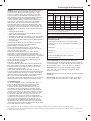
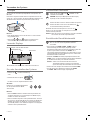
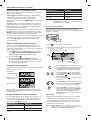
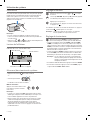
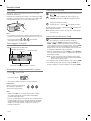
e benefits of research
Over fourteen years of research by Bose Corporation brings you
the benefits of award-winning proprietary acoustic waveguide
speaker technology. Using this technology, a tube efficiently
transfers energy from a small speaker to the outside air over a
wide range of low frequencies. And, long waveguides, folded into
intricate patterns, fit into products small enough to be placed
comfortably in your home. Your Wave
®
Music System IV features
dual tapered waveguide speaker technology, connecting two
speakers to two 26" tapered waveguides which combine to deliver
performance well beyond the size of the system.
Dual tapered
waveguides
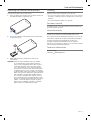
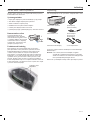
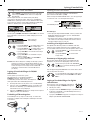
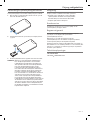
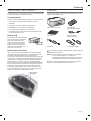
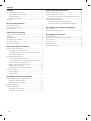
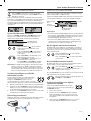
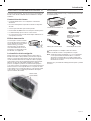
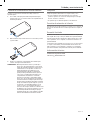
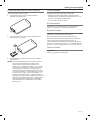
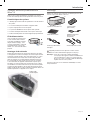
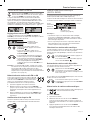
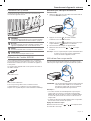
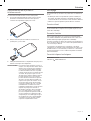
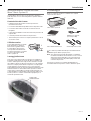
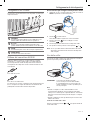
Unpacking
Carefully unpack the carton and confirm that the following parts
are included.
Wave
®
music system IV
Remote control
(battery installed)
Demonstration CD
AC power cord(s)
Antenna adapter
(Europe and UK only)
2.5 mm dipole antenna
®
May ship with multiple power cords. Use the power cord for
your region.
Note: If part of the system is damaged, do not use it. Contact your
authorized Bose
®
dealer or Bose customer service. Refer to
the quick start guide in the carton for contact information.
Save the carton and packing materials for transporting or storing
the system.

6 - English
Setting Up the System
Placing the system
• To enjoy maximum audio performance:
— Place the system across the room from where you listen.
— Place the system within two feet of a wall, and avoid placing
directly in a corner.
• Place the system on a flat, stable surface.
CAUTIONS:
• Do not place the system on a metal surface. It could interfere
with AM reception.
• Do not place the system on a heat-sensitive surface. Like all
electrical equipment, it generates some heat.
• Do not use the system in a damp location or any other place
where moisture can get inside.
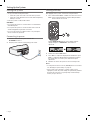
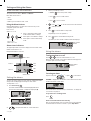
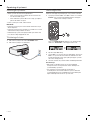
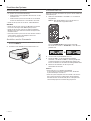
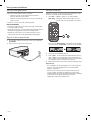
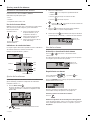
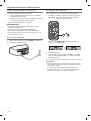
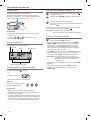
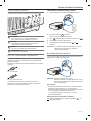
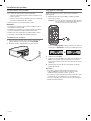
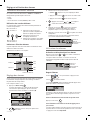
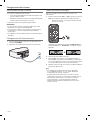
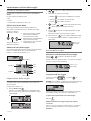
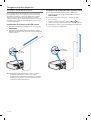
Connecting to power
1. Insert the small end of the power cord into the
AC POWER connector.
2. Plug the power cord into an AC (mains) power outlet.
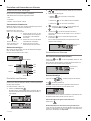
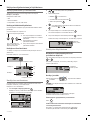
Setting the clock
After plugging in the system, set the clock using the remote.
1. Press and hold either Time – or Time + for about one second.
Note: Press-and-hold operations require holding the button
down for about one second.
Initially, HOLD TO SET appears on the display and then
quickly changes to – CLOCK SET – as the button is
depressed.
2. Release the selected Time button.
3. Press Time – to adjust the displayed time backward or press
Time + to adjust the displayed time forward until it matches
the current time. You can also press and hold for rapid
adjustment.
4. Wait five seconds for the system to exit clock setup mode.
Notes:
• To change the clock from 12-hour (AM/PM) time to 24-hour time,
see “Changing a system setting” on page 15.
• If the system loses power due to a power outage or if you
unplug the system, all system settings are permanently retained.
However, the clock time is only temporarily stored in backup
memory for up to 48 hours.

English - 7
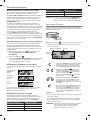
Using the System
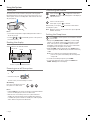
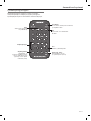
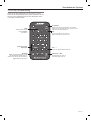
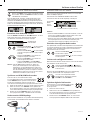
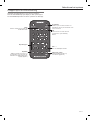
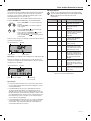
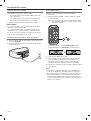
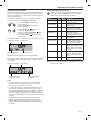
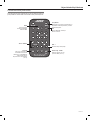
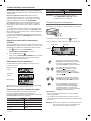
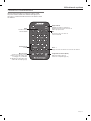
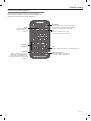
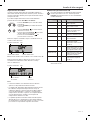
Remote control buttons
Use the remote control to operate the system. Aim
the remote at the display and press the buttons. The
remote works within 20 feet of the display.
Play Mode
Select shuffle and repeat options for CDs
(page 11); Change the display of digital
radio station information (page 9)
Radio
Toggles between radio on
and FM/AM selection
Playback controls
Alarm Setup - Menu
Alarm settings (page 12) and
setup menu (page 15)
Aux
Listen to a source connected to the
AUX IN connector
Sleep Buzzer
Snooze alarms, set system shut off timer,
and select Buzzer alarm
Time - +
Set clock and alarm times

8 - English
Touch pad
The system has a touch-sensitive control pad on the top panel.
Momentarily placing your hand on the touch pad can power on or
off the system, snooze a sounding alarm, and reset it for the next
day (see page 12).
Notes:
• Press-and-hold operations require holding the button down for
about one second.
• Pressing
, , or automatically powers on the system to
the selected source.
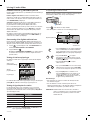
Reading the display
Source indicators: CD, FM, AM, or AUX
Play mode
Clock
Alarm status
Source or system-related information
Powering on or off the system
• Press on the remote control
or
• Touch the touch pad.
®
The last source you were listening to is active.
Alternatively:
Press any source button to power
the system on to that source.
Notes:
• Selecting AUX does not power on a device connected to AUX IN
(such as a media player). Power on the device first.
• After 24 hours of no button presses, the system switches to
standby (off). If the 20-minute system standby timer (page 15)
is enabled, the system switches to standby if no audio is played
and no buttons are pressed for 20 minutes.
Controlling the volume
Press and hold or to adjust the volume level.
VOLUME - 0 (silent) to 99 (loud) appears on the display to
indicate the level.
Press to mute the system.
Press again, or press
to unmute.
While muted, you can press
to lower the volume before
unmuting the system.
Note: When the system is off, the volume can only be adjusted
between 10 and 75.
Setting the Sleep timer
Press SLEEP to set the system to shut off after a selected
period of time.
• After pressing SLEEP, SLEEP - 30 MIN (or your last setting)
appears on the display and the sleep timer begins counting
down. If the system is off, press SLEEP to power on and
immediately set the sleep time. The last source selected will
start playing as the sleep timer counts down.
• While the SLEEP setting is displayed, press SLEEP again to
set the sleep timer to 10-90 minutes (in 10-minute increments)
or OFF.
Note: If more than 10 seconds elapses between button
presses, the system automatically exits the sleep timer
setup mode.
• To review the remaining sleep time, press SLEEP.
• To cancel the sleep timer, press and release SLEEP until
SLEEP - OFF appears on the display.
Using the System

English - 9
Listening to FM or AM radio
Press RADIO to turn it on to the station last selected. Press
RADIO as necessary to select FM or AM radio.
When you select FM radio, Radio Data System (RDS) information
for the current station is displayed. This is controlled by the RADIO
TEXT setting in the setup menu. To disable RDS and view only the
station frequency, change the RADIO TEXT setting to OFF. See
“Changing a system setting” on page 15.
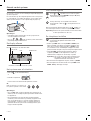
Tuning to an FM/AM station
When you press RADIO, Seek/Track, or Tune/MP3 to tune to a
radio station, the frequency appears in the center of the display
while you are tuning.
Station frequency
while tuning
• Press Seek/Track to find a
lower-frequency station with a strong signal.
• Press Seek/Track to find a
higher-frequency station with a strong signal.
• Press Tune/MP3 < to manually tune to a
lower frequency.
• Press Tune/MP3 > to manually tune to a
higher frequency.
• Press and hold Tune/MP3 < or Tune/MP3 > to
rapidly change the frequency.
Note: If AM reception is weak, rotate the system clockwise or
counterclockwise to improve AM reception. If FM reception
is weak, make sure the power cord is straightened as much
as possible. To improve FM reception, you can install an
external FM antenna (see page 14).
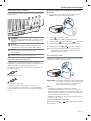
Storing FM/AM radio station Presets
You can store up to six FM and six AM radio stations
for quick recall using the PRESETS buttons. Storing
a preset replaces any station previously stored to
that preset number.
1. Tune to the station you want to save as a preset.
2. Press and hold one of the six PRESETS buttons until you hear
a double tone and the preset number and station frequency
appear on the display.
3. Press one of the PRESETS buttons to quickly tune to a
previously stored FM or AM station.
Improving FM reception
Unwind and straighten the power cord to ensure the best FM radio
reception. The power cord is used as an antenna.
Listening to DIGITAL RADIO
The system can receive Band III digital radio broadcasts (DAB,
DAB+ and DMB formats only).
After selecting a DIGITAL RADIO station, information about the sta-
tion is displayed such as in the following example:
Clock
time
Selected
source
Preset
number
Station information
(See page 10)
Notes:
• The first time you select DIGITAL RADIO, the system scans
for available digital radio stations and displays “PLEASE WAIT
SCANNING” for a few minutes.
• If you cannot receive one or more digital radio stations in your
area you may need to install the external antenna included with
your system (see page 14).
Tuning to a digital radio station
The digital radio tunes to stations alphabetically by station name.
Primary station names appear in alphabetical order with secondary
station names appearing after the primary station name.
Press Seek/Track to tune to the next station.
Press Seek/Track
to tune to the previous
station.
Browsing available stations
While to listening to the current station, digital radio allows you to
browse through the names of available stations.
Press, or press and hold Seek/Track or to
browse forward or back through digital stations.
If you release the Seek/Track button for more than one second, the
radio will tune to the displayed station.
To return to the previously tuned station, press
either Tune/MP3 < or Tune/MP3 >.
Storing digital radio station presets
You can store up to six DIGITAL radio stations for
quick recall using the PRESETS buttons.
1. Tune to a station.
2. Press and hold one of the six PRESETS buttons until you hear
a double tone and see the preset number and station informa-
tion displayed.
3. Press one of the PRESETS buttons to quickly tune to a
previously stored DIGITAL RADIO station.
Listening to Other Sources

10 - English
Primary stations and secondary services
Primary digital radio stations and secondary services are tuned in
the same manner.
Primary digital radio stations generally broadcast the same
number of hours as FM. If a primary digital radio station goes off
the air while you are listening, or if signal strength drops to zero,
UNAVAILABLE is displayed.
Secondary services are associated with a primary digital radio
station. They may only broadcast periodically and may broadcast
different program material than the primary digital radio station.
If a secondary service goes off-air while you are listening, or if
the signal strength drops to zero, OFF AIR is displayed for two
seconds. Then, the digital radio tunes to the associated primary
digital radio station.
When tuned to a primary digital radio station or secondary service
with a low signal, the display alternates between LOW SIGNAL and
the station name.
Re-scanning digital radio stations
You can re-scan for available digital radio stations at any time DIGI-
TAL RADIO is selected. This capability is useful if you change the
location of the system or decide to connect the external antenna.
1. Press and hold
until AUTOSCAN is displayed,
followed by PRESS PRESET 3 TO CONFIRM.
2. Press PRESETS
.
The message, PLEASE WAIT SCANNING is displayed until
scanning is done. When done, the first primary station is
played.
Displaying station information
There are three ways to display information about the currently
playing digital station:
Station name
(default setting):
Current program
content:
Program type:
To change the way station information is displayed, press Play
Mode until the type of information you want is displayed.
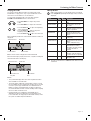
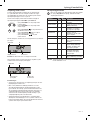
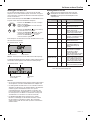
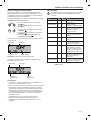
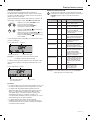
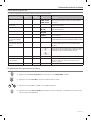
Displaying station signal strength
For the current station, signal strength is displayed as a numeric
percentage of full signal strength and its classification. To view the
signal strength of the current station, press and hold Play Mode.
Signal Strength(%) Classification
0 - 19 Low
20 - 39 Poor
40 - 79 Moderate
80 - 89 Good
90 - 100 Very Good
Note: If the station is UNAVAILABLE or OFF AIR, no signal
strength information is available.
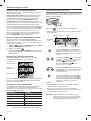
Playing audio CDs
Insert the disc, label side up, into the CD slot below the display.
The disc player pulls the disc in and begins playing.
®
Press if the CD source is not selected.
• When playing an audio CD, source information is displayed:
Selected source
Play
mode
Clock time
Track number Elapsed track time
• Press Play/Pause to pause a playing CD. The
elapsed time flashes while paused. Press Play/
Pause again to resume play.
• Press Seek/Track to skip to the beginning
of the current track; Press Seek/Track
again to skip to the beginning of the previous
track.
• Press Seek/Track to skip to the next track.
• Press and hold Tune/MP3 < to scan backward
quickly through a track; press Tune/MP3 > to
scan forward quickly through a track.
• Press Stop/Eject to stop a CD. Press Stop/
Eject again to eject a CD. If a CD is playing,
press and hold Stop/Eject to stop a CD and
eject it.
Notes:
• When you play a stopped CD it will always resume from the
place it was stopped.
• If you eject a CD but do not remove it from the CD player slot
within 10 seconds, the CD player will pull the CD back into the
player and reload it.
CAUTION: DO NOT INSERT mini CDs or non-circular CDs into
the disc player. These discs may not play properly and
could interfere with the system’s ability to eject them.
Listening to Other Sources

English - 11
Playing MP3 CDs
The system can play MP3 music files recorded on CD-R and
CD-RW discs. To play, pause, stop or eject an MP3 CD, use the
same remote control buttons as for an audio CD.
You can easily navigate through your music files using the
Tune/MP3 and Seek/Track remote control buttons.
• Press Tune/MP3 < to skip to the previous
folder.
• Press Tune/MP3 > to skip to the next folder.
• Press Seek/Track to skip to the beginning
of the current track.
• Press Seek/Track again to skip to the
beginning of the previous track.
• Press Seek/Track to skip to the next track.
When navigating an MP3 CD, folder number and track number are
displayed:
Selected source Clock time
Track numberFolder number
Note: The Root level is displayed as folder number 00.
Once the track begins playing, artist name, song title, and elapsed
track time will return to the display:
Selected source Clock time
Elapsed track
time
Artist name and
song title
Notes:
• The system will display artist name and song title information
when available on music file CDs.
• The audio quality of MP3 CDs is dependent on factors such as
the encoded bit rate, the sampling rate, and the type of encoder
used. The system supports MP3 CDs encoded at bit rates of
64kbps or higher, and sampling rates of 32kHz or higher. It is
recommended that a bit rate of at least 128kbps and a sampling
rate of 44.1kHz or better be used.
• Playback quality of recorded CD-R and CD-RW discs is
dependent on the CD recording process and software used
to record the disc. An improperly recorded audio CD may cause
the system to exhibit unexpected behavior.
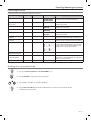
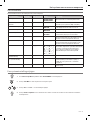
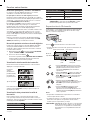
CD Play Modes
While a CD is playing, you can change the way it is played.
Press Play Mode repeatedly until the play mode you want is
displayed:
Mode CD MP3
Description
NORMAL PLAY
Plays tracks once in sequential
order.
SHUFFLE DISC
Plays all tracks once in ran-
dom order.
SHUFFLE RPT
Repeats all tracks in a random
order that changes each time
the disc is repeated.
REPEAT DISC
Repeats the disc from the
beginning after the last track is
played.
REPEAT TRACK
Repeats the selected track
continuously.
SHUFFLE FLDR
Plays all tracks in the selected
folder in
random order (MP3 only).
SHUF RPT FDR
Repeats all tracks in the
selected folder in random
order (MP3 only) that changes
each time the folder is
repeated.
SHUFF RPT CD
Repeats all tracks on a disc in
a random order that changes
each time the disc is repeated.
REPEAT FOLDR
Repeats all tracks in a folder in
order (MP3 only).
Note: The play mode will return to NORMAL PLAY whenever a CD
is inserted.
Listening to Other Sources

12 - English
Setting and Using the Alarms
Alarm buttons and indicators
The system has two alarms, Alarm 1 and Alarm 2.
Each alarm can be set for:
• Time
• Volume
• Wake-up source: buzzer, radio, or CD
Using the Alarm buttons
Using the Alarm buttons on the bottom of the remote you can
setup and operate each alarm:
Press to turn
Alarm 1 on or off.
Press to turn
Alarm 2 on or off.
1. Press to activate the Alarm Setup
mode and view Alarm 1 settings.
2. Press again to view Alarm 2 settings.
3. Press again to exit the Alarm Setup
mode.
Alarm status indicators
The upper right-hand corner of the display shows the alarm status
indicators if the alarm is set.
Example with Alarm 1 and 2 set:
Alarm 1 time
Alarm 1
Alarm 2
Alarm 2 time
AM
PM
AM
PM
Setting the alarms
You can choose the settings for each alarm by activating the Alarm
Setup mode and displaying the settings for each alarm.
To setup Alarm 1 or 2:
1. Press Alarm Setup
.
The alarm number and time start flashing (A) and after a
moment, the current Alarm 1 settings are displayed (B).
A
B
2. Using the Time buttons, set the alarm time.
3. Select your wake-up source:
• BUZZER
is the factory alarm setting.
• Press
to choose a radio station.
• Press
to choose a track.
4.
Press or to set the volume level of the selected
wake-up source.
5. Press
to enter the Alarm 2 setup mode.
Repeat Steps 2-4 to set up Alarm 2.
6. Press
again to exit the Alarm Setup mode.
The alarm you set is turned on and the alarm time displays:
Alarm number
and time
Using the alarms
Turning an alarm on or off
Press or to turn the selected alarm on or off.
When an alarm is turned on, the alarm number and time appear in
the upper right corner of the display.
Alarm number
and time
Snoozing an alarm
Tap the touch pad ,
®
or press on the remote.
SNOOZE is displayed for the duration of the selected snooze time
and then the alarm sounds again.
The snooze time is set at the factory to 10 minutes. To change the
snooze time, see page 15.
Stop and reset a sounding alarm
Press .
Reset a snoozed alarm for the next day
After snoozing the alarm, place your hand on the touch pad again
and hold it there for at least 2 seconds, or press Stop Alarm.

English - 13
System connections
The rear panel of the system provides connections for external
equipment.
2
3
4
1
1 ANTENNAS
3.5 mm FM antenna and 2.5 mm DAB antenna connectors.
See “Using an external antenna” on page 14.
2 Bose link
An input that accepts the output of another Bose link
enabled product via a Bose link cable.
3 AUX IN
3.5 mm stereo input connector for external sources.
4 HEADPHONES
A 3.5 mm stereo headphone connector.
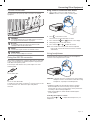
Using the AUX IN connector
When using a TV, DVD player, computer, video game or other audio
source, you can enhance your listening experience by playing the
audio device through the system.
Connecting an audio device to the system requires one of the
following cables:
3.5 mm audio cable
3.5 mm to stereo RCA cable
To obtain the correct cable, contact Bose
®
customer service or visit
a local electronics store. Refer to the quick start guide in
the carton.
Using a cable to connect an audio device
1. Using a cable, connect your audio device to the
AUX IN connector on the system’s connector panel.
2. Press on the remote control.
The last source you were listening to is active.
3. Press and release
until appears on the display.
4. Start playing music on the audio device.
5. Press and hold
or to adjust the volume.
Note: If the volume level of the system cannot be adjusted
high enough, increase the volume level of the connected
audio device.
Using headphones
For private listening, plug the headphones into the headphone
connector on the rear panel of the system.
CAUTION: Long-term exposure to loud music may cause hearing
damage. It is best to avoid extreme volume when using
headphones, especially for extended periods.
Notes:
• Plugging in headphones automatically mutes the speakers.
Because headphone volume levels may vary from speaker
volume levels, be sure to lower the volume of the system before
connecting or disconnecting headphones.
• While using headphones, alarms will be heard through the
system speakers.
Controlling the headphones volume:
Press and hold
or to adjust the listening level of your
headphones.
Connecting Other Equipment
3. Select your wake-up source:
• BUZZER
is the factory alarm setting.
• Press
to choose a radio station.
• Press
to choose a track.
4.
Press or to set the volume level of the selected
wake-up source.
5. Press
to enter the Alarm 2 setup mode.
Repeat Steps 2-4 to set up Alarm 2.
6. Press
again to exit the Alarm Setup mode.
The alarm you set is turned on and the alarm time displays:
Alarm number
and time
Using the alarms
Turning an alarm on or off
Press or to turn the selected alarm on or off.
When an alarm is turned on, the alarm number and time appear in
the upper right corner of the display.
Alarm number
and time
Snoozing an alarm
Tap the touch pad ,
®
or press on the remote.
SNOOZE is displayed for the duration of the selected snooze time
and then the alarm sounds again.
The snooze time is set at the factory to 10 minutes. To change the
snooze time, see page 15.
Stop and reset a sounding alarm
Press .
Reset a snoozed alarm for the next day
After snoozing the alarm, place your hand on the touch pad again
and hold it there for at least 2 seconds, or press Stop Alarm.

14 - English
Connecting Other Equipment
Using an external antenna
The system power cord is used as an antenna for FM radio. If, after
adjusting the position of the power cord, you still experience poor
reception, you may need to install an external antenna. An external
dipole antenna can be ordered through Bose Customer Service.
Refer to the quick start guide in the carton.
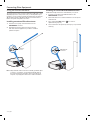
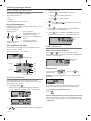
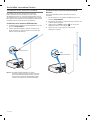
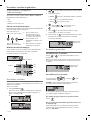
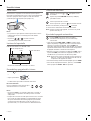
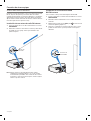
Installing an external FM radio antenna
1. Insert the 3.5 mm plug of the FM antenna into the
FM ANTENNA connector.
2. Extend the ends of the antenna as far from the unit
and other external equipment as possible to establish
optimum reception.
FM antenna
connector
Note: Many FM radio stations transmit a vertically polarized signal
as well as, or instead of, a horizontally polarized signal. If
the horizontal antenna orientation does not provide good
reception, try hanging the antenna in a vertical orientation.
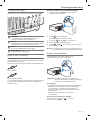
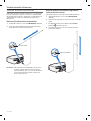
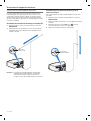
Installing an external DIGITAL RADIO antenna
A DAB external dipole antenna is included with your system.
1. Insert the 2.5 mm plug of the DAB antenna into the
DAB ANTENNA connector.
2. Extend the antenna in a vertical orientation as shown by the
vertical arrows.
3. Press and hold the Mute button
to re-scan for
digital stations (page 12).
4. Tune and check for the previously missing or poorly-received
station(s).
DAB antenna
connector

English - 15
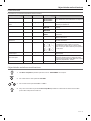
Personalizing the System
e setup menu
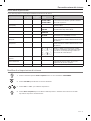
The setup menu allows you to customize the operation of the system.
System Setting Menu Item
Factory
Setting Choices Description
Snooze duration
SNOOZE- 10 MIN 10 MIN, 20 MIN,
30 MIN, 40 MIN,
50 MIN, 60 MIN
This setting determines the duration of time the system
remains silent when the snooze function is activated.
Radio Data System (RDS)
information
RADIO TEXT- ON ON, OFF
Enables (ON) or disables (OFF) the system to display RDS
information.
Continuous play
CONT PLAY- NO NO, AUX, FM,
AM, DAB
Determines which source will automatically play after a CD
ends.
Bass level
BASS- NORMAL NORMAL,
REDUCED
Adjusts the bass level.
Clock time format
TIME- 12 HOUR 12-HOUR,
24-HOUR
Sets the clock display for 12-hour (AM/PM) or 24-hour time.
Display high brightness
level
BRIGHT HI- 10 8-15
Sets the display brightness level when the unit detects high
ambient light conditions.
Display low brightness
level
BRIGHT LO- 4 1-8
Sets the display brightness level when the unit detects low
ambient light conditions.
Room code
ROOM- B _ _ _ – B _ _ _ –, C _ _ – _,
D _ _ – –, E _ – _ _,
F _ – _ –, G _ – – _,
H _ – – –, I – _ _ _,
J – _ _ –, K – _ – _,
L – _ – –, M – – _ _,
N – – _ –, O – – – _
Sets the room code for the system when it is connected
to a Bose link network. The dashes following the room
letter indicate how the microswitches should be set on a
Lifestyle
®
remote control.
Capacitive touch control
TOUCH PAD- ON ON, OFF
Enables (ON) or disables (OFF) the touch pad.
20-minute system standby
timer
AUTO OFF- YES YES, NO
Enables (YES) or disables (NO) the 20-minute system
standby timer. See “Powering on or off the system”
on page 8.
System reset
RESET ALL- NO NO, YES
Restores the system to factory settings.
Changing a system setting
1. Press and hold Alarm Setup/Menu until -SETUP MENU- is displayed.
2. Press Tune/MP3 to skip to the menu item you want.
3. Press Time + or Time – to change the setting.
4. Press Alarm Setup/Menu to exit the setup menu or wait 10 seconds for the setup menu to exit automatically.

16 - English
Troubleshooting
Problem What to do
System does not function • Connect the system to AC (mains) power.
• Unplug the power cord from the AC wall outlet for 10 seconds and then reconnect it; this resets
the system.
• Tap the touch pad on the top of the system (see page 8).
No sound • Increase the volume.
• Eject and reload the CD.
• Disconnect headphones from the system (connecting headphones mutes the speakers).
Poor sound quality • If the bass is too heavy or low, adjust the bass level of the system using the setup menu (see page 15)
• If listening to an external AUX source, use a stereo cable and make sure it is fully inserted.
Remote control is
inconsistent or does
not work
• Operate the remote control closer to the system.
• Check that the remote control battery is installed with positive (+) polarity facing up.
• Replace the remote control battery.
• Check for interference from fluorescent room lighting, sunlight, or dust or dirt on lens.
• Try the system in a different location.
AM reception is weak • Turn the system slightly one way and then the other to change the direction of the internal AM antenna.
• Move the unit farther from a TV, refrigerator, halogen lamps, dimmer switches, or other electronic
equipment that generates electrical noise.
• If neither suggestion works, you may be in an area of weak AM signal coverage.
FM reception is weak • Extend the power cord as much as possible. The power cord acts as an FM antenna (see page 9).
• See “Using an external antenna” on page 14.
CD does not play
• Select the CD source or press
. The CD icon appears on the display.
• Load the CD label-side up.
• Check that the disc surface is clean, If not, try cleaning it.
• Try another disc.
Care and Maintenance

English - 17
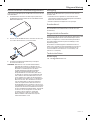
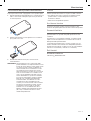
Replacing the remote control battery
Place the remote face down on a flat surface.
1. Using your finger, push the tab lock to the side as shown and
hold. Slide the battery compartment open.
2. Remove the old battery and install the new one with the plus
(+) symbol facing up.
3. Gently slide the battery compartment closed. It locks
automatically.
WARNING: Keep new and used batteries away from children.
Do not ingest battery, chemical burn hazard. The
remote control supplied with this product contains a
coin/button cell battery. If the coin/button cell bat-
tery is swallowed it can cause severe internal burns
in just two hours and can lead to death. If the battery
compartment does not close securely, stop using the
product and keep it away from children. If you think the
battery may have been swallowed or placed inside any
part of the body, seek immediate medical attention.
The coin/button cell battery may explode or cause a
fire or chemical burn if incorrectly replaced or mishan-
dled. Do not recharge, disassemble, heat above 212ºF
(100ºC), or incinerate. Replace only with an agency
approved (ex. UL) CR2032 or DL2032 3-volt lithium
battery. Dispose of used batteries promptly.
Cleaning
Clean the surface of the system with a soft, dry cloth.
• Do not use any sprays near the system. Do not use any solvents,
chemicals, or cleaning solutions containing alcohol, ammonia or
abrasives.
• Do not allow liquids to spill into any openings.
Customer service
For additional help, contact Bose Customer Service. Refer to the
quick start guide in the carton.
Limited warranty
Your system is covered by a limited warranty. Details of the limited
warranty are provided on the quick start guide in the carton.
Please refer to the quick start guide for instructions on how to reg-
ister. Failure to register will not affect your limited warranty rights.
The warranty information provided with this product does
not apply in Australia and New Zealand. See our website at
www.bose.com.au/warranty or www.bose.co.nz/warranty for details
of the Australia and New Zealand warranty.
Technical information
AC power rating
220-240V
50/60Hz 60W max.
Care and Maintenance

2 - Dansk
Vigtige sikkerhedsinstruktioner
Læs venligst denne brugervejledning omhyggeligt, og gem den,
så du har adgang til den senere.
En ligebenet trekant med et lyn med pilehoved gør
brugeren opmærksom på, at der i systemets kabinet kan
være uisoleret, farlig spænding, der kan være så kraftig,
at der er risiko for elektrisk stød.
Mærket med et udråbstegn i en ligesidet trekant skal gøre
brugeren opmærksom på vigtige betjenings- og
vedligeholdelsesinstruktioner i denne brugervejledning.
ADVARSLER:
• Produktet må ikke udsættes for regn eller fugtighed af hensyn til
risikoen for brand eller elektrisk stød.
• Udsæt ikke dette apparat for dryp eller stænk, og placer ikke
genstande, der er fyldt med væske, på eller nær ved apparatet.
Som ved alle elektriske apparater skal du passe på ikke at spilde
væske på nogen af systemdelene. Væsker kan forårsage fejl i
systemet og/eller medføre fare for brand.
• Opbevar nye og brugte batterier utilgængeligt for børn.
Undgå at sluge batteriet – fare for kemiske forbrændinger. Den
fjernbetjening, der følger med dette produkt, indeholder et mønt-/
knapcellebatteri. Hvis mønt-/knapcellebatteriet sluges, kan det
forårsage alvorlige indre forbrændinger på blot 2 timer, hvilken
kan være livsfarligt. Hvis batterirummet ikke lukker ordentligt,
skal du ophøre med at bruge produktet og opbevare det
utilgængeligt for børn. Hvis du har mistanke om, at batteriet kan
være blevet slugt eller er kommet ind et andet sted i kroppen,
skal du straks søge læge. Det kan eksplodere eller forårsage
brand eller kemiske forbrændinger, hvis det ikke udskiftes korrekt,
eller hvis det håndteres forkert. Undlad at genoplade batteriet,
skille det ad, opvarme det til over 100ºC eller brænde det. Må
kun udskiftes med et institutgodkendt (f.eks. UL) CR2032 eller
DL2032 3-volt litiumbatteri. Bortskaf brugte batterier omgående.
• Placer ikke nogen form for åben ild (f.eks. stearinlys) på eller tæt
ved apparatet.
• Sørg for, at det brede kontaktben på ledningsstikket passer til
den brede spalteåbning i stikkontakten af hensyn til risikoen for
elektrisk stød. Indsæt benet helt.
ADVARSEL: Dette produkt indeholder magnetisk materiale.
Kontakt din læge, hvis du er i tvivl om, hvorvidt dette kan
påvirke din implanterbare medicinske enheds funktion.
ADVARSEL: Indeholder små dele, som kan udgøre en
kvælningsfare. Egner sig ikke til børn under 3 år.
FORSIGTIG:
• Undlad at foretage ændringer i systemet eller tilbehøret.
Uautoriserede ændringer kan sætte sikkerheden, overholdelse af
lovbestemmelser samt systemets ydeevne over styr.
• Langtidseksponering for høj musik kan give høreskader.
Undgå ekstreme lydstyrker ved brug af hovedtelefoner, især i
længere perioder.
• Brug af betjeningsfunktioner eller justeringer eller udførelse
af procedurer ud over dem, der er anført i dette dokument,
kan medføre udsættelse for farlig stråling fra den indvendige
laserkomponent. Cd-afspilleren må ikke justeres eller repareres af
andre end kvalificeret servicepersonale.
• DAB-antennestikket på denne enhed er ikke beregnet til
tilslutning til et CATV-system.
Bemærkninger:
• Produktmærkaten er placeret i bunden af produktet.
• Produktet skal anvendes inden døre. Det er hverken designet
eller testet til udendørs brug i fritidskøretøjer eller i lystbåde.
• Hvis netstikket eller stikdåsen anvendes som afbryder,
skal denne afbryder være let at komme til.
Bortskaf brugte batterier korrekt i overensstemmelse
med eventuelle lokale regler. Batterier må ikke brændes.
Klasse 1-laserprodukt
Denne cd-afspiller er klassificeret som et KLASSE 1
LASERPRODUKT i henhold til EN/IEC 60825. Etiketten CLASS 1
LASER PRODUCT er placeret på undersiden af enheden.
CLASS 1 LASER PRODUCT
KLASSE 1 LASER PRODUKT
LUOKAN 1 LASER LAITE
KLASS 1 LASER APPARAT
Vigtige sikkerhedsinstruktioner
1. Læs disse instruktioner.
2. Gem disse instruktioner.
3. Ret dig efter alle advarsler.
4. Følg alle instruktioner.
5. Anvend ikke dette apparat i nærheden af vand.
6. Rengør kun med en tør klud.
7. Undgå at blokere ventilationsåbningerne. Installer i
overensstemmelse med producentens instruktioner.
8. Installer ikke i nærheden af varmekilder, såsom radiatorer,
varmeovne, komfurer eller andre apparater (herunder
forstærkere), der frembringer varme.
9. Beskyt netledningen mod at blive trådt på eller klemt, især
ved stikkene, stikkontakter og på det sted, hvor den kommer
ud af apparatet.
10. Brug kun tilslutningsudstyr/tilbehør, der er angivet af
producenten.
11.
Brug kun apparatet sammen med en vogn, et stativ,
et beslag eller et bord, der er angivet af producenten
eller solgt sammen med apparatet. Når der anvendes
en vogn, skal der udvises forsigtighed ved kørsel
med vogn/apparat, så det ikke vælter.
12. Afbryd strømmen til apparatet under tordenvejr, eller når det
står ubrugt i lang tid.
13. Overlad al servicering til kvalificeret servicepersonale.
Et serviceeftersyn er påkrævet, når apparatet på nogen
måde er beskadiget, hvis f.eks. netledningen eller stikket er
beskadiget, der er blevet spildt væske, eller der er kommet
objekter ind i apparatet, hvis apparatet er blevet udsat for regn
eller fugt, ikke virker normalt eller er blevet tabt.
Bose Corporation erklærer hermed, at dette produkt
stemmer overens med de væsentlige krav og andre
relevante bestemmelser i direktiv 2014~/53/EU og alle
andre
relevante krav i EU-direktiver. Den fulde
overensstemmelseserklæring kan findes på
www.Bose.com/compliance

Dansk - 3
Oplysninger om regler
BEMÆRK: Dette udstyr er testet og overholder grænseværdierne
for en digital enhed i Klasse B, afsnit 15 af FCCs bestemmelser.
Disse grænser er udviklet til at yde rimelig beskyttelse mod
skadelig interferens i en privat installation. Dette udstyr
genererer, bruger og kan udstråle radiofrekvensenergi, og kan –
hvis det ikke installeres og bruges i overensstemmelse med
instruktionerne – forårsage skadelig interferens i forbindelse med
radiokommunikation. Dette garanterer dog ikke, at der ikke kan
forekomme interferens i en særskilt installation. Hvis dette udstyr
forårsager skadelig interferens i forbindelse med radio- og tv-
modtagelsen, hvilket kan kontrolleres ved at slukke og tænde for
udstyret, opfordres du til at forsøge at eliminere interferensen ved
hjælp af en eller flere af følgende fremgangsmåder:
• Ret modtageantennen i en anden retning, eller flyt antennen.
• Skab større afstand mellem udstyret og modtageren.
• Tilslut udstyret til en stikkontakt på et andet kredsløb end det,
hvor modtageren er tilsluttet.
• Kontakt forhandleren eller en radio/tv-tekniker for at få hjælp.
Ændringer eller modifikationer, der ikke udtrykkeligt er godkendt
af Bose Corporation, kan ophæve brugerens ret til at betjene
dette udstyr.
Dette apparat overholder afsnit 15 i FCC-reglerne. Driften er
underlagt betingelsen, at denne enhed ikke forårsager skadelig
interferens.
Dette apparat overholder afsnit 15 i FCC-reglerne. Driften er
underlagt følgende to betingelser: (1) Denne enhed må ikke
forårsage skadelig interferens, og (2) denne enhed skal acceptere
enhver modtaget interferens, herunder interferens, der kan
forårsage uønsket drift.
Denne digitale Klasse B-enhed efterlever den canadiske ICES-003.
CAN ICES-3 (B) /NMB-3 (B)
Denne enhed overholder FCC’s og Industry Canadas
strålingseksponeringsgrænser for befolkningen i almindelighed.
Den må ikke placeres sammen med eller anvendes sammen med
nogen andre antenner eller sendere.
Denne enhed efterlever Industry Canadas licensfritagede
RSS-standard(er) Driften er underlagt følgende to betingelser:
(1) Denne enhed må ikke forårsage skadelig interferens, og (2)
denne enhed skal acceptere enhver interferens, herunder interferens,
der kan forårsage, at apparatet ikke fungerer efter hensigten.
Dette udstyr skal installeres og anvendes med en afstand på
mindst 20 cm mellem enheden og din krop.
Produktdataloger
Dette system har en produktdatalogger, som er designet til at
hjælpe Bose med bedre at forstå produktets brug og ydelse
over tid. Produktdataloggeren registrerer visse tekniske data og
brugshistorisk, herunder, men ikke begrænset til, lydstyrkeniveauer,
tænd/sluk-data, brugerindstillinger, kildeindgange, effektoutput
samt opsætningsdata. Vi vil eventuelt bruge disse data til at
give dig bedre service og support til dit system og til at forbedre
produktdesignet i fremtiden. Der kræves specialudstyr for at læse
de data, som produktdataloggeren gemmer, og sådanne data
kan kun læses af Bose, hvis dit system returneres til Bose med
henblik på service eller som returneret vare. Produktdataloggeren
indsamler ikke nogen personidentificerbare oplysninger om dig
og registrerer ikke titel, genre eller andre oplysninger om det
medieindhold, som du får adgang til, mens du bruger dit system.
Navne på og indhold af giftige eller farlige stoffer eller elementer
Giftige eller farlige stoffer og elementer
Delens
navn
Bly
(Pb)
Kviksølv
(Hg)
Cadmium
(Cd)
Hexavalent
(CR(VI))
Polybromeret
biphenyl (PBB)
Polybromeret
diphenylether
(PBDE)
PCB’er X O O O O O
Metaldele X O O O O O
Plastikdele O O O O O O
Højttalere X O O O O O
Kabler X O O O O O
Denne tabel er oprettet i henhold til bestemmelserne i SJ/T 11364.
O: Angiver, at dette nævnte skadelige stof, som findes i alle de homogene materialer for denne del,
er under grænsekravet i GB/T 26572.
X: Angiver, at dette nævnte skadelige stof, som findes i mindst ét af de homogene materialer,
der anvendes til denne del, er over grænsekravet i GB/T 26572.
Bedes udfyldt og opbevaret, så du har det til rådighed
Skriv serienummeret for dit nye Wave
®
Music System IV herunder.
Serie- og modelnummeret kan findes på det nederste panel.
Serienummer: _____________________________________________
Modelnummer: ____________________________________________
Købsdato: _________________________________________________
Vi anbefaler, at du opbevarer kvitteringen sammen med denne
brugervejledning.
Fremstillingsdato: De fire cifre med fed skrift i serienummeret
angiver fremstillingsdatoen. Det første ciffer er fremstillingsåret:
”5” er 2005 eller 2015. Cifrene 2-4 er måned og dato. ”001” er
1. januar og ”365” er 31. december.
Importør i Kina: Bose Electronics (Shanghai) Company Limited,
Part C, Plan 9, No. 353 North Riying Road, China (Shanghai)
Pilot Free Trade Zone
Importør i EU: Bose Products B.V., Gorslaan 60, 1441 RG Purmerend,
Holland
Importør i Taiwan: Bose Taiwan Branch, Room 905, 9F, Worldwide
House, 131 Min Sheng East Rd, Section 3, Taipei, Taiwan, 105
Wave-musiksystemets karakteristiske design er et registreret varemærke, der tilhører Bose Corporation i USA og andre lande.
©2017 Bose Corporation. Gengivelse, ændring, distribution eller anden brug af denne dokumentation eller dele heraf er forbudt uden forudgående skriftlig
tilladelse.

4 - Dansk
Indledning
Om dit Wave
®
Music System IV ............................................................. 5
Systemegenskaber ......................................................................... 5
Demonstrations-cd’en .................................................................... 5
Fordelene ved forskning ................................................................. 5
Udpakning ................................................................................................. 5
Opsætning af systemet
Placering af systemet ............................................................................. 6
Tilslutning af strøm ................................................................................. 6
Indstilling af uret ..................................................................................... 6
Anvendelse af systemet
Fjernbetjeningsknapper ......................................................................... 7
Touchpad .................................................................................................. 8
Læsning af displayet ............................................................................... 8
Tænd eller sluk for systemet ................................................................. 8
Regulering af lydstyrken ........................................................................ 8
Indstilling af sleeptimer ......................................................................... 8
Lytning til andre kilder
Lytning til FM- eller AM-radio ................................................................ 9
Indstilling til en FM/AM-station ................................................... 9
Lagring af forudindstillinger for FM/AM-radiostation .............. 9
Forbedring af FM-modtagelsen .................................................... 9
Lytning til DIGITAL RADIO ...................................................................... 9
Gennemsyn af tilgængelige stationer ......................................... 9
Lagring af forudindstillinger for digitale radiostationer .......... 9
Primære stationer og sekundære tjenester ............................... 10
Genscanning efter digitale radiostationer ................................. 10
Visning af stationsoplysninger ..................................................... 10
Visning af signalstyrke for station ............................................... 10
Afspilning af musik-cd’er ........................................................................ 10
Afspilning af MP3-cd’er .................................................................. 11
Cd-afspilningstilstande .................................................................. 11
Indstilling og brug af alarmer
Alarmknapper og -indikatorer ............................................................... 12
Brug af alarmknapperne................................................................. 12
Statusindikatorer for alarm ........................................................... 12
Indstilling af alarmer .............................................................................. 12
Brug af alarmerne .................................................................................... 12
Sådan slås en alarm til eller fra ..................................................... 12
Brug af snooze ................................................................................. 12
Tilslutning af andet udstyr
Systemtilslutninger ................................................................................ 13
Brug af AUX IN-stikket ............................................................................ 13
Brug af et kabel til at tilslutte en lydenhed ................................ 13
Brug af hovedtelefoner ........................................................................... 13
Brug af en ekstern antenne ................................................................... 14
Installation af en ekstern FM-radioantenne .............................. 14
Installation af en ekstern DIGITAL RADIO-antenne .................. 14
Personlig tilpasning af systemet
Opsætningsmenuen ............................................................................... 15
Ændring af en systemindstilling .......................................................... 15
Pleje og vedligeholdelse
Fejlfinding ................................................................................................. 16
Udskiftning af fjernbetjeningens batteri ............................................ 17
Rengøring .................................................................................................. 17
Kundeservice ............................................................................................ 17
Begrænset garanti .................................................................................. 17
Tekniske oplysninger .............................................................................. 17
Indhold
A página está carregando...
A página está carregando...
A página está carregando...
A página está carregando...
A página está carregando...
A página está carregando...
A página está carregando...
A página está carregando...
A página está carregando...
A página está carregando...
A página está carregando...
A página está carregando...
A página está carregando...
A página está carregando...
A página está carregando...
A página está carregando...
A página está carregando...
A página está carregando...
A página está carregando...
A página está carregando...
A página está carregando...
A página está carregando...
A página está carregando...
A página está carregando...
A página está carregando...
A página está carregando...
A página está carregando...
A página está carregando...
A página está carregando...
A página está carregando...
A página está carregando...
A página está carregando...
A página está carregando...
A página está carregando...
A página está carregando...
A página está carregando...
A página está carregando...
A página está carregando...
A página está carregando...
A página está carregando...
A página está carregando...
A página está carregando...
A página está carregando...
A página está carregando...
A página está carregando...
A página está carregando...
A página está carregando...
A página está carregando...
A página está carregando...
A página está carregando...
A página está carregando...
A página está carregando...
A página está carregando...
A página está carregando...
A página está carregando...
A página está carregando...
A página está carregando...
A página está carregando...
A página está carregando...
A página está carregando...
A página está carregando...
A página está carregando...
A página está carregando...
A página está carregando...
A página está carregando...
A página está carregando...
A página está carregando...
A página está carregando...
A página está carregando...
A página está carregando...
A página está carregando...
A página está carregando...
A página está carregando...
A página está carregando...
A página está carregando...
A página está carregando...
A página está carregando...
A página está carregando...
A página está carregando...
A página está carregando...
A página está carregando...
A página está carregando...
A página está carregando...
A página está carregando...
A página está carregando...
A página está carregando...
A página está carregando...
A página está carregando...
A página está carregando...
A página está carregando...
A página está carregando...
A página está carregando...
A página está carregando...
A página está carregando...
A página está carregando...
A página está carregando...
A página está carregando...
A página está carregando...
A página está carregando...
A página está carregando...
A página está carregando...
A página está carregando...
A página está carregando...
A página está carregando...
A página está carregando...
A página está carregando...
A página está carregando...
A página está carregando...
A página está carregando...
A página está carregando...
A página está carregando...
A página está carregando...
A página está carregando...
A página está carregando...
A página está carregando...
A página está carregando...
A página está carregando...
A página está carregando...
A página está carregando...
A página está carregando...
A página está carregando...
A página está carregando...
A página está carregando...
A página está carregando...
A página está carregando...
A página está carregando...
A página está carregando...
A página está carregando...
A página está carregando...
A página está carregando...
A página está carregando...
A página está carregando...
A página está carregando...
A página está carregando...
A página está carregando...
A página está carregando...
A página está carregando...
A página está carregando...
A página está carregando...
A página está carregando...
A página está carregando...
A página está carregando...
A página está carregando...
A página está carregando...
A página está carregando...
A página está carregando...
A página está carregando...
A página está carregando...
A página está carregando...
A página está carregando...
A página está carregando...
A página está carregando...
A página está carregando...
A página está carregando...
A página está carregando...
A página está carregando...
A página está carregando...
A página está carregando...
A página está carregando...
A página está carregando...
A página está carregando...
A página está carregando...
A página está carregando...
A página está carregando...
A página está carregando...
A página está carregando...
A página está carregando...
A página está carregando...
A página está carregando...
A página está carregando...
A página está carregando...
A página está carregando...
A página está carregando...
A página está carregando...
A página está carregando...
A página está carregando...
A página está carregando...
A página está carregando...
A página está carregando...
A página está carregando...
A página está carregando...
A página está carregando...
A página está carregando...
A página está carregando...
A página está carregando...
A página está carregando...
A página está carregando...
A página está carregando...
A página está carregando...
A página está carregando...
A página está carregando...
A página está carregando...
-
 1
1
-
 2
2
-
 3
3
-
 4
4
-
 5
5
-
 6
6
-
 7
7
-
 8
8
-
 9
9
-
 10
10
-
 11
11
-
 12
12
-
 13
13
-
 14
14
-
 15
15
-
 16
16
-
 17
17
-
 18
18
-
 19
19
-
 20
20
-
 21
21
-
 22
22
-
 23
23
-
 24
24
-
 25
25
-
 26
26
-
 27
27
-
 28
28
-
 29
29
-
 30
30
-
 31
31
-
 32
32
-
 33
33
-
 34
34
-
 35
35
-
 36
36
-
 37
37
-
 38
38
-
 39
39
-
 40
40
-
 41
41
-
 42
42
-
 43
43
-
 44
44
-
 45
45
-
 46
46
-
 47
47
-
 48
48
-
 49
49
-
 50
50
-
 51
51
-
 52
52
-
 53
53
-
 54
54
-
 55
55
-
 56
56
-
 57
57
-
 58
58
-
 59
59
-
 60
60
-
 61
61
-
 62
62
-
 63
63
-
 64
64
-
 65
65
-
 66
66
-
 67
67
-
 68
68
-
 69
69
-
 70
70
-
 71
71
-
 72
72
-
 73
73
-
 74
74
-
 75
75
-
 76
76
-
 77
77
-
 78
78
-
 79
79
-
 80
80
-
 81
81
-
 82
82
-
 83
83
-
 84
84
-
 85
85
-
 86
86
-
 87
87
-
 88
88
-
 89
89
-
 90
90
-
 91
91
-
 92
92
-
 93
93
-
 94
94
-
 95
95
-
 96
96
-
 97
97
-
 98
98
-
 99
99
-
 100
100
-
 101
101
-
 102
102
-
 103
103
-
 104
104
-
 105
105
-
 106
106
-
 107
107
-
 108
108
-
 109
109
-
 110
110
-
 111
111
-
 112
112
-
 113
113
-
 114
114
-
 115
115
-
 116
116
-
 117
117
-
 118
118
-
 119
119
-
 120
120
-
 121
121
-
 122
122
-
 123
123
-
 124
124
-
 125
125
-
 126
126
-
 127
127
-
 128
128
-
 129
129
-
 130
130
-
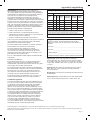 131
131
-
 132
132
-
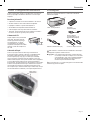 133
133
-
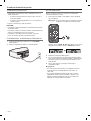 134
134
-
 135
135
-
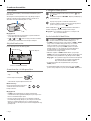 136
136
-
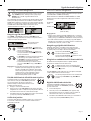 137
137
-
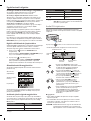 138
138
-
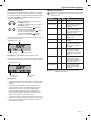 139
139
-
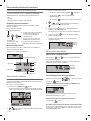 140
140
-
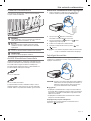 141
141
-
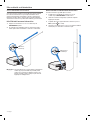 142
142
-
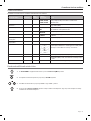 143
143
-
 144
144
-
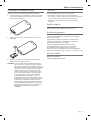 145
145
-
 146
146
-
 147
147
-
 148
148
-
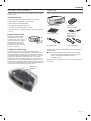 149
149
-
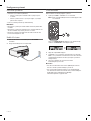 150
150
-
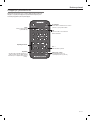 151
151
-
 152
152
-
 153
153
-
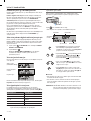 154
154
-
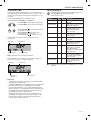 155
155
-
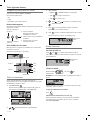 156
156
-
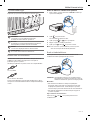 157
157
-
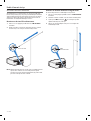 158
158
-
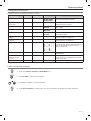 159
159
-
 160
160
-
 161
161
-
 162
162
-
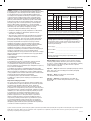 163
163
-
 164
164
-
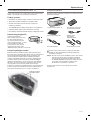 165
165
-
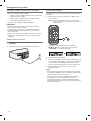 166
166
-
 167
167
-
 168
168
-
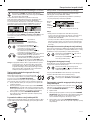 169
169
-
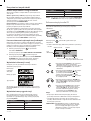 170
170
-
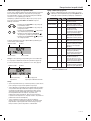 171
171
-
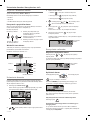 172
172
-
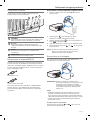 173
173
-
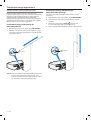 174
174
-
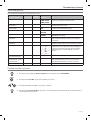 175
175
-
 176
176
-
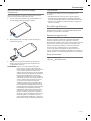 177
177
-
 178
178
-
 179
179
-
 180
180
-
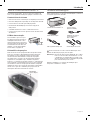 181
181
-
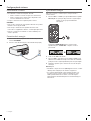 182
182
-
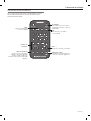 183
183
-
 184
184
-
 185
185
-
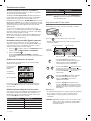 186
186
-
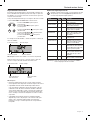 187
187
-
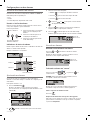 188
188
-
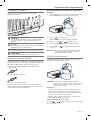 189
189
-
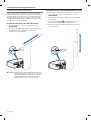 190
190
-
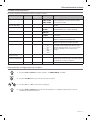 191
191
-
 192
192
-
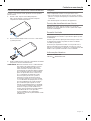 193
193
-
 194
194
-
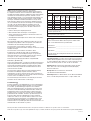 195
195
-
 196
196
-
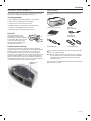 197
197
-
 198
198
-
 199
199
-
 200
200
-
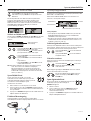 201
201
-
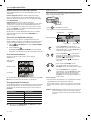 202
202
-
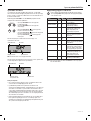 203
203
-
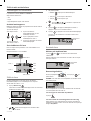 204
204
-
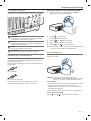 205
205
-
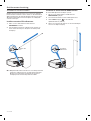 206
206
-
 207
207
-
 208
208
-
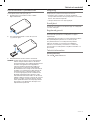 209
209
-
 210
210
-
 211
211
-
 212
212


Bose Wave® music system IV Manual do proprietário
- Categoria
- Tocadores de CD
- Tipo
- Manual do proprietário
- Este manual também é adequado para
em outras línguas
- español: Bose Wave® music system IV El manual del propietario
- français: Bose Wave® music system IV Le manuel du propriétaire
- italiano: Bose Wave® music system IV Manuale del proprietario
- Nederlands: Bose Wave® music system IV de handleiding
- Deutsch: Bose Wave® music system IV Bedienungsanleitung
- dansk: Bose Wave® music system IV Brugervejledning
- svenska: Bose Wave® music system IV Bruksanvisning
Artigos relacionados
Outros documentos
-
Behringer CHORUS ORCHESTRA CO600 Important Notes
-
AIPTEK PocketCinema-T15 Manual do proprietário
-
Yamaha GX-50 Manual do proprietário
-
-
-
-
Tangent CINQUE CD-DAB RADIO Manual do proprietário
-
-
Sony dream machine icf-cd837l Manual do usuário
-