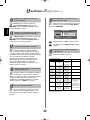
Toshiba Universal Remote C300 Manual do usuário
- Categoria
- TVs
- Tipo
- Manual do usuário
Este manual também é adequado para

C300*
C350*
R350*
Series
TOSHIBA
pg

pg

English
3
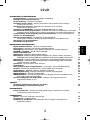
Contents
SETTING UP
Safety precautions – Some do’s and don’ts for you to be aware of 4
Installation and important information 5
The remote control – an at-a-glance guide 6
Connecting external equipment – a guide to connecting external equipment to the back of
the television 7
Connecting a computer – connecting a computer to the back of the television 8
Connecting REGZA-LINK – connecting Toshiba REGZA-LINK equipment 9
Controls and input connections – switching on the television, standby, using the controls,
headphone socket, connecting equipment to the side input sockets 10
Tuning the television using Quick Setup – language, country 11
Sorting programme positions 11
Manual tune – an alternative to Quick Setup, direct entry of channels, tuning a programme
position for a media recorder 12
Programme skip 13
Auto tune 14
CONTROLS AND FEATURES
General controls – changing programme position 14
Sound controls – volume, sound mute, bass/treble/balance 14
Sound controls – bass boost, super woofer, dual, stable sound
®
15
SRS WOW™ sound effects – SRS 3D, FOCUS, TruBass 15
Widescreen viewing 16
Picture controls – picture position, back light 18
Picture controls – picture preferences (contrast, brightness, colour, tint, sharpness), black stretch,
MPEG noise reduction (MPEG NR), digital noise reduction (DNR), colour temperature 19
Picture controls – 3D colour management, base colour adjustment, active backlight control,
cinema mode 20
Picture controls – automatic format (widescreen), 4:3 stretch, blue screen, side panel adjustment,
picture still 21
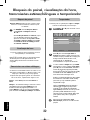
Panel lock – disabling the buttons on the television 22
Time display 22
Stereo and bilingual transmissions – stereo/mono or dual language broadcasts 22
The timer – setting the television to turn on and off 22
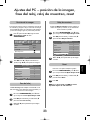
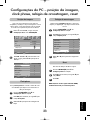
PC Setting – picture position, clock phase, sampling clock, reset 23
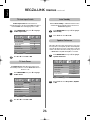
REGZA-LINK controls – general information, input source selection 24
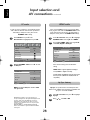
REGZA-LINK menus – enable REGZA-LINK 25
REGZA-LINK menus – TV auto input switch, TV auto power, auto standby, speaker preference 26
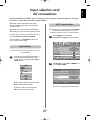
Input selection and AV connections – input and output sockets for connected equipment, lip sync 27
TEXT SERVICES
Setting up, general information, Auto. and LIST modes 29
Control buttons 30
PROBLEM SOLVING
Questions and Answers – answers to some of the more common queries including
manual fine tuning and colour system 31
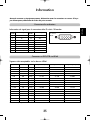
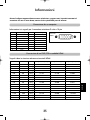
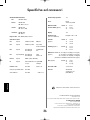
INFORMATION
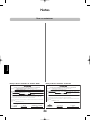
Notes – for your own records 33
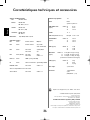
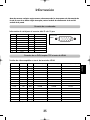
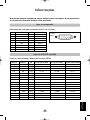
Information – signal information 35
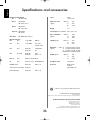
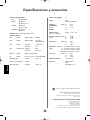
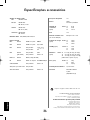
Specifications and Accessories – technical information about the television, supplied accessories 36
gg

English
4
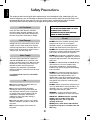
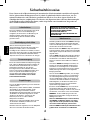
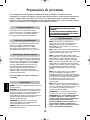
Safety Precautions
This equipment has been designed and manufactured to meet international safety standards but, like any
electrical equipment, care must be taken to obtain the best results and for safety to be assured. Please read
the points below for your own safety. They are of a general nature, intended to help with all electronic
consumer products and some points may not apply to the goods you have just purchased.
Leave more than 10cm clearance around the
television to allow adequate ventilation. This will
prevent overheating and possible damage to the
television. Dusty places should also be avoided.
Damage may occur if the television is left in direct
sunlight or near a heater. Avoid places subject to
extremely high temperatures or humidity. Place in a
location where the temperature remains between
5°C (41°F) min. and 35°C (94°F) max.
The mains supply required for this equipment is
220-240v AC 50/60Hz. Never connect to a DC
supply or any other power source. DO ensure that
the television is not standing on the mains lead.
DO NOT cut off the mains plug from this
equipment, this incorporates a special Radio
Interference Filter, the removal of which will impair
its performance.
IF IN DOUBT PLEASE CONSULT A COMPETENT
ELECTRICIAN.
DO read the operating instructions before you
attempt to use the equipment.
DO ensure that all electrical connections
(including the mains plug, extension leads and
inter-connections between pieces of equipment)
are properly made and in accordance with the
manufacturers’ instructions. Switch off and
withdraw the mains plug before making or
changing connections.
DO consult your dealer if you are ever in doubt
about the installation, operation or safety of your
equipment.
DO be careful with glass panels or doors on
equipment.
Air Circulation
Heat Damage
Mains Supply
Do
DO NOT obstruct the ventilation openings of the
equipment with items such as newspapers,
tablecloths, curtains, etc. Overheating will cause
damage and shorten the life of the equipment.
DO NOT allow electrical equipment to be exposed
to dripping or splashing or objects filled with liquids,
such as vases, to be placed on the equipment.
DO NOT place hot objects or naked flame sources,
such as lighted candles or nightlights on, or close to
equipment. High temperatures can melt plastic and
lead to fires.
DO NOT use makeshift stands and NEVER fix legs
with wood screws. To ensure complete safety,
always fit the manufacturers’ approved stand,
bracket or legs with the fixings provided according
to the instructions.
DO NOT leave equipment switched on when it is
unattended, unless it is specifically stated that it is
designed for unattended operation or has a
standby mode. Switch off by withdrawing the plug,
make sure your family know how to do this. Special
arrangements may need to be made for people
with disabilities.
DO NOT continue to operate the equipment if you
are in any doubt about it working normally, or it is
damaged in any way – switch off, withdraw the
mains plug and consult your dealer.
WARNING – excessive sound pressure from
earphones or headphones can cause hearing loss.
ABOVE ALL – NEVER let anyone, especially
children, push or hit the screen, push
anything into holes, slots or any other
openings in the case.
NEVER guess or take chances with electrical
equipment of any kind – it is better to be safe
than sorry.
Do not
DO NOT REMOVE ANY FIXED COVERS AS THIS
WILL EXPOSE DANGEROUS AND 'LIVE' PARTS.
THE MAINS PLUG IS USED AS A
DISCONNECTING DEVICE AND THEREFORE
SHOULD BE READILY OPERABLE.
gg

English
5
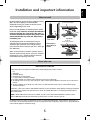
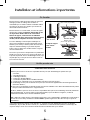
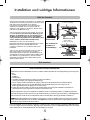
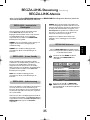
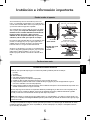
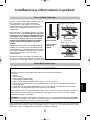
Installation and important information
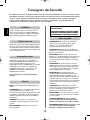
Where to install
Locate the television away from direct sunlight and strong
lights, soft, indirect lighting is recommended for
comfortable viewing. Use curtains or blinds to prevent
direct sunlight falling on the screen.
Place on a sturdy platform, the mounting surface should
be flat and steady. It must be secured to the wall with a
sturdy tie using the clip on the back of the stand, or
secured to the platform using the fixing strap located
underneath the table top stand, this will prevent it
from falling over.
The LCD display panels are manufactured using an
extremely high level of precision technology, however
sometimes some parts of the screen may be missing
picture elements or have luminous spots. This is not a sign
of a malfunction.
Make sure the television is located in a position where it
cannot be pushed or hit by objects, as pressure will break
or damage the screen, and that small items cannot be
inserted into slots or openings in the case.
Please take note
EXCLUSION CLAUSE
Toshiba shall under no circumstances be liable for loss and/or damage to the product caused by:
i) fire;
ii) earthquake;
iii) accidental damage;
iv) intentional misuse of the product;
v) use of the product in improper conditions;
vi) loss and/or damage caused to the product whilst in the possession of a third party;
vii) any damage or loss caused as a result of the owner’s failure and/or neglect to follow the instructions set out in the owner’s
manual;
viii) any loss or damage caused directly as a result of misuse or malfunction of the product when used simultaneously with
associated equipment;
Furthermore, under no circumstances shall Toshiba be liable for any consequential loss and/or damage including but not limited
to the following, loss of profit, interruption of business, the loss of recorded data whether caused during normal operation or
misuse of the product.
NOTE: A Toshiba wall bracket or stand, where available, must be used. If a non Toshiba wall bracket or stand is used the
product’s BEAB approval will become void and the equipment is then used at the consumers own risk.
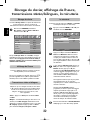
If stationary images generated by 4:3 broadcasts, text services, channel identification logos, computer displays, video games, on
screen menus, etc. are left on the television screen for any length of time they could become conspicuous, it is always advisable to
reduce both the brightness and contrast settings.
Side View
Top View
Sturdy tie
(as short as possible)
Clip
Clip
Clip
Top View
Sturdy tie
(as short as possible)
Clip
Clip
Stand style is
dependent on
model
gg

English
6
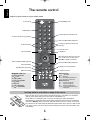
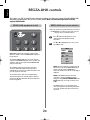
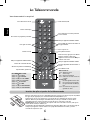
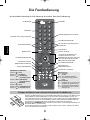
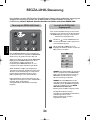
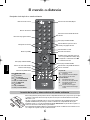
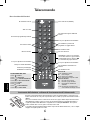
Simple at-a-glance reference of your remote control.
REGZA-LINK or DVD mode:
press
m
/
ll
r
to PAUSE/STEP
press
r
to PLAY
press
q
to REWIND
press
s
to FAST FORWARD
press
w
to EJECT
press
p
to STOP
press
l
q
to SKIP-REWIND
press
s
l
to SKIP-FORWARD
When in TV mode:
8
/
9
Time display
u Still picture
OI/II
Stereo/bilingual transmissions
SUBTITLE No function on this model
When in Text mode:
r
To reveal concealed text
q
To hold a wanted page
s
To enlarge text display size
8
/
9
To select a page whilst viewing a
normal picture
The remote control
UP
Remove the back cover to reveal the battery compartment and make sure the batteries are inserted the
right way round. Suitable battery types for this remote are AAA, IEC R03 1.5V.
Do not combine a used, old battery with a new one or mix battery types. Remove dead batteries
immediately to prevent acid from leaking into the battery compartment. Dispose of them in a designated
disposal area. Warning: batteries must not be exposed to excessive heat such as sunshine, fire or the like.
The performance of the remote control will deteriorate beyond a distance of five metres or outside an angle
of 30 degrees from the centre of the television. If the operating range becomes reduced the batteries may
need replacing.
Inserting batteries and effective range of the remote
To change programme positions and
text pages
To display on-screen information
To call up text services
To exit Menus
Selectable picture preferences
To select mode
To select input from external sources
To mute the sound
Widescreen viewing
On-screen Menus
To alter the volume
Active for Toshiba ancillary equipment
Text control buttons
Active for Toshiba ancillary equipment
Number buttons
To return to the previous programme
For On/Standby mode
When using menus the arrows move the
cursor on the screen up, down, left or
right. OK to confirm your selection
Active for Toshiba ancillary equipment
gg

English
7
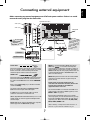
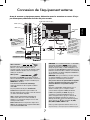
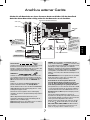
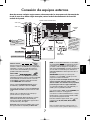
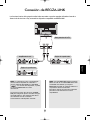
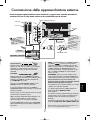
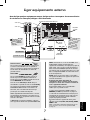
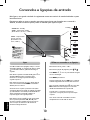
Connecting external equipment
Before connecting any external equipment, turn off all main power switches. If there is no switch
remove the mains plug from the wall socket.
media recorder
decoder*
CABLE HOLDER
FIXING STRAP
HDMI™ INPUT
SOCKETS
SCART 2 (EXT2)
COMPONENT VIDEO (EXT3)
SCART 1 (EXT1)
*
a decoder could
be Digital Satellite
or any other
compatible decoder.
IN/OUT
MEDIA REC.
TV
SAT
NOTE: It is recommended that an HDMI cable with the
HDMI logo ( ) is used. When connecting other
equipment to this television if the connection is capable of
1080p a Category 2 cable will be required. Conventional
HDMI/DVI cable may not work properly with this mode. It is
recommended that DVI cable or DVI/HDMI adapter with
cable is less than 2m long.
NOTE: Although this television is able to connect to HDMI
equipment it is possible that some equipment may not
operate correctly.
A wide variety of external equipment can be
connected to the back of the television, therefore the
relevant owners manuals for all additional
equipment must be referred to.
We recommend SCART 1 for a decoder and SCART 2 for a
media recorder. If connecting S-VIDEO equipment, set the
INPUT for EXT2. See page 27.
If the television automatically switches over to monitor
external equipment, return to normal television by pressing
the desired programme position button. To recall external
equipment, press
B
to select between TV, EXT1, EXT2,
EXT3C, HDMI1, HDMI2 or PC.
HDMI, the HDMI logo, and High-Definition Multimedia Interface are
trademarks or registered trademarks of HDMI Licensing, LLC.
Aerial cables:
Connect the aerial to the socket on the rear of the television.
If you use a decoder* and/or a media recorder it is essential
that the aerial cable is connected through the decoder
and/or through the media recorder to the television.
SCART leads:
Connect the video recorder IN/OUT socket to the television.
Connect the decoder TV socket to the television. Connect
the media recorder SAT socket to the decoder MEDIA REC.
socket.
Before running Auto tuning put your decoder and media
recorder to Standby.
The phono sockets alongside the COMPONENT VIDEO
INPUT sockets will accept L and R audio signals.
In addition there is a fixed external audio ouput which
enables the connection of a suitable Hi-Fi unit.
HDMI™ (High-Definition Multimedia Interface) is for use with
a DVD, decoder or electrical equipment with digital audio
and video output.
REGZA-LINK will only work through HDMI when using other
Toshiba equipment with REGZA-LINK capability.
The cable holder
can be used for aerial,
media recorder and
audio cables. Do not
use as a handle and
remove all cables
before moving the
television.
gg

English
8
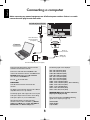
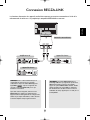
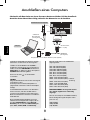
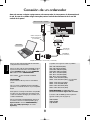
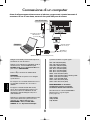
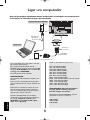
Connecting a computer
Before connecting any external equipment, turn off all main power switches. If there is no switch
remove the mains plug from the wall socket.
Connect the PC cable from the computer to the PC
terminal on the back of the television.
Connect the audio cable to the PC/HDMI1 Audio
socket on the back of the television. Select PC from the
PC/HDMI1 audio options in the AV connection
menu located in the SET UP menu.
Press the
B
to select PC mode.
PLEASE NOTE:
Some PC models cannot be connected to this
television.
An adaptor is not needed for computers with a DOS/V
compatible mini D-sub 15 pin terminal.
A band may appear at the edges of the screen or parts
of the picture may be obscured. This is due to scaling
of the picture by the set, it is not a malfunction.
When PC input mode is selected some of the
television’s features will be unavailable e.g. Manual
setting in the SET UP menu, Colour, Tint, DNR and
Black Stretch in the Picture settings menu.
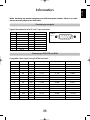
The following signals can be displayed:
VGA: 640 x 480/60 Hz (VESA)
VGA: 640 x 480/75 Hz (VESA)
SVGA: 800 x 600/60 Hz (VESA)
SVGA: 800 x 600/75 Hz (VESA)
XGA: 1024 x 768/60 Hz (VESA)
XGA: 1024 x 768/70 Hz (VESA)
XGA: 1024 x 768/75 Hz (VESA)
WXGA: 1280 x 768/60 Hz (VESA)
WXGA: 1280 x 768/60 Hz (VESA) – Reduced Blanking
WXGA: 1280 x 768/75 Hz (VESA)
WXGA: 1360 x 768/60Hz (VESA)
SXGA: 1280 x 1024/60 Hz (VESA)
SXGA: 1280 x 1024/75 Hz (VESA)
IMPORTANT NOTE: Some PCs when connected
they may not display correctly.
When connecting a PC using HDMI the following
signals can be accepted (see page 17):
1080i 50/60Hz
1080p 50/60Hz
720p 50/60Hz
the back of your television
Computer
Audio cable for PC to
television connection
(not supplied)
Conversion adaptor if required (not supplied)
RGB PC cable
(not supplied)
Mini D-sub
15 pin connector
gg

English
9
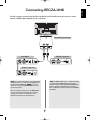
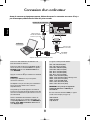
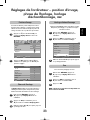
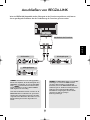
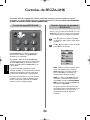
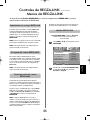
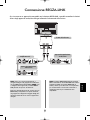
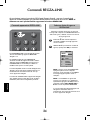
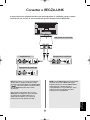
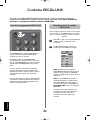
Connecting REGZA-LINK
The basic functions of connected audio/video equipment can be controlled using the televisions remote
control if a REGZA-LINK compatible device is connected.
HDMI IN HDMI OUT
HDMI OUT
HDMI OUT
the back of your television
Playback equipment
AV amplifier
Playback equipment
NOTE: It is recommended that for correct operation all
audio/video devices are connected using HDMI cables
branded with the HDMI logo ( ). If several
devices are connected, the REGZA-LINK feature may
not operate properly.
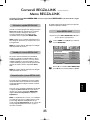
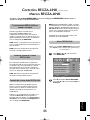
After connecting the equipment use the REGZA-LINK
menus to setup the desired options. The connected
equipment must also be set. For details see the
operation manual for each connected device.
NOTE: The REGZA-LINK feature uses CEC Technology
as regulated by the HDMI standard. This feature is
limited to models incorporating Toshiba’s REGZA-LINK.
However, Toshiba is not liable for those operations.
Refer to individual instruction manuals for compatability
information.
gg

English
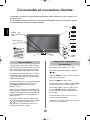
10
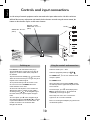
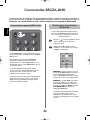
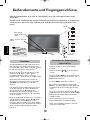
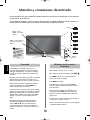
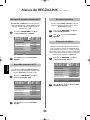
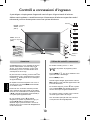
Controls and input connections
If the RED LED is unlit check that the mains plug is
connected to the power supply. If the picture does not
appear press
i
on the remote control, it may take a
few moments.
To put the television into Standby press
i
on the remote
control. To view the television press
i
again. The picture
may take a few seconds to appear.
To set up the television you will now need to use the
on-screen menus. Press the MENU button on the
remote control to see the menus.
The menu bar at the top of the screens will show five
different topics shown in symbols. As each symbol is
selected by pressing
z
or
x
on the navigation ring on
the remote control, its respective options will appear
below.
To use the options, press
e
on the navigation ring to
move down through them and OK,
z
or
x
to select the
required choice. Follow the on-screen instructions. The
functions of each menu are described in detail
throughout the manual.
A wide variety of external equipment can be connected to the input sockets on the side of the television.
Whilst all the necessary adjustments and controls for the television are made using the remote control, the
buttons on the television may be used for some functions.
To alter the volume press – j +.
To alter the programme position press
ee
F
ff
.
Press MENU and S, R, P or Q to control the sound
and picture options.
Press MENU to finish.
When connecting sound equipment to EXT3, connect
the audio output of the equipment to the phono sockets
on the television.
To select the Input, press
B
until the display shows
EXT3 as described on page 27. The television will
automatically sense the type of signal.
Please always refer to the owner’s manual of the
equipment to be connected for full details.
Please note: Inserting the headphone plug will mute the
sound from all speakers.
Switching on Using the controls and connections
Standby
GREEN LED – On timer
(LED 2)
RED LED – Standby
GREEN LED – Power on
(LED1)
INPUT 3
(EXT3)
Input 3
(side) will take
priority over
EXT3 (back) if
both connections
are used at the
same time.
gg

English
11
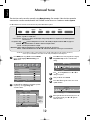
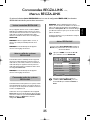
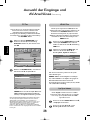
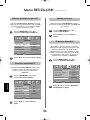
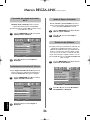
Manual tuning
Prog. Channel Station
1 C22 BBC1
2 C28 BBC2
3 C25 ITV
4 C32 CH4
5 C68
6 C69
Store
MENU
Back
EXIT
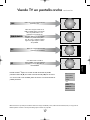
Watch TV
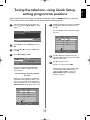
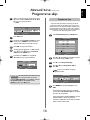
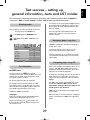
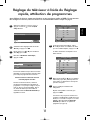
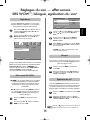
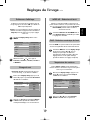
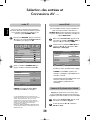
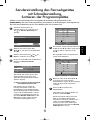
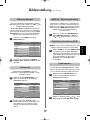
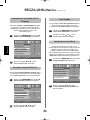
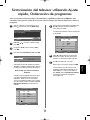
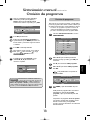
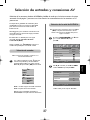
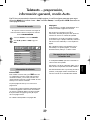
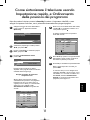
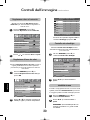
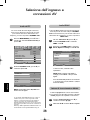
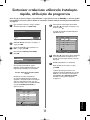
Tuning the television using Quick Setup,
sorting programme positions
Before switching on the television put your decoder and media recorder to Standby if they are connected.
To set up the television use the buttons on the remote control as detailed on page 6.
1
2
3
5
6
7
4
Connect the television to the mains power and
press the
i
button. The Quick Setup screen will
appear.
Using
z
or
x
select your language, then press
OK.
Then press
z
or
x
to select your country and
press OK.
To start Auto tuning press OK.
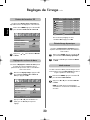
The search will begin for all available stations.
The slide bar will move along the line as the
search progresses.
You must allow the television to complete
the search.
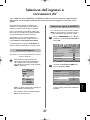
When the search is complete the television will
automatically select programme position 1. This
may not be a clear picture or the signal may be
weak, so the station order can be changed using
Manual tuning which will appear on the screen.
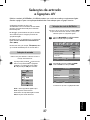
Use
f
or
e
to move through the list to your
preferred position. As you do so the other stations
will move to make room.
Press
x
to store your move.
Repeat as necessary, then press EXIT.
If the television cannot be connected to a media
recorder/decoder with a SCART lead or if a
station on another system is required, use
Manual tuning to allocate a programme
position, see page 12.
With the list of stations now showing use
f
or
e
to highlight the station you want to move and
press
x
.
The selected station will be moved to the right of
the screen.
Quick Setup
Select your language.
Language English
EXIT
Watch TV
OK
Next
Auto tuning
Searching
Channel : C22 Station : BBC1
EXIT
Stop
Manual tuning
Prog. Channel Station
1 C22 BBC1
2 C28 BBC2
3 C25 ITV
4 C32 CH4
5 C68
6 C69
OK
Select Sort
MENU
Back
EXIT
Watch TV
gg

1/2
SET UP
Language English
Country UK
Auto tuning
OK
Manual tuning
OK
AV connection
OK
Picture position
OK
MENU
Back
EXIT
Watch TV
English
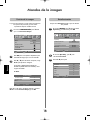
12
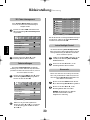
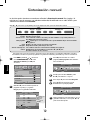
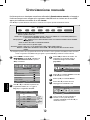
Manual tuning
Prog. Channel Station
0 C60
1 C22 BBC1
2 C28 BBC2
3 C25 ITV
4 C32 CH4
5 C69
OK
Select Sort
MENU
Back
EXIT
Watch TV
4
Press
x
to select System and use
f
or
e
to
change if required.
Then press
x
to select Search.
Press
f
or
e
to begin the search. The search
symbol will flash.
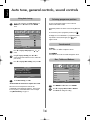
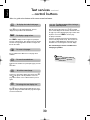
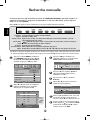
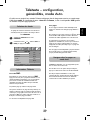
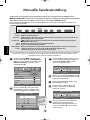
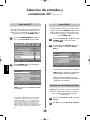
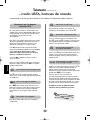
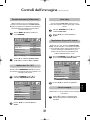
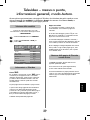
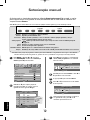
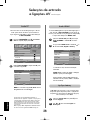
Manual tune
Press OK to select. If the programme is skipped,
Programme skip must be removed before
storing.
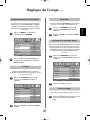
The television can be tuned-in manually using Manual tuning. For example: if the television cannot be
connected to a media recorder/decoder with a SCART lead or to tune-in a station on another System.
Programme: The number to be pressed on the remote control.
System: Specific to certain areas.
Colour system: Factory set to Auto, should only be changed if problems are experienced, i.e. NTSC input from
external source.
Programme skip: means nothing has been stored or the facility to skip the channel is ON. See page 13.
Channel: The channel number on which a station is being broadcast.
Search: Search up and down for a signal.
Manual fine tuning: Only used if interference/weak signal is experienced. See page 31.
Station: Station identification. Use the
f
or
e
and
z
or
x
buttons to enter up to seven characters.
Station
Programme System
Colour
system
Channel Search
Programme
skip
Manual fine
tuning
Use
f
or
e
to highlight the programme position
required e.g. we suggest Prog. 0 for
a media recorder.
Press MENU and using
z
or
x
select the SET UP
menu, with
e
highlight Manual tuning, press
OK to select.
To allocate a programme position on the television for a decoder and media recorder: turn the decoder on,
insert a pre-recorded film in the media recorder and press PLAY, then manually tune.
Use
z
and
x
to move across the screen and select any of these Manual Tune options.
1
2
3
Each signal will show on the television, if it is not
your media recorder, press
f
or
e
again to
restart the search.
7
5
6
Different
Channel
numbers
may be
displayed
Manual tuning
System
0 I A C 60 0
OK
Store
MENU
Back
EXIT
Watch TV
Manual tuning
Search: Up
0 I A C 60 0
OK
Store
MENU
Back
EXIT
Watch TV
gg

English
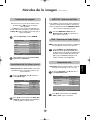
13
Manual tuning
Prog. Channel Station
1 C22 BBC1
2 C28 BBC2
3 C25 ITV
4 C32 CH4
5 C68
6 C69
OK
Select Sort
MENU
Back
EXIT
Watch TV
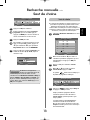
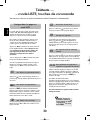
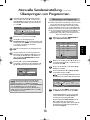
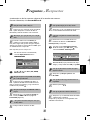
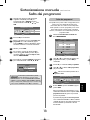
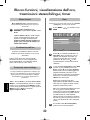
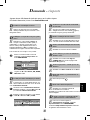
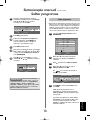
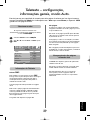
Manual tune continued,
Programme skip
Press MENU and repeat from Step 2 or press
EXIT.
Each programme position has to be individually
selected. To turn Programme skip off, repeat the
procedure for each position.
Skipped programme positions cannot be selected
by P P and P Q or by the controls on the
television, but can still be accessed by the number
buttons on the remote control.
3
4
5
Use
f
or
e
to highlight the programme position
to be skipped and press OK to select.
Press
x
to select Programme skip.
Use
f
or
e
to turn Programme skip on.
Press OK.
on the screen indicates a skipped
programme position.
To prevent certain programmes from being viewed, the
programme position can be skipped. The remote control
must be removed as the channels will still be available using
the number buttons
. Programmes can then be watched as
normal using the controls on the television, but the television
will not show the skipped programme position.
Programme skip
Select Manual tuning from the SET UP menu.
1
2
When your media recorder signal is found, press
x
to move along to Station. With
f
,
e
,
z
and
x
put in the required characters,
e.g. VCR.
This television has direct channel entry
if the channel numbers are known.
Select the Manual tuning screen in Step 3. Enter the
Programme number, the System, then the
Channel number. Press OK to store.
8
Press OK to store.
Repeat for each programme position you want
to tune or, press MENU to return to the list of
channels and select the next number to tune.
Press EXIT when you have finished.
To name external equipment, e.g. DVD on EXT2,
press
B
to select
B
2, then select Manual
setting from the SET UP menu.
Press
x
to select Label then using
f
,
e
,
z
and
x
put in the required characters.
10
11
12
13
9
P
LEASE N
OTE
Manual tuning
Station
0 I A C 60 0 V C R
OK
Store
MENU
Back
EXIT
Watch TV
Manual setting
Label
EXT2 A D V D
OK
Store
MENU
Back
EXIT
Watch TV
Manual tuning
Programme skip : On
1 I A C 22 0 B B C 1
OK
Store
MENU
Back
EXIT
Watch TV
gg

SOUND
Dual Dual 1
Bass 0
Treble 0
Balance 0
WOW
OK
Stable sound Off
MENU
Back
EXIT
Watch TV
1/2
1/2
SET UP
Language English
Country UK
Auto tuning
OK
Manual tuning
OK
AV connection
OK
Picture position
OK
MENU
Back
EXIT
Watch TV
English
14
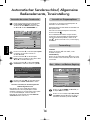
You must allow the television to complete the search.
When the search is complete the television will
automatically select programme position 1. This may not
be a clear picture, so the station order can be changed
using Manual tuning, see page 11.
i
+
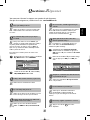
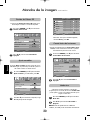
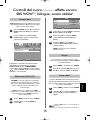
Auto tune, general controls, sound controls
Using Auto tuning
1
2
3
4
To set up the television using Auto tuning, press
MENU and use
z
or
x
to select the SET UP
menu.
Volume
Press
j
— or
j
+ to adjust the volume.
Sound Mute
Press
k
once to turn the sound off and again to cancel.
To select a programme position use the numbered
buttons on the remote control.
Programme positions can also be selected using P P and
P Q.
To revert to the previous programme position press
^^
.
To display on-screen information i.e. programme position,
input mode or stereo/mono signal, press . Press
again to cancel.
Selecting programme positions
Sound controls
Press MENU and
z
or
x
to select SOUND.
Press
e
to highlight Bass, Treble or Balance
and
z
or
x
to change the setting.
Bass, Treble and Balance
1
2
Press
e
to highlight Language and
z
or
x
to
select.
Using
e
highlight Country, then
z
or
x
to
select. The television will now tune the stations for
your country.
Press
e
to highlight Auto tuning, then press OK.
Auto tuning
Previous settings will be lost !
Press EXIT for no change.
Press OK to start Auto tune.
MENU
Back
EXIT
Watch TV
!
5
To start Auto tuning press OK.
gg

2/2
SOUND
Bass boost On
Bass boost level 70
MENU
Back
EXIT
Watch TV
English
15
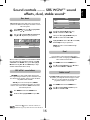
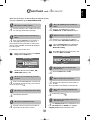
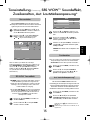
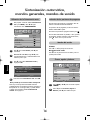
Sound controls continued, SRS WOW™ sound
effects, dual, stable sound
®
SRS WOW
™
sound effects
SRS WOW™ is a suite of audio effects which use the
stereo signals being broadcast to produce enhanced sound
from the television’s speakers. If mono sound is broadcast
only TruBass will be available.
SRS 3D gives a rich sound experience, FOCUS
concentrates the sound and gives the effect of it coming
from the centre of the television, TruBass enhances the
lower bass frequencies.
Stable sound
®
The Stable Sound feature limits high volume levels on the
TV speakers, preventing the extreme changes in volume
that can occur when channels are changed or a
programme switches to a commercial.
1
2
Press MENU and select the SOUND menu.
Use
f
or
e
to highlight WOW then press OK.
3
4
5
Press
e
to highlight SRS 3D and using
z
or
x
select between On or Off.
Then press
e
to highlight FOCUS and press
z
or
x
to select between On or Off.
Highlight TruBass and use
z
or
x
to select Off,
Low or High to suit your preference.
NOTE: This feature is not available through
headphones.
1
Press MENU and select the SOUND menu.
Use
e
to highlight Stable sound then press
z
or
x
to select On or Off.
Dual
If a programme or film is being broadcast with a
soundtrack in more than one language, the DUAL feature
allows selection between them.
1
2
Press MENU and select the SOUND menu.
Use
e
to highlight Dual then press
z
or
x
to
choose between Dual 1 or Dual 2.
WOW, SRS and
•
symbol are trademarks of SRS Labs, Inc.
WOW technology is incorporated under license from SRS Labs, Inc.
WOW
SRS 3D On
FOCUS Off
TruBass Off
MENU
Back
EXIT
Watch TV
Bass boost
In the SOUND menu press
e
to highlight Bass
boost. Use
z
or
x
to select On.
Then press
e
to highlight Bass boost level and
using
z
or
x
adjust to suit your preference.
1
2
Bass boost enhances the depth of the sound on the TV
speakers. The difference will only be noticeable on sound
with a strong bass.
2
When an active Super Woofer is connected to the Woofer
Out connection on the back of the television, select AV
connection in the SET UP menu, press
e
to highlight
Woofer and using
z
or
x
select External. (See 'Input
Selection and AV Connections' section).
gg

English
16
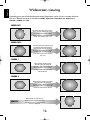
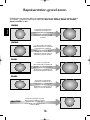
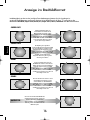
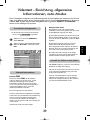
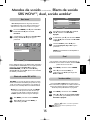
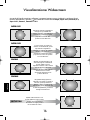
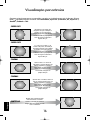
SUBTITLE
When subtitles are included on a
letterbox format broadcast, this setting
will raise the picture to ensure that all
the text is displayed.
SUBTITLE
Widescreen viewing
SUPER LIVE 1
This setting will enlarge a 4:3 image to
fit the screen by stretching the image
horizontally and vertically, holding
better proportions at the centre of the
image. Some distortion may occur.
Depending on the type of broadcast being transmitted, programmes can be viewed in a number of formats.
Press the
{
button repeatedly to select between Wide, Super Live 2, Cinema 2, 4:3, Super Live 1,
Cinema 1, Subtitle and 14:9.
SUPER LIVE 2
If a ‘side panel format’ signal is being
received this setting will enlarge the
image to fit the screen by stretching
the image horizontally and vertically,
holding better proportions at the
centre of the image. Some distortion
may occur.
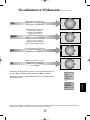
CINEMA 1
When watching ‘letterbox format’
films/video tapes, this setting will
eliminate or reduce the black bars at
the top and bottom of the screen by
zooming in and selecting the image
without distortion.
CINEMA 2
When watching ‘all sides panel format’
films/video tapes, this setting will
eliminate or reduce the black bars at all
sides of the screen by zooming in and
selecting the image without distortion.
gg

English
17
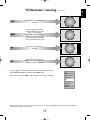
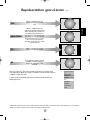
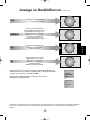
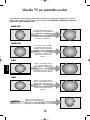
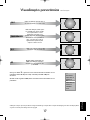
Widescreen viewing
continued
Use this setting when watching a
widescreen DVD, widescreen video
tape or a 16:9 broadcast
(when available). Due to the range of
widescreen formats (16:9, 14:9,
20:9 etc.) black bars may be visible
on the top and bottom of the screen.
WIDE
When using a PC connected via
HDMI this setting will show the picture
without over scan, i.e. WYSIWYG.
PC
Use this setting to view a true 4:3
broadcast.
4:3
Using the special functions to change the size of the displayed image (i.e. changing the height/width ratio) for the purposes of public display or
commercial gain may infringe on copyright laws.
Press the
{
button and a list of all the widescreen formats will appear on screen.
Use
f
and
e
to highlight the required format and OK to select.
When a PC is connected via HDMI it will be selectable in the widescreen format list.
14:9
Use this setting when watching a 14:9
broadcast.
PC
Wide
Super Live 2
Cinema 2
4:3
Super Live 1
Cinema 1
Subtitle
14:9
gg

PICTURE
Picture settings
OK
3D Colour management
Off
Base colour adjustment
Active Backlight Control
On
Cinema mode
On
MENU
Back
EXIT
Watch TV
1/2
SET UP
Language English
Country UK
Auto tuning
OK
Manual tuning
OK
AV connection
OK
Picture position
OK
MENU
Back
EXIT
Watch TV
English
18
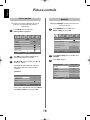
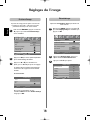
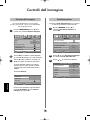
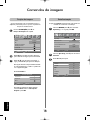
Picture controls
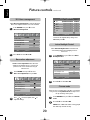
To return to the original factory settings select Reset
in the Picture position menu and press OK.
Picture position
The picture position may be adjusted to suit personal
preference and can be particularly useful for
external inputs.
In the SET UP menu press
e
until
Picture position is highlighted.
1
Press OK to view the options available for the
picture format that has been selected.
Press
f
and
e
to select an option, then
z
or
x
to adjust the settings.
The options alter depending on the widescreen
format chosen and when viewing connected
equipment.
In Cinema 2:
2
3
In the Picture settings menu press
e
to select
Backlight.
Press
z
or
x
to adjust.
2
3
In the PICTURE menu press
e
to select
Picture settings, then press OK.
1
Adjusting the Backlight can improve the clarity of the
screen when viewing.
Backlight
Picture position
Horizontal position 0
Vertical position 0
Reset
OK
MENU
Back
EXIT
Watch TV
Picture settings
Backlight 100
Contrast 100
Brightness 50
Colour 50
Tint 0
Sharpness 0
MENU
Back
EXIT
Watch TV
1/2
gg

English
19
Picture settings
Black stretch On
MPEG NR Low
DNR Auto.
Colour Temperature Cool
MENU
Back
EXIT
Watch TV
2/2
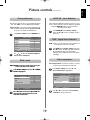
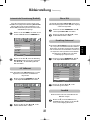
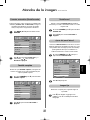
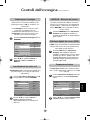
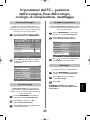
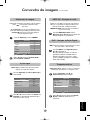
Picture controls continued
DNR enables you to ‘soften’ the screen representation of a
weak signal to reduce the noise effect.
DNR – Digital Noise Reduction
Select DNR from the Picture settings menu. Use
z
or
x
to adjust. The differences may not always
be noticeable (for the best result use lower
settings as picture quality can be lost if the setting
is too high).
1
When watching a DVD the compression may cause some
words or picture elements to become distorted or pixelated.
Using the MPEG NR feature reduces this effect by
smoothing out the edges.
MPEG NR – Noise Reduction
Select MPEG NR from the Picture settings
menu. Use
z
or
x
to select a setting to suit your
preference.
1
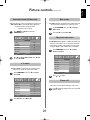
Black Stretch increases the strength of dark areas of the
picture which improves the definition.
Black stretch
Press
z
or
x
to select between On and Off. The
effect depends on the broadcast and is most
noticeable on dark colours.
1
2
Picture settings
Black stretch On
MPEG NR Low
DNR Auto.
Colour Temperature Cool
MENU
Back
EXIT
Watch TV
2/2
In the Picture settings menu press
e
until Black
Stretch is highlighted.
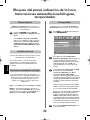
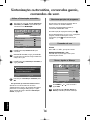
This television offers the choice of personalising the picture
style. Press
m
to view the different styles available:
Picture mode-1 to 3 are preset options and effect many
features/settings within the television, Picture mode-M
stores your own settings as detailed below:
Use
z
or
x
to adjust the Contrast, Brightness,
Colour, Tint and Sharpness.
Picture preferences
2
Select Picture settings from the PICTURE menu.
1
Picture settings
Backlight 100
Contrast 100
Brightness 50
Colour 50
Tint 0
Sharpness 0
MENU
Back
EXIT
Watch TV
1/2
In the Picture settings menu press
e
until
Colour Temperature is highlighted.
Press
z
or
x
to select between Cool, Normal
and Warm to suit your preference.
1
2
Colour Temperature increases the ‘warmth’ or ‘coolness’
of a picture by increasing the red or blue tint.
Colour temperature
gg

PICTURE
Picture settings
OK
3D Colour management
Off
Base colour adjustment
Active Backlight Control
On
Cinema mode
On
MENU
Back
EXIT
Watch TV
PICTURE
Picture settings
OK
3D Colour management
On
Base colour adjustment
OK
Active Backlight Control
On
Cinema mode
On
MENU
Back
EXIT
Watch TV
PICTURE
Picture settings
OK
3D Colour management
On
Base colour adjustment
OK
Active Backlight Control
On
Cinema mode
On
MENU
Back
EXIT
Watch TV
English
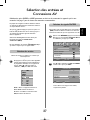
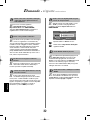
20
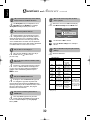
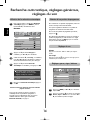
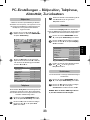
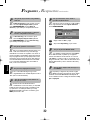
Base colour adjustment
Hue Saturation Brightness
Red +2 +6 +4
Green 0 0 0
Blue 0 0 0
Yellow 0 0 0
Magenta 0 0 0
Cyan 0 0 0
Reset
OK
MENU
Back
EXIT
Watch TV
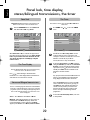
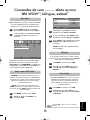
If there are lines or jagged edges in the film or programme
being viewed, selecting Cinema mode can help correct
this by smoothing out the picture.
Cinema mode
In the PICTURE menu press
e
to select Cinema
mode.
Press
z
or
x
to select On or Off.
NOTE: When a DVD with subtitles is being played
this mode may not work correctly.
1
2
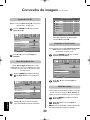
Picture controls continued
Press
z
or
x
to select an option, then
x
to
adjust the settings.
2
In the PICTURE menu press
e
to select
Base colour adjustment, then press OK.
1
The Base colour adjustment feature allows the
adjustment of individual colours to suit personal
preference. This can be useful when using an
external source.
Base colour adjustment
When 3D Colour management is selected it allows the
‘Base colour adjustment’ feature to become available.
3D Colour management
In the PICTURE menu press
e
to select
3D Colour management.
Press
z
or
x
to select On or Off.
1
2
To return to the original factory settings select
Reset and press OK.
When Active Backlight Control is activated it will
automatically optimise the backlighting levels for
dark scenes.
Active Backlight Control
In the PICTURE menu press
e
to select Active
Backlight Control.
Press
z
or
x
to select On or Off.
1
2
gg
A página está carregando...
A página está carregando...
A página está carregando...
A página está carregando...
A página está carregando...
A página está carregando...
A página está carregando...
A página está carregando...
A página está carregando...
A página está carregando...
A página está carregando...
A página está carregando...
A página está carregando...
A página está carregando...
A página está carregando...
A página está carregando...
A página está carregando...
A página está carregando...
A página está carregando...
A página está carregando...
A página está carregando...
A página está carregando...
A página está carregando...
A página está carregando...
A página está carregando...
A página está carregando...
A página está carregando...
A página está carregando...
A página está carregando...
A página está carregando...
A página está carregando...
A página está carregando...
A página está carregando...
A página está carregando...
A página está carregando...
A página está carregando...
A página está carregando...
A página está carregando...
A página está carregando...
A página está carregando...
A página está carregando...
A página está carregando...
A página está carregando...
A página está carregando...
A página está carregando...
A página está carregando...
A página está carregando...
A página está carregando...
A página está carregando...
A página está carregando...
A página está carregando...
A página está carregando...
A página está carregando...
A página está carregando...
A página está carregando...
A página está carregando...
A página está carregando...
A página está carregando...
A página está carregando...
A página está carregando...
A página está carregando...
A página está carregando...
A página está carregando...
A página está carregando...
A página está carregando...
A página está carregando...
A página está carregando...
A página está carregando...
A página está carregando...
A página está carregando...
A página está carregando...
A página está carregando...
A página está carregando...
A página está carregando...
A página está carregando...
A página está carregando...
A página está carregando...
A página está carregando...
A página está carregando...
A página está carregando...
A página está carregando...
A página está carregando...
A página está carregando...
A página está carregando...
A página está carregando...
A página está carregando...
A página está carregando...
A página está carregando...
A página está carregando...
A página está carregando...
A página está carregando...
A página está carregando...
A página está carregando...
A página está carregando...
A página está carregando...
A página está carregando...
A página está carregando...
A página está carregando...
A página está carregando...
A página está carregando...
A página está carregando...
A página está carregando...
A página está carregando...
A página está carregando...
A página está carregando...
A página está carregando...
A página está carregando...
A página está carregando...
A página está carregando...
A página está carregando...
A página está carregando...
A página está carregando...
A página está carregando...
A página está carregando...
A página está carregando...
A página está carregando...
A página está carregando...
A página está carregando...
A página está carregando...
A página está carregando...
A página está carregando...
A página está carregando...
A página está carregando...
A página está carregando...
A página está carregando...
A página está carregando...
A página está carregando...
A página está carregando...
A página está carregando...
A página está carregando...
A página está carregando...
A página está carregando...
A página está carregando...
A página está carregando...
A página está carregando...
A página está carregando...
A página está carregando...
A página está carregando...
A página está carregando...
A página está carregando...
A página está carregando...
A página está carregando...
A página está carregando...
A página está carregando...
A página está carregando...
A página está carregando...
A página está carregando...
A página está carregando...
A página está carregando...
A página está carregando...
A página está carregando...
A página está carregando...
A página está carregando...
A página está carregando...
A página está carregando...
A página está carregando...
A página está carregando...
A página está carregando...
A página está carregando...
A página está carregando...
A página está carregando...
A página está carregando...
A página está carregando...
A página está carregando...
A página está carregando...
A página está carregando...
A página está carregando...
A página está carregando...
A página está carregando...
A página está carregando...
A página está carregando...
A página está carregando...
A página está carregando...
A página está carregando...
A página está carregando...
A página está carregando...
A página está carregando...
A página está carregando...
A página está carregando...
A página está carregando...
A página está carregando...
A página está carregando...
A página está carregando...
A página está carregando...
A página está carregando...
A página está carregando...
A página está carregando...
A página está carregando...
A página está carregando...
A página está carregando...
A página está carregando...
A página está carregando...
A página está carregando...
A página está carregando...
A página está carregando...
A página está carregando...
A página está carregando...
A página está carregando...
A página está carregando...
A página está carregando...
-
 1
1
-
 2
2
-
 3
3
-
 4
4
-
 5
5
-
 6
6
-
 7
7
-
 8
8
-
 9
9
-
 10
10
-
 11
11
-
 12
12
-
 13
13
-
 14
14
-
 15
15
-
 16
16
-
 17
17
-
 18
18
-
 19
19
-
 20
20
-
 21
21
-
 22
22
-
 23
23
-
 24
24
-
 25
25
-
 26
26
-
 27
27
-
 28
28
-
 29
29
-
 30
30
-
 31
31
-
 32
32
-
 33
33
-
 34
34
-
 35
35
-
 36
36
-
 37
37
-
 38
38
-
 39
39
-
 40
40
-
 41
41
-
 42
42
-
 43
43
-
 44
44
-
 45
45
-
 46
46
-
 47
47
-
 48
48
-
 49
49
-
 50
50
-
 51
51
-
 52
52
-
 53
53
-
 54
54
-
 55
55
-
 56
56
-
 57
57
-
 58
58
-
 59
59
-
 60
60
-
 61
61
-
 62
62
-
 63
63
-
 64
64
-
 65
65
-
 66
66
-
 67
67
-
 68
68
-
 69
69
-
 70
70
-
 71
71
-
 72
72
-
 73
73
-
 74
74
-
 75
75
-
 76
76
-
 77
77
-
 78
78
-
 79
79
-
 80
80
-
 81
81
-
 82
82
-
 83
83
-
 84
84
-
 85
85
-
 86
86
-
 87
87
-
 88
88
-
 89
89
-
 90
90
-
 91
91
-
 92
92
-
 93
93
-
 94
94
-
 95
95
-
 96
96
-
 97
97
-
 98
98
-
 99
99
-
 100
100
-
 101
101
-
 102
102
-
 103
103
-
 104
104
-
 105
105
-
 106
106
-
 107
107
-
 108
108
-
 109
109
-
 110
110
-
 111
111
-
 112
112
-
 113
113
-
 114
114
-
 115
115
-
 116
116
-
 117
117
-
 118
118
-
 119
119
-
 120
120
-
 121
121
-
 122
122
-
 123
123
-
 124
124
-
 125
125
-
 126
126
-
 127
127
-
 128
128
-
 129
129
-
 130
130
-
 131
131
-
 132
132
-
 133
133
-
 134
134
-
 135
135
-
 136
136
-
 137
137
-
 138
138
-
 139
139
-
 140
140
-
 141
141
-
 142
142
-
 143
143
-
 144
144
-
 145
145
-
 146
146
-
 147
147
-
 148
148
-
 149
149
-
 150
150
-
 151
151
-
 152
152
-
 153
153
-
 154
154
-
 155
155
-
 156
156
-
 157
157
-
 158
158
-
 159
159
-
 160
160
-
 161
161
-
 162
162
-
 163
163
-
 164
164
-
 165
165
-
 166
166
-
 167
167
-
 168
168
-
 169
169
-
 170
170
-
 171
171
-
 172
172
-
 173
173
-
 174
174
-
 175
175
-
 176
176
-
 177
177
-
 178
178
-
 179
179
-
 180
180
-
 181
181
-
 182
182
-
 183
183
-
 184
184
-
 185
185
-
 186
186
-
 187
187
-
 188
188
-
 189
189
-
 190
190
-
 191
191
-
 192
192
-
 193
193
-
 194
194
-
 195
195
-
 196
196
-
 197
197
-
 198
198
-
 199
199
-
 200
200
-
 201
201
-
 202
202
-
 203
203
-
 204
204
-
 205
205
-
 206
206
-
 207
207
-
 208
208
-
 209
209
-
 210
210
-
 211
211
-
 212
212
-
 213
213
-
 214
214
-
 215
215
-
 216
216
-
 217
217
-
 218
218
-
 219
219
-
 220
220


Toshiba Universal Remote C300 Manual do usuário
- Categoria
- TVs
- Tipo
- Manual do usuário
- Este manual também é adequado para
em outras línguas
Artigos relacionados
Outros documentos
-
Haier LE32B7000C Manual do usuário
-
Haier LE40B8000TF Manual do usuário
-
Panasonic TX32ESF607 Guia rápido
-
Sharp dv 25071 Manual do proprietário
-
Yamaha RX-V4600 Manual do usuário
-
Yamaha DVX-S200 Manual do usuário
-
-
-
 Joytech AV CONTROL CENTER Manual do proprietário
-
MasterCool A/C SYSTEM ANALYZER Instruções de operação
