Infanttech ALWAYS IN VIEW 1000-YG Manual do usuário
- Categoria
- Monitores de vídeo de bebê
- Tipo
- Manual do usuário

INSTRUCTION MANUAL
A
AL
LW
WA
AY
YS
S
I
IN
N
V
VI
IE
EW
W
™ BABY MONITOR FOR CARS
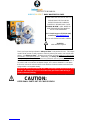
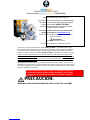
Thank you for purchasing Infanttech’s Always In View™ baby monitor for cars. This unique
monitor allows parents to safely operate a vehicle by reducing the need to turn around while
driving. Your Always In View™ will allow you to monitor your baby while he or she is facing
backwards in a rear passenger seat. Additionally, your Always In View™ can also be used
when your baby becomes a toddler and is facing forward in the rear passenger seat. The
parent’s unit includes a digital video monitor that easily attaches to the dashboard window of
any vehicle, with a convenient car adapter charger, and a camera installed in a cute plush
that can be secured in various locations in the backseat. Both the monitor and camera are
equipped with a rechargeable battery.
Please note, that use of the Always In View™ does not replace a driver’s need to obey
all traffic and safety laws and use reasonable safety precautions while driving to
minimize distractive driving.
CAUTION:
KEEP SMALL PARTS OUT OF CHILD’S REACH
[Model numbers 1000-GM; 1000- BP; 1000- YG]
PLEASE READ THE FOLLOWING
INSTRUCTIONS AND WARNINGS
CAREFULLY BEFORE USING YOUR
ALWAYS IN VIEW™ BABY MONITOR.
KEEP THIS INSTRUCTION MANUAL
FOR FUTURE REFERENCE.
For Technical Support call [855-422-2983]
or email us at info@infanttech.com.
For use with Children from birth to toddlers.
WARNING:
Adult installation required.

WARNING:
THIS PRODUCT CANNOT REPLACE RESPONSIBLE ADULT
SUPERVISION AND VEHICLE DRIVING.
• Test monitor before first use, periodically, and when changing location of the
units.
• Prevent distracted driving- before you are ready to start your vehicle, make
sure you have adjusted all of your vehicle’s options such as seats, mirrors,
seatbelts, the position of the camera from the Always In View™ facing your
child, etc.
• Prevent Cord entanglement- do not place any cords within arm’s reach of baby.
Never use extension cords with AC adapters. Only use the AC Adapters
provided.
• When an AC Adapter is plugged into an electrical outlet, do not touch the
exposed end.
• Do not use monitor near water.
• Keep monitor away from heat sources and make sure there is proper
ventilation.
• THIS PRODUCT IS NOT A TOY. DO NOT ALLOW CHILDREN TO PLAY WITH IT.
NOT INTENDED FOR CHILD’S PLAY.
BATTERY WARNING:
• Do not Mix old and new batteries.
• Do not mix alkaline, standard, or rechargeable batteries.
• Remove batteries and unplug the rechargeable battery pack when product is
stored for a long period of time or when batteries are exhausted.
• Dispose of exhausted batteries properly.
• Use only the original rechargeable battery pack. Warranty is void if other
batteries are used. Please contact Infantech Solutions, Inc. for a replacement
battery, contact information can be found at the end of the instruction booklet.
CAUTION:
KEEP SMALL PARTS OUT OF CHILD’S REACH
1

FCC Information
This device complies with part 15 of the FCC Rules. Operation is subject to the
following two conditions: (1) This device may not cause harmful interference, and (2)
this device must accept any interference received, including interference that may
cause undesired operation.
Industry Canada (IC) Compliance Statement
This device complies with Industry Canada licence-exempt RSS standard(s).
Operation is subject to the following two conditions: (1) this device may not cause
interference, and (2) this device must accept any interference, including interference
that may cause undesired operation of the device.
Industrie Canada (IC) Déclaration de conformité
Le présent appareil est conforme aux CNR d'Industrie Canada applicables aux
appareils radio exempts de licence. L'exploitation est autorisée aux deux conditions
suivantes : (1) l'appareil ne doit pas produire de brouillage, et (2) l'utilisateur de
l'appareil doit accepter tout brouillage radioélectrique subi, même si le brouillage est
susceptible d'en compromettre le fonctionnement.
CAUTION: Changes or modifications not expressly approved by Infantech Solutions, Inc.,
may void the users’ authority to operate this equipment.
NOTE: This equipment has been tested and found to comply with the limits for a
Class A digital device, pursuant to part 15 of the FCC Rules. These limits are
designed to provide reasonable protection against harmful interference in a
commercial environment. This equipment generates, uses, and can radiate radio
frequency energy and, if not installed and used in accordance with the instructions,
may cause harmful interference to radio communications. However, there is no
guarantee that interference will not occur in a particular installation. If this equipment
does cause harmful interference to radio reception, which can be determined by
turning the equipment on and off, the user is encouraged to correct the interference
by one or more of the following measures:
• Reorient or relocate the receiving antenna (monitor)
• Increase the separation between the equipment and the receiver
• Connect the equipment into a different circuit from that to which the receiver
is connected.
• Consult the dealer or an experienced radio/TV technician for help.
NOTE: Use only the original rechargeable battery pack or approved battery
replacement. Warranty void if other batteries are used. Please contact Infantech
Solutions, Inc. for replacement battery pack, contact information can be found on the
next page.
2

QUICK REFERENCE FOR DAILY OPERATION:
After your initial set up (see instructions below), follow these easy steps for optimal
performance of your Always in View monitor:
1. Make sure the safety buckle straps on the plush of the camera are always used and
adjusted to fit snugly on any headrest the plush is mounted on.
2. Turn on the monitor by holding the power button for 5 seconds.
3. When you place your baby/toddler in the backseat, turn on the camera in the plush
by unzipping the zipper and holding the power button until the light turns green. Zip
up the plush.
4. The monitor should display the images from the camera. Adjust the camera in the
plush for the view you like.
5. When exiting the vehicle, turn off the monitor by holding the power button for 5
seconds. When taking your baby out of the vehicle, turn off the camera in the plush.
This will ensure optimal battery life and performance.
6. Remember to charge monitor or camera as needed. If your vehicle is equipped with
cigarette lighter or power outlets, you can keep your monitor plugged in with the
included 2-port USB car adapter. The camera in the plush may be charged in the
vehicle when your child is not in the car.
7. When your monitor and camera are fully charged, enjoy a wireless unit.
3

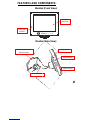
FEATURES AND COMPONENTS
Monitor (Front View):
Always
Monitor (Side View):
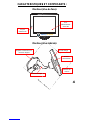
Power LED
Indicator
Suction Cup Mount on
Monitor Bracket
Monitor Bracket
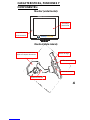
FEATURES AND COMPONENTS
:
Monitor (Front View):
Always
In View
Monitor (Side View):
Anti
-
glare
LED Screen
Volume Control
Charging Port
Power Button
Volume Control
4

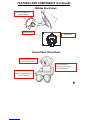
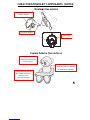
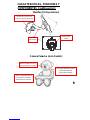
FEATURES AND COMPONENTS (Continued)
Monitor (Back View):
Camera Plush (Front View):
Camera Mounted in Nose
so you can see your child
Super Velcro
and safety
buckle straps on Paws for
ease of mounting
Suction Cup Mount on
Monitor Bracket
Monitor Bracket
FEATURES AND COMPONENTS (Continued)
:
Monitor (Back View):
Camera Plush (Front View):
Internal
Bendineck
technology for optimal
viewing capabilities
Bracket Slot
5

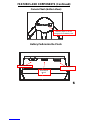
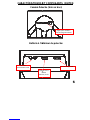
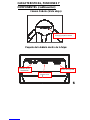
FEATURES AND COMPONENTS (Continued)
Camera Plush (bottom View):
Battery Pack
Power Indicator LED
Push ON/Off
Button
FEATURES AND COMPONENTS (Continued)
:
Camera Plush (bottom View):
Battery Pack
inside the Plush:
Hideaway Zipper to access
Charging Port and Battery Pack
USB Charging Port
Push ON/Off
Button
6
Hideaway Zipper to access
Charging Port and Battery Pack
USB Charging Port

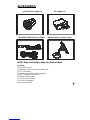
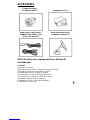
ACCESSORIES
:
2-Port USB Car Charger (1)
3Ft AND 7Ft USB Cables (1 of Each)
NOTE: Style and designs may vary from pictures
Contents:
1-Plush with Camera
1-
1000Mah Lithium ion Battery (Inside Plush)
1- 3.5” LCD Monitor
1-
Monitor bracket with suction cup mount
1- USB Charging cable for plush
1- Monitor charging cable
1- 2-Port USB car adapter
1- USB AC wall adapter
1- Instruction Manual
AC adapters (1)
3Ft AND 7Ft USB Cables (1 of Each)
Monitor mount w/ suction cup (1)
NOTE: Style and designs may vary from pictures
1000Mah Lithium ion Battery (Inside Plush)
Monitor bracket with suction cup mount
7

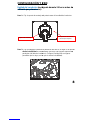
SET UP & USE:
Monitor
(Charge for 24 hours prior to first use):
Step 1:
Attach the mounting bracket to the back of the monitor slot.
Step 2
: Attach the monitor to the windshield of the car in a secure location that
not obstruct your view.
We recommend the left corner of the driver’s
windshield. (
only place it in a location allowed by law so that it doesn’t
interfere with vision.)
Mounting Bracket
(Charge for 24 hours prior to first use):
Attach the mounting bracket to the back of the monitor slot.
: Attach the monitor to the windshield of the car in a secure location that
does
We recommend the left corner of the driver’s
only place it in a location allowed by law so that it doesn’t
Back of Monitor;
Slot for Bracket
does
8

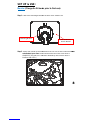
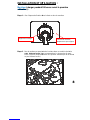
SET UP & USE (Continued)
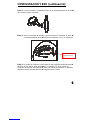
Step 3:
Press On/Off button for 5 seconds to turn monitor On.
Step 4:
Unzip bottom of plush and turn On/Off button to On position. Reclose
zipper.
Step 5:
Once the camera and monitor are on, they will pair. Signal strength / Battery
status will show on the LCD monitor. Meanwhile, the monitor can receive the video
from the camera.
SET UP & USE (Continued)
:
Press On/Off button for 5 seconds to turn monitor On.
Unzip bottom of plush and turn On/Off button to On position. Reclose
Once the camera and monitor are on, they will pair. Signal strength / Battery
status will show on the LCD monitor. Meanwhile, the monitor can receive the video
9
Push
On/Off
button
Once the camera and monitor are on, they will pair. Signal strength / Battery
status will show on the LCD monitor. Meanwhile, the monitor can receive the video
9

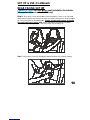
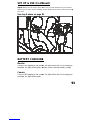
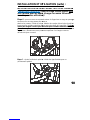
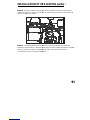
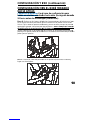
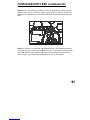
SET UP & USE (Continued)
REAR FACING SET UP
Camera in Plush: For
rear facing
(Charge for 24 hours prior to first use):
Step 6:
Wrap plush’s arms around the backseat headrest in front of car seat and
attach palms together with the
Velcro. Attach the plastic safety buckle straps and pull
for a snug fit around the headrest posts.
the camera will stay in place. Note
-
Velcro use may not be possible. The b
Step 7
: Adjust plush’s head by flexing the
SET UP & USE (Continued)
:
REAR FACING SET UP
rear facing
seat installation for Infants
(Charge for 24 hours prior to first use):
Wrap plush’s arms around the backseat headrest in front of car seat and
Velcro. Attach the plastic safety buckle straps and pull
for a snug fit around the headrest posts.
Always use the buckle straps
to ensure
-
due to differences in headrest post width,
Velcro use may not be possible. The b
uckle straps should always fit.
: Adjust plush’s head by flexing the
internal
bendineck for optimal viewing.
10
seat installation for Infants
Wrap plush’s arms around the backseat headrest in front of car seat and
Velcro. Attach the plastic safety buckle straps and pull
to ensure
bendineck for optimal viewing.
10

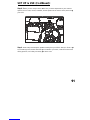
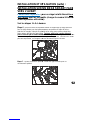
SET UP & USE (Continued)
Step 8: B
efore you are ready to drive, make sure you have adjusted all of your vehicle’s
options such as seats, mirrors, seatbelts, and the position of the camera in the plush facing
your child.
Step 9:
Drive safely and with quick glances know
see something in the monitor that alerts you to attend to your child, continue to follow safe
driving practices, and cal
mly and safely pull off the road.
SET UP & USE (Continued)
:
efore you are ready to drive, make sure you have adjusted all of your vehicle’s
options such as seats, mirrors, seatbelts, and the position of the camera in the plush facing
Drive safely and with quick glances know
ing that your child is Always In View.
If you
see something in the monitor that alerts you to attend to your child, continue to follow safe
mly and safely pull off the road.
1
efore you are ready to drive, make sure you have adjusted all of your vehicle’s
options such as seats, mirrors, seatbelts, and the position of the camera in the plush facing
If you
see something in the monitor that alerts you to attend to your child, continue to follow safe
1
1

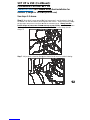
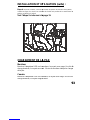
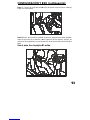
SET UP & USE (Continued)
FORWARD
FACING SET UP
Camera in Plush: For
Forward facing
toddlers (Charge for 24 hours prior to use):
See steps 1-5 above.
Step 6:
Wrap plush’s arms around the front passenger’s seat headrest in front of
the toddler car seat and attach
palms together with V
buckle straps and pull for a snug fit around the headrest posts.
buckle straps
to ensure the camera will stay in place.
headrest post width, Velcro use may
always fit.
Step 7
: Adjust plush’s head by flexing the
SET UP & USE (Continued)
:
FACING SET UP
Forward facing
Seat installation for
toddlers (Charge for 24 hours prior to use):
Wrap plush’s arms around the front passenger’s seat headrest in front of
palms together with V
elcro.
. Attach the plastic safety
buckle straps and pull for a snug fit around the headrest posts.
Always use the
to ensure the camera will stay in place.
Note-
due to differences in
headrest post width, Velcro use may
not be possible. The buckle straps should
: Adjust plush’s head by flexing the
internal bendi-
neck for optimal viewing.
1
Wrap plush’s arms around the front passenger’s seat headrest in front of
. Attach the plastic safety
due to differences in
neck for optimal viewing.
1
2

SET UP & USE (Continued)
Step 8: B
efore you are ready to drive, make sure
options such as seats, mirrors, seatbelts, and the position of the camera in th
your child.
See step 9 above
on page 11
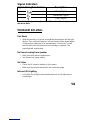
BATTERY CHARGING
Monitor
Connect USB adapter to the monitor,
complete, the light will be green.
Monitor screen indicates battery charge.
Camera
Connect USB adapter to the camera, the light will be red. Once charging is
complete, the light will be green.
SET UP & USE (Continued)
:
efore you are ready to drive, make sure
you have adjusted all of your vehicle’s
options such as seats, mirrors, seatbelts, and the position of the camera in th
e plush facing
on page 11
.
BATTERY CHARGING
Connect USB adapter to the monitor,
the light will be red. Once charging is
Monitor screen indicates battery charge.
Connect USB adapter to the camera, the light will be red. Once charging is
1
you have adjusted all of your vehicle’s
e plush facing
the light will be red. Once charging is
Connect USB adapter to the camera, the light will be red. Once charging is
1
3

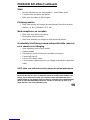
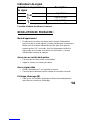
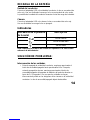
Signal Indicators
Signal Strength Indicators
Description
Strong Signal
Moderate Signal
Poor Signal
Note: Verify the signal strength on the LCD monitor. Please reference
the above table.
PROBLEM SOLVING:
Pair Mode
• While the monitor is off, press and hold the power button until the light
flashes. Then, while the camera is off, press and hold the power button
on the plushes battery pack for approximately 3-5 seconds. You will
see the video from the camera once the pairing is complete. The
power light will stop flashing.
No Sound coming from speaker
• Make sure both units are powered on.
• Set Volume to a higher setting.
No Video
• Check the DC power or battery on the camera.
• Make sure the camera and monitor are in effective range.
Infrared (IR) Lighting
• In the dark, the IR lights will automatically work, but IR lights do not
provide light.
14

PROBLEM SOLVING (Continued):
Static
• Monitor and plush are too close together – move farther apart.
• Turn down the volume on the monitor.
• Make sure the battery is fully charged.
Flickering monitor
• Make sure monitor and camera are moved away from other wireless
devices (i.e. Wi-Fi, Bluetooth, GPS, etc).
Weak reception or no reception
• Make sure both units are turned on.
• Move plush closer to monitor.
• Make sure batteries are charged on both plush and monitor.
Accidentally tried Pairing camera and monitor while camera is
on or camera is not charging
• Open up battery pack in plush animal.
• Remove battery.
• Get paperclip and short outer pins of battery connectors.
• Camera will shut off.
• Connect USB power cable.
• Connect power cable to house or car charger and plug into respective
outlet.
NOTE: Make sure both units are fully charged for optimal performance
If you experience a problem that is not noted in this manual, please do not return the
product to the store as once it is returned it cannot be re-sold and the materials and
energy used to make it are wasted. Our Customer Service Department may have a
simple solution to your problem. Please contact our Customer Service Department by
phone at 1-855-422-2983 between the hours of 9:00 a.m. and 4:30 p.m. (PST) or via
email 24 hours a day at info@infanttech.com.
1
5

Infanttech Solutions, Inc. warranty Policy
Infanttech Solutions, Inc will repair or replace your unit free of charge for 12 months from the
date of purchase if the unit is defective in workmanship or materials. To claim your
repair/replacement, the product must be returned to Infanttech Solutions along with a copy of
the original purchase receipt. In the absence of the purchase receipt, the warranty will be 12
months from the date of manufacture. Please visit www.infanttech.com to register your
product.
Void Warranty
:
This warranty does not apply to normal wear or damage from misuse, removal or tampering
of serial numbers, abuse, improper storage and handling, installation, accident, unauthorized
repair or alteration. If possible, Infanttech can replace or repair unit for a fee.
For most recent manual visit www.infanttech.com
Para manual mas reciente visite www.infanttech.com
Pour manuel plus tard visite www.infanttech.com
Infant
t
ech Solutions, Inc.
515 W Whittier Blvd
Montebello, CA 90640
855-422-2983
© 2013 Infanttech Solutions, Inc.
Please retain information for future
reference. Color and styles may vary.
MADE IN CHINA

MANUEL D’INSTRUCTIONS
MONITEUR DE BÉBÉ POUR VOITURE
A
AL
LW
WA
AY
YS
S
I
IN
N
V
VI
IE
EW
W
MC
Merci d’avoir fait l’achat du moniteur de bébé pour voiture Always In View
MC
d’Infanttech.
Ce moniteur unique permet aux parents de conduire un véhicule en toute sécurité en
éliminant le besoin de se retourner pendant la conduite. Votre moniteur Always In View
MC
vous permet de surveiller votre bébé pendant qu’il est assis en regardant vers l’arrière dans
le siège du passager arrière. De plus, votre moniteur Always In View
MC
peut également
être utilisé lorsque bébé grandit et devient un tout-petit et que son siège est placé sur le
siège du passager arrière de la voiture, mais tourné vers l’avant. L’unité du parent comprend
un moniteur vidéo numérique qui se fixe facilement sur le pare-brise au-dessus du tableau de
bord de tout véhicule, un adaptateur de voiture pratique et une caméra cachée dans un
toutou en peluche qui peut être installé de différentes manières sur le siège arrière. La
caméra et le moniteur sont munis d’une pile rechargeable.
Veuillez noter que malgré l’utilisation du moniteur Always In View
MC
, le conducteur
doit respecter toutes les lois en matière de sécurité et de conduite, ainsi que prendre
tout
e
s les précautions de sécurité requises pendant la conduite pour éviter les
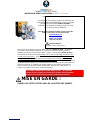
diMISE EN GARDE :
GARDER LES PETITES PIÈCES HORS DE LA PORTÉE DES ENFANTS
[Numéros de modèle 1000-GM; 1000-BP; 1000-YG]
VEUILLEZ LIRE LES INSTRUCTIONS SUIVANTES ET LES
AVERTISSEMENTS SOIGNEUSEMENT AVANT D’UTILISER
LE MONITEUR POUR BÉBÉ ALWAYS IN VIEW
MC
.
CONSERVER CE MANUEL D’INSTRUCTIONS AUX FINS
DE CONSULTATION ULTÉRIEURE.
Pour obtenir de l’assistance technique, appeler au [855 422-
2983] ou nous envoyer un courriel à l’adresse
info@infanttech.com.
Utiliser avec des bébés
jusqu’aux tout-petits.
AVERTISSEMENT :
Installation par un adulte requise.

AVERTISSEMENT :
CE PRODUIT NE REMPLACE PAS LA SUPERVISION D’UN ADULTE ET
UNE CONDUITE RESPONSABLES.
• Essayer le moniteur avant la première utilisation, régulièrement et au moment de
changer la position des unités.
• Éviter les distractions pendant la conduite : avant de démarrer le véhicule,
s’assurer que toutes les options du véhicule sont bien ajustées, comme les
sièges, les miroirs, les ceintures de sécurité, que la caméra du moniteur Always In
View
MC
est bien face à l’enfant, etc.
• Empêcher l’emmêlement des câbles : ne pas placer les cordons à portée du bébé.
Ne jamais utiliser d’extension avec les adaptateurs CA. Utiliser uniquement les
adaptateurs CA fournis.
• Lorsqu’un adaptateur CA est branché sur une prise électrique, ne pas toucher à
l’extrémité exposée.
• Ne pas utiliser le moniteur près d’une source d’eau.
• Garder le moniteur hors de portée de sources de chaleur et s’assurer qu’il est
bien aéré.
• CE PRODUIT N’EST PAS UN JOUET. NE PAS LAISSER D’ENFANT JOUER AVEC
CE PRODUIT. NE CONVIENT PAS AUX JEUX D’ENFANTS.
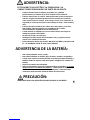
AVERTISSEMENT POUR
LA PILE :
• Ne pas mélanger de vieilles piles avec de nouvelles.
• Ne pas mélanger de piles alcalines, standard ou rechargeables.
• Retirer les piles et débrancher le bloc-piles rechargeable lorsque le produit est
rangé pour une longue période ou lorsque les piles sont vides.
• Disposer des piles vides convenablement.
• N’utiliser que le bloc-piles rechargeable d’origine. La garantie est annulée si
d’autres piles sont utilisées. Veuillez communiquer avec Infanttech Solutions, Inc.
pour obtenir une pile de rechange (les coordonnées se trouvent à la fin du livret
d’instructions).
MISE EN GARDE :
GARDER LES PETITES PIÈCES HORS DE LA PORTÉE DES ENFANTS
1

Renseignements relatifs à la Federal Communications Commission (FCC, É.-
U.)
Ce dispositif est conforme à l’article 15 du règlement de la FCC. Son utilisation est
soumise aux deux conditions suivantes : (1) ce dispositif ne peut causer
d’interférence dommageable et (2) ce dispositif doit être en mesure d’accepter
l’interférence reçue, y compris celle causée par une utilisation indésirable.
Industrie Canada (IC) Déclaration de conformité
Le présent appareil est conforme aux CNR d'Industrie Canada applicables aux
appareils radio exempts de licence. L'exploitation est autorisée aux deux conditions
suivantes : (1) l'appareil ne doit pas produire de brouillage, et (2) l'utilisateur de
l'appareil doit accepter tout brouillage radioélectrique subi, même si le brouillage est
susceptible d'en compromettre le fonctionnement.
MISE EN GARDE : Tout changement ou toute modification n’étant pas approuvé
expressément par Infanttech Solutions, Inc. peut annuler l’autorisation accordée à
l’utilisateur de faire fonctionner cet équipement.
REMARQUE : Cet équipement a subi des essais et il est conforme à la classe A
pour les dispositifs numériques, en vertu de l’article 14 du règlement de la FCC. Ces
limites sont conçues pour fournir une protection raisonnable contre une interférence
pouvant être nocive dans un environnement commercial. Cet équipement génère,
utilise et peut émettre de l’énergie de fréquence radio et, s’il n’est pas installé et
utilisé en respectant les instructions, il peut causer une interférence nocive pour les
communications radio. Toutefois, il n’y a aucune garantie qu’aucune interférence ne
sera produite dans une installation particulière. Si cet équipement cause des
interférences nocives pour la réception radio, ce qui peut être déterminé en allumant
et éteignant l’équipement, on encourage l’utilisateur à corriger l’interférence en
prenant au moins une des mesures suivantes :
• Réorienter ou repositionner l’antenne de réception (moniteur)
• Augmenter la distance séparant l’équipement et le récepteur
• Brancher l’équipement dans un circuit différent de celui sur lequel le
récepteur est branché.
• Consulter le détaillant ou un technicien radio/TV d’expérience pour obtenir de
l’aide.
REMARQUE : Utiliser le bloc-piles rechargeable fourni ou une pile de rechange
approuvée. La garantie est annulée si d’autres piles sont utilisées. Veuillez
communiquer avec Infanttech Solutions, Inc. pour obtenir une pile de rechange (les
coordonnées se trouvent sur la page suivante).
2
A página está carregando ...
A página está carregando ...
A página está carregando ...
A página está carregando ...
A página está carregando ...
A página está carregando ...
A página está carregando ...
A página está carregando ...
A página está carregando ...
A página está carregando ...
A página está carregando ...
A página está carregando ...
A página está carregando ...
A página está carregando ...
A página está carregando ...
A página está carregando ...
A página está carregando ...
A página está carregando ...
A página está carregando ...
A página está carregando ...
A página está carregando ...
A página está carregando ...
A página está carregando ...
A página está carregando ...
A página está carregando ...
A página está carregando ...
A página está carregando ...
A página está carregando ...
A página está carregando ...
A página está carregando ...
A página está carregando ...
A página está carregando ...
-
 1
1
-
 2
2
-
 3
3
-
 4
4
-
 5
5
-
 6
6
-
 7
7
-
 8
8
-
 9
9
-
 10
10
-
 11
11
-
 12
12
-
 13
13
-
 14
14
-
 15
15
-
 16
16
-
 17
17
-
 18
18
-
 19
19
-
 20
20
-
 21
21
-
 22
22
-
 23
23
-
 24
24
-
 25
25
-
 26
26
-
 27
27
-
 28
28
-
 29
29
-
 30
30
-
 31
31
-
 32
32
-
 33
33
-
 34
34
-
 35
35
-
 36
36
-
 37
37
-
 38
38
-
 39
39
-
 40
40
-
 41
41
-
 42
42
-
 43
43
-
 44
44
-
 45
45
-
 46
46
-
 47
47
-
 48
48
-
 49
49
-
 50
50
-
 51
51
-
 52
52


Infanttech ALWAYS IN VIEW 1000-YG Manual do usuário
- Categoria
- Monitores de vídeo de bebê
- Tipo
- Manual do usuário
em outros idiomas
Outros documentos
-
ingenuity Keep Cozy 3-in-1 Grow Manual do proprietário
-
 Summer Infant SLUMBER MELODIES BEAR Manual do usuário
-
-
Summer slim & secure plus Manual do usuário
-
-
 Miniland beMyBuddy elphy Manual do usuário
-
 Miniland beMyBuddy foxy Manual do usuário
-
Angelcare AC517 Manual do proprietário
-
-


