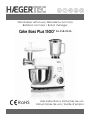
HAEGER BL-15B.013A Manual do usuário
- Categoria
- Picadores
- Tipo
- Manual do usuário

Stand Mixer with bowl / Batedeira com taça
Batidora con taza / Robot ménager
User instructions / Instruções de uso
Instrucciones de uso / Mode d’emploi
* BL-15B.013A
RoHS

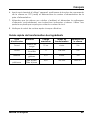
24
12
14
15
16
17
18
19
13
22
23
21
20
(*)
(*)
Not supplied / Não fornecido
No incluído / Non fourni
16

GB
Instructions for use 1
DEAR COSTUMER
Thank you for having chosen a HÆGERTEC product.
The HÆGERTEC products have been produced to think about the welfare of the
consumer privileging the most raised standards of quality, functionality and
assign. We are sure you will be happy with this appliance.
We assume that the user is familiar with the common procedures of handling
household appliances.
Before using the appliance for the first time please read carefully and
thoroughly through these operating instructions and the safety advice,
completely familiarising yourself with the appliance. Retain these instructions for
future reference and pass them on to whoever might acquire the appliance at
a future date.
IMPORTANT SAFETY INSTRUCTIONS
When using electrical appliance, basic safety precautions should
always be followed, including the following:
• This appliance shall not be used by children aged less
than 8 years.
• This appliance can be used by children aged from 8
years and above and persons with reduced physical,
sensory or mental capabilities or lack of experience and
knowledge if they have been given supervision or
instruction concerning use of the appliance in a safe way
and understand the hazards involved.
• Children shall not play with the appliance.
• Keep the appliance and its cord out of reach of children
aged less than 8 years.
• Cleaning and user maintenance shall not be made by
children unless older than 8 and supervised.
• To ensure your children’s safety, please keep all packaging (plastic
bags, boxes, polystyrene etc.) out of their reach.
• Do not allow small children to play with the foil as there is a danger
of suffocation!

English
2 Instructions for use
• Before connecting the appliance to a power socket, make sure the
rated voltage stated on its rating label corresponds to the voltage in
your power socket.
• Never use accessories, which have not been supplied with this
appliance or which have not been explicitly recommended by the
manufacturer for this type of appliance.
• This appliance is designed for household use. Do not use it for
commercial purposes, in industrial surroundings, or outdoors, or for
purposes other than those for which it is intended.
• Always place the appliance on an even, dry and stable surface. Do
not place it on an electric or gas stove, near an open flame or
appliances that are sources of heat.
• Before putting the appliance into operation, check that it is correctly
assembled and that the multi-function head is tilted down in the
horizontal position. For safety reasons, this appliance is equipped
with a safety mechanism that prevents the motor from being started
when the multi-function head is tilted out.
• If the multi-function head tilts out during operation, the appliance will
automatically stop running. When the multi-function head is tilted to
the horizontal working position, the appliance will not automatically
resume operation. To resume operation, it is necessary to set the
speed control knob to the OFF position and then re-select the
desired speed.
• Do not touch rotating parts of the appliance and ensure that foreign
items such as clothing, hair, etc. are kept away. An injury could
occur, or the appliance could be damaged.
• If an item, such as a spoon, falls into the bowl during operation,
immediately set the speed control knob to the OFF position (stand-
by mode), and disconnect the power cord from the power socket.
Wait until the rotating parts come to a stop and then remove the
item.
• If ingredients stick to the attachment or the sides of the bowl, turn
the appliance off, disconnect it from the power socket, and wait
until the rotating parts stops. Use a silicone spatula to clean the
attachment and the inside of the bowl. Then you can restart the
appliance.

English
Instructions for use 3
Warning: Incorrect use may lead to injuries.
• The maximum continuous operating time is 24 minutes. Before
starting it again, allow the appliance to cool down for 15
minutes.
• The mixer has an internal safety to prevent overheating. If the
mixer shuts down because of overheating, reset the speed
control dial to OFF and unplug unit from wall. Wait 1 minute
and plug back in. If mixer still does not start, wait 30 minutes to
allow it to cool completely before turning back on.
• Always turn off the appliance, disconnect it from the power socket
when not be using it, when leaving it without supervision, and before
assembling, disassembling, cleaning or moving it. Prior to
disassembling the appliance and replacing accessories or
accessible parts that move during use, wait until all moving parts
come to a stop.
• Do not turn on the appliance when it is empty. Incorrect use of the
appliance may negatively affect its lifetime.
• Ensure that the power plug contacts do not come into contact with
water or moisture. Do not place heavy items on the power cord.
• Make sure that the power cord does not hang over the edge of a
table or that it is not touching a hot surface.
• Disconnect the power cord from the power socket by pulling on the
plug, never pulling on the cord. Otherwise, this could damage the
power cord or the socket.
• Check the appliance and the cable for damage on a regular basis.
Do not use the appliance if it is damaged.
• If the power cord is damaged, have it replaced at a professional
service centre. It is forbidden to use the appliance if it has a
damaged power cord.

English
4 Instructions for use
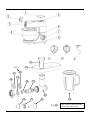
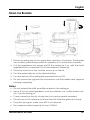
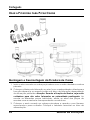
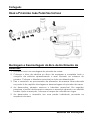
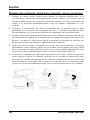
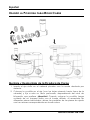
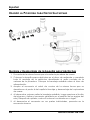
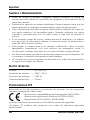
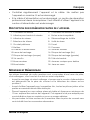
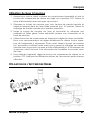
DESCRIPTION OF THE APPLIANCE AND ACCESSORIES
1. Top cover for jar blender
2. Front cover for meat grinder
3. Meat grinder drive
4. Stainless Steel bowl
5. Jar connection
6. Head release lock
7. Speed control knob
8. Body
9. Dough hook
10. Whisk
11. Beater
12. Pusher meat grinder
13. Removable tray
14. Threaded ring
15. Cutting blade (knife)
16. Grinding Disc (fine)
17. Grinding Disc (medium)
18. Grinding Disc (coarse)
19. Screw shaft
20. Mincer head
21. Sausage nozzle
22. “Kebbe” conical ring
23. “Kebbe” nozzle
24. Glass mixing jug
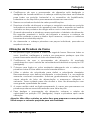
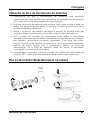
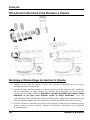
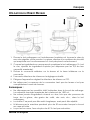
ASSEMBLING AND DISASSEMBLING
The standard parts of this machine are composed of dough hook, whisk, beater
and stainless-steel bowl.
− Before assembling the mixer, be sure the power cord is unplugged from the
power outlet and the speed selector is in the 0 position.
− Before the appliance is used for the first time, all attachments and accessory
parts must be cleaned.
− Place the food mixer on a flat stable surface and ensure a minimum of 10
cm. free space around the device. This device is not suitable for installation
in a cabinet or for outside use.
− Do not insert the mains plug of the machine into the power socket without
having installed all the necessary accessories.
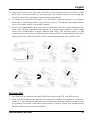
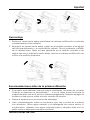
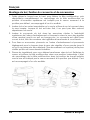
Inserting the bowl, attaching the cover and accessories
1. Slide the lock to release the multi-function head and then fully move it up.
Locking of the multi-function head in the top open position is indicated by
the lock returning to the default position, which is accompanied by an
audible click.
2. Insert the stainless-steel bowl into the base unit and secure it in place by
turning it clockwise. When the bowl is properly attached, it cannot be
separately lifted out of the base unit.

English
Instructions for use 5
3. Insert the bowl cover into the notches on the upper end of the drive shaft
and turn it clockwise until it is not moving. The cover is used for covering the
bowl for short term storage of processed ingredients.
4. To attach an accessory, place it on the drive shaft and push it up slightly
and turn it clockwise until it cannot be moved. Gently pull the attachment
down to check that it is properly seated.
5. Place the ingredients that you wish to process into the bowl. Release the
lock and tilt the multi-function head to a horizontal position. After tilting
down the multifunction head, release the lock. The locked status of the
multi-function head in the tilted down work position is indicated by the lock
returning to the default position. This is accompanied by an audible click.
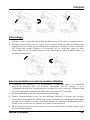
Disassembly
1. Use the lock to release the multi-function head and tilt it out all the way.
2. Push the attachment up and turn it counter clockwise to release it, and then
pull it out. Turn the bowl and remove it from the base unit. Remove the cover
by turning it counter clockwise and pulling it down. Move the multifunction
head back to the horizontal position.

English
6 Instructions for use
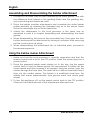
Recommendations before first use
• The appliance is designed to process average domestic quantities of food.
When using the speed levels 1 - 6, the unit should not be operated
continuously for more than 24 minutes. Switch off the appliance afterwards
and allow the motor to cool down for 15 minutes.
• Take the appliance and its accessories out of the packaging materials.
• Thoroughly wash all accessory parts that are intended to come into contact
with food using warm water and a neutral kitchen detergent. Then rinse
under clean running water and thoroughly wipe dry with a fine wiping cloth
or allow them to dry naturally.
• Do not submerge the food processor or its power cord in water or any other
liquids.
Selecting attachment types
Beater (6)
It is used for beating light and medium heavy yeast-free doughs,
for preparing sauces, creams, fillings, etc. Do not use it for
kneading heavy doughs.
Whisk (7)
It is used for whisking whole eggs or egg whites, whipped cream,
foamy creams, etc. Do not use it for beating or kneading doughs
Dough hook
(8)
It is used for kneading various types of doughs including heavy
and thick doughs such as for example bread dough, pizza
dough, fresh pastry doughs, etc.
USING THE FOOD MIXER
1. Select the right type of attachment based on its intended use and assemble
the appliance according to the instructions in the chapter Assembling and
disassembling the appliance. Place the ingredients into the bowl.

English
Instructions for use 7
2. Make sure that the multi-function head is tilted down in the horizontal
working position and that the speed control knob is set to the OFF position.
Connect the power cord to a power socket.
3. Set the required speed using the speed control knob. Gradually turn the
speed control knob clockwise to increase the speed, turning it in the
opposite direction will reduce the speed. To initially stir in the ingredients, first
set a lower speed and then adjust it as required. Electronic speed regulation
ensures that the set speed will be maintained under various loads. While it is
running, ingredients may be added into the bowl through the hole in the
cover.
4. The pulse mode is used for increasing the speed to maximum for a short
time. To activate the pulse mode, turn the speed control knob to the P
(PULSE) position and to ensure continuous operation hold it down in this
position. As soon as you release the speed control knob, it will automatically
return to the OFF position.
5. If it is necessary to wipe ingredients off the inside of the mixing bowl and the
attachment, first turn off the food processor by setting the speed control
knob to the OFF position and then disconnect it from the power socket. Wait
until the rotating parts come to a stop and only then scrape away the
ingredients with a spatula.
6. After you have finished using the appliance, set the speed control knob to
the OFF position and disconnect the power cord from the power socket.
7. Wait until the rotating parts come to a stop and disassemble the food mixer
according to the instructions indicated above. Use a soft plastic spatula to
empty out the contents of the bowl.
8. Clean out the food processor after each use.
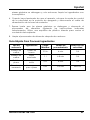
Quick Guide to Processing Ingredients
Attachment
type
Ingredients
Maximum
load
Processing
time
Speed
selection
Whisk
Egg whites
12 pcs
4 min
5-6
Whisk
Whipping
cream
1 l
6-8 min
5-6
Beater
Cake dough
2,2 l
6 min
3-4
Dough hook
Bread or Pizza
dough
0,8 l
4-5 min
MIN to 2

English
8 Instructions for use
USING THE GRINDER TO GRIND MEAT
Assembling and Disassembling the Meat Grinder
1. Insert the screw shaft into the mincer head with the cogged wheel
entering first.
2. Place the grinding blade on to the shaft (with the edge facing outwards
from the chamber) and on to it attach a grinding disc, or depending on
the preferred the grind. Attention: When attaching the blade, be very
careful not to injure yourself on the sharp edge. When assembling the
different individual parts, make sure that the notched markings on the
inserts match up with the relevant one on the housing.

English
Instructions for use 9
3. Place the screw ring on to the mincer head and tighten it securely by
screwing it clockwise. Place the removable tray on to the feed tube.
4. Make sure that the food processor is turned off and disconnected from the
power socket. The multi-function head must be tilted down in the
horizontal position and the whisk, beater or kneading attachments must be
removed.
5. Remove the front cover from the multi-function head.
6. Press the lock button and fit the prepared attachment onto the drive of
the base unit, holding it at an angle. Turn the attachment anticlockwise
until you hear it click into position.
7. When disassembling the meat grinder, first remove the removable tray.
Then press the lock button and remove the attachment by turning it
clockwise. After removing, put the cover back in its place.
8. When disassembling the mincer head into its individual parts, proceed in
the reverse sequence.
Using the Meat Grinder
1. First prepare the meat for grinding in the following way. Remove all bones,
tendons, cartilage and cut the meat into small pieces that will freely pass
through the feed tube.
2. Make sure that the food processor is correctly assembled and that the
speed control knob is set to the OFF position.
3. Place the bowl or another suitable container under the mincer head. Insert
the power plug into a power socket.
4. Use the speed control knob to set the desired speed. We recommend to
initially set speed 3 and then increase it as required. Gradually place the
meat pieces into the feed tube and push them in using the pusher. Take
care not to clog up the feed tube by a large amount of meat.
5. The ground meat will fall into the prepared bowl. The meat that remains in
the grinding mincer can be removed by grinding a slice of bread.
6. To turn off the food processor, set the speed control knob to the OFF
position. Clean out the meat grinder after each use.
Attention: Do not use fingers or other items to push the meat in. Always use the
pusher designed for this purpose.

English
10 Instructions for use
USING THE GRINDER TO MAKE SAUSAGE
Assembling and Disassembling the Sausage Attachment
1. Proceed in the same way as when assembling the meat grinder.
2. Place the sausage nozzle on to the grinding disc and complete the entire
sausage assembly by screwing the threaded ring on to the mincer head.
Place the removable tray on to the feed tube.
3. Attach the attachment to the food processor in the same way as
described in point 6 in chapter Assembling and disassembling the meat
grinder.
4. When disassembling, first remove the removable tray. Then press the lock
button and remove the attachment by turning it clockwise. After removing,
put the cover back in its place.
5. When disassembling the attachment into its individual parts, proceed in
the reverse sequence.

English
Instructions for use 11
Using the Sausage nozzle
1. Make sure that the food processor is correctly assembled and that the
speed control knob is set to the OFF position. Insert the power plug into a
power socket.
2. Prepare a sausage casing that you will stuff with ground meat and allow it
to soak in lukewarm water for approx. 10 minutes. Place the ground meat
mixture on to the removable tray.
3. Take the sausage casing out of the water and skewer or tie up one end
and slide the other end like a sock on to the sausage nozzle.
4. Use the speed control knob to set the desired speed. We recommend to
initially set the lowest speed and then increase it as required. With one
hand hold the sausage casing on the attachment and use the other hand
to push the ground meat mixture with the pusher through the feed tube. If
the sausage casing sticks to the nozzle, it is necessary to moisten it with
water again.
5. To turn off the appliance, set the speed control knob to the OFF position.
Clean out the individual parts of the attachment after each use.
Attention: Do not use fingers or other items to push the ground meat in.
Always use the pusher designed for this purpose.
USING THE KEBBE ATTACHMENTS

English
12 Instructions for use
Assembling and Disassembling the Kebbe Attachment
1. Proceed in the same way as when assembling the meat grinder, only with
the difference that instead of the grinding blade and the grinding disc,
only conical ring and nozzle are used.
2. Place the kebab moulder attachments and complete the entire kebab
maker assembly by screwing the threaded ring on to the mincer head.
Place the removable tray on to the feed tube.
3. Attach the attachment to the food processor in the same way as
described in point 6 in chapter Assembling and disassembling the meat
grinder.
4. When disassembling, first remove the removable tray. Then press the lock
button and remove the attachment by turning it clockwise. After removing,
put the cover back in its place.
5. When disassembling the attachment into its individual parts, proceed in
the reverse sequence.
Using the Kebbe maker Attachment
1. Make sure that the food processor is correctly assembled and that the
speed control knob is set to the OFF position. Insert the power plug into a
power socket.
2. Place the prepared kebab meat mixture on to the tray. Use the speed
control knob to set the desired speed. We recommend to initially set the
lowest speed and then increase it as required. Using the pusher, push the
mixture through the feed tube. The result will be a hollow meat tube that is
then cut into smaller pieces. The kebab is a traditional meal from the
Middle East made predominantly from ground meat and whole grain
wheat.
3. To turn the appliance off, set the speed control knob to the OFF position.
Clean out the individual parts of the attachment after each use.

English
Instructions for use 13
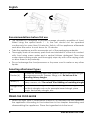
USING THE BLENDER
1. Place the mixing jug on the upper drive and turn it clockwise. The blender
has a safety system that prevents its operation if it is not placed correctly.
2. Cut the ingredients into pieces and fill the mixing jar. If so, add the liquid
ingredients (do not exceed 2/3 of their maximum capacity).
3. Place the outer lid on top and the inner cup on the lid.
4. Turn the speed selector to the desired setting.
5. Turn the device off by setting the speed selector to OFF.
6. Do not remove the jug from the connection until the blades have stopped
rotating completely.
Notes:
• Do not exceed the MAX quantities marked in the mixing jar.
• Never fill hot or hard ingredients, such as potatoes, ice, coffee beans nuts,
etc., into the mixing jar.
• P level cannot be stay for a long time, but can be repeat operated.
• Do not turn on the machine for more than 30s while the glass jar is empty.
• The juicer jar is glass, water over 40℃ is not allowed.
• The maximum rated capacity of cup is 1500ml

English
14 Instructions for use
CLEANING AND MAINTENANCE
• Before cleaning the stand mixer, always switch it off by setting the speed
control knob to the OFF position and disconnect it from the power socket.
• Disassemble the mixer into its individual parts. Wait until moving parts come
to a complete stop before disassembly.
• Thoroughly wash the used removable parts after every use using warm water
with a neutral dishwashing detergent. Then rinse them under clean running
water and wipe them dry with a fine wiping cloth or allow them to dry
naturally.
• If you whisked egg whites, first rinse the bowl and the beater under cold
water. If you were to use hot water, the egg white remains would harden,
and their removal would be more difficult.
• For cleaning the base unit and the multi-function head, use a cloth lightly
dipped in a weak detergent solution. Then wipe everything with a clean
dampened cloth and thoroughly wipe dry.
• For cleaning, do not use solvents or cleaning agents with abrasive effects.
Otherwise, the surface of the appliance may be damaged.
• Do not submerge the food processor or its power cord in water or any other
liquids.
TECHNICAL DATA
Model:......................................... BL-15B.013A
Power supply: ............................. 230V~, 50 Hz
Power consumption: ................. 1500W
Protection Class ......................... Class II
DECLARATION OF CONFORMITY
This product has been tested and produced according to all relevant current
CE guidelines, such as:
- electromagnetic compatibility Directive 2014/30/EU,
- Low voltage Directive (LVD) Directive 2014/35/EU,
- RoHS Directives 2011/65/EU and (EU)2015/863,
and has been constructed in accordance with the latest safety regulations.
The CE mark attests this product with all relevant directives.

English
Instructions for use 15
ENVIRONMENT
Please consider our environment
Do not dispose of the appliance in your normal domestic waste. This
product is subject to the European guideline 2012/19/UE.
Dispose of the appliance through an approved disposal centre or at
your community waste facility. Observe the currently applicable regulations. In
case of doubt, please contact your waste disposal centre.
Dispose of all packaging materials in an environmentally responsible manner.
When you wish to dispose of the appliance, remove the cable and dispose it in
an environmentally friendly way (e.g., recycling plant).
GUARANTEE
This unit is covered by a 24 months (*) warranty, from the purchase date, and
covers the repair free of charges of the damaged due to the manufacturer
fault or defected components. The distributor reserves the right to change the
unit for an equivalent model.
The warranty does not cover any damaged caused by incorrect use, lightning,
incorrect installation, external factors or any intentional damaged. The warranty
does not cover damage thus attributable to falls, blows, spill, exposure to
extreme environmental conditions or deterioration caused by normal use of
plastic parts or keyboards, as well as using batteries other than those specified in
this manual.
For the repairing, during the warranty period, the unit shall be sent to the
distributor or reseller, or to the address indicated by them, and must be jointed
the warranty certificated and the respective original invoice or selling ticket,
where the buying date is expressed indicated.
The consumer is protected by the guarantee provided by Directive 1999/44/CE
of European Parliament and Council of 25 May.
(*) Only for European Union countries

PT
16 Manual de Instruções
ESTIMADO CLIENTE
Obrigado por ter escolhido um produto HÆGERTEC.
Os produtos HÆGERTEC foram concebidos a pensar no bem-estar do
consumidor, privilegiando os mais elevados padrões de qualidade,
funcionalidade e designe. Estamos certos da sua satisfação pela aquisição
deste produto.
Partimos do princípio de que o utilizador possui conhecimentos gerais sobre o
manuseamento com eletrodomésticos.
Antes da primeira utilização, leia cuidadosa e totalmente estas instruções de
utilização e de segurança e familiarize-se com as funções do aparelho.
Guarde estas instruções e, se necessário, entregue-as a terceiros.
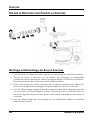
INSTRUÇÕES DE SEGURANÇA IMPORTANTES
Antes da instalação de qualquer eletrodoméstico, deverá seguir as
precauções básicas de segurança, incluindo as seguintes:
• Este aparelho não deve ser utilizado por crianças com
idades compreendidas entre menos de 8 anos.
• Este aparelho pode ser utilizado por crianças com mais
de 8 anos e por pessoas com capacidades físicas,
sensoriais ou mentais reduzidas, assim como com falta
de experiência e conhecimentos, caso sejam
supervisionadas ou instruídas sobre como utilizar o
aparelho de modo seguro e compreendam os riscos
envolvidos.
• As crianças não devem brincar com o aparelho.
• Mantenha o aparelho e respetivo cabo fora do alcance
de crianças com idade inferior a 8 anos.
• A limpeza e manutenção não devem ser realizadas por
crianças a não ser que tenham mais de 8 anos e sejam
supervisionadas.
• Para a segurança dos seus filhos, não deixe partes da embalagem
(sacos plásticos, papelão, esferovite, etc.) ao alcance dos mesmos.
• Não deixe crianças pequenas brincarem com os sacos de plástico.
Existe sempre o perigo de asfixia!

Português
Manual de Instruções 17
• Antes de ligar este aparelho a uma tomada elétrica, certifique-se
de que a tensão nominal que consta na placa de características do
aparelho corresponde a tensão elétrica da tomada.
• Nunca utilize acessórios que não tenham sido fornecidos
juntamente com este aparelho ou que não tenham sido
explicitamente recomendados pelo fabricante para este tipo de
aparelho.
• Este aparelho é destinado a uso doméstico. Não utilize para
questões comerciais, em ambientes industriais ou no exterior ou
para finalidades diferentes daquelas para as quais o aparelho foi
destinado.
• Coloque sempre o aparelho em superfícies uniformes, secas e
estáveis. Não o coloque num fogão elétrico ou a gás, nas
proximidades de lume forte ou aparelhos que são fonte de calor.
• Antes de colocar o aparelho em funcionamento, verifique se está
corretamente montado e se a cabeça multifunções está inclinada
para baixo na posição horizontal. Por motivos de segurança, este
aparelho está equipado com um mecanismo de segurança que
impede que o motor seja iniciado quando a cabeça multifunções
está inclinada para fora.
• Caso a cabeça multifunções incline para fora durante o
funcionamento, o aparelho irá parar automaticamente de
funcionar. Quando a cabeça multifunções está inclinada na
posição de funcionamento horizontal, o aparelho não irá retomar
automaticamente o funcionamento. Para retomar o
funcionamento, é necessário definir o botão de controlo da
velocidade para a posição OFF (desligar) e, em seguida, volte a
selecionar a velocidade desejada.
• Não toque nas peças rotativas do aparelho e certifique-se de que
itens estranhos, tais como roupas, cabelos, etc. são mantidos
afastados. Podem ocorrer ferimentos ou danos no aparelho.
• Caso um item, como uma colher, cair na tigela durante o
funcionamento, defina imediatamente o botão de controlo da
velocidade para a posição OFF (modo em espera) e retire o cabo
de alimentação da tomada elétrica. Espere que as peças rotativas
parem e, em seguida, remova o item.
• Se ingredientes ficarem colados ao acessório ou às laterais da
tigela, desligue o aparelho, retire-lhe a tomada elétrica e aguarde
até as peças rotativas pararem. Utilize uma espátula de silicone

Português
18 Manual de Instruções
para limpar o acessório e o interior da tigela. Em seguida, pode
reiniciar o aparelho.
Aviso: uma utilização incorreta do aparelho pode
resultar em ferimentos.
• O tempo de funcionamento contínuo máximo é de 24
minutos. Antes de voltar a usar, deixe o aparelho arrefecer
durante 15 minutos.
• Este aparelho tem uma segurança interna para evitar o
sobreaquecimento. Se o aparelho se desligar por causa de
sobreaquecimento, rode o controle de velocidade para OFF e
desligue a ficha da tomada. Aguarde 1 minuto antes de ligar
a ficha novamente. Se ainda assim o aparelho não iniciar,
aguarde 30 minutos para que ele esfrie completamente e só
depois tente novamente.
• Desligue sempre o aparelho, retire-o da tomada elétrica quando
não estiver a utilizá-lo, se planear deixá-lo sem supervisão e antes da
montagem, desmontagem, limpeza ou ao deslocá-lo. Antes de
desmontar o aparelho e substituir os acessórios ou peças acessíveis
que se movem durante a utilização, espere até que todas as peças
móveis parem.
• Limpe-o de acordo com as instruções no capítulo Limpeza e
manutenção.
• Não ligue o aparelho enquanto estiver vazio. A utilização incorreta
do aparelho pode afetar a sua vida útil de forma negativa.
• Certifique-se de que os contactos da ficha elétrica não entram em
contacto com água ou humidade. Não coloque itens pesados
sobre o cabo de alimentação.
• Certifique-se de que o cabo de alimentação não fica pendurado
na extremidade de uma mesa e que não está em contacto com
uma superfície quente.
• Puxe o cabo de alimentação para desligar o aparelho da tomada
elétrica. Caso contrário, isto pode danificar o cabo de alimentação
ou a tomada.
• Verifique regularmente se o aparelho ou o fio apresentam danos.
Nunca ponha a funcionar o aparelho com quaisquer danos.
A página está carregando...
A página está carregando...
A página está carregando...
A página está carregando...
A página está carregando...
A página está carregando...
A página está carregando...
A página está carregando...
A página está carregando...
A página está carregando...
A página está carregando...
A página está carregando...
A página está carregando...
A página está carregando...
A página está carregando...
A página está carregando...
A página está carregando...
A página está carregando...
A página está carregando...
A página está carregando...
A página está carregando...
A página está carregando...
A página está carregando...
A página está carregando...
A página está carregando...
A página está carregando...
A página está carregando...
A página está carregando...
A página está carregando...
A página está carregando...
A página está carregando...
A página está carregando...
A página está carregando...
A página está carregando...
A página está carregando...
A página está carregando...
A página está carregando...
A página está carregando...
A página está carregando...
A página está carregando...
A página está carregando...
A página está carregando...
A página está carregando...
A página está carregando...
A página está carregando...
A página está carregando...
A página está carregando...
A página está carregando...
-
 1
1
-
 2
2
-
 3
3
-
 4
4
-
 5
5
-
 6
6
-
 7
7
-
 8
8
-
 9
9
-
 10
10
-
 11
11
-
 12
12
-
 13
13
-
 14
14
-
 15
15
-
 16
16
-
 17
17
-
 18
18
-
 19
19
-
 20
20
-
 21
21
-
 22
22
-
 23
23
-
 24
24
-
 25
25
-
 26
26
-
 27
27
-
 28
28
-
 29
29
-
 30
30
-
 31
31
-
 32
32
-
 33
33
-
 34
34
-
 35
35
-
 36
36
-
 37
37
-
 38
38
-
 39
39
-
 40
40
-
 41
41
-
 42
42
-
 43
43
-
 44
44
-
 45
45
-
 46
46
-
 47
47
-
 48
48
-
 49
49
-
 50
50
-
 51
51
-
 52
52
-
 53
53
-
 54
54
-
 55
55
-
 56
56
-
 57
57
-
 58
58
-
 59
59
-
 60
60
-
 61
61
-
 62
62
-
 63
63
-
 64
64
-
 65
65
-
 66
66
-
 67
67
-
 68
68


HAEGER BL-15B.013A Manual do usuário
- Categoria
- Picadores
- Tipo
- Manual do usuário
em outras línguas
- español: HAEGER BL-15B.013A Manual de usuario
- français: HAEGER BL-15B.013A Manuel utilisateur
- English: HAEGER BL-15B.013A User manual
Artigos relacionados
Outros documentos
-
Proline KM10 Operating Instructions Manual
-
-
Tefal FP413DAE Manual do usuário
-
Team TKG HA 1014S Manual do proprietário
-
Jocel CH-7103A Manual do usuário
-
Philips HR7958/02 Manual do usuário
-
Livoo DOP219W Manual do usuário
-
AEG KM54WR Manual do usuário
-
AEG KM5540-U Manual do usuário
-