
Warnings:
1. Installation must be carried out by a qualified
electrician in accordance with local regulations.
2. Keep the device out of the reach of children.
3. Keep the device away from water , damp or hot
environment.
4. Install the device away from strong signal sources
such as microwave oven that may cause signal
interruption resulted in abnormal operation of the
device.
5. Obstruction by concrete wall or metallic
materials may reduce the effective operation
range of the device and should be avoided.
6. Do NOT attempt to disassemble,repair or modify
the device.
.
1 2 3 4
5 6 7 8
Smart Switch Module
Instruction Manual
WiFi 2 Gang
MS-104B
TECHNICAL SPECIFICATIONS
Smart Switch Module
Wireless Protocol
Wi-Fi 2.4GHz IEEE 802.11 b/g/n
Operation Temp. -10ºC - +40ºC
Case Temp.
Operation Range
Dims (WxDxH) 52x47x18 mm
IP Rating IP20
90-250V AC 50/60Hz
Current 10A/Gang;Total 10A
≤200 m
Tc: +80ºC (Max.)
Product Type
Voltage
52 mm
18 mm
47 mm
S2
L
L
LN
S1
2
1
Rocker light switch
Push wall switch
(Reset switch)
Global international operation Whenever & Wherever
You are, All-in-one Mobile App
Anywhere
APP
APP
Schedule timer Voice control-work
with Google Home
Voice control-work
with Amazon Alexa
Device Sharing
In house local operation
App
APP
Router Voice control Push wall switch
(Reset switch)
Rocker light switch
L N
2. With 2 Gang 2 Way switches
WIRING DIAGRAM
1. With one 2 Gang switch
L N
English
EnglishEnglish English
EnglishEnglish EnglishEnglish
Remove the old switch
Turn off the circuit breaker and use the electrical tester to
test the power.
Ensure the circuit breaker is off before wiring.
Step 1
Step 2
Step 3
Remove the switch and pull it away from the wall.
Identify Line/Load Wire(Note:The color of your wire
may be different from the color shown on the
manual.)
We recommend you remove the faceplate from the old switch and
use an electrical tester to test all wires connected to the switch to
ensure there is no voltage in the circuit.
You may need to turn off more than one circuit breaker.
Verify power is off
Please disconnect the power supply before installing
or removing the device for avoiding irreversible
damage on the device from the electric current or
some unpredictable problems such as lamp flashing.
Attention:
Bitte scannen Sie den QR-Code, um das deutsche
Handbuch, das Installationsvideo und die Funktionsein-
führung zu erhalten
Escanee el código QR para obtener el manual en español,
el video de instalación y la introducción de la función
Veuillez scanner le code QR pour obtenir le manuel en
français, la vidéo d'installation et l'introduction des
fonctions
Отсканируйте QR-код, чтобы получить руководство на
русском языке, видео по установке и описание функций
Leia o código QR para obter o manual em português, o
vídeo de instalação e a introdução das funções

3.2 Method two:Pair with traditional pairing method.
(Wi-Fi)
Wiring Instructions and Diagrams
FAQ
Scan the QR code to download Smart Life App, or
you can also search keyword “Smart Life” at App
Store or Googleplay to download App.
iOS App / Android App
APP USER MANUAL
MANUAL OVERRIDE
The switch module terminal reserves the access of
manual override function for the end-user to switch on/off
• Switch on/off for permanent on/off function.
Notes:
1) Both the adjustment on App and switch can be
reset, the last adjustment remains in memory.
2) The App control is synchronized with the
manual switch.
1.Turn off the power supply before carrying out any
electrical installation work.
2. Connect wires according to the wiring diagram.
3. Insert the module into the junction box.
4. Connect the power supply and follow switch module
configuration instructions.
Notes:
Q1: What should I do if I can’t configure the switch
module?
a. Please check whether device is powered on.
b. Make sure your mobile and switch module
are under the same 2.4 GHz WiFi network.
c. Whether it’s in good internet conditions.
d. Make sure the password entered in App is correct.
e. Make sure the wiring is correct.
Q2: What device can be connected to this WiFi switch
module?
Q3: What happens if the WiFi goes off?
Most of your household electrical appliances can be,
such as lamps, laundry machine, coffe maker, etc.
You can still control the device connected the switch
module with your traditional switch and once WiFi is
active again the device connected to module will
connect automatically to your WiFi network.
Q4: What should I do if I change the WiFi network or
change the password?
You have to re-connect our WiFi switch module to the
new WiFi network according to the App User Manual.
Reset button
Log in or register your account with your mobile
number or e-mail address. Type in the verification
code sent to your mobile or mail box, then set your
login password. Click "Create Family" to enter into
the App.
Mobile number/e-mail address
Region
Obtain verification code
9 10 11 12
14
13 15 16
3.1 Method one:Pair and clear up the WiFi code with
Bluetooth and WiFi connected meantime.(New
Updated)
1.Make sure your phone is connected to Wi-Fi
and Bluetooth.
2.Open Smart Life/Tuya App and Click“+”,then
the prompt page will automatically show on the
screen.Click “Go to add”.
3.Select the device you want to add and click “+”
4.Enter Wi-Fi Password and click “Next”,waiting
for completing the connection.
5.Add the device successfully, you can edit the
name of the device to enter the device page by
click “Done”
a. for reset switch:press the switch button for 10
times until the beep sounds continuously and rapidly
as Di-Di-Di... for pairing and reset mode.
b. for rocker light switch:press the switch button for
20 times (ON/OFF cycle for 10 times) until the beep
sounds continuously and rapidly as Di-Di-Di... for
pairing and reset mode.
c. for switch module:long press the reset button on
the module until you hear Di-Di for 2 times,then
continue to press until the beep sounds continuously
and rapidly as Di-Di-Di...
Wi-Fi link method:(two pairing methods)
Complete the wiring of the switch module before pairing
Open the App, select “+” on top right and choose
“Switch (Wi-Fi)” to add device.
Make sure your smart phone and WiFi+RF
switch module are under the same WiFi network
at2.4GHz connection. Confirm when the light
blinks rapidly (twice a second).
Add Device
the indicator blinks rapidly
Add Device
Confirm indicator blinks rapidly
After the wiring of switch module is done, press the
traditional switch to enter into the pairing mode:
Rocker switch Push wall switch
(Reset switch)
Fit for the two switches
3. With Wall Socket
L N
Put your smartphone close to the switch
module when you’re configuring, and make
sure you have min. 50% Wi-Fi signal.
EnglishEnglish EnglishEnglish
EnglishEnglish EnglishEnglish
Wall Socket
Wall Socket

17 18 19 20
21
22 23 24
Note:
2.Then you will see two devices in the app and
click the main switch(as One gang switch as
below) by entering into the next operation.
3.Click in the upper right corner and
choose“Multi-Control Association, and then click
“+” in the right corner
4.Choose the switch that you want to associate
to and then choose the switch button that you
want to control the same light.
5.Then go back to previous page,you will see two
items in the page,one is your main switch,the other is
the one you associate just now.
Note:Please confirm the associated switch is
enabled.
6.Now you are able to control your light with two
switches.Do not associate another button in the
same switch for multi-control.
a. For reset switch:press the switch button for 10
times until the beep sounds continuously and rapidly
as Di-Di-Di... for pairing and reset mode.
b. For rocker light switch:press the switch button for
20 times(ON/OFF cycle for 10 times) until the beep
sounds continuously and rapidly as Di-Di-Di... for
pairing and reset mode.
c. For switch module:long press the reset button on
the module until you hear Di-Di for 2 times,then
continue to press until the beep sounds continuously
and rapidly as Di-Di-Di...
How to reset /pair Wi-Fi code
The connecting will take about 10-120 seconds to
complete depending on your network condition.
Connecting
Device found
Register device to the smart cloud
initializing device
Make sure your router,mobile,and
device are as close as possible
2% When pairing is done, the switch will be shown on
the App.
Connect to Amazon Alexa or Google Assistant
for voice control, or share the devices with your
families or friends.
More
Device Name
Basic information about the device
Supported Third-party
Control Others
Others
Share Device
Create Group
Device information
Feedback
Device Location
Check Network
Amazon
Alexa Google
Assistant
Enjoy your smart life of home automation for
lighting control by using our All-in-one mobile
App wherever you are in the world or simply by
voice control when you are sitting at home
comfortably.
Voice control
App control
APP
This WiFi+RF switch module fits for rocker
light switch and reset switch meanwhile.Please
pay attention to the different pairing modes.
Main Switch
New Added Switch
MS-104B
MS-104B
Light Switch Switch 1
Pair and clear up the RF code
1. How to pair the RF code
2. How to clear up the RF code
1.1 For reset switch: press the switch for 5 times to hear
the beep sounds as Di-Di(2 times) for successful pairing.
1.2 For rocker light switch: press the switch for 10 times
(ON/OFF cycle for 5 times) to hear the beep sounds as
Di-Di(2 times) for successful pairing.
1.3 For reset button:
a.for button 1:press the button on the module for once to
hear the beep sounds as Di(1 second),then long press the
button on the module to hear the beep sounds as Di-Di(2
times) for successful paring.
b.for button 2:press the button on the module for twice
to hear the beep sounds as Di...(2 seconds),then long
press the button on the module to hear the beep sounds
as Di-Di(2 times)for successful paring.
2.1 For reset switch: press the switch for 5 times to hear
the beep sounds as Di-Di(2 times),and press the switch
for 5 times again after 5 seconds to hear the beep
sounds as Di-Di-Di-Di(4 times) for successful clearing.
2.2 For rocker light switch: press the switch for 10 times
(ON/OFF cycle for 5 times) to hear the beep sounds as
Di-Di(2 times),and press the switch for 10 times (ON/OFF
cycle for 5 times) again after 5 seconds to hear the beep
sounds as Di-Di-Di-Di(4 times) for successful clearing.
2.3 For reset button:
a. for button 1: press the button on the module for once
to hear the beep sounds as Di(1 second),then long press
the button on the module to hear beep sounds as Di-Di
(2 times),release your finger for 5 seconds and long
press the button again to hear the beep sounds as
Di-Di-Di-Di(4 times) for successful clearing.
b. for button 2: press the button on the module for twice
to hear the beep sounds as Di...(2 seconds),then long
press the button on the module to hear beep sounds as
Di-Di(2 times),release your finger for 5 seconds and
long press the button again to hear the beep sounds as
Di-Di-Di-Di(4 times) for successful clearing.
Note:Please confirm you have successfully finished the
WiFi link method above for adding this switch to your
Smart Life App before the association.
1.WiFi add another smart switch to the same Smart
Life/Tuya App.(If there is a smart switch having been
added before to the app,just go to next step.)
Note:There is no need to wire the new added switch to
the light,only L and N are required for wiring.
3.3
How to achieve multi-control association
EnglishEnglish EnglishEnglish
EnglishEnglish EnglishEnglish

7.If you want to add another third or more smart
switches to control your light,just repeat the steps
above.And you will see the result as below when
you associate another new switch.
Associated 1
Associated 2
Main Switch
Switch 1
Switch 1
25 26 27 28
Product Information
Product Name____________________________________
Product Type_____________________________________
Purchase Date____________________________________
Warranty Period__________________________________
Dealer Information________________________________
Customer's Name_________________________________
Customer Phone__________________________________
Customer Address________________________________
_________________________________________________
Maintenance Records
Failure date Cause Of Issue Fault Content Principal
WARRANTY CARD
EnglishEnglish EnglishEnglish
1.During the free warranty period, if the product
breaks down during normal use, we will offer free
maintenance for the product.
2.Natural disasters/man-made equipment failures,
disassembly and repair without the permission of
our company, no warranty card, products beyond
the free warranty period, etc., are not within the
scope of free warranty
3.Any commitment (oral or written) made by the
third party (including the dealer/service provider) to
the user beyond the warranty scope shall be
executed by the third party
4.Please keep this warranty card to ensure your
rights
5.Our company may update or change the products
without notice. Please refer to the official website
for the updates.
SERVICE RECYCLING INFORMATION
All products marked with the symbol for separate
collection of waste electrical and electronic
equipment (WEEE Directive 2012/19 / EU) must
be disposed of separately from unsorted
municipal waste. To protect your health and the
environment, this equipment must be disposed of
at designated collection points for
electrical and electronic equipment
designated by the government or
local authorities.
Correct disposal and recycling will
help prevent potential negative
consequences for the environment
and human health. To find out where
these collection points are and how they work,
contact the installer or your local authority.
AL23

Warnungen:
1. Die Installation muss von einem qualifizierten
Elektriker gemäß den örtlichen Vorschriften
durchgeführt werden.
2. Bewahren Sie das Gerät außerhalb der Reichweite
von Kindern auf.
3. Halten Sie das Gerät von Wasser, feuchter oder
heißer Umgebung fern.
4. Installieren Sie das Gerät entfernt von starken
Signalquellen wie Mikrowellenherden, die eine
Signalunterbrechung verursachen können, die zu
einem abnormalen Betrieb des Geräts führen kann.
5. Eine Behinderung durch Betonwände oder
metallische Materialien kann den effektiven
Betriebsbereich des Geräts verringern und sollte
vermieden werden.
6. Versuchen Sie NICHT, das Gerät zu zerlegen, zu
reparieren oder zu modifizieren.
Verdrahtungsanweisungen und -diagramme
.
1.Schalten Sie die Stromversorgung aus, bevor Sie
Elektroinstallationsarbeiten durchführen.
2. Schließen Sie die Drähte gemäß dem Schaltplan an.
3. Stecken Sie das Modul in die Anschlussdose.
4. Schließen Sie das Netzteil an und befolgen Sie die
Anweisungen zur Konfiguration des Schaltermoduls.
Anmerkungen:
1 2 3 4
5 6 7 8
Smart-Switch-Modul
Bedienungsanleitung
WiFi 2 Gang
MS-104B
TECHNISCHE SPEZIFIKATIONEN
Smart-Switch-Modul
Wireless-Protokoll
Wi-Fi 2.4GHz IEEE 802.11 b/g/n
Betriebstemp. -10ºC - +40ºC
Gehäusetemp.
Betriebsbereich
Maße (BxTxH) 52x47x18 mm
IP-Bewertung IP20
90-250V AC 50/60Hz
Strom 10A/Bande;Gesamt 10A
≤200 m
Tc: +80ºC (max.)
Produktart
Stromspannung
52 mm
18 mm
47 mm
S2
L
L
LN
S1
2
1
Wippschalter
Wippschalter
Hell
Hell
Hell
Hell
Wippschalter
Wippschalter
Wippschalter
Wandschalter drücken
(Reset-Schalter)
Globaler internationaler Betrieb Wann und wo immer Sie
sind, All-in-One Mobile App
Irgendwo
APP
APP
Timer planen Sprachsteuerung
– funktioniert mit
Google Home
Sprachsteuerung
– funktioniert mit
Amazon Alexa
Gerätefreigabe
Lokaler Betrieb im Haus
App
APP
Router Stimmenkontrolle Wandschalter drücken
(Reset-Schalter)
Wippschalter
L N
2. Mit 2-Gang 2-Wege-Schaltern
SCHALTPLAN
1. Mit einem 2-Gang-Schalter
L N
3. Mit Steckdose
L N
Legen Sie Ihr Smartphone bei der Konfiguration in die
Nähe des Switch-Moduls und stellen Sie sicher, dass
Sie min. 50% WLAN-Signal.
Deutsch
DeutschDeutsch Deutsch
DeutschDeutsch DeutschDeutsch
Entfernen Sie den alten Schalter
Schalten Sie den Schutzschalter aus und verwenden Sie den
elektrischen Tester, um die Leistung zu testen.
Stellen Sie vor der Verdrahtung sicher, dass der
Schutzschalter ausgeschaltet ist.
Schritt 1
Schritt 2
Schritt 3
Entfernen Sie den Schalter und ziehen Sie ihn von
der Wand weg.
Identifizieren Sie das Leitungs-/Ladekabel (Hinweis:
Die Farbe Ihres Kabels kann von der im Handbuch
gezeigten Farbe abweichen.)
Wir empfehlen Ihnen, die Frontplatte vom alten Schalter zu
entfernen und mit einem elektrischen Tester alle an den Schalter
angeschlossenen Drähte zu testen, um sicherzustellen, dass im
Stromkreis keine Spannung anliegt.
Möglicherweise müssen Sie mehr als einen Schutzschalter
ausschalten.
Stellen Sie sicher, dass die Stromversorgung ausgeschaltet ist
Bitte trennen Sie die Stromversorgung, bevor Sie das
Gerät installieren oder entfernen, um irreversible
Schäden am Gerät durch den elektrischen Strom oder
einige unvorhersehbare Probleme wie Lampenblitzen
zu vermeiden.
Beachtung:
Steckdose
Steckdose
SOBRE
APAGADO

3.2 Methode zwei:Paaren Sie mit der traditionellen
Paarungsmethode.
(Wi-Fi)
FAQ
Scannen Sie den QR-Code, um die Smart Life App
herunterzuladen, oder suchen Sie im App Store oder
bei Googleplay nach dem Stichwort „Smart Life“,
um die App herunterzuladen.
iOS App / Android App
APP-BENUTZERHANDBUCH
HANDBETRIEB
Die Klemme des Schaltmoduls reserviert den Zugriff
auf die manuelle Überbrückungsfunktion für den
Endbenutzer zum Ein-/Ausschalten
• Ein-/Ausschalten für permanente Ein-/Aus-Funktion.
Anmerkungen:
1) Sowohl die Einstellung an App als auch Schalter
können zurückgesetzt werden, die letzte Einstellung
bleibt gespeichert.
2) Die App-Steuerung ist mit dem Handschalter
synchronisiert.
F1: Was soll ich tun, wenn ich das Switch-Modul nicht
konfigurieren kann?
a. Bitte überprüfen Sie, ob das Gerät eingeschaltet ist.
b. Stellen Sie sicher, dass sich Ihr Mobiltelefon und das
Switch-Modul im selben 2,4-GHz-WLAN-Netzwerk
befinden.
c. Ob bei guten Internetbedingungen.
d. Stellen Sie sicher, dass das in der App eingegebene
Passwort korrekt ist.
e. Stellen Sie sicher, dass die Verkabelung korrekt ist.
F2: Welches Gerät kann an dieses WiFi-Switch-Modul
angeschlossen werden?
F3: Was passiert, wenn das WLAN ausfällt?
Die meisten Ihrer elektrischen Haushaltsgeräte können
wie Lampen, Waschmaschinen, Kaffeemaschinen usw.
Sie können das mit dem Switch-Modul verbundene
Gerät weiterhin mit Ihrem herkömmlichen Switch steuern
und sobald WLAN wieder aktiv ist, verbindet sich das
mit dem Modul verbundene Gerät automatisch mit Ihrem
WLAN-Netzwerk.
F4: Was soll ich tun, wenn ich das WLAN-Netzwerk oder
das Passwort ändere?
Sie müssen unser WiFi-Switch-Modul gemäß App-
Benutzerhandbuch erneut mit dem neuen WiFi-Netzwerk
verbinden.
Reset-Knopf
Melden Sie sich an oder registrieren Sie Ihr Konto
mit Ihrer Handynummer oder E-Mail-Adresse.
Geben Sie den Bestätigungscode ein, der an Ihr
Mobiltelefon oder Ihre Mailbox gesendet wurde, und
legen Sie dann Ihr Login-Passwort fest. Klicken Sie
auf "Familie erstellen", um die App zu öffnen.
Mobile number/e-mail address
Region
Obtain verification code
9 10 11 12
14
13 15 16
3.1 Methode eins:Koppeln und löschen Sie den
WiFi-Code mit Bluetooth und WiFi in der
Zwischenzeit. (Neu aktualisiert)
1.Stellen Sie sicher, dass Ihr Telefon mit Wi-Fi
und Bluetooth verbunden ist.
2.Öffnen Sie die Smart Life/Tuya App und
klicken Sie auf „+“, dann wird die
Eingabeaufforderungsseite automatisch auf dem
Bildschirm angezeigt. Klicken Sie auf „Gehe zum
Hinzufügen“.
3.Wählen Sie das Gerät aus, das Sie hinzufügen
möchten, und klicken Sie auf „+“
4.Geben Sie das Wi-Fi-Passwort ein und klicken
Sie auf „Weiter“ und warten Sie, bis die
Verbindung hergestellt ist.
5.Fügen Sie das Gerät erfolgreich hinzu. Sie
können den Namen des Geräts bearbeiten, um
die Geräteseite aufzurufen, indem Sie auf
„Fertig“ klicken.
a. für Reset-Schalter:Drücken Sie die Umschalttaste
10 Mal, bis der Piepton kontinuierlich und schnell als
Di-Di-Di... für den Pairing- und Reset-Modus ertönt.
b. für Wippschalter:Drücken Sie die Schalttaste 20
Mal (10 Mal EIN/AUS-Zyklus), bis der Piepton
kontinuierlich und schnell als Di-Di-Di... für den
Pairing- und Reset-Modus ertönt.
c. für Schaltermodul:Drücken Sie die Reset-Taste am
Modul lange, bis Sie Di-Di 2 Mal hören, und drücken
Sie dann weiter, bis der Piepton kontinuierlich und
schnell als Di-Di-Di ertönt.
Wi-Fi-Verbindungsmethode: (zwei
Paarungsmethoden)
Schließen Sie die Verkabelung des Schaltmoduls vor dem
Pairing ab
Öffnen Sie die App, wählen Sie oben rechts „+“
und wählen Sie „Switch (Wi-Fi)“, um das Gerät
hinzuzufügen.
Stellen Sie sicher, dass sich Ihr Smartphone und
das WiFi+RF-Switch-Modul im selben WiFi-
Netzwerk mit einer 2,4-GHz-Verbindung befinden.
Bestätigen Sie, wenn das Licht schnell blinkt
(zweimal pro Sekunde).
Add Device
the indicator blinks rapidly
Add Device
Confirm indicator blinks rapidly
Nachdem die Verkabelung des Schaltmoduls
abgeschlossen ist, drücken Sie den herkömmlichen
Schalter, um in den Pairing-Modus zu gelangen:
Wippschalter Wandschalter drücken
(Reset-Schalter)
Passend für die beiden
Schalter
DeutschDeutsch DeutschDeutsch
DeutschDeutsch DeutschDeutsch

17 18 19 20
21
22 23 24
Notiz:
2. Dann sehen Sie zwei Geräte in der App und
klicken auf den Hauptschalter (als
One-Gang-Switch wie unten), indem Sie in den
nächsten Vorgang eintreten.
3.Klicken Sie auf in der oberen rechten Ecke
und wählen Sie „Multi-Control Association“ und
klicken Sie dann auf „+“ in der rechten Ecke.
4.Wählen Sie den Schalter, dem Sie zuordnen
möchten, und wählen Sie dann die Schaltertaste,
mit der Sie dasselbe Licht steuern möchten.
5. Dann gehen Sie zurück zur vorherigen Seite, Sie
sehen zwei Elemente auf der Seite, einer ist Ihr
Hauptschalter, der andere ist der, den Sie gerade
zuordnen.
Hinweis: Bitte bestätigen Sie, dass der zugehörige
Schalter aktiviert ist.
6.Jetzt können Sie Ihr Licht mit zwei Schaltern
steuern. Ordnen Sie für die Mehrfachsteuerung
keine weitere Taste im selben Schalter zu.
a. Für Reset-Schalter:Drücken Sie die Umschalttaste
10 Mal, bis der Piepton kontinuierlich und schnell als
Di-Di-Di... für den Pairing- und Reset-Modus ertönt.
b. Für Wippschalter:Drücken Sie die Schalttaste 20
Mal (EIN / AUS-Zyklus für 10 Mal), bis der Piepton
kontinuierlich und schnell als Di-Di-Di ... für den
Pairing- und Reset-Modus ertönt.
c. Für Schaltermodul:Drücken Sie die Reset-Taste am
Modul lange, bis Sie Di-Di 2 Mal hören, und drücken
Sie dann weiter, bis der Piepton kontinuierlich und
schnell als Di-Di-Di ertönt.
WLAN-Code zurücksetzen/koppeln
Der Verbindungsaufbau dauert je nach
Netzwerkzustand etwa 10-120 Sekunden.
Connecting
Device found
Register device to the smart cloud
initializing device
Make sure your router,mobile,and
device are as close as possible
2% Wenn das Pairing abgeschlossen ist, wird der Schalter
in der App angezeigt.
Verbinden Sie sich zur Sprachsteuerung mit
Amazon Alexa oder Google Assistant oder
teilen Sie die Geräte mit Ihren Familien oder
Freunden.
More
Device Name
Basic information about the device
Supported Third-party
Control Others
Others
Share Device
Create Group
Device information
Feedback
Device Location
Check Network
Amazon
Alexa Google
Assistant
Genießen Sie Ihr smartes Leben der
Hausautomation für die Lichtsteuerung, indem
Sie unsere All-in-One-Mobile-App überall auf
der Welt verwenden oder einfach per
Sprachsteuerung, wenn Sie bequem zu Hause
sitzen.
Stimmenkontrolle
App-Steuerung
APP
Dieses WiFi + RF-Schaltermodul passt
inzwischen für Wipplichtschalter und
Reset-Schalter. Bitte beachten Sie die
verschiedenen Pairing-Modi.
Hauptschalter
Neuer hinzugefügter
Schalter
MS-104B
MS-104B
Light Switch Switch 1
Koppeln und löschen Sie den RF-Code
1. So koppeln Sie den RF-Code
2. So löschen Sie den RF-Code
1.1 Für Reset-Schalter: Drücken Sie den Schalter 5 Mal,
um den Piepton als Di-Di (2 Mal) für eine erfolgreiche
Kopplung zu hören.
1.2 Für Wippschalter: Drücken Sie den Schalter 10 Mal
(EIN / AUS-Zyklus für 5 Mal), um den Piepton als Di-Di (2
Mal) für eine erfolgreiche Kopplung zu hören.
1.3 Für Reset-Taste:
a.für Taste 1: Drücken Sie die Taste am Modul einmal,
um den Piepton als Di (1 Sekunde) zu hören .
b.für Taste 2: Drücken Sie die Taste am Modul zweimal,
um den Piepton als Di ... (2 Sekunden) zu hören, und
drücken Sie dann lange auf die Taste am Modul, um den
Piepton als Di-Di (2 Mal) zu hören. für eine erfolgreiche
Paarung.
2.1 Für Reset-Schalter: Drücken Sie den Schalter 5 Mal,
um den Piepton als Di-Di (2 Mal) zu hören, und drücken
Sie den Schalter nach 5 Sekunden erneut 5 Mal, um den
Piepton als Di-Di-Di-Di (4 Mal) erfolgreich zu hören
Clearing.
2.2 Für Wippschalter: Drücken Sie den Schalter 10 Mal
(EIN / AUS-Zyklus für 5 Mal), um den Piepton als Di-Di (2
Mal) zu hören, und drücken Sie den Schalter nach 5
Sekunden erneut 10 Mal (EIN / AUS-Zyklus für 5 Mal).
hören Sie den Piepton als Di-Di-Di-Di (4-mal) für ein
erfolgreiches Löschen.
2.3 Für Reset-Taste:
A. für Taste 1: Drücken Sie die Taste am Modul einmal,
um die Pieptöne als Di zu hören (1 Sekunde), dann
drücken Sie die Taste am Modul lange, um die Pieptöne
als Di-Di zu hören (2 Mal), lassen Sie Ihren Finger für 5 .
los Sekunden und drücken Sie die Taste erneut lange, um
den Piepton als Di-Di-Di-Di (4-mal) für den
erfolgreichen Löschvorgang zu hören.
B. für Taste 2: Drücken Sie die Taste am Modul zweimal,
um die Pieptöne als Di ... (2 Sekunden) zu hören. Drücken
Sie dann die Taste am Modul lange, um die Pieptöne als
Di-Di (2 Mal) zu hören Finger für 5 Sekunden und
drücken Sie die Taste erneut lange, um den Piepton als
Di-Di-Di-Di (4 Mal) für einen erfolgreichen
Löschvorgang zu hören.
Hinweis: Bitte bestätigen Sie, dass Sie die oben
beschriebene WiFi-Link-Methode erfolgreich
abgeschlossen haben, um diesen Schalter vor der
Verknüpfung zu Ihrer Smart Life-App hinzuzufügen.
1.WiFi fügen Sie der gleichen Smart Life/Tuya App
einen weiteren Smart Switch hinzu. (Wenn der App
zuvor ein Smart Switch hinzugefügt wurde, gehen Sie
einfach zum nächsten Schritt.)
Hinweis: Es ist nicht erforderlich, den neu hinzugefügten
Schalter mit dem Licht zu verkabeln, es werden nur L
und N für die Verkabelung benötigt.
3.3
So erreichen Sie eine Multi-Control-Assoziation
DeutschDeutsch DeutschDeutsch
DeutschDeutsch DeutschDeutsch

7.Wenn Sie einen weiteren dritten oder mehr
intelligenten Schalter hinzufügen möchten, um Ihr
Licht zu steuern, wiederholen Sie einfach die
obigen Schritte. Und Sie sehen das Ergebnis wie
unten, wenn Sie einen anderen neuen Schalter
zuordnen.
Damit
verbundenen 1
Damit
verbundenen 2
Hauptschalter
Switch 1
Switch 1
25 26 27 28
Produktinformation
Produktname______________________________________
Produktart________________________________________
Kaufdatum________________________________________
Garantiezeit_______________________________________
Händlerinformationen
__________________________________________________
Kundenname______________________________________
Kundentelefon____________________________________
Kundenadresse___________________________________
_________________________________________________
Wartungsaufzeichnungen
Ausfalldatum Ursache des
Problems Fehlerinhalt Rektor
GARANTIEKARTE
DeutschDeutsch DeutschDeutsch
1.Während der kostenlosen Garantiezeit bieten wir,
wenn das Produkt während des normalen
Gebrauchs ausfällt, eine kostenlose Wartung für
das Produkt an.
2. Naturkatastrophen / vom Menschen verursachte
Geräteausfälle, Demontage und Reparatur ohne
Genehmigung unseres Unternehmens, keine
Garantiekarte, Produkte außerhalb der kostenlosen
Garantiezeit usw. fallen nicht unter die kostenlose
Garantie
3.Jede Verpflichtung (mündlich oder schriftlich) des
Dritten (einschließlich des Händlers/Dienstleisters)
gegenüber dem Benutzer über den Garantieumfang
hinaus wird von dem Dritten ausgeführt
4.Bitte bewahren Sie diese Garantiekarte auf, um
Ihre Rechte zu gewährleisten
5.Unser Unternehmen kann die Produkte ohne
vorherige Ankündigung aktualisieren oder ändern.
Die Aktualisierungen finden Sie auf der offiziellen
Website.
SERVICE RECYCLING-INFORMATIONEN
Alle Produkte, die mit dem Symbol für die
getrennte Sammlung von Elektro- und
Elektronikaltgeräten (WEEE-Richtlinie 2012/19 /
EU) gekennzeichnet sind, müssen getrennt vom
unsortierten Siedlungsabfall entsorgt werden. Um
Ihre Gesundheit und die Umwelt zu schützen,
müssen diese Geräte an
ausgewiesenen Sammelstellen für
Elektro- und Elektronikgeräte entsorgt
werden, die von der Regierung oder den
örtlichen Behörden vorgesehen sind.
Eine ordnungsgemäße Entsorgung
und Wiederverwertung trägt dazu bei,
potenzielle negative Folgen für die Umwelt und die
menschliche Gesundheit zu vermeiden. Um
herauszufinden, wo sich diese Sammelstellen
befinden und wie sie funktionieren, wenden Sie
sich an den Installateur oder Ihre lokale Behörde.
AL23

Mises en garde:
1. L'installation doit être effectuée par un électricien
qualifié conformément aux réglementations locales.
2. Gardez l'appareil hors de portée des enfants.
3. Gardez l'appareil loin de l'eau, de l'environnement
humide ou chaud.
4. Installez l'appareil loin des sources de signaux
puissants telles qu'un four à micro-ondes qui
peuvent provoquer une interruption du signal et un
fonctionnement anormal de l'appareil.
5. L'obstruction par un mur en béton ou des
matériaux métalliques peut réduire la plage de
fonctionnement efficace de l'appareil et doit être
évitée.
6. N'essayez PAS de démonter, réparer ou modifier
l'appareil.
Instructions et schémas de câblage
.
1.Coupez l'alimentation électrique avant d'effectuer
tout travail d'installation électrique.
2. Connectez les fils selon le schéma de câblage.
3. Insérez le module dans la boîte de jonction.
4. Connectez l'alimentation et suivez les instructions
de configuration du module de commutation.
Remarques:
1 2 3 4
5 6 7 8
Module de commutateur
intelligent
Manuel d'instructions
WiFi 2 Gang
MS-104B
SPÉCIFICATIONS TECHNIQUES
Module de commutateur intelligent
Protocole sans fil
Wi-Fi 2.4GHz IEEE 802.11 b/g/n
Temp. de
fonctionnement -10ºC - +40ºC
Température du dossier.
Plage de fonctionnement
Dim (LxPxH) 52x47x18 mm
Classement IP IP20
90-250V AC 50/60Hz
Courant 10A/Gang;Total 10A
≤200 m
Tc: +80ºC (Max.)
type de produit
Tension
52 mm
18 mm
47 mm
S2
L
L
LN
S1
2
1
Interrupteur à bascule
Pousser l'interrupteur mural
(Bouton de réinitialisation)
Opération internationale mondiale où que vous soyez,
application mobile tout-en-un
Partout
APP
APP
Programmer la
minuterie
Commande vocale
–fonctionne avec
GoogleHome
Commande vocale
–fonctionne avec
Amazon Alexa
Partage d'appareil
Opération locale en interne
App
APP
Routeur Commande vocale Pousser l'interrupteur mural
(Bouton de réinitialisation)
Interrupteur à
bascule
Interrupteur à bascule
léger
léger
léger
léger
Interrupteur à
bascule
Interrupteur à bascule
Interrupteur à
bascule
L N
2. Avec 2 commutateurs à 2 voies
SCHÉMA DE CÂBLAGE
1. Avec un interrupteur 2 Gang
L N
3. Avec prise murale
L N
Placez votre smartphone à proximité du module de
commutation lors de la configuration et assurez-vous
d'avoir min. 50% de signal Wi-Fi.
français
françaisfrançais français
françaisfrançais françaisfrançais
Retirer l'ancien interrupteur
Éteignez le disjoncteur et utilisez le testeur électrique pour
tester la puissance.
Assurez-vous que le disjoncteur est éteint avant le câblage.
Étape 1
Étape 2
Étape 3
Retirez l'interrupteur et retirez-le du mur.
Identifiez le fil de ligne/de charge (Remarque: la
couleur de votre fil peut être différente de la couleur
indiquée dans le manuel.)
Nous vous recommandons de retirer la façade de l'ancien
interrupteur et d'utiliser un testeur électrique pour tester tous les fils
connectés à l'interrupteur afin de vous assurer qu'il n'y a pas de
tension dans le circuit.
Vous devrez peut-être désactiver plusieurs disjoncteurs.
Vérifiez que l'alimentation est coupée
Veuillez débrancher l'alimentation avant d'installer ou
de retirer l'appareil pour éviter des dommages
irréversibles sur l'appareil dus au courant électrique ou
à certains problèmes imprévisibles tels que le
clignotement de la lampe.
Attention:
Prise murale
Prise murale
AU
DÉSACTIVÉ

3.2 Deuxième méthode:Paire avec la méthode
d'appariement traditionnelle.
(Wi-Fi)
FAQ
Scannez le code QR pour télécharger l'application
Smart Life, ou vous pouvez également rechercher
le mot-clé «Smart Life» sur l'App Store ou
Googleplay pour télécharger l'application.
iOS App / Android App
COMMANDE MANUELLE
Le terminal du module de commutation réserve l'accès
à la fonction de dérogation manuelle à l'utilisateur final
pour allumer/éteindre
• Interrupteur marche/arrêt pour une fonction
marche/arrêt permanente.
Remarques:
1) Le réglage sur l'application et le commutateur
peuvent être réinitialisés, le dernier réglage reste en
mémoire.
2) Le contrôle App est synchronisé avec le
commutateur manuel.
Q1: que dois-je faire si je ne parviens pas à configurer
le module de commutation?
a. Veuillez vérifier si l'appareil est sous tension.
b. Assurez-vous que votre mobile et votre module de
commutation sont sous le même réseau WiFi 2.4 GHz.
c. Que ce soit dans de bonnes conditions Internet.
d. Assurez-vous que le mot de passe entré dans
l'application est correct.
e. Assurez-vous que le câblage est correct.
Q2 : quel appareil peut être connecté à ce module de
commutation WiFi ?
Q3: Que se passe-t-il si le WiFi se coupe?
La plupart de vos appareils électroménagers peuvent
l'être, comme les lampes, la machine à laver, la cafetière,
etc.
Vous pouvez toujours contrôler l'appareil connecté au
module de commutation avec votre commutateur
traditionnel et une fois que le WiFi est à nouveau actif,
l'appareil connecté au module se connectera
automatiquement à votre réseau WiFi.
Q4 : Que dois-je faire si je change de réseau WiFi ou de
mot de passe ?
Vous devez reconnecter notre module de commutation
WiFi au nouveau réseau WiFi conformément au manuel
d'utilisation de l'application.
Bouton de réinitialisation
Connectez-vous ou enregistrez votre compte avec
votre numéro de portable ou votre adresse e-mail.
Saisissez le code de vérification envoyé sur votre
mobile ou votre boîte mail, puis définissez votre mot
de passe de connexion. Cliquez sur "Créer une
famille" pour entrer dans l'application.
Mobile number/e-mail address
Region
Obtain verification code
9 10 11 12
14
13 15 16
3.1 Première méthode:Associez et effacez le code
WiFi avec Bluetooth et WiFi connectés entre-temps.
(Nouvelle mise à jour)
1.Assurez-vous que votre téléphone est
connecté au Wi-Fi et au Bluetooth.
2.Ouvrez l'application Smart Life/Tuya et cliquez
sur «+», puis la page d'invite s'affichera
automatiquement à l'écran.Cliquez sur «Aller
pour ajouter».
3.Sélectionnez l'appareil que vous souhaitez
ajouter et cliquez sur «+»
4.Entrez le mot de passe Wi-Fi et cliquez sur «
Suivant», en attendant la fin de la connexion.
5.Ajoutez l'appareil avec succès, vous pouvez
modifier le nom de l'appareil pour accéder à la
page de l'appareil en cliquant sur "Terminé"
a. pour interrupteur de réinitialisation:appuyez 10 fois
sur le bouton de l'interrupteur jusqu'à ce que le bip
retentisse en continu et rapidement en tant que
Di-Di-Di... pour le mode d'appairage et de
réinitialisation.
b. pour interrupteur à bascule:appuyez sur le bouton
de l'interrupteur pendant 20 fois (cycle ON/OFF
pendant 10 fois) jusqu'à ce que le bip retentisse en
continu et rapidement en tant que Di-Di-Di... pour le
mode d'appairage et de réinitialisation.
c. pour le module de commutation:appuyez
longuement sur le bouton de réinitialisation du module
jusqu'à ce que vous entendiez Di-Di 2 fois, puis
continuez à appuyer jusqu'à ce que le bip retentisse en
continu et rapidement comme Di-Di-Di...
Méthode de liaison Wi-Fi: (deux
méthodes de couplage)
Terminez le câblage du module de commutation avant
l'appairage
Ouvrez l'application, sélectionnez «+» en haut à
droite et choisissez «Switch (Wi-Fi)» pour
ajouter un appareil.
Assurez-vous que votre téléphone intelligent et
le module de commutation WiFi + RF sont sous
le même réseau WiFi à une connexion de 2.4GHz.
Confirmez lorsque le voyant clignote rapidement
(deux fois par seconde).
Add Device
the indicator blinks rapidly
Add Device
Confirm indicator blinks rapidly
Une fois le câblage du module de commutation terminé,
appuyez sur le commutateur traditionnel pour entrer
dans le mode d'appairage:
Interrupteur à
bascule
Pousser l'interrupteur
mural
(Bouton de
réinitialisation)
Fit pour les deux
commutateurs
françaisfrançais françaisfrançais
françaisfrançais françaisfrançais
MANUEL D'UTILISATION DE
L'APPLICATION

17 18 19 20
21
22 23 24
Noter:
2.Ensuite, vous verrez deux appareils dans
l'application et cliquez sur l'interrupteur principal
(comme interrupteur Un gang comme
ci-dessous) en entrant dans l'opération suivante.
3.Cliquez sur dans le coin supérieur droit et
choisissez "Association multi-contrôles, puis
cliquez sur "+" dans le coin droit.
4.Choisissez l'interrupteur auquel vous souhaitez
vous associer, puis choisissez le bouton de
l'interrupteur auquel vous souhaitez contrôler la
même lumière.
5. Ensuite, revenez à la page précédente, vous verrez
deux éléments dans la page, l'un est votre
interrupteur principal, l'autre est celui que vous
associez à l'instant.
Remarque: veuillez confirmer que le commutateur
associé est activé.
6.Maintenant, vous pouvez contrôler votre
lumière avec deux interrupteurs. N'associez pas
un autre bouton dans le même interrupteur pour
le multi-contrôle.
a. Pour interrupteur de réinitialisation:appuyez 10 fois
sur le bouton de l'interrupteur jusqu'à ce que le bip
retentisse en continu et rapidement en tant que Di-Di-Di...
pour le mode d'appairage et de réinitialisation.
b. Pour interrupteur à bascule:appuyez sur le bouton de
l'interrupteur pendant 20 fois (cycle ON/OFF pendant 10
fois) jusqu'à ce que le bip retentisse en continu et
rapidement en tant que Di-Di-Di... pour le mode
d'appairage et de réinitialisation.
c. Pour module de commutation:appuyez longuement sur
le bouton de réinitialisation du module jusqu'à ce que vous
entendiez Di-Di 2 fois, puis continuez à appuyer jusqu'à
ce que le bip retentisse en continu et rapidement comme
Di-Di-Di...
Comment réinitialiser / associer le code Wi-Fi
La connexion prendra environ 10 à 120 secondes
en fonction de l'état de votre réseau.
Connecting
Device found
Register device to the smart cloud
initializing device
Make sure your router,mobile,and
device are as close as possible
2% Une fois l'appairage terminé, le commutateur
s'affichera sur l'application.
Connectez-vous à Amazon Alexa ou à Google
Assistant pour le contrôle vocal, ou partagez les
appareils avec votre famille ou vos amis.
More
Device Name
Basic information about the device
Supported Third-party
Control Others
Others
Share Device
Create Group
Device information
Feedback
Device Location
Check Network
Amazon
Alexa Google
Assistant
Profitez de votre vie intelligente de domotique
pour le contrôle de l'éclairage en utilisant notre
application mobile tout-en-un où que vous soyez
dans le monde ou simplement par commande
vocale lorsque vous êtes confortablement assis à
la maison.
Commande
vocale
Contrôle des
applications
APP
Ce module de commutation WiFi + RF convient à
l'interrupteur à bascule et à l'interrupteur de
réinitialisation. Veuillez faire attention aux
différents modes d'appairage.
Interrupteur
principal
Nouveau commutateur
ajouté
MS-104B
MS-104B Light Switch Switch 1
Associez et effacez le code RF
1. Comment appairer le code RF
2. Comment effacer le code RF
1.1 Pour interrupteur de réinitialisation: appuyez sur
l'interrupteur 5 fois pour entendre le bip sonore en tant
que Di-Di (2 fois) pour un jumelage réussi.
1.2 Pour interrupteur à bascule: appuyez sur l'interrupteur
10 fois (cycle ON/OFF 5 fois) pour entendre le bip sonore
en tant que Di-Di (2 fois) pour un jumelage réussi.
1.3 Pour le bouton de réinitialisation:
a. pour le bouton 1: appuyez une fois sur le bouton du
module pour entendre le bip sonore en tant que Di (1
seconde), puis appuyez longuement sur le bouton du
module pour entendre le bip sonore en tant que Di-Di (2
fois) pour un jumelage réussi .
b.pour le bouton 2: appuyez deux fois sur le bouton du
module pour entendre le bip sonore comme Di... (2
secondes), puis appuyez longuement sur le bouton du
module pour entendre le bip sonore comme Di-Di (2 fois)
pour un jumelage réussi.
2.1 Pour interrupteur de réinitialisation: appuyez sur
l'interrupteur 5 fois pour entendre le bip sonore comme
Di-Di (2 fois), et appuyez à nouveau sur l'interrupteur 5
fois après 5 secondes pour entendre le bip sonore
comme Di-Di-Di-Di (4 fois) pour réussir clairière.
2.2 Pour interrupteur à bascule: appuyez sur l'interrupteur
10 fois (cycle marche/arrêt 5 fois) pour entendre le bip
sonore comme Di-Di (2 fois), et appuyez à nouveau sur
l'interrupteur 10 fois (cycle marche/arrêt 5 fois) après 5
secondes pour entendez le bip sonore en tant que
Di-Di-Di-Di (4 fois) pour un effacement réussi.
2.3 Pour le bouton de réinitialisation:
une. pour le bouton 1: appuyez une fois sur le bouton du
module pour entendre le bip sonore comme Di (1
seconde), puis appuyez longuement sur le bouton du
module pour entendre le bip sonore comme Di-Di (2
fois), relâchez votre doigt pendant 5 secondes et
appuyez longuement sur le bouton à nouveau pour
entendre le bip sonore comme Di-Di-Di-Di (4 fois) pour
un effacement réussi.
b. pour le bouton 2 : appuyez deux fois sur le bouton du
module pour entendre le bip sonore comme Di... (2
secondes), puis appuyez longuement sur le bouton du
module pour entendre le bip sonore comme Di-Di (2
fois), relâchez votre doigt pendant 5 secondes et
appuyez longuement sur le bouton à nouveau pour
entendre le bip sonore comme Di-Di-Di-Di (4 fois) pour
un effacement réussi.
Remarque: veuillez confirmer que vous avez terminé avec
succès la méthode de liaison Wi-Fi ci-dessus pour
ajouter ce commutateur à votre application Smart Life
avant l'association.
1.Le Wi-Fi ajoute un autre commutateur intelligent à la
même application Smart Life/Tuya. (Si un commutateur
intelligent a déjà été ajouté à l'application, passez
simplement à l'étape suivante.)
Remarque: il n'est pas nécessaire de câbler le nouvel
interrupteur ajouté à la lumière, seuls L et N sont
nécessaires pour le câblage.
3.3
Comment réaliser une association multi-contrôles
françaisfrançais françaisfrançais
françaisfrançais françaisfrançais

7.Si vous souhaitez ajouter un autre tiers ou plus
d'interrupteurs intelligents pour contrôler votre
lumière, répétez simplement les étapes ci-dessus.
Et vous verrez le résultat ci-dessous lorsque vous
associez un autre nouvel interrupteur.
Associé 1
Associé 2
Interrupteur
principal
Switch 1
Switch 1
25 26 27 28
françaisfrançais françaisfrançais
1. Pendant la période de garantie gratuite, si le
produit tombe en panne lors d'une utilisation
normale, nous offrirons une maintenance gratuite
pour le produit.
2. Les catastrophes naturelles/défaillances
d'équipement causées par l'homme, le démontage
et la réparation sans l'autorisation de notre société,
aucune carte de garantie, les produits au-delà de la
période de garantie gratuite, etc., ne sont pas
couverts par la garantie gratuite.
3. Tout engagement (oral ou écrit) pris par le tiers
(y compris le revendeur/prestataire de services)
envers l'utilisateur au-delà de la portée de la
garantie sera exécuté par le tiers
4. Veuillez conserver cette carte de garantie pour
garantir vos droits
5.Notre société peut mettre à jour ou modifier les
produits sans préavis. Veuillez vous référer au site
officiel pour les mises à jour.
SERVICE INFORMATIONS DE
RECYCLAGE
Tous les produits marqués du symbole de
collecte séparée des déchets d'équipements
électriques et électroniques (directive DEEE
2012/19 / UE) doivent être éliminés séparément
des déchets municipaux non triés. Pour protéger
votre santé et l'environnement, cet équipement
doit être mis au rebut dans des
points de collecte désignés pour les
équipements électriques et
électroniques désignés par le
gouvernement ou les autorités
locales. Une élimination et un
recyclage corrects aideront à
prévenir les conséquences négatives potentielles
pour l'environnement et la santé humaine. Pour
savoir où se trouvent ces points de collecte et
comment ils fonctionnent, contactez l'installateur
ou votre autorité locale.
Information produit
Nom du produit____________________________________
Type de produit____________________________________
Date d'achat_______________________________________
Période de garantie________________________________
Informations sur le concessionnaire__________________
__________________________________________________
Nom du client_____________________________________
Téléphone du client________________________________
Adresse du client__________________________________
__________________________________________________
Dossiers d'entretien
Date de
défaillance
Cause du
problème Contenu de
l'erreur Principal
CARTE DE GARANTIE
AL23

Предупреждения:
1. Установка должна выполняться
квалифицированным электриком в соответствии
с местными нормативами.
2. Храните устройство в недоступном для детей
месте.
3. Держите устройство подальше от воды, сырости
или горячей среды.
4. Устанавливайте устройство вдали от источников
сильного сигнала, таких как микроволновая печь,
которые могут вызвать прерывание сигнала и
привести к ненормальной работе устройства.
5. Препятствие бетонной стеной или
металлическими материалами может снизить
эффективный рабочий диапазон устройства, и
этого следует избегать.
6. НЕ пытайтесь разбирать, ремонтировать или
модифицировать устройство.
Инструкции по подключению и схемы
.
1.Перед выполнением любых электромонтажных
работ отключите электропитание.
2. Подсоедините провода в соответствии со схемой
подключения.
3. Вставьте модуль в распределительную коробку.
4. Подключите источник питания и следуйте
инструкциям по настройке модуля переключения.
Примечания:
1 2 3 4
5 6 7 8
Модуль интеллектуального
переключателя
Руководство пользователя
WiFi 2 Gang
MS-104B
ТЕХНИЧЕСКИЕ
ХАРАКТЕРИСТИКИ
Модуль интеллектуального
переключателя
Беспроводной протокол
Wi-Fi 2.4GHz IEEE 802.11 b/g/n
Температура
эксплуатации. -10ºC - +40ºC
Временный сотрудник
по делу.
Рабочий диапазон
Размеры (ШxГxВ) 52x47x18 mm
Рейтинг IP IP20
90-250V AC 50/60Hz
Текущий 10А / банда; всего 10А
≤200 m
Tc: +80ºC (Max.)
Тип продукта
Напряжение
52 mm
18 mm
47 mm
S2
L
L
LN
S1
2
1
Кулисный
переключатель света
Нажмите настенный выключатель
(Переключатель сброса)
Глобальная международная деятельность в любом
месте и в любом месте, универсальное мобильное
приложение
В любом месте
APP
APP
Расписание
таймера
Голосовое
управление -
работа с Google Home
Голосовое
управление -
работа с Amazon Alexa
Совместное использование
устройства
Внутреннее локальное управление
App
APP
Маршрутизатор Голосовое
управление
Нажмите настенный
выключатель
(Переключатель сброса)
Кулисный
переключатель света
L N
2. С 2-позиционными переключателями
ЭЛЕКТРИЧЕСКАЯ СХЕМА
1. С одним 2-клавишным переключателем
L N
3. С настенной розеткой
L N
Во время настройки поднесите смартфон к
модулю коммутатора и убедитесь, что у вас есть
мин. 50% сигнала Wi-Fi.
русский
русскийрусский русский
русскийрусский русскийрусский
Снимаем старый выключатель
Шаг 1
Шаг 2
Шаг 3
Снимите выключатель и снимите его со стены.
Определите провод линии / нагрузки
(Примечание: цвет вашего провода может
отличаться от цвета, указанного в руководстве.)
Мы рекомендуем вам снять лицевую панель со старого
переключателя и с помощью электрического тестера проверить
все провода, подключенные к переключателю, чтобы убедиться в
отсутствии напряжения в цепи.
Возможно, вам потребуется отключить более одного
автоматического выключателя.
Убедитесь, что питание отключено
Розетка
Розетка
Выключите автоматический выключатель и с помощью
электрического тестера проверьте питание.
Перед подключением убедитесь, что автоматический
выключатель выключен.
Пожалуйста, отключите источник питания перед
установкой или снятием устройства, чтобы
избежать необратимого повреждения устройства
электрическим током или некоторых
непредсказуемых проблем, таких как мигание
лампы.
Внимание:
НА
ВЫКЛЮЧЕННЫЙ
Светлый
Кулисный
переключатель
света
Кулисный
переключатель света
Кулисный
переключатель
света
Кулисный
переключатель света
Светлый
Светлый
Светлый

3.2 Способ второй:Пара с традиционным методом
сопряжения.
(Wi-Fi)
FAQ
Отсканируйте QR-код, чтобы загрузить
приложение Smart Life, или вы также можете
выполнить поиск по ключевому слову «Smart
Life» в App Store или Googleplay, чтобы загрузить
приложение.
iOS App / Android App
ПРИЛОЖЕНИЕ РУКОВОДСТВО
ПОЛЬЗОВАТЕЛЯ
РУЧНАЯ ОТМЕНА
Терминал переключающего модуля резервирует
доступ к функции ручного управления для конечного
пользователя для включения/выключения.
• Включение/выключение для постоянной функции
включения/выключения.
Примечания:
1) И настройку в приложении, и на переключателе
можно сбросить, последняя настройка остается
в памяти.
2) Управление приложением синхронизировано
с ручным переключателем.
Q1: Что мне делать, если я не могу настроить модуль
коммутатора?
a. Пожалуйста, проверьте, включено ли устройство.
b. Убедитесь, что ваш мобильный телефон и модуль
коммутатора находятся в одной и той же сети
Wi-Fi 2,4 ГГц.
c. Будь то в хороших условиях интернета.
d. Убедитесь, что пароль, введенный в приложении,
правильный.
e. Убедитесь, что проводка правильная.
Q2: Какое устройство можно подключить к этому
модулю коммутатора WiFi?
Q3: What happens if the WiFi goes off?
Большинство ваших бытовых электроприборов могут
быть такими, как лампы, стиральная машина,
кофеварка и т. д.
Вы по-прежнему можете управлять устройством,
подключенным к модулю коммутатора, с помощью
вашего традиционного коммутатора, и как только
WiFi снова станет активным, устройство,
подключенное к модулю, автоматически подключится
к вашей сети WiFi.
Q4: What should I do if I change the WiFi network or
change the password?
Вам необходимо повторно подключить наш модуль
коммутатора WiFi к новой сети WiFi в соответствии с
руководством пользователя приложения.
Кнопка сброса
Войдите или зарегистрируйте свою учетную
запись, указав свой номер мобильного телефона
или адрес электронной почты. Введите
проверочный код, отправленный на ваш
мобильный или почтовый ящик, затем установите
пароль для входа. Нажмите «Создать семью»,
чтобы войти в приложение.
Mobile number/e-mail address
Region
Obtain verification code
9 10 11 12
14
13 15 16
3.1 Способ первый:Соедините и очистите код
WiFi с подключенным Bluetooth и Wi-Fi. (Новое
обновление)
1. Убедитесь, что ваш телефон подключен к
Wi-Fi и Bluetooth.
2. Откройте приложение Smart Life/Tuya и
нажмите «+», после чего страница подсказки
автоматически отобразится на экране.
Нажмите «Перейти, чтобы добавить».
3. Выберите устройство, которое хотите
добавить, и нажмите «+».
4.Введите пароль Wi-Fi и нажмите «Далее»,
ожидая завершения соединения.
5. Добавьте устройство успешно, вы можете
отредактировать имя устройства, чтобы войти
на страницу устройства, нажав «Готово».
a. для переключателя сброса:нажмите кнопку
переключения 10 раз, пока не раздастся
непрерывный и быстрый звуковой сигнал, как
Di-Di-Di... для режима сопряжения и сброса.
b. для кулисного выключателя света:нажмите
кнопку переключателя 20 раз (цикл ВКЛ/ВЫКЛ 10
раз), пока не раздастся непрерывный и быстрый
звуковой сигнал, как Di-Di-Di... для режима
сопряжения и сброса.
c. для модуля переключения:нажмите и
удерживайте кнопку сброса на модуле, пока вы не
услышите Di-Di 2 раза, затем продолжайте
нажимать, пока не раздастся непрерывный и
быстрый звуковой сигнал, как Di-Di-Di...
Метод подключения Wi-Fi: (два метода
сопряжения)
Завершите подключение модуля переключателя перед
сопряжением.
Откройте приложение, выберите «+» в правом
верхнем углу и выберите «Переключить
(Wi-Fi)», чтобы добавить устройство.
Убедитесь, что ваш смартфон и модуль
переключателя WiFi+RF находятся в одной и
той же сети WiFi на частоте 2,4 ГГц.
Подтвердите, когда индикатор начнет быстро
мигать (дважды в секунду).
Add Device
the indicator blinks rapidly
Add Device
Confirm indicator blinks rapidly
После того, как проводка модуля переключателя
выполнена, нажмите традиционный
переключатель, чтобы войти в режим сопряжения:
Кулисный
переключатель
света
Нажмите настенный
выключатель
(Переключатель
сброса)
Подходит для двух
переключателей
русскийрусский русскийрусский
русскийрусский русскийрусский

17 18 19 20
21
22 23 24
Примечания:
2. Затем вы увидите два устройства в
приложении и щелкните главный
переключатель (как переключатель One Gang,
как показано ниже), выполнив следующую
операцию.
3. Нажмите в правом верхнем углу и
выберите «Multi-Control Association», а затем
нажмите «+» в правом углу.
4. Выберите переключатель, который вы
хотите связать, а затем выберите кнопку
переключателя, которой вы хотите управлять
тем же светом.
5. Затем вернитесь на предыдущую страницу, вы
увидите два элемента на странице, один из
которых является вашим основным
переключателем, а другой — тем, который вы
только что связали.
Примечание. Убедитесь, что соответствующий
переключатель включен.
6. Теперь вы можете управлять своим светом
с помощью двух переключателей. Не
связывайте другую кнопку с тем же
переключателем для мультиуправления.
a. Для переключателя сброса:нажмите кнопку
переключения 10 раз, пока не раздастся
непрерывный и быстрый звуковой сигнал, как
Di-Di-Di... для режима сопряжения и сброса.
b. Для кулисного выключателя света:нажмите
кнопку переключателя 20 раз (цикл ВКЛ/ВЫКЛ 10
раз), пока не раздастся непрерывный и быстрый
звуковой сигнал, как Di-Di-Di... для режима
сопряжения и сброса.
c. Для модуля переключения:нажмите и
удерживайте кнопку сброса на модуле, пока вы не
услышите Di-Di 2 раза, затем продолжайте
нажимать, пока не раздастся непрерывный и
быстрый звуковой сигнал, как Di-Di-Di...
Как сбросить/подключить код Wi-Fi
Подключение займет около 10-120 секунд в
зависимости от состояния вашей сети.
Connecting
Device found
Register device to the smart cloud
initializing device
Make sure your router,mobile,and
device are as close as possible
2% Когда сопряжение будет выполнено, переключатель
будет отображаться в приложении.
Подключитесь к Amazon Alexa или Google
Assistant для голосового управления или
поделитесь устройствами с семьей или
друзьями.
More
Device Name
Basic information about the device
Supported Third-party
Control Others
Others
Share Device
Create Group
Device information
Feedback
Device Location
Check Network
Amazon
Alexa Google
Assistant
Наслаждайтесь умной жизнью домашней
автоматизации для управления освещением,
используя наше универсальное мобильное
приложение, где бы вы ни находились, или
просто с помощью голосового управления,
когда вы удобно сидите дома.
Голосовое
управление
Управление
приложением
APP
Этот модуль переключателя WiFi + RF подходит для
кулисного переключателя света и переключателя сброса.
Обратите внимание на различные режимы сопряжения.
Main Switch
New Added Switch
MS-104B
MS-104B
Light Switch Switch 1
Pair and clear up the RF code
1. How to pair the RF code
2. How to clear up the RF code
1.1 For reset switch: press the switch for 5 times to hear
the beep sounds as Di-Di(2 times) for successful pairing.
1.2 For rocker light switch: press the switch for 10 times
(ON/OFF cycle for 5 times) to hear the beep sounds as
Di-Di(2 times) for successful pairing.
1.3 For reset button:
a.for button 1:press the button on the module for once to
hear the beep sounds as Di(1 second),then long press the
button on the module to hear the beep sounds as Di-Di(2
times) for successful paring.
b.for button 2:press the button on the module for twice
to hear the beep sounds as Di...(2 seconds),then long
press the button on the module to hear the beep sounds
as Di-Di(2 times)for successful paring.
2.1 For reset switch: press the switch for 5 times to hear
the beep sounds as Di-Di(2 times),and press the switch
for 5 times again after 5 seconds to hear the beep
sounds as Di-Di-Di-Di(4 times) for successful clearing.
2.2 For rocker light switch: press the switch for 10 times
(ON/OFF cycle for 5 times) to hear the beep sounds as
Di-Di(2 times),and press the switch for 10 times (ON/OFF
cycle for 5 times) again after 5 seconds to hear the beep
sounds as Di-Di-Di-Di(4 times) for successful clearing.
2.3 Для кнопки сброса:
а. для кнопки 1: нажмите кнопку на модуле один раз,
чтобы услышать звуковой сигнал как Di (1 секунду),
затем нажмите и удерживайте кнопку на модуле,
чтобы услышать звуковой сигнал как Di-Di
(2 раза), отпустите палец на 5 секунд и снова
нажмите и удерживайте кнопку, чтобы услышать
звуковой сигнал Di-Di-Di-Di (4 раза) для успешной
очистки.
б. для кнопки 2: нажмите кнопку на модуле дважды,
чтобы услышать звуковой сигнал как Di... (2 секунды),
затем нажмите и удерживайте кнопку на модуле,
чтобы услышать звуковой сигнал как Di-Di (2 раза),
отпустите пальцем в течение 5 секунд и снова
нажмите и удерживайте кнопку, чтобы услышать
звуковой сигнал Di-Di-Di-Di (4 раза) для успешной
очистки.
Примечание. Подтвердите, что вы успешно завершили
описанный выше метод подключения к WiFi для
добавления этого переключателя в приложение Smart
Life до связывания.
1. WiFi добавьте еще один смарт-переключатель в то
же приложение Smart Life/Tuya. (Если ранее в
приложение был добавлен смарт-переключатель,
просто перейдите к следующему шагу.)
Примечание. Нет необходимости подключать новый
добавленный переключатель к свету, для подключения
требуются только L и N.
3.3
Как добиться ассоциации с несколькими
элементами управления
русскийрусский русскийрусский
русскийрусский русскийрусский

7.Если вы хотите добавить еще треть или более
интеллектуальных переключателей для
управления освещением, просто повторите шаги,
описанные выше. И вы увидите результат, как
показано ниже, когда подключите еще один новый
переключатель.
Связанный 1
Связанный 2
Главный
выключатель
Switch 1
Switch 1
25 26 27 28
русскийрусский русскийрусский
1. В течение периода бесплатной гарантии, если
продукт выйдет из строя при нормальном
использовании, мы предложим бесплатное
обслуживание продукта.
2. Стихийные бедствия / поломки оборудования
по вине человека, разборка и ремонт без
разрешения нашей компании, отсутствие
гарантийного талона, продукты, выходящие за
рамки бесплатного гарантийного срока, и т. Д. Не
подпадают под действие бесплатной гарантии.
3. Любое обязательство (устное или письменное),
принятое третьей стороной (включая дилера /
поставщика услуг) перед пользователем за
пределами гарантийных обязательств, должно
выполняться третьей стороной.
4. Сохраните этот гарантийный талон, чтобы
гарантировать свои права.
5. Наша компания может обновлять или изменять
продукты без предварительного уведомления. За
обновлениями обращайтесь на официальный сайт.
УСЛУГА ИНФОРМАЦИЯ ОБ
УТИЛИЗАЦИИ
Все продукты, отмеченные символом
раздельного сбора отходов электрического и
электронного оборудования (Директива WEEE
2012/19 / EU), должны утилизироваться
отдельно от несортированных бытовых отходов.
В целях защиты вашего здоровья и окружающей
среды это оборудование
необходимо утилизировать в
специально отведенных пунктах
сбора электрического и
электронного оборудования,
назначенных правительством или
местными властями.
Правильная утилизация и переработка помогут
предотвратить возможные негативные
последствия для окружающей среды и здоровья
человека. Чтобы узнать, где находятся эти
пункты сбора и как они работают, обратитесь к
установщику или в местные органы власти.
Информация о товаре
Наименование товара_____________________________
Тип продукта_____________________________________
Дата покупки____________________________________
Гарантийный срок_________________________________
Информация о дилере ____________________________
Имя клиента _____________________________________
Телефон клиента _________________________________
Адрес покупателя ________________________________
__________________________________________________
Записи о техническом обслуживании
Дата отказа Причина
проблемы Содержание
ошибки Главный
ГАРАНТИЙНЫЙ ТАЛОН
AL23
A página está carregando...
A página está carregando...
A página está carregando...
A página está carregando...
-
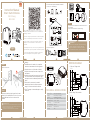 1
1
-
 2
2
-
 3
3
-
 4
4
-
 5
5
-
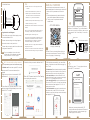 6
6
-
 7
7
-
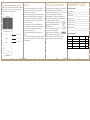 8
8
-
 9
9
-
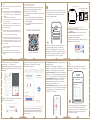 10
10
-
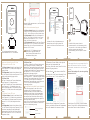 11
11
-
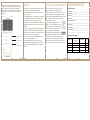 12
12
-
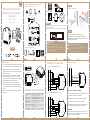 13
13
-
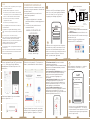 14
14
-
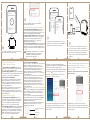 15
15
-
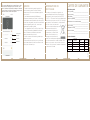 16
16
-
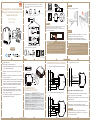 17
17
-
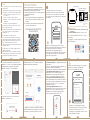 18
18
-
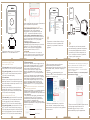 19
19
-
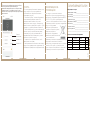 20
20
-
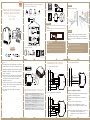 21
21
-
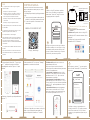 22
22
-
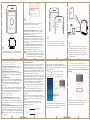 23
23
-
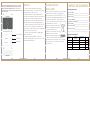 24
24


em outras línguas
- français: EXPERT4HOUSE MS-104B Manuel utilisateur
- English: EXPERT4HOUSE MS-104B User manual
- Deutsch: EXPERT4HOUSE MS-104B Benutzerhandbuch
Outros documentos
-
Calex Smart Outdoor 24v Garden Lighting Guia de usuario
-
MOES MS-108 Manual do usuário
-
V TAC V-TAC VT-2629 Wi-Fi Enabled Smart IP65 Strip Light Guia de instalação
-
Samsung HW-Q70R Manual do usuário
-
-
Samsung HW-Q80R Manual do usuário
-
Samsung HW-N850 Manual do usuário
-
Samsung HW-Q70T Manual do usuário
-
-
Yamaha TA2 Manual do proprietário