
To register this product please visit
www.samsung.com/register.
Quick Setup Guide
Wall Mount Kit Specications (VESA)
Wall mount Adapter
(Depending on the Model)
Before installing any other wall mounting kit, assemble the wall mount adapter provided separately with the TV.
Install your wall mount on a solid wall perpendicular to the oor. If you are attaching the wall mount to building materials other
than plaster board, contact your nearest dealer. If installed on a ceiling or slanted wall, the TV may fall and cause severe
personal injury.
➣ Standard dimensions for wall mount kits are shown in the table below.
➣ Samsung wall mount kits contain a detailed installation manual. All parts necessary for assembly are provided.
➣ Do not use screws that do not comply with the VESA standard screw specications.
➣ Do not use screws that are longer than the standard dimension or do not comply with the VESA standard screw
specications. Screws that are too long may cause damage to the inside of the TV set.
➣ For wall mounts that do not comply with the VESA standard screw specications, the length of the screws may differ
depending on the wall mount specications.
➣ Do not fasten the screws too rmly. This may damage the product or cause the product to fall, leading to personal injury.
Samsung is not liable for these kinds of accidents.
➣ Samsung is not liable for product damage or personal injury when a non-VESA or non-specied wall mount is used or the
consumer fails to follow the product installation instructions.
➣ Do not mount the TV at more than a 15 degree tilt.
➣ Always have two people mount the TV onto a wall.
Product Family
TV size in
inches
VESA screw hole
specs (A * B) in
millimeters
Standard Screw
(Length*
Pitch in mm)
Quantity
LED-TV 32 200 X 200 M8 4
Do not install your Wall Mount Kit while your TV is turned on. This may result in personal injury due to electric
shock.
STOP
Please do not return
this unit
If you are having problems operating this TV,
Please call;
BRAZIL:0800-124-421
or 4004-0000
web site:
http://www.samaung.com/br/support
BN68-07044R-00
Licence
Manufactured under license from Dolby Laboratories. Dolby and the double-D symbol are
trademarks of Dolby Laboratories.
Manufactured under a license from U.S. Patent No’s: 5,956,674, 5,974,380, 5,978,762, 6,487,535,
6,226,616, 7,212,872, 7,003,467, 7,272,567, 7,668,723, 7,392,195, 7,930,184, 7,333,929 and
7,548,853. DTS, the Symbol, and DTS and the Symbol together are registered trademarks & DTS
Premium Sound is a trademark of DTS, Inc. ©2012 DTS, Inc. All Rights Reserved.
Manufactured under a license from U.S. Patent No’s: 6,285,767, 8,027,477, 5,319,713, 5,333,201,
5,638,452, 5,771,295, 5,970,152, 5,912,976, 7,200,236, 7,492,907, 8,050,434, 7,720,240,
7,031,474, 7,907,736 and 7,764,802. DTS, the Symbol, and DTS and the Symbol together are
registered trademarks & DTS Studio Sound is a trademark of DTS, Inc. ©2012 DTS, Inc. All Rights
Reserved.
The terms HDMI and HDMI High-De nition Multimedia Interface, and the HDMI Logo are
trademarks or registered trademarks of HDMI Licensing LLC in the United States and other
countries.
DivX Certied® to play DivX® video up to HD 1080p, including premium content.
ABOUT DIVX VIDEO: DivX® is a digital video format created by DivX, LLC, a subsidiary of Rovi Corporation. This is an ofcial
DivX Certied® device that has passed rigorous testing to verify that it plays DivX video. Visit divx.com for more information
and software tools to convert your les into DivX videos.
ABOUT DIVX VIDEO-ON-DEMAND: This DivX Certied® device must be registered in order to play purchased DivX Video-on-
Demand (VOD) movies.
To obtain your registration code, locate the DivX VOD section in your device setup menu. Go to vod.divx.com for more
information on how to complete your registration.
DivX®, DivX Certied® and associated logos are trademarks of Rovi Corporation or its subsidiaries and are used under
license.
Covered by one or more of the following U.S. patents: 7,295,673; 7,460,668; 7,515,710; 7,519,274
Open Source License Notice
Open Source used in this product can be found on the following webpage. (http://opensource.samsung.com)
Open Source License Notice is written only English.
Specications
Environmental onsiderations
Operating Temperature
Operating Humidity
Storage Temperature
Storage Humidity
50°F to 104°F (10°C to 40°C)
10% to 80%, non-condensing
-4°F to 113°F (-20°C to 45°C)
5% to 95%, non-condensing
Model Name HG32ND450S
Display Resolution 1366 x 768
Screen Size
(Diagonal)
32” Class
(31.5” measured diagonally)
Sound (Output) 5W x 2
Dimensions (WxDxH)
Body
With stand
745.4 x 69.0 x 442.2 mm
745.4 x 150.5 x 466.6 mm
Weight
Without Stand
With Stand
3.73 kg
3.82 kg
➣ Design and specications are subject to change without prior notice.
➣ This device is a Class B digital apparatus.
WARNING: This product contains chemicals known to the State of California to cause cancer and reproductive toxicity.
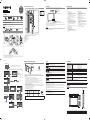
Dimensions
HG32ND450S
1
2
3 4 5 6
8
7
9
(unit: mm)
1 2 3 4 5 6 7 8 9
HG32ND450S 745.4 699.7 394.3 433.9 442.2 466.6 37.3 69.0 150.5
♦ UI Scenario
List of Parts
1
2
3
4
5
Remote Control & Batteries
(AAA x 2)
Power Cord
Owner’s Instructions
Safety Guide
Wall mount Adapter
(Depending on the Model)
Adaptor
Installing the LED TV Stand
♦ HG32ND450S
Components
When installing the stand, use the provided components and parts.
A
B
X 4 (M4 X L12)
Stand Screws
1
4
2 3
(M4 X L12) (2EA)
(M4 X L12) (2EA)
✎ Make sure that at least two people lift and move the LED TV.
✎ When connecting the stand, lay the product down on a soft surface, with the screen facing down, and then fasten the screws.
✎ The number of screws may differ depending on the model.
Auto Program
Auto Program is incomplete.
0 channels are memorized.
Change Settings Scan Again
DTV Air0
Air
Cable
0
0
If you select
Change
If you select
Standalone Only
TV will enter the RF mode.
appears for 3 seconds
If you don’t change the country of the Current Location
If you select Skip
If you select
Standalone Setup
Select your language
Hospitality Option Menu
appears,press Power OFF to exit
Select Picture mode
Select Clock Mode and your Time Zone
Select the channel
band to use for Auto
Program
After Searching
channels.
If you select Factory Reset,the TV resets all values to their factory defaults and
then displays the Hospital Plug & Play menu below when powered on again.
The TV is automatically
turned off and on.
If you change the country of
the Current Location
Local Set
Change Locat Set if Located in North America, Latin America and Europe.
In other regions, Please press SKIP button move to the next step.
Current Localset : US
Change Skip
Local Set
Change Locat Set if Located in North America, Latin America and Europe.
In other regions, Please press SKIP button move to the next step.
Current Localset : BRA_DTV
Change Skip
Easy Set up
Standalone Setup
(Continue Setup)
Standalone Only
(End Setup)
If you select this, Easy
setup will be started.
There are Essential
Details, Channel Scan,
Clock and Terms in Easy
setup.
c
Select your Language
Select your language to start the on screen setup.
The Language Setting will be applied to Main Menu and not Plug and Play.
Press the arrow buttons
to move around the
screen.
Press the Enter button to
select.
English
Español
age
Press th
earrow
buttons
c
Português
Configure your TV
Picture Mode Standard
Choose a picture mode
that best suits your
viewing enviroment.
Select your information in all of the categories
below.
TV Setup Complete!
Your TV is now ready to use.
OK
Auto Program
Antenna Both
Select current connected
antenna.
To get channels, set the options below then select
Scan.
Scan
Auto Program
Auto Program is channels for you...
Air 13
4%
Stop
DTV Air0
Air
Cable
0
0
Clock
-- : -- --
You can adjust your time to set DST, Time Zone and
clock mode
Set current date and time
Clock Mode Auto
Date
-- / -- / ----
Time
-- : -- --
Time Zone South and Southeast
Local Set
Warning! TV might not function if local set is not correctly configured.
When Local set is changed, TV will turn off automatically to apply it.
BRA_DTV
Countries List
None
Standalone mode has been set.
OK
P
w
Factory Reset
Type
Local Set
SW Model
BOM Model
HD450
32S6AH0JJ
BRA_DTV
Tuner
Ch Table
NONE
MRT Option
Engineer Option
S_TC
450
Power On
Menu OSD
Music Mode
External Source
Eco Solution
Cloning
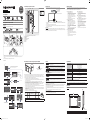
Hotel Plug & Play
The Hospital Plug & Play function, which automatically performs the Hospital Mode selection, Country Setup, Clock Setup, and
Picture Mode Setup, runs once when power is rst turned ON. Setup also runs automatically after you have executed a Service
Reset.
♦ Local Set OSD
– Initially highlighted: BRA_DTV
– If you press the Enter key after selecting Change, you
can change the country.If the country is changed, the
TV automatically turns off and on.
– If you select the incorrect country,execute Factory Reset
again after entering the Factory menu.
– If you don`t want to change the country,select skip.
♦ Easy Set Up OSD
– Initially highlighted: Standalone Setup
– If you select the Standalone Only button, Standalone
hospital mode is set by default and the “Standalone
mode has been set” OSD appears for 3 seconds.
– TV enters into RF mode automatically after displaying
the “Standalone mode has been set” OSD for 3
seconds.
– If you select Standalone Setup mode, the “Select your
Language” OSD appears
♦ Select your Language OSD
– Initially highlighted: Português
– Display time: OSD time out and operation are the same
as Samsung’s consumer TV models.
– If you press the Enter key, the “Configure your TV” OSD
appears.
♦ Congure your TV OSD
– Initially highlighted: Standard.
– The TV displays the Picture Mode OSD where you can
choose Dynamic or Standard Picture mode.
♦ Auto Program Mode OSD
– If you press the Enter key, the TV automatically
searches for channels.
♦ Set Clock Mode and Time Zone OSD
– Initially highlighted: Clock Mode : Auto, Time Zone :
South and Southeast
– If the TV will be tuned to digital broadcast channels, and
these channels transmit date and time information, set
the Clock Mode to Auto. The TV will set the date and
time automatically.
– If the TV will not be tuned to digital broadcast channels,
set the Clock Mode to Manual, and then set the date
and time on the TV manually.
– Select your time zone on the map appears.
Viewing the Connection Panel
1
4
5
23
HDMI IN
2 (DVI)
HDMI IN
1 (STB)
AUDIO
OUT
ANT IN
6
➣ The product color and shape may vary depending on the model.
1 COMPONENT / AV IN
2 AUDIO OUT
3 HDMI IN 1(STB), 2(DVI)
4 USB (5V 0.5A)
5 ANT IN
6 DC 19V
TV Controller
The TV’s Controller on the bottom right side of the TV, lets you control the TV without the remote control.
: Turns the TV on or off.
/ : Changes channels.
/ : Adjusts the volume.
: Switch the available video sources.
Control Menu
Remote control sensor/TV Controller
✎ If you press it rst, the control menu appears. You can select the function by pressing and holding the TV’s controller.
✎ The product color and shape may vary depending on the model.
✎ With the TV’s Controller, you cannot perform other operations except for turning the TV on or off, changing the channel,
adjusting the volume, and switching the input source.
Standby mode
Your TV enters Standby mode when you turn it off and continues to consume a small amount of electric power. To be safe and to
decrease power consumption, do not leave your TV in standby mode for long periods of time (when you are away on vacation,
for example). It is best to unplug the power cord.
[HD450S-ZD-QSG]BN68-07044R-00L02.indd 1 2015-03-18 11:22:35

Para registrar este produto, acesse
www.samsung.com/register.
Guia de conguração rápida
Especicações do kit de montagem na parede (VESA)
Adaptador para montagem na parede
(Dependendo do modelo)
Antes de instalar qualquer outro kit de montagem na parede, instale o adaptador de montagem, fornecido em separado, com a
TV.
Instale seu suporte em uma parede sólida e perpendicular ao chão. Se você for xar o suporte de parede em materiais de
construção que não sejam placas de gesso, entre em contato com o revendedor mais próximo. Se instalada em um teto ou uma
parede com inclinação, a TV poderá cair e causar algum ferimento grave.
➣ As medidas padrão para kits de montagem na parede são mostradas na tabela abaixo.
➣ Os kits de montagem na parede da Samsung contêm um manual de instalação detalhado. Todas as peças necessárias
para a montagem são fornecidas.
➣ Não utilize parafusos que não estejam em conformidade com as especicações VESA para parafusos padrão.
➣ Não utilize parafusos mais longos do que a dimensão padrão ou que não estejam em conformidade com as especicações
VESA para parafusos padrão. Parafusos muito longos podem danicar o interior da TV.
➣ Para suportes de parede que não estejam em conformidade com as especicações VESA para parafusos padrão, o
comprimento dos parafusos pode ser diferente, dependendo das especicações do suporte.
➣ Não aperte os parafusos com muita força. Isso pode danicar o produto ou fazer com que ele caia, causando ferimentos. A
Samsung não se responsabiliza por esses tipos de acidentes.
➣ A Samsung não se responsabiliza por danos ao produto nem por ferimentos quando for usado um suporte de parede não
especicado ou que não esteja em conformidade com os padrões VESA, ou caso o consumidor não siga as instruções de
instalação do produto.
➣ Não instale a TV a uma inclinação maior do que 15 graus.
➣ Conte sempre com a ajuda de duas pessoas para instalar a TV na parede.
Família do
produto
Tamanho da TV em
polegadas
Especicações VESA
para o orifício do parafuso (A * B) em
milímetros
Parafuso padrão
(Medida*
nominal em mm)
Quantidade
TV de LED 32 200 X 200 M8 4
Não instale o kit de montagem na parede enquanto a TV estiver ligada. Isso pode causar ferimentos
ocasionados por choque elétrico.
BN68-07044R-00
Licença
Fabricado sob licença de Dolby Laboratories. Dolby e o símbolo D duplo são marcas registradas
da Dolby Laboratories.
Manufactured under a license from U.S. Patent No’s: 5,956,674, 5,974,380, 5,978,762, 6,487,535,
6,226,616, 7,212,872, 7,003,467, 7,272,567, 7,668,723, 7,392,195, 7,930,184, 7,333,929 and
7,548,853. DTS, the Symbol, and DTS and the Symbol together are registered trademarks & DTS
Premium Sound is a trademark of DTS, Inc. ©2012 DTS, Inc. All Rights Reserved.
Manufactured under a license from U.S. Patent No’s: 6,285,767, 8,027,477, 5,319,713, 5,333,201,
5,638,452, 5,771,295, 5,970,152, 5,912,976, 7,200,236, 7,492,907, 8,050,434, 7,720,240,
7,031,474, 7,907,736 and 7,764,802. DTS, the Symbol, and DTS and the Symbol together are
registered trademarks & DTS Studio Sound is a trademark of DTS, Inc. ©2012 DTS, Inc. All Rights
Reserved.
Os termos HDMI e HDMI High-Denition Multimedia Interface, e o logótipo HDMI são marcas
comerciais ou marcas registradas da HDMI Licensing LLC nos Estados Unidos e em outros países.
DivX Certied® to play DivX® video up to HD 1080p, including premium content.
ABOUT DIVX VIDEO: DivX® is a digital video format created by DivX, LLC, a subsidiary of Rovi Corporation. This is an ofcial
DivX Certied® device that has passed rigorous testing to verify that it plays DivX video. Visit divx.com for more information
and software tools to convert your les into DivX videos.
ABOUT DIVX VIDEO-ON-DEMAND: This DivX Certied® device must be registered in order to play purchased DivX Video-on-
Demand (VOD) movies.
To obtain your registration code, locate the DivX VOD section in your device setup menu. Go to vod.divx.com for more
information on how to complete your registration.
DivX®, DivX Certied® and associated logos are trademarks of Rovi Corporation or its subsidiaries and are used under
license.
Covered by one or more of the following U.S. patents: 7,295,673; 7,460,668; 7,515,710; 7,519,274
Aviso de licença de software livre
O software livre usado neste produto pode ser encontrado no website a seguir. (http://opensource.samsung.com )
O aviso de licença de software livre está escrito apenas em inglês.
Specications
Considerações ambientais
Temperatura de funcionamento
Umidade de funcionamento
Temperatura de armazenamento
Umidade de armazenamento
50°F a 104°F (10°C a 40°C)
10% a 80%, sem condensação
-4°F a 113°F (-20°C a 45°C)
5% a 95%, sem condensação
Nome do modelo HG32ND450S
Resolução da tela 1366 x 768
Tamanho da tela
(Diagonal)
Classe de 32”
(31.5” - medida na diagonal)
Som (saída) 5W x 2
Dimensões (LxPxA)
Corpo
Com base
745.4 x 69.0 x 442.2 mm
745.4 x 150.5 x 466.6 mm
Peso
Sem base
Com base
3.73 kg
3.82 kg
➣ O design e as especicações estão sujeitos a alterações sem aviso prévio.
➣ Este dispositivo é um equipamento digital Classe B.
AVISO: Este produto contém substâncias químicas conhecidas no Estado da Califórnia por provocarem câncer e
toxicidade reprodutiva.
Dimensões
HG32ND450S
1
2
3 4 5 6
8
7
9
(unidade: mm)
1 2 3 4 5 6 7 8 9
HG32ND450S 745.4 699.7 394.3 433.9 442.2 466.6 37.3 69.0 150.5
♦ UI Scenario
Lista de peças
1
2
3
4
5
Controle remoto e
pilhas (AAA x 2)
Cabo de alimentação
Instruções ao proprietário
Guia de segurança
Adaptador para montagem na parede
(Dependendo do modelo)
Adaptador
Instalação da base da TV de LED
♦ HG32ND450S
Componentes
Ao instalar a base, use os componentes e as peças fornecidas.
A
B
X 4 (M4 X L12)
Base Parafusos
1
4
2 3
(M4 X L12) (2EA)
(M4 X L12) (2EA)
✎ Certique-se de ter pelo menos duas pessoas ajudando a levantar e mover a TV de LED.
✎ Ao conectar a base, coloque o produto em uma superfície macia, com a tela virada para baixo e, em seguida, aperte os
parafusos.
✎ O número de parafusos pode ser diferente, dependendo do modelo.
Factory Reset
Type
Local Set
SW Model
BOM Model
HD450
32S6AH0JJ
BRA_DTV
Tuner
Ch Table
NONE
MRT Option
Engineer Option
S_TC
450
Power On
Menu OSD
Music Mode
External Source
Eco Solution
Cloning
Hotel Plug & Play
Hospital Plug & Play é uma função que realiza automaticamente a seleção do modo Hospital, a conguração de país, a
conguração de relógio e a conguração de modo de imagem quando o aparelho é ligado pela primeira vez. A conguração
também é realizada automaticamente após a execução de uma reinicialização de serviço.
♦ Menu na tela Denição de local
– Realçado inicialmente: BRA_DTV
– Se você pressionar a tecla Enter depois de selecionar
Alterar, poderá alterar o país. Se o país for alterado, a
TV será desligada e ligada automaticamente.
– Se você não selecionar o país correto, execute a
configuração de fábrica novamente após entrar no
menu Factory (Fábrica).
– Se não desejar alterar o país, selecione Ignorar.
♦ Menu na tela Conguração fácil
– Realçado inicialmente: configuração do modo
Autônomo
– Se você selecionar o botão Somente Autônomo, o
modo de hospital Autônomo será configurado por
padrão e a mensagem na tela “Modo Standalone
definido.” será exibida por 3 segundos.
– A TV entrará no modo RF automaticamente depois de
exibir a mensagem na tela “Modo Standalone definido.”
por 3 segundos.
– Se você selecionar o modo de configuração Autônomo,
a mensagem na tela “Select Menu Language”
(Selecione o idioma do menu) será exibida.
♦ Menu na tela Selecione seu idioma
– Realçado inicialmente: Português
– Tempo de exibição: O tempo limite e a operação do
menu na tela são os mesmos de outros modelos de TV
da Samsung.
– Se você pressionar a tecla Enter, a mensagem na tela
“Configure sua TV” será exibida.
♦ Menu na tela Congure sua TV
– Realçado inicialmente: Padrão.
– A TV exibirá o menu na tela Modo de Imagem, no
qual você poderá escolher entre o modo de imagem
dinâmico ou padrão.
♦ Menu na tela Modo de programação automática
– Se você pressionar a tecla Enter, a TV pesquisará os
canais automaticamente.
♦ Menu na tela Denir modo de relógio e fuso horário
– Realçado inicialmente: Modo Relógio: Auto, Fuso
Horário: Sul, Sud., GO e DF
– Se a TV for ser sintonizada em canais de transmissão
digital e se esses canais transmitirem informações de
data e hora, defina o modo Relógio como Auto. A TV
ajustará a data e a hora automaticamente.
– Se a TV não for ser sintonizada em canais de
transmissão digital, defina o modo Relógio como
Manual e, em seguida, ajuste a data e a hora da TV
manualmente.
– Selecione seu fuso horário no mapa que será exibido.
Visualização do painel de conexão
1
4
5
23
HDMI IN
2 (DVI)
HDMI IN
1 (STB)
AUDIO
OUT
ANT IN
6
➣ A cor e o formato do produto podem variar, dependendo do modelo.
1 COMPONENT / AV IN
2 AUDIO OUT
3 HDMI IN 1(STB), 2(DVI)
4 USB (5V 0.5A)
5 ANT IN
6 DC 19V
Controle da TV
O controle da TV, na parte inferior direita da TV, permite controlar a TV sem o controle remoto.
: Liga ou desliga o televisor.
/ : O canal é alterado.
/ : Regula o volume.
: Altera as fontes de vídeo disponíveis.
Menu de controlo
Sensor do telecomando/Controle da TV
✎ Se pressionar primeiro, é exibido o menu de controle. Você pode selecionar a função pressionando e mantendo pressionado
o controle da TV.
✎ A cor e o formato do produto podem variar consoante o modelo.
✎ Com o controlador do televisor, pode efectuar outras operações, excepto ligar ou desligar o televisor, mudar de canal, regular
o volume e trocar de fonte de entrada.
Modo Standby
Sua TV entra no modo Standby quando você a desliga e ela continua a consumir uma pequena quantidade de energia. Por
questões de segurança e para reduzir o consumo de energia, não deixe sua TV no modo Standby por longos períodos (quando
você viajar, por exemplo). É melhor desconectar o cabo de alimentação.
STOP
Não retorne
esta unidade
Caso enfrente problemas para operar esta TV,
Ligue para:
BRASIL: 0800-124-421
ou 4004-0000
Site:
http://www.samaung.com/br/support
Auto Program
Auto Program is incomplete.
0 channels are memorized.
Change Settings Scan Again
DTV Air0
Air
Cable
0
0
Caso
selecione
Change
Caso selecione
Standalone Only
A TV entrará no modo RF.
será exibida por 3 segundos
Caso não altere o país em Current Location (Local Atual)
Caso selecione Skip
Caso selecione a
Standalone Setup
Selecione seu idioma
O menu de opção de hospitalidade será
exibido, pressione Power OFF para sair
Selecione o Modo de Imagem
Selecione Modo Relógio, Fuso Horário
Selecione a faixa
de canais a ser
usada para Prog.
Automática
Depois de pesquisar
os canais.
Se você selecionar a redefinição de fábrica, a TV redefinirá todos os
valores para o padrão de fábrica e, em seguida, exibirá o menu Hospital
Plug & Play na parte inferior quando for ligada novamente.
A TV será desligada e
ligada automaticamente.
Caso altere o país em Current
Location (Local Atual)
Local Set
Change Locat Set if Located in North America, Latin America and Europe.
In other regions, Please press SKIP button move to the next step.
Current Localset : US
Change Skip
Local Set
Change Locat Set if Located in North America, Latin America and Europe.
In other regions, Please press SKIP button move to the next step.
Current Localset : BRA_DTV
Change Skip
Easy Set up
Standalone Setup
(Continue Setup)
Standalone Only
(End Setup)
If you select this, Easy
setup will be started.
There are Essential
Details, Channel Scan,
Clock and Terms in Easy
setup.
c
Select your Language
Select your language to start the on screen setup.
The Language Setting will be applied to Main Menu and not Plug and Play.
Press the arrow buttons
to move around the
screen.
Press the Enter button to
select.
English
Español
age
Press th
earrow
buttons
c
Português
Configure your TV
Picture Mode Standard
Choose a picture mode
that best suits your
viewing enviroment.
Select your information in all of the categories
below.
TV Setup Complete!
Your TV is now ready to use.
OK
Auto Program
Antenna Both
Select current connected
antenna.
To get channels, set the options below then select
Scan.
Scan
Auto Program
Auto Program is channels for you...
Air 13
4%
Stop
DTV Air0
Air
Cable
0
0
Clock
-- : -- --
You can adjust your time to set DST, Time Zone and
clock mode
Set current date and time
Clock Mode Auto
Date
-- / -- / ----
Time
-- : -- --
Time Zone South and Southeast
Local Set
Warning! TV might not function if local set is not correctly configured.
When Local set is changed, TV will turn off automatically to apply it.
BRA_DTV
Countries List
None
Standalone mode has been set.
OK
P
w
[HD450S-ZD-QSG]BN68-07044R-00L02.indd 2 2015-03-18 11:22:36
-
 1
1
-
 2
2


em outras línguas
Artigos relacionados
-
Samsung HG40ND460SG Manual do usuário
-
-
-
Samsung HG40ND450BG Guia rápido
-
-
Samsung HG32ED590HB Manual do usuário
-
Samsung HG40ED790QB Manual do usuário
-
Samsung HG32EC470GW Manual do usuário
-
Samsung HG40ED450BW Manual do usuário