
User’s Guide
DataTraveler 4000 Managed-Ready Solution
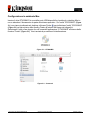
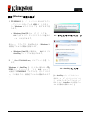
Find the language and latest documentation for your Kingston
®
DT4000M-R here.
DT4000M-R User’s Guide
Simplied Chinese .....
Traditional Chinese ....
............ For instructions in English
. . . . . . . . . . . . . . . . . . Para instrucciones en español
......... Für Anleitungen in Deutsch
. . . . . . . . . . . . . . . . . . Pour des instructions en français
. . . . . . . . . . . . . . . . . . Per le istruzioni in italiano
............Por as instruções em português
. . . . . . . . . . . . . . . . . . Instrukcje w jezyku polskim
. . . . . . . . . . . . . . . . . . Для инструкции на русском
. . . . . . . . . . . . . . . . . . Turkce talimatlar icin
. . . . . . . . . . . . . . . . . . Japanese
. . . . . . . . . . . . . . . . . . Thai
. . . . . . . . . . . . . . . . . . Vietnamese

Document No. 480DT4000M-R.A01
Managed-Ready Solution
Page 1 of 14
DataTraveler
®
4000
Managed-Ready Solution
User Manual

Document No. 480DT4000M-R.A01
Managed-Ready Solution
Page 2 of 14
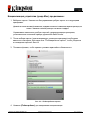
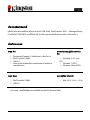
About This User Guide
This quick start guide is for Kingston's DataTraveler
®
4000 – Managed-Ready Secure USB
device (referred to simply as DT4000M-R from this point forward) using the default system
values and no customisations.
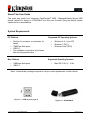
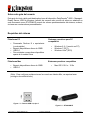
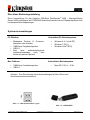
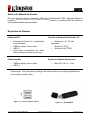
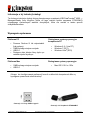
System Requirements
PC Platform
• Pentium III processor or equivalent (or
faster)
• 15MB free disk space
• USB 2.0
• Two available consecutive drive letters
after the last physical drive
Supported PC Operating Systems
• Windows 8, 8.1 (non RT)
• Windows 7 (SP1)
• Windows Vista
®
(SP2)
Mac Platform
• 15MB free disk space
• USB 2.0
Supported Operating Systems
• Mac OS X 10.6.x - 10.9x
(Note: Administrator privileges required to set up console preferences on Mac clients.)
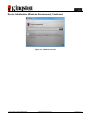
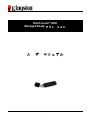
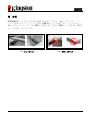
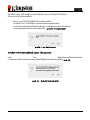
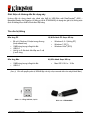
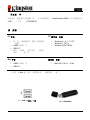
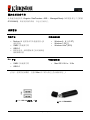
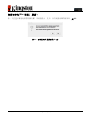
Figure 1.1 – USB 2.0 ports, type A
Figure 1.2 – DT40000M-R

Document No. 480DT4000M-R.A01
Managed-Ready Solution
Page 3 of 14
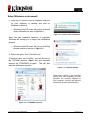
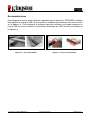
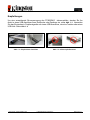
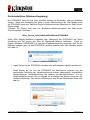
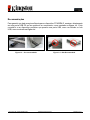
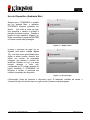
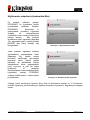
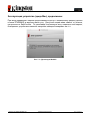
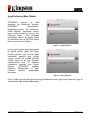
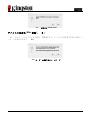
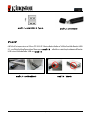
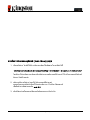
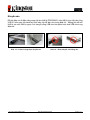
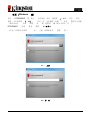
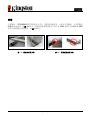
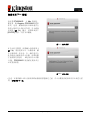
Recommendations
To ensure that ample power is provided to the DT4000M-R device, insert it directly into a USB
2.0 port on your notebook or desktop, as seen in
Figure 1.3. Avoid connecting it to any
peripheral device(s) that may feature a USB port, such as a keyboard or USB-powered hub, as
seen in Figure 1.4.
Figure 1.3 – Recommended usage
Figure 1.4 – Not recommended

Document No. 480DT4000M-R.A01
Managed-Ready Solution
Page 4 of 14
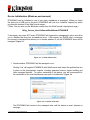
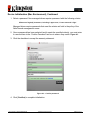
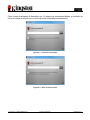
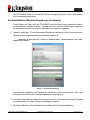
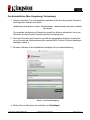
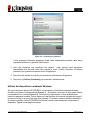
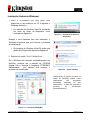
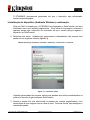
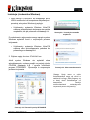
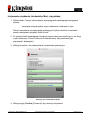
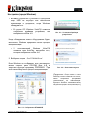
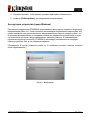
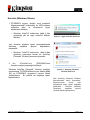
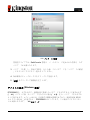
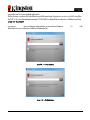
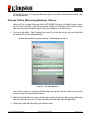
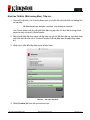
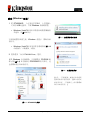
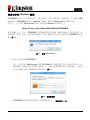
Setup (Windows environment)
1. Insert the DT4000M-R into an available USB port
on your notebook or desktop and wait for
Windows to detect it.
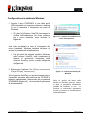
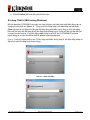
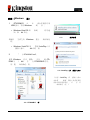
• Windows Vista/7/8 users will receive a device
driver notification as seen in Figure 2.1.
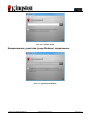
Once the new hardware detection is complete,
Windows will prompt you to begin the initialisation
process.
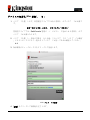
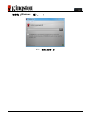
• Windows Vista/7/8 users will see an AutoPlay
window similar to the one in Figure 2.2.
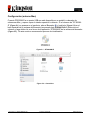
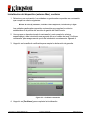
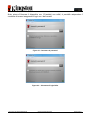
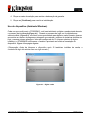
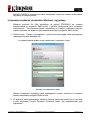
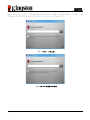
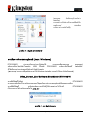
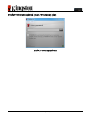
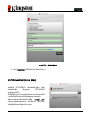
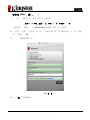
2. Select the option ‘Run DT4000M-R.exe’.
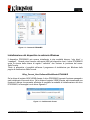
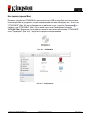
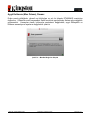
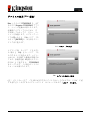
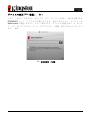
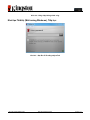
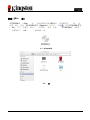
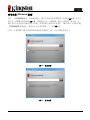
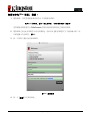
If Windows does not AutoPlay, you can browse to
the CD-ROM partition (Figure 2.3) and manually
execute the DT4000M-R program. This will also
start the initialisation process.
Figure 2.3 – DT4000M-R contents
Figure 2.1 – Device driver installation
Figure 2.2 – AutoPlay window
(Note: Menu options in the AutoPlay
window may vary depending on what
programs are currently installed on
your computer. AutoRun will start the
initialisation process automatically.
)

Document No. 480DT4000M-R.A01
Managed-Ready Solution
Page 5 of 14
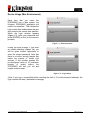
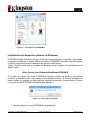
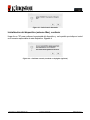
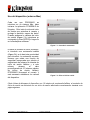
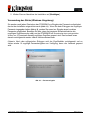
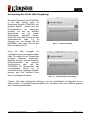
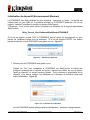
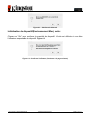
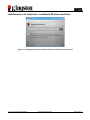
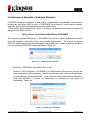
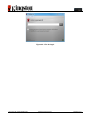
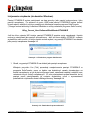
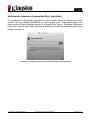
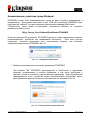
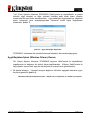
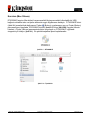
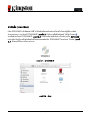
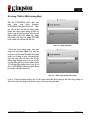
Device Initialisation (Windows environment)
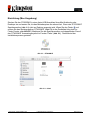
DT4000M-R can be initialised in one of two ways: standalone or managed. When you insert
the drive into a USB port on the host, DT4000M-R will look for a 'safestick' registry key which
provides the location of the SafeConsole server:
(*Note: You can also use the Windows installer from the SafeConsole's deployment page.)
HKey_Current_User\Software\BlockMaster\DT4000M-R
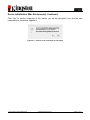
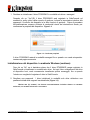
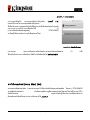
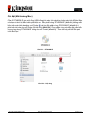
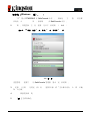
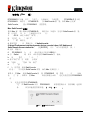
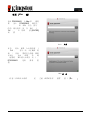
If the registry key does NOT exist, DT4000M-R will bypass the management option and allow
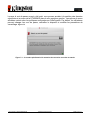
you to initialise the device as a standalone drive. If the registry key DOES exist, a message
box prompt is displayed that allows you to decide whether or not the DT4000M-R drive will be
managed.
Figure 3.1
Figure 3.1 – Found SafeConsole
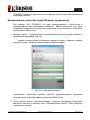
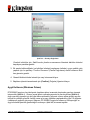
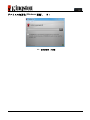
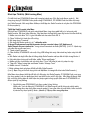
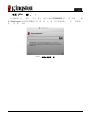
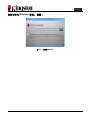
1. Decide whether DT4000M-R will be managed or not.
Clicking 'Yes' will register DT4000M-R with SafeConsole and inherit the policies that are
in place on the management console, including password criteria, device auditing and
other managed features. To confirm ownership of this device, you will be prompted for
the credentials of the local host/domain user prior to initialisation. Figure 3.2
Figure 3.2 – Confirm ownership
The DT4000M-R will remain in the managed state until the device is reset. Continue on
next page.

Document No. 480DT4000M-R.A01
Managed-Ready Solution
Page 6 of 14
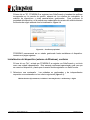
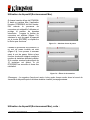
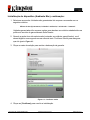
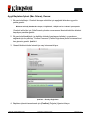
Device Initialisation (Windows Environment), Continued:
Clicking 'No' will prevent the DT4000M-R from registering with SafeConsole and it will
initialise as a standalone drive. This message box will continue to appear each time the
device is plugged in, until you opt to register with SafeConsole.
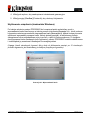
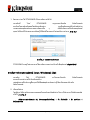
2. Select a password. Non-managed and standalone drives require a password with the
following criteria (
Figure 3.3):
Minimum of eight (8) characters, including 1 upper-case, 1 lower-case and 1 digit
Figure 3.3 – Confirm password
Managed drives require passwords that meet the criteria set forth in the policy of the
SafeConsole management server.
3. Once a password has been selected (and it meets the specified criteria), you must enter
it a second time in the 'Confirm Password' text box to ensure proper entry.
4. Click the checkbox to accept the warranty statement.
5. Click [Confirm] to complete initialisation.

Document No. 480DT4000M-R.A01
Managed-Ready Solution
Page 7 of 14
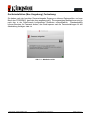
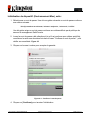
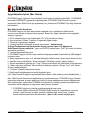
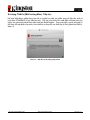
Device Usage (Windows Environment)
Each time that you insert the DT4000M-R, you will be prompted to enter the password created
during the initialisation process (Figure 4.1). During the login process, if you enter an invalid
password (Figure 4.2), you will be given another opportunity to enter the correct password. Note
that there is a built-in security feature that tracks the number of invalid login attempts. If this
number reaches the pre-configured value of 10 (maximum number of invalid logins), the
DT4000M-R will lock you out and require a device reset.
Figure 4.3 on next page
(Note: If you log in successfully before reaching the limit of 10 invalid password attempts, the
login counter will reset.)
Figure 4.1 – Enter password
Figure 4.2 – Login failure

Document No. 480DT4000M-R.A01
Managed-Ready Solution
Page 8 of 14
Device Initialisation (Windows Environment), Continued:
Figure 4.3 – MaxNoA reached

Document No. 480DT4000M-R.A01
Managed-Ready Solution
Page 9 of 14
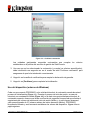
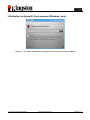
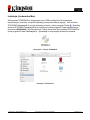
Setup (Mac environment)
Insert the DT4000M-R into an available USB port on your Mac notebook or desktop and wait
for the operating system to detect it. If the 'DT4000M-R' volume (
Figure 5.1) does not appear
on the desktop, open Finder and locate the 'DT4000M-R' volume (Figure 5.2) on the left side
of the Finder window (listed under
DEVICES.) Highlight the volume and double-click the
'DT4000M-R' application icon the 'Finder' window (Figure 5.2). This will start the initialisation
process.
Figure 5.1 – DT4000M-R
Figure 5.2 – Contents

Document No. 480DT4000M-R.A01
Managed-Ready Solution
Page 10 of 14
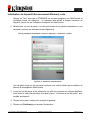
Device Initialisation (Mac Environment)
DT4000M-R can be initialised in one of two ways: standalone or managed. Upon launching the
DT4000M-R application on the DT4000M-R volume, DT4000M-R will look for a SafeConsole
server. If the Mac has been set up for SafeConsole, it will prompt for the DT4000M-R to be
managed.
Mac SafeConsole Setup:
To initialise the DT4000M-R on a Mac client, the application must know where to locate the
SafeConsole server. To enable this, follow these steps prior to inserting the device:
1. Click on the "Go" menu in the upper left-hand corner of the OS X desktop.
2. Select 'Utilities' from the drop-down menu.
3. Launch the 'Terminal' application.
4. Using the admin account, type " defaults write
/Library/Preferences/com.blockmaster.device console https://<IP Address of
SafeConsole Server>/safestick " in the terminal window and press [ENTER]. (NOTE: This
command does require elevated privileges.)
5. Exit the terminal window.
6. Insert the DT4000M-R into an available USB port on your notebook or desktop.
a. Open Safari and browse to the SafeConsole login address you specified in Step 4.
b. When the certificate warning appears, click “Show certificate”.
c. Press the arrow to the left of the “Trust” menu to show the trust options.
d. Change the “When using this certificate” to “Always Trust”.
e. Click the 'Continue' button.
f. Enter your credentials to connect to SafeConsole.
(Note: You can also use the Mac installer from the SafeConsole's deployment page.)
If the Mac hasn't been setup to connect to a SafeConsole Server, DT4000M-R will bypass the
management option and allow you to initialise the device as a standalone drive. If the Mac has
been setup, a message box prompt is displayed that allows you to decide whether or not the
DT4000M-R drive will be managed.
1. Decide whether DT4000M-R will be managed or not.
Clicking 'Yes' will register DT4000M-R with SafeConsole and inherit the policies that are
in place on the management console, including password criteria, device auditing and
other managed features. (Figure 6.1) Continue on next page.
Figure 6.1 – Found SafeConsole

Document No. 480DT4000M-R.A01
Managed-Ready Solution
Page 11 of 14
Device Initialisation (Mac Environment), Continued:
Click 'Yes" to confirm ownership of this device, you will be prompted if you are the user
responsible for the device. Figure 6.2
Figure 6.2 – Confirm user (continued on next page)

Document No. 480DT4000M-R.A01
Managed-Ready Solution
Page 12 of 14
Device Initialisation (Mac Environment), Continued:
1. Select a password. Non-managed drives require a password with the following criteria:
Minimum of eight (8) characters, including 1 upper-case, 1 lower-case and 1 digit*
Managed drives require passwords that meet the criteria set forth in the policy of the
SafeConsole management server.
2. Once a password has been selected (and it meets the specified criteria), you must enter
it a second time in the 'Confirm Password' text box to ensure they match. Figure 6.3
3. Click the checkbox to accept the warranty statement.
Figure 6.3 – Confirm password
4. Click [Confirm] to complete initialisation.

Document No. 480DT4000M-R.A01
Managed-Ready Solution
Page 13 of 14
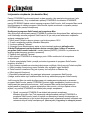
Device Usage (Mac Environment)
Each time that you insert the
DT4000M-R into a Mac system, the
Kingston DT4000M-R application will
need to be launched. This initiates the
login routine that authenticates the user
and protects the secure data partition.
When the login window appears
(
Figure 7.1), enter your password and
press [ENTER] or click on the arrow to
proceed.
Figure 7.1 – Enter password
During the login process, if you enter
an invalid password (Figure 7.2), you
will be given another opportunity to
enter the correct password. Note that
there is a built-in security feature that
tracks the number of invalid login
attempts.
If this number reaches the
pre-configured value of 10 (maximum
number of invalid logins), the
DT4000M-R will lock you out and
require a device reset.
Figure 7.2 – Login failure
(Note: If you log in successfully before reaching the limit of 10 invalid password attempts, the
login counter will reset.)
Continued on next page.

Document No. 480DT4000M-R.A01
Managed-Ready Solution
Page 14 of 14
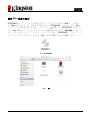
Device Usage (Mac Environment), Continued:
When you enter the correct password, you can access the secure data partition and the
DT4000M-R menu in the upper left-hand corner. The menu options that appear will vary based
on the policies configured in SafeConsole. By default, users will be able to change their
password, lock the device, and change the lockout timer settings. Figure 7.3
Figure 7.3 – MaxNoA reached

Documento n.º 480DT4000M-R.A01
Solución gestionada
Página 1 de 15
DataTraveler
®
4000
Solución gestionada
Manual del usuario

Documento n.º 480DT4000M-R.A01
Solución gestionada
Página 2 de 15
Sobre esta guía del usuario
Esta guía de inicio rápido está destinada al uso del dispositivo DataTraveler
®
4000 – Managed-
Ready Secure USB de Kingston (referido de manera más sencilla de ahora en adelante en
este documento como DT4000M-R) usando los valores predeterminados del sistema, es decir,
sin tener en cuenta valores personalizados.
Requisitos del sistema
Plataforma PC
• Procesador Pentium III o equivalente
(o más rápido)
• Espacio disponible en disco de 15MB
• USB 2.0
• Dos unidades consecutivas disponibles
aparte de la unidad física
Sistemas operativos para PC
compatibles
• Windows 8, 8.1 (versión no RT)
• Windows 7 (SP1)
• Windows Vista
®
(SP2)
Plataforma Mac
• Espacio disponible en disco de 15MB
• USB 2.0
Sistemas operativos compatibles
• Mac OS X 10.6.x - 10.9x
(Nota: Para configurar preferencias en la consola en clientes Mac, se requiere tener
privilegios de administrador.)
Figura 1.1 – Puertos USB 2.0, tipo A
Figura 1.2 – DT40000M-R

Documento n.º 480DT4000M-R.A01
Solución gestionada
Página 3 de 15
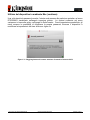
Recomendaciones
Para asegurarse de que existe suficiente capacidad para el dispositivo DT4000M-R, insértelo
directamente en el puerto USB 2.0 de su portátil u ordenador de sobremesa, tal como se indica
en la
Figura 1.3. Evite conectarlo a cualquier dispositivo periférico que pueda incorporar un
puerto USB, tal como un teclado o concentrador alimentado por USB, tal como se muestra en
la
Figura 1.4.
Figura 1.3 – Uso recomendado
Figura 1.4 – Uso no recomendado

Documento n.º 480DT4000M-R.A01
Solución gestionada
Página 4 de 15
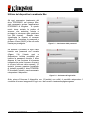
Configuración (entorno de Windows)
1. Inserte DT4000M-R en un puerto USB que se
encuentre disponible en su portátil u ordenador
de sobremesa y espere a que Windows lo
detecte.
• Los usuarios de Windows Vista/7/8 recibirán
una notificación del controlador del
dispositivo, tal como se muestra en la Figura
2.1
.
Una vez detectado el hardware, Windows le indicará
que ponga en marcha el proceso de inicialización.
• Los usuarios de Windows Vista/7/8 verán una
ventana Reproducción Automática similar a la
que se muestra en la
Figura 2.2.
2. Seleccione la opción ‘Run DT4000M-
R.exe
("Ejecutar DT4000M-R.exe").
Si Windows no le muestra la ventana Reproducción
Automática, vaya hasta la partición del CD-ROM
(Figura 2.3) y ejecute manualmente el programa
DT4000M-R. De este modo también se comenzará
el proceso de inicialización.
Figura 2.1 – Instalación del controlador del
dispositivo
Figura 2.2 – Ventana de AutoPlay
(Reproducción automática)
(Nota: Las opciones del menú en la
ventana de Reproducción Automática
pueden variar en función de los
programas que se encuentren
instalados en ese momento en su
ordenador. Ejecución Automática
pondrá en marcha directamente el
proceso de inicialización
)

Documento n.º 480DT4000M-R.A01
Solución gestionada
Página 5 de 15
Figura 2.3 – Contenidos de DT40000M-R
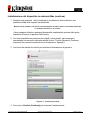
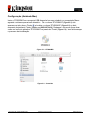
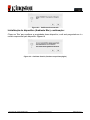
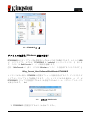
Inicialización del dispositivo (entorno de Windows)
DT4000M-R puede inicializarse de una de las dos formas siguientes: autónoma o gestionada.
Al insertar la unidad en un puerto USB en el anfitrión, DT4000M-R buscará la clave de registro
"safestick' que proporciona la localización del servidor SafeConsole:
(*Nota: También puede usar el instalador de Windows desde la página de implementación de
SafeConsole.)
HKey_Current_User\Software\BlockMaster\DT4000M-R
Si la clave de registro NO existe, DT4000M-R derivará la opción de gestión y le permitirá
inicializar el dispositivo como si se tratara de una unidad autónoma. Si la clave de registro SÍ
existe, recibirá un mensaje con una casilla de solicitud que permite al usuario decidir si quiere
o no que la unidad DT4000M-R sea gestionada. Figura 3.1
Figura 3.1 – SafeConsole detectada
1. Decida si quiere o no que DT4000M-R sea gestionado.
A página está carregando ...
A página está carregando ...
A página está carregando ...
A página está carregando ...
A página está carregando ...
A página está carregando ...
A página está carregando ...
A página está carregando ...
A página está carregando ...
A página está carregando ...
A página está carregando ...
A página está carregando ...
A página está carregando ...
A página está carregando ...
A página está carregando ...
A página está carregando ...
A página está carregando ...
A página está carregando ...
A página está carregando ...
A página está carregando ...
A página está carregando ...
A página está carregando ...
A página está carregando ...
A página está carregando ...
A página está carregando ...
A página está carregando ...
A página está carregando ...
A página está carregando ...
A página está carregando ...
A página está carregando ...
A página está carregando ...
A página está carregando ...
A página está carregando ...
A página está carregando ...
A página está carregando ...
A página está carregando ...
A página está carregando ...
A página está carregando ...
A página está carregando ...
A página está carregando ...
A página está carregando ...
A página está carregando ...
A página está carregando ...
A página está carregando ...
A página está carregando ...
A página está carregando ...
A página está carregando ...
A página está carregando ...
A página está carregando ...
A página está carregando ...
A página está carregando ...
A página está carregando ...
A página está carregando ...
A página está carregando ...
A página está carregando ...
A página está carregando ...
A página está carregando ...
A página está carregando ...
A página está carregando ...
A página está carregando ...
A página está carregando ...
A página está carregando ...
A página está carregando ...
A página está carregando ...
A página está carregando ...
A página está carregando ...
A página está carregando ...
A página está carregando ...
A página está carregando ...
A página está carregando ...
A página está carregando ...
A página está carregando ...
A página está carregando ...
A página está carregando ...
A página está carregando ...
A página está carregando ...
A página está carregando ...
A página está carregando ...
A página está carregando ...
A página está carregando ...
A página está carregando ...
A página está carregando ...
A página está carregando ...
A página está carregando ...
A página está carregando ...
A página está carregando ...
A página está carregando ...
A página está carregando ...
A página está carregando ...
A página está carregando ...
A página está carregando ...
A página está carregando ...
A página está carregando ...
A página está carregando ...
A página está carregando ...
A página está carregando ...
A página está carregando ...
A página está carregando ...
A página está carregando ...
A página está carregando ...
A página está carregando ...
A página está carregando ...
A página está carregando ...
A página está carregando ...
A página está carregando ...
A página está carregando ...
A página está carregando ...
A página está carregando ...
A página está carregando ...
A página está carregando ...
A página está carregando ...
A página está carregando ...
A página está carregando ...
A página está carregando ...
A página está carregando ...
A página está carregando ...
A página está carregando ...
A página está carregando ...
A página está carregando ...
A página está carregando ...
A página está carregando ...
A página está carregando ...
A página está carregando ...
A página está carregando ...
A página está carregando ...
A página está carregando ...
A página está carregando ...
A página está carregando ...
A página está carregando ...
A página está carregando ...
A página está carregando ...
A página está carregando ...
A página está carregando ...
A página está carregando ...
A página está carregando ...
A página está carregando ...
A página está carregando ...
A página está carregando ...
A página está carregando ...
A página está carregando ...
A página está carregando ...
A página está carregando ...
A página está carregando ...
A página está carregando ...
A página está carregando ...
A página está carregando ...
A página está carregando ...
A página está carregando ...
A página está carregando ...
A página está carregando ...
A página está carregando ...
A página está carregando ...
A página está carregando ...
A página está carregando ...
A página está carregando ...
A página está carregando ...
A página está carregando ...
A página está carregando ...
A página está carregando ...
A página está carregando ...
A página está carregando ...
A página está carregando ...
A página está carregando ...
A página está carregando ...
A página está carregando ...
A página está carregando ...
A página está carregando ...
A página está carregando ...
A página está carregando ...
A página está carregando ...
A página está carregando ...
A página está carregando ...
A página está carregando ...
A página está carregando ...
A página está carregando ...
A página está carregando ...
A página está carregando ...
A página está carregando ...
A página está carregando ...
A página está carregando ...
A página está carregando ...
A página está carregando ...
A página está carregando ...
A página está carregando ...
-
 1
1
-
 2
2
-
 3
3
-
 4
4
-
 5
5
-
 6
6
-
 7
7
-
 8
8
-
 9
9
-
 10
10
-
 11
11
-
 12
12
-
 13
13
-
 14
14
-
 15
15
-
 16
16
-
 17
17
-
 18
18
-
 19
19
-
 20
20
-
 21
21
-
 22
22
-
 23
23
-
 24
24
-
 25
25
-
 26
26
-
 27
27
-
 28
28
-
 29
29
-
 30
30
-
 31
31
-
 32
32
-
 33
33
-
 34
34
-
 35
35
-
 36
36
-
 37
37
-
 38
38
-
 39
39
-
 40
40
-
 41
41
-
 42
42
-
 43
43
-
 44
44
-
 45
45
-
 46
46
-
 47
47
-
 48
48
-
 49
49
-
 50
50
-
 51
51
-
 52
52
-
 53
53
-
 54
54
-
 55
55
-
 56
56
-
 57
57
-
 58
58
-
 59
59
-
 60
60
-
 61
61
-
 62
62
-
 63
63
-
 64
64
-
 65
65
-
 66
66
-
 67
67
-
 68
68
-
 69
69
-
 70
70
-
 71
71
-
 72
72
-
 73
73
-
 74
74
-
 75
75
-
 76
76
-
 77
77
-
 78
78
-
 79
79
-
 80
80
-
 81
81
-
 82
82
-
 83
83
-
 84
84
-
 85
85
-
 86
86
-
 87
87
-
 88
88
-
 89
89
-
 90
90
-
 91
91
-
 92
92
-
 93
93
-
 94
94
-
 95
95
-
 96
96
-
 97
97
-
 98
98
-
 99
99
-
 100
100
-
 101
101
-
 102
102
-
 103
103
-
 104
104
-
 105
105
-
 106
106
-
 107
107
-
 108
108
-
 109
109
-
 110
110
-
 111
111
-
 112
112
-
 113
113
-
 114
114
-
 115
115
-
 116
116
-
 117
117
-
 118
118
-
 119
119
-
 120
120
-
 121
121
-
 122
122
-
 123
123
-
 124
124
-
 125
125
-
 126
126
-
 127
127
-
 128
128
-
 129
129
-
 130
130
-
 131
131
-
 132
132
-
 133
133
-
 134
134
-
 135
135
-
 136
136
-
 137
137
-
 138
138
-
 139
139
-
 140
140
-
 141
141
-
 142
142
-
 143
143
-
 144
144
-
 145
145
-
 146
146
-
 147
147
-
 148
148
-
 149
149
-
 150
150
-
 151
151
-
 152
152
-
 153
153
-
 154
154
-
 155
155
-
 156
156
-
 157
157
-
 158
158
-
 159
159
-
 160
160
-
 161
161
-
 162
162
-
 163
163
-
 164
164
-
 165
165
-
 166
166
-
 167
167
-
 168
168
-
 169
169
-
 170
170
-
 171
171
-
 172
172
-
 173
173
-
 174
174
-
 175
175
-
 176
176
-
 177
177
-
 178
178
-
 179
179
-
 180
180
-
 181
181
-
 182
182
-
 183
183
-
 184
184
-
 185
185
-
 186
186
-
 187
187
-
 188
188
-
 189
189
-
 190
190
-
 191
191
-
 192
192
-
 193
193
-
 194
194
-
 195
195
-
 196
196
-
 197
197
-
 198
198
-
 199
199
-
 200
200
-
 201
201
-
 202
202
-
 203
203
-
 204
204


Kingston Technology Computer Drive DT4000M-R Manual do usuário
- Tipo
- Manual do usuário
- Este manual também é adequado para
em outros idiomas
- français: Kingston Technology Computer Drive DT4000M-R Manuel utilisateur
- italiano: Kingston Technology Computer Drive DT4000M-R Manuale utente
- polski: Kingston Technology Computer Drive DT4000M-R Instrukcja obsługi
- 日本語: Kingston Technology Computer Drive DT4000M-R ユーザーマニュアル
- Türkçe: Kingston Technology Computer Drive DT4000M-R Kullanım kılavuzu
Artigos relacionados
Outros documentos
-
Kingston KUSBDTE Manual do proprietário
-
Emtec S450 32GB Manual do proprietário
-
-
3com AP9552 Hardware Installation Manual
-
HP Color LaserJet Pro MFP M476 series Guia de instalação
-
HP LaserJet Pro MFP M226 series Guia de instalação
-
-
WEG Gateway X1000 Manual do usuário
-
HP Color LaserJet Pro M453-M454 series Guia de usuario
-
Dell N30 Series Getting Started Manual