
Motors | Automation | Energy | Transmission & Distribution | Coatings
USB Communication Module
Módulo de Comunicación USB
Módulo de Comunicação USB
CFW300-CUSB
Installation, Configuration and Operation Guide
Guía de Instalación, Configuración y Operación
Guia de Instalação, Configuração e Operação
WEG Drives & Controls - Automação LTDA.
Jaraguá do Sul - SC - Brazil
Phone 55 (47) 3276-4000 - Fax 55 (47) 3276-4020
São Paulo - SP - Brazil
Phone 55 (11) 5053-2300 - Fax 55 (11) 5052-4212
automacao@weg.net
www.weg.net
Document: 10003312263 / 00
131235 68

English
Español
1 SAFETY INFORMATION
1.1 SAFETY WARNINGS
NOTE!
Only use the USB module (CFW300-CUSB) on WEG CFW300 series
inverters.
It is recommended reading the CFW300 user’s manual before
installing or operating this accessory.
The content of this guide provides important information for the full
understanding and proper operation of this module.
1.2 PRELIMINARY RECOMMENDATIONS
ATTENTION!
Always disconnect the general power supply before connecting or
disconnecting the accessories of the CFW300 frequency inverter.
Wait for at least 10 minutes for the full discharge of the inverter.
2 GENERAL INFORMATION
This guide provides directions for the installation, configuration and operation of
the USB module (CFW300-CUSB).
3 CONTENT OF THE PACKAGE
Upon receiving the product, check if the package contains:
Accessory in anti-static package.
2 m cable with mini USB (mini-B) and USB (type A) plugs.
Installation, configuration and operation guide.
4 INSTALLATION OF THE ACCESSORY
The CFW300-CUSB is easily connected to the CFW300 frequency inverter by
means of the plug-and-play concept. The procedures below must be observed
for the proper installation and start-up:
1. With the inverter de-energized, remove the inverter communication accessory
cover in Figure A1.
2. Fit the accessory to be installed as shown in Figure A1.
3. Connect the cable to the connector of the accessory (mini USB - Figure A2)
and computer (USB type A).
4. Power up the inverter.
5 CONFIGURATIONS
The USB communication of this accessory presents the following characteristics:
Interface with the computer: USB V2.0 Plug and Play.
Mini USB plug-in connector (mini-B - see Figure A2).
The CFW300-CUSB module has the necessary resources to perform setting,
command and monitoring of the inverter by means of the WPS software - WEG
Programming Suite (available on www.weg.net). For further details, refer to
chapter 7 of the user's manual of the CFW300.
NOTE!
After installing the drive, when connected to the computer, the
associated virtual port is automatically determined by the operating
system some seconds after the connection. The user can easily
identify or change the associated COM port according to the
operating system.
The drive of the serial port will be installed together with the WPS
software.
1 INFORMACIONES DE SEGURIDAD
1.1 AVISOS DE SEGURIDAD
¡NOTA!
Solamente utilizar el módulo USB (CFW300-CUSB) en los
convertidores WEG serie CFW300.
Se recomienda la lectura del manual del usuario del CFW300 antes
de instalar o operar este accesorio.
El contenido de esta guía provee informaciones importantes para el
correcto entendimiento y el buen funcionamiento de este módulo.
1.2 RECOMENDACIONES PRELIMINARES
¡ATENCIÓN!
Siempre desconecte la alimentación general antes de conectar o
desconectar los accesorios del convertidor de frecuencia CFW300.
Aguarde por el menos 10 minutos para garantizar la desenergización
completa del convertidor.
2 INFORMACIONES GENERALES
Esta guía orienta en la instalación, configuración y operación del módulo USB
(CFW300-CUSB).
3 CONTENIDO DEL EMBALAJE
Al recibir el producto, verificar si el embalaje contiene:
Accesorio en embalaje antiestático.
Cable de 2 m con plugs mini USB (mini-B) y USB (tipo A).
Guía de instalación, configuración y operación.
4 INSTALACIÓN DEL ACCESORIO
El CFW300-CUSB es fácilmente conectado al convertidor de frecuencia CFW300
utilizando el concepto “plug-and-play”. Los procedimientos de abajo deben ser
seguidos para la correcta instalación y puesta en funcionamiento:
1. Con el convertidor sin tensión, retire la tapa de los accesorios de comunicación
del convertidor, Figura A1.
2. Encaje el accesorio a ser instalado conforme es indicado en la Figura A1.
3. Conecte el cable en el conector del accesorio (mini USB Figura A2) y en la
computadora (USB tipo A).
4. Energice el convertidor.
5 CONFIGURACIONES
La comunicación USB de este accesorio presenta las siguientes características:
Interfaz con la computadora: USB V2.0 Plug and Play.
Conector plug-in mini USB (mini-B - ver Figura A2).
El módulo CFW300-CUSB posee los recursos necesarios para realizar
parametrización, comando y monitoreo del convertidor, a través del software
WPS - WEG Programming Suite (disponible en www.weg.net). Para más detalles
consulte el capítulo 7 del manual del usuario del CFW300.
¡NOTA!
Después de la instalación del drive, al conectar en la computadora,
la puerta serial virtual asociada es automáticamente determinada
por el sistema operativo, algunos instantes luego de la conexión.
El usuario puede fácilmente identificar o alterar la puerta COM
asociada, conforme su sistema operativo.
La instalación del drive del puerto serial será realizada con la
instalación del software WPS.
1 INFORMAÇÕES DE SEGURANÇA
1.1 AVISOS DE SEGURANÇA
NOTA!
Somente utilizar o módulo USB (CFW300-CUSB) nos inversores
WEG série CFW300.
Recomenda-se a leitura do manual do usuário do CFW300 antes
de instalar ou operar esse acessório.
O conteúdo deste guia fornece informações importantes para o
correto entendimento e bom funcionamento deste módulo.
1.2 RECOMENDAÇÕES PRELIMINARES
ATENÇÃO!
Sempre desconecte a alimentação geral antes de conectar ou
desconectar os acessórios do inversor de frequência CFW300.
Aguarde pelo menos 10 minutos para garantir a desenergização
completa do inversor.
2 INFORMAÇÕES GERAIS
Este guia orienta na instalação, configuração e operação do módulo USB
(CFW300-CUSB).
3 CONTEÚDO DA EMBALAGEM
Ao receber o produto, verificar se a embalagem contém:
Acessório em embalagem anti-estática.
Cabo de 2 m com plugs mini USB (mini-B) e USB (tipo A).
Guia de instalação, configuração e operação.
4 INSTALAÇÃO DO ACESSÓRIO
O CFW300-CUSB é facilmente conectado ao inversor de frequência CFW300
utilizando o conceito “plug-and-play”. Os procedimentos abaixo devem ser
seguidos para a correta instalação e colocação em funcionamento:
1. Com o inversor desenergizado, retire a tampa de acessórios de comunicação
do inversor (Figura A1).
2. Encaixe o acessório a ser instalado conforme indicado na Figura A1.
3. Conecte o cabo no conector do acessório (mini USB Figura A2) e computador
(USB tipo A).
4. Energize o inversor.
5 CONFIGURAÇÕES
A comunicação USB deste acessório apresenta as seguintes características:
Interface com o computador: USB V2.0 Plug and Play.
Conector plug-in mini USB (mini-B - ver Figura A2).
O módulo CFW300-CUSB possui os recursos necessários para realizar
parametrização, comando e monitoração do inversor através do software WPS
- WEG Programming Suite (disponível em www.weg.net). Para mais detalhes
consulte o capítulo 7 do manual do usuário do CFW300.
NOTA!
Após instalação do drive, ao conectar no computador, a porta serial
virtual associada é automaticamente determinada pelo sistema
operacional alguns instantes após a conexão. O usuário pode
facilmente identificar ou alterar a porta COM associada conforme
seu sistema operacional.
A instalação do drive da porta serial será realizada juntamente com
a instalação do software WPS.
Português
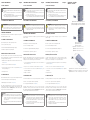
APPENDIX A - FIGURES
ANEXO A - FIGURAS
(a) Removal of the communication accessory cover
(a) Remoción de la tapa de accesorios de comunicación
(a) Remoção da tampa de acessórios de comunicação
(b) Accessory connection
(b) Conexión del accesorio
(b) Conexão de acessório
Figure A1: (a) to (b): Installation of accessory
Figura A1: (a) a (b): Instalación de accesorio
Figura A1: (a) a (b): Instalação de acessório
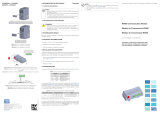
Mini USB
62.5 [2.461]
29.5 [1.162]
14.6
[0.577]
Figure A2: CFW300-CUSB dimensions in mm [in] and mini USB connector
Figura A2: Dimensiones del CFW300-CUSB en mm [in] y connectador mini USB
Figura A2: Dimensões do CFW300-CUSB em mm [in] e conector mini USB
-
 1
1
-
 2
2


em outras línguas
- español: WEG USB Guía del usuario
- English: WEG USB User guide
Artigos relacionados
-
 Automation Direct CFW300 Manual do usuário
-
 Automation Direct RS485 Guia de usuario
-
 Automation Direct khmir Guia de usuario
-
WEG RS232 Guia de usuario
-
-
-
-
WEG CFW300-CETH Instruções de operação
-
-
Automation Direct CFW100 Guia de usuario


