Logitech Premium Notebook Manual do usuário
- Tipo
- Manual do usuário

Logitech
®
User’s Guide
QuickCam
®
Pro for Notebooks

QuickCam
®
Pro for Notebooks
QuickCam
®
Pro for Notebooks
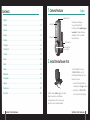
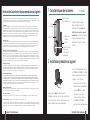
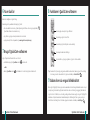
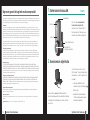
1 Camera Features
English
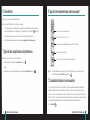
English . . . . . . . . . . . . . . . . . . . . . . . . . . . . . . . . . . . . . . . . . . . . . . . . . . . . . . . . . . . . . . . . . . . . . 3
Deutsch . . . . . . . . . . . . . . . . . . . . . . . . . . . . . . . . . . . . . . . . . . . . . . . . . . . . . . . . . . . . . . . . . . . 10
Français . . . . . . . . . . . . . . . . . . . . . . . . . . . . . . . . . . . . . . . . . . . . . . . . . . . . . . . . . . . . . . . . . . . 17
Italiano . . . . . . . . . . . . . . . . . . . . . . . . . . . . . . . . . . . . . . . . . . . . . . . . . . . . . . . . . . . . . . . . . . . . 24
Español. . . . . . . . . . . . . . . . . . . . . . . . . . . . . . . . . . . . . . . . . . . . . . . . . . . . . . . . . . . . . . . . . . . . 31
Português . . . . . . . . . . . . . . . . . . . . . . . . . . . . . . . . . . . . . . . . . . . . . . . . . . . . . . . . . . . . . . . . . 38
Nederlands . . . . . . . . . . . . . . . . . . . . . . . . . . . . . . . . . . . . . . . . . . . . . . . . . . . . . . . . . . . . . . . . 45
Svenska. . . . . . . . . . . . . . . . . . . . . . . . . . . . . . . . . . . . . . . . . . . . . . . . . . . . . . . . . . . . . . . . . . . . 52
Dansk . . . . . . . . . . . . . . . . . . . . . . . . . . . . . . . . . . . . . . . . . . . . . . . . . . . . . . . . . . . . . . . . . . . . . 59
Norsk . . . . . . . . . . . . . . . . . . . . . . . . . . . . . . . . . . . . . . . . . . . . . . . . . . . . . . . . . . . . . . . . . . . . . 66
Suomi . . . . . . . . . . . . . . . . . . . . . . . . . . . . . . . . . . . . . . . . . . . . . . . . . . . . . . . . . . . . . . . . . . . . . 73
Ελληνικά . . . . . . . . . . . . . . . . . . . . . . . . . . . . . . . . . . . . . . . . . . . . . . . . . . . . . . . . . . . . . . . . . . 80
По-русски . . . . . . . . . . . . . . . . . . . . . . . . . . . . . . . . . . . . . . . . . . . . . . . . . . . . . . . . . . . . . . . . . 87
Magyar 94
Česká verze 101
Po polsku 108
Contents
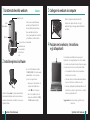
Install the Software First
Thank you for purchasing your
new Logitech
®
QuickCam
®
Pro
for Notebooks, with an autofocus, glass
lens system. This guide will help you
install and get the best performance
from your webcam.
Insert the installation CD into your
CD-ROM/DVD-ROM drive. Your CD
should start automatically. If it does not,
follow the steps below:
Double-click the My computer icon.
Alternatively, click Start My computer.
Right-click the CD-ROM/DVD-ROM
drive icon, and then click Autoplay.
•
•
Install the software
before
plugging in the camera.
Many of your camera’s extended features,
including autofocus, will not operate properly
without the complete software installation.
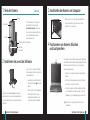
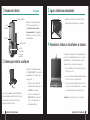
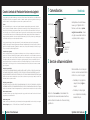
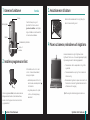
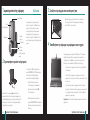
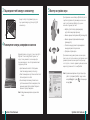
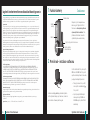
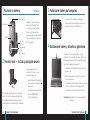
Microphone
Autofocus glass
lens system
Activity light
Notebook clip
Snapshot button

QuickCam
®
Pro for Notebooks
QuickCam
®
Pro for Notebooks
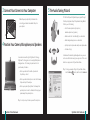
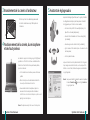
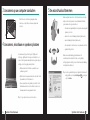
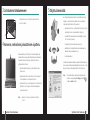
Connect Your Camera to Your Computer
Wait until you are prompted by the software before
connecting your camera to an available USB port on
your computer.
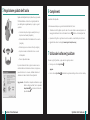
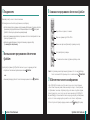
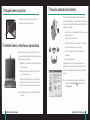
Position Your Camera, Microphone, and Speakers
Your camera comes with Logitech
®
RightSound
™
Technology.
RightSound
™
Technology cancels echo and significantly reduces
background noise. The following steps will ensure the best
possible audio performance:
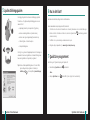
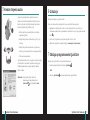
Position your camera in the middle of your monitor
for optimal eye contact.
Position your camera’s microphone no more than 1 m away
from you and point it toward you.
Position your speakers (if used) at least 30 cm away from
your microphone to reduce feedback, and then angle your
speakers away from your microphone.
Tip Do not place objects between you and the microphone.
•
•
•
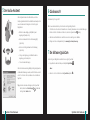
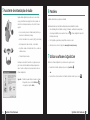
The Audio Tuning Wizard
The first time that you start QuickCam, you are guided through
the Microphone/Speaker Setup Utility and Audio Tuning Wizard
that lets you do the following:
Select the audio input device (microphone)
and audio output device (speakers).
Enable Acoustic Echo Cancellation (AEC)—recommended.
Enable background suppression—recommended.
Specify microphone input volume and speaker output volume.
Test audio settings.
In situations with loud and irregular background noise, your voice
can become distorted when using noise suppression. If this occurs,
disable noise suppression in the QuickCam
®
software.
Tip To change your audio settings in the QuickCam
®
software,
click the Settings button, and then click the Audio tab.
•
•
•
•
•

QuickCam
®
Pro for Notebooks
QuickCam
®
Pro for Notebooks
Your camera is now set up and ready to go!
There are many ways to enjoy using your new webcam, including
Making free video calls to friends and family. (Installation and use of an instant messaging application
is required. Click in the QuickCam
®
software to learn more.)
Taking still photos or recording videos to share or e-mail.
Adding videos to your E-bay auctions (see www.logitech.com/videosnap).
Using the QuickCam
®
Software
To start the Logitech
®
QuickCam
®
software, do either of the following:
On your desktop, double-click the QuickCam
®
icon.
- or-
In the lower-right corner of your desktop in the taskbar, click the QuickCam
®
icon.
•
•
•
•
•
Tip To personalize your video calls with customized Avatar images, Face Accessories, or Fun Filters,
click the Video Effects button.
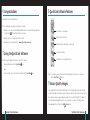
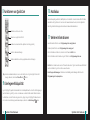
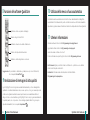
9 Ensure Quality Images
Logitech
®
RightLight
™
2 ensures that you automatically get the best image quality in harsh, dim, or back lit
conditions that usually cast a shadow on your face. When your camera determines that you are experiencing
these situations, a dialog box appears asking if you want to turn on Logitech
®
RightLight
™
2. Click Yes to let
your camera automatically adjust frame rates, color, and exposure to produce the best image quality.
To manually adjust these settings, click the Settings button.
Record videos or capture images.
Enable Logitech Video Effects.
Enable Audio & Video Mute (when on a video call).
Specify camera settings.
Install and use video programs and services.
8 QuickCam
®
Software Features Congratulations

8 QuickCam
®
Pro for Notebooks
9QuickCam
®
Pro for Notebooks
The autofocus system will ensure that images as close as 10 cm to the camera will be put in focus,
automatically. If you wish to control the lens focus manually, switch to manual mode in ‘‘autofocus’’
controls on the Settings tab of the QuickCam
®
software.
11 For More Information
Audio Information. Go to http://www.logitech.com/rightsound.
Software Updates. Go to http://www.logitech.com/support.
Additional Help. Launch the software and click the Help button.
To learn more about Logitech
®
products, go to http://www.logitech.com.
UL Testing. Your product is UL tested and should only be used with other UL listed devices.
Compliance. For compliance information, go to http://www.logitech.com/compliance.
10 Using Autofocus
Logitech
®
Hardware Product Limited Warranty
Logitech
®
warrants that your Logitech hardware product shall be free from defects in material and workmanship for two (2) years, beginning
from the date of purchase. Except where prohibited by applicable law, this warranty is nontransferable and is limited to the original purchaser.
This warranty gives you specific legal rights, and you may also have other rights that vary under local laws.
Remedies
Logitech’s entire liability and your exclusive remedy for any breach of warranty shall be, at Logitech’s option, (1) to repair or replace the hardware,
or (2) to refund the price paid, provided that the hardware is returned to the point of purchase, or such other place as Logitech may direct,
with a copy of the sales receipt or dated itemized receipt. Shipping and handling charges may apply except where prohibited by applicable
law. Logitech may, at its option, use new or refurbished or used parts in good working condition to repair or replace any hardware product.
Any replacement hardware product will be warranted for the remainder of the original warranty period, or thirty (30) days, whichever is longer
or for any additional period of time that may be applicable in your jurisdiction.
Limits of Warranty
This warranty does not cover problems or damage resulting from (1) accident, abuse, misapplication, or any unauthorized repair,
modification or disassembly; (2) improper operation or maintenance, usage not in accordance with product instructions or connection
to improper voltage supply; or (3) use of consumables, such as replacement batteries, not supplied by Logitech except where such restriction
is prohibited by applicable law.
How to Obtain Warranty Support
Before submitting a warranty claim, we recommend you visit the support section at www.logitech.com for technical assistance. Valid warranty
claims are generally processed through the point of purchase during the first thirty (30) days after purchase; however, this period of time may
vary depending on where you purchased your product. Please check with Logitech or the retailer where you purchased your product for details.
Warranty claims that cannot be processed through the point of purchase and any other product related questions should be addressed directly to
Logitech. The addresses and customer service contact information for Logitech can be found in the documentation accompanying your product
and on the web at www.logitech.com/contactus.
Limitation of Liability
LOGITECH SHALL NOT BE LIABLE FOR ANY SPECIAL, INDIRECT, INCIDENTAL, OR CONSEQUENTIAL DAMAGES WHATSOEVER, INCLUDING BUT NOT
LIMITED TO LOSS OF PROFITS, REVENUE OR DATA (WHETHER DIRECT OR INDIRECT) OR COMMERCIAL LOSS FOR BREACH OF ANY EXPRESS OR IMPLIED
WARRANTY ON YOUR PRODUCT EVEN IF LOGITECH HAS BEEN ADVISED OF THE POSSIBILITY OF SUCH DAMAGES. Some jurisdictions do not allow
the exclusion or limitation of special, indirect, incidental, or consequential damages, so the above limitation or exclusion may not apply to you.
Duration of Implied Warranties
EXCEPT TO THE EXTENT PROHIBITED BY APPLICABLE LAW, ANY IMPLIED WARRANTY OR CONDITION OF MERCHANTABILITY OR FITNESS FOR
A PARTICULAR PURPOSE ON THIS HARDWARE PRODUCT IS LIMITED IN DURATION TO THE DURATION OF THE APPLICABLE LIMITED WARRANTY
PERIOD FOR YOUR PRODUCT. Some jurisdictions do not allow limitations on how long an implied warranty lasts, so the above limitation may
not apply to you.
National Statutory Rights
Consumers have legal rights under applicable national legislation governing the sale of consumer goods. Such rights are not affected
by the warranties in this Limited Warranty.
No Other Warranties
No Logitech dealer, agent, or employee is authorized to make any modification, extension, or addition to this warranty.
Logitech
®
Address. Logitech, Inc., 6505 Kaiser Drive, Fremont, California 94555, U.S.A.

10 QuickCam
®
Pro for Notebooks
11QuickCam
®
Pro for Notebooks
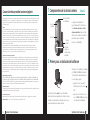
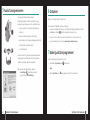
1 Teile der Kamera
Deutsch
Installieren Sie zuerst die Software
Vielen Dank, dass Sie sich für Logitech
®
QuickCam
®
Pro for Notebooks mit
Autofokus-Glasobjektiv entschieden
haben. In diesem Handbuch erfahren Sie,
wie Sie die Webkamera installieren
und optimal einsetzen.
Legen Sie die CD ein. Falls die Installation
nicht automatisch gestartet wird, gehen Sie
folgendermaßen vor:
Doppelklicken Sie auf Arbeitsplatz. Sie
können auch auf Start Arbeitsplatz
wählen.
Klicken Sie mit der rechten Maustaste
auf das Symbol für das CD- bzw.
DVD-Laufwerk und wählen Sie im
Kontextmenü den Befehl AutoPlay.
•
•
Installieren Sie die Software, bevor Sie die Kamera
anschließen. Viele der erweiterten Kamerafunktionen
(z. B. Autofokus) funktionieren nur, wenn die Software
installiert ist.
Anschließen der Kamera am Computer
Warten Sie, bis Sie von der Software dazu aufgefordert
werden, und schließen Sie die Kamera an einer USB-
Schnittstelle des Computers an.
Positionieren von Kamera, Mikrofon
und Lautsprechern
Die Kamera ist Logitech
®
RightSound
™
ausgestattet. RightSound
™
unterdrückt Echos und reduziert Hintergrundgeräusche drastisch.
Mit den folgenden Schritten können Sie die bestmögliche
Audioleistung gewährleisten:
Platzieren Sie die Kamera in Augenhöhe mittig auf dem
Monitor.
Stellen Sie die Kamera maximal einen Meter entfernt auf
und richten Sie sie auf Ihr Gesicht aus.
Stellen Sie die Lautsprecher (falls vorhanden) mindestens
30 cm vom Mikrofon entfernt so auf, dass sie nicht auf
das Mikrofon zeigen, um Rückkopplungen zu vermeiden.
Tipp Stellen Sie keine Gegenstände zwischen sich und
das Mikrofon.
•
•
•
Microfon
Autofokus-
Glasobjektiv
Betriebs-LED
Halterung für Notebookmonitore
Auslöser

1 QuickCam
®
Pro for Notebooks
1QuickCam
®
Pro for Notebooks
Der Audio-Assistent
Wenn Sie QuickCam zum ersten Mal starten, werden das
Dienstprogramm zum Einrichten von Mikrofon und Lautsprechern
sowie der Audio-Assistent aufgerufen. Sie haben folgende
Möglichkeiten:
Wählen des Audio-Eingabegeräts (Mikrofon) und -
Ausgabegeräts (Lautsprecher).
Aktivieren der akustischen Echo-Unterdrückung (AEC)
(empfohlen).
Aktivieren der Hintergrundrauschen-Unterdrückung
(empfohlen).
Festlegen des Eingabepegels des Mikrofons und des
Ausgabepegels der Lautsprecher.
Testen der Audio-Einstellungen.
Wenn Sie bei lauten und unregelmäßigen Hintergrundgeräuschen
die Rauschunterdrückung verwenden, wird Ihre Stimme eventuell
verzerrt. Sollte dies der Fall sein, deaktivieren Sie die Funktion in
QuickCam
®
.
Tipp Sie können die Audioeinstellungen später in QuickCam
®
ändern, indem Sie auf Einstellungen und dann auf
die Registerkarte Audio klicken.
•
•
•
•
•
Die Kamera ist jetzt eingerichtet!
Mit der neuen Kamera haben Sie jetzt unter anderem folgende Möglichkeiten:
Unterhalten Sie sich kostenlos mit Verwandten oder Freunden. (Dazu müssen Sie einen Instant Messenger
installieren. Weitere Informationen erhalten Sie, indem Sie in QuickCam
®
auf klicken.)
Aufnehmen von Standbildern oder Aufzeichnen von Videos zum Zeigen oder E-Mailen.
Einfügen von Videos in eBay-Auktionen (siehe www.logitech.com/videosnap).
Die Software QuickCam
®
Sie haben folgende Möglichkeiten zum Starten von Logitech
®
QuickCam
®
:
Doppelklicken Sie auf dem Desktop auf das Symbol QuickCam
®
.
- oder-
Klicken Sie rechts in der Taskleiste auf das QuickCam
™
-Symbol .
•
•
•
•
•
Glückwunsch!

1 QuickCam
®
Pro for Notebooks
1QuickCam
®
Pro for Notebooks
Tipp Sie können individuelle Avatars, Accessoires oder Fun Filters, die sich gleichzeitig mit Ihrem Gesicht
bewegen, aktivieren, indem Sie auf Video Effects klicken.
9 Überlegene Bildqualität
Logitech
®
RightLight
™
2 gewährleistet automatisch die beste Bildqualität auch bei schlechten Lichtbedingungen
(auch bei starkem Gegenlicht), bei denen es normalerweise zu starken Schatten kommt. Wenn die Kamera
bestimmt, dass ein solches Problem vorliegt, werden Sie gefragt, ob Logitech
®
RightLight
™
2 aktiviert werden
soll. Sie können diese Einstellungen auch manuell anpassen, indem Sie auf Einstellungen klicken.
Aufnehmen von Videos oder Fotos.
Aktivieren von Logitech Video Effects.
Deaktivieren von Audio und Video (während eines Videogesprächs).
Ändern der Kameraeinstellungen.
Installieren und Nutzen von Videoprogrammen und -dienstleistungen.
8 Funktionen von QuickCam
®
Das Autofokussystem gewährleistet, dass Objekte, die sich minimal 10 cm von der Kamera entfernt befinden,
automatisch scharf gestellt werden. Sie können den Fokus auch manuell steuern, indem Sie in QuickCam
®
auf der Registerkarte Einstellungen unter Autofokus den manuellen Modus aktivieren.
11 Weitere Informationen
Audio-Informationen finden Sie unter http://www.logitech.com/rightsound.
Software-Updates finden Sie unter http://www.logitech.com/support.
Weitere Informationen erhalten Sie, indem Sie in der Software auf Hilfe klicken.
Weitere Informationen über Produkte von Logitech
®
finden Sie auf http://www.logitech.com.
UL-Test. Unsere Produkte werden von den “Underwriters Laboratories” getestet und sollten ausschließlich mit
anderen ebenfalls dort getesteten Geräten verwendet werden.
Einhaltung von Bestimmungen: Informationen zur Einhaltung von Bestimmungen finden Sie unter
http://www.logitech.com/compliance.
10 Autofokus

1 QuickCam
®
Pro for Notebooks
1QuickCam
®
Pro for Notebooks
Beschränkte Garantie für Hardwareprodukte von Logitech
Logitech garantiert, dass Ihr Logitech Hardwareprodukt für 2 Jahre ab dem Kaufdatum keine Material- und Verarbeitungsfehler aufweisen wird. Außer dort, wo
dies vom anwendbaren Recht untersagt ist, ist diese Garantie nicht übertragbar und auf den Originalkäufer beschränkt. Diese Garantie gewährt Ihnen besondere
gesetzliche Rechte, Sie können jedoch auch andere Rechte besitzen, die je nach örtlichen Gesetzen unterschiedlich sind.
Rechtsmittel
Logitechs gesamte Haftung und Ihr einziges Rechtsmittel für jegliche Art der Garantieverletzung ist nach Logitechs Ermessen entweder (1) die Reparatur
oder der Austausch der Hardware oder (2) die Rückerstattung des bezahlten Preises, vorausgesetzt, dass die Hardware an den Kaufort oder solch anderen Ort
zurückgebracht wird, der von Logitech bestimmt wird, und zwar zusammen mit einer Kopie der Kaufquittung oder einer datierten aufgeschlüsselten Quittung.
Versandkosten können anfallen, außer dort, wo dies vom anwendbaren Recht untersagt wird. Logitech kann nach seinem Ermessen neue oder instand gesetzte
oder gebrauchte Teile, die sich in gutem Betriebszustand befinden, zur Reparatur oder zum Austausch eines beliebigen Hardwareprodukts verwenden. Jedes
Ersatzhardwareprodukt wird für den Rest der ursprünglichen Garantielaufzeit bzw. für dreißig (30) Tage mit einer Garantie versehen, je nachdem, welcher
Zeitraum länger ist, oder für solch eine zusätzliche Zeitspanne, die in Ihrer Gerichtsbarkeit Anwendung findet.
Limits of Warranty
Diese Garantie deckt keine Probleme oder Schäden ab, die durch Folgendes entstanden sind: (1) unvorhergesehenes Ereignis, Missbrauch, falsche Anwendung
oder jedwede nicht genehmigte Reparatur, Modifikation oder Demontage, (2) unsachgemäße Bedienung oder unvorschriftsmäßige Wartung, eine von den
Produktanweisungen abweichende Nutzung oder Anschluss an eine ungeeignete Spannungsversorgung oder (3) Gebrauch von Verbrauchsmaterialien wie
Ersatzbatterien, die nicht von Logitech geliefert wurden, außer dort, wo eine solche Beschränkung vom anwendbaren Recht untersagt ist.
Erhalt des durch die Garantie gewährten Supports
Wir empfehlen Ihnen, vor der Stellung eines Garantieanspruchs auf www.logitech.com den Abschnitt „Support“ zu besuchen, um technische Unterstützung in
Anspruch zu nehmen. Gültige Garantieansprüche werden normalerweise innerhalb der ersten dreißig (30) Tage nach dem Kauf über den Kaufort abgewickelt;
abhängig von dem Ort, an dem Sie das Produkt gekauft haben, kann diese Zeitspanne jedoch unterschiedlich sein – bitte erkundigen Sie sich diesbezüglich bei
Logitech oder dem Händler, bei dem Sie das Produkt gekauft haben, nach Einzelheiten. Bei Garantieansprüchen, die nicht über den Kaufort abgewickelt werden
können, oder sonstigen produktbezogenen Fragen wenden Sie sich bitte direkt an Logitech. Die Adressen und Kontaktinformationen für den Kundendienst von
Logitech finden Sie in den Begleitunterlagen zum Produkt und im Internet unter www.logitech.com/contactus.
Haftungsbeschränkung
LOGITECH SHALL NOT BE LIABLE FOR ANY SPECIAL, INDIRECT, INCIDENTAL, OR CONSEQUENTIAL DAMAGES WHATSOEVER, INCLUDING BUT NOT LIMITED TO LOSS OF
PROFITS, REVENUE OR DATA (WHETHER DIRECT OR INDIRECT) OR COMMERCIAL LOSS FOR BREACH OF ANY EXPRESS OR IMPLIED WARRANTY ON YOUR PRODUCT
EVEN IF LOGITECH HAS BEEN ADVISED OF THE POSSIBILITY OF SUCH DAMAGES. Some jurisdictions do not allow the exclusion or limitation of special, indirect,
incidental, or consequential damages, so the above limitation or exclusion may not apply to you.
Duration of Implied Warranties
LOGITECH IST IN KEINEM FALL HAFTBAR FÜR JEGLICHEN SCHADENERSATZ FÜR BESONDERE SCHADENSFOLGEN, FÜR INDIREKTEN SCHADEN, FÜR NEBEN- UND
FOLGESCHÄDEN, EINSCHLIESSLICH, JEDOCH NICHT BESCHRÄNKT AUF, DEN VERLUST VON GEWINNEN, EINNAHMEN ODER DATEN (OB DIREKT ODER INDIREKT)
ODER KOMMERZIELLEN VERLUST AUF GRUND EINER VERLETZUNG EINER BELIEBIGEN AUSDRÜCKLICHEN ODER STILLSCHWEIGENDEN GARANTIE FÜR IHR PRODUKT,
UND ZWAR SELBST DANN, WENN LOGITECH AUF DIE MÖGLICHKEIT SOLCHER SCHÄDEN AUFMERKSAM GEMACHT WURDE. Einige Gerichtsbarkeiten erlauben nicht
den Ausschluss oder die Beschränkung von Schadenersatz für besondere Schadensfolgen, für indirekten Schaden, für Neben- und Folgeschäden, sodass die
vorstehende Beschränkung bzw. der vorstehende Ausschluss eventuell nicht auf Sie zutreffen.
Nationale gesetzliche Rechte
Verbraucher besitzen Rechte nach anwendbarer nationaler Gesetzgebung, die sich auf den Verkauf von Konsumgütern beziehen. Diese Rechte sind von den in
dieser beschränkten Garantie enthaltenen Zusicherungen nicht betroffen.
Keine anderen Garantien
Kein Händler, Vertreter oder Mitarbeiter von Logitech ist befugt, an dieser Garantie etwaige Modifikationen, Erweiterungen oder Zusätze vorzunehmen.
Adresse von Logitech. Logitech, Inc., 6505 Kaiser Drive, Fremont, California 94555, U.S.A.
© 2007 Logitech. Alle Rechte vorbehalten. Logitech, das Logitech Logo und andere Kennzeichen von Logitech befinden sich im Besitz von Logitech und können
eingetragen sein. Alle anderen Markenzeichen sind das Eigentum ihrer entsprechenden Besitzer. Logitech übernimmt keine Verantwortung für jedwede Fehler, die
in einem beliebigen Handbuch oder auf dieser Website enthalten sind. Änderungen an den hierin enthaltenen Informationen sind vorbehalten.
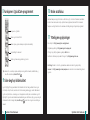
1 Caractéristiques de la caméra
Français
Installation préalable du logiciel
Vous venez d’acheter la caméra
Web Logitech
®
QuickCam
®
Pro for
Notebooks, dotée d’un système de
lentille de verre avec mise au point
automatique, et nous vous en félicitons.
Ce guide vous aidera à installer votre
caméra Web et à l’exploiter de façon
optimale.
Insérez le CD d’installation dans le lecteur
de CD-ROM ou de DVD-ROM. Le CD devrait
démarrer automatiquement. Dans le cas
contraire, procédez comme suit:
Cliquez deux fois sur l’icône Poste de
travail. Vous pouvez également cliquer
sur Démarrer Poste de travail.
Cliquez avec le bouton droit
de la souris sur l’icône du lecteur
de CD-ROM ou de DVD-ROM,
puis choisissez Exécution automatique.
•
•
Installez le logiciel avant de brancher la caméra.
L’installation complète du logiciel est requise pour obtenir un
bon fonctionnement de toutes les fonctions avancées de la
caméra, notamment la mise au point automatique.
Microphone
Système de lentille
de verre avec
mise au point
automatique
Témoin
d’activité
Attache pour
ordinateur
portable
Bouton pour prises
de vue instantanées

18 QuickCam
®
Pro for Notebooks
19QuickCam
®
Pro for Notebooks
Branchement de la caméra à l’ordinateur
Attendez que l’invite de commande apparaisse avant
de brancher la caméra sur un port USB disponible de
l’ordinateur.
Positionnement de la caméra, du microphone
et des haut-parleurs
La caméra est équipée de la technologie Logitech
®
RightSound
™
,
qui élimine les effets d’écho et atténue considérablement les
bruits de fond. Pour bénéficier d’une qualité audio optimale,
procédez comme suit:
Centrez la caméra sur le moniteur pour un contact visuel
optimal.
Placez le microphone de la caméra à moins d’un mètre
de vous et pointez-le dans votre direction.
Si vous souhaitez utiliser les haut-parleurs, placez-les
à au moins 30 cm du microphone afin de minimiser
les interférences et orientez-les de façon à ce qu’ils ne soient
pas dirigés vers le microphone.
Conseil Ne placez aucun objet entre vous et le microphone.
•
•
•
Assistant de réglage audio
Au premier démarrage de QuickCam, vous êtes guidé par l’utilitaire
de configuration du microphone/des haut-parleurs et l’assistant
de réglage audio pour effectuer les actions suivantes:
sélectionner le dispositif d’entrée audio (microphone) et le
dispositif de sortie audio (haut-parleurs);
activer la fonction d’annulation de l’écho acoustique (AEA)
(recommandé);
activer la suppression des bruits de fond (recommandé);
régler le volume d’entrée du microphone et le volume de sortie
des haut-parleurs;
tester les paramètres audio.
Lorsque les bruits de fond sont particulièrement forts et irréguliers
et que la suppression du bruit est activée, votre voix risque d’être
déformée. Le cas échéant, désactivez la suppression du bruit dans
le logiciel QuickCam
®
.
Conseil Vous pouvez modier les paramètres audio en cliquant sur
le bouton Paramètres puis sur l’onglet Audio dans
le logiciel QuickCam
®
.
•
•
•
•
•

0 QuickCam
®
Pro for Notebooks
1QuickCam
®
Pro for Notebooks
Votre caméra Web est maintenant configurée et prête à fonctionner!
Votre nouvelle caméra Web va vous permettre de réaliser une multitude d’opérations, notamment:
effectuer des appels vidéo gratuits vers vos amis et votre famille (l’installation et l’utilisation d’une
application de messagerie instantanée sont requises; cliquez sur dans le logiciel QuickCam
®
pour
en savoir plus);
prendre des photos ou enregistrer des vidéos à partager ou à envoyer par courrier électronique;
ajouter des vidéos à vos annonces eBay (voir www.logitech.com/videosnap).
Utilisation du logiciel QuickCam
®
Pour démarrer le logiciel QuickCam
®
, procédez de l’une des manières suivantes:
Sur le Bureau, cliquez deux fois sur l’icône QuickCam
®
.
- ou-
Dans l’angle inférieur droit du Bureau, dans la barre des tâches, cliquez sur l’icône QuickCam
®
.
•
•
•
•
•
Félicitations
Conseil Pour personnaliser vos appels vidéo avec des avatars, des accessoires ou des ltres amusants,
cliquez sur le bouton Video Effects .
9 Garantie d’images de qualité
La technologie Logitech
®
RightLight
™
2 vous garantit d’obtenir automatiquement la meilleure qualité d’image
en contre-jour, en éclairage faible ou en rétroéclairage, lesquels projettent souvent une ombre sur votre
visage. Lorsque la caméra détecte l’une de ces conditions, une boîte de dialogue s’affiche, vous demandant
si vous souhaitez activer la technologie Logitech
®
RightLight
™
2. Cliquez sur Oui pour permettre à la caméra de
régler automatiquement le débit d’image, la couleur et l’exposition afin d’obtenir la meilleure qualité d’image
possible. Pour effectuer vous-même ces réglages, cliquez sur le bouton Paramètres .
Enregistrement de vidéos ou capture d’images
Activation de Logitech Video Effects
Coupure du son et de la vidéo (lors d’un appel vidéo)
Configuration des paramètres de la caméra
Installation et utilisation de programmes et services vidéo
8 Caractéristiques du logiciel QuickCam
®

QuickCam
®
Pro for Notebooks
QuickCam
®
Pro for Notebooks
La distance minimale de la mise au point automatique est de 10 cm. Pour contrôler la mise au point
manuellement, passez en mode manuel en utilisant les commandes de mise au point automatique de l’onglet
Paramètres dans le logiciel QuickCam
®
.
11 Pour plus d’informations
Informations audio. Rendez-vous sur le site http://www.logitech.com/rightsound.
Mises à jour logicielles. Rendez-vous sur le site http://www.logitech.com/support.
Aide supplémentaire. Lancez le logiciel et cliquez sur le bouton Aide.
Pour plus d’informations sur les produits Logitech
®
, rendez-vous sur le site http://www.logitech.com.
Certification UL. Votre produit est certifié UL et doit être utilisé uniquement avec des appareils certifiés UL.
Conformité. Pour les informations relatives à la conformité, rendez-vous sur le site http://www.logitech.
com/compliance.
10 Utilisation de la mise au point automatique
Garantie limitée du matériel Logitech
®
Logitech garantit que votre produit Logitech exempt de tout défaut de matériel et de construction pour 2 ans, à partir de sa date d’achat. Hormis
lorsque les lois en vigueur l’interdisent, cette garantie n’est pas transférable et elle est limitée à l’acheteur initial. Cette garantie vous octroie un
certain nombre de droits et vous bénéficiez également d’autres droits qui varient selon les lois locales en vigueur.
Recours
En cas de rupture de garantie, la seule obligation de Logitech et votre seul recours consistent, à la discrétion de Logitech, (1) à réparer ou
remplacer le matériel, ou (2) à rembourser le montant payé, sous réserve qu’il soit renvoyé au point de vente ou à tout autre lieu indiqué par
Logitech, accompagné d’un justificatif d’achat ou d’un reçu détaillé et daté. Des frais de port et de traitement peuvent être demandés, sauf si
cela est contraire aux lois applicables. Logitech se réserve le droit d’utiliser des pièces neuves, remises à neuf ou déjà utilisées mais en état de
marche pour réparer ou remplacer le produit. Tout matériel de remplacement sera garanti pour le reste de la période de garantie initiale ou pour
trente (30) jours, selon la période la plus longue, ou pour toute durée supplémentaire éventuellement requise par la loi dans votre juridiction.
Cette garantie ne couvre pas les problèmes ou les préjudices résultant (1) d’un accident, d’un abus, d’une mauvaise utilisation, d’une modification
ou d’un désassemblage ; (2) d’une utilisation ou d’un entretien incorrect, d’une utilisation non conforme aux instructions fournies avec le produit
ou d’un branchement à une alimentation dont la tension est inadaptée ; ou (3) de l’utilisation de consommables (piles de remplacement, par
exemple) non fournis par Logitech, hormis là où une telle restriction est interdite par les lois en vigueur.
Comment bénéficier de la garantie
Avant de soumettre une réclamation relative à la garantie, nous vous recommandons de consulter la rubrique de support technique de notre site
Web, disponible à l’adresse www.logitech.com, afin d’obtenir de l’aide. Les réclamations fondées, et qui sont liées à la garantie, sont en général
traitées par l’intermédiaire du point de vente dans les trente (30) jours suivant l’achat. Cette durée peut toutefois varier en fonction du lieu
d’achat. Veuillez vous renseigner auprès de Logitech ou de la boutique qui vous a vendu le produit pour plus de détails. Les réclamations qui ne
peuvent être traitées par l’intermédiaire du point de vente, et les autres questions liées au produit, doivent être adressées directement à Logitech.
Les adresses et les coordonnées du service client de Logitech sont mentionnées dans la documentation qui accompagne votre produit, et sur
Internet à l’adresse www.logitech.com/contactus.
Limite de responsabilité
LOGITECH NE PEUT ÊTRE TENU RESPONSABLE DE TOUT PRÉJUDICE SPÉCIAL, INDIRECT, CONSÉCUTIF OU ACCIDENTEL, Y COMPRIS, MAIS SANS
RESTRICTION, DE TOUT MANQUE À GAGNER, DE TOUTE PERTE DE RECETTES OU DE DONNÉES (DIRECTE OU INDIRECTE) OU DE TOUT PRÉJUDICE
COMMERCIAL POUR RUPTURE DE TOUTE GARANTIE EXPLICITE OU IMPLICITE CONCERNANT VOTRE PRODUIT, MÊME SI LOGITECH A ÉTÉ INFORMÉ DE
L’ÉVENTUALITÉ DE CES PRÉJUDICES. Certaines juridictions n’autorisant pas l’exclusion ou la limitation des préjudices spéciaux, indirects, consécutifs
ou accidentels, les limitations ou les exclusions susmentionnées peuvent ne pas s’appliquer à votre cas.
Durée des garanties implicites
HORMIS LORSQUE CELA EST INTERDIT PAR LES LOIS EN VIGUEUR, TOUTE GARANTIE IMPLICITE OU CONDITION DE QUALITÉ MARCHANDE OU
D’ADAPTATION À UN USAGE PARTICULIER EST LIMITÉE EN TEMPS, POUR UNE DURÉE CORRESPONDANT À LA DURÉE DE LA PÉRIODE DE GARANTIE
LIMITÉE APPLICABLE À VOTRE PRODUIT. Certaines juridictions ne reconnaissant pas les limitations de durée des garanties implicites, les limitations
susmentionnées peuvent ne pas s’appliquer à votre cas.
Droits nationaux prévus par la loi
Les consommateurs bénéficient de droits reconnus par la loi en vertu de la législation nationale applicable régissant la vente de biens de
consommation. Ces droits ne sont pas affectés par les garanties mentionnées dans cette garantie limitée.
Aucune autre garantie
Aucun distributeur, représentant ou employé de Logitech n’est autorisé à modifier ou étendre la présente garantie, ni à y ajouter des éléments.
Adresse de Logitech
®
. Logitech, Inc., 6505 Kaiser Drive, Fremont, California 94555, U.S.A.

QuickCam
®
Pro for Notebooks
QuickCam
®
Pro for Notebooks
1 Caratteristiche della webcam
Italiano
Installare prima il software
Grazie per avere acquistato la nuova
webcam Logitech
®
QuickCam
®
Pro for
Notebook dotata di sistema di messa
a fuoco automatica dell’obiettivo
in vetro. Questa guida fornisce assistenza
per l’installazione e l’utilizzo ottimale
della webcam.
Inserire il CD di installazione nell’unità
CD-ROM/DVD-ROM. Il CD dovrebbe avviarsi
automaticamente. Se ciò non avviene,
procedere nel seguente modo:
Fare doppio clic sull’icona Risorse del
computer. In alternativa, fare clic
su Start Risorse del computer.
Fare clic con il pulsante destro del
mouse sull’icona dell’unità CD-ROM/
DVD-ROM, quindi su AutoPlay.
•
•
Installare il software prima di collegare la webcam. Molte
funzioni avanzate della webcam, fra cui la messa a fuoco
automatica, funzioneranno correttamente solo dopo avere
installato il software.
Collegare la webcam al computer
Prima di collegare la webcam a una porta USB
disponibile nel computer, attendere che venga
visualizzato l’apposito messaggio durante l’installazione
del software.
Posizionare la webcam, il microfono
e gli altoparlanti
Per la webcam viene utilizzata la tecnologia Logitech
®
RightSound
™
. La tecnologia RightSound
™
consente di eliminare
l’eco e ridurre considerevolmente i rumori di fondo. La seguente
procedura consente di ottenere prestazioni audio ottimali:
Per un puntamento ottimale collocare la webcam sul
monitor in posizione centrale.
Posizionare il microfono della webcam a una distanza non
superiore a 1 m dal viso, orientandolo verso di sé.
Posizionare gli altoparlanti (se utilizzati) ad almeno 30 cm
dal microfono per ridurre il segnale di ritorno e orientarli in
direzione opposta al microfono.
Suggerimento Non collocare alcun oggetto fra se stessi
e il microfono.
•
•
•
Microfono
Sistema di messa a
fuoco automatica
dell’obiettivo in
vetro
Spia di
funzionamento
Clip per notebook
Pulsante di scatto

QuickCam
®
Pro for Notebooks
QuickCam
®
Pro for Notebooks
Regolazione guidata dell’audio
Quando si utilizza QuickCam per la prima volta, vengono avviate
l’Utilità di installazione del microfono e degli altoparlanti e la
procedura Regolazione guidata audio per eseguire le seguenti
operazioni:
Selezionare il dispositivo di ingresso audio (microfono) e il
dispositivo di uscita audio (altoparlante).
Attivare la funzionalità AEC di eliminazione dell’eco acustico
(consigliato).
Attivare la soppressione dei rumori di fondo (consigliato).
Impostare il volume in entrata del microfono e in uscita
dell’altoparlante.
Provare le impostazioni audio.
In presenza di rumori di fondo irregolari e di volume elevato, se
si utilizza la funzione di eliminazione del rumore, la propria voce
può subire distorsioni. Se ciò avviene, disattivare la funzione di
eliminazione del rumore tramite il software QuickCam
®
.
Suggerimento Per modicare le impostazioni dell’audio in seguito
tramite il software QuickCam
®
, fare clic sul pulsante
Impostazioni e selezionare la scheda delle
impostazioni Audio.
•
•
•
•
•
La webcam è stata impostata.
Con la tua nuova webcam puoi eseguire moltissime attività divertenti, fra cui:
Chiamate video in diretta gratuite a parenti e amici. È necessario installare e avviare un’applicazione di
messaggistica istantanea. Per ulteriori informazioni fare clic su all’interno del software QuickCam
®
.
Acquisizione di fotografie e registrazione di video da condividere o inviare tramite posta elettronica.
Aggiunta di video alle aste su eBay (visita www.logitech.com/videosnap).
Utilizzo del software QuickCam
®
Per avviare Logitech
®
QuickCam
®
, eseguire una delle seguenti operazioni:
Fare doppio clic sull’icona QuickCam
®
.
- oppure-
Fare clic sull’icona QuickCam
®
sulla barra delle applicazioni nell’angolo inferiore destro del desktop.
•
•
•
•
•
Complimenti

8 QuickCam
®
Pro for Notebooks
9QuickCam
®
Pro for Notebooks
Suggerimento Per personalizzare le chiamate video con avatar, accessori per il viso o ltri divertenti,
fare clic sul pulsante Video Effects .
9 Realizzazione di immagini di alta qualità
Logitech
®
RightLight
™
2 consente la regolazione automatica della luminosità per ottenere immagini di alta
qualità anche in condizioni di illuminazione scarsa, eccessiva o posteriore, che in genere causano la presenza
di ombre sul viso. Quando la webcam rileva una di queste situazioni, viene visualizzata una finestra di
dialogo che chiede se si desidera attivare Logitech
®
RightLight
™
2. Fare clic su Sì per regolare automaticamente
frequenza di quadro, colore ed esposizione e ottenere immagini di qualità ottimale. Per regolare queste
impostazioni manualmente, fare clic sul pulsante Impostazioni .
Registrazione di video o acquisizione di immagini.
Attivazione di Logitech Video Effects.
Disattivazione di audio e video durante chiamate video.
Definizione delle impostazioni della webcam.
Installazione e utilizzo di applicazioni e servizi video.
8 Funzioni del software QuickCam
®
Il sistema di messa a fuoco automatica consente di mettere a fuoco automaticamente le immagini fino
a una distanza di 10 cm dalla webcam. È possibile controllare la messa a fuoco dell’obiettivo manualmente
impostando la regolazione manuale di tale funzione tramite la scheda Impostazioni del software QuickCam
®
.
11 Ulteriori informazioni
Informazioni sull’audio. Visitare il sito Web http://www.logitech.com/rightsound.
Aggiornamenti software. Visitare il sito http://www.logitech.com/support.
Guida in linea. Avviare il software e fare clic su ?.
Per ulteriori informazioni sui prodotti Logitech
®
visitare il sito Web http://www.logitech.com.
Certificazione UL. Questo prodotto ha ottenuto la certificazione UL e pertanto deve essere utilizzato
soltanto con altri dispositivi con marchio UL.
Conformità. Per informazioni sulla conformità, visitare il sito Web all’indirizzo
http://www.logitech.com/compliance.
10 Utilizzo della messa a fuoco automatica

0 QuickCam
®
Pro for Notebooks
1QuickCam
®
Pro for Notebooks
Garanzia limitata prodotto hardware Logitech
®
Logitech garantisce che il prodotto Logitech acquistato sarà privo di difetti dei materiali e di produzione per il periodo di 2 anni a decorrere dalla
data dell’acquisto. Fatta eccezione per quanto proibito dalla legge in vigore, la presente garanzia non è trasferibile ed è limitata all’acquirente
originale. La presente garanzia attribuisce all’acquirente diritti legali specifici, e l’acquirente può a sua volta vantare altri diritti che variano a
seconda delle leggi locali.
Rimedi
L’intera responsabilità di Logitech ed il rimedio esclusivo dell’acquirente per qualsiasi violazione di garanzia sarà, a discrezione di Logitech:
(1) riparazione o sostituzione dell’hardware, oppure (2) rimborso del prezzo pagato, a condizione che l’hardware sia stato restituito al punto
di acquisto o al luogo eventualmente indicato da Logitech, accompagnato dalla copia della ricevuta d’acquisto o dalla ricevuta dettagliata e
datata. Possono essere applicate spese di spedizione e di movimentazione, fatta eccezione per i casi in cui ciò è proibito dalla legge in vigore.
Per riparare o sostituire un prodotto hardware, Logitech ha la facoltà, a propria discrezione, di utilizzare parti nuove, rinnovate o usate in buone
condizioni di funzionamento. Qualsiasi prodotto hardware di sostituzione sarà garantito per tutto il tempo rimanente del periodo di garanzia
originale, o per trenta (30) giorni, quale dei due periodi sia il più lungo, oppure per qualsiasi periodo di tempo aggiuntivo che sia conforme alle
disposizioni di legge in vigore localmente.
La presente garanzia non copre problemi o danni risultanti da: (1) incidente, abuso, applicazione impropria, riparazione, modifica o
disassemblaggio non autorizzati; (2) operazione impropria di manutenzione, utilizzo non conforme alle istruzioni relative al prodotto o
collegamento ad una tensione di alimentazione impropria; oppure (3) utilizzo di accessori non forniti da Logitech, quali ad es. batterie di
ricambio, fatta eccezione per i casi in cui tali restrizioni siano proibite dalla legge in vigore.
Come ottenere assistenza per la garanzia
Prima di presentare una richiesta di intervento in garanzia, si raccomanda di visitare per ulteriori informazioni la sezione relativa all’assistenza
tecnica all’indirizzo www.logitech.com. Le richieste di intervento in garanzia valide vengono di norma gestite attraverso il punto di acquisto
del prodotto nel caso vengano presentate nei primi trenta (30) giorni dopo l’acquisto stesso; questo periodo di tempo può tuttavia variare a
seconda del luogo in cui è stato effettuato l’acquisto. Si prega di accertare questo particolare con Logitech o con il dettagliante presso il quale
si è acquistato il prodotto. Le richieste di intervento in garanzia che non possono essere gestite attraverso il punto di acquisto, nonché qualsiasi
altra domanda relativa al prodotto, dovranno essere rivolte direttamente a Logitech. Gli indirizzi e le informazioni di contatto per il servizio di
assistenza clienti Logitech sono rinvenibili nella documentazione che accompagna il prodotto acquistato, nonché sul Web all’indirizzo www.
logitech.com/contactus.
Durata delle garanzie implicite
FATTA ECCEZIONE PER QUANTO PROIBITO DALLA LEGGE IN VIGORE, QUALSIASI GARANZIA IMPLICITA O CONDIZIONE DI COMMERCIABILITÀ O DI
IDONEITÀ AD UN USO PARTICOLARE RELATIVA A QUESTO PRODOTTO HARDWARE È LIMITATA ALLA DURATA DEL PERIODO DI GARANZIA LIMITATA
SPECIFICO PER IL PRODOTTO ACQUISTATO. Alcune giurisdizioni non ammettono limitazioni di durata della garanzia implicita: per tale motivo la
limitazione sopra riportata potrebbe non essere valida nella giurisdizione dell’acquirente.
Diritti legali nazionali
I consumatori godono dei diritti legali sanciti dalle leggi nazionali in vigore relative alla vendita di prodotti destinati ai consumatori. Tali diritti non
sono influenzati dalle garanzie contenute nella presente garanzia.
Assenza di altre garanzie
Nessun venditore, agente o dipendente Logitech è autorizzato ad apportare modifiche, estensioni o aggiunte alla presente garanzia.
Indirizzo Logitech
®
. Logitech, Inc., 6505 Kaiser Drive, Fremont, California 94555, U.S.A.
1 Componentes de la cámara amera
Español
Primer paso: instalación del software
Le agradecemos la adquisición de
Logitech
®
QuickCam
®
Pro for Notebooks
con sistema de objetivo de cristal y
enfoque automático. Aquí encontrará
instrucciones de instalación e información
para obtener el mejor rendimiento
posible de esta cámara Web.
Introduzca el CD de instalación en la unidad
de CD-ROM o DVD-ROM del ordenador. El
CD debería iniciarse automáticamente. De
no ser así, haga lo siguiente:
Haga doble clic en el icono Mi PC.
También puede hacer clic en Inicio
Mi PC.
Haga clic con el botón derecho en el
icono CD-ROM/DVD-ROM y luego haga
clic en Reproducción automática.
•
•
Debe instalar el software antes de conectar la cámara.
Muchas de las funciones avanzadas, entre ellas la de enfoque
automático, no funcionarán correctamente a menos que se
realice una instalación de software completa.
Micrófono
Sistema de
objetivo de
cristal y enfoque
automático
Diodo de
actividad
Clip para
portátiles
Botón de captura
de instantáneas

QuickCam
®
Pro for Notebooks
QuickCam
®
Pro for Notebooks
Conexión de la cámara al ordenador
Espere hasta que aparezca la indicación en pantalla
para conectar la cámara a un puerto USB del
ordenador.
Colocación de la cámara, el micrófono
y los altavoces
La cámara está equipada con la tecnología Logitech
®
RightSound
™
.
La tecnología RightSound
™
elimina el eco y reduce el ruido
ambiental. Para asegurar el mejor sonido posible, siga este
procedimiento:
Coloque la cámara sobre la parte central del monitor para
obtener un contacto visual más directo.
El micrófono de la cámara debe estar orientado hacia el
hablante, a una distancia no superior a un metro.
Si utiliza altavoces, colóquelos al menos a 30 cm del
micrófono y en ángulo, para reducir la retroalimentación.
Consejo No debería haber objetos entre el hablante y el
micrófono.
•
•
•
Asistente para el ajuste de audio
La primera vez que utilice la cámara QuickCam, la Utilidad
de configuración de micrófono/altavoces y el Asistente para el ajuste
de audio le guiarán para realizar el siguiente procedimiento:
Seleccione el dispositivo de entrada de audio (micrófono)
y el dispositivo de salida de audio (altavoces).
Active la cancelación de eco (CEA) (acción recomendada).
Active la supresión de ruido ambiental (acción recomendada).
Ajuste el volumen de salida de los altavoces y el volumen de
entrada del micrófono.
Compruebe la configuración de audio.
En entornos ruidosos, es posible que la voz del hablante quede
distorsionada al usar la función de supresión de ruido. De ser así,
desactive la función en el software QuickCam
®
.
Consejo Si desea modicar la conguración en el software
QuickCam
®
, haga clic en el botón Configuración
y luego en la cha Audio.
•
•
•
•
•

QuickCam
®
Pro for Notebooks
QuickCam
®
Pro for Notebooks
¡La cámara está configurada y lista para usar!
Éstas son algunas de las muchas posibilidades de uso de su nueva cámara Web
Videoconferencias en directo para charlar con la familia y los amigos. (Es preciso instalar y usar una
aplicación de mensajería instantánea. Para más información, haga clic en en el software QuickCam
®
.)
Fotografías y vídeos compartidos o enviados por correo electrónico.
Vídeo añadido a los artículos para subastar en eBay (visite www.logitech.com/videosnap).
Uso del software QuickCam
®
Utilice uno de estos métodos para iniciar el programa Logitech
®
QuickCam
®
:
Haga doble clic en el icono de QuickCam
®
situado en el escritorio.
- o bien-
Haga clic en el icono de QuickCam
®
situado en la barra de tareas (en la esquina inferior derecha
del escritorio).
•
•
•
•
•
Consejo Para personalizar sus llamadas de vídeo con avatares, accesorios faciales o Fun Filters, haga clic en
el botón Video Effects .
9 Calidad de imagen
Logitech
®
RightLight
™
2 garantiza la mejor calidad de imagen posible en condiciones de luz posterior, escasa o
de contraste intenso que crea sombras en la cara del usuario. Si la cámara detecta ese tipo de condiciones,
se abrirá un cuadro de diálogo para permitir activar Logitech
®
RightLight
™
2. Haga clic en Sí para dejar que
la cámara ajuste automáticamente los valores de frecuencia de cuadro, color y exposición con los que
obtener una calidad de imagen óptima. Para ajustar esos parámetros manualmente, haga clic en el botón
Configuración .
Grabación de vídeo y captura de fotografías.
Activación de Logitech Video Effects.
Desactivación de audio o vídeo (durante una videoconferencia).
Configuración de parámetros de cámara.
Instalación y uso de servicios y programas de vídeo.
8 Funciones del software QuickCam
®
¡Enhorabuena!

QuickCam
®
Pro for Notebooks
QuickCam
®
Pro for Notebooks
El sistema de enfoque automático asegura el correcto enfoque de imágenes muy próximas a la cámara
(hasta 10 cm). Si desea controlar manualmente el enfoque de objetivo, active el modo manual en las opciones
de enfoque automático de la ficha Configuración del software QuickCam
®
.
11 Más información
Información de audio. Visite http://www.logitech.com/rightsound.
Actualizaciones de software. Visite http://www.logitech.com/support.
Ayuda adicional. Inicie el software y haga clic en el botón Ayuda.
Para averiguar más sobre los productos de Logitech
®
, visite http://www.logitech.com.
Pruebas UL. Este producto ha pasado las pruebas UL y sólo debería utilizarse con otros dispositivos
con certificación UL.
Conformidad. Para obtener más información sobre el cumplimiento de las normativas,
visite http://www.logitech.com/compliance.
10 Uso de enfoque automático
Garantía Limitada de Productos de Hardware Logitech
Logitech garantiza que sus productos de hardware Logitech no presentarán defectos materiales ni de fabricación durante 2 años, a partir de
la fecha de compra. Salvo disposición legal contraria, esta garantía no es transferible y se limita al comprador original. Esta garantía le otorga
derechos legales específicos y es posible que usted también tenga otros derechos que varían según las leyes locales.
Recursos
La responsabilidad total de Logitech y su recurso exclusivo en caso de violación de la garantía consistirá en, según el criterio de Logitech, (1)
reparar o reemplazar el hardware, o (2) reembolsar el precio abonado, siempre que se devuelva el hardware al punto de venta u otro lugar similar
indicado por Logitech, con una copia del recibo de venta o del recibo detallado y fechado Es posible que se apliquen gastos de envío y entrega,
salvo disposición legal contraria. Es posible que Logitech utilice, según su criterio, piezas nuevas, restauradas o usadas en buenas condiciones
para reparar o reemplazar cualquier producto de hardware. Todo producto de hardware de reemplazo estará cubierto por la garantía durante el
período restante correspondiente al período de la garantía original o durante treinta (30) días, el período que sea más largo, o durante cualquier
período adicional establecido en su jurisdicción.
Esta garantía no cubre los problemas o daños ocasionados por (1) accidente, abuso, mal uso o toda reparación, modificación o desmontaje
no autorizados; (2) uso o mantenimiento inadecuados, uso no compatible con las instrucciones del producto o conexión a una fuente de
alimentación eléctrica inadecuada o (3) utilización de insumos, como baterías de reemplazo, no proporcionados por Logitech, salvo disposición
legal contraria a esta restricción.
Cómo obtener respaldo de la garantía
Antes de gestionar un reclamo de garantía, le recomendamos que visite la sección de asistencia en www.logitech.com para recibir soporte
técnico. Los reclamos de garantía válidos generalmente son procesados a través del punto de venta durante los primeros treinta (30) días
posteriores a la compra. Sin embargo, dicho período podrá variar de acuerdo con el lugar donde usted adquirió el producto: consulte con
Logitech o con el minorista donde usted adquirió el producto para obtener más detalles al respecto. Los reclamos de garantía que no puedan ser
procesados a través del punto de venta y toda inquietud relacionada con el producto adquirido deberán ser enviados a Logitech. Usted podrá
encontrar las direcciones y la información de contacto del servicio al cliente de Logitech en la documentación adjunta al producto y en la página
web www.logitech.com/contactus.
Limitaciones de responsabilidad
LOGITECH NO ASUMIRÁ NINGUNA RESPONSABILIDAD POR DAÑOS ESPECIALES, INDIRECTOS, FORTUITOS O CONSIGUIENTES, A SABER, ENTRE OTROS,
LA PÉRDIDA DE GANANCIAS, INGRESOS O INFORMACIÓN (YA SEA DIRECTA O INDIRECTA) O LA PÉRDIDA COMERCIAL POR VIOLACIÓN DE CUALQUIER
GARANTÍA EXPRESA O IMPLÍCITA DE SU PRODUCTO, AÚN CUANDO LOGITECH HAYA SIDO ASESORADO CON RESPECTO A LOS POSIBLES DAÑOS
Algunas jurisdicciones no permiten la exclusión o limitación de los daños especiales, indirectos, fortuitos o consiguientes, de modo que es posible
que la limitación o exclusión antes mencionada no lo afecte a usted.
Duración de las garantías implícitas
SALVO DISPOSICIÓN LEGAL CONTRARIA, LA DURACIÓN DE TODA GARANTÍA O CONDICIÓN IMPLÍCITA DE APTITUD E IDONEIDAD QUE TENGA UN
PROPÓSITO ESPECÍFICO PARA ESTE PRODUCTO DE HARDWARE ESTARÁ LIMITADA A LA DURACIÓN DEL PERÍODO CORRESPONDIENTE A LA GARANTÍA
LIMITADA DE SU PRODUCTO Algunas jurisdicciones no avalan limitaciones relativas a la duración de la garantía implícita, de modo que es posible
que la limitación antes mencionada no lo afecte a usted.
Derechos legales nacionales
Los consumidores poseen derechos legales establecidos por la legislación nacional vigente con respecto a la venta de bienes de consumo. Dichos
derechos no se ven afectados por las garantías establecidas en esta Garantía Limitada.
Ninguna otra garantía
Ningún distribuidor, representante o empleado de Logitech tiene autorización para realizar modificaciones, extensiones o adiciones a esta
garantía.
Dirección de Logitech Logitech, Inc., 6505 Kaiser Drive, Fremont, California 94555, U.S.A.

8 QuickCam
®
Pro for Notebooks
9QuickCam
®
Pro for Notebooks
1 Funções da câmara
Português
Comece por instalar o software
Obrigado por ter adquirido a QuickCam
®
Pro for Notebooks da Logitech
®
, com
um sistema de lentes de vidro de
focagem automática. Este guia ajuda-o
a instalar e obter o melhor desempenho
da sua câmara Web.
Introduza o CD de instalação na unidade
de CD-ROM/DVD-ROM. O CD deverá iniciar
automaticamente. Caso contrário, siga os
passos seguintes:
Faça duplo clique no ícone O meu
computador. Em alternativa, clique em
Iniciar O meu computador.
Clique no ícone da unidade de CD-
ROM/DVD-ROM com o botão direito
do rato e, em seguida, clique em
Reprodução automática.
•
•
Instale o software antes de ligar a câmara. Muitas das
funções alargadas da sua câmara, incluindo a focagem
automática, não funcionarão correctamente sem
a instalação completa do software.
Ligue a câmara ao computador
Aguarde até ser solicitado pelo software antes de ligar
a câmara a uma porta USB disponível no computador.
Posicionar a câmara, o microfone e as colunas
A sua câmara está equipada com a Tecnologia RightSound
™
da
Logitech
®
. A Tecnologia RightSound
™
cancela os ecos e reduz
significativamente os ruídos de fundo. Os passos seguintes
assegurarão o melhor desempenho de áudio possível:
Posicione a câmara no centro do monitor para o melhor
contacto com os olhos.
Posicione o microfone da câmara a uma distância máxima
de 1 m de si e aponte-o para a sua direcção.
Posicione as colunas (se utilizadas), pelo menos, a 30cm
do microfone, de modo a reduzir reacções e, em seguida,
vire as colunas para a direcção oposta do microfone.
Sugestão Não coloque objectos entre si e o microfone.
•
•
•
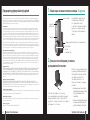
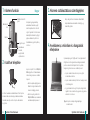
Microfone
Sistema de
lentes de vidro
de focagem
automática
Luz de
actividade
Clip para portáteis
Botão de instantâneo
A página está carregando...
A página está carregando...
A página está carregando...
A página está carregando...
A página está carregando...
A página está carregando...
A página está carregando...
A página está carregando...
A página está carregando...
A página está carregando...
A página está carregando...
A página está carregando...
A página está carregando...
A página está carregando...
A página está carregando...
A página está carregando...
A página está carregando...
A página está carregando...
A página está carregando...
A página está carregando...
A página está carregando...
A página está carregando...
A página está carregando...
A página está carregando...
A página está carregando...
A página está carregando...
A página está carregando...
A página está carregando...
A página está carregando...
A página está carregando...
A página está carregando...
A página está carregando...
A página está carregando...
A página está carregando...
A página está carregando...
A página está carregando...
A página está carregando...
A página está carregando...
A página está carregando...
-
 1
1
-
 2
2
-
 3
3
-
 4
4
-
 5
5
-
 6
6
-
 7
7
-
 8
8
-
 9
9
-
 10
10
-
 11
11
-
 12
12
-
 13
13
-
 14
14
-
 15
15
-
 16
16
-
 17
17
-
 18
18
-
 19
19
-
 20
20
-
 21
21
-
 22
22
-
 23
23
-
 24
24
-
 25
25
-
 26
26
-
 27
27
-
 28
28
-
 29
29
-
 30
30
-
 31
31
-
 32
32
-
 33
33
-
 34
34
-
 35
35
-
 36
36
-
 37
37
-
 38
38
-
 39
39
-
 40
40
-
 41
41
-
 42
42
-
 43
43
-
 44
44
-
 45
45
-
 46
46
-
 47
47
-
 48
48
-
 49
49
-
 50
50
-
 51
51
-
 52
52
-
 53
53
-
 54
54
-
 55
55
-
 56
56
-
 57
57
-
 58
58
-
 59
59


Logitech Premium Notebook Manual do usuário
- Tipo
- Manual do usuário
em outras línguas
- français: Logitech Premium Notebook Manuel utilisateur
- italiano: Logitech Premium Notebook Manuale utente
- Nederlands: Logitech Premium Notebook Handleiding
- slovenčina: Logitech Premium Notebook Používateľská príručka
- dansk: Logitech Premium Notebook Brugermanual
- polski: Logitech Premium Notebook Instrukcja obsługi
Artigos relacionados
-
Logitech QUICKCAM CONNECT Manual do proprietário
-
-
-
-
-
-
-
-
-