Bosch 00466148 Manual do usuário
- Categoria
- Cozinha
- Tipo
- Manual do usuário


en
3
Table of contents
[en]Inst ructi on manual
8 Intended use . . . . . . . . . . . . . . . . . . . . . . . . . . . . . 4
( Important safety information . . . . . . . . . . . . . . . 4
General information . . . . . . . . . . . . . . . . . . . . . . . . . . . 4
Microwave . . . . . . . . . . . . . . . . . . . . . . . . . . . . . . . . . . 5
] Causes of damage . . . . . . . . . . . . . . . . . . . . . . . . 7
7 Environmental protection . . . . . . . . . . . . . . . . . . 7
Environmentally-friendly disposal . . . . . . . . . . . . . . . . . 7
* Getting to know your appliance . . . . . . . . . . . . . 8
Control panel . . . . . . . . . . . . . . . . . . . . . . . . . . . . . . . . 8
Controls . . . . . . . . . . . . . . . . . . . . . . . . . . . . . . . . . . . . 8
Display . . . . . . . . . . . . . . . . . . . . . . . . . . . . . . . . . . . . . 8
Further information . . . . . . . . . . . . . . . . . . . . . . . . . . . . 9
Cooking compartment functions . . . . . . . . . . . . . . . . . 9
K Before using for the first time. . . . . . . . . . . . . . 10
Initial use . . . . . . . . . . . . . . . . . . . . . . . . . . . . . . . . . . 10
1 Operating the appliance . . . . . . . . . . . . . . . . . . 10
Switching the appliance on and off . . . . . . . . . . . . . . 10
Operation . . . . . . . . . . . . . . . . . . . . . . . . . . . . . . . . . . 10
Selecting an operating mode . . . . . . . . . . . . . . . . . . . 11
^ Microwave. . . . . . . . . . . . . . . . . . . . . . . . . . . . . . 11
Cookware. . . . . . . . . . . . . . . . . . . . . . . . . . . . . . . . . . 11
Microwave power settings . . . . . . . . . . . . . . . . . . . . . 12
Setting the microwave . . . . . . . . . . . . . . . . . . . . . . . . 12
O Timer . . . . . . . . . . . . . . . . . . . . . . . . . . . . . . . . . . 13
P Programmes . . . . . . . . . . . . . . . . . . . . . . . . . . . . 13
Setting a programme . . . . . . . . . . . . . . . . . . . . . . . . . 13
Information on the programmes. . . . . . . . . . . . . . . . . 13
Resting time . . . . . . . . . . . . . . . . . . . . . . . . . . . . . . . . 14
Programme table . . . . . . . . . . . . . . . . . . . . . . . . . . . . 14
Q Basic settings. . . . . . . . . . . . . . . . . . . . . . . . . . . 15
Changing the basic settings. . . . . . . . . . . . . . . . . . . . 15
List of basic settings . . . . . . . . . . . . . . . . . . . . . . . . . 15
Power cut . . . . . . . . . . . . . . . . . . . . . . . . . . . . . . . . . . 15
Changing the time . . . . . . . . . . . . . . . . . . . . . . . . . . . 15
D Cleaning . . . . . . . . . . . . . . . . . . . . . . . . . . . . . . . 16
Cleaning agent. . . . . . . . . . . . . . . . . . . . . . . . . . . . . . 16
3 Trouble shooting . . . . . . . . . . . . . . . . . . . . . . . . 17
4 Customer service . . . . . . . . . . . . . . . . . . . . . . . . 18
E number and FD number . . . . . . . . . . . . . . . . . . . . . 18
Technical specifications . . . . . . . . . . . . . . . . . . . . . . . 18
J Tested for you in our cooking studio. . . . . . . . 19
Defrosting . . . . . . . . . . . . . . . . . . . . . . . . . . . . . . . . . .19
Defrosting, heating up or cooking frozen food . . . . . .20
Heating . . . . . . . . . . . . . . . . . . . . . . . . . . . . . . . . . . . .20
Cooking . . . . . . . . . . . . . . . . . . . . . . . . . . . . . . . . . . .21
Microwave tips . . . . . . . . . . . . . . . . . . . . . . . . . . . . . .22
E Test dishes . . . . . . . . . . . . . . . . . . . . . . . . . . . . . 22
Cooking only using the microwave. . . . . . . . . . . . . . .22
Defrosting only using the microwave . . . . . . . . . . . . .22
Produktinfo
Additional information on products, accessories,
replacement parts and services can be found at
www.bosch-home.com and in the online shop
www.bosch-eshop.com

en Intended use
4
8Intended use
Intended use
Read these instructions carefully. Only then
will you be able to operate your appliance
safely and correctly. Retain the instruction
manual and installation instructions for future
use or for subsequent owners.
This appliance is only intended to be fully fitted
in a kitchen. Observe the special installation
instructions.
Check the appliance for damage after
unpacking it. Do not connect the appliance if it
has been damaged in transport.
Only a licensed professional may connect
appliances without plugs. Damage caused by
incorrect connection is not covered under
warranty.
This appliance is intended for domestic use
only. The appliance must only be used for the
preparation of food and drink. The appliance
must be supervised during operation. Only
use this appliance indoors.
This appliance is intended for use up to a
maximum height of 4000 metres above sea
level.
This appliance may be used by children over
the age of 8 years old and by persons with
reduced physical, sensory or mental
capabilities or by persons with a lack of
experience or knowledge if they are
supervised or are instructed by a person
responsible for their safety how to use the
appliance safely and have understood the
associated hazards.
Children must not play with, on, or around the
appliance. Children must not clean the
appliance or carry out general maintenance
unless they are at least 15 years old and are
being supervised.
Keep children below the age of 8 years old at
a safe distance from the appliance and power
cable.
Always slide accessories into the cooking
compartment the right way round.
(Important safety
information
Impor t ant saf et y informat i on
General information
:Warning – Risk of fire!
Combustible items stored in the cooking
compartment may catch fire. Never store
combustible items in the cooking
compartment. Never open the appliance door
if there is smoke inside. Switch off the
appliance and unplug it from the mains or
switch off the circuit breaker in the fuse box.
:Warning – Risk of serious burns!
■ Accessories and ovenware become very
hot. Always use oven gloves to remove
accessories or ovenware from the cooking
compartment.
Risk of burns!
■ Alcoholic vapours may catch fire in the hot
cooking compartment. Never prepare food
containing large quantities of drinks with a
high alcohol content. Only use small
quantities of drinks with a high alcohol
content. Open the appliance door with care.
:Warning – Risk of scalding!
■ The accessible parts become hot during
operation. Never touch the hot parts. Keep
children at a safe distance.
Risk of scalding!
■ When you open the appliance door, hot
steam may escape. Open the appliance
door with care. Keep children at a safe
distance.
Risk of scalding!
■ Water in a hot cooking compartment may
create hot steam. Never pour water into the
hot cooking compartment.
:Warning – Risk of injury!
■ Scratched glass in the appliance door may
develop into a crack. Do not use a glass
scraper, sharp or abrasive cleaning aids or
detergents.
Risk of injury!
■ The hinges on the appliance door move
when opening and closing the door, and
you may be trapped. Keep your hands away
from the hinges.

Important safety information en
5
:Warning – Risk of electric shock!
■ Incorrect repairs are dangerous. Repairs
may only be carried out and damaged
power cables replaced by one of our
trained after-sales technicians. If the
appliance is defective, unplug the appliance
from the mains or switch off the circuit
breaker in the fuse box. Contact the after-
sales service.
Risk of electric shock and serious injury!
■ The cable insulation on electrical
appliances may melt when touching hot
parts of the appliance. Never bring
electrical appliance cables into contact with
hot parts of the appliance.
Risk of electric shock!
■ Do not use any high-pressure cleaners or
steam cleaners, which can result in an
electric shock.
Risk of electric shock!
■ A defective appliance may cause electric
shock. Never switch on a defective
appliance. Unplug the appliance from the
mains or switch off the circuit breaker in the
fuse box. Contact the after-sales service.
:Warning – Hazard due to magnetism!
Permanent magnets are used in the control
panel or in the control elements. They may
affect electronic implants, e.g. heart
pacemakers or insulin pumps. Wearers of
electronic implants must stay at least 10 cm
away from the control panel.
Microwave
:Warning – Risk of fire!
■ Using the appliance for anything other than
its intended purpose is dangerous and may
cause damage.
The following is not permitted: drying out
food or clothing, heating slippers, grain or
cereal pillows, sponges, damp cleaning
cloths or similar.
For example, heated slippers and grain or
cereal pillows may catch fire, even several
hours after they have been heated.The
appliance must only be used for the
preparation of food and drinks.
Risk of fire!
■ Food may catch fire. Never heat food in
heat-retaining packages.
Do not leave food heating unattended in
containers made of plastic, paper or other
combustible materials.
Do not select a microwave power or time
setting that is higher than necessary. Follow
the information provided in this instruction
manual.
Never use the microwave to dry food.
Never defrost or heat food with a low water
content, e.g. bread, at too high a microwave
power or for too long.
Risk of fire!
■ Cooking oil may catch fire. Never use the
microwave to heat cooking oil on its own.
:Warning – Risk of explosion!
Liquids and other food may explode when in
containers that have been tightly sealed.
Never heat liquids or other food in containers
that have been tightly sealed.
:Warning – Risk of burns!
■ Foods with peel or skin may burst or
explode during, or even after, heating.
Never cook eggs in their shells or reheat
hard-boiled eggs. Never cook shellfish or
crustaceans. Always prick the yolk when
baking or poaching eggs. The skin of foods
that have a peel or skin, such as apples,
tomatoes, potatoes and sausages, may
burst. Before heating, prick the peel or skin.
Risk of burns!
■ Heat is not distributed evenly through baby
food. Never heat baby food in closed
containers. Always remove the lid or teat.
Stir or shake well after the food has been
heated. Check the temperature of the food
before it is given to the child.
Risk of burns!
■ Heated food gives off heat. The ovenware
may become hot. Always use oven gloves
to remove ovenware or accessories from
the cooking compartment.
Risk of burns!
■ Airtight packaging may burst when food is
heated. Always observe the instructions on
the packaging. Always use oven gloves to
remove dishes from the cooking
compartment.
Risk of burns!
■ The accessible parts become very hot when
in operation. Never touch hot parts. Keep
children at a safe distance.
Risk of burns!

en Important safety information
6
■ Using the appliance for anything other than
its intended purpose is dangerous.
You are not permitted to use it to dry food
or clothing or to warm slippers, grain or
cereal pillows, sponges, damp cleaning
cloths or the like.
This is because, for instance, overheated
slippers, grain or cereal pillows, sponges
and damp cleaning cloths, etc., may cause
burns to the skin.
:Warning – Risk of scalding!
■ There is a possibility of delayed boiling
when a liquid is heated. This means that the
liquid reaches boiling temperature without
the usual steam bubbles rising to the
surface. Even if the container only vibrates a
little, the hot liquid may suddenly boil over
and spatter. When heating, always place a
spoon in the container. This will prevent
delayed boiling.
:Warning – Risk of injury!
■ Unsuitable ovenware may crack. Porcelain
or ceramic ovenware can have small
perforations in the handles or lids. These
perforations conceal a cavity below. Any
moisture that penetrates this cavity could
cause the ovenware to crack. Only use
microwave-safe ovenware.
Risk of injury!
■ If using the appliance in microwave mode
only, placing cookware and containers
made of metal inside the appliance may
cause sparks when the appliance is
operating. This will damage the appliance.
Never use metal containers when using the
appliance in microwave mode only.
:Warning – Risk of electric shock!
The appliance is a high-voltage appliance.
Never remove the casing.
:Warning – Risk of serious damage to
health!
■ The surface of the appliance may become
damaged if it is not cleaned properly.
Microwave energy may escape. Clean the
appliance on a regular basis, and remove
any food residue immediately. Always keep
the cooking compartment, door seal, door
and door stop clean. ~ "Cleaning"
on page 16
Risk of serious damage to health!
■ Microwave energy may escape if the
cooking compartment door or the door seal
is damaged. Never use the appliance if the
cooking compartment door or the door seal
is damaged. Contact the after-sales service.
Risk of serious damage to health!
■ Microwave energy will escape from
appliances that do not have any casing.
Never remove the casing. For any
maintenance or repair work, contact the
after-sales service.

Causes of damage en
7
]Causes of damage
Causes of damage
Caution!
■ Creation of sparks: Metal – e.g. a spoon in a glass –
must be kept at least 2 cm from the cooking
compartment walls and the inside of the door.
Sparks can irreparably damage the glass on the
inside of the door.
■ Foil containers: Do not use foil containers in the
appliance. They damage the appliance by producing
sparks.
■ Operating the microwave without food: Operating the
appliance without food in the cooking compartment
may lead to overloading. Never switch on the
microwave unless there is food inside. The short
crockery test is the exception to this rule.
~ "Microwave" on page 11
■ Moisture in the cooking compartment: Over an
extended period of time, moisture in the cooking
compartment may lead to corrosion. Allow the
cooking compartment to dry after use. Do not keep
moist food in the closed cooking compartment for
extended periods of time. Do not store food in the
cooking compartment.
■ Extremely dirty seal: If the seal is very dirty, the
appliance door will no longer close properly during
operation. The fronts of adjacent units could be
damaged. Always keep the seal clean.
~ "Cleaning" on page 16
■ Microwave popcorn: Never set the microwave output
too high. Use a maximum microwave output of 600
watts. Always place the popcorn bag on a glass
plate. The door panels may jump if overloaded.
7Environmental protection
En v i r on ment al pr ot ect i on
Environmentally-friendly disposal
Dispose of packaging in an environmentally-friendly
manner.
This appliance is labelled in accordance with
European Directive 2012/19/EU concerning
used electrical and electronic appliances
(waste electrical and electronic equipment -
WEEE). The guideline determines the
framework for the return and recycling of used
appliances as applicable throughout the EU.

en Getting to know your appliance
8
*Getting to know your
appliance
Get t i ng to know your appl i ance
In this chapter, we will explain the indicators and
controls. You will also find out about the various
functions of your appliance.
Note: Depending on the appliance model, individual
details and colours may differ.
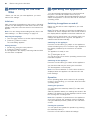
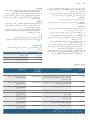
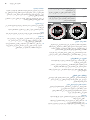
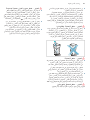
Control panel
In the control panel, you can use the various buttons,
touch fields and the rotary selector to set the required
function of the appliance. The current settings are
shown in the display.
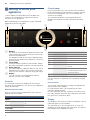
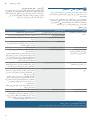
The overview shows the control panel when the
appliance is switched on with a selected operating
mode.
Controls
The individual controls are adapted for the various
functions of your appliance. You can set your appliance
simply and directly.
Buttons and touch fields
Here you can find a short explanation of the various
buttons and touch fields.
--------
The touch field, which has a value on the display that
can be changed or displayed in the foreground, lights
up red.
Rotary selector
You use the rotary selector to change the adjustment
values shown in the display.
In most selection lists, e.g. programmes, the first
selection follows the last.
In some selection lists, e.g. duration, you have to turn
the rotary selector back the other way when you reach
the minimum or maximum value.
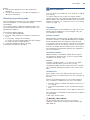
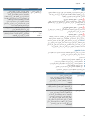
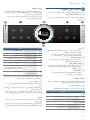
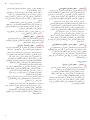
Display
The display is structured so that the information can be
read at a glance in any situation.
The value that you can currently set is in focus. It is
displayed in white lettering and underlined. The value in
the background is displayed in grey.
900
600360
180
VWDUW
VWRS
RQ
RII
#
Heizarten
[
01m00s
900W
900
( Buttons
The buttons on the left- and right-hand side of the
control panel have a pressure point. Press these
buttons to activate them.
For appliances that do not have a stainless steel
front, these two button touch fields do not have a
pressure point.
0 Touch fields
There are sensors under the touch fields. Simply
touch the respective symbol to select the function.
8 Rotary selector
The rotary selector is fitted so that you can turn it
indefinitely to the left or right. Press it lightly and
move it in the direction required using your finger.
@ Display
You can see the current adjustment values,
options or notes in the display.
Symbol Meaning
Buttons
ÿ on/off Switching the appliance on and
off
l start/stop Starting or stopping an operation
Touch fields
90 Microwave output Selects 90 watts
180 Microwave output Selects 180 watts
360 Microwave output Selects 360 watts
600 Microwave output Selects 600 watts
900 Microwave output Selects 900 watts
s Time-setting options Select time-setting options
% Programmes Selects a programme
a Weight Selects the weight in the pro-
gramme
° Information Display notes
Hold down (approx. 3 secs) to call
up the basic settings
v Automatic door opening Opens the appliance door

Getting to know your appliance en
9
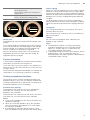
Display ring
The display ring can be found around the outside of the
display.
If you change a value, the display ring shows you where
you are in the selection list. Depending on the settings
area and length of the selection list, the display ring
may be continuous or divided into segments.
As the cooking time counts down, one red segment
disappears each second. After each full minute, all
segments light up red again.
Further information
In most cases, the appliance provides notes and further
information on the action just carried out.
Touch the ° field. The note is shown in the display for a
few seconds. Use the rotary selector to scroll to the end
of longer notes.
Some notes are displayed automatically, for example as
confirmation, or to provide an instruction or warning.
Cooking compartment functions
The functions in the cooking compartment make your
appliance easier to use. This, for example, enables the
cooking compartment to be well lit and a cooling fan to
prevent the appliance from overheating.
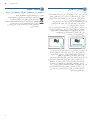
Automatic door opening
The appliance door springs open if you activate the
automatic door opening. You can fully open the
appliance door manually.
The automatic door opening does not work in the event
of a power cut. You can open the door manually.
Notes
■ If you open the appliance door during operation, the
operation is paused.
■ When you close the appliance door, the operation
does not continue automatically. You must restart
the operation manually.
■ If the appliance has been switched off for a long
time, the appliance door will open after a time delay.
Interior lighting
When you open the appliance door, the interior lighting
switches on. If the door remains open for longer than
around five minutes, the cooking compartment lighting
switches off again. When the automatic door opening is
activated, the cooking compartment lighting switches
on again.
For all operating modes, the cooking compartment
lighting switches on as soon as the operation is started.
When the operation has finished, the lighting switches
off.
Cooling fan
The cooling fan switches on as required. The hot air
escapes above the door.
The cooling fan may continue to run for a certain time
after the operation.
Caution!
Do not cover the ventilation slots. Otherwise, the
appliance may overheat.
Notes
■ The appliance remains cool during microwave
operation. Despite this, the cooling fan will still
switch on. The fan may run on even when the
microwave operation has ended.
■ Condensation may form on the door window, interior
walls and floor. This is normal and does not
adversely affect microwave operation. Wipe away the
condensation after cooking.
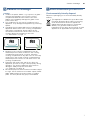
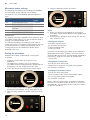
Focus The value in focus can be changed directly with-
out first being selected.
After starting an operation, the cooking time is
always in focus.
Emphasis As you change the value in focus using the rotary
selector, only this value is displayed larger.
Heizarten
Î 600W
04
m
56
s
Heizarten
Weight
500g

en Before using for the first time
10
KBefore using for the first
time
Be f o r e us i ng for the fi rst ti me
Before you can use your new appliance, you must
make some settings.
Initial use
After connecting the appliance to the power or following
a power cut, the settings for initial use are shown on the
display. It may take a few seconds for the instruction to
appear.
Note: You can change these settings at any time in the
basic settings. ~ "Basic settings" on page 15
Selecting the language
1. Turn the rotary selector to set the required language.
2. Press the s field to confirm.
The next setting appears.
Setting the time
1. Set the time using the rotary selector.
2. Press the s field to confirm.
A note appears in the display confirming that the initial
use has been completed.
1Operating the appliance
Oper at i ng the appl i ance
You have already learnt about the controls and how
they work. Now we will explain how to set your
appliance. You will learn about what happens when you
switch the appliance on and off, and how to select the
operating mode.
Switching the appliance on and off
Before you are able to set the appliance, you must
switch it on.
Note: The timer can also be set when the appliance is
switched off. Some displays and notes remain visible in
the display after the appliance has been switched off.
Switch off your device when it is not being used. If no
settings are applied for a long time, the appliance
switches itself off automatically.
Switching on the appliance
Press the on/off button ÿ to switch on the appliance.
All touch fields light up red. The Bosch logo appears in
the display, followed by the maximum microwave
output.
The appliance is ready to use.
The s field lights up red.
You can find out how to set the operating modes in the
individual chapters.
Switching off the appliance
Press the on/off button ÿ to switch off the appliance.
Any functions that may be running are cancelled.
The time appears on the display.
Note: You can set whether or not the time should be
displayed when the appliance is switched off in the
basic settings.
Operation
Some operating steps are the same for all operating
modes. In the following, you can learn about the basic
operating steps.
Starting the operation
You must press the start/stop button l to start each
operation.
After the operation starts, your settings are shown in the
display. The display ring is also displayed, which shows
the cooking time counting down.
Note: If the operation is paused due to the appliance
door being opened, the operation must be restarted
using the start/stop button l after the door has been
closed.
Pausing the operation
You can pause and restart the operation by pressing
the start/stop button l.
Press the on/off button to delete all settings.

Microwave en
11
Notes
■ Opening the appliance door also pauses the
operation.
■ The fan may continue to run after an operation is
paused or cancelled.
Selecting an operating mode
After the appliance is switched on, the default operating
mode is displayed. You can start this setting
immediately.
If you want to select a different operating mode, you
can find detailed descriptions of these modes in the
appropriate chapters.
The following always applies:
1. Touch the appropriate field.
2. Turn the rotary selector to change the selection in
focus.
3. If necessary, change other settings.
To do this, touch the appropriate field and change
the value using the rotary selector.
4. Press the start/stop button l to start.
The appliance starts the operation.
^Microwave
Microwave
You can use the microwave to cook, heat up or defrost
food quickly.
To ensure optimum use of the microwave, please
observe the notes on cookware and familiarise yourself
with the data in the application tables at the end of the
instruction manual. ~ "Tested for you in our cooking
studio" on page 19
Cookware
Not all cookware is microwavable. So that your food is
heated and the appliance is not damaged, only use
microwavable cookware.
Suitable cookware
Heat-resistant cookware made of glass, glass ceramic,
porcelain, ceramic or heat-resistant plastic are suitable.
These materials allow microwaves to pass through.
You can also use serving dishes. This saves you having
to transfer food from one dish to another. You should
only use cookware with decorative gold or silver trim if
the manufacturer guarantees that they are suitable for
use in microwaves.
Unsuitable cookware
Metal cookware is unsuitable. Metal does not allow
microwaves to pass through. Food in covered metal
containers will remain cold.
Caution!
Creation of sparks: Metal – e.g. a spoon in a glass –
must be kept at least 2 cm from the cooking
compartment walls and the inside of the door. Sparks
can irreparably damage the glass on the inside of the
door.
Cookware test
Never switch on the microwave unless there is food
inside. The short cookware test is the only exception to
this rule.
Perform the following test if you are unsure whether
your cookware is suitable for use in the microwave.
1. Heat the empty cookware at maximum power for ½
to 1 minute.
2. Check the temperature of the cookware during this
time.
The cookware should remain cold or warm to the touch.
The cookware is unsuitable if it becomes hot or sparks
are generated.
In this case, stop the test.
:Warning – Risk of burns!
The accessible parts become very hot when in
operation. Never touch hot parts. Keep children at a
safe distance.

en Microwave
12
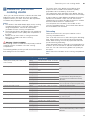
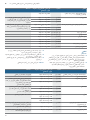
Microwave power settings
The following microwave power settings are available.
The microwave power settings do not always
correspond to the exact wattage that the appliance
uses.
Default value:
The appliance provides a default cooking time for each
microwave output setting. You can accept this value or
change it in the appropriate area.
The maximum setting is for heating liquids. After a
certain period, the microwave's power output is reduced
to below maximum to protect the appliance.After a
cooling period, the microwave's full power will be
available once more.
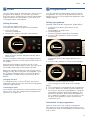
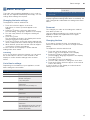
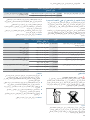
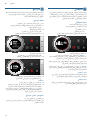
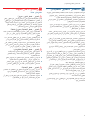
Setting the microwave
Example: Microwave output 600 W, cooking time
5 minutes.
1. Press the on/off button ÿ to switch on the
appliance.
The appliance is ready to use. The maximum
microwave output is displayed as the default value in
the display. You can change this at any time.
2. Touch the field of the required microwave output.
The microwave output and a default cooking time
are shown in the display. The s field lights up red.
3. Turn the rotary selector to set the required cooking
time.
4. Press the start/stop button l to start.
The cooking time counts down on the display.
Notes
■ When you switch on the appliance, the highest
microwave output always appears in the display as a
suggestion.
■ If you open the appliance door during use, the fan
may continue to run.
Cooking time elapsed
An audible signal sounds.
The operation has finished.
To stop the signal early:
Touch the s field.
Press the on/off button ÿ to switch off the appliance.
Note: After touching the s button, the timer function
appears; after a short time, it automatically disappears.
Press the s again for the option to increase the
cooking time.
Changing the cooking time
This can be done at any time.
Change the cooking time using the rotary selector.
The operation continues.
Changing the microwave output
This can be done at any time.
Touch the field for the required microwave output.
The cooking time remains unchanged.
The operation continues.
Note: If the set cooking time exceeds the maximum
time for the microwave output of 900 W, it is reduced
automatically. The operation stops. Press the l button
to start the operation.
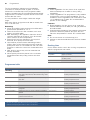
Setting Food Maximum cook-
ing time
90 W For defrosting delicate foods 1 hr 30 mins
180 W For defrosting and continued cooking 1 hr 30 mins
360 W For cooking meat and for heating del-
icate foods
1 hr 30 mins
600 W For heating and cooking food 1 hr 30 mins
900 W For heating liquids 30 mins
900
180
Heizarten
\ 01m00s
600W
360
600
VWDUW
VWRS
Heizarten
05m00s
›
Timer
›
Cook.time
VWDUW
VWRS
Heizarten
Î 600W
04
m
56
s

Timer en
13
OTimer
Ti mer
You can use the timer as a kitchen timer. The timer runs
alongside other settings. You can set it at any time,
even if the device is switched off. It has its own audible
signal so that you can tell whether it is the timer or a
cooking time which has elapsed.
Setting the timer
The maximum setting is 24 hours.
The higher the value, the longer the time intervals.
1. Touch the s field.
The timer is displayed.
2. Set the timer duration using the rotary selector.
3. Press the s field to start.
Note: The timer will also start automatically after a
few seconds.
The timer duration counts down. The display switches
back after a short time. A timer symbol is also shown on
the display.
When the timer duration comes to an end, a note
appears and an audible signal sounds. You can cancel
the audible signal early by touching the s field.
Note: If an operating mode with a set cooking time is
already running, the cooking time is highlighted. Touch
the s field to display the timer. The timer duration is
highlighted for a certain amount of time and can be
altered.
Changing the timer
To change the timer, touch the s field. The timer is
displayed in white and in focus, and can be changed by
using the rotary selector.
Cancelling the timer
If you want to cancel the timer, reset the duration on the
timer to zero. Once the change has been applied, the
symbol is no longer lit up.
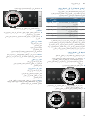
PProgrammes
Pr ogr ammes
You can prepare food really easily using the various
programmes. You select a programme and enter the
weight of your food. The program then applies the most
suitable settings.
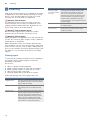
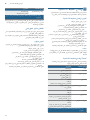
Setting a programme
Example: "Defrost bread" programme, weight 250 g.
1. Press the on/off button ÿ to switch on the
appliance.
The appliance is ready to use.
2. Press the % field.
The first programme appears in the display.
3. Turn the rotary selector to set the required
programme.
4. Press the a field.
The default value for the weight appears in the
display.
5. Turn the rotary selector to set the required weight.
6. Press the start/stop button l to start.
The cooking time counts down on the display.
Notes
■ The cooking time is calculated by the programmes.
■ For some dishes, the display provides instructions
for turning or stirring during preparation. Follow the
information provided. Opening the appliance door
pauses the operation. After closing the appliance
door, restart the operation. If you do not turn or stir
the dish, the programme runs as normal until it
reaches the end.
Information on the programmes
Place the food in the cold cooking compartment.
Take the food out of its packaging and weigh it. If it is
not possible to enter the exact weight, you should round
it up or down.
_
7H[W
7H[W
Heizarten
15
m
40
s
Timer
VWDUW
VWRS
Heizarten
350g
Defrost
Bread
[06m06s
VWDUW
VWRS
Heizarten
Weight
250g

en Programmes
14
For the programmes, always use microwavable
cookware, for example made of glass or ceramic.
Observe the cookware tips in the programme table.
A table of suitable types of food with appropriate weight
ranges and the cookware required can be found in the
section after the notes.
It is not possible to set a weight outside the weight
range.
With many dishes, a signal sounds after a certain time.
Turn or stir the food.
Defrosting:
■ As far as possible, freeze and store food flat and in
portion-sized quantities at -18 °C.
■ Place the frozen food in flat cookware, such as a
glass or porcelain plate.
■ After defrosting in the appliance, leave the food to
continue defrosting for a further 15 to 90 minutes
until it reaches an even temperature.
■ Bread should only be defrosted in the required
amounts, as it quickly becomes stale.
■ Liquid will be produced when defrosting meat or
poultry. Drain off this liquid when turning meat and
poultry and under no circumstances use it for other
purposes or allow it to come into contact with other
foods.
■ After turning, remove any minced meat that has
already defrosted.
■ Whole poultry should be placed in the cookware
breast-side down and poultry portions skin-side
down.
Vegetables:
■ Fresh vegetables: Cut into pieces of an equal size.
Add one tablespoon of water for every 100 g
vegetables.
■ Frozen vegetables: This programme is only suitable
for blanched, not pre-cooked vegetables. It is not
suitable for frozen vegetables in a cream sauce. Add
1 to 3 tablespoons of water. Do not add water to
spinach or red cabbage.
Potatoes:
■ Boiled potatoes: Cut into pieces of an equal size.
Add two tablespoons of water per 100 g of potatoes,
and salt to taste.
■ Unpeeled boiled potatoes: Use potatoes of the same
thickness. Wash the potatoes and prick the skin.
Place the wet potatoes in a dish. Do not add water.
Rice:
■ Do not use brown or boil-in-the-bag rice.
■ Add two to two-and-a-half times the amount of water
to rice.
Resting time
Some dishes need to rest in the cooking compartment
after the programme has ended.
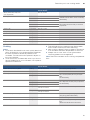
Programme table
Dish Resting time
Vegetables Approx. 5 minutes
Potatoes Approx. 5 minutes. First pour off the
remaining water
Rice 5 to 10 minutes
Programme Suitable food Weight range in kg Cookware
Defrosting
Bread* Bread, whole, round or long; sliced bread; sponge
cake, yeast cake, fruit flan, cakes without icing, cream
or gelatine
0.20-1.50 kg Shallow cookware without lid
Cooking compartment floor
Meat* Joints, flat pieces of meat, minced meat, chicken, pou-
lard, duck
0.20-2.00 kg Shallow cookware without lid
Cooking compartment floor
Fish* Whole fish, fish fillet, fish cutlet 0.10-1.00 kg Shallow cookware without lid
Cooking compartment floor
Cooking
Fresh vegetables** Cauliflower, broccoli, carrots, kohlrabi, leeks, peppers,
courgettes
0.15-1.00 kg Cookware with lid
Cooking compartment floor
Frozen vegetables** Cauliflower, broccoli, carrots, kohlrabi, red cabbage,
spinach
0.15-1.00 kg Cookware with lid
Cooking compartment floor
Potatoes** Boiled potatoes, unpeeled boiled potatoes, chopped
potatoes of the same size
0.20-1.00 kg Cookware with lid
Cooking compartment floor
Rice** Rice, long-grain rice 0.05-0.30 kg Deep cookware with lid
Cooking compartment floor
*) Observe the signals given when it is time to turn the food
**) Observe the signals given when it is time to stir the food

Basic settings en
15
QBasic settings
Ba s i c set t i ngs
There are various settings available to you in order to
help use your appliance effectively and simply. You can
change these settings as required.
Changing the basic settings
The appliance must be switched off.
1. Touch the ° field for approx. 3 seconds.
Instructions on how to proceed appear in the
display.
2. Press the s field to confirm the instructions.
The first setting, "Language", appears in the display.
3. Turn the rotary selector to change the setting as
required.
4. Touch the s field.
The next setting is shown in the display and can be
changed using the rotary selector.
5. Touch the s field to go through all the settings and
use the rotary selector to make changes as required.
6. When finished, press and hold the ° field for approx.
3 seconds to confirm the settings.
A note is shown in the display to confirm that the
settings have been saved.
Cancelling
If you do not want to save the changes, you can press
the on/off button to cancel. A note is shown in the
display to confirm that the settings have not been
saved.
List of basic settings
Depending on the features of your appliance, not all
basic settings are accessible.
Note: Changes to the language, button tone and
display brightness settings take effect immediately. All
other changes take effect after the settings have been
saved.
--------
Power cut
The changes you make to the settings are retained
even after a power cut.
Only the settings pertaining to the initial use of the
appliance need to be implemented once again
following a power cut.
Changing the time
If you want to change the time, for example from
summer to winter time, you have to change the basic
setting.
The appliance must be switched off.
1. Touch the ° field for approx. 3 seconds.
Notes on the process appear on the display.
2. Press the s field to confirm the notes.
The first setting "language" appears in the display.
3. Touch the s field.
The setting for the clock appears.
4. Turn the rotary selector to change the clock time.
5. Press and hold the ° field for approx. 3 seconds to
confirm the setting.
A note is shown on the display to confirm that the
settings have been saved.
Setting Options
Language Set the language
Clock Set the current time
Audible signal Short cooking time
Medium cooking time*
Long cooking time
Button tone Switched on
Switched off*
(Button tone at on/off always on)
Display brightness Scale with 5 levels
Level 3*
Clock Switched on*
Switched off
Night-time dimming Switched off**
Switched on (Display dimmed between
22:00 and 6:00)
Demo mode Switched off*
Switched on
(only displayed during the first 3 minutes
after the appliance has been reset or is
used for the first time)
Factory settings Reset
Do not reset*
* Factory setting (factory settings may vary depending on the appli-
ance model)

en Cleaning
16
DCleaning
Cl eani ng
With good care and cleaning, your appliance will retain
its appearance and remain fully functioning for a long
time to come. We will explain here how you should
correctly care for and clean your appliance.
:Warning – Risk of burns!
The appliance becomes very hot. Never touch the
interior surfaces of the cooking compartment or the
heating elements. Always allow the appliance to cool
down. Keep children at a safe distance.
:Warning – Risk of electric shock!
Do not use any high-pressure cleaners or steam
cleaners, which can result in an electric shock.
:Warning – Risk of injury!
Scratched glass in the appliance door may develop into
a crack. Do not use a glass scraper, sharp or abrasive
cleaning aids or detergents.
Note: Unpleasant odours, for example after fish has
been prepared, can be removed very easily. Add a few
drops of lemon juice to a cup of water. Always place a
spoon in the container to prevent delayed boiling. Heat
the water for 1 to 2 minutes at maximum microwave
output.
Cleaning agent
To ensure that the different surfaces are not damaged
by using the wrong cleaning agent, observe the
information in the table.
Do not use:
■ Harsh or abrasive cleaning agents.
■ Metal or glass scrapers to clean the door panels.
■ Metal or glass scrapers to clean the door seal.
■ Hard scouring pads or sponges.
■ Cleaning agents with a high alcohol content.
Wash new sponge cloths thoroughly before use.
Area Cleaning agent
Appliance front Hot soapy water: Clean using a dish cloth and
then dry with a soft cloth. Do not use a metal or
glass scraper for cleaning.
Display Wipe down using a microfibre cloth or a
slightly damp cloth. Do not wipe with a wet
cloth.
Stainless steel Hot soapy water: Clean using a dish cloth and
then dry with a soft cloth. Remove flecks of
limescale, grease, starch and albumin (e.g.
egg white) immediately. Corrosion can form
under such flecks. Special stainless-steel
cleaning agents are available from the after-
sales service or from specialist retailers.
Cooking compart-
ment made of stain-
less steel
Hot soapy water or vinegar solution: Clean
using a dish cloth and then dry with a soft
cloth. Do not use oven spray or any other
aggressive oven cleaners or abrasive materi-
als. Scouring pads, rough sponges and pan
cleaners are also unsuitable. These items
scratch the surface. Allow the interior surfaces
to dry thoroughly.
Door panels Glass cleaner: Clean with a dish cloth. Do not
use a glass scraper.
Door seal
Do not remove.
Hot soapy water: Clean with a dish cloth and
do not scour. Do not use a metal or glass
scraper for cleaning.
Area Cleaning agent

Trouble shooting en
17
3Trouble shooting
Tr oubl e s hoot i ng
If a fault occurs, there is often a simple explanation.
Before calling the after-sales service, please refer to the
fault table and attempt to correct the fault yourself.
Tip: If a dish does not turn out exactly as you wanted,
refer to the following chapter, where you will find lots of
tips and notes relating to the optimum
settings.~ "Tested for you in our cooking studio"
on page 19
:Warning – Risk of electric shock!
Incorrect repairs are dangerous. Repairs may only be
carried out and damaged power cables replaced by
one of our trained after-sales technicians. If the
appliance is defective, unplug the appliance from the
mains or switch off the circuit breaker in the fuse box.
Contact the after-sales service.
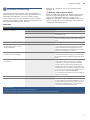
Fault table
--------
Fault Possible cause Remedy/information
The appliance does not work or the
display is not working
The plug is not plugged into the mains Connect the appliance to the electricity supply
Power cut Check whether other kitchen appliances are working
The circuit breaker is faulty Check in the fuse box to make sure that the fuse for
the appliance is OK
Faulty operation Switch off the circuit-breaker for the appliance in the
fuse box and switch it back on after approx. 60 sec-
onds
The appliance cannot be started The appliance door is not fully closed Close the appliance door
Appliance does not heat up.
The m symbol for demo mode is
shown in the display.
The appliance is in demo mode Deactivate demo mode in the basic settings.
To do this, briefly disconnect the appliance from the
mains (switch off the household fuse or the circuit
breaker in the fuse box). Then deactivate demo mode
in the basic settings within 3 minutes.
The rotary selector has fallen out of
the support in the control panel.
The rotary selector has been accidentally disengaged. The rotary selector can be removed. Simply place the
rotary selector back in its support in the control panel
and push it in so that it engages and can be turned as
usual.
The rotary selector can no longer be
turned easily.
There is dirt under the rotary selector. The rotary selector can be removed. To disengage the
rotary selector, simply remove it from the support.
Alternatively, press on the outer edge of the rotary
selector so that it tips and can be picked up easily.
Carefully clean the rotary selector and its support on
the appliance using a cloth and soapy water. Dry with
a soft cloth. Do not use any sharp or abrasive materi-
als. Do not soak or clean in the dishwasher.
Do not remove the rotary selector too often so that the
support remains stable.
The interior lighting is not working The interior lighting is faulty Call the after-sales service
Error message "Exxx"* If an error message is displayed, switch the appliance
off and on again; if the message disappears, it was a
one-off problem. If the fault occurs again or the error
message is still displayed, please contact the after-
sales service and provide the fault code.
* Special features:
Error message "E0532": Open and close the appliance door.
Error message "E6501": Switch off the appliance. Wait for 10 minutes. Switch the appliance on again.

en Customer service
18
4Customer service
Cu s t o mer ser vi ce
Our after-sales service is there for you if your appliance
needs to be repaired. We will always find an
appropriate solution, also in order to avoid after-sales
personnel having to make unnecessary visits.
E number and FD number
When calling us, please quote the full product number
(E no.) and the production number (FD no.) so that we
can provide you with the correct advice. The rating plate
bearing these numbers can be found when you open
the appliance door.
If your appliance operates with steam, you will find the
rating plate on the right-hand side behind the panel.
To save time, you can make a note of the numbers for
your appliance and the telephone number of the after-
sales service in the space below in case you need
them.
Please note that a visit from an after-sales service
engineer is not free of charge in the event that the
appliance has been misused, even during the warranty
period.
Please find the contact data of all countries in the
enclosed customer service list.
To book an engineer visit and product advice
Rely on the professionalism of the manufacturer. You
can therefore be sure that the repair is carried out by
trained service technicians who carry original spare
parts for your appliances.
This appliance corresponds to the standards EN 55011
and CISPR 11. It is a Group 2, Class B product.
Group 2 means that microwaves are produced for the
purpose of heating food. Class B states that the
appliance is suitable for private households.
Technical specifications
E no.
FD no.
After-sales service O
GB 0344 892 8979
Calls charged at local or mobile rate.
IE 01450 2655
0.03 € per minute at peak. Off peak 0.0088 €
per minute.
Z-Nr:FD:E-Nr:
Type:
Power supply 220-240 V, 50/60 Hz
Max. total connected load 1220 W
Microwave output 900 W (IEC 60705)
Microwave frequency 2450 MHz
Fuse 10 A
Dimensions (H/W/D)
- Appliance 382 x 594 x 318 mm
- Cooking compartment 220 x 350 x 270 mm
VDE approved Yes
CE mark Yes

Tested for you in our cooking studio en
19
JTested for you in our
cooking studio
Tes t ed for you in our cooki ng st udi o
Here, you can find a selection of dishes and the ideal
settings for them. We show you which microwave
output is best for your dish. There are also tips about
cookware and preparation methods.
Notes
■ The values in the table always apply to the cooking
compartment when it is cold and empty. Before
using the appliance, remove all unnecessary
cookware from the cooking compartment.
■ The times specified in the tables are only guidelines.
They will depend on the quality and composition of
the food.
■ Always use an oven cloth or oven gloves when
taking hot cookware out of the cooking
compartment.
:Warning – Risk of scalding!
When pulling out the cookware, hot liquid may overflow.
Carefully pull the cookware out of the cooking
compartment.
The following tables provide you with numerous options
and settings for the microwave.
The times given in the tables are guidelines; they
depend on the cookware used, and the quality,
temperature and consistency of the food.
Time ranges are often specified in the tables. Set the
shortest time first and then extend the time if necessary.
It may be that you have different quantities from those
specified in the tables. There is a rule of thumb for
operating the microwave: Double the amount = double
the time, half the amount = half the time.
You can place the cookware in the middle on the
cooking compartment floor. The food will then absorb
the microwaves from all sides.
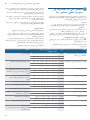
Defrosting
Place the frozen food in an open container on the
cooking compartment floor.
Turn or stir the food once or twice during the defrosting
time. Large pieces of food should be turned several
times. When turning, remove any liquid that has been
produced during defrosting.
Leave defrosted items to stand at room temperature for
a further 10 to 60 minutes so that the temperature can
even out. You can remove the giblets from poultry at
this point.
Note: Place the ovenware on the cooking compartment
floor.
Dish Weight Microwave output in watts,
time in minutes
Note
Whole pieces of beef, pork or veal (on the
bone or boned)
800 g 180 W, 15 mins + 90 W, 15-25 mins Turn several times
1000 g 180 W, 20 mins + 90 W, 20-30 mins
1500 g 180 W, 25 mins + 90 W, 25-30 mins
Meat in pieces or slices of beef, veal or pork 200 g 180 W, 5-8 mins + 90 W, 5-10 mins Separate the slices/pieces of meat when turn-
ing
500 g 180 W, 8-11 mins + 90 W, 10-15
mins
800 g 180 W, 10 mins + 90 W, 10-15 mins
Minced meat, mixed 200 g 90 W, 10-15 mins Freeze food flat if possible;
turn several times during defrosting and
remove any minced meat that has already
defrosted
500 g 180 W, 5 mins + 90 W, 10-15 mins
1000 g 180 W, 15 mins + 90 W, 20-25 mins
Poultry or poultry portions 600 g 180 W, 8 mins + 90 W, 10-15 mins Turn during defrosting;
remove liquid that escapes during defrosting
1200 g 180 W, 15 mins + 90 W, 20-25 mins
Fish fillet, fish steak or slices 400 g 180 W, 5 mins + 90 W, 10-15 mins Separate any defrosted parts
Whole fish 300 g 180 W, 3 mins + 90 W, 10-15 mins Turn during defrosting
600 g 180 W, 8 mins + 90 W, 15-20 mins
Vegetables, e.g. peas 300 g 180 W, 10-15 mins Stir carefully during defrosting
Fruit, e.g. raspberries 300 g 180 W, 6-9 mins Stir carefully during defrosting and separate
any defrosted parts
500 g 180 W, 8 mins + 90 W, 5-10 mins
Butter, defrosting 125 g 180 W, 1 min. + 90 W, 1-2 mins Remove all packaging
250 g 180 W, 1 min. + 90 W, 2-4 mins
Loaf of bread 500 g 180 W, 8 mins + 90 W, 5-10 mins Turn during defrosting
1000 g 180 W, 12 mins + 90 W, 10-20 mins
Cakes, dry, e.g. sponge cake 500 g 90 W, 10-15 mins Separate the pieces of cake;
only for cakes without icing, cream or crème
pâtissière
750 g 180 W, 5 mins + 90 W, 10-15 mins

en Tested for you in our cooking studio
20
Defrosting, heating up or cooking frozen
food
Take ready meals out of the packaging. They will heat
up more quickly and evenly in microwaveable
cookware. The different components of the meal may
not require the same amount of time to heat up.
Food which lies flat will cook more quickly than food
which is piled high. You should therefore distribute the
food so that it is as flat as possible in the cookware.
Food should not be placed in layers on top of one
another.
Always cover the food. If you do not have a suitable lid
for your cookware, use a plate or special microwave
foil.
Stir or turn the food 2 or 3 times during cooking.
After heating, allow the food to stand for a further 2 to 5
minutes to allow the temperature to even out.
This will help the food retain its own distinct taste, which
means it will require less seasoning.
Note: Place the ovenware on the cooking compartment
floor.
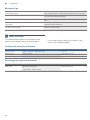
Heating
:Warning – Risk of scalding!
There is a possibility of delayed boiling when a liquid is
heated. This means that the liquid reaches boiling
temperature without the usual steam bubbles rising to
the surface. Even if the container only vibrates a little,
the hot liquid may suddenly boil over and spatter. When
heating, always place a spoon in the container. This will
prevent delayed boiling.
Caution!
Creation of sparks: Metal – e.g. a spoon in a glass –
must be kept at least 2 cm from the cooking
compartment walls and the inside of the door. Sparks
can irreparably damage the glass on the inside of the
door.
Notes
■ Take ready meals out of the packaging. They will
heat up more quickly and evenly in microwaveable
cookware. The different components of the meal
may not require the same amount of time to heat up.
■ Always cover the food. If you do not have a suitable
cover for your cookware, use a plate or special
microwave foil.
■ Stir or turn the food several times during the heating
time. Check the temperature.
■ After heating, allow the food to stand for a further 2
to 5 minutes to allow the temperature to even out.
■ Always use an oven cloth or oven gloves when
removing plates from the appliance.
Note: Place the ovenware on the cooking compartment
floor.
Cakes, moist, e.g. fruit flan, cheesecake 500 g 180 W, 5 mins + 90 W, 15-20 mins Only for cakes without icing, cream or gela-
tine
750 g 180 W, 7 mins + 90 W, 15-20 mins
Dish Weight Microwave output in watts,
time in minutes
Note
Dish Weight Microwave output in watts,
cooking time in minutes
Note
Menu, plated meal, ready meal
(2-3 components)
300-400 g 600 W, 8-13 mins Covered
Soup 400 g 600 W, 8-12 mins Cookware with lid
Stew 500 g 600 W, 10-15 mins Cookware with lid
Slices or pieces of meat in sauce, e.g. goulash 500 g 600 W, 10-15 mins Cookware with lid
Fish, e.g. fillet steaks 400 g 600 W, 10-15 mins Covered
Bakes, e.g. lasagne, cannelloni 450 g 600 W, 10-15 mins Cookware without lid
Side dishes, e.g. rice, pasta 250 g 600 W, 3-7 mins Cookware with lid, add liquid
500 g 600 W, 8-12 mins
Vegetables, e.g. peas, broccoli, carrots 300 g 600 W, 7-11 mins Cookware with lid, add 1 tbsp of water
600 g 600 W, 14-17 mins
Creamed spinach 450 g 600 W, 10-15 mins Cook without additional water
A página está carregando...
A página está carregando...
A página está carregando...
A página está carregando...
A página está carregando...
A página está carregando...
A página está carregando...
A página está carregando...
A página está carregando...
A página está carregando...
A página está carregando...
A página está carregando...
A página está carregando...
A página está carregando...
A página está carregando...
A página está carregando...
A página está carregando...
A página está carregando...
A página está carregando...
A página está carregando...
A página está carregando...
A página está carregando...
A página está carregando...
A página está carregando...
-
 1
1
-
 2
2
-
 3
3
-
 4
4
-
 5
5
-
 6
6
-
 7
7
-
 8
8
-
 9
9
-
 10
10
-
 11
11
-
 12
12
-
 13
13
-
 14
14
-
 15
15
-
 16
16
-
 17
17
-
 18
18
-
 19
19
-
 20
20
-
 21
21
-
 22
22
-
 23
23
-
 24
24
-
 25
25
-
 26
26
-
 27
27
-
 28
28
-
 29
29
-
 30
30
-
 31
31
-
 32
32
-
 33
33
-
 34
34
-
 35
35
-
 36
36
-
 37
37
-
 38
38
-
 39
39
-
 40
40
-
 41
41
-
 42
42
-
 43
43
-
 44
44


Bosch 00466148 Manual do usuário
- Categoria
- Cozinha
- Tipo
- Manual do usuário
em outras línguas
- English: Bosch 00466148 User manual
Artigos relacionados
Outros documentos
-
Siemens BE634LGS1B Manual do usuário
-
-
Siemens BF834LGW1/06 Manual do usuário
-
Siemens BE634RGS1/03 Manual do usuário
-
-
-
Siemens BI630CNS1M Manual do usuário
-
AEG FAV40750IW Manual do usuário
-
Dometic MWO24 Manual do usuário