Sony A6100 SEL1650 Black (ILCE-6100L/B) Manual do usuário
- Tipo
- Manual do usuário

©2019 Sony Corporation Printed in China
C:\5009876411ILCE6100CEC\00COV-ILCE6100CEC\000COV.indd
2019/07/30 14:17
ILCE-6100
5-009-876-41(1)
C:\5009876411ILCE6100CEC\00COV-ILCE6100CEC\000COV.indd
2019/07/30 14:17
ILCE-6100
5-009-876-41(1)
ILCE-6100
5-009-876-41(1)
E-mount
Interchangeable Lens Digital Camera/Startup Guide GB
Fotocamera digitale con obiettivo intercambiabile/Guida di avvio IT
Digitalkamera med utbytbart objektiv/Startguide SE
Digitalkamera mit Wechselobjektiv/Einführungsanleitung DE
Цифровой фотоаппарат со сменным объективом/Руководство по началу работы
RU
Digitale camera met verwisselbare lens/Beknopte gids NL
Digitalkamera med utskiftbart objektiv/Startveiledning NO
Appareil photo à objectif interchangeable/Guide de démarrage FR
Câmara Digital de Objetivas intercambiáveis/Guia de início PT
Digitaalinen kamera vaihdettavalla objektiivilla/Aloitusopas FI
Cámara Digital de Lentes Intercambiables/Guía de inicio ES
Цифровий фотоапарат зі змінним об’єктивом/Посібник із початку роботи
UA
Aparat cyfrowy z wymiennymi obiektywami/Przewodnik uruchamiania
PL
Digitalkamera med udskifteligt objektiv/Startvejledning DK
https://rd1.sony.net/help/ilc/1950/h_zz/
“Help Guide” (Web manual)
Refer to “Help Guide” for in-depth
instructions on the many
functions of the camera.

ILCE-6100
5-009-876-41(1)
GB
2
\\Win-473\camera\CX88400(PD)\Multi\06_Compose\5009876411_14lang\5009876411ILCE6100CEC\01GB-ILCE6100CEC\01GB.indd
DTP data saved: 2019/07/30 13:54
PDF file created: 2019/07/31 09:15
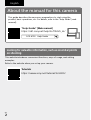
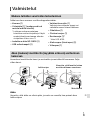
Looking for valuable information, such as essential points
on shooting
This website introduces convenient functions, ways of usage, and setting
examples.
Refer to the website when you set up your camera.
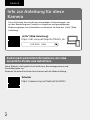
About the manual for this camera
This guide describes the necessary preparations to start using the
product, basic operations, etc. For details, refer to the “Help Guide” (web
manual).
https://rd1.sony.net/help/ilc/1950/h_zz/
“Help Guide” (Web manual)
ILCE-6100 Help Guide
Tutorials
https://www.sony.net/tutorial/ilc/6100/
English

ILCE-6100
5-009-876-41(1)
GB
3
\\Win-473\camera\CX88400(PD)\Multi\06_Compose\5009876411_14lang\5009876411ILCE6100CEC\01GB-ILCE6100CEC\01GB.indd
DTP data saved: 2019/07/30 13:54
PDF file created: 2019/07/31 09:15
GB
Preparations
Checking the supplied items
The number in parentheses indicates the number of pieces.
• Camera (1)
• Power cord (mains lead) (1)*
(supplied in some countries/
regions)
* Multiple power cords may be
supplied with this equipment. Use
the appropriate one that matches
your country/region. See page
11.
• Rechargeable battery pack
NP-FW50 (1)
• Micro USB cable (1)
• AC Adaptor (1)
The type of the AC Adaptor may
differ depending on the country/
region.
• Shoulder strap (1)
• Eyepiece cup (1)
• Body cap (1)*
* Only for the ILCE-6100
• Startup Guide (this manual) (1)
• Reference Guide (1)
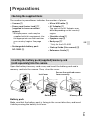
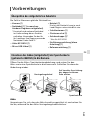
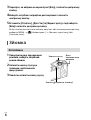
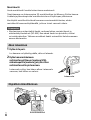
Inserting the battery pack (supplied)/memory card
(sold separately) into the camera
Open the battery/memory card cover, and insert the battery pack and a
memory card into the camera. Then, close the cover.
Memory card Battery pack
Lock lever
Ensure the notched corner
faces correctly.
Battery pack
Make sure that the battery pack is facing in the correct direction, and insert
it while pressing the battery lock lever.

ILCE-6100
5-009-876-41(1)
GB
4
\\Win-473\camera\CX88400(PD)\Multi\06_Compose\5009876411_14lang\5009876411ILCE6100CEC\01GB-ILCE6100CEC\01GB.indd
DTP data saved: 2019/07/30 13:54
PDF file created: 2019/07/31 09:15
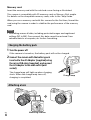
Memory card
Insert the memory card with the notched corner facing as illustrated.
This camera is compatible with SD memory cards or Memory Stick media.
For details on the compatible memory cards, refer to the “Help Guide.”
When you use a memory card with this camera for the first time, format the
card using the camera in order to stabilize the performance of the memory
card.
Note
• Formatting erases all data, including protected images and registered
settings (M1 to M4). Once erased, this data cannot be restored. Save
valuable data to a computer, etc. before formatting.
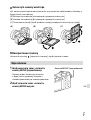
Charging the battery pack
1 Turn the power off.
If the camera is turned on, the battery pack will not be charged.
2 Connect the camera with the battery pack
inserted to the AC Adaptor (supplied) using
the micro USB cable (supplied), and connect
the AC Adaptor to the wall outlet (wall
socket).
The charge lamp will light up when charging
starts. When the charge lamp turns off,
charging is completed.
Charge lamp
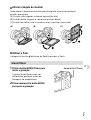
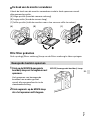
Attaching a lens
Mounting indexes

ILCE-6100
5-009-876-41(1)
GB
5
\\Win-473\camera\CX88400(PD)\Multi\06_Compose\5009876411_14lang\5009876411ILCE6100CEC\01GB-ILCE6100CEC\01GB.indd
DTP data saved: 2019/07/30 13:54
PDF file created: 2019/07/31 09:15
GB
1 Remove the body cap from the camera and the rear lens cap from the
rear of the lens.
2 Mount the lens by aligning the two white index marks (mounting
indexes) on the lens and camera.
3 While pushing the lens lightly toward the camera, turn the lens slowly
in the direction of the arrow until it clicks into the locked position.
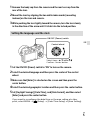
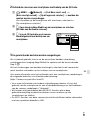
Setting the language and the clock
ON/OFF (Power) switch
Control wheel
Select items : ////
/
Confirm : Center button
1 Set the ON/OFF (Power) switch to “ON” to turn on the camera.
2 Select the desired language and then press the center of the control
wheel.
3 Make sure that [Enter] is selected on the screen and then press the
center button.
4 Select the desired geographic location and then press the center button.
5 Set [Daylight Savings], [Date/Time], and [Date Format], and then select
[Enter] and press the center button.
If you want to reconfigure the date/time or the area setting at a later
point, select MENU
(Setup) [Date/Time Setup] or [Area Setting].

ILCE-6100
5-009-876-41(1)
GB
6
\\Win-473\camera\CX88400(PD)\Multi\06_Compose\5009876411_14lang\5009876411ILCE6100CEC\01GB-ILCE6100CEC\01GB.indd
DTP data saved: 2019/07/30 13:54
PDF file created: 2019/07/31 09:15
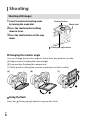
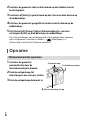
Shooting
Shooting still images
1 Select the desired shooting mode
by turning the mode dial.
Shutter button
Mode dial
(Flash pop-up) button
2 Press the shutter button halfway
down to focus.
3 Press the shutter button all the way
down.
Changing the monitor angle
You can change the monitor angle to shoot from any position you like.
(A) High position (holding the camera high)
(B) Low position (holding the camera low)
(C) Selfie position (facing the monitor toward you to take a selfie)
(A)
(B)
(C)
Using the flash
Press the (Flash pop-up) button to pop up the flash.

ILCE-6100
5-009-876-41(1)
GB
7
\\Win-473\camera\CX88400(PD)\Multi\06_Compose\5009876411_14lang\5009876411ILCE6100CEC\01GB-ILCE6100CEC\01GB.indd
DTP data saved: 2019/07/30 13:54
PDF file created: 2019/07/31 09:15
GB
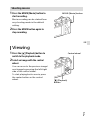
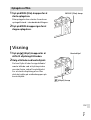
Shooting movies
1 Press the MOVIE (Movie) button to
start recording.
Movie recording can be started from
any shooting mode in the default
setting.
MOVIE (Movie) button
2 Press the MOVIE button again to
stop recording.
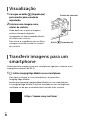
Viewing
1 Press the (Playback) button to
switch to the playback mode.
(Playback)
button
Control wheel
2 Select an image with the control
wheel.
You can move to the previous image/
next image by pressing the left/right
side of the control wheel.
To start playing back a movie, press
the center button on the control
wheel.

ILCE-6100
5-009-876-41(1)
GB
8
\\Win-473\camera\CX88400(PD)\Multi\06_Compose\5009876411_14lang\5009876411ILCE6100CEC\01GB-ILCE6100CEC\01GB.indd
DTP data saved: 2019/07/30 13:54
PDF file created: 2019/07/31 09:15
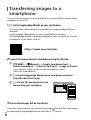
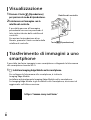
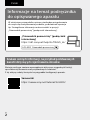
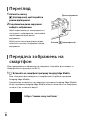
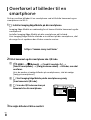
Transferring images to a
smartphone
You can transfer images to a smartphone by connecting the camera and a
smartphone via Wi-Fi.
1 : Install Imaging Edge Mobile on your smartphone.
To connect the camera and your smartphone, Imaging Edge Mobile is
required.
Install Imaging Edge Mobile to your smartphone in advance.
If Imaging Edge Mobile is already installed on your smartphone, be sure
to update it to the latest version.
https://www.sony.net/iem/
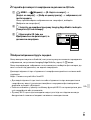
2 Connect the camera and your smartphone using the QR Code.
: MENU (Network) [Send to Smartphone Func.]
[Send to Smartphone] [Select on This Device] images to transfer.
If you want to select images on the smartphone, select
[Select on Smartphone].
: Launch Imaging Edge Mobile on your smartphone, and select
[Scan QR Code of the Camera].
: Scan the QR Code displayed on the
camera using your smartphone.
3 The selected images will be transferred.
If you are using Android, you can transfer images after the first time simply
by launching Imaging Edge Mobile with Step 2-
above.

ILCE-6100
5-009-876-41(1)
GB
9
\\Win-473\camera\CX88400(PD)\Multi\06_Compose\5009876411_14lang\5009876411ILCE6100CEC\01GB-ILCE6100CEC\01GB.indd
DTP data saved: 2019/07/30 13:54
PDF file created: 2019/07/31 09:15
GB
If image transfer does not start, select the camera to connect on the screen
of your smartphone.
For details on how to connect to a smartphone, refer to the following
support sites:
https://www.sony.net/dics/iem02/
• For details on other connection methods or how to use the smartphone as
a remote commander to operate the camera, refer to the “Help Guide.”
• The Wi-Fi functions introduced in this manual are not guaranteed to
operate on all smartphones or tablets.
• The Wi-Fi functions of this camera are not available when connected to a
public wireless LAN.
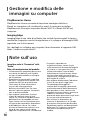
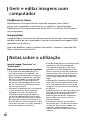
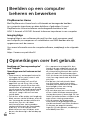
Managing and editing images
on a computer
PlayMemories Home
PlayMemories Home allows you to import still images and movies to your
computer and view or use them. You need to install PlayMemories Home to
import XAVC S movies or AVCHD movies to your computer.
Imaging Edge
Imaging Edge is a software suite that includes functions such as remote
shooting from a computer, and adjusting or developing RAW images
recorded with the camera.
For details on the computer software, refer to the following URL.
https://www.sony.net/disoft/
Notes on use
Refer to “Precautions“ in the “Help Guide”
as well.
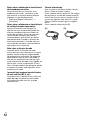
Notes on handling the product
• This camera is designed to be dust-
and moisture-resistant, but is not
waterproof or dust-proof.
• Remove any dirt from the surface of
the flash. Dirt on the surface of the
flash may emit smoke or burn due to
heat generated by the emission of
light. If there is dirt/dust, clean it off
with a soft cloth.

ILCE-6100
5-009-876-41(1)
GB
10
\\Win-473\camera\CX88400(PD)\Multi\06_Compose\5009876411_14lang\5009876411ILCE6100CEC\01GB-ILCE6100CEC\01GB.indd
DTP data saved: 2019/07/30 13:54
PDF file created: 2019/07/31 09:15
• Do not leave the lens or the viewfinder
exposed to a strong light source such
as sunlight. Because of the lens’s
condensing function, doing so may
cause smoke, fire, or a malfunction
inside the camera body or the lens. If
you have to leave the camera exposed
to a light source such as sunlight,
attach the lens cap to the lens.
• When you shoot with backlighting,
keep the sun sufficiently far away
from the angle of view. Otherwise, the
sunlight may enter the focus inside the
camera and cause smoke or fire. Even if
the sun is slightly away from the angle
of view, it may still cause smoke or fire.
• Do not directly expose the lens to
beams such as laser beams. That may
damage the image sensor and cause
the camera to malfunction.
• Do not look at sunlight or a strong
light source through the lens when
it is detached. This may result in
unrecoverable damage to the eyes or
cause a malfunction.
• Do not leave the camera, the supplied
accessories, or memory cards within
the reach of infants. They may be
accidentally swallowed. If this occurs,
consult a doctor immediately.
Notes on the monitor and electronic
viewfinder
• The monitor and electronic viewfinder
are manufactured using extremely
high-precision technology, and over
99.99% of the pixels are operational
for effective use. However, there may
be some small black dots and/or
bright dots (white, red, blue or green
in color) that constantly appear on
the monitor and electronic viewfinder.
These are imperfections due to the
manufacturing process and do not
affect the recorded images in any way.
• When shooting with the viewfinder,
you may experience symptoms such as
eyestrain, fatigue, motion sickness, or
nausea. We recommend that you take a
break at regular intervals when you are
shooting with the viewfinder.
• If the monitor or electronic viewfinder
is damaged, stop using the camera
immediately. The damaged parts may
harm your hands, face, etc.
Notes on continuous shooting
During continuous shooting, the monitor
or viewfinder may flash between the
shooting screen and a black screen.
If you keep watching the screen in
this situation, you may experience
uncomfortable symptoms such as
feeling of unwellness. If you experience
uncomfortable symptoms, stop using
the camera, and consult your doctor as
necessary.
Notes on recording for long periods of
time or recording 4K movies
• The camera body and battery may
become warm with use – this is normal.
• If the same part of your skin touches
the camera for a long period of time
while using the camera, even if the
camera does not feel hot to you, it may
cause symptoms of a low-temperature
burn such as redness or blistering.
Pay special attention in the following
situations and use a tripod, etc.
- When using the camera in a high
temperature environment
- When someone with poor circulation
or impaired skin sensation uses the
camera
- When using the camera with
[Auto Power OFF Temp.] set to [High]
Notes on using a tripod
Use a tripod with a screw less than
5.5mm (7/32 inches) long. Otherwise,
you cannot firmly secure the camera, and
damage to the camera may occur.
Sony lenses/accessories
Using this unit with products from
other manufacturers may affect its
performance, leading to accidents or
malfunction.
Warning on copyrights
Television programs, films, videotapes,
and other materials may be copyrighted.
Unauthorized recording of such materials
may be contrary to the provisions of the
copyright laws.

ILCE-6100
5-009-876-41(1)
GB
11
\\Win-473\camera\CX88400(PD)\Multi\06_Compose\5009876411_14lang\5009876411ILCE6100CEC\01GB-ILCE6100CEC\01GB.indd
DTP data saved: 2019/07/30 13:54
PDF file created: 2019/07/31 09:15
GB
Notes on location information
If you upload and share an image
tagged with a location, you may
accidentally reveal the information to a
third party. To prevent third parties from
obtaining your location information, set
[
Location Info. Link Set.] to [Off] before
shooting images.
Notes on discarding or transferring this
product to others
Before discarding or transferring this
product to others, be sure to perform the
following operation to protect private
information.
• Select [Setting Reset] [Initialize].
Notes on discarding or transferring a
memory card to others
Executing [Format] or [Delete] on
the camera or a computer may not
completely delete the data on the
memory card. Before transferring a
memory card to others, we recommend
that you delete the data completely using
data deletion software. When discarding
a memory card, we recommend that you
physically destroy it.
Note on network functions
When you use network functions,
unintended third parties on the network
may access the camera, depending on
the usage environment. For example,
unauthorized access to the camera may
occur in network environments to which
another network device is connected or
can connect without permission. Sony
bears no responsibility for any loss or
damage caused by connecting to such
network environments.
How to turn off wireless network
functions (Wi-Fi, etc.) temporarily
When you board an airplane, etc., you
can turn off all wireless network functions
temporarily using [Airplane Mode].
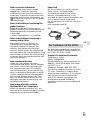
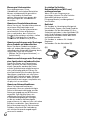
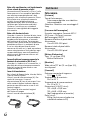
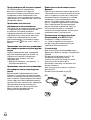
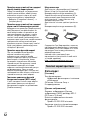
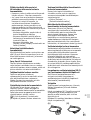
Power Cord
For the customers in the UK, Ireland,
Malta, Cyprus and Saudi Arabia
Use the power cord (A). For safety
reasons, the power cord (B) is not
intended for above countries/regions and
shall therefore not be used there.
For the customers in other EU countries/
regions
Use the power cord (B).
(A) (B)
For Customers in the U.S.A.
For question regarding your product or
for the Sony Service Center nearest you,
call 1-800-222-SONY (7669) .
Supplier’s Declaration of Conformity
Trade Name : SONY
Model : WW642826
Responsible Party : Sony Electronics Inc.
Address : 16535 Via Esprillo, San Diego,
CA 92127 U.S.A.
Telephone Number : 858-942-2230
This device complies with part 15 of the
FCC rules. Operation is subject to the
following two conditions: (1) This device
may not cause harmful interference,
and (2) this device must accept any
interference received, including
interference that may cause undesired
operation.

ILCE-6100
5-009-876-41(1)
GB
12
\\Win-473\camera\CX88400(PD)\Multi\06_Compose\5009876411_14lang\5009876411ILCE6100CEC\01GB-ILCE6100CEC\01GB.indd
DTP data saved: 2019/07/30 13:54
PDF file created: 2019/07/31 09:15
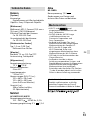
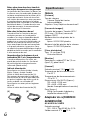
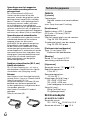
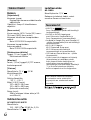
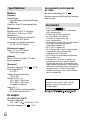
Specifications
Camera
[System]
Camera Type:
Interchangeable Lens Digital Camera
Lens: Sony E-mount lens
[Image sensor]
Image format: APS-C size (23.5mm ×
15.6mm), CMOS image sensor
Effective pixel number of camera:
Approx. 24 200 000 pixels
Total pixel number of camera:
Approx. 25 000 000 pixels
[Electronic Viewfinder]
Type: 1.0 cm (0.39 type)
Electronic Viewfinder
[Monitor]
Wide, 7.5 cm (3.0 type) TFT drive,
touch panel
[General]
Rated input: 7.2V
, 2.3W
Operating temperature:
0 to 40°C (32 to 104°F)
Storage temperature:
–20 to 55°C (–4 to 131°F)
Dimensions (W/H/D) (Approx.):
120 × 66.9 × 59.4mm
120 × 66.9 × 49.9mm
(from grip to monitor)
43/4 × 23/4 × 23/8in.
43/4 × 23/4 × 2in.
(from grip to monitor)
Mass (Approx.):
396g (14.0oz) (including battery
pack, SD memory card)
AC Adaptor
AC-UUD12/AC-UUE12
Rated input:
100 - 240V
, 50/60Hz, 0.2A
Rated output: 5V , 1.5A
Rechargeable battery pack
NP-FW50
Rated voltage: 7.2V
Design and specifications are subject
to change without notice.
Trademarks
• XAVC S and are registered
trademarks of Sony Corporation.
• AVCHD and AVCHD logotype are
trademarks of Panasonic Corporation
and Sony Corporation.
• Android and Google Play are
trademarks or registered trademarks of
Google LLC.
• Wi-Fi, the Wi-Fi logo and
Wi-Fi Protected Setup are registered
trademarks or trademarks of the
Wi-Fi Alliance.
• QR Code is a trademark of
Denso Wave Inc.
• In addition, system and product names
used in this manual are, in general,
trademarks or registered trademarks
of their respective developers or
manufacturers. However, the ™ or ®
marks may not be used in all cases in
this manual.
Additional information on this
product and answers to frequently
asked questions can be found at our
Customer Support Website.

ILCE-6100
5-009-876-41(1)
GB
13
\\Win-473\camera\CX88400(PD)\Multi\06_Compose\5009876411_14lang\5009876411ILCE6100CEC\01GB-ILCE6100CEC\01GB.indd
DTP data saved: 2019/07/30 13:54
PDF file created: 2019/07/31 09:15
GB

ILCE-6100
5-009-876-41(1)
FR
2
\\Win-473\camera\CX88400(PD)\Multi\06_Compose\5009876411_14lang\5009876411ILCE6100CEC\02FR-ILCE6100CEC\02FR.indd
DTP data saved: 2019/07/19 14:42
PDF file created: 2019/07/31 09:15
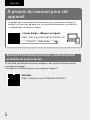
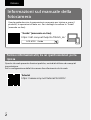
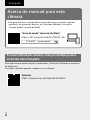
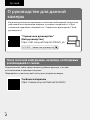
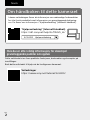
À propos du manuel pour cet
appareil
Ce guide décrit les préparatifs nécessaires pour commencer à utiliser le
produit, les fonctions de base, etc. Pour plus d’informations, consultez le
«Guide d’aide» (manuel en ligne).
https://rd1.sony.net/help/ilc/1950/h_zz/
« Guide d’aide » (Manuel en ligne)
ILCE-6100 Guide d’aide
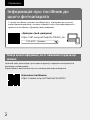
Recherche d’informations précieuses, comme des points
essentiels sur la prise de vue
Ce site Web présente des fonctions pratiques, des types d’utilisation et des
exemples de réglage.
Consultez le site Web lorsque vous configurez l’appareil.
Tutoriels
https://www.sony.net/tutorial/ilc/6100/
Français

ILCE-6100
5-009-876-41(1)
FR
3
\\Win-473\camera\CX88400(PD)\Multi\06_Compose\5009876411_14lang\5009876411ILCE6100CEC\02FR-ILCE6100CEC\02FR.indd
DTP data saved: 2019/07/19 14:42
PDF file created: 2019/07/31 09:15
FR
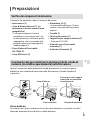
Préparatifs
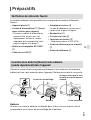
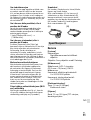
Vérification des éléments fournis
Le nombre indiqué entre parenthèses correspond au nombre d’éléments
fournis.
• Appareil photo (1)
• Cordon d’alimentation (1)* (fourni
dans certains pays/régions)
* Plusieurs cordons d’alimentation
peuvent être fournis avec cet
équipement. Utilisez le cordon
approprié qui correspond à votre
pays ou région. Voir page 11.
• Batterie rechargeable NP-FW50
(1)
• Câble micro-USB (1)
• Adaptateur secteur (1)
Le type d’adaptateur secteur peut
varier selon le pays/la région.
• Bandoulière (1)
• Oculaire de visée (1)
• Capuchon de boîtier (1)*
* Uniquement pour le ILCE-6100
• Guide de démarrage (ce manuel)
(1)
• Guide de référence (1)
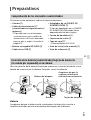
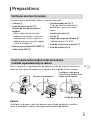
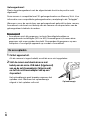
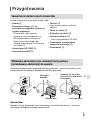
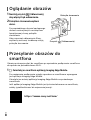
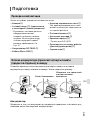
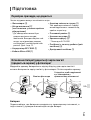
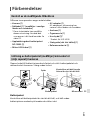
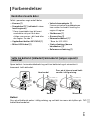
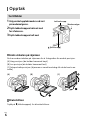
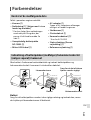
Insertion de la batterie (fourni)/carte mémoire
(vendu séparément) dans l’appareil
Ouvrez le couvercle du compartiment batterie/carte mémoire et insérez la
batterie et une carte mémoire dans l’appareil. Refermez ensuite le couvercle.
Carte mémoire Batterie
Levier de verrouillage
Assurez-vous que le coin
entaillé est correctement
orienté.
Batterie
Assurez-vous que la batterie est placée dans le bon sens et insérez-la tout
en appuyant sur le levier de verrouillage de la batterie.

ILCE-6100
5-009-876-41(1)
FR
4
\\Win-473\camera\CX88400(PD)\Multi\06_Compose\5009876411_14lang\5009876411ILCE6100CEC\02FR-ILCE6100CEC\02FR.indd
DTP data saved: 2019/07/19 14:42
PDF file created: 2019/07/31 09:15
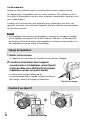
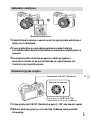
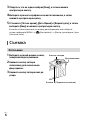
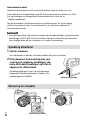
Carte mémoire
Insérez la carte mémoire avec le coin biseauté tourné comme illustré.
Cet appareil est compatible avec les cartes mémoire SD ou Memory Stick.
Pour plus d’informations sur les cartes mémoire compatibles, reportez-vous
au «Guide d’aide».
Lorsque vous utilisez une carte mémoire pour la première fois avec cet
appareil, formatez-la en utilisant l’appareil, afin de stabiliser la performance
de la carte mémoire.
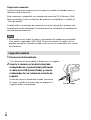
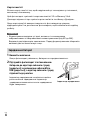
Note
• Le formatage efface toutes les données, y compris les images protégées
et les réglages enregistrés (M1 à M4). Une fois effacées, ces données ne
peuvent pas être récupérées. Sauvegardez vos données importantes sur
un ordinateur ou autre avant le formatage.
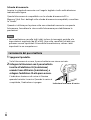
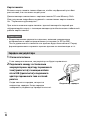
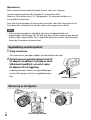
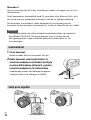
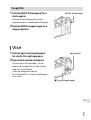
Charge de la batterie
1 Mettez-le hors tension.
Si l’appareil est sous tension, la batterie ne sera pas chargée.
2 La batterie étant insérée dans l’appareil,
raccordez celui-ci à l’adaptateur secteur (fourni)
à l’aide du câble micro-USB (fourni) et branchez
l’adaptateur secteur sur la prise murale.
Le témoin de charge s’allumera au
commencement de la charge. Lorsque le témoin
de charge s’éteint, la charge est terminée.
Témoin de charge
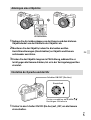
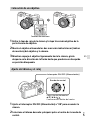
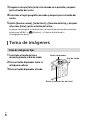
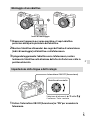
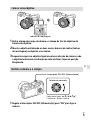
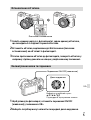
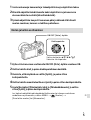
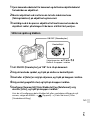
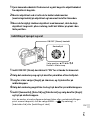
Fixation d’un objectif
Repères de montage

ILCE-6100
5-009-876-41(1)
FR
5
\\Win-473\camera\CX88400(PD)\Multi\06_Compose\5009876411_14lang\5009876411ILCE6100CEC\02FR-ILCE6100CEC\02FR.indd
DTP data saved: 2019/07/19 14:42
PDF file created: 2019/07/31 09:15
FR
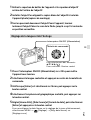
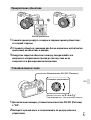
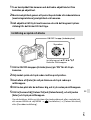
1 Retirez le capuchon de boîtier de l’appareil et le capuchon d’objectif
arrière de l’arrière de l’objectif.
2 Installez l’objectif en alignant le repère blanc de l’objectif et celui de
l’appareil photo (repères de montage).
3 Tout en poussant doucement l’objectif vers l’appareil, tournez
lentement l’objectif dans le sens de la flèche jusqu’à ce qu’il s’enclenche
en position verrouillée.
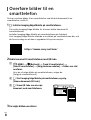
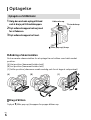
Réglage de la langue et de l’horloge
Interrupteur ON/OFF (Alimentation)
Molette de commande
Pour sélectionner des éléments:
////
/
Pour confirmer: Bouton central
1 Placez l’interrupteur ON/OFF (Alimentation) sur «ON» pour mettre
l’appareil sous tension.
2 Sélectionnez la langue souhaitée et appuyez au centre de la molette de
commande.
3 Vérifiez que [Entrer] est sélectionné sur l’écran, puis appuyez sur le
bouton central.
4 Sélectionnez l’emplacement géographique souhaité, puis appuyez sur
le bouton central.
5 Réglez [Heure d'été], [Date/heure] et [Format de date], puis sélectionnez
[Entrer] et appuyez sur le bouton central.
Pour reconfigurer la date/heure ou le réglage de la zone ultérieurement,
sélectionnez MENU
(Réglage) [Rég. date/heure] ou
[Réglage zone].

ILCE-6100
5-009-876-41(1)
FR
6
\\Win-473\camera\CX88400(PD)\Multi\06_Compose\5009876411_14lang\5009876411ILCE6100CEC\02FR-ILCE6100CEC\02FR.indd
DTP data saved: 2019/07/19 14:42
PDF file created: 2019/07/31 09:15
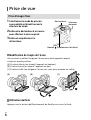
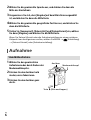
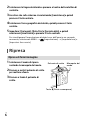
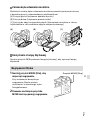
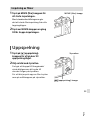
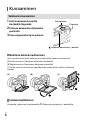
Prise de vue
Prise d’images fixes
1 Sélectionnez le mode de prise de
vue souhaité en faisant tourner le
sélecteur de mode.
Déclencheur
Sélecteur
de mode
Bouton (Déploiement du flash)
2 Enfoncez le déclencheur à mi-course
pour effectuer la mise au point.
3 Enfoncez complètement le
déclencheur.
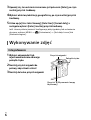
Modification de l’angle de l’écran
Vous pouvez modifier l’angle de l’écran pour photographier depuis
n’importe quelle position.
(A) Position élevée (en tenant l’appareil en hauteur)
(B) Position basse (en tenant l’appareil en bas)
(C) Position Selfie (en dirigeant l’écran vers vous pour prendre un selfie)
(A)
(B)
(C)
Utilisation du flash
Appuyez sur le bouton (Déploiement du flash) pour ouvrir le flash.

ILCE-6100
5-009-876-41(1)
FR
7
\\Win-473\camera\CX88400(PD)\Multi\06_Compose\5009876411_14lang\5009876411ILCE6100CEC\02FR-ILCE6100CEC\02FR.indd
DTP data saved: 2019/07/19 14:42
PDF file created: 2019/07/31 09:15
FR
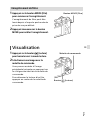
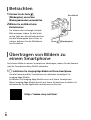
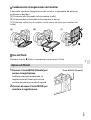
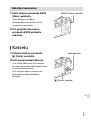
Enregistrement de films
1 Appuyez sur le bouton MOVIE (Film)
pour commencer l’enregistrement.
L’enregistrement de films peut être
lancé depuis n’importe quel mode de
prise de vue par défaut.
Bouton MOVIE (Film)
2 Appuyez à nouveau sur le bouton
MOVIE pour arrêter l’enregistrement.
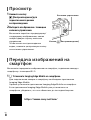
Visualisation
1 Appuyez sur le bouton (Lecture)
pour basculer vers le mode lecture.
Bouton (Lecture)
Molette de commande
2 Sélectionnez une image avec la
molette de commande.
Vous pouvez accéder à l’image
précédente/suivante en appuyant sur
le côté gauche/droit de la molette de
commande.
Pour démarrer la lecture d’un film,
appuyez au centre de la molette de
commande.

ILCE-6100
5-009-876-41(1)
FR
8
\\Win-473\camera\CX88400(PD)\Multi\06_Compose\5009876411_14lang\5009876411ILCE6100CEC\02FR-ILCE6100CEC\02FR.indd
DTP data saved: 2019/07/19 14:42
PDF file created: 2019/07/31 09:15
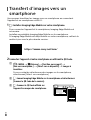
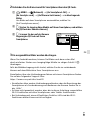
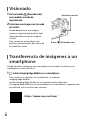
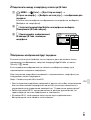
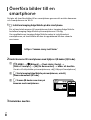
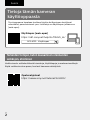
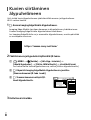
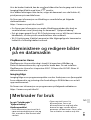
Transfert d’images vers un
smartphone
Vous pouvez transférer les images vers un smartphone en connectant
l’appareil et un smartphone via Wi-Fi.
1 : Installez Imaging Edge Mobile sur votre smartphone.
Pour connecter l’appareil et le smartphone, Imaging Edge Mobile est
nécessaire.
Installez au préalable Imaging Edge Mobile sur le smartphone.
Si Imaging Edge Mobile est déjà installé sur votre smartphone, veillez à le
mettre à jour vers la plus récente version.
https://www.sony.net/iem/
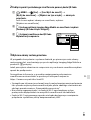
2 Connectez l’appareil et votre smartphone en utilisant le QR Code.
: MENU (Réseau) [Fnct Env. vers smart.]
[Env. vers smartphon.] [Sélect. sur ce dispositif] images à
transférer.
Si vous souhaitez sélectionner des images sur le smartphone,
sélectionnez [Sélect. sur smartphone].
: Lancez Imaging Edge Mobile sur le smartphone et sélectionnez
[Scanner le QR Code de la caméra].
: Scannez le QR Code affiché sur
l’appareil au moyen du smartphone.
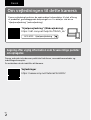
A página está carregando ...
A página está carregando ...
A página está carregando ...
A página está carregando ...
A página está carregando ...
A página está carregando ...
A página está carregando ...
A página está carregando ...
A página está carregando ...
A página está carregando ...
A página está carregando ...
A página está carregando ...
A página está carregando ...
A página está carregando ...
A página está carregando ...
A página está carregando ...
A página está carregando ...
A página está carregando ...
A página está carregando ...
A página está carregando ...
A página está carregando ...
A página está carregando ...
A página está carregando ...
A página está carregando ...
A página está carregando ...
A página está carregando ...
A página está carregando ...
A página está carregando ...
A página está carregando ...
A página está carregando ...
A página está carregando ...
A página está carregando ...
A página está carregando ...
A página está carregando ...
A página está carregando ...
A página está carregando ...
A página está carregando ...
A página está carregando ...
A página está carregando ...
A página está carregando ...
A página está carregando ...
A página está carregando ...
A página está carregando ...
A página está carregando ...
A página está carregando ...
A página está carregando ...
A página está carregando ...
A página está carregando ...
A página está carregando ...
A página está carregando ...
A página está carregando ...
A página está carregando ...
A página está carregando ...
A página está carregando ...
A página está carregando ...
A página está carregando ...
A página está carregando ...
A página está carregando ...
A página está carregando ...
A página está carregando ...
A página está carregando ...
A página está carregando ...
A página está carregando ...
A página está carregando ...
A página está carregando ...
A página está carregando ...
A página está carregando ...
A página está carregando ...
A página está carregando ...
A página está carregando ...
A página está carregando ...
A página está carregando ...
A página está carregando ...
A página está carregando ...
A página está carregando ...
A página está carregando ...
A página está carregando ...
A página está carregando ...
A página está carregando ...
A página está carregando ...
A página está carregando ...
A página está carregando ...
A página está carregando ...
A página está carregando ...
A página está carregando ...
A página está carregando ...
A página está carregando ...
A página está carregando ...
A página está carregando ...
A página está carregando ...
A página está carregando ...
A página está carregando ...
A página está carregando ...
A página está carregando ...
A página está carregando ...
A página está carregando ...
A página está carregando ...
A página está carregando ...
A página está carregando ...
A página está carregando ...
A página está carregando ...
A página está carregando ...
A página está carregando ...
A página está carregando ...
A página está carregando ...
A página está carregando ...
A página está carregando ...
A página está carregando ...
A página está carregando ...
A página está carregando ...
A página está carregando ...
A página está carregando ...
A página está carregando ...
A página está carregando ...
A página está carregando ...
A página está carregando ...
A página está carregando ...
A página está carregando ...
A página está carregando ...
A página está carregando ...
A página está carregando ...
A página está carregando ...
A página está carregando ...
A página está carregando ...
A página está carregando ...
A página está carregando ...
A página está carregando ...
A página está carregando ...
A página está carregando ...
A página está carregando ...
A página está carregando ...
A página está carregando ...
A página está carregando ...
A página está carregando ...
A página está carregando ...
A página está carregando ...
A página está carregando ...
A página está carregando ...
A página está carregando ...
A página está carregando ...
A página está carregando ...
A página está carregando ...
A página está carregando ...
A página está carregando ...
A página está carregando ...
A página está carregando ...
A página está carregando ...
A página está carregando ...
A página está carregando ...
A página está carregando ...
A página está carregando ...
-
 1
1
-
 2
2
-
 3
3
-
 4
4
-
 5
5
-
 6
6
-
 7
7
-
 8
8
-
 9
9
-
 10
10
-
 11
11
-
 12
12
-
 13
13
-
 14
14
-
 15
15
-
 16
16
-
 17
17
-
 18
18
-
 19
19
-
 20
20
-
 21
21
-
 22
22
-
 23
23
-
 24
24
-
 25
25
-
 26
26
-
 27
27
-
 28
28
-
 29
29
-
 30
30
-
 31
31
-
 32
32
-
 33
33
-
 34
34
-
 35
35
-
 36
36
-
 37
37
-
 38
38
-
 39
39
-
 40
40
-
 41
41
-
 42
42
-
 43
43
-
 44
44
-
 45
45
-
 46
46
-
 47
47
-
 48
48
-
 49
49
-
 50
50
-
 51
51
-
 52
52
-
 53
53
-
 54
54
-
 55
55
-
 56
56
-
 57
57
-
 58
58
-
 59
59
-
 60
60
-
 61
61
-
 62
62
-
 63
63
-
 64
64
-
 65
65
-
 66
66
-
 67
67
-
 68
68
-
 69
69
-
 70
70
-
 71
71
-
 72
72
-
 73
73
-
 74
74
-
 75
75
-
 76
76
-
 77
77
-
 78
78
-
 79
79
-
 80
80
-
 81
81
-
 82
82
-
 83
83
-
 84
84
-
 85
85
-
 86
86
-
 87
87
-
 88
88
-
 89
89
-
 90
90
-
 91
91
-
 92
92
-
 93
93
-
 94
94
-
 95
95
-
 96
96
-
 97
97
-
 98
98
-
 99
99
-
 100
100
-
 101
101
-
 102
102
-
 103
103
-
 104
104
-
 105
105
-
 106
106
-
 107
107
-
 108
108
-
 109
109
-
 110
110
-
 111
111
-
 112
112
-
 113
113
-
 114
114
-
 115
115
-
 116
116
-
 117
117
-
 118
118
-
 119
119
-
 120
120
-
 121
121
-
 122
122
-
 123
123
-
 124
124
-
 125
125
-
 126
126
-
 127
127
-
 128
128
-
 129
129
-
 130
130
-
 131
131
-
 132
132
-
 133
133
-
 134
134
-
 135
135
-
 136
136
-
 137
137
-
 138
138
-
 139
139
-
 140
140
-
 141
141
-
 142
142
-
 143
143
-
 144
144
-
 145
145
-
 146
146
-
 147
147
-
 148
148
-
 149
149
-
 150
150
-
 151
151
-
 152
152
-
 153
153
-
 154
154
-
 155
155
-
 156
156
-
 157
157
-
 158
158
-
 159
159
-
 160
160
-
 161
161
-
 162
162
-
 163
163
-
 164
164
-
 165
165
-
 166
166
-
 167
167
-
 168
168
-
 169
169
-
 170
170
-
 171
171


