A página está carregando...

Status LED Bar Blink Codes
Blink Pattern Indication
5-second blink • No network cable connection.
Rotating • Bridge firmware is updating if the status
LEDs are progressing around the bridge
in sequence.
• Firmware is updating. The Lutron
ConnectTM bridge is not functional during
a firmware update.
Please Read Before Installing
Use these instructions to install the model numbers
listed above.
For more information visit: www.lutron.com/radiora2
or www.lutron.com/hwqs
Features
• Add button allows the bridge to be activated in a
RadioRA
® 2 or HomeWorks® QS system and the
Lutron Connect
TM Mobile App.
• Ethernet port allows the bridge to be connected to a
wireless router.
Important Notes
Environment
Ambient operating temperature: 32 °F to 104 °F
(0 °C to 40 °C), 0% to 90% humidity. Indoor use only.
Codes
Install in accordance with all local and national
electrical codes.
Cleaning
To clean, wipe with a clean damp cloth. DO NOT use
any chemical cleaning solutions.
DC Power Adapter
Using a DC power adapter not rated at the proper
specifications could damage the Lutron Connect
TM bridge
and possibly overheat the DC power adapter. Ensure that
the DC power adapter follows the proper specifications
as detailed above.
Programming
Programming and activation (addressing) must be
accomplished through the RadioRA
® 2 or
HomeWorks
® QS software.
Lutron Elec tron ics Co., Inc.
7200 Suter Road Coopersburg, PA 18036-1299
Returning Lutron ConnectTM Bridge to
Factory Settings
Returning the Lutron ConnectTM bridge to its factory
settings will erase all its programming and will require
the Lutron Connect
TM bridge to be reactivated into the
system.
1. Triple tap and hold the “Add” button. DO NOT release
the button after the third tap.
2. Keep the button pressed on the third tap until the
LEDs start to flash.
3. Release the button and immediately triple tap it again.
The LEDs will flash quickly. When the LEDs stop
flashing, the Lutron Connect
TM bridge has been
returned to its factory settings.
Lutron, HomeWorks, and RadioRA are registered trademarks and RadioRA 2 and Lutron Connect are trademarks of Lutron Electronics Co., Inc.
NEC is a registered trademark of National Fire Protection Association, Quincy, Massachusetts. © 2016 Lutron Electronics Co., Inc.
English
CONNECT-BDG-1
CONNECT-BDG-2
Installation Instructions
* Typical Power Consumption test conditions: LED on, Ethernet cable
plugged in, powered by the 5 V- adapter.
041531b
02/2016
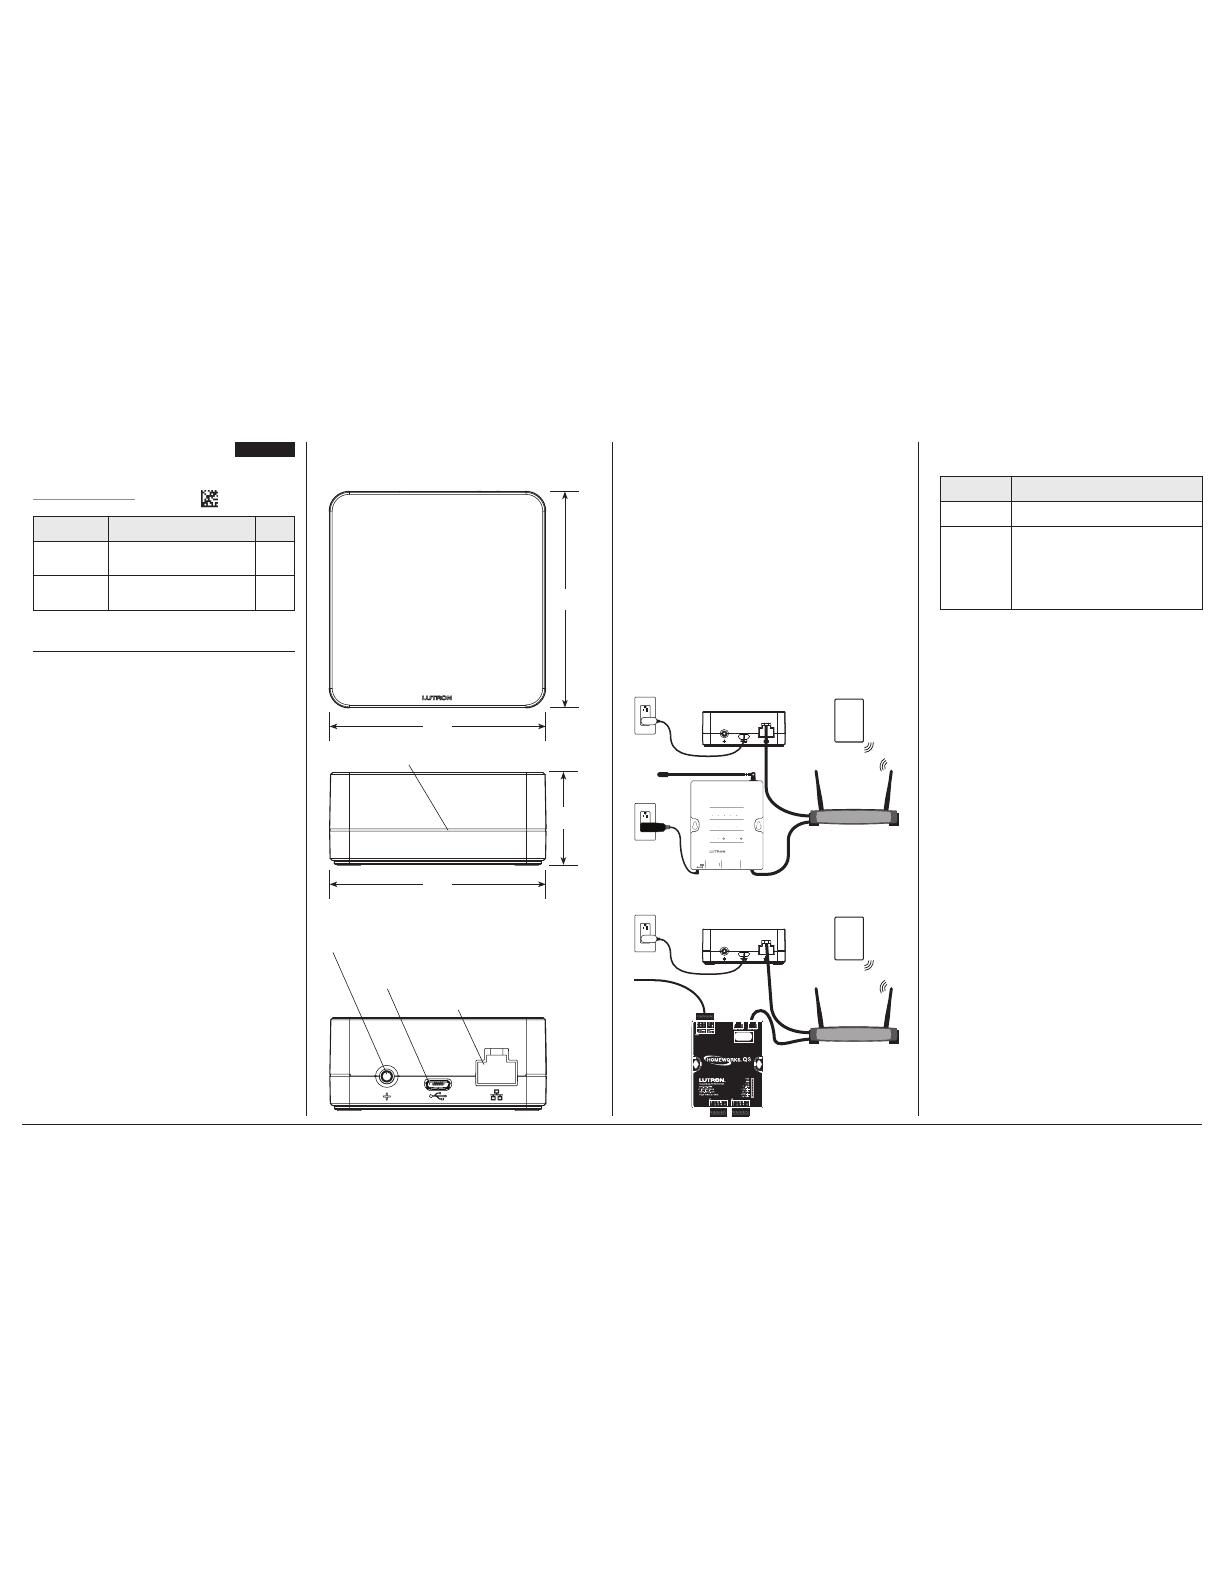
Installation
1. Using the Ethernet cable, connect the Lutron ConnectTM
bridge to a wireless router on the same network (subnet)
as the RadioRA
® 2 main repeater or the HomeWorks® QS
processor.
2. Attach the DC power adapter cord to the power jack on
the Lutron Connect
TM bridge and insert the DC power
adapter plug into a receptacle.
3. Use the RadioRA
® 2 or HomeWorks® QS design software
to activate the Lutron Connect
TM bridge into the system.
Ensure convenient access to the “Add” button because it
will be used for activating the bridge into the system and
pairing with the Lutron Connect
TM App.
4. Use the Lutron Connect
TM App to control and monitor the
system through the Lutron Connect
TM bridge. The “Add”
button will be used for pairing the app to the bridge.
Dimensions
Measurements shown as: in (mm)
Front View
1.19
(30.2)
2.75
(69.9)
Top View
2.75
(69.9)
2.75
(69.9)
Connections
Back View
“Add” Button
Power Jack (to adapter)
NEC® Class 2, LPS or SELV, limited energy (<15 W)
Ethernet CAT5 Port
Lutron ConnectTM
Bridge
DC Power Adapter
Ethernet
Cable
CONNECT-BDG-1
(5V- 300 mA)
T-5DC-USB-WH (included):
Input: 100 – 240 V~ 50/60 Hz 100 mA;
Output: 5 V- 550 mA
Included
CONNECT-BDG-2
(5V- 300 mA)
Not included. Use LPS or SELV output
5 V- 550–1000 mA USB Micro
Connector
Included
Typical Power Consumption*: 1.3 W
Warranty
For warranty information, please see the Warranty
enclosed with the product, or visit
www.lutron.com/resiinfo
FCC/IC Information
For FCC/IC information, please visit
www.lutron.com/fcc-ic
Customer Assistance
Online: forums.lutron.com | www.lutron.com/help
Email: support@lutron.com
Phone:
U.S.A./Canada: 1.844.LUTRON1 (588.7661)
Europe: +44.(0)20.7680.4481
Mexico: +1.888.235.2910
Other Countries: +1.610.282.3800
Setup
Wired
RF
Communication
Repeater Status
1
3
4
2
M
Power
Repeater Link
COM
9 V
1
N / C
MUX
MUX
2
3
4
AddTest
USB
Integrate
Program / Integrate
RS232
Ethernet
Main Repeater
HomeWorks® QS Processor
Lutron ConnectTM Bridge
Lutron
Connect
TM
App
HomeWorks
®
QS Processor
Wireless Router
(not sold by Lutron)
Ethernet
Connection
Ethernet
Connection
DC Power
Adapter
24 V-
Input
Setup
Wired
RF
Communication
Repeater Status
1
3
4
2
M
Power
Repeater Link
COM
9 V
1
N / C
MUX
MUX
2
3
4
AddTest
USB
Integrate
Program / Integrate
RS232
Ethernet
Main Repeater
RadioRA® 2 Main Repeater
Lutron ConnectTM Bridge
Lutron
Connect
TM
App
RadioRA
® 2 Main Repeater
Wireless Router
(not sold by Lutron)
Ethernet
Connection
Ethernet
Connection
DC Power
Adapter
Status LED Bar
Lutron ConnectTM Bridge
Codes de clignotement de la barre de
LED d’état
Motif de
clignotement
Indication
Clignotement
de 5secondes
• Absence de connexion du câble réseau.
Rotation • Le micrologiciel du Bridge est en cours
de mise à jour si les LED d’état
progressent autour du Bridge de façon
séquentielle.
• Le micrologiciel est en cours de mise à
jour. Le Lutron Connect
TM Bridge ne
fonctionne pas durant la mise à jour du
micrologiciel.
Veuillez lire avant l’installation
Utilisez ces instructions pour installer les numéros de
modèles énumérés ci-dessus. Pour plus d’informations,
consultez: www.lutron.com/radiora2 ou
www.lutron.com/hwqs
Caractéristiques
• Le bouton «Ajouter» permet d’activer le Bridge dans un
système RadioRA
® 2 ou HomeWorks® QS et l’application
mobile Lutron Connect
TM.
• Le port Ethernet permet de raccorder le Bridge à un
routeur sans fil.
Remarques importantes
Environnement
Température ambiante de fonctionnement: 0 °C à 40 °C
(32 °F à 104 °F), 0 à 90% d'humidité. Utilisation à
l’intérieur seulement.
Codes
Effectuez l’installation en conformité avec les codes
électriques en vigueur.
Nettoyage
Pour nettoyer, essuyez avec un torchon propre et humide.
NE PAS utiliser de produit chimique de nettoyage.
Adaptateur CC
L’utilisation d’un adaptateur CC dont les spécifications ne
correspondent pas aux caractéristiques d’utilisation peut
endommager le Lutron Connect
TM Bridge et
éventuellement provoquer une surchauffe de l’adaptateur
CC. Vérifiez que l’adaptateur CC respecte les
spécifications correctes énumérées ci-dessus.
Programmation
La programmation et l’activation (adressage) doivent être
effectuées à l’aide du logiciel du RadioRA
® 2 ou
HomeWorks
® QS.
Lutron Electronics Co., Inc.
7200 Suter Road Coopersburg, PA 18036-1299 É.-U.
Réinitialiser le Lutron ConnectTM Bridge
aux réglages d’usine
La réinitialisation du Lutron ConnectTM Bridge à ses
réglages d’usine effacera toute sa programmation et
nécessitera la réactivation du Lutron Connect
TM Bridge
dans le système.
1. Appuyez trois fois et maintenez le bouton «Ajouter»
enfoncé. NE relâchez PAS le bouton la troisième fois.
2. Gardez le bouton appuyé la troisième fois jusqu'à ce
que les LED commencent à clignoter.
3. Relâchez le bouton et rappuyez immédiatement trois
fois dessus. Les LED clignoteront rapidement. Lorsque
les LED arrêtent de clignoter, le Lutron Connect
TM
Bridge est réinitialisé à ses réglages d’usine.
Lutron, HomeWorks, et RadioRA sont des marques déposées, et RadioRA 2 et Connect de Lutron sont des marques commerciales de Lutron Electronics Co., Inc.
NEC est une marque déposée de la National Fire Protection Association, Quincy, Massachusetts. © 2016 Lutron Electronics Co., Inc.
Français
Instructions d’installation
* Conditions d’essai de la consommation électrique typique: LED
allumée, câble Ethernet branché, alimenté par l’adaptateur de 5V-.
Installation
1. À l’aide du câble Ethernet, raccordez le Lutron ConnectTM
Bridge à un routeur sans fil sur le même réseau (sous-
réseau) comme répéteur principal RadioRA
® 2 ou
processeur HomeWorks
® QS.
2. Branchez le cordon de l’adaptateur CC à la prise
d’alimentation du Lutron Connect
TM Bridge et insérez la fiche
de l’adaptateur CC dans la prise.
3. Utilisez le logiciel de conception RadioRA
® 2 ou
HomeWorks
® QS pour activer le Lutron ConnectTM Bridge
dans le système. Vérifiez la facilité d’accès au bouton
«Ajouter» car il sera utilisé pour activer le Bridge dans le
système et jumeler l’application Lutron Connect
TM.
4. Utilisez l’application Lutron Connect
TM. pour commander et
contrôler le système à l’aide du Lutron Connect
TM Bridge. Le
bouton «Ajouter» sera utilisé pour associer l’application et le
Bridge.
Dimensions
Mesures représentées en: mm (po)
Vue frontale
30,2
(1,19)
69,9
(2,75)
Vue de dessus
69,9
(2,75)
69,9
(2,75)
Raccordements
Vue arrière
Bouton « Ajouter »
Prise d'alimentation (vers l'adaptateur)
NEC® de classe 2, type LPS ou SELV,
puissance limitée (<15W)
Port CAT5 Ethernet
Lutron ConnectTM
Bridge
Adaptateur CC
Câble
Ethernet
CONNECT-BDG-1
(5V- 300 mA)
T-5DC-USB-WH (inclus):
Entrée: 100 – 240 V~ 50/60 Hz 100 mA;
Sortie: 5 V- 550 mA
Inclus
CONNECT-BDG-2
(5V- 300 mA)
Non inclus. Utilisez un connecteur micro
USB à sortie de type LPS ou SELV (très
basse tension) de 5V- 550–1 000mA
Inclus
Consommation électrique*: 1,3W
Garantie
Pour des renseignements concernant la garantie,
veuillez lire la garantie incluse avec le produit, ou
consultez www.lutron.com/resiinfo
Informations FCC/IC
Pour les Informations de la FCC/IC, veuillez consulter
www.lutron.com/fcc-ic
Assistance à la clientèle
En ligne: forums.lutron.com | www.lutron.com/help
Email: support@lutron.com
Téléphone:
États-Unis/Canada: 1.844.LUTRON1 (588.7661)
Europe: +44.(0)20.7680.4481
Mexique: +1.888.235.2910
Autres pays: +1.610.282.3800
Setup
Wired
RF
Communication
Repeater Status
1
3
4
2
M
Power
Repeater Link
COM
9 V
1
N / C
MUX
MUX
2
3
4
AddTest
USB
Integrate
Program / Integrate
RS232
Ethernet
Main Repeater
Processeur HomeWorks® QS
Lutron ConnectTM Bridge
Application
Lutron
Connect
TM
Processeur
HomeWorks
® QS
Routeur sans fil
(non vendu par Lutron)
Connexion
Ethernet
Connexion
Ethernet
Adaptateur
CC
Entrée
24 V-
Setup
Wired
RF
Communication
Repeater Status
1
3
4
2
M
Power
Repeater Link
COM
9 V
1
N / C
MUX
MUX
2
3
4
AddTest
USB
Integrate
Program / Integrate
RS232
Ethernet
Main Repeater
Répéteur principal RadioRA® 2
Lutron ConnectTM Bridge
Application
Lutron
Connect
TM
Répéteur principal RadioRA® 2
Routeur sans fil
(non vendu par Lutron)
Connexion
Ethernet
Connexion
Ethernet
Adaptateur
CC
Barre de LED d’état
Lutron ConnectTM Bridge
CONNECT-BDG-1
CONNECT-BDG-2
041531b
02/2016

Códigos de destello de la barra de
LED de estado
Patrón de
destellos
Indicación
Destello de 5
segundos
• No hay ninguna conexión de cable de
red.
Giratorio • Si los LED de estado van recorriendo el
Bridge en secuencia el firmware del
Bridge se está actualizando.
• El firmware se está actualizando. Durante
una actualización de firmware el Lutron
Connect
TM Bridge no estará operativo.
Por favor lea antes de instalar
Para instalar los números de modelo listados
anteriormente siga estas instrucciones.Para obtener
información adicional, visite: www.lutron.com/radiora2 o
www.lutron.com/hwqs
Características
• El botón Añadir permite que el Bridge sea activado en un
sistema RadioRA
® 2 o HomeWorks® QS y una aplicación
móvil Lutron Connect
TM.
• El puerto de Ethernet le permite que el Bridge ser
conectado a un enrutador inalámbrico.
Notas importantes
Entorno
Temperatura ambiental de operación: 0 °C a 40 °C (32 °F a
104 °F), 0% a 90% de humedad. Sólo para uso bajo techo.
Códigos
Instale de acuerdo con todos los códigos eléctricos
locales y nacionales.
Limpieza
Para limpiar, pase un paño limpio y húmedo. NO utilice
ninguna solución química limpiadora.
Adaptador de alimentación eléctrica CC
La utilización de un adaptador de alimentación eléctrica
CC que no satisfaga las especificaciones adecuadas
podría dañar el Lutron Connect
TM Bridge y posiblemente
recalentar el adaptador de alimentación CC. Asegúrese
de que el adaptador de alimentación eléctrica CC tenga
las especificaciones adecuadas que se detallaron
anteriormente.
Programación
La programación y la activación (direccionamiento) debe
llevarse a cabo a través del software RadioRA
® 2 o
HomeWorks
®
Lutron Elec tron ics Co., Inc.
7200 Suter Road Coopersburg, PA 18036-1299 E.U.A.
Retorno del Lutron ConnectTM Bridge
a su configuración de fábrica
El retorno del Lutron ConnectTM Bridge a su
configuración de fábrica borrará toda su programación
y requerirá que el Lutron Connect
TM Bridge sea
reactivado en el sistema.
1. Toque tres veces seguidas y mantenga pulsado el
botón “Añadir”. NO suelte el botón después del tercer
toque.
2. Mantenga el botón pulsado en el tercer toque hasta
que el LED comience a destellar.
3. Suelte el botón e inmediatamente vuélvalo a pulsar tres
veces consecutivas. Los LED destellarán rápidamente.
Cuando los LED dejen de destellar, el Lutron Connect
TM
Bridge ha sido retornado a su configuración de fábrica.
Lutron, HomeWorks y RadioRA son marcas comerciales registradas y RadioRA 2 y Lutron Connect son marcas comerciales de Lutron Electronics Co., Inc.
NEC es una marca comercial registrada de la National Fire Protection Association, Quincy, Massachusetts. © 2016 Lutron Electronics Co., Inc.
Español
Instrucciones de instalación
* Condiciones típicas del ensayo de consumo de energía: LED encendido,
cable de Ethernet enchufado, alimentado por el adaptador de 5V-.
Instalación
1. Utilizando el cable de Ethernet, conecte el Lutron ConnectTM
Bridge a un enrutador inalámbrico ubicado en la misma red
(subred) que el repetidor principal RadioRA
® 2 o el
procesador HomeWorks
® QS.
2. Conecte el cable del adaptador de alimentación eléctrica de
CC al conector hembra de alimentación del Lutron
Connect
TM Bridge e inserte el conector del adaptador de
alimentación de CC en un tomacorriente.
3. Utilice el software de diseño RadioRA
® 2 o HomeWorks® QS
para activar el Lutron Connect
TM Bridge en el sistema.
Asegúrese de que haya un acceso cómodo al botón
“Añadir”, ya que el mismo será utilizado para activar el
Bridge en el sistema y vincularlo con la aplicación Lutron
Connect
TM.
4. Utilice la aplicación Lutron Connect
TM para controlar y
supervisar el sistema a través del Lutron Connect
TM Bridge.
El botón “Añadir” será utilizado para vincular la aplicación
con el Bridge.
Dimensiones
Las mediciones se muestran en mm (pulg)
Vista frontal
30,2
(1,19)
69,9
(2,75)
Vista superior
69,9
(2,75)
69,9
(2,75)
Conexiones
Vista trasera
Botón “Añadir”
Conector de alimentación eléctrica (al adaptador)
NEC® Clase 2, LPS o SELV, energía limitada (<15 W)
Puerto de Ethernet CAT5
Lutron ConnectTM
Bridge
Adaptador de alimentación
eléctrica CC
Cable de
Ethernet
CONNECT-BDG-1
(5V- 300 mA)
T-5DC-USB-WH (incluido):
Entrada: 100 – 240 V~ 50/60 Hz 100 mA;
Salida: 5 V- 550 mA
Incluido
CONNECT-BDG-2
(5V- 300 mA)
No incluido. Utilice un microconector
USB LPS o SELV con salida 5 V- y
550–1 000 mA
Incluido
Consumo típico de energía*: 1,3 W
Garantía
Para obtener información sobre la garantía, consulte la
garantía incluida con el producto, o visite
www.lutron.com/resiinfo
Información de la FCC/IC
Para obtener información de la FCC/IC, visite
www.lutron.com/fcc-ic
Asistencia al cliente
En línea: forums.lutron.com | www.lutron.com/help
Correo electrónico: support@lutron.com
Teléfono:
E.U.A./Canadá: 1.844.LUTRON1 (588.7661)
Europa: +44.(0)20.7680.4481
México: +1.888.235.2910
Otros países: +1.610.282.3800
Setup
Wired
RF
Communication
Repeater Status
1
3
4
2
M
Power
Repeater Link
COM
9 V
1
N / C
MUX
MUX
2
3
4
AddTest
USB
Integrate
Program / Integrate
RS232
Ethernet
Main Repeater
Procesador HomeWorks®QS
Lutron ConnectTM Bridge
Aplicación
Lutron
Connect
TM
Procesador
HomeWorks
®QS
Enrutador inalámbrico
(no vendido por Lutron)
Conexión de
Ethernet
Conexión de
Ethernet
Adaptador de
alimentación
eléctrica CC
Entrada de
24 V-
Setup
Wired
RF
Communication
Repeater Status
1
3
4
2
M
Power
Repeater Link
COM
9 V
1
N / C
MUX
MUX
2
3
4
AddTest
USB
Integrate
Program / Integrate
RS232
Ethernet
Main Repeater
Repetidor principal RadioRA® 2
Lutron ConnectTM Bridge
Aplicación
Lutron
Connect
TM
Repetidor principal RadioRA® 2
Enrutador inalámbrico
(no vendido por Lutron)
Conexión de
Ethernet
Conexión de
Ethernet
Adaptador de
alimentación
eléctrica CC
Barra de LED de estado
Lutron ConnectTM Bridge
CONNECT-BDG-1
CONNECT-BDG-2
041531b
02/2016

Códigos de piscagem da barra do
LED de status
Padrão de
piscagem
Indicação
Pisca por 5
segundos
• Não há conexão por cabo de rede.
Alternando • O firmware do Bridge está sendo
atualizado, se os LEDs de status
estiverem progredindo em sequência no
Bridge.
• O firmware está sendo atualizado. O
Lutron Connect
TM Bridge não funciona
durante a atualização do firmware.
Leia antes de instalar
Utilize estas instruções para instalar os números de
modelo listados acima.
Para obter mais informações, visite o site:
www.lutron.com/radiora2 ou www.lutron.com/hwqs
Recursos
• O botão Adicionar permite que o bridge seja ativado em
um sistema RadioRA
® 2 ou HomeWorks® QS e no
aplicativo móvel Lutron Connect
TM.
• A porta Ethernet permite que o bridge seja conectado a
um roteador sem fio.
Notas importantes
Ambiente
Temperatura operacional: 0°C a 40°C (32°F a 104°F),
0%-90% de umidade. Para uso somente em ambientes
fechados.
Códigos
A instalação elétrica deve ser feita de acordo com as
normas locais e nacionais.
Limpeza
Para limpar, use um pano limpo e úmido. NÃO use
produtos químicos.
Adaptador de energia CC
O uso de adaptadores de CC não avaliados pelas
especificações adequadas pode causar danos ao Lutron
Connect
TM Bridge e superaquecimento do próprio
adaptador de CC. O adaptador de CC deve seguir as
especificações adequadas, conforme detalhes acima.
Programação
A programação e a ativação (endereçamento) devem
ser feitas por meio do software RadioRA
® 2 ou
HomeWorks
® QS.
Lutron Electronics Co., Inc.
7200 Suter Road Coopersburg, PA 18036-1299 EUA
Restauração do Lutron ConnectTM Bridge
às configurações de fábrica
A restauração do Lutron ConnectTM Bridge às
configurações de fábrica apagará toda a programação
e exigirá que o Lutron Connect
TM Bridge seja reativado
ao sistema.
1. Toque três vezes e mantenha pressionado o botão
“Adicionar”. NÃO solte o botão após o terceiro toque.
2. Mantenha o botão pressionado no terceiro toque, até
que os LEDs comecem a piscar.
3. Solte o botão e toque imediatamente nele três vezes
novamente. Os LEDs piscarão rapidamente. Quando
os LEDs pararem de piscar, o Lutron Connect
TM Bridge
terá novamente as configurações de fábrica.
Lutron, HomeWorks e RadioRA são marcas comerciais registradas, e RadioRA 2 e Lutron Connect são marcas comerciais da Lutron Electronics Co., Inc.
NEC é marca comercial registrada da National Fire Protection Association, de Quincy, Massachusetts, EUA. © 2016 Lutron Electronics Co., Inc.
Português
Instruções de instalação
* Condições de teste de consumo médio: LED aceso, cabo Ethernet
conectado, alimentado pelo adaptador de 5V-.
Instalação
1. Usando o cabo Ethernet, conecte o Lutron ConnectTM Bridge
a um roteador sem fio na mesma rede (sub-rede), assim
como o repetidor principal RadioRA
® 2 ou o processador
HomeWorks
® QS.
2. Conecte o cabo adaptador de fonte CC ao Lutron Connect
TM
Bridge e insira o plugue do adaptador em uma tomada.
3. Use o software de design do RadioRA
® 2 ou do
HomeWorks
® QS para ativar o Lutron ConnectTM Bridge ao
sistema. É necessário ter acesso fácil ao botão “Adicionar”,
pois ele será usado para ativar o Bridge ao sistema e
emparelhá-lo com o aplicativo Lutron Connect
TM.
4. Use o aplicativo Lutron Connect
TM para controlar e monitorar
o sistema, por meio do Lutron Connect
TM Bridge. O botão
“Adicionar” será usado para emparelhar o aplicativo ao
Bridge.
Dimensões
As dimensões estão exibidas em: mm (pol)
Vista frontal
Vista superior
Conexões
Vista traseira
Botão “Adicionar”
Tomada (para o adaptador)
Classe 2, NEC®, LPS ou SELV, energia limitada (<15W)
Porta Ethernet CAT5
Lutron ConnectTM
Bridge
Adaptador de energia CC
Cabo
Ethernet
CONNECT-BDG-1
(5V- 300mA)
T-5DC-USB-WH (incluído):
Entrada: 100–240V~ 50/60Hz 100 mA;
Saída: 5V- 550mA
Incluído
CONNECT-BDG-2
(5V- 300mA)
Não incluído. Use microconector
USB LPS ou SELV, saída de 5V-
550–1 000mA
Incluído
Consumo médio*: 1,3W
Garantia
Para obter informações sobre a garantia, consulte a
Garantia incluída no pacote do produto, ou visite o site
www.lutron.com/resiinfo
Informações sobre certificação FCC/IC
Para obter informações sobre FCC/IC, visite
www.lutron.com/fcc-ic
Atendimento ao cliente
On-line: forums.lutron.com | www.lutron.com/help
E-mail: support@lutron.com
Telefone:
EUA/Canadá: 1.844.LUTRON1 (588.7661)
Europa: +44.(0)20.7680.4481
México: +1.888.235.2910
Outros países: +1.610.282.3800
Setup
Wired
RF
Communication
Repeater Status
1
3
4
2
M
Power
Repeater Link
COM
9 V
1
N / C
MUX
MUX
2
3
4
AddTest
USB
Integrate
Program / Integrate
RS232
Ethernet
Main Repeater
Processador HomeWorks® QS
Lutron ConnectTM Bridge
Aplicativo
Lutron
Connect
TM
Processador
HomeWorks
® QS
Roteador sem fio
(não vendido pela Lutron)
Conexão
Ethernet
Conexão
Ethernet
Adaptador
de energia
CC
Entrada de
24V-
Setup
Wired
RF
Communication
Repeater Status
1
3
4
2
M
Power
Repeater Link
COM
9 V
1
N / C
MUX
MUX
2
3
4
AddTest
USB
Integrate
Program / Integrate
RS232
Ethernet
Main Repeater
Repetidor principal RadioRA® 2
Lutron ConnectTM Bridge
Aplicativo
Lutron
Connect
TM
Repetidor principal RadioRA® 2
Roteador sem fio
(não vendido pela Lutron)
Conexão Ethernet
Conexão
Ethernet
Adaptador
de energia
CC
Barra do LED de estado
Lutron ConnectTM Bridge
30,2
(1,19)
69,9
(2,75)
69,9
(2,75)
69,9
(2,75)
CONNECT-BDG-1
CONNECT-BDG-2
041531b
02/2016

Status-LED-Balken – Blinksignale
Blinkmuster Bedeutung
5 Sekunden
Blinken
• Keine Netzwerkkabelverbindung.
Rotierend • Die Bridge-Firmware wird aktualisiert,
wenn die Status-LEDs nacheinander
aufleuchten.
• Firmware wird aktualisiert. Die Lutron
Connect
TM Bridge funktioniert während
einer Firmware-Aktualisierung nicht.
Bitte vor der Installation lesen
Für die Installation der o.a. Modellnummern ist diese
Anleitung zu verwenden. Weitere Informationen siehe:
www.lutron.com/radiora2 oder www.lutron.com/hwqs
Leistungsmerkmale
• Über die „Hinzufügen“-Taste kann die Bridge in einem
RadioRA
® 2- oder HomeWorks® QS-System und der
mobilen Lutron Connect
TM App aktiviert werden.
• Der Ethernetanschluss ermöglicht den Anschluss der
Bridge an einen drahtlosen Router.
Wichtige Hinweise
Umgebung
Umgebungsbetriebstemperatur: 0 °C bis 40 °C, 0 % bis
90 % Luftfeuchtigkeit. Nur für den Innenbereich.
Vorschriften
Die Installation muss gemäß allen örtlichen Vorschriften
erfolgen.
Reinigung
Mit einem sauberen feuchten Tuch abwischen. KEINE
chemischen Reinigungslösungen verwenden.
Gleichstromadapter
Bei Verwendung eines Gleichstromadapters, der nicht die
richtigen Nennwerte aufweist, kann die Lutron Connect
TM
Bridge beschädigt werden und sich ggf. überhitzen.
Daher ist sicherzustellen, dass der Gleichstromadapter die
richtigen Spezifikationen aufweist (siehe oben).
Programmierung
Die Programmierung und Aktivierung (Adressierung) muss
über die RadioRA
® 2- oder HomeWorks® QS-
Systemsoftware erfolgen.
Lutron Electronics Co., Inc.
7200 Suter Road Coopersburg, PA 18036-1299, USA
Zurücksetzen der Lutron ConnectTM
Bridge auf Werkseinstellungen
Bei Zurücksetzen der Lutron ConnectTM Bridge auf ihre
Werkseinstellungen wird die gesamte Programmierung
gelöscht. Zudem muss die Lutron Connect
TM Bridge
danach wieder im System aktiviert werden.
1. Dreifachtippen und „Hinzufügen“-Taste gedrückt
halten. Taste nach dem dritten Mal NICHT loslassen.
2. Taste nach dem dritten Antippen gedrückt halten, bis
alle LEDs blinken.
3. Taste loslassen und sofort wieder dreimal antippen.
Die LEDs blinken schnell. Wenn die LEDs nicht mehr
blinken, wurde die Lutron Connect
TM Bridge erfolgreich
auf Werkseinstellungen zurückgesetzt.
Lutron, HomeWorks und RadioRA sind eingetragene Marken und RadioRA 2 und Lutron Connect sind Marken von Lutron Electronics Co., Inc.
NEC ist eine eingetragene Marke der National Fire Protection Association, Quincy, Massachusetts (USA). © 2016 Lutron Electronics Co., Inc.
Deutsch
Installationsanleitung
* Typische Leistungsaufnahme-Testbedingungen: LED ein, Ethernetkabel
angeschlossen, Speisung über den 5-V--Adapter.
Installation
1. Die Lutron ConnectTM Bridge mit dem Ethernetkabel an
einen drahtlosen Router im selben Netzwerk (Teilnetz) wie
der RadioRA
® 2-Hauptrepeater oder der HomeWorks®
QS-Prozessor verbinden.
2. Gleichstromadapterkabel an den Netzstromanschluss der
Lutron Connect
TM Bridge anschließen und den
Gleichstromadapterkabelstecker in eine Steckbuchse
einführen.
3. Die Lutron Connect
TM Bridge im System mit der RadioRA® 2
oder HomeWorks
® QS-Design-Software aktivieren. Dabei ist
sicherzustellen, dass die „Hinzufügen“-Taste gut zu erreichen
ist, da über sie die Bridge im System aktiviert und mit der
Lutron Connect
TM App verknüpft wird.
4. Das System wird über die Connect
TM Bridge von der Lutron
Connect
TM App angesteuert und überwacht. Die
Verknüpfung der App mit der Bridge erfolgt über die
„Hinzufügen“-Taste.
Abmessungen
Abmessungen angezeigt in mm
Vorderansicht
30,2
69,9
Ansicht von oben
69,9
69,9
Anschlüsse/Verbindungen
Rückansicht
„Hinzufügen“-Taste
Netzstromanschluss (zum Adapter)
NEC® Klasse 2, LPS oder SELV, begrenzte Leistung (<15 W)
Ethernet-CAT5-Anschluss
Lutron ConnectTM
Bridge
Gleichstromadapter
Ethernet-
kabel
CONNECT-BDG-1
(5V- 300 mA)
T-5DC-USB-WH
(im Lieferumfang inbegriffen):
Eingang: 100 – 240 V~ 50/60 Hz 100 mA;
Ausgang: 5 V- 550 mA
Im
Lieferum-
fang
inbegriffen
CONNECT-BDG-2
(5V- 300 mA)
Nicht im Lieferumfang inbegriffen.
LPS- oder SELV-Ausgang-USB-
Mikrokonnektor verwenden
(5 V- 550 – 1 000 mA)
Im
Lieferum-
fang
inbegriffen
Typische Leistungsaufnahme*: 1,3 W
Garantie
Garantieinformationen entnehmen Sie bitte der
Produktgarantie im Lieferumfang oder informieren Sie
sich unter www.lutron.com/resiinfo
FCC/IC-Informationen
FCC/IC-Informationen finden Sie unter
www.lutron.com/fcc-ic
Unterstützung für Kunden
Online: forums.lutron.com | www.lutron.com/help
E-Mail: support@lutron.com
Tel.-Nr.:
USA/Kanada: 1.844.LUTRON1 (588.7661)
Europa: +44.(0)20.7680.4481
Mexiko: +1.888.235.2910
Sonstige Länder: +1.610.282.3800
Setup
Wired
RF
Communication
Repeater Status
1
3
4
2
M
Power
Repeater Link
COM
9 V
1
N / C
MUX
MUX
2
3
4
AddTest
USB
Integrate
Program / Integrate
RS232
Ethernet
Main Repeater
HomeWorks® QS-Prozessor
Lutron ConnectTM Bridge
Lutron
Connect
TM
App
HomeWorks
®
QS-Prozessor
Drahtloser Router
(nicht über Lutron
vertrieben)
Ethernetverbindung
Ethernetverbindung
Gleichstro-
madapter
24-V--
Eingang
Setup
Wired
RF
Communication
Repeater Status
1
3
4
2
M
Power
Repeater Link
COM
9 V
1
N / C
MUX
MUX
2
3
4
AddTest
USB
Integrate
Program / Integrate
RS232
Ethernet
Main Repeater
RadioRA® 2-Hauptrepeater
Lutron ConnectTM Bridge
Lutron
Connect
TM
App
RadioRA
® 2-Hauptrepeater
Drahtloser Router
(nicht über Lutron vertrieben)
Ethernetverbindung
Ethernetverbindung
Gleichstro-
madapter
Status-LED-Balken
Lutron ConnectTM Bridge
CONNECT-BDG-1
CONNECT-BDG-2
041531b
02/2016

状态 LED 条闪烁代码
闪烁模式 指示
5 秒闪烁
• 无网络电缆连接。
旋转
• 如果状态 LED 围绕 Bridge 按顺序执行
进 程 ,则 Bridge 固件正在 更新。
• 固件正在更新。Lutron ConnectTM Bridge
在固件更新过程中不运行。
请在安装前阅读
使用 这 些 说明安装上 述 所 列的型号。
若 要 获 取 更 多 信 息 ,请 访 问 :www.lutron.com/radiora2
或 www.lutron.com/hwqs
特性
• 添加按钮让 Bridge 可以在 RadioRA® 2 或 HomeWorks®
QS 系统和 Lutron Connect
TM 手机应用程序中得到激活。
• 以太网端口让 Bridge 可以连接至无线路由器。
重要注意事项
环境
环境 工作温 度:0 °C 到 40 °C,
0% 到 90% 湿 度 。仅 室 内 使 用 。
规范
依据所有地方和国家电气规范安装。
清洁
若要进行清洁,使用干净湿布擦拭。
请勿使用任何化学清洁溶剂。
DC 电源适配器
使用未按照正确的规范进行评级的 DC 电源适配器可能
会损坏 Lutron Connect
TM Bridge,并 可 能 令 DC 电源适
配 器 过 热 。请 确 保 DC 电源适配器符合上述详细规定的
正确规范。
编程
编程和激活(寻址)必须通过 RadioRA
® 2 或
HomeWorks
® QS 软件完成。
将Lutron ConnectTM Bridge 恢复至出厂设置
将 Lutron ConnectTM Bridge 恢复至其出厂设置会擦除
其所有编程,并需要重新激活 Lutron Connect
TM Bridge
进入系统。
1. 轻敲三次并按住“添加”按钮。第三次敲击后请勿放开
按钮。
2. 在第三次敲击时按住按钮不放直至 LED 开始闪烁。
3. 放开按钮并立即再敲三次。LED 将快速闪烁。LED
停止闪烁 时,Lutron Connect
TM Bridge 已经恢复至
其出厂设 置。
Lutron、HomeWorks 和 RadioRA 是注册商标,RadioRA 2 和Lutron Connect 是 Lutron Electronics Co., Inc. 的商标。
NEC 是马萨诸塞州昆西美国国家消防协会的注册商标。© 2016 Lutron Electronics Co., Inc.
中文
安装说明
* 典型电力消耗测试条 件:LED 亮 ,以 太 网 电 缆 插 入 ,
由 5 V- 适配器供电。
安装
1. 使用以太网电缆,连接 Lutron ConnectTM Bridge 至同一网
络(子网)中的无线路由器充当 RadioRA
® 2 主中继器或
HomeWorks
® QS 处理器。
2. 将 DC 电源适配器附在 Lutron Connect
TM Bridge 上的电
源 插 座 上 ,并 将 DC 电源适配器插头插入插座。
3. 使用 RadioRA
® 2 或 HomeWorks® QS 设计软件激活
Lutron Connect
TM Bridge 进 入 系 统 。确 保 方 便 使 用“ 添 加 ”
按钮,因为该按钮将被用于激活 Bridge 进入系统并与
Lutron Connect
TM 应用程 序配对。
4. 使用 Lutron Connect
TM 应用程序控制并监测系统通过
Lutron Connect
TM Bridge。“ 添 加 ” 按 钮 将 被 用 于 将 应 用 程
序与 Bridge 配对。
尺寸
测量结果显示为:mm
前视图
顶视图
连接
后视图
“ 添 加 ”按 钮
电 源 插 座( 至 适 配 器 )
NEC® 2 类,LPS 或 SELV,能量有限 (<15 W)
以太网 CAT5 端口
Lutron ConnectTM
Bridge
DC 电源适配器
以太网
电缆
CONNECT-BDG-1
(5V- 300 mA)
T-5DC-USB-WH( 包 括 在 内 ):
输入:100 – 240 V~ 50/60 Hz 100 mA;
输出:5 V- 550 mA
包括在内
CONNECT-BDG-2
(5V- 300 mA)
不 包 括 在 内 。使 用 LPS 或 SELV
输出 5 V- 550–1 000 mA
USB Micro 连接器
包括在内
典型电源消耗*:1.3 W
质保
若要获取质保信息,请参阅产品随附的保证书或访问
www.lutron.com/resiinfo
FCC/IC 信息
若要获取 FCC/IC 信息,请访问:
www.lutron.com/fcc-ic
客户协助
在线: forums.lutron.com | www.lutron.com/help
电子邮箱:support@lutron.com
电话:
美国/加拿大:1.844.LUTRON1 (588.7661)
中国:86.21.61650990
欧洲:+44.(0)20.7680.4481
墨西哥:+1.888.235.2910
其他国家:+1.610.282.3800
Setup
Wired
RF
Communication
Repeater Status
1
3
4
2
M
Power
Repeater Link
COM
9 V
1
N / C
MUX
MUX
2
3
4
AddTest
USB
Integrate
Program / Integrate
RS232
Ethernet
Main Repeater
HomeWorks® QS 处理器
Lutron ConnectTM Bridge
Lutron
Connect
TM
应用程序
HomeWorks
®
QS 处理器
无线路由器
(Lutron 不出售)
以太网连接
以太网连接
DC 电源
适配器
24 V-
输入
Setup
Wired
RF
Communication
Repeater Status
1
3
4
2
M
Power
Repeater Link
COM
9 V
1
N / C
MUX
MUX
2
3
4
AddTest
USB
Integrate
Program / Integrate
RS232
Ethernet
Main Repeater
RadioRA® 2 主中继器
Lutron ConnectTM Bridge
Lutron
Connect
TM
应用程序
RadioRA
® 2 主中继器
无线路由器
(Lutron 不出售)
以太网连接
以太网连接
DC 电源适
配器
状态 LED 条
Lutron ConnectTM Bridge
30.2
69.9
69.9
69.9
Lutron Elec tron ics Co., Inc.
7200 Suter Road Coopersburg, PA 18036-1299
CONNECT-BDG-1
CONNECT-BDG-2
041531b
02/2016
1/6