VOX electronics CHM 650IX Operating Instructions Manual
- Categoria
- Exaustores
- Tipo
- Operating Instructions Manual

CHM 650IX
OPERATING INSTRUCTIONS
COOKER HOOD
UPUTSTVO ZA UPOTREBU
ASPIRATOR
NAVODILA ZA UPORABO KUH I NJSKA NAPA
UPUTE ZA UPORABU
KUHINJSKA NAPA
MANUAL DE ISTRUÇÕESEXAUSTOR
GBR
^Z
SVN
HRV
PRT

CHM-650IX
OPERATING INSTRUCTIONSCOOKER H OOD
GBR

1
Read the User Manual Carefully!
MODEL: CHM650IX

2
“Complies with EEE Regulation. No PCB Included”
1 TECHNICAL DRAWING 4
2 WARNINGS AND SAFETY PRECAUTIONS 5
2.1 Life-Threatening Danger, Poisoning Danger 7
3 USAGES WITH AND WITHOUT CARBON FILTER 9
3.1 Replacement of Carbon Filter 9
3.2 Replacement of Carbon Filter 9
4 CLEANING AND PREVENTIVE MAINTENANCE 10
4.1 Washing in Dishwasher 11
4.2 Hand Wash 11
5 INSTALLATION OF APPLIANCE 12
5.1 Installation ascheme 12
5.2 Installation and Unpacking of the Appliance 12
5.3 Recommendation for Saving Energy 12
6 CONTENT OF PACKAGE 13
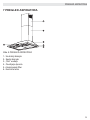
7 OVERVIEW OF COOKER HOOD 14
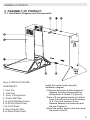
8 ASSEMBLY OF PRODUCT 15
8.1 Installation Diagram and Components 15
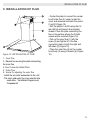
9 ASSEMBLY OF FLUE 16
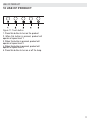
10 USE OF PRODUCT 17
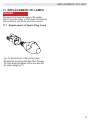
11 REPLACEMENT OF LAMPS 18
11.1 Replacement of Spark Plug Lamp 18
12 AUTHORIZED TECHNICAL SERVICE 19
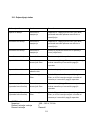
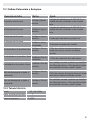
12.1 Potential Failures and Solutions 20
12.2 Technical Table 20

3

4
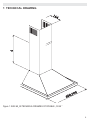
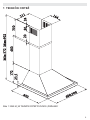
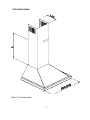
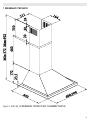
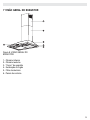
1 TECHNICAL DRAWING
Figure 1: 2240 60_90 TECHNICAL DRAWING OF DOUBLE „FLUE “

5
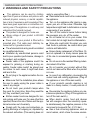
2 WARNINGS AND SAFETY PRECAUTIONS
■ This appliance can be used by children
aged from 8 years and above and persons with
reduced physical, sensory or mental capabili-
ties or lack of experience and knowledge if they
have been given supervision or instruction con-
cerning use of the appliance in a safe way and
understand the hazards involved.
■ This product is designed for home use.
■ Usage voltage of your product is 220-240
Volt~50 Hz.
■ Power cord of your product is tted with a
grounded plug. That cable must denitely be
connected to a grounded socket.
■ The whole electrical wiring must be installed
by a qualied electrician.
■ Installation by unauthorized persons could
lead to poor operation performance, damage to
the product, and accidents.
■ Feeder cable of the appliance mustn’t be
exposed to jamming or crashing during as-
sembly. Feeder cable mustn’t be placed near
the cooker. In such cases, it might melt down
and lead to re.
■ Do not plug in the appliance before the ins-
tallation.
■ Make sure that the installation place allows
the user to easily unplug the power cable in
case of any danger.
■ Do not touch your product’s lamps when
they work for a long time. Since they would be
hot, they could burn your hand.
■ Kitchen cooker hoods are designed for nor-
mal cooking and home use. For uses other than
specied, there is the risk of failure and the app-
liance becomes out of warranty.
■ Comply with the rules and instructions re-
garding discharge of outgoing air, stipulated by
the relevant authorities. (This warning does not
apply to uses without ue.)
■ Flammable foods must not be cooked under
the appliance.
■ Turn on the appliance after placing a sau-
cepan, pan, etc. on the cooker. Otherwise, high
temperature might lead to deformation on some
components of your product.
■ Turn off the cooker’s burner before taking
the saucepan, pan, etc. off the cooker.
■ Do not leave hot oil on your cooker. Pots
that contain hot oil might lead to inammation.
■ Since oils could catch re when you cook
fried foods in particular, be careful about your
curtains and tablecloths.
■ Ensure timely replacement of the lters. Fil-
ters not replaced in a timely manner pose risk
of re due to accumulated grease deposits on
them.
■ Do not use non-re-resistant ltering materi-
als instead of the lter.
■ Do not operate your product without lter,
and do not remove the lters when the product
is in use.
■ In case of any deagration, de-energize the
cooker hood and cooking appliances. (Plug off
the appliance or turn off the main switch).
■ If your product’s periodic cleaning is not
made in a timely manner, it could pose risk of
re.
■ De-energize the appliance before any ma-
intenance operations. (Plug off the appliance or
turn off the main switch.)
■ When electric cooker hood and devices
fed with energies other than electricity opera-
te simultaneously, the negative pressure in the
room must not exceed 4 Pa ( 4 X 10 bar ).
■ Gas or fuel oil burning appliances, such as
room heaters, which share the same environ-
WARNINGS AND SAFETY PRECAUTIONS

6
ment with your product, must be fully insulated
from the exhaust of this product or they must be
hermetical.
■ When you make a ue connection for your
product, use pipes with a diameter of 150mm
or 120 mm.
■ The length of the pipe connection as well as
the number of elbows must be as minimum as
possible.
■ Children should not tamper with the device.
■ For your safety, use ”MAX 6 A” fuse in the
cooker hood system.
■ Since the packing materials could be dan-
gerous, keep them away from children.
■ If the feeder cable is damaged, it must be
replaced by its manufacturer or authorized te-
chnical service or any other personnel qualied
at the same level, in order to avoid any dange-
rous situation.
■ In case of any deagration, de-energize the
cooker hood and cooking appliances, and co-
ver the ame. Never use water to extinguish the
re.
■ When cooking appliances are in operation,
their accessible parts could be hot.
■ This appliance is not intended to be used
by people with physical, sensory and mental
disabilities (including children) or those who
have not adequate experience and knowledge
regarding its use, unless they are under the su-
pervision of a person responsible for the safety
of the appliance.
■ After the installation of the cooker hood,
the minimum distance must be 65 cm between
the product and any electric cooker; and 75 cm
between it and any gas ranges or cookers bur-
ning other fuels.
■ Output of the cooker hood must not be con-
nected to air ducts, where there exist another
smokes.
■ You must be careful when using the appli-
ance spontaneously with other appliances (e.g.
gas, diesel fuels, coal or wood burning heaters,
shower heaters, etc.) which use the same air in
the same environment. It is because the cooker
hood could adversely affect the combustion, by
discharging the ambient air.
■ This warning does not apply to uses without
ue.
■ When electric cooker hood is used simulta-
neously with devices that use gas or other fuels,
there must be sufcient ventilation in the room
(might not apply to devices that discharges the
air back into the room).
WARNINGS AND SAFETY PRECAUTIONS

7
WARNINGS AND SAFETY PRECAUTIONS
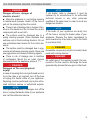
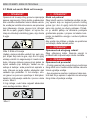
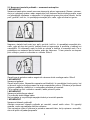
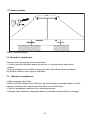
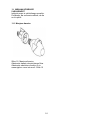
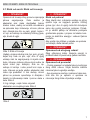
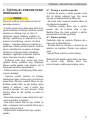
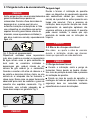
2.1 Life-Threatening Danger, Poiso-
ning Danger
A DANGER
There are life-threatening danger and poisoning
danger due to reabsorbed combustion gases.
During the air discharge outlet use, unless suf-
cient air supply is provided, do not use the appli-
ance simultaneously with devices that discharge
toxic gases through ue such as ventilated, gas,
oil, wood or coal burning heaters, shower hea-
ters, water heaters, etc.
Fig. 2: Poisoning Danger
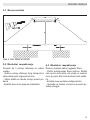
Ventilated devices (e.g. gas, oil, wood or coal
burning heaters, shower heaters, water hea-
ters) take combustion air from the installation
location, and discharge the waste gas through
a waste gas system (e.g. ue). When the coo-
ker hood is active, it absorbs air from the kitchen
and neighbouring rooms. If adequate air entry is
not provided vacuum emerges. In such a case,
the toxic gases are absorbed from the ue
and waste gas channel, and are taken into to
door again. Fig. 2 Therefore, adequate fresh
air ingress must always be ensured. Fig. 3
Fig. 3
A DANGER
Fire danger!
Due to sparkling. Installation of appliance over
a heating device that is heated by using solid
fuels (for ex. wood or coal) is only allowed if an
non-detachable cover is present. For the instal-
lation process, attention must be paid to current
applicable construction regulations and regulati-
ons of local electric and gas companies.
Appliance might lead to re unless it is produced
in accordance with cleaning instructions.
A DANGER
2.2 Danger of electric shock!
Do not bend or jam the connection cable during
installation due to danger of damaged connecti-
on cable.
A DANGER
2.3 Danger of physical injury!
■ During the installation, there is a danger
of physical injury due to the sharp edges. Use
protective gloves throughout the installation pro-
cess of the appliance.
■ Due to risk of dropping the appliance, as-
sembly of all safety bolts and covers must be
performed as specied in the user manual.

8
LIFE-THREATENING DANGER, POISONING DANGER
A DANGER
Danger of burn, danger of
electric shock!
■ Allow the appliance to cool before cleaning
or maintenance process. Switch off the fuse or
pull out the mains plug from the socket.
■ There is risk of damage due to ingress of mo-
isture in the electronics. Do not clean the control
components with a wet cloth.
■ The surface could be damaged due to a
wrong cleaning process. Clean stainless steel
surfaces only in their brushing direction. Do not
use a stainless steel cleaner for the control ele-
ments.
■ The surface could be damaged due to agg-
ressive and abrasive cleaning agents. Never use
use aggressive and abrasive cleaning agents.
■ There is risk of damage due to backow
of condensate. Mount the air outlet channel
downwards from the appliance (slope of 1°).
A DANGER
Dangers of re and physical
injury!
In case of repairing that is not performed accord-
ing to the rules or as required, turn off the fuse
or unplug the feeder cable of your appliance.
Repairing must be performed only by the autho-
rized technical service or authorized experts.
NOTE
If the appliance is faulty or damages, turn off the
fuse or unplug the feeder cable of your appliance
and call the authorized service.
NOTE
If the feeder cable is damaged, it must be
replaced by its manufacturer or its authorized
technical service or any other personnel
qualied at the same level, in order to avoid any
dangerous situation.
NOTE
If the bulbs of your appliance are faulty, turn
off the fuse or unplug the feeder cable of your
appliance. Replace the bulbs immediately to
avoid overload on other bulbs (wait for the bulbs
to cool down rst)
A DANGER
Accessible components might be heated when
used with cooking devices.
A DANGER
Air outlet pipe of this appliance mustn’t be con-
nected in the ue used to discharge the fume
generated by devices that use gas or other fuels.

9
USAGE WITH AND WITHOUT CARBON FILTER
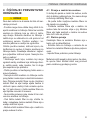
3 USAGE WITH AND WITHOUT
CARBON FILTER
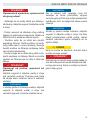
3.1 Replacement of Carbon Filter
In environments without ue, active carbon lter
must be used for ltering the air and resending
it in. Active carbon lter must be supplied from
service or your dealer. De-energize the applian-
ce before replacing the carbon lter. Since car-
bon lter is used in kitchens with no ue outlet,
it must be replaced in every 3-5 months depen-
ding on the use.
Carbon lter must never be washed. Grease l-
ters must be installed in the product, regardless
of whether or not carbon lters are used. Do not
use your product without grease lter.
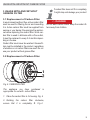
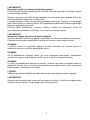
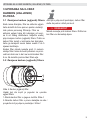
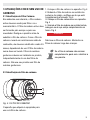
3.2 Replacement of Carbon Filter
Fig. 4: CARBON FILTER
The appliance you have purchased is
appropriate for use with carbon lters.
1. Place the carbon lter in its housing. Fig. 4
2. Rotating the carbon lter clockwise,
ensure that it is completely t. Fig. 4
If carbon lter does not t in completely,
it might drop and damage your product.
A DANGER
Do not wash carbon lters. Keep the carbon l-
ters away from children.

10
CLEANING AND PREVENTIVE MAINTENANCE
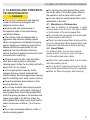
4 CLEANING AND PREVENTI-
VE MAINTENANCE
A DANGER
■ Prior to each maintenance and cleaning,
cooker hood must be unplugged, and
appliance must be dead
■ Cleaning and user maintenance of
the appliance shall not be performed by
unattended children.
■ The surface could be damaged due to
aggressive and abrasive cleaning agents.
Never use aggressive and abrasive cleaning
agents. Supply your cleaning and protective
substances that are appropriate for your
appliance from the authorized technical
service. Surface of appliance and control units
are sensitive to scratching.
■ Clean the surfaces with a soft and damp
cloth, dish-washing liquid or mild glass
cleaning agent. Soften the dry, sticky dirt with a
damp cloth. Do not scrape!
■ It is not appropriate to use dry cloths,
sponges that may scratch, materials that
require rubbing, and other aggressive cleaning
agents containing sand, soda, acid or chlorine.
■ Clean the stainless steel surfaces in their
brushing direction only.
■ Do not use stainless steel cleaning agents
and wet clothes for control units. Cleaning of
metal grease lters Used metal grease lters
retain the greasy particles in the moisture and
vapour generated in the kitchen. Clean the
metal grease lters about every three months,
under normal use conditions (1 to 2 hours a
day).
■ Do not use excessively effective, acidic or
alkaline cleaning agents.
■ For cleaning the metal grease lters, clean
the holder parts of the metal grease lters in
the appliance, with a damp cloth as well.
■ You can clean the metal grease lters in the
dishwasher or by hand.
4.1 Washing in Dishwasher
■ In case of washing in dishwasher, a slight
change might occur in colour. This has no effect
on the function of the metal grease lter.
■ Do not wash the excessively dirty metal grea-
se lters together with dishes.
■ Place the metal grease lters loosely and fre-
ely in the dishwasher. Metal grease lters must
be placed in the dishwasher without jamming.
4.2 Hand Wash
For stubborn dirts, you can use a special
grease solvent. You can buy such an agent
from the authorized sales centre.
■ Soften the metal grease lters in a hot water
with dish-washing liquid.
■ Use a brush for cleaning and wait for the liq-
uid in metal grease lters to ow off completely.
■ Rinse the lters thoroughly after cleaning.

11
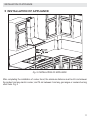
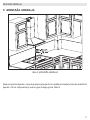
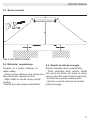
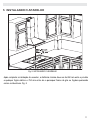
Fig. 5: INSTALLATION OF APPLIANCE
After completing the installation of cooker hood, the minimum distance must be 65 cm between
the product and any electric cooker; and 75 cm between it and any gas ranges or cookers burning
other fuels. Fig. 5
INSTALLATION OF APPLIANCE
5 INSTALLATION OF APPLIANCE

12
INSTALLATION OF APPLIANCE
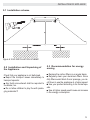
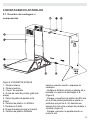
5.1 Installation scheme
Figure 6: 2240 INSTALLATION SCHEME
5.2 Installation and Unpacking of
the Appliance
Check that your appliance is not deformed.
■ Report the transport issues immediately to
transport operator.
■ Any faults encountered shall be reported to
the dealer, too.
■ Do not allow children to play the with packa-
ging materials !!!
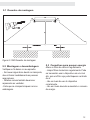
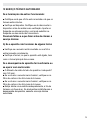
5.3 Recommendation for energy
saving
■ Replace the carbon lters on a regular basis.
■ Regularly clean your aluminium lters. Since
dirty lters would block the air passage, you mi-
ght have to use the appliance at a higher speed.
■ Use your product according to its normal spe-
eds.
■ Use at higher speed would cause an increase
in the energy consumption.

13
CONTENT OF PACKAGE
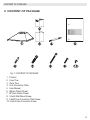
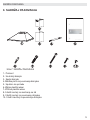
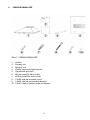
6 CONTENT OF PACKAGE
Fig. 7: CONTENT OF PACKAGE
1. Product
2. Inner Flue
3. Outer Flue
4. Flue Connection Plate
5. User Manual
6. Ø6mm Plastic Dowel
7. Ø10mm Plastic Dowel
8. 5.5x60 Wall Mount Screw
9. 3.9x22 Flue Connection Plate Screw
10. 3.5x9.5 Flue Connection Screw

14
OVERVIEW OF COOKER HOOD
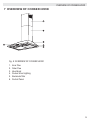
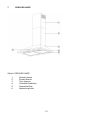
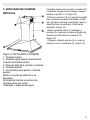
7 OVERVIEW OF COOKER HOOD
Fig. 8: OVERVIEW OF COOKER HOOD
1. Inner Flue
2. Outer Flue
3. Hood body
4. Cooker Hood Lighting
5. Aluminuim filter
6.
Control Panel

15
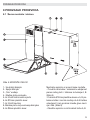
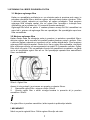
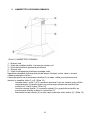
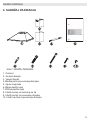
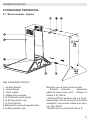
Figure 9: INSTALLATION AND
COMPONENTS
1 - Inner Flue
2 - Outer Flue
3 - „Body“ of the appliance
4 - Product Wall Plate
5- 3x 5.5x60 Wall Mount Screw
6- 3x Ø10mm Plastic Dowel
7- 2x 3.9x22 Screw
8- Flue Connection Plate
9- 2x Ø6mm Plastic Dowel
Install the cooker hood using this
installation diagram.
- Check the minimum and the maximum
distance from the worktop and the
drilling holes A, B and C (Figure 9).
- Place x10 mm plastic dowels into drilled
holes A and B and secure the screws
to A + B points leaving a 5-mm
distance between the screw top and
the wall (Figure 9).
- Mount the cooker hood on the wall using
the points A and B.
ASSEMBLY OF PRODUCT
8 ASSEMBLY OF PRODUCT
8.1 Installation Diagram and Components

16
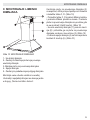
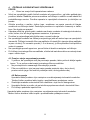
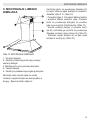
Figure 10: INSTALLATION OF FLUE
1 - Inner Flue
2 -
Dowels for securing the plate connecting
the inner flue
3- Flue Connection Metal Plate
4 - Outer Flue
5 - Screw for adjusting the outer flue
- Install the air outlet connection to the unit.
- The inner and outer flues are inserted into
each other. "Installation Diagram and
Components"
INSTALLATION OF FLUE
9 INSTALLATION OF FLUE
- Center the plate to connect the cooker
hood to the flue (3), keep it under the
cover and measure and mark the points
C and D (Figure 10).
- Drill the points C and D using the 0.6
mm drill bit and place 0.6 mm plastic
dowels. Place the plate connecting the
flue on the surface where the 3.9x22
screws will be inserted (Figure 10).
- Pull out the inner flue (1) with the
screw (2) and tighten it to the flue
connection plate on both the right and
left sides (3) (Figure 10).
- Place the outer flue (4) on the cooker
hood body (5) using 2 dowels (6) (Figure
10).

17
USE OF PRODUCT
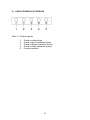
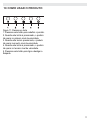
10 USE OF PRODUCT
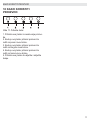
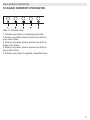
Figure 11: Touch button
1. Press this button to turn on the product.
2. When this button is pressed, product will
operate at speed level 1.
3. When this button is pressed, product will
operate at speed level 2.
4. When this button is pressed, product will
operate at speed level 3.
5. Press this button to turn on or off the lamp.

18
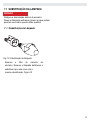
REPLACEMENT OF LAMP
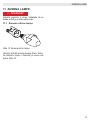
11 REPLACEMENT OF LAMPS A
DANGER
Disconnect the electrical supply of the cooker
hood. Leave the lamps to cool down first because
they could burn your hands when they are hot.
11.1 Replacement of Spark Plug Lamp
Fig. 12: Replacement of Spark Plug Lamp
Remove the aluminium cartridge filter. Remove
the faulty bulb and replace with a new one with
the same rating.Fig. 12
A página está carregando...
A página está carregando...
A página está carregando...
A página está carregando...
A página está carregando...
A página está carregando...
A página está carregando...
A página está carregando...
A página está carregando...
A página está carregando...
A página está carregando...
A página está carregando...
A página está carregando...
A página está carregando...
A página está carregando...
A página está carregando...
A página está carregando...
A página está carregando...
A página está carregando...
A página está carregando...
A página está carregando...
A página está carregando...
A página está carregando...
A página está carregando...
A página está carregando...
A página está carregando...
A página está carregando...
A página está carregando...
A página está carregando...
A página está carregando...
A página está carregando...
A página está carregando...
A página está carregando...
A página está carregando...
A página está carregando...
A página está carregando...
A página está carregando...
A página está carregando...
A página está carregando...
A página está carregando...
A página está carregando...
A página está carregando...
A página está carregando...
A página está carregando...
A página está carregando...
A página está carregando...
A página está carregando...
A página está carregando...
A página está carregando...
A página está carregando...
A página está carregando...
A página está carregando...
A página está carregando...
A página está carregando...
A página está carregando...
A página está carregando...
A página está carregando...
A página está carregando...
A página está carregando...
A página está carregando...
A página está carregando...
A página está carregando...
A página está carregando...
A página está carregando...
A página está carregando...
A página está carregando...
A página está carregando...
A página está carregando...
A página está carregando...
A página está carregando...
A página está carregando...
A página está carregando...
A página está carregando...
A página está carregando...
A página está carregando...
A página está carregando...
A página está carregando...
A página está carregando...
A página está carregando...
A página está carregando...
A página está carregando...
A página está carregando...
A página está carregando...
A página está carregando...
A página está carregando...
-
 1
1
-
 2
2
-
 3
3
-
 4
4
-
 5
5
-
 6
6
-
 7
7
-
 8
8
-
 9
9
-
 10
10
-
 11
11
-
 12
12
-
 13
13
-
 14
14
-
 15
15
-
 16
16
-
 17
17
-
 18
18
-
 19
19
-
 20
20
-
 21
21
-
 22
22
-
 23
23
-
 24
24
-
 25
25
-
 26
26
-
 27
27
-
 28
28
-
 29
29
-
 30
30
-
 31
31
-
 32
32
-
 33
33
-
 34
34
-
 35
35
-
 36
36
-
 37
37
-
 38
38
-
 39
39
-
 40
40
-
 41
41
-
 42
42
-
 43
43
-
 44
44
-
 45
45
-
 46
46
-
 47
47
-
 48
48
-
 49
49
-
 50
50
-
 51
51
-
 52
52
-
 53
53
-
 54
54
-
 55
55
-
 56
56
-
 57
57
-
 58
58
-
 59
59
-
 60
60
-
 61
61
-
 62
62
-
 63
63
-
 64
64
-
 65
65
-
 66
66
-
 67
67
-
 68
68
-
 69
69
-
 70
70
-
 71
71
-
 72
72
-
 73
73
-
 74
74
-
 75
75
-
 76
76
-
 77
77
-
 78
78
-
 79
79
-
 80
80
-
 81
81
-
 82
82
-
 83
83
-
 84
84
-
 85
85
-
 86
86
-
 87
87
-
 88
88
-
 89
89
-
 90
90
-
 91
91
-
 92
92
-
 93
93
-
 94
94
-
 95
95
-
 96
96
-
 97
97
-
 98
98
-
 99
99
-
 100
100
-
 101
101
-
 102
102
-
 103
103
-
 104
104
-
 105
105


VOX electronics CHM 650IX Operating Instructions Manual
- Categoria
- Exaustores
- Tipo
- Operating Instructions Manual
Outros documentos
-
Beko HCA62640B Manual do usuário
-
Beko BHCB 91632 X Manual do usuário
-
Beko BHCB 61632 XH Manual do usuário
-
-
Beko BHCB 93640 B Manual do usuário
-
Candy CFT62/3X-ALG Manual do usuário
-
-
Beko HNU51311SH Cooker Hood Manual do usuário
-
Candy CGM91X Manual do usuário
-
Hoover HGM 61 X Manual do usuário