Anker PowerConf S360 Manual do usuário

Tipo
Manual do usuário
Anker PowerConf S360
USER MANUAL
Anker PowerConf S360
USER MANUAL
English 01
Čeština 05
Dansk 09
Deutsch 13
Español 17
Suomi 21
Français 25
Italiano 29
Nederlands 33
Norsk 37
Język polski 41
Portugues do Brasil 45
Pусский 49
Svenska 53
Türkçe 57
日本語 61
󼨫󺈼󻪃 65
简体中文 69
繁體中文 73
 77

81
01 EN
At a Glance
1 6 7 8 9 552 3 4
1. Volume down button 6. PD-IN port
2. Mute button 7. USB-A port (USB 3.2 Gen 1, 5 Gbps)
3. Phone call button 8. HDMI port (HDMI 1.4, up to 4K@30 Hz)
4. Volume up button 9. USB-C connector (USB 3.2 Gen 1, 5 Gbps)
5. Microphone
Connecting
There are 2 ways that you can connect the speakerphone to your devices.
Option A
Plug the USB-C connector of the speakerphone into a USB-C port on your PC.
HDMI
Option B
1. Plug the USB-C connector of the speakerphone into a USB-C port on your PC.
2. Connect the speakerphone to a PD power adapter (not included) via the USB-C
port on the back. Then, the speakerphone can power your PC.
EN 02
PD-IN
HDMI
The speakerphone will automatically power on once it's connected to your PC.
Once the speakerphone is connected and powered on, all buttons will flash
white for 2 seconds and then stay solid white.
If necessary, connect the speakerphone to a monitor via the HDMI port, or to a
USB-A device to support data transfer via the USB-A port.
You might need to manually select PowerConf S360 and its built-in microphones for
your PC system or conference software.
macOS
System Preferences > Sound > Sound Effects / Output / Input
Windows
Right-click on the sound icon > Open Sound settings > Choose your output device /
Choose your input device
Software (Zoom, Skype, others)
Settings > Audio > Speaker / Microphone
Controls
×1
2s
×1
03 EN
Press once Answer / End a call
Press and hold for 2 seconds Reject a call
Press once Mute or restore the microphone
Press or press and hold Volume up / down
Make, answer, reject, or end a call only with certied software.
LED Light Guide
Make a call Flashing green
Incoming call
Answer / End a call Solid green for 1 second, then solid
white
Reject a call
Mute on Solid red
Mute off Solid white
Volume up / down Flashing white
AnkerWork Software
software.ankerwork.com
Download and install the AnkerWork software on your PC to update rmware.
EN 04
Specifications
Specications are subject to change without notice.
PD-IN port input 5 V 3 A, 9 V 3 A, 12 V 3 A,
15 V 3 A, 20 V 5 A
Total USB-A port output 5 V 1.5 A (7.5 W max per port)
USB-C connector maximum input 5 V 3 A
USB-C connector output
(with PD-IN port connected to USB-C
adapter, and other port(s) loaded)
5 V 0.5 A, 9 V 0.9 A, 12 V 1.4 A,
15 V 1.45 A, 20 V 1.5 A
USB-C connector maximum output
(with PD-IN port connected to USB-C
adapter, and no other port loaded)
5 V 2.4 A, 9 V 1.85 A, 12 V 2.1 A,
15 V 2.1 A, 20 V 3.6 A
Rated output power 3 W
Speaker driver size 1 x 1.75" full-range driver
Voice pickup frequency 16 kHz
Voice pickup range Up to 6 people
Microphone 4
05 CS
ehled
1 6 7 8 9 552 3 4
1. Tlačítko snížení hlasitosti 6. Port PD-IN
2. Tlačítko ztlumení 7. Port USB-A (USB 3.2 Gen 1, 5 Gbps)
3. Tlačítko telefonního hovoru 8. Port HDMI (HDMI 1.4, až 4K @ 30 Hz)
4. Tlačítko zvýšení hlasitosti 9. Konektor USB-C (USB 3.2 Gen 1, 5 Gbps)
5. Mikrofon
Připojení
Konferenční mikrofon můžete ke svým zařízením připojit dvěma způsoby.
Možnost A
Konektor USB-C konferenčního mikrofonu zapojte do portu USB-C na počítači.
HDMI
Možnost B
1. Konektor USB-C konferenčního mikrofonu zapojte do portu USB-C na počítači.
2. Konferenční mikrofon připojte k napájecímu adaptéru PD (není součástí dodávky)
přes port USB-C na zadní straně. Konferenční mikrofon pak může napájet
počítač.
CS 06
PD-IN
HDMI
Konferenční mikrofon se po připojení k počítači automaticky zapne.
Po připojení a zapnutí začnou nejprve všechna tlačítka konferenčního
mikrofonu 2 vteřiny blikat bíle a poté zůstanou rozsvícena bíle.
V případě potřeby připojte konferenční mikrofon k monitoru přes port HDMI
nebo k zařízení USB-A, potřebujete-li podporu přenosu dat přes port USB-A.
Je možné, že v počítačovém systému nebo konferenčním softwaru budete muset
zařízení PowerConf S360 a integrované mikrofony manuálně vybrat.
macOS
Předvolby systému > Zvuk > Zvukové efekty / Výstup / Vstup
Windows
Pravým tlačítkem myši klikněte na ikonu zvuku > otevřete Nastavení zvuku > Zvolte
výstupní zařízení / Zvolte vstupní zařízení
Software (Zoom, Skype, jiné)
Nastavení > Zvuk > Reproduktor / Mikrofon
Ovládání
×1
2s
×1
07 CS
Stiskněte jednou Přijmout/ukončit hovor
Stiskněte a podržte 2 sekundy Zamítnout hovor
Stiskněte jednou Ztlumení nebo obnovení mikrofonu
Stiskněte nebo stiskněte
a podržte Zvýšení/snížení hlasitosti
K uskutečnění, přijetí, odmítnutí nebo ukončení hovoru používejte pouze
certikovaný software.
Popis funkcí LED kontrolek
Uskutečnění hovoru Bliká zeleně
Příchozí hovor
Přijmout/ukončit hovor Svítí zeleně po dobu 1 sekundy, poté
svítí bíle
Zamítnout hovor
Ztlumení je aktivní Svítí červeně
Ztlumení je neaktivní Svítí bíle
Zvýšení/snížení hlasitosti Bliká bíle
Software AnkerWork
software.ankerwork.com
Chcete-li aktualizovat rmware, stáhnte si software AnkerWork a nainstalujte ho do poítae.
CS 08
Specifikace
Specikace se mohou bez předchozího upozornění změnit.
Vstup portu PD-IN 5 V 3 A, 9 V 3 A, 12 V 3 A,
15 V 3 A, 20 V 5 A
Celkový výstup portu USB-A 5 V 1,5 A (7,5 W max. na port)
Maximální vstup konektoru USB-C 5 V 3 A
Výstup konektoru USB-C
(s portem PD-IN připojeným k adaptéru
USB-C a načtenými dalšími porty)
5 V 0,5 A, 9 V 0,9 A, 12 V 1,4 A,
15 V 1,45 A, 20 V 1,5 A
Maximální výstup konektoru USB-C
(s portem PD-IN připojeným k adaptéru
USB-C a žádnými dalšími načtenými
porty)
5 V 2,4 A, 9 V 1,85 A, 12 V 2,1 A,
15 V 2,1 A, 20 V 3,6 A
Jmenovitý výstupní výkon 3 W
Velikost reproduktoru Reproduktor s plným rozsahem 1 × 1,75”
Frekvence zachycení hlasu 16 kHz
Rozsah zachycení hlasu 6 lidí
Mikrofon 4
09 DA
Et overblik
1 6 7 8 9 552 3 4
1. Knap til lydstyrke ned 6. PD-IN-port
2. Muteknap 7. USB-A-port (USB 3.2 Gen 1, 5 Gbps)
3. Opkaldsknap 8. HDMI-port (HDMI 1.4, op til 4K @ 30 Hz)
4. Knap til lydstyrke op 9. USB-C-stik (USB 3.2 Gen 1, 5 Gbps)
5. Mikrofon
Tilslutning
Du kan slutte højttalertelefonen til dine enheder på to måder.
Mulighed A
Slut højttalertelefonens USB-C-stik til en USB-C-port på din pc.
HDMI
Mulighed B
1. Slut højttalertelefonens USB-C-stik til en USB-C-port på din pc.
2. Slut højttalertelefonen til en PD-strømadapter (medfølger ikke) via USB-C-porten
på bagsiden. Derefter kan højttalertelefonen tænde din pc.
DA 10
PD-IN
HDMI
Højttalertelefonen tændes automatisk, når den er tilsluttet din pc.
Når højttalertelefonen er tilsluttet og tændt, blinker alle knapper hvidt i 2
sekunder, hvorefter de lyser hvidt konstant.
Om nødvendigt skal du slutte højttalertelefonen til en skærm via HDMI-porten
eller til en USB-A-enhed for at understøtte dataoverførsel via USB-A-porten.
Du skal muligvis manuelt vælge PowerConf S360 og de indbyggede mikrofoner til
dit pc-system eller konferencesoftware.
macOS
Systemindstillinger > Lyd > Lydeffekter/Output/Input
Windows
Højreklik på lydikonet > Åbn lydindstillinger > Vælg din outputenhed / Vælg din
inputenhed
Software (Zoom, Skype, andre)
Indstillinger > Lyd > Højttaler / Mikrofon
Kontroller
×1
2s
×1
11 DA
Tryk én gang Besvar / afslut et opkald
Tryk og hold nede i 2 sekunder Afvise et opkald
Tryk én gang Slå lyden fra eller gendan mikrofonen
Tryk eller hold nede Lydstyrke op / ned
Foretag, besvar, afvis eller afslut kun et opkald med certiceret software.
Vejledning til LED-lys
Udgående opkald Blinker grønt
Indgående opkald
Besvar / afslut et opkald Fast grønt lys i 1 sekund, derefter fast
hvidt lys
Afvise et opkald
Slå lyden fra Konstant rød
Slå lyden til Solidt hvid
Lydstyrke op / ned Blinker hvidt
AnkerWork-software
software.ankerwork.com

DA 12
Specifikationer
Specikationerne kan ændres uden forudgående varsel.
Input for PD-IN-port 5 V 3 A, 9 V 3 A, 12 V 3 A,
15 V 3 A, 20 V 5 A
Samlet output for USB-A-port 5 V 1,5 A (7,5 W maks. pr. port)
Maks. input for USB-C-stik 5 V 3 A
Output for USB-C-stik
(med PD-IN-port sluttet til USB-C-adapter
og andre porte anvendt)
5 V 0,5 A, 9 V 0,9 A, 12 V 1,4 A,
15 V 1,45 A, 20 V 1,5 A
Maks. output for USB-C-stik
(med PD-IN-port sluttet til USB-C-adapter
og ingen andre porte anvendt)
5 V 2,4 A, 9 V 1,85 A, 12 V 2,1 A, 15
V 2,1 A, 20 V 3,6 A
Nominel udgangseffekt 3 W
Størrelse på højttalerdriver 1 x 1,75" fuldtonedriver
Opsamling af stemmefrekvens 16 kHz
Område for stemmeopsamling Op til 6 personer
Mikrofon 4
13 DE
Auf einen Blick
1 6 7 8 9 552 3 4
1. Lautstärketaste (leiser) 6. PD-IN-Anschluss
2. Stummschalttaste 7. USB-A-Anschluss (USB 3.2 Gen 1, 5 Gbit/s)
3. Anruftaste 8. HDMI-Anschluss (HDMI 1.4, bis zu 4K bei 30 Hz)
4. Lautstärketaste (lauter) 9. USB-C-Anschluss (USB 3.2 Gen 1, 5 Gbit/s)
5. Mikrofon
Verbinden
Es gibt zwei Möglichkeiten, wie Sie die Freisprecheinrichtung mit Ihren Geräten
verbinden können.
Option A
Schließen Sie den USB-C-Anschluss der Freisprecheinrichtung an einen USB-C-
Anschluss Ihres PCs an.
HDMI
Option B
1. Schließen Sie den USB-C-Anschluss der Freisprecheinrichtung an einen USB-C-
Anschluss Ihres PCs an.
2. Verbinden Sie die Freisprecheinrichtung über den USB-C-Anschluss auf der
Rückseite mit einem PD-Netzteil (nicht im Lieferumfang enthalten). Dann
können Sie mit der Freisprecheinrichtung Ihren PC mit Strom versorgen.
DE 14
PD-IN
HDMI
Die Freisprecheinrichtung schaltet sich automatisch ein, sobald sie mit Ihrem PC
verbunden ist.
Sobald die Freisprecheinrichtung angeschlossen und eingeschaltet ist, blinken
alle Tasten 2 Sekunden lang weiß und bleiben dann dauerhaft weiß.
Schließen Sie die Freisprecheinrichtung bei Bedarf über den HDMI-Anschluss an
einen Monitor oder an ein USB-A-Gerät an, um die Datenübertragung über den
USB-A-Anschluss zu unterstützen.
Je nach PC-System oder Konferenz-Software müssen Sie PowerConf S360 und die
integrierten Mikrofone möglicherweise manuell auswählen.
macOS
Systemeinstellungen > Ton > Soundeffekte/Ausgang/Eingang
Windows
Rechtsklicken Sie auf das Sound-Symbol > Öffnen Sie Soundeinstellungen > Wählen
Sie ein Ausgabegerät / Wählen Sie ein Eingabegerät
Software (Zoom, Skype, sonstige)
Einstellungen > Audio > Lautsprecher/Mikrofon
Steuerung
×1
2s
×1
15 DE
Einmal drücken Einen Anruf annehmen/beenden
2 Sekunden lang gedrückt halten Einen Anruf ablehnen
Einmal drücken Mikrofon stummschalten oder
wiederherstellen
Drücken oder gedrückt halten Laut/Leise
Tätigen, Annehmen, Ablehnen oder Beenden eines Anrufs nur mit zertifizierter
Software.
Anleitung zu LED-Anzeigen
Anruf tätigen Blinkt grün
Eingehender Anruf
Einen Anruf annehmen/beenden Leuchtet 1 Sekunde lang grün, dann
weiß
Einen Anruf ablehnen
Stummschaltung aktiviert Leuchtet rot
Stummschaltung deaktiviert Leuchtet weiß
Laut/Leise Blinkt weiß
AnkerWork-Software
software.ankerwork.com


DE 16
Technische Daten
Änderungen der technischen Daten ohne Vorankündigung vorbehalten.
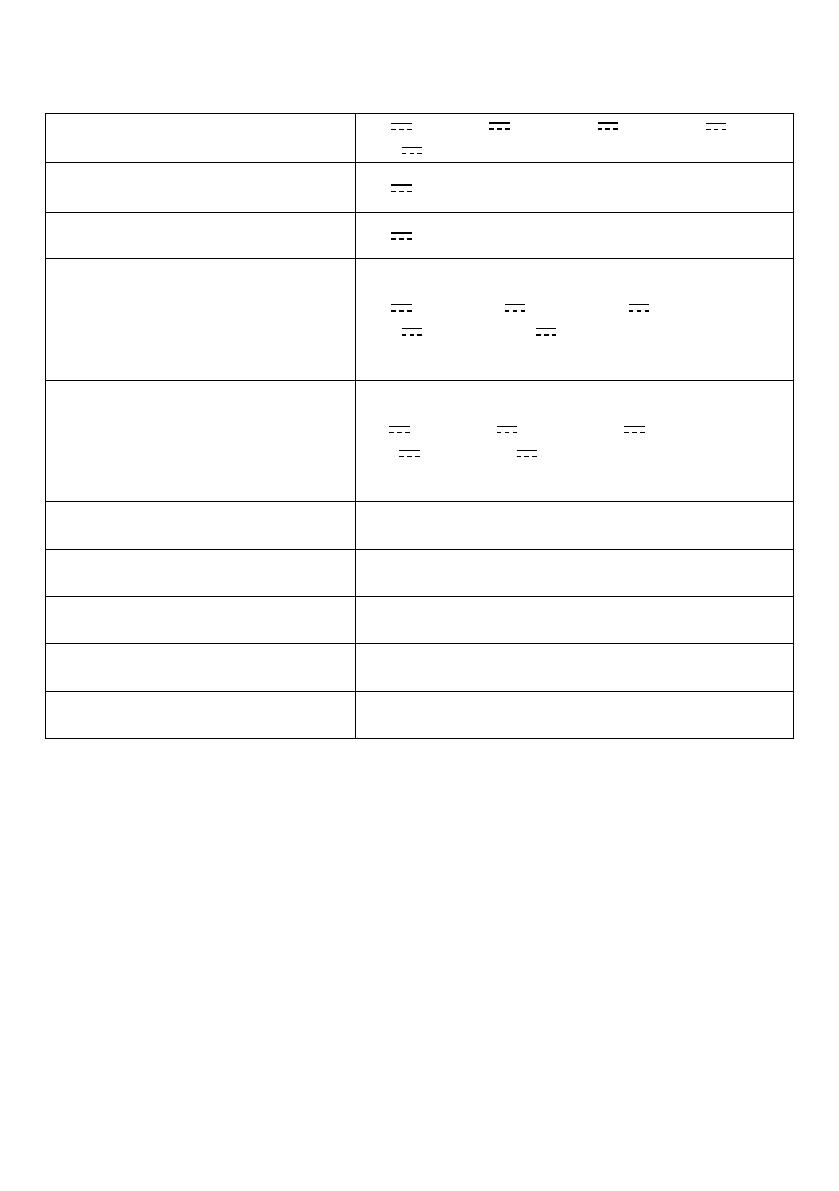
PD-IN-Eingangsanschluss 5 V 3 A, 9 V 3 A, 12 V 3 A, 15 V 3 A,
20 V 5 A
USB-A-Ausgangsanschluss
gesamt 5 V 1,5 A (7,5 W max. pro Anschluss)
USB-C-Eingangsanschluss max. 5 V 3 A
USB-C-Ausgangsanschluss
(wenn der PD-IN-Anschluss mit
dem USB-C-Adapter verbunden
ist und andere Anschlüsse belegt
sind)
5 V 0,5 A, 9 V 0,9 A, 12 V 1,4 A,
15 V 1,45 A, 20 V 1,5 A
USB-C-Ausgangsanschluss max.
(wenn der PD-IN-Anschluss mit
dem USB-C-Adapter verbunden
ist und keine anderen Anschlüsse
belegt sind)
5 V 2,4 A, 9 V 1,85 A, 12 V 2,1 A,
15 V 2,1 A, 20 V 3,6 A
Nennausgangsleistung 3 W
Lautsprechertreibergröße 1 x 1,75" Breitbandtreiber
Sprachaufnahmefrequenz 16 kHz
Aufnahmebereich Bis zu 6 Personen
Mikrofon 4
17 ES
Vista general
1 6 7 8 9 552 3 4
1. Botón de bajar el volumen 6. Puerto de entrada PD
2. Botón de silencio 7. Puerto USB-A (USB 3.2 Gen 1, 5 Gbps)
3. Botón de llamada 8. Puerto HDMI (HDMI 1.4, hasta 4K, a 30 Hz)
4. Botón de subir el volumen 9. Conector USB-C (USB 3.2 Gen 1, 5 Gbps)
5. Micrófono
Conectando
Hay 2 formas en las que puede conectar el altavoz a sus dispositivos.
Opción A
Enchufe el conector USB-C del altavoz al puerto USB-C del PC.
HDMI
Opción B
1. Enchufe el conector USB-C del altavoz al puerto USB-C del PC.
2. Conecte el altavoz a un adaptador de corriente PD (no incluido) a través del
puerto USB-C que hay en la parte de atrás. De este modo, el altavoz dará
corriente al PC.
ES 18
PD-IN
HDMI
El altavoz se encenderá automáticamente al conectarlo al PC.
Cuando el altavoz esté conectado y encendido, todos los botones parpadearán
en blanco durante 2 segundos y luego se quedarán en blanco jo.
Si es necesario, conecte el altavoz a un monitor a través del puerto HDMI o a un
dispositivo con conexión USB-A para transferir datos a través del puerto USB-A.
Es posible que deba seleccionar PowerConf S360 de forma manual y sus micrófonos
integrados en el sistema del PC o el software de conferencias.
macOS
Preferencias del sistema > Sonido > Efectos de sonido / Salida / Entrada
Windows
Haga clic con el botón derecho en el icono de sonido > Abra Conguración del
sonido > Seleccione el dispositivo de salida/Seleccione el dispositivo de entrada
Software (Zoom, Skype u otros)
Conguración > Sonido > Altavoz/Micrófono
Controles
×1
2s
×1
  • Page 1 1
  • Page 2 2
  • Page 3 3
  • Page 4 4
  • Page 5 5
  • Page 6 6
  • Page 7 7
  • Page 8 8
  • Page 9 9
  • Page 10 10
  • Page 11 11
  • Page 12 12
  • Page 13 13
  • Page 14 14
  • Page 15 15
  • Page 16 16
  • Page 17 17
  • Page 18 18
  • Page 19 19
  • Page 20 20
  • Page 21 21
  • Page 22 22
  • Page 23 23
  • Page 24 24
  • Page 25 25
  • Page 26 26
  • Page 27 27
  • Page 28 28
  • Page 29 29
  • Page 30 30
  • Page 31 31
  • Page 32 32
  • Page 33 33
  • Page 34 34
  • Page 35 35
  • Page 36 36
  • Page 37 37
  • Page 38 38
  • Page 39 39
  • Page 40 40
  • Page 41 41
  • Page 42 42
  • Page 43 43
  • Page 44 44
  • Page 45 45
  • Page 46 46
  • Page 47 47
  • Page 48 48
  • Page 49 49
  • Page 50 50
  • Page 51 51
  • Page 52 52
  • Page 53 53
  • Page 54 54
  • Page 55 55
  • Page 56 56
  • Page 57 57
  • Page 58 58
  • Page 59 59
  • Page 60 60
  • Page 61 61
  • Page 62 62
  • Page 63 63
  • Page 64 64
  • Page 65 65
  • Page 66 66
  • Page 67 67
  • Page 68 68
  • Page 69 69
  • Page 70 70
  • Page 71 71
  • Page 72 72
  • Page 73 73
  • Page 74 74
  • Page 75 75
  • Page 76 76
  • Page 77 77
  • Page 78 78
  • Page 79 79
  • Page 80 80
  • Page 81 81
  • Page 82 82
  • Page 83 83
  • Page 84 84
  • Page 85 85
  • Page 86 86

Anker PowerConf S360 Manual do usuário

Tipo
Manual do usuário