
1
RoHS
User instructions / Instruções de uso
Instrucciones de uso / Mode d’emploi
Οδηγίες χρήστη
Dehumidifier / Desumidificador
Deshumidificador / Déshumidificateur / Αφυγραντήρας
Digi Desumi 10 * DE-D10.012A
Download
Multi-language file

2

1
English
Dear customer
Thank you for having chosen a HÆGER product.
The HÆGER products have been produced to think about the welfare of the consumer
privileging the most raised standards of quality, functionality and assign. We are sure you
will be happy with this appliance.
We assume that the user is familiar with the common procedures of handling household
appliances.
Before using the appliance for the first time please read carefully and thoroughly through
these operating instructions and the safety advice, completely familiarising yourself with
the appliance. Retain these instructions for future reference and pass them on to whoever
might acquire the appliance at a future date.
Intended use
The appliance is designed and produced for domestic use only. Use this appliance only as
described in this instruction manual. As with all electrical equipment, whilst the
instructions aim to cover as many eventualities as possible.
Caution and common sense should be applied when operating and installing this appliance.
For safety reasons, alterations or modifications of the device are prohibited.
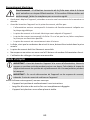
Safety Instructions
Please read the operating instructions carefully before using your
dehumidifier for the first time and keep it on a safe floor.
To reduce the risk of fire, electrical shock, or injury when using your
appliance, follows these basic precautions:
• Never immerse the appliance in water or other liquids.
• Place the unit on a stable flat surface to avoid loud noises and vibrations.
• Never operate the appliance if a cable or connector has been damaged,
after appliance malfunction or if the appliance was dropped or
otherwise damaged.
• The appliance may only be repaired by qualified personal, improper
repair work can be a source of considerable danger for the users.
• Pull out the power plug before transporting it and / or before cleaning.
• Operate the appliance only at the voltage specified on the rating label.
• The device may not be connected to a power strip with other household
appliances.

2
• Use the appliance only in the household, and only for the purpose it was
developed for.
• Do not operate this unit near heating appliances and flammable or
dangerous objects.
• If the dehumidifier is operated in a room with gas driven devices, so the
room must be aired regularly and often.
• Do not place heavy objects on the appliance.
• Do not hang curtains or wet clothes in front of the air outlet, this will
overload the device.
• The drainage hose may not be installed outdoors at low temperatures.
• To prevent spillage, empty the water tank before relocating the
appliance.
• Do not tip the appliance to any side as escaping water could damage the
appliance.
• If you smell the smoke during start-up or if you can see the smoke,
immediately disconnect the power plug out and contact your dealer.
• The unit should be installed with a minimum distance of 20 cm from the
wall or other obstacles.
WARNING:
Do not touch the plug at the mains cable with wet or moist
hands when connecting or disconnecting. Risk of death by
electric shock!
• In case of emergency, unplug the device immediately.
• Hold the plug when disconnecting the mains cable; do not pull the cable.
• Disconnect the plug before cleaning or servicing.
• Regularly check the device and cable for signs of damage. Do not
continue to operate the device in case of damage.
• If the supply cord is damaged, it must be replaced by a qualified person
to avoid a hazard.
• A damaged mains cable must be replaced by the manufacturer or a
technician and without any delay. Do not use the device with a damaged
cable or plug.

3
• Do not repair the device by yourself. Please contact authorized
personnel.
• Except for cleaning and maintenance work described in this manual, no
other alterations of this device must be executed.
• Do not operate the device with an external timer or separate remote-
control system.
CAUTION!
In order to ensure your children’s safety, please keep all
packaging (plastic bags, boxes, polystyrene etc.) out of their
reach. Do not allow small children to play with the foil as
there is a danger of suffocation!
• This appliance can be used by children aged from 8 years and above and
persons with reduced physical, sensory or mental capabilities or lack of
experience and knowledge if they have been given supervision or
instruction concerning use of the appliance in a safe way and understand
the hazards involved.
• Cleaning and user maintenance shall not be made by children without
supervision
• Keep the appliance and its cord out of reach of children less than 8 years.
• The packaging must be undamaged. Check the device for any possible
transport damage. Do not install a damaged device. In case of damage,
please contact your distributor.
• Do not install the appliance in rooms containing gas, oil or sulphur. Do
not install near sources of heat.
• Do not use the appliance on sloping surfaces.
• Keep the appliance at least 50 cm away from flammable substances
(alcohol etc) or pressurised containers (e.g., aerosol cans).
• Do not rest heavy or hot objects on top of the appliance.
• Always transport the appliance upright or resting on one side.
Remember to drain the condensate tank before moving the appliance.
Wait at least 1 hour after transporting the appliance before starting it.

4
WARNINGS (for using R290 refrigerant only)
• R290 is a refrigerant gas that complies with the European directives on
the environment. Do not puncture any part of the refrigerant circuit. At
the end of its working life, consign the appliance to a specialist collection
centre.
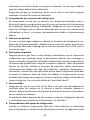
DANGER: Propane gas (R290) is flammable, odourless gas.
While working on a machine, no smoking and no open flames
should be permitted.
• If the appliance is installed, operated or stored in a nonventilated area,
the room must be designed to prevent to the accumulation of refrigerant
leaks resulting in a risk of fire or explosion due to ignition of the
refrigerant caused by electric heaters, stoves, or other sources of
ignition.
• Do not use means to accelerate the defrosting process or to clean, other
than those recommended by the manufacturer.
• Do not pierce or burn.
• Appliance should be installed, operated and stored in a room with a floor
area larger than 4 m2.
• Compliance with national gas regulations shall be observed.
• Keep ventilation openings clear of obstruction.
• The appliance shall be stored in a room without continuously operating
ignition sources (for example: open flames, an operating gas appliance
or an operating electric heater).
• The appliance must be stored in such a way as to prevent mechanical
failure.
• Individuals who operate or work on the refrigerant circuit must have the
appropriate certification issued by an accredited organization that
ensures competence in handling refrigerants according to a specific
evaluation recognized by associations in the industry.
• Repairs must be performed based on the recommendation from the
manufacturing company. Maintenance and repairs that require the
assistance of other qualified personnel must be performed under the
supervision of an individual specified in the use of flammable
refrigerants.

5
• The materials used for packaging can be recycled. You are therefore
recommended to dispose of them in special differentiated waste
collection containers.
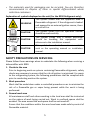
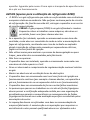
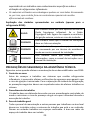
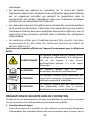
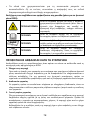
Explanation of symbols displayed on the unit (For the R290 Refrigerant only):
WARNING
This symbol shows that this appliance used a
flammable refrigerant. If the refrigerant is leaked
and exposed to an external ignition source, there
is a risk of fire.
CAUTION
This symbol shows that the operation manual
should be read carefully.
CAUTION
This symbol shows that a service personnel
should be handling this equipment with
reference to the installation manual.
CAUTION
This symbol shows that information is available
such as the operating manual or installation
manual.
SAFETY PRECAUTIONS ON SERVICING
Please follow these warnings when to undertake the following when servicing a
dehumidifier with R290.
1. Checks to the area
Prior to beginning work on systems containing flammable refrigerants, safety
checks are necessary to ensure that the risk of ignition is minimized. For repair
to the refrigerating system, the following precautions shall be complied with
prior to conducting work on the system.
2. Work procedure
Work shall be undertaken under a controlled procedure so as to minimize the
risk of a flammable gas or vapor being present while the work is being
performed.
3. General work area
All maintenance staff and others working in the local area shall be instructed
on the nature of work being carried out. Work in confined spaces shall be
avoided. The area around the workspace shall be sectioned off.
Ensure that the conditions within the area have been made safe by control of
flammable material.

6
4. Checking for presence of refrigerant
The area shall be checked with an appropriate refrigerant detector prior to and
during work, to ensure the technician is aware of potentially flammable
atmospheres. Ensure that the leak detection equipment being used is suitable
for use with flammable refrigerants, i.e., no sparking, adequately sealed or
intrinsically safe.
5. Presence of fire extinguisher
If any hot work is to be conducted on the refrigeration equipment or any
associated parts, appropriate fire extinguishing equipment shall be available to
hand. Have a dry powder orCO2 fire extinguisher adjacent to the charging area.
6. No ignition sources
No person carrying out work in relation to a refrigeration system which
involves exposing any pipe work that contains or has contained flammable
refrigerant shall use any sources of ignition in such a manner that it may lead
to the risk of fire or explosion. All possible ignition sources, including cigarette
smoking, should be kept sufficiently far away from the site of installation,
repairing, removing and disposal, during which flammable refrigerant can
possibly be released to the surrounding space. Prior to work taking place, the
area around the equipment is to be surveyed to make sure that there are no
flammable hazards or ignition risks. “No Smoking” signs shall be displayed.
7. Ventilated area
Ensure that the area is in the open or that it is adequately ventilated before
breaking into the system or conducting any hot work. A degree of ventilation
shall continue during the period that the work is carried out.
The ventilation should safely disperse any released refrigerant and preferably
expel it externally into the atmosphere.
8. Checks to the refrigeration equipment
Where electrical components are being changed, they shall be fit for the
purpose and to the correct specification. At all times the manufacturer’s
maintenance and service guidelines shall be followed. If in doubt consult the
manufacturer’s technical department for assistance.
The following checks shall be applied to installations using flammable
refrigerants:
− The charge size is in accordance with the room size within which the
refrigerant containing parts are installed;
− The ventilation machinery and outlets are operating adequately and are
not obstructed;

7
− If an indirect refrigerating circuit is being used, the secondary circuit shall
be checked for the presence of refrigerant;
− Marking to the equipment continues to be visible and legible. Markings
and signs that are illegible shall be corrected;
− refrigeration pipe or components are installed in a position where they
are unlikely to be exposed to any substance which may corrode
refrigerant containing components, unless the components are
constructed of materials which are inherently resistant to being corroded
or are suitably protected against being so corroded.
9. Checks to electrical devices
Repair and maintenance to electrical components shall include initial safety
checks and component inspection procedures. If a fault exists that could
compromise safety, then no electrical supply shall be connected to the circuit
until it is satisfactorily dealt with. If the fault cannot be corrected immediately
but it is necessary to continue operation, an adequate temporary solution shall
be used. This shall be reported to the owner of the equipment so all parties are
advised.
Initial safety checks shall include:
− those capacitors are discharged: this shall be done in a safe manner to avoid
possibility of sparking;
− that there no live electrical components and wiring are exposed while
charging, recovering or purging the system;
− that there is continuity of earth bonding.
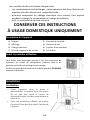
SAVE THESE INSTRUCTIONS
FOR HOUSEHOLD USE ONLY
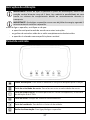
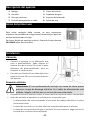
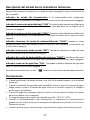
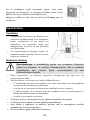
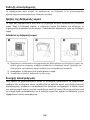
Description of the appliance
1. Handle
2. Control panel
3. Display window
4. Water tank
5. Continuous drain
6. Winding bracket
7. Power cord storage socket
8. Air outlet

8
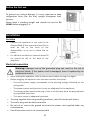
Before the first use
To prevent any internal damage, it is very important to keep
refrigeration units (like this one) upright throughout their
journey.
Please leave it standing upright and outside the box for 24
HOURS before plugging it in.
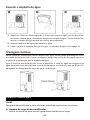
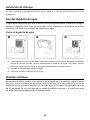
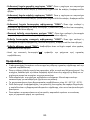
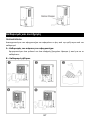
Installation
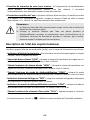
Location
• Position the appliance in the room to be
dehumidified. A free space of at least 50 cm
must be left at the front of the
dehumidifier, so as not to block the air
outlet.
• For efficient ventilation a space of about 20
cm should be left at the back of the
appliance.
Electrical connection
Warning: Improper use of the grounded plug can result in the risk of
electrical shock. If the power cord is damaged, have it replaced by an
authorized service.
• After moving the appliance, wait at least an hour before turning it on again.
• Before plugging the appliance into the mains socket, check that:
– The mains power supply corresponds to the working voltage indicated on the
rating plate.
– The power socket and electrical circuit are adequate for the appliance.
– The power socket matches the plug. If this is not the case, have the plug replaced
by a qualified electrician.
– The mains socket is adequately earthed.
• The plug, together with the grounding conductor, must fit into the wall socket.
• The mains plug must be freely accessible.
• Do not cut or remove the ground wire from the power cord supplied under any
circumstances.
• Use of extension cords is not recommended.

9
Operating Instructions
IMPORTANT: Before connecting the appliance to the power source, let it stand
upright for approximately 1 hour. This will reduce the possibility of a malfunction
in the cooling system from handling during transportation.
IMPORTANT: In case you disconnect the device or in case of power failure, wait
for 3 minutes before restarting the device.
Before switching on your appliance, make sure that:
- the appliance is positioned in accordance with these instructions.
- the air inlet and outlet grills are completely unobstructed.
- the appliance is placed on a flat and stable surface.
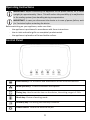
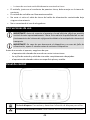
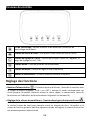
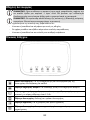
Control Panel
Child lock key: For activation and deactivation of the child lock function.
Wind speed key: To switch between wind speeds.
Timing key: Used to set the time on the device, the setting range is 1~24h.
Mode key: Choice of working mode.
Humidity key: For setting the humidity threshold.
Power button: To turn the machine on/off.

10
Function setting
▪ Power button : This button is used to turn the machine ON/OFF with the indicator
light showing "ON" or "OFF" when the corresponding mode is chosen (when the indoor
humidity reaches the set value, the compressor will stop running, and the running
indicator will flash at this time).
▪ Fan speed setting : There are two types of wind speed: strong speed and a
comfortable speed. When the device is turned on, press the [SPEED] key to switch
between wind speeds. The humidity and wind speed cannot be set in the drying mode,
and the strong wind speed is automatically selected.
▪ Mode setting : The device has three working modes: dehumidifier mode, drying
mode, continuous dehumidifier mode. In the power-on state, press the [MODE] button
and the device will cycle through the dehumidifier, drying, and continuous dehumidifier
modes.
The working mode can be switched according to feature preference:
− Dehumidification mode: humidity and wind speed can be set.
− Drying mode: Humidity and wind speed cannot be set.
− Continuous dehumidification mode: the humidity cannot be set, but the wind speed
can be set.
▪ Humidity setting : In dehumidification mode (other modes are invalid), press the
[HUMI] key once to enter the set humidity viewing state; "" flashes to display the set
humidity value. During the flashing period of "", press [HUMI] to set the humidity.
Value. The setting range is 30-80% RH, which can be set cyclically. Press the [HUMI] key
once, and the set humidity value will increase by 5% RH. After 5seconds of no key
operation or pressing other keys, it will automatically confirm and exit, and "" displays
the current ambient humidity. When the humidity level is set at 30%RH, the dehumidifier
will be work at continuous dehumidifying mode.
▪ Lock settings : In the on or off state, long press the [LOCK] button for 3 seconds to
control the activation and deactivation of the child lock. After entering the child lock
state, all other key operations stop working. You can only release it by long pressing the
[LOCK] button for 3 seconds.
▪ Timing settings : If the timer is set when the device is off, the timer will be set to
turn on; if it is set when the device is on, the timer will be set to turn off the device.
Press the "TIMER" button to set the timer. Each time you press it, the timer increases by
1h. The setting range is 1~24h, which can be set cyclically. Press and hold the "TIMER"
for a few seconds to continuously adjust the timer; when the timer is 00, it is invalid.

11
When the timer is valid, the indicator light "O" above the timing button will be on. Press
the "timing button" once, the display screen can show the remaining time on the timer,
and the current humidity value will be automatically displayed after a few seconds.
▪ Power-down memory function: If the equipment is suddenly powered off during
normal operation, once it is turned back on, it will automatically return to the settings
before the power off.
▪ Water full protection: When the water tank is full, the machine stops, and the water
full indicator light "O" starts flashing, When the water tank is emptied, the water full
indicator light "O" will turn off. The machine can then be restarted.
Note:
1. The water tank needs to be properly filled, otherwise it will lead to
detection of a full tank.
2. When the machine detects that the water is full during normal
dehumidification, the compressor stops working, and the fan continues to
run for 3 minutes and then stops, at which time it prompts that the water
is full.
Description of the status of the indicator lights
After the device is powered on, in standby (shutdown) mode, only the power light is on.
− Timer status indicator: If the timer is setup properly, the indicator will light up,
otherwise the indicator light will be off.
− Low-speed indicator light "LOW": When the fan speed is set to comfortable wind,
the LOW indicator light will be on, otherwise it will be off.
− High-speed indicator light "HIGH": When the fan speed is set to strong wind, the
HIGH indicator light will be on, otherwise it will be off.
− Dehumidify mode light indicator "DEHU": When the dehumidifier mode is selected
and it is running, this indicator will be on, otherwise it will be off.
− Dry clothes light indicator "DRY": When dry clothes mode is selected, it will be on,
otherwise it will be off.
− Continuous dehumidification mode indicator "CONT": When continuous
dehumidification mode is selected, it will be on, otherwise it will be off.
− Water full light indicator: flashes when the water tank is full, otherwise off.
− During normal operation, "" displays the current ambient humidity value.

12
Precautions
• The dehumidifier should not operate at a humidity setting higher than the ambient
humidity.
• When the water full indicator is on, pour out the water in the water tank. Then put
the emptied water tank back to its original position, and the machine can continue to
be used.
• When the machine stops, wait at least 3 minutes before restarting to avoid damage
to the compressor.
• The usable ambient temperature range is 5 ~ 35°C (41 ~ 95°F).
• When the dehumidifier is operating, the operating compressor will generate heat,
which will make the room temperature higher, which is a normal phenomenon.
• When you need to move this product, please lift it facing the front of the product.
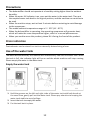
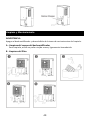
Drain indication
Drained water can be stored in a tank or externally drained using a hose.
Use of the water tank
The water dehumidified by this machine will automatically flow into the water tank. When
the tank is full, the indicator light will be on and the whole machine will stop running.
Please empty the water in the water tank.
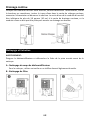
Empty the water tank
1. Hold the grooves on the left and right sides of the water tank with both hands at
the same time, gently pull out the water tank. Please pay attention to keeping the
water tank stable to avoid spillage.
2. Invert the tank to empty the water.
3. Put the tank back in place.

13
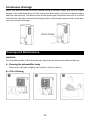
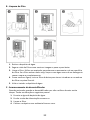
Continuous drainage
When you want to use this function, please unplug the power supply, pull out the rubber
stopper, insert the water pipe into the continuous drain outlet, connect the power supply
and start the machine. The water outlet of the water pipe should be more than 3.9 inches
(10cm) lower than the continuous drainage outlet, and the water pipe should not be bent
to ensure smooth drainage.
Cleaning and Maintenance
WARNING:
Turn the dehumidifier off and remove the plug from the wall outlet before Cleaning.
A - Cleaning the dehumidifier body
Please use a soft and a slightly wet textile or cloth to clean it.
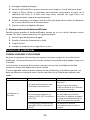
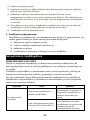
B – Filter Cleaning

14
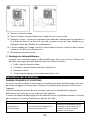
1. Take out the water tank.
2. Hold the filter screen as shown in the image and pull down the filter screen.
3. Clean the filter: Use a vacuum cleaner to gently absorb the dust on the surface of
the filter. If the filter is very dirty, wipe it with warm water and a mild detergent
and dry it completely.
4. As shown in the picture, insert the filter from bottom to top and insert it into the
filter slot in the front shell.
5. Reinstall the water tank.
C - Dehumidifier storage
When you want to store the dehumidifier because you don't use it for a long time.
Please pay attention to the following steps:
1. Empty the water in the water tank.
2. Roll up the power cord and tie it up.
3. Clean the filter.
4. Place the machine in a cool and dry environment.
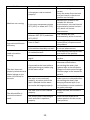
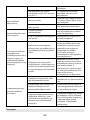
Troubleshooting
COMMON FAULTS AND SOLUTIONS
Check the information below for troubleshooting steps, it will save you time to resolve
issues that may happen with the unit.
The list includes most of the common cases, but not the results of defective unit, crafts
or materials in the unit.
If all troubleshooting steps have been exhausted and the issue is still occurring, please
feel free to reach out to Customer Service to get further assistance.

15
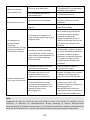
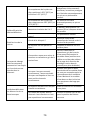
Problem
Reason
Method
Machine not running.
Is the power cord connected
properly?
Connect the plug into the
socket.
Drain the water from the tank
and put it back in the correct
position on the body.
ls the room temperature above
95°F (35°C) or below 41°F (5°C).
Because this product is not
suitable for extreme
environments, the machine will
automatically protect and turn
off, which is a normal
phenomenon.
ls the room temperature
between 68°F (20°C) and above
95°F (35°C)?
The machine will cool
automatically, which is normal.
Poor dehumidification
efficiency.
Poor air flow?
There should be about 7.9
inches(20cm) of space around
the product.
Is the ambient humidity too low?
A normal phenomenon.
Loud noise when
running.
Air intake blocked?
Clean any dirt from the air inlet
and outlet of the product.
Is the machine placed at an
angle?
Move the machine to a level
surface.
The drain hose was
properly connected and
Water leakage or the
water still drained to
the tank.
Connected to the hose without
pulling out the gray rubber plug
of the water outlet.
Pull out the grey rubber plug of
the water outlet before
connecting the water pipe
(please refer to the schematic
diagram of continuous drainage
function page in the manual for
details)
The pipe is not connected
properly, the other end of the
pipe is blocked and the water
cannot be discharged properly.
Ensure that both ends of the
water pipe are unimpeded after
connecting the water pipe.
Keeping the water pipe in an
inclined state is more conducive
to gravity drainage.
The dehumidifier is
started but doesn't
work.
The tank is full or not installed
properly.
Empty the tank and reinstall it
in place.
The sensor float in the tank got
stuck and didn't reposition
properly.
Push the float down to the
lowest position for the correct
float position.

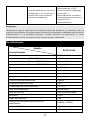
16
The dehumidifier is in the
defrosting process, it is normal
the compressor ceases while
defrosting process.
The defrosting process may
take 15 to 20 minutes. When
the defrosting is complete, the
dehumidifier automatically
starts to continue the
dehumidification process.
Notice:
Please make sure that the air outlet is open before starting the machine, otherwise the
machine will overheat. Never stop the machine directly by unplugging the power cord. If
the problem persists, please shut down and unplug the power plug, and send it back to
our company for repair.
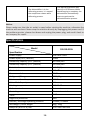
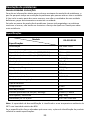
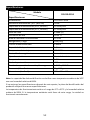
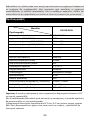
Specifications
Model
Specification
DE-010.012A
Power Supply
220-240V~50Hz
Power input (30℃ /80%RH)
220W
Dehumidify capacity (30℃ /80%RH)
10 Litres/24h
Dehumidify capacity (35℃ /90%RH)
13 Litres/24h
Noise level
≤ 46dB (A)
Air circulation
110m3/h
Recommended room area
15-20m2
Refrigerant/Charge
R290/35g
Maximum allowable pressure
4.0MPa
Water Tank Capacity
1.6L
Working temperature
5 ℃~35 ℃
Defrost control
Automatic
Control type
Electronic control
Timer
1-24h
Degree of protection
IPX0
Suction / Discharge Operating Pressure
1.0MPa / 2.6MPa
Net Weight / Gross weight
9kg / 10kg
Body size (W x D x H) mm
275 x 195 x 440 mm

17
Note: The dehumidification capacity is rated at a room temperature of 30℃ with a relative
humidity of 80%.
If specifications are improved after this pointing, the product nameplate will reflect the
new specifications.
The operational temperature is in the range of 5℃ to 35℃ and max relative humidity of
80%. If the room temperature is outside of this range, the unit will not operate normally.
Conformity CE
This product has been tested and produced according to all relevant current CE guidelines,
such as:
- Electromagnetic compatibility Directive 2014/30/EU,
- Low voltage Directive (LVD) Directive 2014/35/EU,
- RoHS with its amendments Directive EU 2015/863,
and has been constructed in accordance with the latest safety regulations.
The CE mark attests this product with all relevant directives.
Disposal – Environment policy
Packing
The packaging material is entirely recyclable and marked with the recycling
symbol. Follow local regulations for scrapping. Keep the packaging materials
(plastic bags, polystyrene parts, etc.) out of reach of children, as they are
potentially dangerous.
Disposal
This appliance is marked according to the European directive 2012/19/EU on Waste
Electrical and Electronic Equipment (WEEE).
By ensuring this product is disposed of correctly, you will help prevent potential negative
consequences for the environment and human health, which could otherwise be caused
by inappropriate waste handling of this product.
This symbol on the product, or on the documents accompanying the product,
indicates that this appliance may not be treated as household waste. Instead, it
shall be handed over to the applicable collection point for the recycling of
electrical and electronic equipment.
Disposal must be carried out in accordance with local environmental regulations for waste
disposal. For more detailed information about treatment, recovery and recycling of this
product, please contact your local city office, your household waste disposal service or the
shop where you purchased the product.

18
Warranty
Warranty Terms and Conditions
1. The product is guaranteed for the period stipulated by the legislation where it is placed on the market,
starting from the date of purchase, against manufacturing defects and/or workmanship. The lack of
conformity manifested in this period is presumed to exist at the date of purchase. After this period, it is for
the customer to prove that the lack of conformity already existed at the time of delivery.
2. If, during the warranty period, the product is defective in normal use, the buyer should contact the selling
establishment and send the appliance to the place indicated by the seller.
3. The warranty is only valid upon presentation of the invoice proving the purchase and the completed
warranty certificate (indicating the date of purchase, the name of the dealer, the reference of the model,
and it is also recommended to indicate the serial number and lot number).
4. The importer/seller reserves the right to refuse warranty assistance in the event that such information has
been deleted or altered after the original purchase of the product.
5. The responsibility of the importer/seller includes in particular the costs of repairing and/or replacing the unit
covered by the warranty with the reservation of the right to replace it with an equivalent product, in cases
where it is not possible to repair it.
6. The warranty does not apply to problems that are not directly related to defects in material, design or
workmanship.
7. This product is an appliance and is intended for home use only. The warranty will be void if the product is
used for professional purposes.
8. The warranty does not cover damage caused by misuse, improper installation, spillage, external factors, or
intentional damage.
9. The warranty does not cover damage resulting from falls, use of excessive force, blows, exposure to extreme
environmental conditions or deterioration caused by the normal use of plastic parts or keyboards, as well as
the use of batteries other than those specified in this manual.
10. The warranty does not cover installation and programming by the dealer. In particular, no claim for
installation and free programming by the reseller may be accepted.
11. The warranty does not cover deficiencies that insignificantly impair the operation of the appliance. Other
costs, such as installation, transportation and travel of the technician are expressly excluded from the
warranty.
12. The applicability of the warranty presupposes that the appliance is sent to the seller or place indicated by
him, complete and in well-protected packaging (if possible, in its original packaging) and accompanied by its
sheet or warranty card duly filled out and proof of purchase.
13. If after verification, it is found that there are no reasons for the claim, or that the product is not defective,
the inherent costs will be imputed to the customer, and the dealer is authorized to charge those costs to the
customer.
14. The warranty will be void when it shows signs that an unauthorized person has attempted to carry out repairs,
modifications or replacement of parts on the appliance.
15. Repairs carried out after the end of the warranty period are subject to costs.
16. This warranty does not affect your legal rights that you may have as a consumer under applicable national
law governing the purchase of products where the product is sold.
17. Warranty Period:
European Union countries - European Directives (EU) 2019/771 and (EU) 2019/770 apply on certain aspects
of contracts for the purchase and sale of movable property and transposed into the national laws of their
countries.
Other countries - national legislation on consumer rights in their country applies. In the case of no official
legislation, the guarantee shall be applied at the discretion of the importer placing the product on the market
or the seller establishment.
A página está carregando...
A página está carregando...
A página está carregando...
A página está carregando...
A página está carregando...
A página está carregando...
A página está carregando...
A página está carregando...
A página está carregando...
A página está carregando...
A página está carregando...
A página está carregando...
A página está carregando...
A página está carregando...
A página está carregando...
A página está carregando...
A página está carregando...
A página está carregando...
A página está carregando...
A página está carregando...
A página está carregando...
A página está carregando...
A página está carregando...
A página está carregando...
A página está carregando...
A página está carregando...
A página está carregando...
A página está carregando...
A página está carregando...
A página está carregando...
A página está carregando...
A página está carregando...
A página está carregando...
A página está carregando...
A página está carregando...
A página está carregando...
A página está carregando...
A página está carregando...
A página está carregando...
A página está carregando...
A página está carregando...
A página está carregando...
A página está carregando...
A página está carregando...
A página está carregando...
A página está carregando...
A página está carregando...
A página está carregando...
A página está carregando...
A página está carregando...
A página está carregando...
A página está carregando...
A página está carregando...
A página está carregando...
A página está carregando...
A página está carregando...
A página está carregando...
A página está carregando...
A página está carregando...
A página está carregando...
A página está carregando...
A página está carregando...
A página está carregando...
A página está carregando...
A página está carregando...
A página está carregando...
A página está carregando...
A página está carregando...
A página está carregando...
A página está carregando...
A página está carregando...
A página está carregando...
A página está carregando...
A página está carregando...
A página está carregando...
A página está carregando...
-
 1
1
-
 2
2
-
 3
3
-
 4
4
-
 5
5
-
 6
6
-
 7
7
-
 8
8
-
 9
9
-
 10
10
-
 11
11
-
 12
12
-
 13
13
-
 14
14
-
 15
15
-
 16
16
-
 17
17
-
 18
18
-
 19
19
-
 20
20
-
 21
21
-
 22
22
-
 23
23
-
 24
24
-
 25
25
-
 26
26
-
 27
27
-
 28
28
-
 29
29
-
 30
30
-
 31
31
-
 32
32
-
 33
33
-
 34
34
-
 35
35
-
 36
36
-
 37
37
-
 38
38
-
 39
39
-
 40
40
-
 41
41
-
 42
42
-
 43
43
-
 44
44
-
 45
45
-
 46
46
-
 47
47
-
 48
48
-
 49
49
-
 50
50
-
 51
51
-
 52
52
-
 53
53
-
 54
54
-
 55
55
-
 56
56
-
 57
57
-
 58
58
-
 59
59
-
 60
60
-
 61
61
-
 62
62
-
 63
63
-
 64
64
-
 65
65
-
 66
66
-
 67
67
-
 68
68
-
 69
69
-
 70
70
-
 71
71
-
 72
72
-
 73
73
-
 74
74
-
 75
75
-
 76
76
-
 77
77
-
 78
78
-
 79
79
-
 80
80
-
 81
81
-
 82
82
-
 83
83
-
 84
84
-
 85
85
-
 86
86
-
 87
87
-
 88
88
-
 89
89
-
 90
90
-
 91
91
-
 92
92
-
 93
93
-
 94
94
-
 95
95
-
 96
96


em outras línguas
- español: HAEGER DE-D10.012A Manual de usuario
- français: HAEGER DE-D10.012A Manuel utilisateur
Artigos relacionados
Outros documentos
-
HTW Deshumidificador A3 Guia de instalação
-
Jocel JDE002136 Manual do usuário
-
-
UFESA DH5020 Manual do proprietário
-
mundoclima Series MUPO-C9/H9 Manual do proprietário
-
-
-
-
Orbegozo DH 1240 Manual do proprietário
-
Orbegozo DH 650 Manual do usuário