HP LaserJet 9000 Multifunction Printer series Guia rápido
- Categoria
- Multifuncionais
- Tipo
- Guia rápido
Este manual também é adequado para

hp LaserJet 9000mfp
hp LaserJet 9000Lmfp
hp LaserJet 9000mfp hp LaserJet 9000Lmfp
inicio
start
início
lea esto primero
Q2622-90902
*Q2622-90902*
*Q2622-90902*
copyright 2002
Hewlett-Packard Company
printed in USA
©
www.hp.com/support/lj9000
printed on at least
50% total recycled fiber with
at least 10% post-consumer paper
spine = 10/32 in (0.3125 in)


English
hp LaserJet 9000mfp
hp LaserJet 9000Lmfp
Start

Hewlett-Packard Company
11311 Chinden Boulevard
Boise, Idaho 83714 U.S.A.
© Copyright Hewlett-Packard
Company 2002
All Rights Reserved.
Reproduction, adaptation, or
translation without prior written
permission is prohibited, except
as allowed under the copyright
laws.
Publication number
Q2622-90902
Edition 1, 12/2002
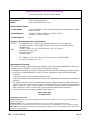
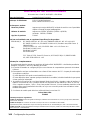
Warranty
The information contained in
this document is subject to
change without notice.
Hewlett-Packard makes no
warranty of any kind with
respect to this information.
HEWLETT-PACKARD
SPECIFICALLY DISCLAIMS
THE IMPLIED WARRANTY OF
MERCHANTABILITY AND
FITNESS FOR A PARTICULAR
PURPOSE.
Hewlett-Packard shall not be
liable for any direct, indirect,
incidental, consequential, or
other damage alleged in
connection with the furnishing or
use of this information.
Trademark Credits
Microsoft
, MS Windows
,
Windows
, Windows NT
,
Windows Me
, and Windows
XP
are U.S. registered
trademarks of Microsoft
Corporation.
All other products mentioned
herein may be trademarks of
their respective companies.

ENWW
Contents 3
English
Product Setup
Contents
Introduction . . . . . . . . . . . . . . . . . . . . . . . . . . . . . . . . . . . . . . . . . . . 4
Where to look for information . . . . . . . . . . . . . . . . . . . . . . . . . . . . . 5
Installation checklist . . . . . . . . . . . . . . . . . . . . . . . . . . . . . . . . . . . . 6
Prepare product location . . . . . . . . . . . . . . . . . . . . . . . . . . . . . . . . . 7
Check package contents. . . . . . . . . . . . . . . . . . . . . . . . . . . . . . . . . 9
Remove internal packaging. . . . . . . . . . . . . . . . . . . . . . . . . . . . . . 10
Identify product parts. . . . . . . . . . . . . . . . . . . . . . . . . . . . . . . . . . . 11
Position the product. . . . . . . . . . . . . . . . . . . . . . . . . . . . . . . . . . . . 12
Install the print cartridge . . . . . . . . . . . . . . . . . . . . . . . . . . . . . . . . 14
Install accessories. . . . . . . . . . . . . . . . . . . . . . . . . . . . . . . . . . . . . 16
Load trays 1, 2, 3, and 4 . . . . . . . . . . . . . . . . . . . . . . . . . . . . . . . . 17
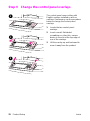
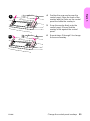
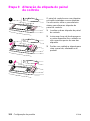
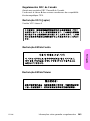
Change the control panel overlays . . . . . . . . . . . . . . . . . . . . . . . . 22
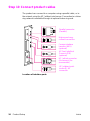
Connect product cables. . . . . . . . . . . . . . . . . . . . . . . . . . . . . . . . . 24
Connect power cords. . . . . . . . . . . . . . . . . . . . . . . . . . . . . . . . . . . 26
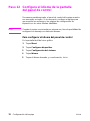
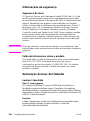
Configure the control panel display language . . . . . . . . . . . . . . . . 28
Configure digital sending. . . . . . . . . . . . . . . . . . . . . . . . . . . . . . . . 29
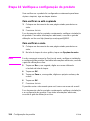
Print the configuration . . . . . . . . . . . . . . . . . . . . . . . . . . . . . . . . . . 30
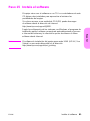
Install software . . . . . . . . . . . . . . . . . . . . . . . . . . . . . . . . . . . . . . . 31
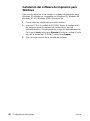
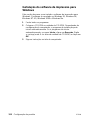
Installing Windows printing software . . . . . . . . . . . . . . . . . . 32
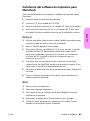
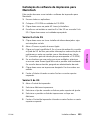
Installing Macintosh printing software . . . . . . . . . . . . . . . . . 33
Verify product setup. . . . . . . . . . . . . . . . . . . . . . . . . . . . . . . . . . . . 34
Customer support . . . . . . . . . . . . . . . . . . . . . . . . . . . . . . . . . . . . . 36
Warranty and regulatory information. . . . . . . . . . . . . . . . . . . . . . . 37
Hewlett-Packard limited warranty statement . . . . . . . . . . . . 37
Limited warranty for print cartridge life. . . . . . . . . . . . . . . . . 39
HP software license terms. . . . . . . . . . . . . . . . . . . . . . . . . . 40
FCC regulations. . . . . . . . . . . . . . . . . . . . . . . . . . . . . . . . . . 42
Safety information . . . . . . . . . . . . . . . . . . . . . . . . . . . . . . . . 44
Declaration of Conformity . . . . . . . . . . . . . . . . . . . . . . . . . . . . . . . 46

4 Product Setup
ENWW
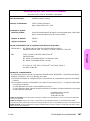
Introduction
Congratulations on your purchase of the HP LaserJet 9000mfp*
(product number C8523A) or HP LaserJet 9000Lmfp (product number
Q2622A). The product comes standard with:
•
128 MB random access memory (RAM)
•
copying, digital sending, and wide-format printing capabilities
•
wide-format printing
•
two 500-sheet trays (Tray 2 and Tray 3)
•
a 100-sheet multipurpose tray (Tray 1)
•
a 2000-sheet input tray (Tray 4)
•
an HP Jetdirect print server
•
a duplex printing accessory (for printing on both sides of paper)
The product features an interactive touch screen on the control panel
graphical display. You must choose one of the three paper handling
devices: the 3000-sheet stacker, the 3000-sheet stapler/stacker, or
the multifunction finisher.
Note The product requires an optional token ring card to connect to a token
ring network.
*Multifunction Peripheral

ENWW
Where to look for information 5
English
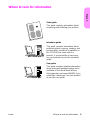
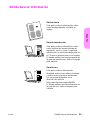
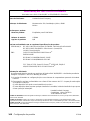
Where to look for information
Start guide
This guide contains information about
unpacking and installing your product.
Introduce guide
This guide contains information about
performing basic copying, sending, and
printing tasks. Introduce is available on
the CD-ROM that came with the
product. If you would like a hard copy,
use your product to print the introduce
guide.
Use guide
This guide contains detailed information
about using and troubleshooting and is
available on the World Wide Web at
http://www.hp.com/support/lj9000. If you
would like a hard copy, use your product
to print the use guide.

6 Product Setup
ENWW
Installation checklist
This guide will help you set up and install your new product. For
proper installation, please complete each section in order.
WARNING! To avoid injury, do not attempt to lift the product. The product has been
designed to roll on wheels.
•
Unpack the product steps 1 through 5
•
Install the product steps 6 through14
•
Install printing software step 15
•
Verify product setup step 16

ENWW
Prepare product location 7
English
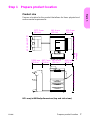
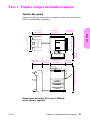
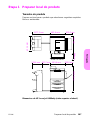
Step 1 Prepare product location
Product size
Prepare a location for the product that allows for these physical and
environmental requirements:
HP LaserJet 9000mfp dimensions (top and side views)
762 mm (30 in)
529.6 mm
(20.5 in)
641.4 mm
(25.3 in)
1219.2 mm (48.0 in)
508 mm
(20 in)
1177.3 mm
(46.0 in)
641.4 mm
(25.3 in)
635.0 mm
(25.0 in)
635.0 mm
(25.0 in)
647.7 mm
(25.5 in)
5
3
1
.
1
m
m
(
2
1
.
5
i
n
)

8 Product Setup
ENWW
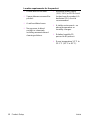
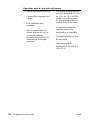
Location requirements for the product
•
A level area on the floor.
•
Space allowance around the
product.
•
A well-ventilated room.
•
No exposure to direct
sunlight or chemicals,
including ammonia-based
cleaning solutions.
•
Adequate power supply
(15 A, 110 V, or 220 V circuit
located near the product). A
dedicated 15 A circuit is
recommended.
•
A stable environment—no
abrupt temperature or
humidity changes.
•
Relative humidity 20
percent to 80 percent.
•
Room temperature 10° C to
32.5° C (50° F to 91° F).

ENWW
Check package contents 9
English
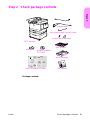
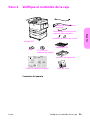
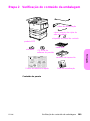
Step 2 Check package contents
Package contents
power cords
MFP product
control panel overlays
print cartridge
product software
CD-ROM
Start guide
ADF output
high speed copy connect cable
standoffs
Quick Reference Poster

10 Product Setup
ENWW
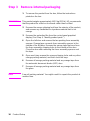
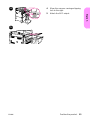
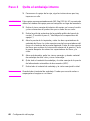
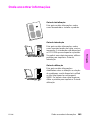
Step 3 Remove internal packaging
1 To remove the product from the box, follow the instructions
printed on the box.
WARNING! This product weighs approximately 143.2 kg (315 lb). HP recommends
that the product be rolled on its wheels rather than be lifted.
2 Remove the orange shipping lock from the exterior of the product,
and remove any cardboard or styrofoam material that is not
orange.
3 Remove the protective film from the control panel graphical
display. (See Step 4, “Identify product parts.”)
4 Open the left door and remove the two packing fuser assembly
spacers. Orange tape connects fuser assembly spacers to the
outside of the left door. Remove the orange tape that runs from
the fuser assembly shipping locks to the outside of the door.
Close the door after removing the fuser assembly spacers and
the tape.
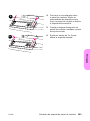
5 Open each tray, remove the orange shipping locks and any other
orange packing material, and then close the trays.
6 Remove all orange packing material and any orange tape from
the automatic document feeder (ADF) door.
7 Remove all orange packing material and any orange tape from
the glass.
Note Save all packing material. You might need it to repack the product at
another time.

ENWW
Identify product parts 11
English
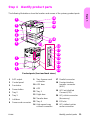
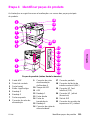
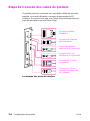
Step 4 Identify product parts
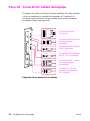
The following illustrations show the location and names of the primary product parts.
Product parts (front and back views)
1
5
7
3
4
2
12
13
16
17
8
18
10
11
19
20
15
14
9
6
21
22
1 ADF output
2 Control panel
3 Front door
4 Power button
5 Tray 2
6 Tray 3
7 Left door
8 Power-cord connector
9 Tray 4 power-cord
connector
10 ADF door
11 ADF
12 Tray 1
13 Right door
14 Transfer door
15 Tray 4
16 High speed copy
connect connector
17 Parallel connector
18 Foreign interface
harness connector
(AUX)
19 HP Fast InfraRed
Connect (FIR)
20 HP JetLink connector
(Accessory)
21 EIO slot
22 HP Jetdirect printer
server connector

12 Product Setup
ENWW
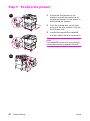
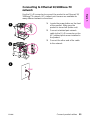
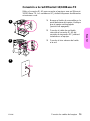
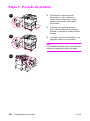
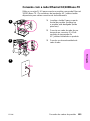
Step 5 Position the product
1 Unlock the front wheels of the
product, and roll the product to its
permanent location. Leave space to
walk behind the product.
2 Push the locking tabs on the front
wheels to the lock position. Only the
front wheels lock.
3 Locate the bag with the standoffs,
and then attach them to the product.
Note
The standoffs ensure that your product
cannot be pushed up against the wall.
1
2
3

ENWW
Position the product 13
English
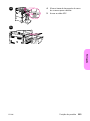
4 Move the scanner carriage shipping
lock to the right.
5 Attach the ADF output.
4
5

14 Product Setup
ENWW
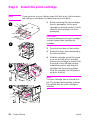
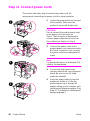
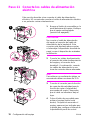
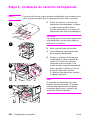
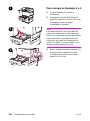
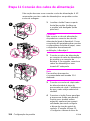
Step 6 Install the print cartridge
Note If you get toner on your clothing, wipe it off with a dry cloth and wash
the clothing in cold water. Hot water sets toner into fabric.
1 Before removing the print cartridge
from its packaging, set the print
cartridge on a sturdy surface. Gently
slide the print cartridge out of the
packaging.
CAUTION
To prevent damage to the print cartridge,
use two hands when handling the
cartridge.
2 Open the front door of the product.
3 Rotate the green lever downward to
the unlock position.
4 Hold the cartridge so that the arrow
is on the left side of the cartridge.
Position the cartridge as shown, with
the arrow on the left side pointing
toward the product, and align the
cartridge with the printing guides.
Slide the cartridge into the product
as far as it will go.
Note
The print cartridge has an internal pull
tab. The product automatically removes
the pull tab after the print cartridge is
installed.
1
4
3
2

ENWW
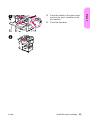
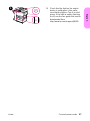
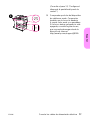
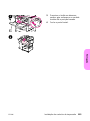
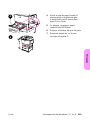
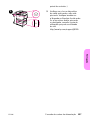
Install the print cartridge 15
English
5 Press the button on the green lever,
and turn the lever clockwise to the
lock position.
6 Close the front door.
5
6

16 Product Setup
ENWW
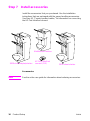
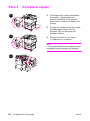
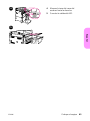
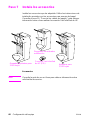
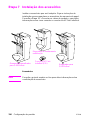
Step 7 Install accessories
Install the accessories that you purchased. Use the installation
instructions that are packaged with the paper-handling accessories.
See Step 10, “Connect product cables,” for information on connecting
the HP Fast InfraRed connect.
.
Accessories
Note See the online use guide for information about ordering accessories.
HP Fast InfraRed
connect (FIR)
3000-sheet stapler/stacker
3000-sheet stacker
Multifunction finisher

ENWW
Load trays 1, 2, 3, and 4 17
English
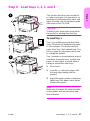
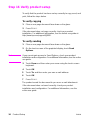
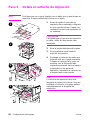
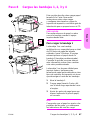
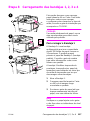
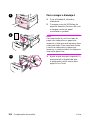
Step 8 Load trays 1, 2, 3, and 4
This section describes how to load A4-
or Letter-size paper. For instructions on
loading and configuring other sizes and
types of media, see the introduce guide
that came on the CD-ROM.
CAUTION
To avoid a jam, never open a tray while
the product is printing from that tray.
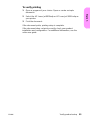
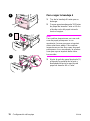
To load Tray 1
Tray 1 is a multipurpose tray that holds
up to 100 sheets of standard-size paper
or 10 envelopes. The product will pull
paper from Tray 1 first (default tray). See
the use guide for information about how
to change this default.
Tray 1 provides a convenient way to print
envelopes, transparencies, custom-size
paper, or other types of media without
having to unload the other trays.
1 Open Tray 1.
2 Load A4- or Letter-size paper with
the long edge leading into the
product.
3 Adjust the paper guides so that they
lightly touch the paper stack, but do
not bend the paper.
Note
Make sure the paper fits under the tabs
on the guides and not above the load
level indicators.
2
1
2
3

18 Product Setup
ENWW
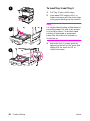
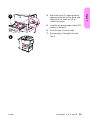
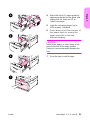
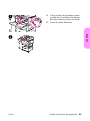
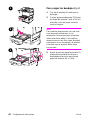
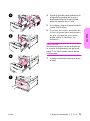
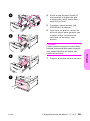
To load Tray 2 and Tray 3
1 Pull Tray 2 open until it stops.
2 Load about 100 sheets of A4- or
Letter-size paper with the short edge
of the paper leading into the product.
Note
For single-sided printing of letterhead or
preprinted paper, the side to be printed
on should be down. For double-sided
printing of letterhead or preprinted
paper, the first side to be printed on
should be up.
3 Adjust the left (Y) paper guide by
squeezing the tab on the guide and
sliding it to the mark for A4- or
Letter-size paper.
2
3
1
A página está carregando...
A página está carregando...
A página está carregando...
A página está carregando...
A página está carregando...
A página está carregando...
A página está carregando...
A página está carregando...
A página está carregando...
A página está carregando...
A página está carregando...
A página está carregando...
A página está carregando...
A página está carregando...
A página está carregando...
A página está carregando...
A página está carregando...
A página está carregando...
A página está carregando...
A página está carregando...
A página está carregando...
A página está carregando...
A página está carregando...
A página está carregando...
A página está carregando...
A página está carregando...
A página está carregando...
A página está carregando...
A página está carregando...
A página está carregando...
A página está carregando...
A página está carregando...
A página está carregando...
A página está carregando...
A página está carregando...
A página está carregando...
A página está carregando...
A página está carregando...
A página está carregando...
A página está carregando...
A página está carregando...
A página está carregando...
A página está carregando...
A página está carregando...
A página está carregando...
A página está carregando...
A página está carregando...
A página está carregando...
A página está carregando...
A página está carregando...
A página está carregando...
A página está carregando...
A página está carregando...
A página está carregando...
A página está carregando...
A página está carregando...
A página está carregando...
A página está carregando...
A página está carregando...
A página está carregando...
A página está carregando...
A página está carregando...
A página está carregando...
A página está carregando...
A página está carregando...
A página está carregando...
A página está carregando...
A página está carregando...
A página está carregando...
A página está carregando...
A página está carregando...
A página está carregando...
A página está carregando...
A página está carregando...
A página está carregando...
A página está carregando...
A página está carregando...
A página está carregando...
A página está carregando...
A página está carregando...
A página está carregando...
A página está carregando...
A página está carregando...
A página está carregando...
A página está carregando...
A página está carregando...
A página está carregando...
A página está carregando...
A página está carregando...
A página está carregando...
A página está carregando...
A página está carregando...
A página está carregando...
A página está carregando...
A página está carregando...
A página está carregando...
A página está carregando...
A página está carregando...
A página está carregando...
A página está carregando...
A página está carregando...
A página está carregando...
A página está carregando...
A página está carregando...
A página está carregando...
A página está carregando...
A página está carregando...
A página está carregando...
A página está carregando...
A página está carregando...
A página está carregando...
A página está carregando...
A página está carregando...
A página está carregando...
A página está carregando...
A página está carregando...
A página está carregando...
A página está carregando...
A página está carregando...
A página está carregando...
A página está carregando...
A página está carregando...
A página está carregando...
A página está carregando...
A página está carregando...
A página está carregando...
A página está carregando...
A página está carregando...
A página está carregando...
A página está carregando...
A página está carregando...
A página está carregando...
A página está carregando...
A página está carregando...
-
 1
1
-
 2
2
-
 3
3
-
 4
4
-
 5
5
-
 6
6
-
 7
7
-
 8
8
-
 9
9
-
 10
10
-
 11
11
-
 12
12
-
 13
13
-
 14
14
-
 15
15
-
 16
16
-
 17
17
-
 18
18
-
 19
19
-
 20
20
-
 21
21
-
 22
22
-
 23
23
-
 24
24
-
 25
25
-
 26
26
-
 27
27
-
 28
28
-
 29
29
-
 30
30
-
 31
31
-
 32
32
-
 33
33
-
 34
34
-
 35
35
-
 36
36
-
 37
37
-
 38
38
-
 39
39
-
 40
40
-
 41
41
-
 42
42
-
 43
43
-
 44
44
-
 45
45
-
 46
46
-
 47
47
-
 48
48
-
 49
49
-
 50
50
-
 51
51
-
 52
52
-
 53
53
-
 54
54
-
 55
55
-
 56
56
-
 57
57
-
 58
58
-
 59
59
-
 60
60
-
 61
61
-
 62
62
-
 63
63
-
 64
64
-
 65
65
-
 66
66
-
 67
67
-
 68
68
-
 69
69
-
 70
70
-
 71
71
-
 72
72
-
 73
73
-
 74
74
-
 75
75
-
 76
76
-
 77
77
-
 78
78
-
 79
79
-
 80
80
-
 81
81
-
 82
82
-
 83
83
-
 84
84
-
 85
85
-
 86
86
-
 87
87
-
 88
88
-
 89
89
-
 90
90
-
 91
91
-
 92
92
-
 93
93
-
 94
94
-
 95
95
-
 96
96
-
 97
97
-
 98
98
-
 99
99
-
 100
100
-
 101
101
-
 102
102
-
 103
103
-
 104
104
-
 105
105
-
 106
106
-
 107
107
-
 108
108
-
 109
109
-
 110
110
-
 111
111
-
 112
112
-
 113
113
-
 114
114
-
 115
115
-
 116
116
-
 117
117
-
 118
118
-
 119
119
-
 120
120
-
 121
121
-
 122
122
-
 123
123
-
 124
124
-
 125
125
-
 126
126
-
 127
127
-
 128
128
-
 129
129
-
 130
130
-
 131
131
-
 132
132
-
 133
133
-
 134
134
-
 135
135
-
 136
136
-
 137
137
-
 138
138
-
 139
139
-
 140
140
-
 141
141
-
 142
142
-
 143
143
-
 144
144
-
 145
145
-
 146
146
-
 147
147
-
 148
148
-
 149
149
-
 150
150
-
 151
151
-
 152
152
-
 153
153
-
 154
154


HP LaserJet 9000 Multifunction Printer series Guia rápido
- Categoria
- Multifuncionais
- Tipo
- Guia rápido
- Este manual também é adequado para
em outras línguas
Artigos relacionados
-
HP LaserJet 9040/9050 Multifunction Printer series Guia rápido
-
-
-
HP LaserJet 8150 Printer series Guia de usuario
-
HP LaserJet 8100 Multifunction Printer series Guia de usuario
-
-
HP 9040 CE Guia rápido
-
HP LaserJet 8150 Multifunction Printer series Manual do usuário
-
HP LASERJET 9065MFP Guia de usuario
-
HP LaserJet M5025 Multifunction Printer series Guia rápido