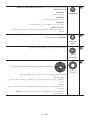
Samsung HW-Q950T Manual do usuário
- Categoria
- Alto-falantes da barra de som
- Tipo
- Manual do usuário

HW-Q950T
FULL MANUAL
Imagine the possibilities
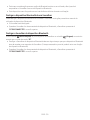
Thank you for purchasing this Samsung product.
To receive more complete service, please register
your product at www.samsung.com/register

ENG - 2
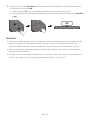
SAFETY INFORMATION
SAFETY WARNINGS
TO REDUCE THE RISK OF ELECTRIC SHOCK, DO
NOT REMOVE THE COVER (OR BACK).
NO USER-SERVICEABLE PARTS ARE INSIDE.
REFER SERVICING TO QUALIFIED SERVICE
PERSONNEL.
Refer to the table below for an explanation of
symbols which may be on your Samsung product.
CAUTION
RISK OF ELECTRIC SHOCK.
DO NOT OPEN.
This symbol indicates that high voltage
is present inside. It is dangerous to
make any kind of contact with any
internal part of this product.
This symbol indicates that this product
has included important literature
concerning operation and maintenance.
Class II product : This symbol indicates
that it does not require a safety
connection to electrical earth (ground).
If this symbol is not present on a
product with a power cord, the product
MUST have a reliable connection to
protective earth (ground).
AC voltage : This symbol indicates that
the rated voltage marked with the
symbol is AC voltage.
DC voltage : This symbol indicates that
the rated voltage marked with the
symbol is DC voltage.
Caution, Consult instructions for use :
This symbol instructs the user to
consult the user manual for further
safety related information.
WARNING
• To reduce the risk of re or electric shock, do
not expose this appliance to rain or moisture.
CAUTION
• TO PREVENT ELECTRIC SHOCK, MATCH WIDE
BLADE OF PLUG TO WIDE SLOT, FULLY INSERT.
• This apparatus shall always be connected to a
AC outlet with a protective grounding
connection.
• To disconnect the apparatus from the mains,
the plug must be pulled out from the mains
socket, therefore the mains plug shall be
readily operable.
• Do not expose this apparatus to dripping or
splashing. Do not put objects lled with
liquids, such as vases on the apparatus.
• To turn this apparatus off completely, you
must pull the power plug out of the wall
socket. Consequently, the power plug must
be easily and readily accessible at all times.

ENG - 3
PRECAUTIONS
1. Ensure that the AC power supply in your
house complies with the power
requirements listed on the identication
sticker located on the bottom of your
product. Install your product horizontally, on
a suitable base (furniture), with enough
space around it for ventilation (7~10 cm).
Make sure the ventilation slots are not
covered. Do not place the unit on ampliers
or other equipment which may become hot.
This unit is designed for continuous use. To
fully turn off the unit, disconnect the AC plug
from the wall outlet. Unplug the unit if you
intend to leave it unused for a long period of
time.
2. During thunderstorms, disconnect the AC
plug from the wall outlet. Voltage peaks due
to lightning could damage the unit.
3. Do not expose the unit to direct sunlight or
other heat sources. This could lead to
overheating and cause the unit to
malfunction.
4. Protect the product from moisture (i.e.
vases), and excess heat (e.g. a replace) or
equipment creating strong magnetic or
electric elds. Unplug the power cable from
the AC wall socket if the unit malfunctions.
Your product is not intended for industrial
use. It is for personal use only. Condensation
may occur if your product has been stored in
cold temperatures. If transporting the unit
during the winter, wait approximately
2 hours until the unit has reached room
temperature before using.
5. The battery used with this product contains
chemicals that are harmful to the
environment. Do not dispose of the battery
in the general household trash. Do not
expose the battery to excess heat, direct
sunlight, or re. Do not short circuit,
disassemble, or overheat the battery.
Danger of explosion if the battery is replaced
incorrectly. Replace only with the same or
equivalent type.
Fabric cleaning
Remove any dirt or stain on the product surface
immediately.
Removing and cleaning can be less effective for
some substances or if left for a prolonged time.
CAUTION
• Use a vacuum cleaner or an adhesive lint
roller to remove dust, handprints, and the
likes.
– Some cleaning brushes may damage the
product, depending on the materials they
contain.
– Towels and cleaning clothes may leave
lint or dirt on the product.
• Do not use a nail or other tools to scratch the
dirt off. It may damage the fabric.
• To remove oil or liquid stains, use a clean
white cloth moist with water. If the stain
persists, wipe it with a mixture of water and
neutral detergent (such as dishwashing
soaps) and a cloth.
– A non-neutral detergent or cleaner may
cause discolouration or fabric damage.
– After cleaning, use a dry cloth or
hairdryer to dry the area.
– Do not use excessive force to avoid
discolouration or fabric damage.

ENG - 4
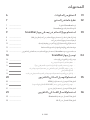
CONTENTS
01 Checking the Components 6
02 Product Overview 7
Top Panel of the Soundbar ------------------------- 7
Bottom Panel of the Soundbar ------------------------- 8
03 Using the Soundbar Remote Control 9
Inserting Batteries before using the Remote Control (AA batteries X 2) ------------------------- 9
How to Use the Remote Control
-------------------------
9
Using the Hidden Buttons (Buttons with more than one function)
-------------------------
12
Output specications for the different sound effect modes
-------------------------
12
Adjusting the Soundbar volume with a TV remote control
-------------------------
13
04 Connecting the Soundbar 14
Connecting the power and units
-------------------------
14
–
Recommended Speaker Layout ------------------------- 15
– Manually connecting the Subwoofer or Surround Speakers
-------------------------
16
– LED Indicator Lights on the Rear of Subwoofer and
Surround Speakers
-------------------------
17
– In case the audio output of the Subwoofer and Surround Speaker
is unstable
-------------------------
18
05 Using a wired connection to the TV 20
Method 1. Connecting with HDMI
-------------------------
20
– Connecting the TV that supports HDMI ARC (Audio Return Channel)
-------------------------
20
Method 2. Connecting using an Optical Cable
-------------------------
21
06 Using a wireless connection to the TV 23
Method 1. Connecting via Bluetooth
-------------------------
23
Method 2. Connecting via Wi-Fi
-------------------------
25

ENG - 5
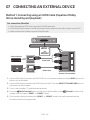
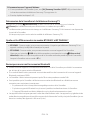
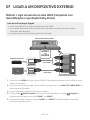
07 Connecting an External Device 26
Method 1. Connecting using an HDMI Cable (Capable of Dolby Atmos
decoding and playback)
-------------------------
26
Method 2. Connecting using an Optical Cable
-------------------------
27
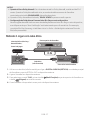
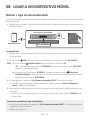
08 Connecting a Mobile Device 28
Method 1. Connecting via Bluetooth
-------------------------
28
Method 2. Connecting via Wi-Fi (Wireless Network)
-------------------------
31
Conguring Amazon Alexa
-------------------------
32
Using the Tap Sound
-------------------------
34
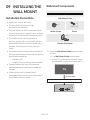
09 Installing the Wall Mount 35
Installation Precautions
-------------------------
35
Wallmount Components
-------------------------
35
Installing the Surround Speakers on a Wall
-------------------------
37
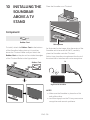
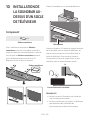
10 Installing the Soundbar above a TV Stand 38
Component
-------------------------
38
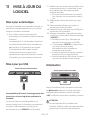
11 Software Update 39
Auto Update
-------------------------
39
USB Update
-------------------------
39
Initialisation
-------------------------
39
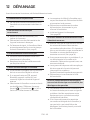
12 Troubleshooting 40
13 Licence 43
14 Open Source Licence Notice 43
15 Important Notes About Service 43
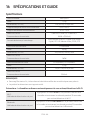
16 SpecicationsandGuide 44
Specications
-------------------------
44

ENG - 6
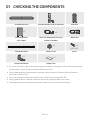
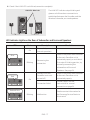
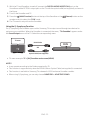
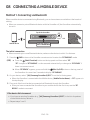
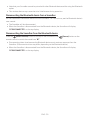
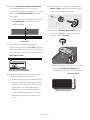
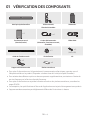
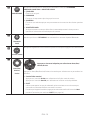
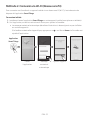
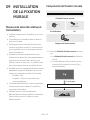
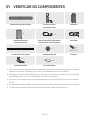
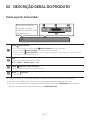
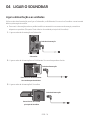
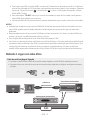
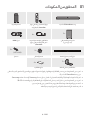
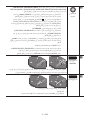
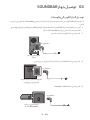
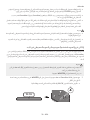
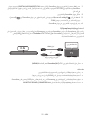
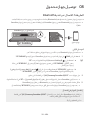
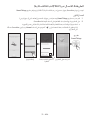
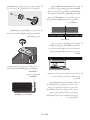
01 CHECKING THE COMPONENTS
VOL WOOFER
SOUNDBAR
SOUND
MODE
PAIR
Soundbar Main Unit Soundbar Remote Control / Batteries Subwoofer
POWER
x 2
x 4
Surround Speaker
(Left / Right)
Power Cord (Subwoofer, Surround
Speaker, Soundbar)
HDMI Cable
x 2
(M4 x L10)
x 2
Wall Mount Guide Holder-Screw Screw
x 2
x 4
Bracket-Wall Mount Rubber-Foot
• For more information about the power supply and power consumption, refer to the label attached
to the product. (Label: Bottom of the Soundbar Main Unit)
• To purchase additional components or optional cables, contact a Samsung Service Centre or
Samsung Customer Care.
• For more information about the wallmount or rubber-foot, see pages 35~38.
• Design, specications, and App screen are subject to change without prior notice.
• The appearance of the accessories may differ slightly from the illustrations above.

ENG - 7
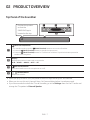
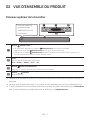
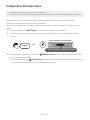
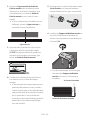
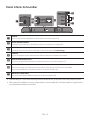
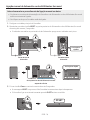
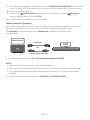
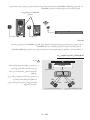
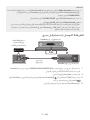
02 PRODUCT OVERVIEW
Top Panel of the Soundbar
Position the product
so that the
SAMSUNG logo is
located on the top.
(Multi Function) Button
• In standby mode, press the (Multi Function) button to turn on the Soundbar.
• Press the (Multi Function) button to change the input source.
• Press the (Multi Function) button for 3 seconds to call Alexa. Say with the button pressed to
enable voice recognition.
Display
Displays the product’s status and current mode.
D.IN HDMI 1 HDMI 2 Wi-Fi BT
(Mic On/Off) Button
Press the button to turn the microphone on or off.
(Volume) Button
Adjusts the volume.
• When you plug in the AC cord, the power button will begin working in 4 to 6 seconds.
• When you turn on this unit, there will be a 4 to 5 second delay before it produces sound.
• If you hear sounds from both the TV and Soundbar, go to the Settings menu for the TV audio and
change the TV speaker to External Speaker.

ENG - 8
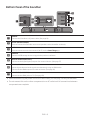
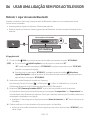
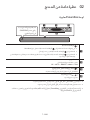
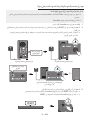
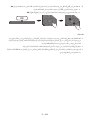
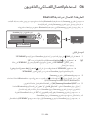
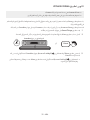
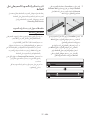
Bottom Panel of the Soundbar
ID SET
HDMI IN 1
HDMI IN 2
POWER
NETWORK
SERVICE
DIGITAL AUDIO IN
(OPTICAL)
HDMI TO TV
(eARC/ARC)
HDMI 2
HDMI 1
ID SET
(WOOFER/REAR)
POWER
ID SET
NETWORK
SERVICE
ID SET
(WOOFER/REAR)
DIGITAL AUDIO IN
(OPTICAL)
HDMI TO TV
(eARC/ARC)
HDMI 2
HDMI 1
ID SET
HDMI IN 1
HDMI IN 2
POWER
NETWORK
SERVICE
DIGITAL AUDIO IN
(OPTICAL)
HDMI TO TV
(eARC/ARC)
HDMI 2
HDMI 1
ID SET
(WOOFER/REAR)
POWER
ID SET
NETWORK
SERVICE
ID SET
(WOOFER/REAR)
DIGITAL AUDIO IN
(OPTICAL)
HDMI TO TV
(eARC/ARC)
HDMI 2
HDMI 1
ID SET
HDMI IN 1
HDMI IN 2
POWER
NETWORK
SERVICE
DIGITAL AUDIO IN
(OPTICAL)
HDMI TO TV
(eARC/ARC)
HDMI 2
HDMI 1
ID SET
(WOOFER/REAR)
POWER
ID SET
NETWORK
SERVICE
ID SET
(WOOFER/REAR)
DIGITAL AUDIO IN
(OPTICAL)
HDMI TO TV
(eARC/ARC)
HDMI 2
HDMI 1
ID SET
HDMI IN 1
HDMI IN 2
POWER
NETWORK
SERVICE
DIGITAL AUDIO IN
(OPTICAL)
HDMI TO TV
(eARC/ARC)
HDMI 2
HDMI 1
ID SET
(WOOFER/REAR)
POWER
ID SET
NETWORK
SERVICE
ID SET
(WOOFER/REAR)
DIGITAL AUDIO IN
(OPTICAL)
HDMI TO TV
(eARC/ARC)
HDMI 2
HDMI 1
POWER
Connect the Soundbar's AC power cable. (See page 14)
ID SET (WOOFER/REAR)
Press to connect the Soundbar to surround speakers and a subwoofer wirelessly.
NETWORK
Press to connect to a wireless network (Wi-Fi) via the SmartThings app.
SERVICE
Connect a USB storage device to upgrade the product's software.
DIGITAL AUDIO IN (OPTICAL)
Connect to the digital (optical) output of an external device. (See page 27)
HDMI 1 / HDMI 2
Inputs digital video and audio signals simultaneously using an HDMI cable.
Connect to the HDMI output of an external device. (See page 26)
HDMI TO TV (eARC/ARC)
Connect to the HDMI jack on a TV. (See page 20)
• When disconnecting the power cord from a wall outlet, pull the plug. Do not pull the cable.
• Do not connect this unit or other components to an AC outlet until all connections between
components are complete.

ENG - 9
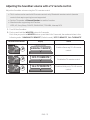
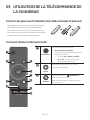
03 USING THE SOUNDBAR REMOTE
CONTROL
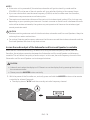
Inserting Batteries before using the Remote Control (AA batteries X 2)
Slide the back cover in the direction of the arrow
until it is completely removed. Insert 2 AA batteries
(1.5V) oriented so that their polarity is correct. Slide
the back cover back into position.
How to Use the Remote Control
VOL WOOFER
SOUNDBAR
SOUND
MODE
PAIR
Power
VOL WOOFER
SOUND
MODE
PAIR
Turns the Soundbar on and off.
• Auto Power Down Function
The unit turns off automatically in the
following situations:
– In D.IN / HDMI 1 / HDMI 2 / Wi-Fi / BT
mode if there is no audio signal for 18
minutes.
VOL WOOFER
SOUND
MODE
PAIR
Source
Press to select a source connected to the
Soundbar.
Mute
VOL WOOFER
SOUND
MODE
PAIR
Press the (Mute) button to mute the
sound.
Press it again to unmute the sound.

ENG - 10
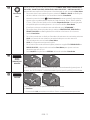
SOUND MODE
VOL WOOFER
SOUND
MODE
PAIR
You can select the desired sound mode by choosing STANDARD, SURROUND, GAME
PRO, or ADAPTIVE SOUND.
• STANDARD
Outputs the original sound.
• SURROUND
Provides a wider sound eld than standard.
• GAME PRO
Provides stereoscopic sound to immerse you in the action while gaming.
• ADAPTIVE SOUND
Analyzes the content in real time and automatically provides the optimal sound eld
based on the characteristics of the content.
VOL WOOFER
SOUND
MODE
PAIR
Bluetooth
PAIR
Switch the Soundbar to Bluetooth pairing mode. Press the button and wait for the “BT
PAIRING” screen to connect to a new Bluetooth device.
Play / Pause
VOL WOOFER
SOUND
MODE
PAIR
You can also play or pause music by pressing the button.
VOL WOOFER
SOUND
MODE
PAIR
Up/Down/
Left/Right
Press the indicated areas to select Up/Down/Left/Right.
Press Up/Down/Left/Right on the button to select or set functions.
• Music Skip
Press the Right button to select the next music le. Press the Left button to select
the previous music le.
• ID SET
Use this option when the Subwoofer or Surround Speakers are not connected or need
reconnection.
While powered off, press and hold the Up button for 5 seconds to perform ID SET.
(See page 16.)

ENG - 11
Sound Control
VOL WOOFER
SOUND
MODE
PAIR
When pressed, the setting items such as TREBLE, BASS, SYNC, CENTER LEVEL, SIDE
LEVEL, FRONT TOP LEVEL, REAR LEVEL, REAR TOP LEVEL, and VIRTUAL ON/OFF are
displayed in sequence. The desired item can be adjusted using the Up/Down buttons.
– To control the volume of the treble or bass sound, select TREBLE or BASS in Sound
Settings, and then adjust the volume between -6~+6 by using the Up/Down buttons.
– Press and hold the (Sound Control) button for about 5 seconds to adjust the
sound for each frequency band. 150Hz, 300Hz, 600Hz, 1.2kHz, 2.5kHz, 5kHz, and
10kHz are selectable using the Left/Right buttons and each can be adjusted to a
setting between -6 to +6 using the Up/Down buttons.
(Make sure the Sound mode is set to “STANDARD”.)
– To control the volume of the each speaker select CENTER LEVEL, SIDE LEVEL, or
FRONT TOP LEVEL in Sound Settings, and then adjust the volume between -6~+6 by
using the Up/Down buttons.
– If the video on the TV and audio from the Soundbar are not synchronised, select
SYNC in Sound Control, and then set the audio delay between 0~300 milliseconds by
using the Up/Down buttons.
– SYNC is only supported for some functions.
– If Surround Speakers are connected, select REAR LEVEL or REAR TOP LEVEL and
then use the Up/Down buttons to adjust the volume within a -6 to +6 range.
– The VIRTUAL Speaker function can be turned ON/OFF by using the Up/Down
buttons.
VOL WOOFER
SOUND
MODE
PAIR
WOOFER
(BASS) LEVEL
SOUND
MODE
VOL
WOOFER
SOUNDBAR
SOUND
MODE
VOL
WOOFER
SOUNDBAR
SOUND
MODE
VOL
WOOFER
SOUNDBAR
SOUND
MODE
VOL
WOOFER
SOUNDBAR
Push the button up or down to adjust the level of the woofer (bass) to -12 or between -6
to +6. To set the woofer (bass) volume level to 0 (Default), press the button.
VOL WOOFER
SOUND
MODE
PAIR
VOLUME
SOUND
MODE
VOL
WOOFER
SOUNDBAR
SOUND
MODE
VOL
WOOFER
SOUNDBAR
SOUND
MODE
VOL
WOOFER
SOUNDBAR
SOUND
MODE
VOL
WOOFER
SOUNDBAR
Push the button up or down to adjust the volume.
• Mute
Press the VOL button to mute the sound. Press it again to unmute the sound.

ENG - 12
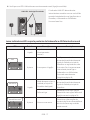
Using the Hidden Buttons (Buttons with more than one function)
Hidden Button
Reference page
Remote Control Button Function
WOOFER (Up) TV remote control On/Off (Standby) page 13
Up ID SET page 16
(Sound Control)
7 Band EQ page 11
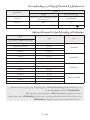
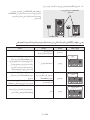
Outputspecicationsforthedifferentsoundeffectmodes
Effect Input
Output
With Subwoofer & Surround Speaker
STANDARD
2.0 ch 2.1 ch
5.1 ch 5.1 ch / 7.1 ch (DTS)
7.1 ch 7.1 ch
7.1.4 ch 9.1.4 ch
SURROUND
2.0 ch 9.1.4 ch
5.1 ch 9.1.4 ch
7.1 ch 9.1.4 ch
7.1.4 ch 9.1.4 ch
GAME PRO
2.0 ch 9.1.4 ch
5.1 ch 9.1.4 ch
7.1 ch 9.1.4 ch
7.1.4 ch 9.1.4 ch
ADAPTIVE SOUND
2.0 ch 9.1.4 ch
5.1 ch 9.1.4 ch
7.1 ch 9.1.4 ch
7.1.4 ch 9.1.4 ch
• For input sources Dolby Atmos and DTS:X, the effect modes that can be selected using the
SOUND MODE button will not be available. (See above for the effect modes.)
• If the input source is Dolby Atmos®, 9.1.4 channels are outputted.
• The Surround Speakers will not produce sounds for 2 channel output while STANDARD mode is
in use. To enable sound for the Surround Speakers, change the effect mode to SURROUND.

ENG - 13
Adjusting the Soundbar volume with a TV remote control
Adjust the Soundbar volume using the TV’s remote control.
• This function can be used with IR remote controls only. Bluetooth remote controls (remote
controls that require pairing) are not supported.
• Set the TV speaker to External Speaker to use this function.
• Manufacturers supporting this function:
VIZIO, LG, Sony, Sharp, PHILIPS, PANASONIC, TOSHIBA, Hisense, RCA
1. Turn Off the Soundbar.
2. Push up and hold the WOOFER button for 5 seconds.
Each time you push the WOOFER button up and hold it for 5 seconds, the mode switches in the
following order: “SAMSUNG-TV REMOTE” (Default mode), “OFF-TV REMOTE”, “ALL-TV REMOTE”.
Remote Control Button Display Status
SOUND
MODE
VOL
WOOFER
SOUNDBAR
5 Sec
SAMSUNG-TV REMOTE
(Default mode)
Enable a Samsung TV’s IR remote
control.
SOUND
MODE
VOL
WOOFER
SOUNDBAR
5 Sec
OFF-TV REMOTE
Disable the TV remote control.
SOUND
MODE
VOL
WOOFER
SOUNDBAR
5 Sec
ALL-TV REMOTE
Enable a third-party TV’s IR remote
control.

ENG - 14
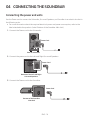
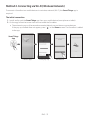
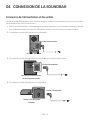
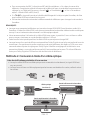
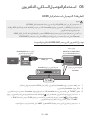
04 CONNECTING THE SOUNDBAR
Connecting the power and units
Use the Power cord to connect the Subwoofer, Surround Speakers, and Soundbar to an electrical outlet in
the following order:
• For more information about the required electrical power and power consumption, refer to the
label attached to the product. (Label: Bottom of the Soundbar Main Unit)
1. Connect the Power cord to the Subwoofer.
POWER
Rear of Subwoofer
Power Cord
2. Connect the power cord to the Left and Right Surround Speakers.
POWER
POWER
Power Cord
Bottoms of the Left and Right
Surround Speakers
3. Connect the Power cord to the Soundbar.
HDMI IN 1
HDMI IN 2
ID SET
(WOOFER,
REAR)
POWER
NETWORK
SERVICE
DIGITAL AUDIO IN
(OPTICAL)
HDMI TO TV
(eARC/ARC)
HDMI 1
HDMI 2
ID SET
POWER
Power Cord
Bottom of the Soundbar
Main Unit

ENG - 15
4. Connect power to the Soundbar, Subwoofer and Surround Speakers. The Subwoofer and Surround
Speakers are automatically connected when the Soundbar is turned on.
LINK LED - Blue is On
NOTES
• Connect the Subwoofer and Surround Speakers power before connecting to the Soundbar.
The Subwoofer and Surround Speakers will be automatically connected when turning on the
Soundbar.
• If you unplug and reconnect the power cord when the product is turned on, the Soundbar turns on
automatically.
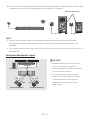
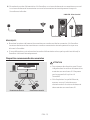
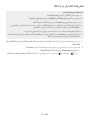
Recommended Speaker Layout
150° 150°
135° 135°
0°
Subwoofer
Soundbar
Surround Speaker L Surround Speaker R
CAUTION
• Wireless receiving antennas are built
into the wireless subwoofer and
surround speakers. Keep the units away
from water and moisture.
• For optimal listening performance,
make sure that the areas around the
wireless subwoofer and surround
speakers locations are clear of any
obstructions.

ENG - 16
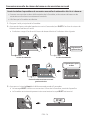
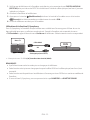
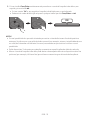
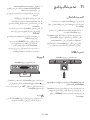
Manually connecting the Subwoofer or Surround Speakers
Before performing the manual connection procedure below:
• Check whether the power cables for the Soundbar and subwoofer or Surround Speakers are
connected properly.
• Make sure that the Soundbar is turned off.
1. Turn off the Soundbar main.
2. Press and hold ID SET on the rear of the subwoofer and surround speakers for at least 5 seconds.
• The red indicator at the rear of each speaker turns off and the blue indicator blinks.
5 Sec
Rear of Subwoofer
Rear of Subwoofer
Blinking blue
fast
Blinking blue fast
POWER
x 2
Rear of the Left and Right Surround Speakers
5 Sec
3. Press the Up button on the remote control for 5 seconds.
• The ID SET message appears on the display of the Soundbar for a moment, and then it
disappears.
• The Soundbar will automatically power on when ID SET is complete.
SOUND
MODE
PAIR
5 Sec
ID SET

ENG - 17
4. Check if the LINK LED is solid blue (connection complete).
LINK LED - Blue is On
The LINK LED indicator stops blinking and
glows a solid blue when a connection is
established between the Soundbar and the
Wireless Subwoofer, surround speakers.
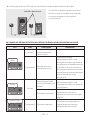
LED Indicator Lights on the Rear of Subwoofer and Surround Speakers
LED Status Description Resolution
Blue
On
Successfully connected
(normal operation)
-
Blinking
Recovering the
connection
Check if the power cable attached
to the main Soundbar unit is
connected properly or wait about
5 minutes. If blinking persists, try
manually connecting the
subwoofer and Surround
Speakers. See page 16.
Red
On
Standby (with the
Soundbar main unit
turned off)
Check if the power cable attached
to the main Soundbar unit is
connected properly.
Connection failed
Connect again. See the
instructions for manual
connection on page 16.
Red and blue
Blinking Malfunction
See the contact information for
the Samsung Service Centre in
this manual.

ENG - 18
NOTES
• If the main unit is powered off, the wireless subwoofer will go into stand-by mode and the
STANDBY LED on the rear of the sub-woofer will turn red after blinking in blue several times.
• If you use a device that uses the same frequency (5.8GHz) as the Soundbar near the Soundbar,
interference may cause some sound interruption.
• The maximum transmission distance of the main unit’s wireless signal is about 10 m, but may vary
depending on your operating environment. If a steel-concrete or metallic wall is between the main
unit and the wireless subwoofer, the system may not operate at all because the wireless signal
cannot penetrate metal.
CAUTION
• Wireless receiving antennas are built into the wireless subwoofer and Surround Speakers. Keep the
unit away from water and moisture.
• For optimal listening performance, make sure that the area around the wireless subwoofer and the
Surround Speakers are clear of any obstructions.
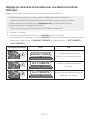
In case the audio output of the Subwoofer and Surround Speaker is unstable
When there is a wireless device (e.g., wireless LAN) using the same frequency (5.8GHz) near the
Soundbar, the wireless connection between the Subwoofer and Surround Speaker could become
unstable. This will affect the quality of audio output. In this case, the radio frequency channel of the
Subwoofer and Surround Speaker can be changed as below:
CAUTION
• It doesn’t work when the display is off. Please turn on the display rst by pressing the button on
the remote controller.
• Please press the WOOFER button vertically.
1. With the power of the Soundbar on, vertically press and hold the WOOFER button on the remote
controller for at least 5 seconds.
• The display shows “W-CH” and the currently set radio frequency channel.
SOUND
MODE
VOL
WOOFER
SOUNDBAR
SOUND
MODE
VOL
WOOFER
SOUNDBAR
SOUND
MODE
VOL
WOOFER
SOUNDBAR
SOUND
MODE
VOL
WOOFER
SOUNDBAR
W-CH
5 Sec

ENG - 19
2. Press the Up/Down button on the remote controller to change the radio frequency channel, and
then press the p button.
• The display shows “OK” and then the frequency is set to the changed channel.
• You can exit the setting mode by pressing any button other than Up/Down or p.
SOUND
MODE
PAIR
SOUND
MODE
PAIR
OK
NOTES
• The default channel is the one that’s optimised for avoiding wireless interference from external
devices. If there is no abnormal audio output (e.g., sound jitter or delays, noise) of the Subwoofer
and Surround Speaker, it is recommended to keep using the default channel.
• 3 to 6 channels are available for selection, depending on the radio specications specic to each
country.
• Changing the radio frequency channel may affect the performance of other near wireless devices
(e.g., wireless LAN) using the same frequency bandwidth.

ENG - 20
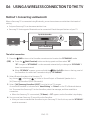
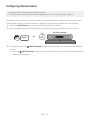
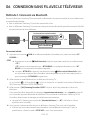
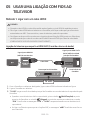
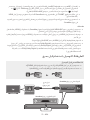
05 USING A WIRED CONNECTION TO THE TV
Method 1. Connecting with HDMI
CAUTION
• When both the HDMI cable and optical cable are connected, the HDMI signal is received rst.
• To connect the HDMI cable between the TV and Soundbar, be sure to connect the terminals
marked ARC. Otherwise, the TV sound may not be output.
• Be sure to use the cable with the premium HDMI certication logo. In addition, make sure that
the cable is a certied Type A, high-speed HDMI Ethernet cable. (HIGH SPEED HDMI CABLE
WITH ETHERNET)
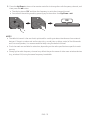
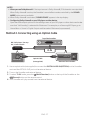
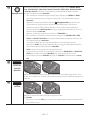
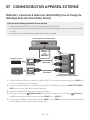
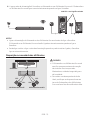
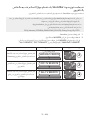
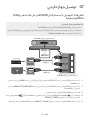
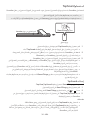
Connecting the TV that supports HDMI ARC (Audio Return Channel)
HDMI IN
(ARC)
HDMI TO TV
(eARC/ARC)
Connect to the HDMI IN
(ARC) port of your TV.
HDMI Cable
Bottom of the Soundbar
Connect to the HDMI TO TV
(eARC/ARC) port of the
Soundbar main unit.
Top of the Soundbar
TV ARC
1. With the Soundbar and TV turned off, connect the HDMI cable as shown in the gure.
2. Turn on the Soundbar and TV.
3. “TV ARC” appears in the display window of the Soundbar main unit and the Soundbar plays TV
sound.
• When the TV sound is not output, press the (Multi Function) button at the top of the
Soundbar or the (Source) button on the remote control to select the “D.IN” mode. The
screen displays “D.IN” and “TV ARC” in sequence, and TV sound is played.
• When connecting a TV that supports the eARC function, “eARC” appears on the display and the
sound is heard.
A página está carregando...
A página está carregando...
A página está carregando...
A página está carregando...
A página está carregando...
A página está carregando...
A página está carregando...
A página está carregando...
A página está carregando...
A página está carregando...
A página está carregando...
A página está carregando...
A página está carregando...
A página está carregando...
A página está carregando...
A página está carregando...
A página está carregando...
A página está carregando...
A página está carregando...
A página está carregando...
A página está carregando...
A página está carregando...
A página está carregando...
A página está carregando...
A página está carregando...
A página está carregando...
A página está carregando...
A página está carregando...
A página está carregando...
A página está carregando...
A página está carregando...
A página está carregando...
A página está carregando...
A página está carregando...
A página está carregando...
A página está carregando...
A página está carregando...
A página está carregando...
A página está carregando...
A página está carregando...
A página está carregando...
A página está carregando...
A página está carregando...
A página está carregando...
A página está carregando...
A página está carregando...
A página está carregando...
A página está carregando...
A página está carregando...
A página está carregando...
A página está carregando...
A página está carregando...
A página está carregando...
A página está carregando...
A página está carregando...
A página está carregando...
A página está carregando...
A página está carregando...
A página está carregando...
A página está carregando...
A página está carregando...
A página está carregando...
A página está carregando...
A página está carregando...
A página está carregando...
A página está carregando...
A página está carregando...
A página está carregando...
A página está carregando...
A página está carregando...
A página está carregando...
A página está carregando...
A página está carregando...
A página está carregando...
A página está carregando...
A página está carregando...
A página está carregando...
A página está carregando...
A página está carregando...
A página está carregando...
A página está carregando...
A página está carregando...
A página está carregando...
A página está carregando...
A página está carregando...
A página está carregando...
A página está carregando...
A página está carregando...
A página está carregando...
A página está carregando...
A página está carregando...
A página está carregando...
A página está carregando...
A página está carregando...
A página está carregando...
A página está carregando...
A página está carregando...
A página está carregando...
A página está carregando...
A página está carregando...
A página está carregando...
A página está carregando...
A página está carregando...
A página está carregando...
A página está carregando...
A página está carregando...
A página está carregando...
A página está carregando...
A página está carregando...
A página está carregando...
A página está carregando...
A página está carregando...
A página está carregando...
A página está carregando...
A página está carregando...
A página está carregando...
A página está carregando...
A página está carregando...
A página está carregando...
A página está carregando...
A página está carregando...
A página está carregando...
A página está carregando...
A página está carregando...
A página está carregando...
A página está carregando...
A página está carregando...
A página está carregando...
A página está carregando...
A página está carregando...
A página está carregando...
A página está carregando...
A página está carregando...
A página está carregando...
A página está carregando...
A página está carregando...
A página está carregando...
A página está carregando...
A página está carregando...
A página está carregando...
A página está carregando...
A página está carregando...
A página está carregando...
A página está carregando...
A página está carregando...
A página está carregando...
A página está carregando...
A página está carregando...
A página está carregando...
A página está carregando...
A página está carregando...
A página está carregando...
A página está carregando...
A página está carregando...
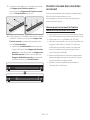
-
 1
1
-
 2
2
-
 3
3
-
 4
4
-
 5
5
-
 6
6
-
 7
7
-
 8
8
-
 9
9
-
 10
10
-
 11
11
-
 12
12
-
 13
13
-
 14
14
-
 15
15
-
 16
16
-
 17
17
-
 18
18
-
 19
19
-
 20
20
-
 21
21
-
 22
22
-
 23
23
-
 24
24
-
 25
25
-
 26
26
-
 27
27
-
 28
28
-
 29
29
-
 30
30
-
 31
31
-
 32
32
-
 33
33
-
 34
34
-
 35
35
-
 36
36
-
 37
37
-
 38
38
-
 39
39
-
 40
40
-
 41
41
-
 42
42
-
 43
43
-
 44
44
-
 45
45
-
 46
46
-
 47
47
-
 48
48
-
 49
49
-
 50
50
-
 51
51
-
 52
52
-
 53
53
-
 54
54
-
 55
55
-
 56
56
-
 57
57
-
 58
58
-
 59
59
-
 60
60
-
 61
61
-
 62
62
-
 63
63
-
 64
64
-
 65
65
-
 66
66
-
 67
67
-
 68
68
-
 69
69
-
 70
70
-
 71
71
-
 72
72
-
 73
73
-
 74
74
-
 75
75
-
 76
76
-
 77
77
-
 78
78
-
 79
79
-
 80
80
-
 81
81
-
 82
82
-
 83
83
-
 84
84
-
 85
85
-
 86
86
-
 87
87
-
 88
88
-
 89
89
-
 90
90
-
 91
91
-
 92
92
-
 93
93
-
 94
94
-
 95
95
-
 96
96
-
 97
97
-
 98
98
-
 99
99
-
 100
100
-
 101
101
-
 102
102
-
 103
103
-
 104
104
-
 105
105
-
 106
106
-
 107
107
-
 108
108
-
 109
109
-
 110
110
-
 111
111
-
 112
112
-
 113
113
-
 114
114
-
 115
115
-
 116
116
-
 117
117
-
 118
118
-
 119
119
-
 120
120
-
 121
121
-
 122
122
-
 123
123
-
 124
124
-
 125
125
-
 126
126
-
 127
127
-
 128
128
-
 129
129
-
 130
130
-
 131
131
-
 132
132
-
 133
133
-
 134
134
-
 135
135
-
 136
136
-
 137
137
-
 138
138
-
 139
139
-
 140
140
-
 141
141
-
 142
142
-
 143
143
-
 144
144
-
 145
145
-
 146
146
-
 147
147
-
 148
148
-
 149
149
-
 150
150
-
 151
151
-
 152
152
-
 153
153
-
 154
154
-
 155
155
-
 156
156
-
 157
157
-
 158
158
-
 159
159
-
 160
160
-
 161
161
-
 162
162
-
 163
163
-
 164
164
-
 165
165
-
 166
166
-
 167
167
-
 168
168
-
 169
169
-
 170
170
-
 171
171
-
 172
172
-
 173
173
-
 174
174


Samsung HW-Q950T Manual do usuário
- Categoria
- Alto-falantes da barra de som
- Tipo
- Manual do usuário
em outras línguas
- français: Samsung HW-Q950T Manuel utilisateur
- English: Samsung HW-Q950T User manual
Artigos relacionados
-
Samsung HW-Q900T Manual do usuário
-
Samsung HW-Q800T Manual do usuário
-
-
-
-
-
-
Samsung HW-N950 Manual do usuário
-

