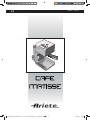
ARIETE 1363 Matisse Beige Manual do usuário
- Categoria
- Cafeteiras
- Tipo
- Manual do usuário

MOD. 1363
1363_Espressomaschine_Cover_IT_GB_FR_DE_ES_PT_NL_GR_RU_AE.indd 2 07.08.15 09:03

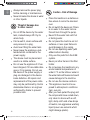
IT Indicazioni per l’uso e per la sicurezza Pagina 5
GB Operation and Safety Notes Page 14
FR Instructions d‘utilisation et consignes de sécurité Page 22
DE Bedienungs- und Sicherheitshinweise Seite 31
ES Instrucciones de utilización y de seguridad Página 41
PT Instruções de utilização e de segurança Página 50
NL Bedienings- en veiligheidsinstructies Pagina 59
GR ȊʌȠįİȓȟİȚȢ ȤİȚȡȚıȝȠȪ țĮȚ ĮıijĮȜİȓĮȢ ȈİȜȓįĮ
R8 ɍɤɚɡɚɧɢɹ ɩɨ ɨɛɫɥɭɠɢɜɚɧɢɸ ɢ ɩɪɚɜɢɥɚ ɬɟɯɧɢɤɢ ɛɟɡɨɩɚɫɧɨɫɬɢ ɋɬɪ
AE ěŏţźŧēěēţěĻœźţŴēţķţēŧę Ŀŗħę
1363_Espressomaschine_Cover_IT_GB_FR_DE_ES_PT_NL_GR_RU_AE.indd 3 07.08.15 09:03

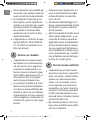
11
9
3
1 2
4
5
6
7
8
10
12
13
1415
17
18
19
16
1363_Espressomaschine_Cover_IT_GB_FR_DE_ES_PT_NL_GR_RU_AE.indd 4 07.08.15 09:03

B CA
D E F
H IG
J K L
1363_Espressomaschine_Cover_IT_GB_FR_DE_ES_PT_NL_GR_RU_AE.indd 5 07.08.15 09:03

5
IT
A proposito di questo manuale
Anche se gli apparecchi sono stati realizzati in confor-
Pitj con le speci¿che NorPative europee vigenti e
sono pertanto protetti in tutte le parti potenzialPente
pericolose leggete con attenzione Tueste avvertenze
e usate l’apparecchio solo per l’uso cui q stato
destinato per evitare infortuni e danni Tenete a portata
di Pano Tuesto liEretto per future consultazioni 4ua-
lora vogliate cedere Tuesto apparecchio ad altre per-
sone ricordatevi di includere anche Tueste istruzioni
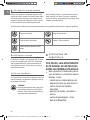
Le inforPazioni riportate in Tuesto Panuale sono Parcate dai seguenti siPEoli che indicano
Pericolo per i EaPEini Avvertenza relativa a ustioni
Pericolo dovuto a elettricitj Attenzione - danni materiali
Pericolo di danni derivanti da altre cause
Uso previsto
Potete usare l‘apparecchio per preparare caffq Ogni
altro utilizzo della macchina non q previsto dal &ostrut-
tore che si esime da Tualsiasi responsaEilitj per danni
di ogni natura generati da un impiego improprio della
macchina stessa L’uso improprio determina inoltre
l’annullamento di ogni forma di garanzia
Rischi residui
Le caratteristiche costruttive dell’apparecchio oggetto
della presente puEElicazione non consentono di pro-
teggere l’utilizzatore dal getto diretto di vapore o acTua
calda
ATTENZIONE!
Pericolo di ustioni Le parti metalliche
esterne dell’apparecchio e del porta¿ltro
non devono essere toccate con l’apparec-
chio in funzione in Tuanto potreEEero
causare delle scottature
AVVERTENZE DI
SICUREZZA
LEGGERE ATTENTAMENTE LE
ISTRUZIONI PRIMA DELL’USO.
4uesto apparecchio q destinato a
essere utilizzato nelle applicazioni
domestiche e similari Tuali
- nelle zone per cucinare riservate
al personale nei negozi, negli
uf¿ci e in altri amEienti profes-
sionali
- nelle fattorie
- utilizzo da parte di clienti di al-
Eerghi, motel e altri amEienti a
carattere residenziale
- negli amEienti tipo Eed and
EreaNfast
1363_Espressomaschine_Content_IT_GB_FR_DE_ES_PT_NL_GR_RU_AE.indd 5 07.08.15 09:12

6
IT
Non si assumono responsaEilitj per
uso errato o per impieghi diversi da
Tuelli previsti dal presente liEretto
Si consiglia di conservare gli im-
Ealli originali, poiché l’assistenza
gratuita non q prevista per i guasti
causati da imEallo non adeguato
del prodotto al momento della
spedizione ad un &entro di Assi-
stenza autorizzato
L’apparecchio q conforme al rego-
lamento E& No 1935 2004 del
2 10 2004 sui materiali in con-
tatto con alimenti
Pericolo per i bambini
L’apparecchio puz essere usato
dai EamEini con un’etj superiore
a anni solo se sono seguiti da
una persona responsaEile o se
hanno ricevuto le istruzioni riguar
danti l’utilizzo dell’apparecchio in
sicurezza ed hanno compreso i
pericoli presenti durante l’uso
Le operazioni di pulizia e di manu-
tenzione da parte dell’utilizzatore
non devono essere effettuate dai
EamEini a meno che non aEEiano
un’etj superiore a anni e operino
sotto sorveglianza Assicurarsi che
i EamEini non giochino con l’appa-
recchio
Tenere sempre l’apparecchio e il
cavo di alimentazione fuori dalla
portata di EamEini con etj infe-
riore a anni
Gli elementi dell’imEallaggio non
devono essere lasciati alla portata
dei EamEini in Tuanto potenziali
fonti di pericolo
Allorché si decida di smaltire come
ri¿uto Tuesto apparecchio, si rac-
comanda di renderlo inoperante
t
agliandone il cavo di alimentazio
ne
Si raccomanda inoltre di rendere
innocue Tuelle parti dell’apparec-
chio suscettiEili di costituire un pe-
ricolo, specialmente per i EamEini
che potreEEero servirsi dell’appa-
recchio per i propri giochi
Pericolo dovuto a elettricità
L’apparecchio puz essere usato
da persone che hanno capacitj ¿-
siche, sensoriali o mentali ridotte,
oppure con mancanza di espe-
rienza o di conoscenza, solo se
sono seguiti da una persona re-
sponsaEile o se hanno ricevuto e
compreso le istruzioni riguardanti
l’utilizzo dell’apparecchio in sicu-
rezza ed hanno compreso i pericoli
presenti durante l’uso
Non lasciar pendere il cavo in un
luogo dove potreEEe essere affer-
rato da un EamEino
1363_Espressomaschine_Content_IT_GB_FR_DE_ES_PT_NL_GR_RU_AE.indd 6 07.08.15 09:12

IT
Prima di collegare l’apparecchio
alla rete di alimentazione control-
lare che la tensione indicata sulla
targhetta posta al di sotto della
macchina corrisponda a Tuella
della rete locale
L’uso di prolunghe elettriche non
autorizzate dal faEEricante dell’ap-
parecchio puz provocare danni e
incidenti
Prima di procedere all’operazione
di riempimento del serEatoio dell’ac-
Tua, scollegare l’apparecchio dalla
presa di corrente
Non mettere mai le parti sotto ten-
sione a contatto con l’acTua
puz generarsi un cortocircuito
Togliere la spina dalla presa prima
di ogni intervento di pulizia o di
manutenzione
Non immergere l’apparecchio in
acTua o altri liTuidi
Pericolo di danni
derivanti da altre cause
Non sollevare l’apparecchio affer-
randolo per il serEatoio dell’acTua
o per la vaschetta, ma afferrarlo
per il corpo
Scegliere un amEiente suf¿ciente-
mente illuminato, pulito e con la
presa di corrente facilmente ac-
cessiEile
Evitare di immettere nel serEatoio
una Tuantitj eccessiva di acTua
Non lasciare incustodito l’appa-
recchio mentre q collegato alla
rete elettrica
L’apparecchio deve essere utiliz-
zato e lasciato a riposo su una
super¿cie staEile
L’apparecchio non deve essere
utilizzato se q stato fatto cadere,
se vi sono segni di danni visiEili o
se ha perdite di acTua Non usare
l’apparecchio se il cavo elettrico o
la spina risultano danneggiati, o se
l’apparecchio stesso risulta difet-
toso Tutte le riparazioni, compresa
la sostituzione del cavo di alimen-
tazione, devono essere eseguite
solamente dal &entro Assistenza
Ariete o da tecnici autorizzati Ariete,
in modo da prevenire ogni rischio
Attenzione - danni materiali
&ollocare la macchina su un piano
staEile dove non possa essere ro-
vesciata
Non usare la macchina senza ac-
Tua, poiché in tale caso la pompa
si ErucereEEe
No
n riempire mai il serEatoio dell’a
c-
Tua con acTua calda o Eollente
Non posizionare la macchina su
super¿ci molto calde o nelle vici-
nanze di ¿amme liEere per evitare
1363_Espressomaschine_Content_IT_GB_FR_DE_ES_PT_NL_GR_RU_AE.indd 7 07.08.15 09:12

8
IT
che la carrozzeria possa essere
danneggiata
Non utilizzare acTua gassata ad-
dizionata di anidride carEonica
Usare solo cialde che riportano il
marchio standard ESE
Non introdurre mai nel porta¿ltro
elementi diversi dalle cialde
Non lasciare la macchina a tem-
peratura amEiente inferiore a 0 &,
in Tuanto il residuo d’acTua nella
caldaia potreEEe ghiacciare e pro-
vocare dei danni
Non usare l’apparecchio all’aperto
Non lasciare l’apparecchio espo-
sto ad agenti atmosferici (pioggia,
sole, ecc
Dopo aver staccato la spina di
alimentazione e dopo che le parti
calde si saranno freddate, l’appa-
recchio dovrj essere pulito esclu-
sivamente con un panno non
aErasivo appena inumidito aggiun-
gendo poche gocce di detergenti
neutri non aggressivi (non usare
mai solventi che danneggiano la
plastica
Per il corretto smaltimento
del prodotto ai sensi della
Direttiva Europea
2012 19 EU si prega
leggere l’apposito foglietto
allegato al prodotto
CONSERVARE SEMPRE
QUESTE ISTRUZIONI.
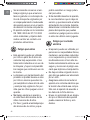
Avvertenza
relativa a ustioni
Non dirigere mai il getto di vapore
o acTua calda verso parti del c
orpo;
manipolare con precauzione il tuEo
vapore acTua calda
Pericolo ustioni
Le parti metalliche esterne dell’ap-
parecchio e del porta¿ltro non devono
essere toccate con l’apparecchio
in funzione, in Tuanto potreEEero
causare delle scottature
La mancata fuoriuscita di acTua dal
porta¿ltro potreEEe essere dovuta
ad un intasamento del ¿ltro Inter-
rompere l’erogazione ed attendere
una decina di secondi Successi-
vamente rimuovere e disinserire
lentamente il porta¿ltro perché l’e-
ventuale pressione residua po
treEEe
provocare spruzzi o schizzi Pro-
cedere Tuindi con la pulizia come
indicato nell’apposito paragrafo
1363_Espressomaschine_Content_IT_GB_FR_DE_ES_PT_NL_GR_RU_AE.indd 8 07.08.15 09:12

9
IT
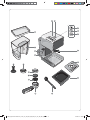
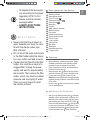
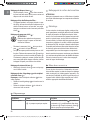
Descrizione dell’apparecchio
1
0acchina da caffq
2
Tasto per l‘erogazione di vapore
3
Tasto ON OFF
4
Tasto per l‘erogazione di caffq
5
Tasto funzione vapore
6
Spina
7
Griglia d‘appoggio per tazze
8
Raccoglitore acTua
9
Dosatore
10
Porta¿ltro
11
Gocciolatore
12
Disco forato in silicone
13
Filtro 2 tazze
14
Filtro 1 tazza cialda
15
Pressino
16
&appuccinatore
17
TuEo 9apore
18
SerEatoio acTua rimoviEile
19
&operchio (serEatoio acTua
Istruzioni per l’uso
Prima della messa in funzione, assicurarsi che
l‘alimentazione a disposizione sia adeguata alla
tensione di alimentazione dell‘apparecchio neces-
saria (vedi targhetta
&ollocare l‘apparecchio su una super¿cie piana
e orizzontale
Estrarre il serEatoio d‘acTua
18
Prima del primo utilizzo lavare il serEatoio dell‘ac-
Tua
18
e riempirlo con acTua fresca liscia (¿g A
¿no alla tacca con l‘indicazione ³0A;´
Inserire il serEatoio dell‘acTua
18
(¿g B
Nota: assicurarsi che il serEatoio dell‘acTua
18
sia in corretta sede In caso contrario l‘erogazione
del caffq potreEEe essere ostacolata
Inserire la spina
6
in una presa elettrica che
deve essere dotata di messa a terra
Prima accensione
Dopo aver riempito il serEatoio
18
con acTua
naturale fresca, posizionare un recipiente della
capacitj di almeno mezzo litro sotto l’attacco del
porta¿ltro e sotto lo stilo erogatore vapore Premere
il tasto ON OFF
3
Premere il tasto erogazione
caffq
4
Attendere la fuoriuscita di acTua dalla
sede di aggancio del porta¿ltro Premere il tasto
erogazione vapore
2
e far fuoriuscire acTua
dallo stilo erogatore vapore
17
Premere nuova-
mente il tasto erogazione vapore
2
e il tasto ero-
gazione caffq
4
per interrompere la fuoriuscita
di acTua
Alla prima accensione, oppure dopo un periodo di
inutilizzo, Tuesta operazione potreEEe richiedere
Tualche minuto 4uesto non sarj necessario per i
successivi caffq
Come fare il caffè
Premere il tasto ON OFF
3
per accendere
l‘apparecchio (¿g &
Con caffè macinato:
Inserire il gocciolatore
11
, il disco forato in silicone
12
e il ¿ltro polvere 2 tazze
13
o 1 tazza
14
, nel
porta¿ltro
10
(¿g E
Dosare il caffq nel ¿ltro e pressare leggermente
con l’apposito pressino
15
per due caffq riempire
completamente due misurini, mentre per un caffq
riempirne uno solo
Nota: se si riempie il ¿ltro
13
con troppo caffq
macinato, q proEaEile che il porta¿ltro
10
si ag-
ganci dif¿cilmente o che durante l‘erogazione il
caffq fuoriesca dal ¿ltro
13
Con cialde:
Inserire il ¿ltro per cialde
14
nel porta¿ltro
10
(¿g G
Spingere la cialda con le dita verso il fondo del
¿ltro
14
La cialda deve trovarsi perfettamente al
centro e all‘interno del ¿ltro
14
Fissare ora il porta¿ltro
10
all‘attacco girandolo
da sinistra verso destra Assicurarsi che il porta-
¿ltro
10
sia Een ¿sso (¿g +
Posizionare una tazza sotto il porta¿ltro
10
All’accensine del tasto erogazione caffq
4
, la
macchina sarj pronta per fare il caffq Per av-
viare l’erogazione del caffq premere il tasto
4
Premere nuovamente il tasto per l‘erogazione di
caffq
4
per interrompere l‘erogazione
1363_Espressomaschine_Content_IT_GB_FR_DE_ES_PT_NL_GR_RU_AE.indd 9 07.08.15 09:12

10
IT
Nota: se la cialda non fosse inserita Eene nel ¿ltro
14
o se il porta¿ltro
10
non venisse Een aggan-
ciato, q possiEile che dell‘acTua sgoccioli dal
porta¿ltro
10
Nota: non rimuovere il porta¿ltro
10
durante
l‘erogazione di caffq In caso contrario sussiste
il pericolo di ustioni
Nota: se l‘acTua non gocciolasse dal porta¿ltro
10
puz essere segno di un‘intasatura del ¿ltro
13
,
14
In tal caso spegnere la macchina, aspettare alcuni
minuti e rimuovere molto lentamente il porta¿ltro
10
,
poiché l‘eventuale presenza di pressione residua
potreEEe provocare schizzi d‘acTua
Alla ¿ne dell‘erogazione del caffq, attendere circa
10 secondi prima di rimuovere il porta¿ltro
10
Per estrarre il porta¿ltro
10
, girarlo lentamente da
destra verso sinistra per evitare spruzzi di acTua
o caffq
Nota: rimuovendo il porta¿ltro
10
q possiEile che
la cialda resti attaccata nella parte superiore
dell‘apparecchio Per rimuovere la cialda, inclinare
il porta¿ltro
10
come descritto in ¿g . e far cadere
la cialda nel porta¿ltro
10
Funzione Stand-By:
Se il dispositivo q acceso ma nessuna funzione q attiva,
dopo circa 30 minuti si attiva la funzione di spegnimento
automatico In Tuesto caso l‘apparecchio si trova in
Stand-By Per riaccendere l‘apparecchio, premere il
tasto ON OFF
3
Riempimento del serbatoio
acqua durante l‘utilizzo
Nota: il serEatoio dell‘acTua
18
deve essere riempito
prima che l‘acTua sia completamente esaurita
Premere il tasto ON OFF
3
per spegnere l‘ap-
parecchio (¿g &
Rimuovere la spina
6
dalla presa di corrente
Estrarre il serEatoio dell‘acTua
18
e riempirlo
con acTua fresca liscia (¿g A ¿no alla tacca con
l‘indicazione ³0A;´
Inserire il serEatoio dell‘acTua
18
(¿g B
Nota: assicurarsi che il serEatoio dell‘acTua
18
sia in corretta sede In caso contrario l‘erogazione
del caffq potreEEe essere ostacolata
Inserire la spina
6
in una presa elettrica casalinga
tradizionale
Premere il tasto ON OFF
3
per accendere
l‘apparecchio
4ualora il serEatoio
18
fosse completamente vuoto,
potreEEe penetrare aria nel circuito impedendo
l‘erogazione di caffq Per riutilizzare l‘apparecchio,
sarà necessario spegnerlo e lasciare che si raf-
freddi
Posizionare un contenitore sotto l‘attacco del ¿ltro
e accendere l‘apparecchio tramite il tasto ON
OFF
3
Premere il tasto per l‘erogazione del caffq
4
e ri-
empire almeno una tazza d‘acTua per far ripartire
il circuito di Àusso dell‘acTua
Premere nuovamente il tasto per l‘erogazione di
caffq
4
per interrompere la fuoriuscita d‘acTua
L‘apparecchio riprende cosu a funzionare corret-
tamente
Come fare il Cappuccino
Premere il tasto vapore
5
Attendere che il tasto vapore
5
smetta di lam-
peggiare e presenti luce ¿ssa
Nota: durante l‘attesa q possiEile che fuoriesca
del vapore dall‘attacco per il porta¿ltro
Immergere lo stilo erogatore di vapore
17
nel
contenitore con il latte da montare
Premere il tasto per l‘erogazione di vapore
2
¿no
a raggiungere il risultato desiderato
Per terminare l‘erogazione di vapore, lasciare il
tasto vapore
2
Per disattavare la funzione vapore, premere nuo-
vamente il tasto vapore
5
Riutilizzo per caffè
Per preparare un caffq suEito dopo aver fatto il cap-
puccino, attendere che il tasto erogazione caffq
2
sia
illumini nuovamente La macchina q pronta per fare il
caffq Procedere Tuindi come spiegato nel paragrafo
³&ome fare il caffq´
CONSIGLI UTILI PER OTTENERE UN BUON
ESPRESSO ALL’ITALIANA
1363_Espressomaschine_Content_IT_GB_FR_DE_ES_PT_NL_GR_RU_AE.indd 10 07.08.15 09:12

11
IT
Un caffq pi forte o meno forte dipende dal grado di
macinatura del caffq, dalla Tuantità di esso immessa
nel porta¿ltro, e dalla pressatura Il caffq macinato nel
porta¿ltro dovrà essere pressato leggermente Pochi
secondi sono il tempo suf¿ciente perché il caffq scenda
nelle tazzine La velocità di erogazione del caffq puz
essere camEiata modi¿cando la Tuantità di caffq nel
porta¿ltro o utilizzando una macinatura diversa
Pulizia dell’apparecchio
ATTENZIONE!
Tutte le operazioni di pulizia sotto indicate
devono essere effettuate a macchina spenta
e con la spina elettrica scollegata dalla
presa di corrente
ATTENZIONE!
Una manutenzione ed una pulizia regolari
mantengono ef¿ciente la macchina per un
periodo maggiore
ATTENZIONE!
Ogni intervento va eseguito a macchina
fredda Non lavare mai i componenti della
macchina in lavastoviglie Non utilizzare
getti di acTua diretta
Pulizia dei filtri
13
,
14
&ontrollare che i fori non siano otturati e pulirli
eventualmente con uno spazzolino
Per eliminare eventuali resti di caffq o di sporco,
posizionare un Eicchiere sotto l‘attacco del ¿ltro e
far scorrere acTua calda dal porta¿ltro
10
con il
¿ltro inserito
13
o
14
senza caffq macinato o
cialda,
procedendo come descritto nel capitolo ³&ome
fare il caffq³
Pulizia del disco forato in silicone
12
:
Pulire il disco forato in silicone
12
sotto l‘acTua
corrente Inclinarlo leggermente in modo che dal
foro centrale possano essere eliminati eventuali
resti di caffq che lo intasano
Pulizia dell‘attacco del portafiltro:
Se l‘apparecchio non venisse utilizzato per lungo
tempo, q possiEile che si creino depositi di caffq
sull‘attacco del porta¿ltro Rimuovere tali residui
con uno stuzzicadenti, una spugnetta o lasciando
scorrere acTua senza il porta¿ltro
10
Pulizia del cappucinatore
16
:
ATTENZIONE!
Eseguire l’operazione Tuando il tuEo vapore
q freddo per evitare scottature
Svitare il cappuccinatore
16
dal tuEo vapore
17
e lavarlo con acTua corrente
Il tuEo vapore puz essere pulito con un panno non
aErasivo Riavvitare il cappuccinatore
16
al tuEo
vapore
17
¿no alla ¿ne della corsa Se necessa-
rio ripulire con uno spillo il foro di uscita del vapore
Dopo ogni utilizzo erogare il vapore per alcuni
secondi per liEerare il foro da eventuali residui
Pulizia serbatoio acqua
18
:
Pulire il serEatoio acTua
18
regolarmente con una
spugna o un panno umido
Pulizia griglia d‘appoggio
7
e raccoglitore
acqua
8
:
Nota: svuotare regolarmente la vaschetta raccoglitore
acTua
8
Rimuovere la griglia d‘appoggio
7
e sciacTuarla
sotto l‘acTua corrente
Estrarre il raccoglitore dell‘acTua
8
, svuotarlo e
sciacTuarlo sotto l‘acTua corrente
Pulizia del corpo macchina
ATTENZIONE!
Pulire le parti ¿sse della macchina usando un panno
umido non aErasivo per non danneggiare la carrozzeria
'HFDOFLÀFD]LRQH
Una cura e una pulizia regolare proteggono l‘apparec-
chio, ne garantiscono un funzionamento prolungato e
riducono il rischio di formazione di calcare Se tuttavia
le funzioni dell‘apparecchio fossero compromesse dopo
un certo periodo in seguito all‘utilizzo freTuente di ac-
Tua dura e ad alto contenuto di calcare, sarà necessa-
rio eliminare il calcare per risolvere il proElema A tal
¿ne utilizzare solamente l‘anticalcare NO&AL di Ariete a
Ease di acido citrico 4uesto prodotto puz essere
1363_Espressomaschine_Content_IT_GB_FR_DE_ES_PT_NL_GR_RU_AE.indd 11 07.08.15 09:12

12
IT
acTuistato presso i centri servizio clienti di Ariete Ariete
non q ritenuta responsaEile per danni a componenti
della
macchina da caffq derivanti dall‘uso di prodotti dalla
composizione chimica non conforme Seguire le istru-
zioni presenti sulla targhetta del prodotto anticalcare
Messa fuori servizio
In caso di messa fuori servizio della macchina occorre
sconnetterla elettricamente, svuotare il serEatoio dell’ac-
Tua e la vaschetta raccogligocce e ripulirla (vedi para-
grafo ³Pulizia dell’apparecchio´ In caso di rottamazione
si dovrà provvedere alla separazione dei vari materiali
utilizzati nella costruzione della macchina e provvedere
al loro smaltimento in Ease alla loro composizione e alle
disposizioni di legge vigenti nel Paese di utilizzo
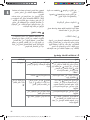
Risoluzione dei problemi
Problema Causa Soluzione
Nessuna erogazione
di vapore
AcTua insuf¿ciente nel serEatoio
18
la pompa non puz aspirare
&ontrollare la sede corretta del serEatoio
18
e che vi sia acTua a suf¿cienza nel serEa-
toio
18
Riempire il serEatoio
18
con acTua
fresca liscia ¿no alla tacca con lindicazione
³0A;´
Foro di uscita del tuEo vapore
17
ostruito
Rimuovere eventuali incrostazioni sullaper-
tura del tuEo vapore
17
con un ago
Fuoriuscita dacTua dal
lato del porta¿ltro
10
ProEaEilmente il ¿ltro
13
q troppo
pieno e per Tuesto non q stato pos-
siEile allacciare Eene il ¿ltro
13
nellattacco
Rimuovere molto lentamente il porta¿ltro
10
,
poiché leventuale presenza di pressione
residua potreEEe provocare schizzi dacTua
Pulire lattacco con una spugnetta Riempire
nuovamente con la giusta Tuantità di caffq
macinato
Resti di caffq sulla guarnizione
dellattacco del ¿ltro
Riempire nuovamente con la giusta Tuantità
di caffq macinato
Foro del disco in silicone
12
intasato Pulire il disco forato in silicone
12
sotto l’ac-
Tua corrente Inclinarlo leggermente in modo
che dal foro centrale possano essere elimi-
nati eventuali resti di caffq che lo intasano
Il ¿ltro
13
,
14
ha i fori di uscita ostruiti Rimuovere molto lentamente il porta¿ltro
10
,
poiché leventuale presenza di pressione
residua potreEEe provocare schizzi dacTua
Pulire il fori intasati del ¿ltro
13
,
14
con uno
spazzolino o con un ago Pulire il ¿ltro
13
,
14
con le pastiglie &OFFEE &LEAN di Ariete
seguendo le istruzioni sulla confezione
&ialda caffq difettosa
Sostituire la cialda nel porta¿ltro
10
1363_Espressomaschine_Content_IT_GB_FR_DE_ES_PT_NL_GR_RU_AE.indd 12 07.08.15 09:12

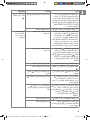
13
IT
Problema Causa Soluzione
Erogazione caffq
troppo lenta o assente
La sede di aggancio del porta¿ltro hai
fori ostruiti
F
ar scorre acTua dalla macchi
na senza inse-
rire il porta¿ltro
10
Se l’acTua continua a
scorrere in modo irregolare da tutti i fori, pro-
cedere con l’eliminazione del calcare A tal
¿ne usare l’anticalcare NO&AL di Ariete dispo-
niEile in tutti i centri servizio clienti Ariete
Seguire le istruzioni sulla confezione
La sede di aggancio del porta¿ltro hai
fori ostruiti
Rimuovere molto lentamente il porta¿ltro
10
,
poiché l’eventuale presenza di pressione
residua potreEEe provocare schizzi d’acTua
Pulire il fori intasati del ¿ltro
13
con uno
spazzolino o con un ago Pulire il ¿ltro con le
pastiglie &OFFEE &LEAN di Ariete seguendo
le istruzioni sulla confezione
0iscela caffq macinato troppo ¿ne Provare con una miscela pi grossa
0iscela caffq troppo pressata
Pressare il caffq pi leggermente nel ¿ltro
13
SerEatoio acTua
18
in sede scorretta
Posizionare correttamente il serEatoio
18
¿n
o
a Eloccarlo
Foro del disco in silicone
12
intasato Pulire il disco forato in silicone
12
sotto lac-
Tua corrente Inclinarlo leggermente in modo
che dal foro centrale possano essere eliminati
eventuali resti di caffq che lo intasano
AcTua insuf¿ciente nel serEatoio
18
la pompa non puz aspirare
&ontrollare la sede corretta del serEatoio
18
e che vi sia acTua a suf¿cienza nel serEatoio
18
Riempire il serEatoio
18
con acTua fresca
liscia ¿no alla tacca con lindicazione ³0A;´
&ialda caffq difettosa
Sostituire la cialda nel porta¿ltro
10
&ialda caffq rotta
R
imuovere il porta¿ltro
10
, pulire lattacco
con
una spugnetta e inserire una nuova cialda
&affq poco forte o
freddo
&affq macinato troppo grosso Per preparare un caffq pi forte e pi caldo,
utilizzare un caffq dalla macinatura pi ¿ne
1363_Espressomaschine_Content_IT_GB_FR_DE_ES_PT_NL_GR_RU_AE.indd 13 07.08.15 09:12

14
GB
About this manual
Even though this device is made to ful¿l the standards
of the European Union and all possiEle sources of
danger have Eeen avoided, please read the following
safety instructions carefully and only use the device
for its intended purpose to avoid accidents and dama
ge
.eep the manual, so that you can refer to it later if
necessary If you wish to pass the device on to another
person, please pass the manual on with it
The information contained in this manual is laEelled with the following symEols, which have the following meanings
Danger for children RisN of Eurns
Danger due to electricity &aution - Damage to property
Threat of damage due to other causes
Intended use
<ou may use the device to maNe coffee The device
has not Eeen designed for other purposes, the manu-
facturer accepts no responsiEility for any damage
caused Ey improper use Improper use will invalidate
the warranty
Remaining risks
The structural characteristics of the device, which is
the suEMect of this manual, do not guarantee protection
from direct streams of water or steam
CAUTION!
RisN of Eurns Do not touch the outer
metal parts or the ¿lter holder while the
device is in use, as this can lead to Eurns
SAFETY
INSTRUCTIONS
PLEASE READ THE OPERATING
INSTRUCTIONS CAREFULLY
PRIOR TO USE.
This device is designed for use in
homes and similar conte[ts, such a
s
- employee Nitchens in small shops
or of¿ces and other worNplaces
- farms
- hotel rooms, guest houses and
other residential environments
- other Ninds of hotel, such as
Bed and BreaNfast hotels
The manufacturer accepts no
liaEility for improper use
<ou are recommended to Neep
the original pacNaging Eecause
our free customer service is not
1363_Espressomaschine_Content_IT_GB_FR_DE_ES_PT_NL_GR_RU_AE.indd 14 07.08.15 09:12

15
GB
intended for damage caused Ey
improperly pacNaging the device
when sending it to an appropriate
custom service centre
The device conforms to (EG de-
cree no 1935 2004 of 2102004
on materials and items intended to
come into contact with food
Danger for children
This device may only Ee used Ey
children from the age of 8 if they
are supervised or instruction in
how to use the machine safely
and if they are aware of the risNs
it presents
&leaning and maintenance must
not Ee performed Ey children un-
less they are at least nine years
old and are supervised Please
ensure that children cannot play
with this unit
Always store the appliance and its
caEle out of the reach of children
under 8 years old
.eep the pacNaging out of reach of
children as it could Ee a potential
source of danger
If you decide to dispose of the de-
vice, it is recommended that you
maNe it unusaEle Ey severing the
power supply caEle It is also rec-
ommended that you do not put
damaged parts loosely into Eins as
this could Ee a potential danger to
children if they attempt to use the
device as a toy
Danger due to electricity
Persons with reduced physical,
sensory or mental aEilities, or
persons lacNing the necessary e[-
perience or Nnowledge of how to
operate the device, may only use
the device once they have Eeen
instructed in how to use the device
safely and have Eeen made to un-
derstand the related dangers in
doing so
Please do not leave caEles hang-
ing where a child can reach them
Before connecting the device to
the mains, ensure that the input
voltage is compatiEle with the in-
formation on the technical data
sheet under the device
Use of an e[tension caEle which is
not authorised Ey the manufacturer
of the device can cause damage
and accidents
9erify the device is not connected
to the mains when ¿lling it with
water
Avoid allowing any of the electric
components to maNe contact with
water
This could lead it to short circuit
1363_Espressomaschine_Content_IT_GB_FR_DE_ES_PT_NL_GR_RU_AE.indd 15 07.08.15 09:12

16
GB
Always remove the power plug
Eefore cleaning or maintenance
Never immerse the device in water
or other liTuids
Threat of damage due
to other causes
Do not lift the device Ey the water
tanN, instead always lift it Ey its
whole Eody
Find a well lit, clean surface with
easy access to a plug
Avoid over ¿lling the water tanN
Never leave the appliance unat-
tended whilst connected to the
power supply
The device must Ee placed and
used on a staEle surface
Do not use the appliance if it has
Eeen dropped, if it has visiEle dam-
age or if it is leaNing Do not use
the device if the power supply or
plug are damaged or the device
looNs defective All repairs and
replacements of the power caEle
may only Ee performed Ey &entro
Assistenza Ariete or an engineer
authorised Ey Ariete to prevent
possiEle risNs
Caution - Risk of Damage
Place the machine on a staEle sur-
face where it cannot Ee NnocNed
over
Do not switch the device on if there
is no water in the water tanN as
this will Eurn through the pump
Never ¿ll the water tanN with hot
or Eoiling water
Do not place the machine on hot
surfaces or near open Àames to
avoid damage to the casing
Do not use sparNling water (with
added carEon dio[ide
Only use the pads from the ESE
system
Never put other items in the ¿lter
holder
Do not e[pose the machine to any
environmental temperatures of
under 0 & as the leftover water in
the water tanN will freeze and could
cause damage to the machine
Do not use the device outdoors
This appliance must not Ee e[-
posed to atmospheric conditions
(rain, sun etc
After you have pulled the plug and
the components have cooled do
wn,
only clean to device with a soft,
light, damp cloth and a few drops
of neutral, non-aggressive washing
liTuid (never use solvents which
might damage plastic
1363_Espressomaschine_Content_IT_GB_FR_DE_ES_PT_NL_GR_RU_AE.indd 16 07.08.15 09:12

1
GB
To dispose of the device prop-
erly according to European
regulation 2012 19 EU
please read the relevant
pacNage leaÀet
ALWAYS KEEP THESE
INSTRUCTIONS.
Risk of burns
Never point the Àow of steam or
water towards your Eody, Ee care-
ful with the steam water pipe
RisN of Eurns
Do not touch the outer metal parts
or the ¿lter holder while the device
is in use, as this can lead to Eurns
If water does not Àow from the ¿lter
holder, this could Ee a result of a
clogged ¿lter Unplug the power
supply and wait for appro[imately
ten seconds Then remove the ¿lter
holder, which may lead to residual
pressure and a spraying of water
Then you can proceed to clean
the section pictured
Description of the device
1
Espresso machine
2
Steam release Eutton
3
ON OFF Eutton
4
&offee release Eutton
5
Steam Eutton
6
0ains plug
7
&up grill
8
Water collection container
9
0easuring spoon
10
Filter holder
11
Individual nozzle discs
12
Silicone perforated disN
13
Filter for 2 cups
14
1 cup pad ¿lter
15
&offee grinder
16
0ilN frother
17
Steam pipe
18
DetachaEle water tanN
19
Lid (water tanN
Start-up
Before assemEly, ensure that the mains voltage
availaEle corresponds to the operating voltage
necessary for the the appliance (see laEel
Place the appliance on a Àat, horizontal surface
Remove the water tanN
18
Wash the water tanN
18
Eefore ¿rst use and ¿ll it
with fresh, still water (Fig A up to the ³0A;³ marN
Put the water tanN
18
EacN in place (Fig B
Note: 0aNe sure that the water tanN
18
has Eeen
replaced correctly Otherwise it may ElocN the Àow
of the coffee
Insert the plug
6
into a socNet, which is availaEle
over an earthing device
6ZLWFKLQJRQIRUWKHÀUVWWLPH
After you have ¿lled the water tanN
18
with fresh,
still water, place a container with a capacity of at
least half a litre under the ¿lter holder connection
and the steam pipe Press the ON OFF switch
3
Press the coffee release Eutton
4
Wait for water
to come out of the side of the ¿lter holder Press
the steam release Eutton
2
and allow the water
to leave the steam pipe
17
Press the steam
1363_Espressomaschine_Content_IT_GB_FR_DE_ES_PT_NL_GR_RU_AE.indd 17 07.08.15 09:12

18
GB
release Eutton
2
and the coffee release Eutton
4
to stop the Àow of water
Upon ¿rst use or after a long period of inactivity, this
process can reTuire several minutes For suEseTuent
coffees, this will no longer Ee necessary
Making coffee
Press the ON OFF Eutton
3
to switch the device
on (Fig &
With ground coffee:
Place the individual nozzle disc
11
, the silicone
perforated disc
12
and, for powdered coffee, the
¿lter for 2 cups
13
or 1 cup
14
in the ¿lter holder
10
(Fig E
0easure out the coffee in the ¿lter and lightly press
it together with the coffee grinder
15
provided for
two coffees ¿ll two measuring cups, for Must one
coffee, ¿ll one measuring cup
Note: If you put too much coffee powder in the
¿lter
13
, the ¿lter holder
10
may Ee dif¿cult to
screw on and or coffee may leaN from the ¿lter
13
With pads:
Insert the ¿lter for the pads
14
in the ¿lter holder
10
(see Fig G
Press the coffee pad with you ¿ngers in the ¿lter
14
underneath The coffee pad must Ee e[actly in the
middle and inside the ¿lter
14
Secure the ¿lter holder
10
Ey turning the ¿lter
holder handle from right to left 0aNe sure that the
¿lter holder
10
is hooNed on properly (Fig +
Place the cup under the ¿lter holder discharge
10
When the relevant Eutton
4
lights up, the machine
is ready to release coffee Press the coffee release
Eutton
4
Press the coffee release Eutton
4
again to stop
the Àow of coffee
Note: If the coffee pad is not correctly inserted into
the ¿lter
14
or not secured properly Ey the ¿lter
holder
10
, drops of water may leaN from the ¿lter
holder
10
Note: Do not remove the ¿lter holder
10
while
coffee is still pouring Otherwise there is a risN of
scalding
Note: If water does not Àow from the ¿lter holder
10
,
this could Ee a result of a clogged ¿lter
13
,
14
In
this case, switch the machine off, wait a few minutes
and turn the ¿lter holder
10
very slowly, Eecause
this may lead to residual pressure and a spraying
of water
Wait 10 seconds after pouring the coffee Eefore
you remove the ¿lter holder
10
To remove the ¿lter holder
10
, turn it slowly from
right to left to avoid spraying water or coffee
Note: When removing the ¿lter holder
10
the cof
fee
pad may stay attached to the upper part of the
device To remove the coffee pad, turn the ¿lter
holder
10
as shown in Fig . and let the coffee
pad fall into the ¿lter holder
10
Stand-by Function:
When the device is switched on Eut no function is Ee-
ing performed, it will automatically switch itself off after
30 minutes The appliance is now in stand-Ey mode
Press the ON OFF Eutton
3
to switch the device on
again
Filling the water tank during use
Note: The water tanN
18
should Ee ¿lled Eefore it
Eecomes completely empty
Press the ON OFF Eutton
3
to switch the device
off (Fig &
Pull the power plug
6
from the socNet
Remove the water tanN
18
and ¿ll it with fresh, still
water (Fig A up to the ³0A;³ marN
Put the water tanN
18
EacN in place (Fig B
Note: 0aNe sure that the water tanN
18
has
Eeen replaced correctly Otherwise it may ElocN
the Àow of the coffee
Insert the mains plug
6
into a standard house-
hold socNet
Press the ON OFF Eutton
3
to switch the
device on
If the water tanN
18
is emptied completely, air may
get into the circuit and ElocN the Àow of coffee To
ensure that the device can Ee used again, switch
it off and let it cool down
Place a container under the ¿lter holder area and
switch on the device Ey pressing the ON OFF
Eutton
3
Press the coffee release Eutton
4
and let at least
one cup of water Àow from the ¿lter holder collector
to restore the device
1363_Espressomaschine_Content_IT_GB_FR_DE_ES_PT_NL_GR_RU_AE.indd 18 07.08.15 09:12

19
GB
Press the coffee release Eutton
4
again to stop
the Àow of water The device should worN properly
again
Making Cappuccinos
Press the steam Eutton
5
Wait until the steam Eutton
5
stops Àashing and
is permanently llit
Note: While you are waiting, steam may Àow from
the ¿lter holder collector
SuEmerge the steam pipe
17
in the container with
the milN which is to Ee frothed
Now press on the steam release Eutton
2
until
you achieved your desired result
To stop the steaming function, let go of the steam
release Eutton
2
Press the steam Eutton
5
again to switch off the
steam function
Reusing a machine
to make coffee
To maNe a coffee immediately after maNing a cappuc-
cino, wait until the coffee release Eutton
2
lights up
again The device is ready to maNe coffee Follow the
instructions in the section ³0aNing coffee³
USEFUL ADVICE FOR MAKING AN ESPRESSO
THE ITALIAN WAY
The strength of the coffee depends on the grinding
degree setting, the amount of coffee in the ¿lter holder
and the pressure used to push the coffee down The
ground coffee in the ¿lter holder should only Ee pressed
lightly The coffee only needs a few seconds to Àow
into the cup The speed of coffee release can Ee reg-
ulated Ey adapting the amount of coffee powder in the
¿lter holder or using coffee with a different grinding
degree
Cleaning the device
CAUTION!
Only perform the following cleaning pro-
cesses if the device is switched off and
unplugged
CAUTION!
Regular maintenance and cleaning ensures
a longer Tuality service
CAUTION!
Each of these processes is only to Ee car-
ried out when the machine has cooled d
own
Do not wash the detachaEle parts of the
device in a dishwasher Do not e[pose the
device to direct Àows of water
Cleaning the filter
13
,
14
&hecN that the holes are not clogged and clean
them with a small Erush
To remove any coffee powder or contamination,
place a glass under the ¿lter holder collector and
run hot water out of the ¿lter holder
10
with a used
¿lter
13
or
14
without a coffee pad or coffee
powder and proceed as descriEed in the chapter
³&leaning the device³
Cleaning the silicone perforated disk
12
:
Rinse out the silicone perforated disN
12
under
running water Turn it so that the middle opening
can Ee unElocNed Ey removing the coffee powder
that it stucN in it
Cleaning the filter holder container:
If the device is not used for an e[tended period
of time, coffee grounds may drop onto the ¿lter
holder collector Remove these with a toothpicN,
a small sponge or Ey running water through it
without the ¿lter holder Eeing inserted
10
Cleaning the milk frother
16
:
CAUTION!
Only perform these processes when the steam
pipe has cooled down to avoid scalding
Unscrew the milN frother
16
from the steam pipe
17
and rinse it out in running water
<ou can clean the steam pipe
17
with a soft cloth
Screw on the milN frother
16
onto the steam pipe
17
tightly again If necessary, clean the opening
of the steam pipe
17
again with a pin After each
use, let a little st
eam out to remove any remains
Cleaning the water tank
18
:
Regularly clean the water tanN
18
with a sponge
or a damp cloth
1363_Espressomaschine_Content_IT_GB_FR_DE_ES_PT_NL_GR_RU_AE.indd 19 07.08.15 09:12

20
GB
Cleaning the cup grill
7
and the water collection
container
8
:
Note: Empty the water collection container
8
peri-
odically
Remove the cup grill
7
and rinse it out under
running water
Remove the water collection container
8
, empty
it and rinse it out under running water
Cleaning the surface of the machine
CAUTION!
Only clean the permanent components of the machine
with a damp cloth to avoid damage to the casing
Descaling
Good maintenance and regular cleaning protect the
device, ensure a longer lifespan and limit the Euild up
of limescale If the device still does not function
properly after some time Eecause hard water and very
calcareous water have primarily Eeen used, the lime-
scale must Ee removed to solve the proElem For this
purpose you should only use the Ariete descaling a
gent
NO&AL with a citric acid Ease
This product can Ee purchased easily at an Ariete cus-
tomer service centre Ariete accepts no liaEility for dam-
age to components of the Espresso machine from the
use of non-compliant products with chemical additives
Follow the instructions on the instruction decalcifying
agent leaÀet
Shutting down
In case of shut down, you must detach the machine
from the power supply, empty the water tanN and the
collection container and clean the device (see the
chapter ³&leaning the device³ In case of scrapping,
you must taNe care to dispose of the different individual
parts according to the applicaEle laws of the country
in which the device is Eeing used
Troubleshooting
Problem Cause Solution
Not releasing steam
Too little water in the water tanN
18
the pump has no suction
&hecN whether the water tanN
18
has Eeen
inserted correctly and that there is enough
water in the water tanN
18
Fill the water
tanN
18
with fresh, still water up to the
³0A;³ marN
The opening of the steam pipe
17
is
ElocNed
Remove any ¿lm which has Euilt up at the
opening of the steam pipe
17
with a pin
Water Àows out of
the side of the ¿lter
holder
10
The ¿lter
13
is proEaEly too full, mean-
ing the ¿lter
13
cannot Ee properly
screwed into the frame
Remove the ¿lter holder
10
very slowly, Ee-
cause this may lead to residual pressure and
a spraying of water &lean the frame with a
small sponge Try it again with the correct
amount of coffee
There are Eits of ground coffee on the
seal of the coffee ¿lter frame
Try it again with the correct amount of coffee
The hole in the silicone perforated
disN
12
is ElocNed
Rinse out the silicone perforated disN
12
un-
der running water Turn it so that the middle
opening can Ee unElocNed Ey removing the
coffee powder that it stucN in it
1363_Espressomaschine_Content_IT_GB_FR_DE_ES_PT_NL_GR_RU_AE.indd 20 07.08.15 09:12
A página está carregando...
A página está carregando...
A página está carregando...
A página está carregando...
A página está carregando...
A página está carregando...
A página está carregando...
A página está carregando...
A página está carregando...
A página está carregando...
A página está carregando...
A página está carregando...
A página está carregando...
A página está carregando...
A página está carregando...
A página está carregando...
A página está carregando...
A página está carregando...
A página está carregando...
A página está carregando...
A página está carregando...
A página está carregando...
A página está carregando...
A página está carregando...
A página está carregando...
A página está carregando...
A página está carregando...
A página está carregando...
A página está carregando...
A página está carregando...
A página está carregando...
A página está carregando...
A página está carregando...
A página está carregando...
A página está carregando...
A página está carregando...
A página está carregando...
A página está carregando...
A página está carregando...
A página está carregando...
A página está carregando...
A página está carregando...
A página está carregando...
A página está carregando...
A página está carregando...
A página está carregando...
A página está carregando...
A página está carregando...
A página está carregando...
A página está carregando...
A página está carregando...
A página está carregando...
A página está carregando...
A página está carregando...
A página está carregando...
A página está carregando...
A página está carregando...
A página está carregando...
A página está carregando...
A página está carregando...
A página está carregando...
A página está carregando...
A página está carregando...
A página está carregando...
A página está carregando...
A página está carregando...
A página está carregando...
A página está carregando...
A página está carregando...
A página está carregando...
A página está carregando...
A página está carregando...
A página está carregando...
A página está carregando...
A página está carregando...
A página está carregando...
A página está carregando...
-
 1
1
-
 2
2
-
 3
3
-
 4
4
-
 5
5
-
 6
6
-
 7
7
-
 8
8
-
 9
9
-
 10
10
-
 11
11
-
 12
12
-
 13
13
-
 14
14
-
 15
15
-
 16
16
-
 17
17
-
 18
18
-
 19
19
-
 20
20
-
 21
21
-
 22
22
-
 23
23
-
 24
24
-
 25
25
-
 26
26
-
 27
27
-
 28
28
-
 29
29
-
 30
30
-
 31
31
-
 32
32
-
 33
33
-
 34
34
-
 35
35
-
 36
36
-
 37
37
-
 38
38
-
 39
39
-
 40
40
-
 41
41
-
 42
42
-
 43
43
-
 44
44
-
 45
45
-
 46
46
-
 47
47
-
 48
48
-
 49
49
-
 50
50
-
 51
51
-
 52
52
-
 53
53
-
 54
54
-
 55
55
-
 56
56
-
 57
57
-
 58
58
-
 59
59
-
 60
60
-
 61
61
-
 62
62
-
 63
63
-
 64
64
-
 65
65
-
 66
66
-
 67
67
-
 68
68
-
 69
69
-
 70
70
-
 71
71
-
 72
72
-
 73
73
-
 74
74
-
 75
75
-
 76
76
-
 77
77
-
 78
78
-
 79
79
-
 80
80
-
 81
81
-
 82
82
-
 83
83
-
 84
84
-
 85
85
-
 86
86
-
 87
87
-
 88
88
-
 89
89
-
 90
90
-
 91
91
-
 92
92
-
 93
93
-
 94
94
-
 95
95
-
 96
96
-
 97
97


ARIETE 1363 Matisse Beige Manual do usuário
- Categoria
- Cafeteiras
- Tipo
- Manual do usuário
em outras línguas
- español: ARIETE 1363 Matisse Beige Manual de usuario
- français: ARIETE 1363 Matisse Beige Manuel utilisateur
- italiano: ARIETE 1363 Matisse Beige Manuale utente
- Nederlands: ARIETE 1363 Matisse Beige Handleiding
- Deutsch: ARIETE 1363 Matisse Beige Benutzerhandbuch
Artigos relacionados
-
ARIETE 1366 Picasso Cialdissima Manual do usuário
-
ARIETE Moka Aroma 1337/41 Manual do usuário
-
-
ARIETE 1334 Minuetto Manual do usuário
-
-
-
-
-