Brady LOCKOUT PRO Enterprise 2.0 Manual do usuário
- Tipo
- Manual do usuário

- 1 -
User Manual

© 2003 Brady Worldwide, Inc. All Rights Reserved.
Lockout PRO - Enterprise
TM
(hereafter “Lockout PRO - Enterprise”) Operating Manual.
This manual is proprietary to Brady Worldwide, Inc. (hereafter “Brady”), and may be revised from time to time without notice. Brady
disclaims any understanding to provide you with such revisions, if any.
All brand or product names referenced in this manual are trademarks(™) or registered trademarks (®) of their respective companies or
organizations.
BRADY WORLDWIDE, INC.
®
YOU SHOULD CAREFULLY READ THE FOLLOWING TERMS AND CONDITIONS OF THIS LICENSE AGREEMENT BEFORE
OPENING THIS PACKAGE. IF YOU DO NOT AGREE WITH THESE TERMS AND CONDITIONS, PLEASE PROMPTLY RETURN
THIS PACKAGE FOR A FULL REFUND.
LICENSE AGREEMENT
Brady Worldwide, Inc. (hereafter "Brady") hereby grants you a non-exclusive, nontransferable license to use this software and the
accompanying documentation according to the following terms:
LICENSE GRANT: You may 1) install the software on only one computer at a time, and 2) make one (1) copy of the software in
machine readable form solely for backup purposes.
LICENSE RESTRICTIONS: You may not: 1) transmit the software over a network without an additional license; 2) modify, adapt,
translate, reverse engineer, decompile, disassemble, create derivative works based on, or copy (except for the backup copy) this
software or the accompanying documentation; 3) rent, transfer or grant any rights in the software or accompanying documentation
without the prior, express written consent of Brady; or 4) remove any proprietary notices, labels, or marks on the software and
accompanying documentation.
NATURE OF THIS AGREEMENT: This license is not a sale. License fees paid by you, if any, are in consideration of the licenses
granted under this Agreement. Title and copyrights to the software, accompanying documentation, and any copy made by you, remain
the property of Brady or its suppliers. Unauthorized copying of the software or the accompanying documentation, or failure to comply
with the above restrictions, shall automatically terminate this license, without further notice, and terminate your rights to use the
software, and Brady shall, in addition to its other legal remedies, be entitled to its reasonable attorney fees.
LIMITED WARRANTY: Brady warrants that, for a period of ninety (90) days from the date of delivery to you as evidenced by a copy of
your receipt, the software, as furnished, under normal use, will perform without significant errors that make it unusable. Brady's entire
liability and your exclusive remedy under this warranty (which is subject to you returning the software to Brady) will be, at the option of
Brady, to attempt to correct or help you around errors, to replace the software with functionally equivalent software or diskettes, or to
refund the license fee of the software and terminate this Agreement.
EXCEPT FOR THE ABOVE EXPRESS LIMITED WARRANTY, BRADY MAKES AND YOU RECEIVE NO WARRANTIES, EXPRESS,
IMPLIED, STATUTORY OR IN ANY COMMUNICATION WITH YOU, AND BRADY SPECIFICALLY DISCLAIMS ANY IMPLIED
WARRANTY OF MERCHANTABILITY OR FITNESS FOR A PARTICULAR PURPOSE. BRADY DOES NOT WARRANT THAT THE
OPERATION OF THE PROGRAM WILL BE UNINTERRUPTED OR ERROR FREE.
Some states do not allow the exclusion of implied warranties so the above exclusions may not apply to you. This warranty gives you
specific legal rights. You may also have other rights which vary from state to state.
1. LIMITATION OF LIABILITY: IN NO EVENT WILL BRADY BE LIABLE FOR ANY DAMAGES, INCLUDING LOSS OF DATA,
WHEN LOADING THIS SOFTWARE OR OTHERWISE, OR LOST PROFITS, COST OF COVER OR OTHER SPECIAL,
INCIDENTAL, CONSEQUENTIAL OR INDIRECT DAMAGES ARISING FROM THE USE OF THE PROGRAM OR
ACCOMPANYING DOCUMENTATION, HOWEVER CAUSED AND ON ANY THEORY OF LIABILITY. THIS LIMITATION WILL
APPLY EVEN IF BRADY HAS BEEN ADVISED OF THE POSSIBILITY OF SUCH DAMAGE.
Some states do not allow the limitation or exclusion of liability for incidental, or consequential damages, so the above limitation may not
apply to you.
GENERAL: This Agreement shall be governed by, and interpreted under, the laws of the State of Wisconsin, USA. You acknowledge
that U.S. law and regulations may restrict the export/re-export of the software. You agree not to export/re-export the software or
portions thereof in any form without the appropriate U.S. and foreign government licenses. This obligation shall survive and continue
after this Agreement terminates. This Agreement is the entire agreement between the parties and supersedes any other
communications or advertising with respect to the software and accompanying documentation. If any provision of this Agreement is
held invalid, the remainder of this Agreement shall continue in full force and effect.

- 3 -
Table of Contents
Technical Support Numbers ................................................................................................................................................
United States and other C/S countries...............................................................................................................................
Canada............................................................................................................................................................................
Mexico.............................................................................................................................................................................
Brazil ...............................................................................................................................................................................
Quick Start..........................................................................................................................................................................
Introducing Brady Lockout PRO - Enterprise........................................................................................................................
Welcome to Lockout PRO - Enterprise..............................................................................................................................
System Requirements ......................................................................................................................................................
Installing Lockout PRO - Enterprise...................................................................................................................................
Uninstalling Lockout PRO - Enterprise...............................................................................................................................
Using Lockout PRO - Enterprise..........................................................................................................................................
Opening Lockout PRO - Enterprise...................................................................................................................................
Program Layout................................................................................................................................................................
Sections...........................................................................................................................................................................
Creating procedures.........................................................................................................................................................
Procedure Layout.............................................................................................................................................................
Header.............................................................................................................................................................................
Images.............................................................................................................................................................................
Energy Sources................................................................................................................................................................
Multiple Pages..................................................................................................................................................................
Long Form Procedure Format...........................................................................................................................................
Header.............................................................................................................................................................................
Lockout Steps ..................................................................................................................................................................
Edit Procedure Template..................................................................................................................................................
Label Settings..................................................................................................................................................................
Procedure Body Settings..................................................................................................................................................
Predefined Notes..............................................................................................................................................................
Predefined Lockout Devices..............................................................................................................................................
Change Current Procedure Template................................................................................................................................
Change Default Template Used For New Procedures........................................................................................................
Undo Template Setting Changes.......................................................................................................................................
Procedure View Settings...................................................................................................................................................
Printing Procedures..........................................................................................................................................................
Printing Energy Source Labels..........................................................................................................................................
Printing Lockout Tags.......................................................................................................................................................
Export Procedure to PDF..................................................................................................................................................
Export Procedure to a TIFF File........................................................................................................................................
Lockout PRO - Enterprise Tips..........................................................................................................................................
Integrating Lockout PRO - Enterprise files with other systems............................................................................................
Printing to a Brady GlobalMark............................................................................................................................................
Printing to a Brady HandiMark.............................................................................................................................................

- 4 -
Technical Support Numbers
United States and other C/S countries
Canada
Mexico
Brazil
Tel: 800-368-3362
Fax: 414-228-5799
Tel: 888-262-7576
Fax: 905-764-5557
Tel: 800-368-3362
Fax: 525-527-5586
Tel (PABX): 55 11 3686-4720
Tel (Direct): 55 11 3686-5697
Fax: 55 11 3686-5236
Email: [email protected]

- 5 -
Welcome to Lockout PRO - Enterprise
Brady Lockout PRO - Enterprise allows you to create and implement a thorough OSHA compliant Lockout-Tagout program throughout
your facility and company with ease. Now you can work faster and more efficiently than ever before thanks to the automated features
provided by Lockout PRO - Enterprise. Lockout PRO - Enterprise uses the conventions that you are already familiar with so that you
can quickly begin creating your machine-specific lockout-tagout procedures using a comfortable, familiar interface.
A few of the highlights within Brady Lockout PRO - Enterprise are:
Server-based collaboration - All procedures and other system data are stored and managed on the server , allowing anyone to view
the most up-to-date Lockout procedures at any time right through their web browser and anyone with the Lockout PRO – Enterprise
desktop client to access themfrom anywhere on the network..
Simple installation, deployment, and maintenance - The Lockout PRO – Enterprise server and desktop clients can be installed in
minutes providing company-wide access with no difficult configuration settings. Additionally, end users of the desktop client can install
the program and begin creating their lockout procedures immediately with no need to wait for the installation of the server component.
Integration with existing systems – The server maintains an up-to-date copy of each procedure in PDF format, allowing you to easily
integrate them into any Windows-based program that can link to external files for opening and/or printing, including most modern
CMMS, ERP, and document management systems.
User friendly – Lockout PRO - Enterprise is very easy to learn and use because it uses standard Microsoft Windows conventions
throughout. This means that you will immediately be comfortable with the navigation and use of the program.
Self-Contained – All functionality needed to create graphical machine-specific Lockout-Tagout procedures is built-in, including image
editing and modification.
Customizable – All text, titles, and procedure format settings can be customized and defined by the end user. This included the
available energy sources, predefined notes, and devices.
On-screen tutorial – Lockout PRO - Enterprise features a tutorial that will walk you through the creation of a lockout-tagout procedure.
This tutorial will launch automatically the first time that you use the program, and is always accessible from the Help menu.

- 6 -
System Components
Desktop Client
A fully featured .NET Smart Client application that provides full procedure creation and
modification functionality.
This program is installed locally on the computers of users who are to be given Lockout
PRO – Enterprise system access, and may be installed by any user having an account on
the computer with Administrative program installation permissions.
Each user requires one administrative license unless the Server or Corporate license was
purchased.
*Note that the program can be used in offline mode for full procedure creation and printing
prior to the server being installed and configured if necessary.
Server
A comprehensive ASP.NET based application that consists of a web service that provides
file and data storage and management functionality to the other components of the system
and a Web Viewer application that provides view/print access to the Lockout procedures
and other content sections.
This program is installed on a web server configured for Intranet, Extranet, or secured
Internet access. It is recommended that this be installed by the system administrator of the
web server or an IT professional.
This application can be installed on one server unless the Corporate license has been
purchased.
Web Viewer
An HTML based application provided by the Lockout PRO – Enterprise Server component
that provides view and print access to the Lockout procedures and the content sections
including the online training.
This is accessed through any modern web browser and requires no installation or configu-
ration on the client computer.
Unlimited access to this service is included in all licenses of Lockout PRO – Enterprise.
Desktop Viewer Client
A fully featured .NET Smart Client application that provides viewing and advanced printing
functionality.
This program is installed locally on the computers of users who need access to the ad-
vanced printing options, and may be installed by any user having an account on the com-
puter with Administrative program installation permissions.
Unlimited installations of this application are included in all licenses of Lockout PRO – En-
terprise.

- 7 -
System Requirements
Desktop Client & Desktop Viewer Client
Web Viewer Users
Server
Installing Lockout PRO – Enterprise
Desktop Client and Desktop Viewer Client Installation
To install the Lockout PRO - Enterprise desktop client or desktop viewer client on your computer, follow these steps:
Note: Before you install the desktop client or desktop viewer client on your system, you must first have a copy of Microsoft Internet
Explorer 5.01 or newer installed. If you do not, install a copy of Internet Explorer before continuing. The latest version of Internet
Explorer can be downloaded for free or ordered on CD from www.microsoft.com.
1. Close all programs that are currently running on your computer, including any email or anti-virus programs that you may have.
2. Insert the Lockout PRO - Enterprise CD into your CD-ROM drive.
3. Go to Run… from the Start menu.
4. In the Open: text box, type “D:\Desktop Client\Setup.exe” or “D:\Desktop Viewer Client\Setup.exe”, replacing D: with the
appropriate letter for your CD-ROM drive.
5. Follow the prompts during the installation process.
It is recommended that you use the default installation directory.
If, during the installation process, you receive a message stating that Lockout PRO - Enterprise is attempting to copy a file that is older
than one that is currently on your system, elect to keep the existing, newer, file.
After completing the installation, see the Working Online / Working Offline section for information on connecting to the server.
Operating System Windows NT 4.0, 98 se, ME, 2000, or XP.
* It is required that the latest available service packs are installed.
Additional system requirements .NET Framework 1.1
MSVB6VM
MDAC 2.6 or newer
*Note: the above will be automatically installed if they are not present during installation
Internet Explorer 5.01 or newer
Disk Space 45mb
Monitor Resolution
Minimum screen resolution of 800x600, though the program is optimized for 1024x768 or
higher
Software Requirements
Any HTML 3.2 or newer browser, For best results Internet Explorer 5.5 or newer is recom-
mended.
Adobe Reader
Operating System Windows 2000 Professional or Server, XP Professional, or 2003 Server
* It is required that the latest available service packs are installed.
Environmental system requirements .NET Framework 1.1
MDAC 2.6 or newer
*Note: the above are provided on the installation CD
FrontPage extensions enabled
ASP.NET support enabled
Disk Space
80mb for minimum installation, with additional for file and data storage based on the
amount of usage

- 8 -
Note: If you wish to mass deploy the Lockout PRO – Enterprise desktop client or Lockout PRO – Enterprise Desktop Viewer client, edit
the address in the ServerAddress.data xml file found in the \System Requirements\Mass Deployment folder on the CD and include it in
the Lockout PRO – Enterprise folder on the client’s computer.
Server Installation
To install the Lockout PRO - Enterprise server on your web server, follow these steps:
Note: Before you install the server on your system, you must first have Internet Information Services installed and configured with
FrontPage extensions, ASP.NET support through the .NET Framework 1.1 enabled, and the server online and configured for Intranet,
Extranet, or secured Internet access by those whom you wish to provide access to. Please see your system documentation for the
proper steps toprepare your server to this state. (For your convenience, the .NET Framework 1.1 and MDAC 2.7 installations are
provided in the \Server\System Requirements folder on the installation CD.
1. Copy the “Lockout PRO” folder from the \Server\Application directory on the installation CD and all of its contents to the desired
location on your server.
2. Configure this folder within IIS such that it has read access over the network. This can be done directly as a shared folder or
through the use of a virtual directory if you prefer.
3. Set the \LockoutPRO and \LockoutPRO\FileService folders as applications in IIS. In the properties page for each folder click the
create button iunder the application settings section.
4. Configure the \LockoutPRO\Repository directory to have write permissions for everyone who may be using the desktop client or
desktop viewer client and the user account being used by the server. Ensure that this is configured to be inherited by any files and
folders currently within or that may be added to the directory.
5. Confirm that the file data.mdb in the \LockoutPRO\Repository directory has full write permissions for everyone who may be using
the desktop client or desktop viewer client.
6. Install the license(s) for the program:
Insert the License Activation CD shipped with your copy of Lockout PRO – Entperprise into the CD drive on the server.
Go to Run… from the Start menu.
In the Open: text box, type “D:\ActivateLicense.exe”, replacing D: with the appropriate letter for your CD-ROM drive.
Select the path to the LockoutPRO folder on the server.
Click the Activate License button. The license(s) will be activated.
If you have purchased any additional user licenses, repeat this procedure with each CD provided to you.
7. Confirm operation of the web service:
In a browser, preferably on a machine other than the server itself, browse to the file in the location of /LockoutPRO/
FileService/FileService.asmx. Be sure that you are browsing to it (using an address similar to http://yourserver/
LockoutPRO/FileService/FileService.asmx) rather than opening it directly (using an address similar to
C:\inetpub\wwwroot\LockoutPRO\FileService\FileService.asmx).
You should be presented with an interface into the web service listing each of the public functions of the service.
If you are not, or receive any error, this indicates that the server is not properly configured. Please see your
system documentation and properly configure it to serve ASP.NET applications.
Click on the Ping function. In the page that is opened, click on the Invoke button to test the operation of the service.
A new browser window should open and contain an xml response message with the value of true. If it does not,
confirm that there is no pop-up blocking stopping the new windo from opening, and then check the configuration
of your server.
Return to the main page of the file service. Click on the GetProcedureData function. In the page that is opened, click the
Invoke button.
A new browser window should open and contain an xml response message with a list of the folders and any .lop
files in the \LockoutPRO\Repository directory. If it does not, confirm that there is no pop-up blocking stopping the
new window from opening, and then check the configuration of your server. This function uses the write
permissions of the \LockoutPRO\Repository directory, so if the error message indicates this confirm that the
\LockoutPRO\Repository directory has full write permissions for the user account from which you are accessing
the service.
Return to the main page of the file service. Click on the DBWriteTest function. In the page that is opened, click the Invoke
button.
A new browser window should open and contain an xml response message with a value of true. If it does not,
confirm that there is no pop-up blocking stopping the new window from opening, and then check the
configuration of your server. This function uses the write permissions of the \LockoutPRO\Repository\data.mdb
file, so if the error message indicates this confirm that the \LockoutPRO\Repository\data.mdb file has full write
permissions for the user account from which you are accessing the service.
Return to the main page of the file service. Click on the AddFolder function. In the page that is opened, enter a name in
the Name: textbox, leaving the Path: textbox blank, then click the Invoke button.
A new browser window should open and contain an xml response message with a value of true. If it does not,
confirm that there is no pop-up blocking stopping the new window from opening, and then check the
configuration of your server. This function uses the write permissions of the \LockoutPRO\Repository\ folder, so if
the error message indicates this confirm that the \LockoutPRO\Repository\ folder has full write permissions for
the user account from which you are accessing the service.

- 9 -
8. Confirm operation of the web viewer application: In a browser, preferably on a machine other than the server itself, browse to the
file in the location of /LockoutPRO/index.htm. Be sure that you are browsing to it (using an address similar to http://yourserver/
LockoutPRO/index.htm) rather than opening it directly (using an address similar to C:\inetpub\wwwroot\LockoutPRO\index.htm).
You should be presented with the Lockout PRO – Enterprise Web Viewer. If you are not, or receive any error,
this indicates that the server is not properly configured. Please see your system documentation and properly
configure it to serve ASP.NET applications.
Click on the nodes of the treeview until you select a folder with files shown, then click on the link for one of the files.
Acrobat reader should launch and the procedure file should be opened to the right of the treeview. If it does not,
ensure that the system you are working from meets the minimum system requirements for the web viewer.
Click on the link to one or more of the content sections in the Sections navigation bar on the left of the screen to confirm
that each section openes as expected.
9. Confirm connectivity with desktop clients:
From a computer with the desktop client installed and access and permissions on the web server, open the Lockout PRO
– Enterprise desktop client.
Select the Admin > Connection settings command from the main menu.
In the address box, enter the address to the /LockoutPRO folder on the web server. This should be similar to http://
yourserver/LockoutPRO.
Click the Test button to test the connectivity.
If any test fails, ensure that the user has access to the Lockout PRO – Enterprise server on the webs erver, and
that the user account from which you are accessing it has proper access permissions for the /LockoutPRO a
and /LockoutPRO/Repository folder and it’s contents.
Click the OK button. A message should be show indicating that a connection to the server has been found and asking if
you wish to go online. Select yes to begin working online. If there are any files in the offline repository of that machine they
will be uploaded to the server before you can continue.
If you are not prompted to go online, or if the program cannot connect to the server when selecting the Admin >
Work Online command from the main menu, this indicates a connectivity problem between the user’s computer
and the web service.
Confirm basic operation of the program, including that you can open procedures and save changes. Select the Admin >
Server explorer command from the main menu and confirm the ability to manipulate the folders and files on the server.
Any problems encountered when testing these functions likely indicate incorrect user permission on the web
server.
Uninstalling Lockout PRO – Enterprise
Desktop Client and Desktop Viewer Client Uninstallation
To remove the Lockout PRO - Enterprise desktop client or desktop viewer client from your system, follow these steps:
1. Close all programs that are currently running on your computer, including any email or anti-virus programs that you may have.
2. From the Start menu, select Settings > Control Panel > Add/Remove Programs
3. In the Add/Remove Programs dialog box select the Brady Lockout PRO - Enterprise entry in the list of programs.
4. Click the Add/Remove button.
5. Follow the prompts during the uninstall process.
6. Restart your computer.
If, during the un-install process, you receive a message asking if you would like to keep or remove shared Lockout PRO - Enterprise
files, elect to keep the files.
Server Uninstallation
To remove the Lockout PRO - Enterprise server installation from your web server, simply delete the LockoutPRO directory and its
contents. Please note that the \LockoutPRO\Repository directory will contain all of the procedure files and data from the program and
this may not be advisable to delete.
Using Lockout PRO - Enterprise
Opening Lockout PRO – Enterprise Desktop Client or Desktop Viewer Client
To open the program, click on the Brady Lockout PRO – Enterprise or Lockout PRO – Enterprise Viewer icon located in the Programs
menu under the Start menu. This will launch the program. You will first see a splash screen while the program is loading. This will go
away once the program is completely loaded and you will be ready to begin using Lockout PRO - Enterprise.
Program Layout
Lockout PRO - Enterprise follows the typical Windows-based program layout and navigation conventions. If you are familiar with other
Windows-based programs you will be comfortable using Lockout PRO - Enterprise.
Menu Bar – The menu bar provides you with an organized way to access the various features and tools available to you. Every
command and tool that is available through other means is also contained within these menus.
Section Bar – The section bar allows you to quickly switch between the sections of the program. Once you click on a new section’s
icon, that section will appear in the Main Window.

- 10 -
The section bar can be set to auto-hide mode to save screen space by clicking on the push-pin icon in the upper right corner of the bar.
This will set the bar to collapse to the left side of the program and open when the mouse is placed over it.
Toolbar – The toolbar provides you with convenient access to the primary tools used when in the Machine-Specific Procedures section.
The toolbar uses buttons with easy to identify icons for each function. To activate a tool, simply click on the proper button.
Main Window – The main window contains the content of the section that you are currently viewing.
Window Tab Bar – Multiple procedures and content sections can be opened at one time. The Window Tab Bar allows you to switch
between the currently opened windows.
Vertical Scrollbar – This scrollbar allows you to scroll up and down through the current section contained in the Main Window. This
scrollbar is only active when the contents of the Main Window are taller than the Main Window itself.
Horizontal Scrollbar - This scrollbar allows you to left and right through the current section contained in the Main Window. This
scrollbar is only active when the contents of the Main Window are wider than the Main Window itself.
Sections
There are five sections that are available within Lockout PRO - Enterprise: Regulations, Corporate Policy, Employee Training, Device
Selection Guide, and Machine-Specific Procedures. To view a section, either click on its icon in the Section Bar, or select it from the
Tools menu in the Menu Bar. This will open the section inside the Main Window. The Machine-Specific Procedures section
automatically opens when the program is loaded because it is the section that you will use most often.
Regulations – This section contains the full text of the OSHA regulation that requires Lockout-Tagout, OSHA regulation 1910.147 -
The control of hazardous energy (lockout/tagout).
Corporate Policy – This section contains a generic corporate policy on lockout-tagout that you can use as a template for your
company. To copy the text into a word processing program for modifications, highlight the text and press the Ctrl and C keys to copy
the selected text to the clipboard.
Employee Training – This section will guide you through the creation of a thorough training program for the employees and other
personnel working within your facility.
Device Selection Guide – This section present to you the many helpful Lockout-Tagout devices that are available from your local
Brady distributor. For the most common devices, instructional videos are included that show the proper application of each device.
Machine-Specific Procedures – This section provides you with a robust toolset that completely automates the creation of the
machine-specific procedures that are required for every machine within your facility that has more than one energy source.
Tracking & Reporting – This section provides you with a number of reports showing information about the lockout procedures in the
system, lockout activity , and online trainaing results. This section is not available from the Lockout PRO – Enterprise Desktop Viewer.
Working with the Lockout PRO – Enterprise Server
The Lockout PRO – Enterprise server saves and manages all procedures and related lockout data. Files in the online repository. When
working online connected to the server you will see the folders and files within the online repository when opening and saving files. You
can use the repository just like any other drive on your system. Using the Server Explorer you can add and organize folders and move,
rename, and delete files.
Connecting to the server
To connect to the server, you must first set the address to the Lockout PRO – Enterprise server. This is done in the connection settings
dialog accessed by selecting Admin > Connection Settings from the menu. In the Connection Settings dialog, enter the address to the
Lockout PRO – Enterprise server. This should be similar to http://yourserver/LockoutPRO.
Click the test button to test the connection with the server. If the Connection to Server test does not pass this indicates that the address
is incorrect or the server or network is down. Please confirm the address and try again. If the Write Permission Test fails, this indicates
that your system administrator has not configured the server to give your account the permission to save files into the repository folder.
If the Database Write Test does not pass this indicates that your user account has not been given correct permissions on the database
file. Please contact your system administrator.
Working Online
To work online connecting to the server and reading files from the online repository select Work Online from the Admin menu. Any files
that are in your offline repository will be uploaded to the online repository on the server.
Working Offline
You can work offline when you are away from the network or the server is not online. To work offline, select Work Offline from the
Admin menu. If the system is able to connect to the server, you will be presented with a dialog box where you can select files that you
wish to bring offline to work with while disconnected. After you have made your selections, click the Go Offline button. Any selected files
will be copied to your offline repository and you will be able to access them while working offline. When you reconnect to the server and
go back into online mode, any changes or new files will be automatically uploaded to the online repository and made available to all
other users.

- 11 -
Content Section Settings
You can redirect the content sections to point to modified or preexisting documents created outside of Lockout PRO. You can link to
any HTML or PDF file that is accessible on the Intranet or Internet. Any changes that you make will be seen by everyone accessing the
system, though the desktop clients or the web viewer.
Select Section Settings in the Admin menu. You will be presented with a dialog showing each section and allowing you to enter a web
address to the section or reset it to the system default. Enter the address to the desired document and click the test button. This will
attempt to load the address into the test window on the right. If the document loads correctly, clock OK to save the changes.
Creating procedures with the Lockout PRO – Enterprise Desktop Client
Creating a new procedure
To create a new procedure, select the New command from the File menu on the Menu Bar, and then select the format that you would
like to use for the procedure, either Short Form or Long Form. You can also click on the New File icon in the Toolbar. This will create a
new procedure using the same form that you worked with last.
The procedure will be opened in a new window and a tab for it will be added to the Window Tab Bar.
Opening an existing procedure
To open an existing procedure, select the Open… command from the File menu on the Menu Bar. You can also click on the Open File
icon in the Toolbar. The program will present you with the Open File dialog box that allows you to browse to the correct drive, folder,
and file location and select the file you wish to open. Once you have located the file that you wish to open, click it and then click the
Open button.
The procedure will be opened in a new window and a tab for it will be added to the Window Tab Bar.
Saving a procedure
To save the procedure currently being viewed, select the Save command from the File menu on the Menu Bar. You can also click on
the Save File icon in the Toolbar. If the procedure has not previously been named, you will be presented with the Save As dialog box.
Select the location and filename that you would like to save the procedure as and click the Save button.
If the procedure has been previously named, the program will save the changes to the file.
Saving a procedure with a new name
To save the current procedure with a new filename, select the Save As… command from the File menu on the Menu Bar. You will be
presented with the Save As dialog box. Select the location and filename that you would like to save the procedure as and click the Save
button.
Deleting a procedure
Lockout PRO - Enterprise files are deleted through the Server Explorer. To delete a procedure file, locate it using the Server Explorer
accessed through the Admin > Server Explorer command in the main menu. Select the file and click the the Delete command.
Import Procedure File
You can upload one or more procedure files that are on your hard drive into the server repository by selecting Import > Procedure file
from the File menu. You will be presented with a dialog asking you to identify the files that you would like to upload. Select them and
click open and the files will be processed and uploaded.
Import Lockout PRO - Enterprise v1.0 Procedures
You can import and open a single Lockout PRO - Enterprise v1.0 procedure, or convert all v1.0 procedures in a selected directory.
To import and open a specific v1.0 procedure, select Import > v1.0 File from the File menu. You will be presented with a file selection
dialog box. Select the v1.0 .blp file that you wish to open and click the Open button. The procedure will be converted and opened.
To convert all v1.0 procedure files in a directory to v2.0 procedure files, select Import > Convert Multiple from the File menu. You will be
presented with a folder selection dialog box. Select the folder that contains the v1.0 .blp files that you wish to convert and click the OK
button. The files will be converted and a dialog showing the conversion progress will be displayed.
Procedure Layout
Machine-specific procedures can be created using either of two user-friendly graphical formats, the Short Form and the Long Form.
Short Form Procedure Format
The Short Form layout provides a page-based organization of the lockout process. By organizing the information within the context of
the available space on each page, the resulting procedure is concise and efficient, but the space constraints may limit the amount of
information that can be entered for each energy source. If you do not need to provide extensively detailed information or use more than
two images for one or more of the lockout steps, the Short Form is a good choice.
Layout
The Short Form is comprised of the Header, Images, Energy Source Table, and Footer.
Header – This section contains information identifying the machine that the procedure applies to, the number of lockout points on the
machine, any special notes, and the Lockout Application Process.
Images – This section contains one or two images of the machine and the energy source labels identifying the correct lockout points.
Energy Source Table – This section contains the steps necessary to lockout each individual energy source.
Footer – This section contains the Lockout Removal Process, the energy source color and abbreviation legend, and the current and
total page numbers.

- 12 -
Header
Editing the header
To edit the header information, select the Edit Header command from the Edit menu on the Menu Bar. You can also click on the Edit
Header icon in the Toolbar.
You will be presented with the Edit Header dialog box. Fill in the appropriate fields and click the OK button.
To disregard the changes that you’ve made, click the Cancel button.
Images
Inserting images into a procedure
To insert one or two images into the current page of the procedure, select the Edit Images command from the Edit menu on the Menu
Bar. You can also click on the Edit Images icon in the Toolbar.
You will be presented with the Edit Images dialog box. Click the Browse button in either the Image 1 or Image 2 section.
You will be presented with the Open Image dialog box. Select the image file that you would like to insert and click the Open button.
To insert an image title, type it in the Title text box once you have selected an image.
When you have selected the correct images and titles, click the OK button.
Changing an image
To edit the images that are on the current page of the procedure, select the Edit Images command from the Edit menu on the Menu
Bar. You can also click on the Edit Images icon in the Toolbar.
You will be presented with the Edit Images dialog box. Make the appropriate changes and click the OK button.
Removing an image
To remove an image that is on the current page of the procedure, select the Edit Images command from the Edit menu on the Menu
Bar. You can also click on the Edit Images icon in the Toolbar.
You will be presented with the Edit Images dialog box. Click the None button in the appropriate location section to remove the image.
When you have made the appropriate changes, click the OK button.
Modify an image
To modify an image that you wish to use in a procedure, click the Modify Image button in the section where you have previously
selected the image. This will open the image in the Modify Image dialog box. Make the desired changes by clicking the related buttons.
The preview thumbnail images above each button allow you to see the effect of the modification before it is applied to the main image.
To accept the changes that you have made, click the OK button. To cancel all changes and return to the previous dialog, click the
Cancel button. To undo all of the changes that you have made since opening the image in the Modify image box, click the Undo
Changes button.
Energy Sources
Inserting an energy source
To insert an energy source into the current page of the procedure, select the Add Energy Source command from the Edit menu on the
Menu Bar. You can also click on the Add Energy Source icon in the Toolbar.
You will be presented with the Add Energy Source dialog box. Select the energy type for the source that you are entering. The other
information sections will then become active. Make the appropriate selections from the drop-down menus to use the automatically
generated text. To use custom text, type it directly into the desired text box. If you would like to insert an energy source other than the
predefined types, first set it up in the Template Settings area of the program. Last, click on the energy source label located above the
upper right corner of the image preview and drag it over the image to the desired location over the image.
When you have made the appropriate selections, click the OK button to insert the energy source into the procedure. To disregard the
changes that you’ve made, click the Cancel button.
Editing an energy source
To edit an energy source on the current page of the procedure, select the Edit Energy Sources command from the Edit menu on the
Menu Bar. You can also click on the Edit Energy Sources section of the Toolbar.
You will be presented with the Edit Energy Sources dialog box.
Each of the energy sources currently found on the page being viewed will be available from the tabs along the top of the dialog. Make
any necessary modifications to the procedure table steps or the energy source label position over the image. When you have made the
appropriate modifications, click the OK button.
To disregard the changes that you’ve made, click the Cancel button.
Removing an energy source
To remove an energy source on the current page of the procedure, select the Edit Energy Sources command from the Edit menu on the
Menu Bar. You can also click on the Edit Energy Sources icon in the Toolbar.
You will be presented with the Edit Energy Sources dialog box.
Each of the energy sources currently found on the page being viewed will be available from the tabs along the top of the dialog. Switch
to the source that you wish to remove and click the Remove Energy Source # button in the lower right corner of the dialog.

- 13 -
Multiple Pages
Adding a page to a procedure
To add a page to the current procedure, select the Add Page command from the Edit menu on the Menu Bar. This will add a page to
the end of the current procedure and move the view to the new page. You can also click the Add Page button on the Toolbar or from
within the Manage Pages dialog.
Viewing pages within a procedure
To navigate through the pages within the current procedure, click the Next Page or Previous Page icons in the View Toolbar.
Removing a page from a procedure
To remove a page from the current procedure, select Manage Pages from the Edit menu on the Menu Bar. You can also click the
Manage Pages button on the Toolbar.
You will be presented with the Manage Pages dialog box. Select the page that you wish to remove and click the Remove button. Click
the OK button to apply the change and return to the procedure, or the cancel button to disregard the change and return to the
procedure.
Reordering the pages in a procedure
To move a page from the current procedure, select Manage Pages from the Edit menu on the Menu Bar. You can also click the
Manage Pages button on the Toolbar.
You will be presented with the Manage Pages dialog box. Select the page that you wish to move and click the Move Up or Move Down
buttons. Click the OK button to apply the change and return to the procedure, or the cancel button to disregard the change and return to
the procedure.
Long Form Procedure Format
The Long Form layout provides a content-based organization of the lockout process. By organizing the procedure according to the
amount of information entered, the procedure layout is flexible and comprehensive. If you need flexibility to provide detailed text
information or images for each of the lockout steps, the Long Form is a good choice.
Layout
The Long Form is comprised of the Header, Lockout Steps Table, and Footer.
Procedure Header – This section contains information identifying the machine that the procedure applies to, the number of lockout
points on the machine, any special notes, and the Lockout Application Process.
Lockout Step Table – This section contains the lockout steps. Each step may contain action and informational instructions, an
informational image, and may be related to a specific energy source.
Procedure Footer – This section contains the Lockout Removal Process, the energy source color and abbreviation legend, and the
current and total page numbers.
Header
Editing the header
To edit the header information, select the Edit Header command from the Edit menu on the Menu Bar. You can also click on the Edit
Header icon in the Toolbar.
You will be presented with the Edit Header dialog box. Fill in the appropriate fields and click the OK button.
To disregard the changes that you’ve made, click the Cancel button.
Lockout Steps
Inserting a Lockout Step
There are three optional components of each lockout step: the energy source, text, and image. Each step may contain any combination
of these components.
To insert a lockout step into the procedure, select the Add Step command from the Edit menu on the Menu Bar. You can also click on
the Add Step icon in the Toolbar. You will be presented with the Add Step dialog box.
If desired, select the energy type for the step that you are entering. If you would like to insert an energy source other than the
predefined types, first set it up in the Template Settings area of the program. The other information sections will then become active.
Make the appropriate selections from the drop-down menus to use the automatically generated text.
To use custom text whether you’ve selected an energy source or not, type it directly into the desired text box.
If you desire to insert an image into the info section of the step, click the Browse button in the Info Image section. Select the image that
you wish to use and click Open in the dialog that is displayed. When an image is inserted within the Info section, only an image title may
be entered, no additional text can be added.
If an image has been chosen and an energy source has been selected, you may place an energy source label over the image. Click the
Set button in the Label option of the Energy Source section. You will be presented with the Position Label dialog box. Click on the label
and drag it to the desired position over the image.
When you have made the appropriate selections, click the OK button to insert the step into the procedure. To disregard the changes
that you’ve made, click the Cancel button.
Editing a Lockout Step
To edit a Lockout Step, select the Edit Step command from the Edit menu on the Menu Bar. You can also click on the Edit Step icon in
the Toolbar.
After selecting the step to edit, you will be presented with the Edit Lockout Step dialog box. Make any necessary modifications to the
step, the energy source selection, label position, or image. When you have made the appropriate modifications, click the OK button.

- 14 -
To disregard the changes that you’ve made, click the Cancel button.
Removing a Lockout Step
To remove a Lockout Step, select the Remove Step command from the Edit menu on the Menu Bar. You can also click on the Remove
Step icon in the Toolbar.
Edit Procedure Template with the Lockout PRO – Enterprise Desktop Client
The template that the procedure is based on controls the titles, text, colors, and layout of the procedure. These settings can be edited
from the Edit Template dialog box.
Header Settings
The titles used within the header fields can be edited in the Procedure Header tab of the Edit Template dialog box. Make any desired
changes to the titles in this tab. The logo used at the top of the procedures can also be changed in this tab. To change the image used
in the header, click the Browse button underneath the logo preview. You will be presented with the Select Logo dialog. Browse to and
select the file you wish to insert into the header. Select the file and click the Open button. The image will be inserted into the logo
preview box.
Energy Sources
The energy sources that are available to be used within the Lockout procedures, and all settings related to them, can be modified in the
Energy Sources tab of the Edit Template dialog box.
Add Energy Source
To add an energy source click the New button below the energy source preview box. A new energy source will be added to the end of
the energy source list and it will be pre-selected to be edited. This energy source will then be available as an option when adding an
energy source to a Short Form procedure and a step in a Long Form procedure.
Edit Energy Source
To edit an energy source, select it from the energy source list box, then click the Edit button. The energy source will be selected and its
settings activated in the settings boxes. Edit the energy type and abbreviation text, or click on the Select button to select the color or
energy source icon.
After all changes are made, click the Save button to save the changes. To cancel any changes, click the Cancel button.
Remove Energy Source
You may remove any energy source that is not currently used in the active procedure.
To remove an energy source, first select it from the energy source list box, then click the Remove button. This will remove the energy
source from the template and it will no longer be available when editing a Lockout procedure.
Label Settings
From the Label settings section of the Energy Sources tab you can control the layout of the automatically generated energy source
labels and the information fields that are printed on the energy source labels when they are printed.
Procedure Body Settings
The Procedure body tab of the Edit template dialog contains the settings for the text and titles used within the body of the Lockout
procedures. This includes the title and text of the lockout application and removal process boxes, and the titles of the lockout step and
energy source table columns.
Predefined Notes
The predefined notes can be added to, edited, or removed from the Misc. tab of the Edit Template dialog box.
Predefined Lockout Devices
The predefined lockout devices can be added to, edited, or removed from the Misc. tab of the Edit Template dialog box.
Change Current Procedure Template
The Edit Template dialog controls the template settings for the currently active procedure. To change the current procedure’s template,
select Edit Template from the Edit menu in the Menu Bar. You can also click the Edit Template icon in the Toolbar. After making any
necessary changes, click the OK button to apply the changes to the current procedure only.
Change Default Template Used For New Procedures
All newly created procedures inherit their template settings from the program default template settings. To change the default template
settings, open a procedure or create a new procedure, then open the Edit Template dialog by selecting Edit Template from the Edit
menu in the Menu Bar. You can also click the Edit Template icon in the Toolbar. Make any desired changes or additions to the template
settings. Check the Also Set as Program Default checkbox. This will apply the settings to the current procedure and save them as the
program default. All procedures created after this will be based on these settings.
Undo Template Setting Changes
A procedure’s template settings can be returned to either the currently defined program default settings, or to the original default
Lockout PRO - Enterprise settings.
To return the template settings to the program default, click the Reset to Program Default button in the lower left of the Edit Template
Settings dialog. This will restore the settings to the currently defined program default settings. Any energy sources used within the
current procedure that are not in the program default settings will remain.
To return the template settings to the original Lockout PRO - Enterprise default, click the Reset to Original Settings button in the lower
left of the Edit Template Settings dialog. This will restore the settings to the original default Lockout PRO - Enterprise settings. Any
energy sources used within the current procedure that are not in the original settings will remain.

- 15 -
Procedure View Settings
The procedure window allows you to adjust the view to suit your editing needs. The icons and buttons in the Procedure View Toolbar
allow you to zoom in or out on the procedure, view multiple pages at once, and move between the pages of the procedure.
You can also split the procedure view by clicking on the horizontal line above the vertical scrollbar and dragging it downwards. This will
allow you to view separate areas of the procedure at once.
Printing Procedures
To print a Lockout procedure, select Print from the File menu or click the Print icon in the Toolbar. You will be presented with the Print/
Preview dialog box. This allows you to preview the final output on the select printer with the selected settings. To send the print to the
printer, click the Print button.
Printing Energy Source Labels
You can print energy source labels for each of the energy sources in the procedure to a Brady GlobalMark, Brady HandiMark, or Brady
label blanks on a standard office printer. With a procedure that has at least one energy source defined, select Print Energy Labels from
the File menu. You will be presented with the Print Energy Labels dialog box. This allows you to preview the final output on the selected
printer with the selected settings. To send the print to the printer, click the Print button.
Printing Lockout Tags
You can print a lockout tag for each of the energy sources in the procedure to a Brady GlobalMark or Brady label blanks on a standard
office printer. With a procedure that has at least one energy source defined, select Print Lockout Tags from the File menu. You will be
presented with the Print Lockout Tags dialog box. This allows you to preview the final output on the selected printer with the selected
settings. Fill in the information for the tag, and click the Print button to send the print to the printer.
Export Procedure to PDF
To save a procedure as a PDF file, select Export > To PDF from the File menu. You will be presented with a Save File dialog. Select
the location and name that you wish to use for the PDF file and click the Save button. The procedure will be saved as a PDF file.
Export Procedure to a TIFF File
To save a procedure as a TIFF image file, select Export > To Color Tiff or Export > To Black and White Tiff from the File menu. You will
be presented with a Save File dialog. Select the location and name that you wish to use for the Tiff file and click the Save button. The
procedure will be saved as a Tiff file.
Export Procedure to a Local Drive
To save a procedure as a TIFF image file, select Export > To Color Tiff or Export > To Black and White Tiff from the File menu. You will
be presented with a Save File dialog. Select the location and name that you wish to use for the Tiff file and click the Save button. The
procedure will be saved as a Tiff file.
Lockout PRO - Enterprise Tips
All of the commands within the Edit menu in the Menu Bar can be accessed in an menu selected by right clicking anywhere on the
procedure.
Becoming familiar with and utilizing the toolbar buttons will greatly speed up the process of creating procedures.
Integrating Lockout PRO - Enterprise files with other systems
The server maintains an up-to-date copy of each procedure in PDF format. This allows you to integrate the files with any Windows-
based program that can link to external files for opening and/or printing, including most modern CMMS, ERP, and document
management systems. Check with the documentation of the system that you wish to incorporate Lockout PRO - Enterprise procedure
files into to determine if that system is capable of linking to, referencing, or attaching external files, and for instructions on how to do so.
Printing to a Brady GlobalMark
Lockout procedures, lockout tags, and energy source labels can all be printed with a Brady GlobalMark using any of the various
materials that are available in the 4” width.
To print to a GlobalMark from within Lockout PRO - Enterprise, you must set up your system to meet the following requirements:
The installed tape must be 4” wide.
To print procedures you must have a 16” panel process color ribbon installed.
To print procedures you may use an 8” or 16” panel process color ribbon.
The GlobalMark must have the word “GlobalMark” in its name as configured within Windows.
Printing to a Brady HandiMark
Energy source labels can be printed with a Brady HandiMark using any of the various color ribbons and tape materials that are
available in the 2” width.
To print to a HandiMark from within Lockout PRO - Enterprise, you must set up your system to meet the following requirements:
The installed tape must be 2” wide.
The label length must be set to 4” within the Printer Preferences in Windows.
The HandiMark must be installed on and connected locally to your computer.
The HandiMark must have the word “HandiMark” in its name as configured within Windows.

- 16 -
Lockout PRO – Enterprise Server Utilities
Reset User Information
If you are have purchased a license other than the server or corporate licenses, the system will allow access only to the number of
users that you have licenses for. There is no need to configure each individual user, the system will automatically add each user in the
order that they access the system. Additionally, inactive user’s accounts will automatically become open for other users to access.
However, if you need to reset the list of authorized users the use the utility file ResetUsers.exe found in the Server\Utilities folder of
the installation CD.
Repair PDF Files Synchronize in the Repository
If you have manually moved or deleted the files or folders within the \LockoutPRO\Repository directory the PDF file synchronization
may have been affected causing Web Viewer users to have trouble viewing certain files. If this has happened, you can repair the file
synchronization using the SynchronizePDF.exe utility found in the Server\Utilities folder of the installation CD.

- 17 -
Versión 2.0
Manual de Uso

- 18 -
Contenido
Technical Support Numbers...................................................................................................................................
Canada ................................................................................................................................................................
Mexico................................................................................................................................................................
Brazil ..................................................................................................................................................................
Guía de inicio rápido..............................................................................................................................................
Introducción a Brady Lockout PRO - Enterprise.....................................................................................................
Bienvenido a Lockout PRO - Enterprise...............................................................................................................
Requisitos del sistema............................................................................................................................................
Instalación de Lockout PRO - Enterprise................................................................................................................
Desinstalación de Lockout PRO - Enterprise ..........................................................................................................
Uso de Lockout PRO - Enterprise...........................................................................................................................
Abrir Lockout PRO - Enterprise...........................................................................................................................
Diseño del programa............................................................................................................................................
Secciones...............................................................................................................................................................
Creación de procedimientos ...................................................................................................................................
Sistema de archivos .............................................................................................................................................
Crear un procedimiento nuevo .............................................................................................................................
Abrir un procedimiento existente .........................................................................................................................
Guardar un procedimiento ...................................................................................................................................
Guardar un procedimiento con un nombre nuevo .................................................................................................
Diseño del procedimiento.......................................................................................................................................
Formato de Formulario de Procedimiento Corto...................................................................................................
Encabezado............................................................................................................................................................
Cómo editar el encabezado ..................................................................................................................................
Imágenes................................................................................................................................................................
Insertar imágenes en un procedimiento ................................................................................................................
Cambiar una imagen............................................................................................................................................
Eliminar una imagen............................................................................................................................................
Modificar una imagen..........................................................................................................................................
Fuentes de energía..................................................................................................................................................
Insertar una fuente de energía ..............................................................................................................................
Editar una fuente de energía.................................................................................................................................
Eliminar una fuente de energía.............................................................................................................................
Múltiples páginas...................................................................................................................................................
Agregar una página a un procedimiento ...............................................................................................................
Ver las páginas de un procedimiento....................................................................................................................
Eliminar una página de un procedimiento ............................................................................................................
Reordenar las páginas de un procedimiento..........................................................................................................
Formulario de Procedimiento Largo .......................................................................................................................
Diseño.................................................................................................................................................................
Encabezado............................................................................................................................................................
Editar Encabezado...............................................................................................................................................
Pasos de Bloqueo...................................................................................................................................................
Insertar un Paso de Bloqueo.................................................................................................................................
Editar un Paso de Bloqueo...................................................................................................................................
Eliminar un Paso de Bloqueo...............................................................................................................................
Editar la Plantilla del Procedimiento.......................................................................................................................

- 19 -
Ajustes de Encabezado ........................................................................................................................................
Fuentes de Energía.................................................................................................................................................
Adicionar Fuente de Energía................................................................................................................................
Editar Fuente de Energía......................................................................................................................................
Eliminar Fuente de Energía..................................................................................................................................
Ajustes de Etiquetas...............................................................................................................................................
Ajustes del Cuerpo del Procedimiento ....................................................................................................................
Notas Predefinidas...............................................................................................................................................
Equipos de Bloqueo Predefinidos.........................................................................................................................
Cambiar la Plantilla del Procedimiento Actual .....................................................................................................
Cambiar la Plantilla Predeterminada a usar en los Procedimientos Nuevos...........................................................
Deshacer los Ajustes de Plantilla..........................................................................................................................
Ajustes de Visualización del Procedimiento ...........................................................................................................
Imprimir Procedimientos .....................................................................................................................................
Imprimir Etiquetas de Fuentes de Energía............................................................................................................
Imprimir Etiquetas de Bloqueo y Etiquetado........................................................................................................
Exportar un Procedimiento como PDF.................................................................................................................
Exportar un Procedimiento como Archivo Tiff.....................................................................................................
Consejos Lockout PRO - Enterprise.....................................................................................................................
Integración de archivos de Lockout PRO - Enterprise con otros sistemas................................................................
Imprimir con el GlobalMark de Brady....................................................................................................................
Imprimir con el HandiMark de Brady ..................................................................................................................

- 20 -
Technical Support Numbers
United States and other C/S countries
Canadá
México
Brasil
Tel: 800-368-3362
Fax: 414-228-5799
Email: [email protected]
Tel: 888-262-7576
Fax: 905-764-5557
Email: [email protected]
Tel: 800-368-3362
Fax: 525-527-5586
Email: [email protected]
Tel (PABX): 55 11 3686-4720
Tel (Direct): 55 11 3686-5697
Fax: 55 11 3686-5236
Email: [email protected]
A página está carregando ...
A página está carregando ...
A página está carregando ...
A página está carregando ...
A página está carregando ...
A página está carregando ...
A página está carregando ...
A página está carregando ...
A página está carregando ...
A página está carregando ...
A página está carregando ...
A página está carregando ...
A página está carregando ...
A página está carregando ...
A página está carregando ...
A página está carregando ...
A página está carregando ...
A página está carregando ...
A página está carregando ...
A página está carregando ...
A página está carregando ...
A página está carregando ...
A página está carregando ...
A página está carregando ...
A página está carregando ...
A página está carregando ...
A página está carregando ...
A página está carregando ...
A página está carregando ...
A página está carregando ...
A página está carregando ...
A página está carregando ...
A página está carregando ...
A página está carregando ...
A página está carregando ...
A página está carregando ...
A página está carregando ...
A página está carregando ...
A página está carregando ...
A página está carregando ...
A página está carregando ...
A página está carregando ...
A página está carregando ...
A página está carregando ...
A página está carregando ...
A página está carregando ...
A página está carregando ...
A página está carregando ...
A página está carregando ...
A página está carregando ...
A página está carregando ...
-
 1
1
-
 2
2
-
 3
3
-
 4
4
-
 5
5
-
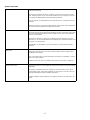 6
6
-
 7
7
-
 8
8
-
 9
9
-
 10
10
-
 11
11
-
 12
12
-
 13
13
-
 14
14
-
 15
15
-
 16
16
-
 17
17
-
 18
18
-
 19
19
-
 20
20
-
 21
21
-
 22
22
-
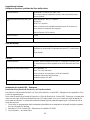 23
23
-
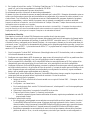 24
24
-
 25
25
-
 26
26
-
 27
27
-
 28
28
-
 29
29
-
 30
30
-
 31
31
-
 32
32
-
 33
33
-
 34
34
-
 35
35
-
 36
36
-
 37
37
-
 38
38
-
 39
39
-
 40
40
-
 41
41
-
 42
42
-
 43
43
-
 44
44
-
 45
45
-
 46
46
-
 47
47
-
 48
48
-
 49
49
-
 50
50
-
 51
51
-
 52
52
-
 53
53
-
 54
54
-
 55
55
-
 56
56
-
 57
57
-
 58
58
-
 59
59
-
 60
60
-
 61
61
-
 62
62
-
 63
63
-
 64
64
-
 65
65
-
 66
66
-
 67
67
-
 68
68
-
 69
69
-
 70
70
-
 71
71


