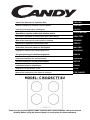
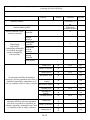
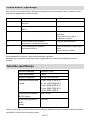
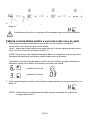
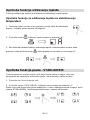
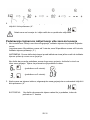
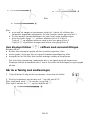
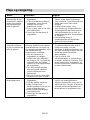
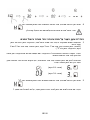
Candy CI642C/4U Manual do usuário
- Categoria
- Fogões
- Tipo
- Manual do usuário
Este manual também é adequado para

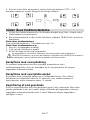
Instruction Manual For Induction Hob
ENGLISH
Návod k použití pro indukční varnou desku
ČEŠTINA
Instrukcja obsługi płyty indukcyjnej
POLSKI
Navodila za uporabo indukcijske kuhalne plošče
SLOVENŠČINA
Priručnik s uputama za indukcijsku ploču za kuhanje
HRVATSKI
Manual de instrucțiuni pentru plită cu inducție
ROMÂNĂ
Uputstvo za upotrebu indukcijske ploče
SRPSKI
Használati útmutató indukciós főzőlaphoz
MAGYAR
Εγχειρίδιο οδηγιών για επαγωγική εστία
ΕΛΛΗΝΙΚΑ
Brugervejledning til induktionskogeplade
DANSK
Instruktionsmanual för induktionshäll
SVENSKA
Bruksanvisning for induksjonskokeplate
NORSK
Induktiokeittotason käyttöopas
SUOMI
היצקודניא יריכ רובע תוארוה ךירדמ
תירבע
MODEL: CIS642SCTT/4U
Thank you for purchasing the CANDY induction hob. Please read this instruction manual
carefully before using the hob and keep it in a safe place for future reference.
Manual de instruções para placa de indução
PORTUGUÊS

EN-1
By placing the mark on this product, we are
confirming compliance to all relevant European
safety, health and environmental requirements
which are applicable in legislation for this
product.
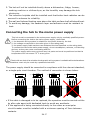
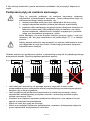
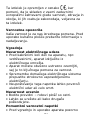
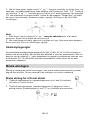
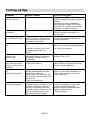
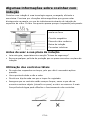
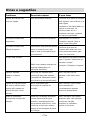
Safety Warnings
Your safety is important to us. Please read this
information before using your cooktop.
Installation
Electrical Shock Hazard
• Disconnect the appliance from the mains
electricity supply before carrying out any work
or maintenance on it.
• Connection to a good earth wiring system is
essential and mandatory.
• Alterations to the domestic wiring system must
only be made by a qualified electrician.
• Failure to follow this advice may result in
electrical shock or death.
Cut Hazard
• Take care - panel edges are sharp.
• Failure to use caution could result in injury or
cuts.
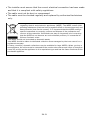
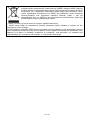
Important safety instructions
• Read these instructions carefully before
installing or using this appliance.
• No combustible material or products should be

EN-2
placed on this appliance at any time.
• Please make this information available to the
person responsible for installing the appliance
as it could reduce your installation costs.
• In order to avoid a hazard, this appliance must
be installed according to these instructions for
installation.
• This appliance is to be properly installed and
earthed only by a suitably qualified person.
• This appliance should be connected to a circuit
which incorporates an isolating switch
providing full disconnection from the power
supply.
• Failure to install the appliance correctly could
invalidate any warranty or liability claims.
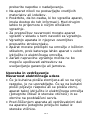
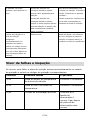
Operation and maintenance
Electrical Shock Hazard
• Do not cook on a broken or cracked cooktop. If
the cooktop surface should break or crack, switch
the appliance off immediately at the mains power
supply (wall switch) and contact a qualified
technician.
• Switch the cooktop off at the wall before
cleaning or maintenance.
• Failure to follow this advice may result in
electrical shock or death.
Health Hazard
• This appliance complies with electromagnetic

EN-3
safety standards.
• However, persons with cardiac pacemakers or
other electrical implants (such as insulin
pumps) must consult with their doctor or
implant manufacturer before using this
appliance to make sure that their implants will
not be affected by the electromagnetic field.
• Failure to follow this advice may result in death.
Hot Surface Hazard
• During use, accessible parts of this appliance
will become hot enough to cause burns.
• Do not let your body, clothing or any item other
than suitable cookware contact the Induction
glass until the surface is cool.
• Metallic objects such as knives, forks, spoons
and lids should not be placed on the hob surface
since they can get hot
• Keep children away.
• Handles of saucepans may be hot to touch.
Check saucepan handles do not overhang other
cooking zones that are on. Keep handles out of
reach of children.
• Failure to follow this advice could result in
burns and scalds.
Cut Hazard
• The razor-sharp blade of a cooktop scraper is
exposed when the safety cover is retracted. Use
with extreme care and always store safely and
out of reach of children.
• Failure to use caution could result in injury or
cuts.

EN-4
Important safety instructions
• Never leave the appliance unattended when in
use. Boilover causes smoking and greasy
spillovers that may ignite.
• Never use your appliance as a work or storage
surface.
• Never leave any objects or utensils on the
appliance.
• Do not place or leave any magnetisable objects
(e.g. credit cards, memory cards)or electronic
devices (e.g. computers, MP3 players) near the
appliance, as they may be affected by its
electromagnetic field.
• Never use your appliance for warming or
heating the room.
• After use, always turn off the cooking zones
and the cooktop as described in this manual (i.e.
by using the touch controls). Do not rely on the
pan detection feature to turn off the cooking
zones when you remove the pans.
• Do not allow children to play with the appliance
or sit, stand, or climb on it.
• Do not store items of interest to children in
cabinets above the appliance. Children climbing
on the cooktop could be seriously injured.
• Do not leave children alone or unattended in
the area where the appliance is in use.
• Children or persons with a disability which
limits their ability to use the appliance should

EN-5
have a responsible and competent person to
instruct them in its use. The instructor should be
satisfied that they can use the appliance without
danger to themselves or their surroundings.
• Do not repair or replace any part of the
appliance unless specifically recommended in the
manual. All other servicing should be done by a
qualified technician.
• Do not use a steam cleaner to clean your
cooktop.
• Do not place or drop heavy objects on your
cooktop.
• Do not stand on your cooktop.
• Do not use pans with jagged edges or drag pans
across the Induction glass surface as this can
scratch the glass.
• Do not use scourers or any other harsh
abrasive cleaning agents to clean your cooktop,
as these can scratch the Induction glass.
• If the supply cord is damaged, it must be
replaced by the manufacturer, its service agent
or similarly qualified persons in order to avoid a
hazard.
•This appliance is intended to be used in
household and similar applications such as:
-staff kitchen areas in shops, offices and other
working environments; -farm houses; -by
clients in hotels, motels and other residential
type environments; -bed and breakfast type
environments.
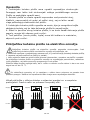
•WARNING: The appliance and its accessible
parts become hot during use.

EN-6
Care should be taken to avoid touching heating
elements.
Children less than 8 years of age shall be kept
away unless continuously supervised.
•This appliance can be used by children aged
from 8 years and above and persons with
reduced physical, sensory or mental capabilities
or lack of experience and knowledge if they have
been given supervision or instruction concerning
use of the appliance in a safe way and
understand the hazards involved.
•Children shall not play with the appliance.
Cleaning and user maintenance shall not be
made by children without supervision.
•WARNING: Unattended cooking on a hob with
fat or oil can be dangerous and may result in fire.
NEVER try to extinguish a fire with water, but
switch off the appliance and then cover flame e.g.
with a lid or a fire blanket.
•WARNING: Danger of fire: do not store items on
the cooking surfaces.
• Warning: If the surface is cracked, switch off
the appliance to avoid the possibility of electric
shock, for hob surfaces of glass-ceramic or
similar material which protect live parts
•A steam cleaner is not to be used.
•The appliance is not intended to be operated by
means of an external timer or separate
remote-control system.

EN-7
CAUTION: The cooking process has to be
supervised. A short term cooking process has to
be supervised continuously.
WARNING: In order to prevent tipping of the
appliance, this stabilizing means must be
installed. Refer to the instructions for
installation.
WARNING: Use only hob guards designed by the
manufactuer of the cooking appliance or
indicated by the manufacture of the appliance in
the instruction for use as suitable or hob guards
incorporated in the appliance. The use of
inappropriate guards can cause accidents.
This appliance incorporates an earth connection
for functional purposes only.
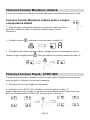
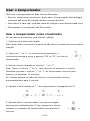
Congratulations on the purchase of your new Induction Hob.
We recommend that you spend some time to read this Instruction / Installation
Manual in order to fully understand how to install correctly and operate it.
For installation, please read the installation section.
Read all the safety instructions carefully before use and keep this Instruction /
Installation Manual for future reference.

EN-8
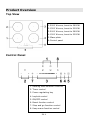
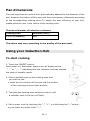
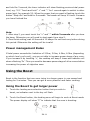
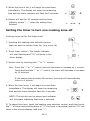
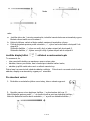
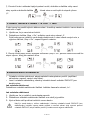
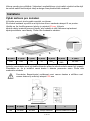
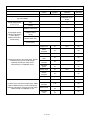
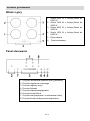
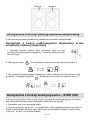
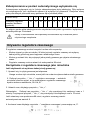
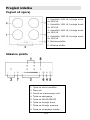
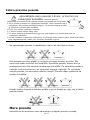
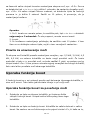
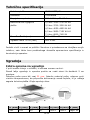
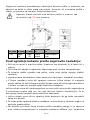
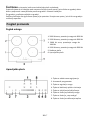
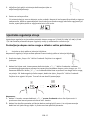
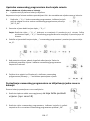
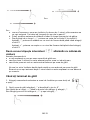
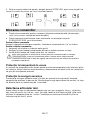
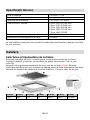
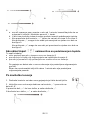
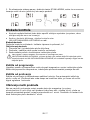
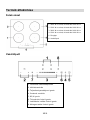
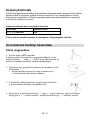
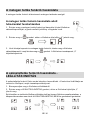
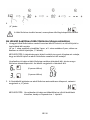
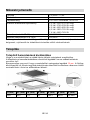
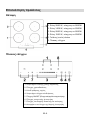
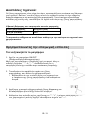
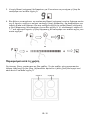
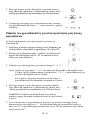
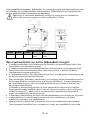
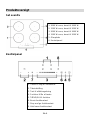
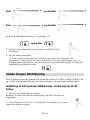
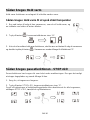
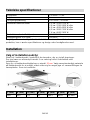
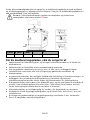
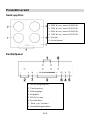
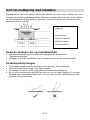
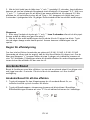
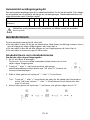
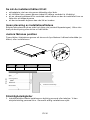
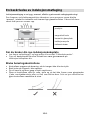
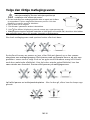
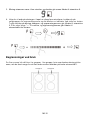
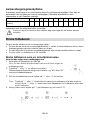
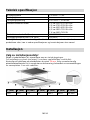
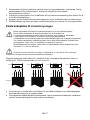
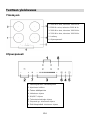
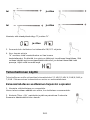
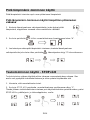
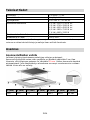
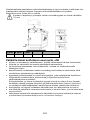
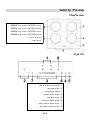
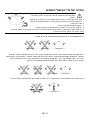
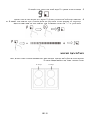
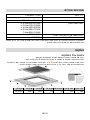
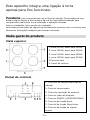
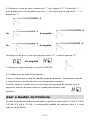
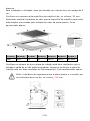
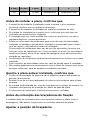
Product Overview
Top View
Control Panel
1.2000 W zone, boost to 2600W
2.1500 W zone, boost to 2000W
3.2000 W zone, boost to 2600W
4.1500 W zone, boost to 2000W
5.Glass plate
6.Control panel
1. Heating zone selection controls
2. Timer control
3. Power regulating key
4. keylock control
5. ON/OFF control
6. Boost function control
7. Stop and go function control
8. Keep warm function control

EN-9
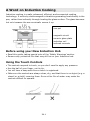
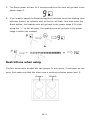
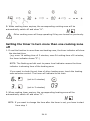
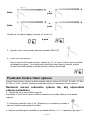
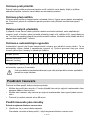
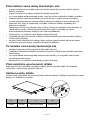
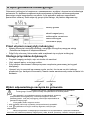
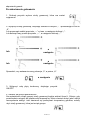
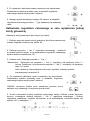
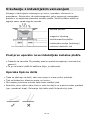
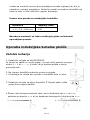
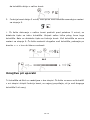
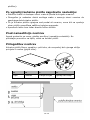
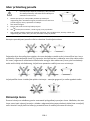
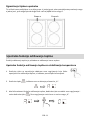
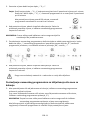
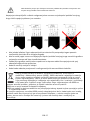
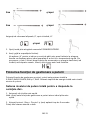
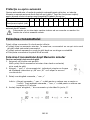
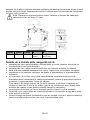
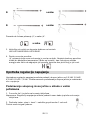
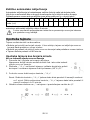
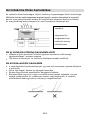
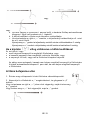
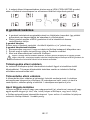
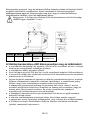
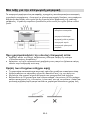
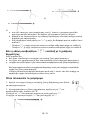
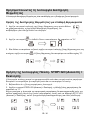
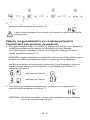
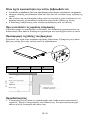
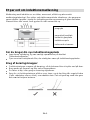
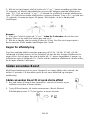
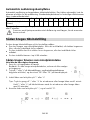
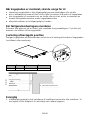
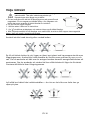
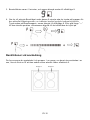
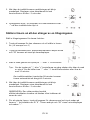
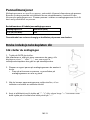
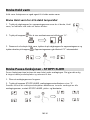
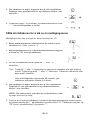
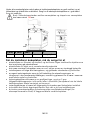
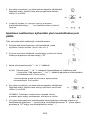
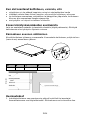
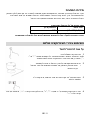
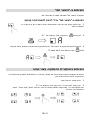
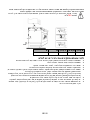
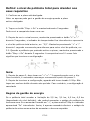
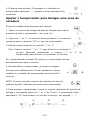
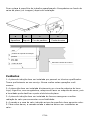
A Word on Induction Cooking
Induction cooking is a safe, advanced, efficient, and economical cooking
technology. It works by electromagnetic vibrations generating heat directly in the
pan, rather than indirectly through heating the glass surface. The glass becomes
hot only because the pan eventually warms it up.
Before using your New Induction Hob
• Read this guide, taking special note of the ‘Safety Warnings’ section.
• Remove any protective film that may still be on your Induction hob.
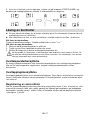
Using the Touch Controls
• The controls respond to touch, so you don’t need to apply any pressure.
• Use the ball of your finger, not its tip.
• You will hear a beep each time a touch is registered.
• Make sure the controls are always clean, dry, and that there is no object (e.g. a
utensil or a cloth) covering them. Even a thin film of water may make the
controls difficult to operate.
iron pot
magnetic circuit
ceramic glass plate
induction coil
induced currents

EN-10
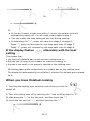
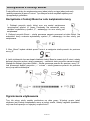
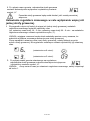
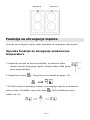
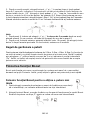
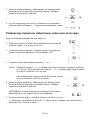
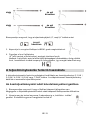
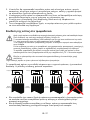
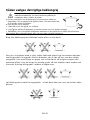
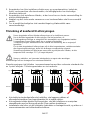
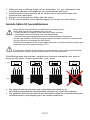
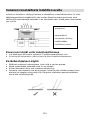
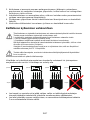
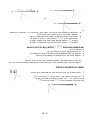
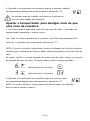
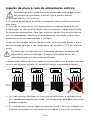
Choosing the right Cookware
• Only use cookware with a base suitable for induction
cooking. Look for the induction symbol on the
packaging or on the bottom of the pan.
• You can check whether your cookware is suitable by carrying out
a magnet test. Move a magnet towards the base of the pan. If it
is attracted, the pan is suitable for induction.
• If you do not have a magnet:
1. Put some water in the pan you want to check.
2. If does not flash in the display and the water is heating, the pan is suitable.
• Cookware made from the following materials is not suitable: pure stainless steel, aluminium or
copper without a magnetic base, glass, wood, porcelain, ceramic, and earthenware.
Do not use cookware with jagged edges or a curved base.
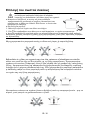
Make sure that the base of your pan is smooth, sits flat against the glass, and is
the same size as the cooking zone. Use pans whose diameter is as large as the
graphic of the zone selected. Using a pot a slightly wider energy will be used at its
maximum efficiency. If you use smaller pot efficiency could be less than expected.
Always centre your pan on the cooking zone.
Always lift pans off the Induction hob – do not slide, or they may scratch the glass.

EN-11
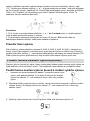
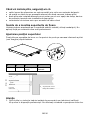
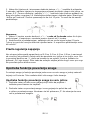
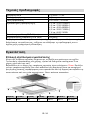
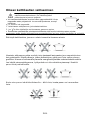
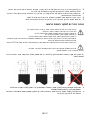
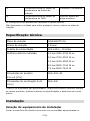
Pan dimensions
The cooking zones are up to a limit, automatically adapted to the diameter of the
pan. However the bottom of this pan must have a minimum of diameter according
to the corresponding cooking zone. To obtain the best efficiency of your hob,
please place the pan in the centre of the cooking zone.
The base diameter of induction cookware
Cooking zone Minimum (mm)
1,2,3,4 (180mm) 120
The above may vary according to the quality of the pan used.
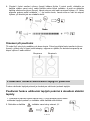
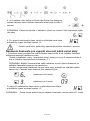
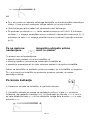
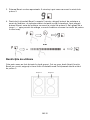
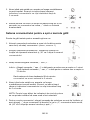
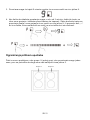
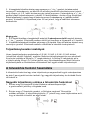
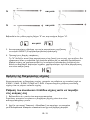
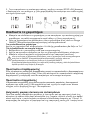
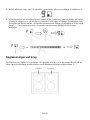
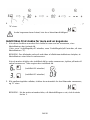
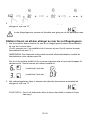
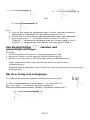
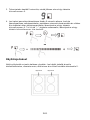
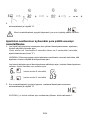
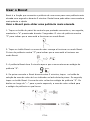
Using your Induction Hob
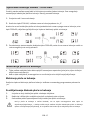
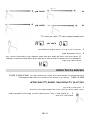
To start cooking
1. Touch the ON/OFF control.
After power on, the buzzer beeps once, all displays sh
ow
“ – “ or “ – – “, indicating that the induction hob has entered
the state of standby mode.
2. Place a suitable pan on the cooking zone that
you wish to use.
• M
ake sure the bottom of the pan and the surface
of the cooking zone are clean and dry.
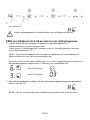
3. Touching the heating zone selection control, and
a indicator next to the key will flash.
4. Set a power level by touching the “-”, “+”, or slide along the “—”control,
or just touch any point of the “—”.

EN-12
Or
Or
a. If you don’t select a heat zone within 1 minute, the ceramic hob will
automatically switch off. You will need to start again at step 1.
b. You can modify the heat setting at any time during cooking.
c. If slide along the “—”, power will vary from stage 2 to stage 8.
Press “-”, power will decrease by one stage each time till stage 0.
Press “+”, power will increase by one stage each time till stage 9.
If the display flashes alternately with the heat
setting
This means that:
• you have not placed a pan on the correct cooking zone or,
• the pan you’re using is not suitable for induction cooking or,
• the pan is too small or not properly centred on the cooking zone.
No heating takes place unless there is a suitable pan on the cooking zone.
The display will automatically turn off after 1 minutes if no suitable pan is placed
on it.
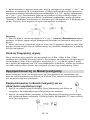
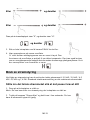
When you have finished cooking
1. Touching the heating zone selection control that you wish to
switch off.
2. Turn the cooking zone off by touching the “-”and scrolling down to “0”.
Or slide along the “—” to the left point, and then touch the “-”.
Or touch the left point of “—”, and then touching the “-”.

EN-13
Or and then
Or and then
Make sure the power display shows “0”, then shows “H”.
and then
3. Turn the whole cooktop off by touching the
ON/OFF control.
4. Beware of hot surfaces
‘H’ will show which cooking zone is hot to touch. It will disappear when the
surface has cooled down to a safe temperature. It can also be used as an
energy saving function if you want to heat further pans, use the hotplate
that is still hot.
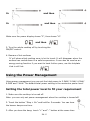
Using the Power Management
Using power management you can set the total power to 2.5kW/ 3.0kW/ 4.5kW/
6.5kW and 7.4kW. The default total power setting is the maximum power level.
Setting the total power level to fit your requirement
1. Make sure the cooktop is turned off.
Note: you can only set power management when the cooktop is turned off.
2. Touch the button “Stop + Go” and hold for 5 seconds. You can hear
the buzzer beeps one time.
3. After you hear the beep, touch “+” and “-” button at the same time

EN-14
and hold for 3 second, the timer indicator will show flashing previous total power
level, e.g. ‘2.5’. Touch and hold ” +” and ”-” for 1 second again to switch to other
power level, for example 3.0. When the power that you want is flashing, touch the
button “Stop+Go” and hold for 5 seconds. The buzzer will beep 10 times. It means
you have finished the setting.
Note:
1. After step 2, you must touch the “+” and “-” within 3 seconds after you hear
the beep. Otherwise you will need to start again from step 2.
2. Once finish setting, wait till the end of 10 beeps. Do not touch any button during
this period. Otherwise the setting will be invalid.
Power management Rules
If total power exceeds the limitation of 2.5kw, 3.0kw, 4.5kw, 6.5kw (depending
on which level you’ve set), you are not able to increase power stage of any zone.
If you increase it by touching ‘+’, the cooktop will beep 3 times and indicator will
show a flashing ‘Pn’. Thus you need to decrease power stage of other zones before
increasing the power of objective zone.
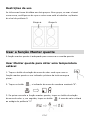
Using the Boost
Boost is the function that one zone rising to a larger power in one second and
lasting for 5 minutes. Thus you can get a more powerful and faster cooking.
Using the Boost to get larger power
1. Touch the heating zone selection button that you wish to
boost, an indicator next to the key will flash.
2. Touch the Boost button, the heating zone will begin to work at Boost mode.
The power display will show “P” to indicate that the zone is boosting.

EN-15
3. The Boost power will last for 5 minutes and then the zone will go back to the
power stage 9.
4. If you want to cancel the Boost during this 5 minutes, touch the heating zone
selection button, an indicator next to the key will flash. And then touch the
Boost button, the heating zone will go back to the power stage 9. Or slide
along the “—” to the left point, the heating zone will go back to the power
stage in which you touched.
Or
Restrictions when using
The four zones were divided into two groups. In one group, if use boost on one
zone, first make sure that the other zone is working on/below power level 5.

EN-16
Using the Keep warm
Keep warm function is suitable for keeping food warm.
Using the Keep warm to get stable temperature
1. Touch the heating zone selection button that you wish to
use keep warm, an indicator next to the key will flash.
2. Touch the button
, the cooking zone indicator will display “A”.
3.
If you want to cancel the keep warm, touch the heating zone selection
button, and then touch the button . The heating zone will go back to
“0” power stage.
Using the Pause function- STOP+GO
Pause function can be used at any time during cooking. It allows to stop the
induction cooktop and come back to it.
1. Make sure the cook zone is working.
2. Touch the button STOP+GO, the cooking zone indicator will show “ll”.
And then the operation of the induction cooktop will be deactivate within the scope
of all cooking zones, except the STOP+GO, on/off and lock keys.

EN-17
3. To cancel the pause status, touch the button STOP+GO , then the cooking zone
will go back to the power stage which you set before.
Locking the Controls
• You can lock the controls to prevent unintended use (for example children
accidentally turning the cooking zones on).
• When the controls are locked, all the controls except the ON/OFF control are
disabled.
To lock the controls
Touch the keylock control. The timer indicator will show “ Lo “
To unlock the controls
1. Make sure the Induction hob is turned on.
2. Touch and hold the keylock control for a while
3. You can now start using your Induction hob.
When the hob is in the lock mode, all the controls are disable except the ON/OFF,
you can always turn the induction hob off with the ON/OFF control in an emergency,
but you shall unlock the hob first in the next operation.
Over-Temperature Protection
A temperature sensor equipped can monitor the temperature inside the Induction
hob. When an excessive temperature is monitored, the Induction hob will stop
operation automatically.
Over-spillage Protection
Over-spillage protection is a safety protection function. It switch off the hob
automatically within 10s if the water flow to the control panel, while buzzer will
beep 1 second.
Detection of Small Articles
When an unsuitable size or non-magnetic pan (e.g. aluminium), or some other
small item (e.g. knife, fork, key) has been left on the hob, the hob automatically
go on to standby in 1 minute. The fan will keep cooking down the induction hob for
a further 1 minute.

EN-18
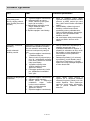
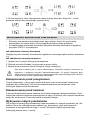
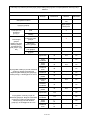
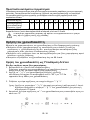
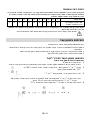
Auto Shutdown Protection
Auto shut down is a safety protection function for your induction hob. It shut down
automatically if ever you forget to turn off your cooking. The default working times
for various power levels are shown in the below table:
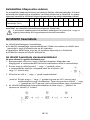
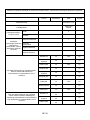
Power level
1
2
3
4
5
6
7
8
9
A
II
Default working timer
(hour)
8
8
8
4
4
4
2
2
2
2
2
When the pot is removed, the induction hob can stop heating immediately and the
hob automatically switch off after 2 minutes.
People with a heart pace maker should consult with their doctor before
using this unit.
Using the Timer
You can use the timer in two different ways:
• You can use it as a minute minder. In this case, the timer will not turn any
cooking zone off when the set time is up.
• You can set it to turn one cooking zone off after the set time is up.
• You can set the timer up to 99 minutes.
Using the Timer as a Minute Minder
If you are not selecting any cooking zone
1. Make sure the cooktop is turned on.
Note: you can use the minute minder even if you’re not selecting any cooking
zone.
2. Touch “-’ or “+” of the timer control, the minder indicator will start
flashing and “99” or “01” will show in the timer display.
3. Set the time by touching the “-” or “+” control
Hint: Touch the “-” or “+” control once to decrease or increase by 1 minute.
Hold the “-” or “+” control of the timer to decrease or increase by 10
minutes.
4. Cancel the time by touching the “-” of timer and scrolling down to “0”.

EN-19
5. When the time is set, it will begin to count down
immediately. The display will show the remaining
time and the timer indicator will flash for 5 seconds.
6. Buzzer will bips for 30 seconds and the timer
indicator shows “- - “ when the setting time
finished.
Setting the timer to turn one cooking zone off
Cooking zones set for this feature will:
1. Touching the heating zone selection control
that you want to set the timer for. (e.g. zone 1#)
2. Touch timer control , The minder indicator
will start flashing and “30” will show in the
timer display.
3. Set the time by touching the “-” or “+” control.
Hint: Touch the “-” or “+” control once will decrease or increase by 1 minute.
Touch and hold the “-” or “+” control, the timer will decrease or increase
by 10 minutes.
If the setting time exceeds 99 minutes, the timer will automatically
return to 0 minute.
4. When the time is set, it will begin to count down
immediately. The display will show the remaining
time and the timer indicator flash for 5 seconds.
NOTE: The red dot next to power level indicator
will illuminate indicating that zone is selected.
5. To cancel the timer, touch the heating zone selection control, and then touch
the “-” of timer and scrolling down to “0”, the timer is cancelled, and the “00” will
show in the minute display, and then “--”.
A página está carregando...
A página está carregando...
A página está carregando...
A página está carregando...
A página está carregando...
A página está carregando...
A página está carregando...
A página está carregando...
A página está carregando...
A página está carregando...
A página está carregando...
A página está carregando...
A página está carregando...
A página está carregando...
A página está carregando...
A página está carregando...
A página está carregando...
A página está carregando...
A página está carregando...
A página está carregando...
A página está carregando...
A página está carregando...
A página está carregando...
A página está carregando...
A página está carregando...
A página está carregando...
A página está carregando...
A página está carregando...
A página está carregando...
A página está carregando...
A página está carregando...
A página está carregando...
A página está carregando...
A página está carregando...
A página está carregando...
A página está carregando...
A página está carregando...
A página está carregando...
A página está carregando...
A página está carregando...
A página está carregando...
A página está carregando...
A página está carregando...
A página está carregando...
A página está carregando...
A página está carregando...
A página está carregando...
A página está carregando...
A página está carregando...
A página está carregando...
A página está carregando...
A página está carregando...
A página está carregando...
A página está carregando...
A página está carregando...
A página está carregando...
A página está carregando...
A página está carregando...
A página está carregando...
A página está carregando...
A página está carregando...
A página está carregando...
A página está carregando...
A página está carregando...
A página está carregando...
A página está carregando...
A página está carregando...
A página está carregando...
A página está carregando...
A página está carregando...
A página está carregando...
A página está carregando...
A página está carregando...
A página está carregando...
A página está carregando...
A página está carregando...
A página está carregando...
A página está carregando...
A página está carregando...
A página está carregando...
A página está carregando...
A página está carregando...
A página está carregando...
A página está carregando...
A página está carregando...
A página está carregando...
A página está carregando...
A página está carregando...
A página está carregando...
A página está carregando...
A página está carregando...
A página está carregando...
A página está carregando...
A página está carregando...
A página está carregando...
A página está carregando...
A página está carregando...
A página está carregando...
A página está carregando...
A página está carregando...
A página está carregando...
A página está carregando...
A página está carregando...
A página está carregando...
A página está carregando...
A página está carregando...
A página está carregando...
A página está carregando...
A página está carregando...
A página está carregando...
A página está carregando...
A página está carregando...
A página está carregando...
A página está carregando...
A página está carregando...
A página está carregando...
A página está carregando...
A página está carregando...
A página está carregando...
A página está carregando...
A página está carregando...
A página está carregando...
A página está carregando...
A página está carregando...
A página está carregando...
A página está carregando...
A página está carregando...
A página está carregando...
A página está carregando...
A página está carregando...
A página está carregando...
A página está carregando...
A página está carregando...
A página está carregando...
A página está carregando...
A página está carregando...
A página está carregando...
A página está carregando...
A página está carregando...
A página está carregando...
A página está carregando...
A página está carregando...
A página está carregando...
A página está carregando...
A página está carregando...
A página está carregando...
A página está carregando...
A página está carregando...
A página está carregando...
A página está carregando...
A página está carregando...
A página está carregando...
A página está carregando...
A página está carregando...
A página está carregando...
A página está carregando...
A página está carregando...
A página está carregando...
A página está carregando...
A página está carregando...
A página está carregando...
A página está carregando...
A página está carregando...
A página está carregando...
A página está carregando...
A página está carregando...
A página está carregando...
A página está carregando...
A página está carregando...
A página está carregando...
A página está carregando...
A página está carregando...
A página está carregando...
A página está carregando...
A página está carregando...
A página está carregando...
A página está carregando...
A página está carregando...
A página está carregando...
A página está carregando...
A página está carregando...
A página está carregando...
A página está carregando...
A página está carregando...
A página está carregando...
A página está carregando...
A página está carregando...
A página está carregando...
A página está carregando...
A página está carregando...
A página está carregando...
A página está carregando...
A página está carregando...
A página está carregando...
A página está carregando...
A página está carregando...
A página está carregando...
A página está carregando...
A página está carregando...
A página está carregando...
A página está carregando...
A página está carregando...
A página está carregando...
A página está carregando...
A página está carregando...
A página está carregando...
A página está carregando...
A página está carregando...
A página está carregando...
A página está carregando...
A página está carregando...
A página está carregando...
A página está carregando...
A página está carregando...
A página está carregando...
A página está carregando...
A página está carregando...
A página está carregando...
A página está carregando...
A página está carregando...
A página está carregando...
A página está carregando...
A página está carregando...
A página está carregando...
A página está carregando...
A página está carregando...
A página está carregando...
A página está carregando...
A página está carregando...
A página está carregando...
A página está carregando...
A página está carregando...
A página está carregando...
A página está carregando...
A página está carregando...
A página está carregando...
A página está carregando...
A página está carregando...
A página está carregando...
A página está carregando...
A página está carregando...
A página está carregando...
A página está carregando...
A página está carregando...
A página está carregando...
A página está carregando...
A página está carregando...
A página está carregando...
A página está carregando...
A página está carregando...
A página está carregando...
A página está carregando...
A página está carregando...
A página está carregando...
A página está carregando...
A página está carregando...
A página está carregando...
A página está carregando...
A página está carregando...
A página está carregando...
A página está carregando...
A página está carregando...
A página está carregando...
A página está carregando...
A página está carregando...
A página está carregando...
A página está carregando...
A página está carregando...
A página está carregando...
A página está carregando...
A página está carregando...
A página está carregando...
A página está carregando...
A página está carregando...
A página está carregando...
A página está carregando...
A página está carregando...
A página está carregando...
A página está carregando...
A página está carregando...
A página está carregando...
A página está carregando...
A página está carregando...
A página está carregando...
A página está carregando...
A página está carregando...
A página está carregando...
A página está carregando...
A página está carregando...
A página está carregando...
A página está carregando...
A página está carregando...
A página está carregando...
A página está carregando...
A página está carregando...
A página está carregando...
A página está carregando...
A página está carregando...
A página está carregando...
A página está carregando...
A página está carregando...
A página está carregando...
A página está carregando...
A página está carregando...
A página está carregando...
A página está carregando...
A página está carregando...
A página está carregando...
A página está carregando...
A página está carregando...
A página está carregando...
A página está carregando...
A página está carregando...
A página está carregando...
A página está carregando...
A página está carregando...
A página está carregando...
A página está carregando...
A página está carregando...
A página está carregando...
A página está carregando...
A página está carregando...
A página está carregando...
A página está carregando...
A página está carregando...
A página está carregando...
A página está carregando...
A página está carregando...
A página está carregando...
A página está carregando...
A página está carregando...
A página está carregando...
A página está carregando...
A página está carregando...
A página está carregando...
A página está carregando...
A página está carregando...
A página está carregando...
A página está carregando...
A página está carregando...
A página está carregando...
A página está carregando...
A página está carregando...
A página está carregando...
A página está carregando...
A página está carregando...
A página está carregando...
A página está carregando...
A página está carregando...
A página está carregando...
A página está carregando...
A página está carregando...
A página está carregando...
A página está carregando...
A página está carregando...
A página está carregando...
A página está carregando...
A página está carregando...
A página está carregando...
A página está carregando...
A página está carregando...
A página está carregando...
A página está carregando...
A página está carregando...
A página está carregando...
A página está carregando...
A página está carregando...
A página está carregando...
A página está carregando...
A página está carregando...
A página está carregando...
A página está carregando...
A página está carregando...
A página está carregando...
A página está carregando...
A página está carregando...
A página está carregando...
A página está carregando...
A página está carregando...
A página está carregando...
A página está carregando...
A página está carregando...
A página está carregando...
A página está carregando...
A página está carregando...
A página está carregando...
A página está carregando...
A página está carregando...
A página está carregando...
A página está carregando...
A página está carregando...
A página está carregando...
A página está carregando...
A página está carregando...
A página está carregando...
A página está carregando...
A página está carregando...
A página está carregando...
A página está carregando...
A página está carregando...
A página está carregando...
A página está carregando...
A página está carregando...
A página está carregando...
A página está carregando...
A página está carregando...
A página está carregando...
A página está carregando...
A página está carregando...
A página está carregando...
A página está carregando...
A página está carregando...
A página está carregando...
A página está carregando...
A página está carregando...
A página está carregando...
A página está carregando...
A página está carregando...
A página está carregando...
A página está carregando...
A página está carregando...
A página está carregando...
A página está carregando...
A página está carregando...
A página está carregando...
A página está carregando...
A página está carregando...
A página está carregando...
A página está carregando...
A página está carregando...
-
 1
1
-
 2
2
-
 3
3
-
 4
4
-
 5
5
-
 6
6
-
 7
7
-
 8
8
-
 9
9
-
 10
10
-
 11
11
-
 12
12
-
 13
13
-
 14
14
-
 15
15
-
 16
16
-
 17
17
-
 18
18
-
 19
19
-
 20
20
-
 21
21
-
 22
22
-
 23
23
-
 24
24
-
 25
25
-
 26
26
-
 27
27
-
 28
28
-
 29
29
-
 30
30
-
 31
31
-
 32
32
-
 33
33
-
 34
34
-
 35
35
-
 36
36
-
 37
37
-
 38
38
-
 39
39
-
 40
40
-
 41
41
-
 42
42
-
 43
43
-
 44
44
-
 45
45
-
 46
46
-
 47
47
-
 48
48
-
 49
49
-
 50
50
-
 51
51
-
 52
52
-
 53
53
-
 54
54
-
 55
55
-
 56
56
-
 57
57
-
 58
58
-
 59
59
-
 60
60
-
 61
61
-
 62
62
-
 63
63
-
 64
64
-
 65
65
-
 66
66
-
 67
67
-
 68
68
-
 69
69
-
 70
70
-
 71
71
-
 72
72
-
 73
73
-
 74
74
-
 75
75
-
 76
76
-
 77
77
-
 78
78
-
 79
79
-
 80
80
-
 81
81
-
 82
82
-
 83
83
-
 84
84
-
 85
85
-
 86
86
-
 87
87
-
 88
88
-
 89
89
-
 90
90
-
 91
91
-
 92
92
-
 93
93
-
 94
94
-
 95
95
-
 96
96
-
 97
97
-
 98
98
-
 99
99
-
 100
100
-
 101
101
-
 102
102
-
 103
103
-
 104
104
-
 105
105
-
 106
106
-
 107
107
-
 108
108
-
 109
109
-
 110
110
-
 111
111
-
 112
112
-
 113
113
-
 114
114
-
 115
115
-
 116
116
-
 117
117
-
 118
118
-
 119
119
-
 120
120
-
 121
121
-
 122
122
-
 123
123
-
 124
124
-
 125
125
-
 126
126
-
 127
127
-
 128
128
-
 129
129
-
 130
130
-
 131
131
-
 132
132
-
 133
133
-
 134
134
-
 135
135
-
 136
136
-
 137
137
-
 138
138
-
 139
139
-
 140
140
-
 141
141
-
 142
142
-
 143
143
-
 144
144
-
 145
145
-
 146
146
-
 147
147
-
 148
148
-
 149
149
-
 150
150
-
 151
151
-
 152
152
-
 153
153
-
 154
154
-
 155
155
-
 156
156
-
 157
157
-
 158
158
-
 159
159
-
 160
160
-
 161
161
-
 162
162
-
 163
163
-
 164
164
-
 165
165
-
 166
166
-
 167
167
-
 168
168
-
 169
169
-
 170
170
-
 171
171
-
 172
172
-
 173
173
-
 174
174
-
 175
175
-
 176
176
-
 177
177
-
 178
178
-
 179
179
-
 180
180
-
 181
181
-
 182
182
-
 183
183
-
 184
184
-
 185
185
-
 186
186
-
 187
187
-
 188
188
-
 189
189
-
 190
190
-
 191
191
-
 192
192
-
 193
193
-
 194
194
-
 195
195
-
 196
196
-
 197
197
-
 198
198
-
 199
199
-
 200
200
-
 201
201
-
 202
202
-
 203
203
-
 204
204
-
 205
205
-
 206
206
-
 207
207
-
 208
208
-
 209
209
-
 210
210
-
 211
211
-
 212
212
-
 213
213
-
 214
214
-
 215
215
-
 216
216
-
 217
217
-
 218
218
-
 219
219
-
 220
220
-
 221
221
-
 222
222
-
 223
223
-
 224
224
-
 225
225
-
 226
226
-
 227
227
-
 228
228
-
 229
229
-
 230
230
-
 231
231
-
 232
232
-
 233
233
-
 234
234
-
 235
235
-
 236
236
-
 237
237
-
 238
238
-
 239
239
-
 240
240
-
 241
241
-
 242
242
-
 243
243
-
 244
244
-
 245
245
-
 246
246
-
 247
247
-
 248
248
-
 249
249
-
 250
250
-
 251
251
-
 252
252
-
 253
253
-
 254
254
-
 255
255
-
 256
256
-
 257
257
-
 258
258
-
 259
259
-
 260
260
-
 261
261
-
 262
262
-
 263
263
-
 264
264
-
 265
265
-
 266
266
-
 267
267
-
 268
268
-
 269
269
-
 270
270
-
 271
271
-
 272
272
-
 273
273
-
 274
274
-
 275
275
-
 276
276
-
 277
277
-
 278
278
-
 279
279
-
 280
280
-
 281
281
-
 282
282
-
 283
283
-
 284
284
-
 285
285
-
 286
286
-
 287
287
-
 288
288
-
 289
289
-
 290
290
-
 291
291
-
 292
292
-
 293
293
-
 294
294
-
 295
295
-
 296
296
-
 297
297
-
 298
298
-
 299
299
-
 300
300
-
 301
301
-
 302
302
-
 303
303
-
 304
304
-
 305
305
-
 306
306
-
 307
307
-
 308
308
-
 309
309
-
 310
310
-
 311
311
-
 312
312
-
 313
313
-
 314
314
-
 315
315
-
 316
316
-
 317
317
-
 318
318
-
 319
319
-
 320
320
-
 321
321
-
 322
322
-
 323
323
-
 324
324
-
 325
325
-
 326
326
-
 327
327
-
 328
328
-
 329
329
-
 330
330
-
 331
331
-
 332
332
-
 333
333
-
 334
334
-
 335
335
-
 336
336
-
 337
337
-
 338
338
-
 339
339
-
 340
340
-
 341
341
-
 342
342
-
 343
343
-
 344
344
-
 345
345
-
 346
346
-
 347
347
-
 348
348
-
 349
349
-
 350
350
-
 351
351
-
 352
352
-
 353
353
-
 354
354
-
 355
355
-
 356
356
-
 357
357
-
 358
358
-
 359
359
-
 360
360
-
 361
361
-
 362
362
-
 363
363
-
 364
364
-
 365
365
-
 366
366
-
 367
367
-
 368
368
-
 369
369
-
 370
370
-
 371
371
-
 372
372
-
 373
373
-
 374
374
-
 375
375
-
 376
376
-
 377
377
-
 378
378
-
 379
379
-
 380
380
-
 381
381
-
 382
382
-
 383
383
-
 384
384
-
 385
385
-
 386
386
-
 387
387
-
 388
388
-
 389
389
-
 390
390
-
 391
391
-
 392
392
-
 393
393
-
 394
394
-
 395
395
-
 396
396
-
 397
397
-
 398
398
-
 399
399
-
 400
400
-
 401
401
-
 402
402
-
 403
403
-
 404
404
-
 405
405
-
 406
406
-
 407
407
-
 408
408
-
 409
409
-
 410
410
-
 411
411
-
 412
412
-
 413
413
-
 414
414
-
 415
415
-
 416
416
-
 417
417
-
 418
418
-
 419
419
-
 420
420
-
 421
421
-
 422
422
-
 423
423
-
 424
424
-
 425
425
-
 426
426
-
 427
427
-
 428
428
-
 429
429
-
 430
430
-
 431
431
-
 432
432
-
 433
433
-
 434
434
-
 435
435
-
 436
436
-
 437
437
-
 438
438
-
 439
439
-
 440
440
-
 441
441
-
 442
442
-
 443
443
-
 444
444
-
 445
445
-
 446
446
-
 447
447
-
 448
448
-
 449
449
-
 450
450


Candy CI642C/4U Manual do usuário
- Categoria
- Fogões
- Tipo
- Manual do usuário
- Este manual também é adequado para
em outras línguas
- English: Candy CI642C/4U User manual
- dansk: Candy CI642C/4U Brugermanual
- čeština: Candy CI642C/4U Uživatelský manuál
- svenska: Candy CI642C/4U Användarmanual
- polski: Candy CI642C/4U Instrukcja obsługi
- suomi: Candy CI642C/4U Ohjekirja
- română: Candy CI642C/4U Manual de utilizare
Artigos relacionados
-
Candy CIS642SCTT/1 Manual do usuário
-
-
Candy MULTIPURPOSE BUILT-IN HOBS Manual do usuário
-
Candy CIS633SCTT Manual do usuário
-
-
-
-
-
-
Outros documentos
-
OK. OBH39831 Manual do usuário
-
CONTINENTAL EDISON CECI3Z5060WP Manual do usuário
-
-
Whirlpool SCHT 644 B Manual do proprietário
-
Indesit NIX 644 B E Manual do proprietário
-
-
Wolf ICBCI152 Guia de usuario
-
Whirlpool TIX 644 B E Manual do proprietário
-
AEG IDE74243IB Manual do usuário
-