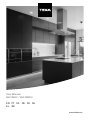
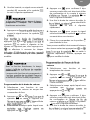
Teka HLC 8440 C Manual do usuário
- Categoria
- Fornos
- Tipo
- Manual do usuário

EN
EL
PT
AR
ES
DE FR
NL
User Manual
HLC 844 C / HLC 8440 C
www.teka.com

2
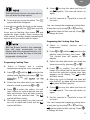
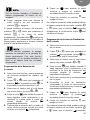
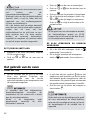
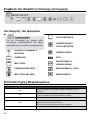
ENGLISH
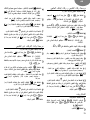
Before using your oven for the first time, please carefully read the installation and
maintenance instructions that come with it.
Depending on the model, the accessories included in your oven may vary from those
shown in the pictures.
PORTUGUÊS
Antes de utilizar o forno pela primeira vez, leia atentamente as instruções de
instalação e manutenção fornecidas juntamente com o forno.
Dependendo do modelo, os acessórios incluídos no forno podem variar em relação
às imagens apresentadas.
ESPAÑOL
Por favor, antes de utilizar su horno por primera vez, lea atentamente las
instrucciones de instalación y mantenimiento incluidas en su horno.
Dependiendo del modelo, los accesorios incluidos en su horno pueden variar
respecto a los mostrados en las imágenes.
FRANÇAIS
Avant la première utilisation de votre four, veuillez lire attentivement les instructions
Selon les modèles, il est possible que les accessoires fournis avec votre four soient
différents de ceux indiqués sur les images.
DEUTSCH
Bevor Sie den Backofen zum ersten Mal verwenden, lesen Sie bitte die zu Ihrem
Backofen gehörenden Einbau- und Wartungsanweisungen aufmerksam durch.
Je nach Modell können die Zubehörteile Ihres Backofens von den auf den
Abbildungen dargestellten Teilen abweichen.
NEDERLANDS
Lees zorgvuldig de meegeleverde instructies voor installatie en gebruik van het
apparaat.
Afhankelijk van het model, de accessoires kunnen verschillen van die in de beelden.

3
ΕΛΛΗΝΙΚΑ
Προτού χρησιμοποιήσετε τον φούρνο σας για πρώτη φορά, διαβάστε προσεκτικά τις
οδηγίες εγκατάστασης και συντήρησης που τον συνοδεύουν.
Ανάλογα με το μοντέλο, τα εξαρτήματα που περιέχει ο φούρνος σας ενδέχεται να
διαφέρουν σε σχέση με αυτά που απεικονίζονται.

4
Description of the appliance ................... 5
Control panel ............................................ 5
Function selector symbols ...................... 6
Oven Functions ........................................ 6
Oven Functions ........................................ 6
Display description .................................. 7
Setting the time ..................................... 7
Hiding and un-hiding the clock ............. 8
Oven use ................................................... 8
Oven functions ...................................... 8
Oven timer operation ............................. 8
Microwave ............................................. 10
Quick start ............................................. 10
Defrost by time ...................................... 10
Defrost by weight .................................. 11
Combined functions .............................. 11
Safety instructions ................................... 12
Safety block ........................................... 12
Showroom mode ................................... 12
TEKA HYDROCLEAN® FUNCTION .......... 12
Programing the Teka Hydroclean®
function .................................................. 12
Modo Showroom ................................... 22
Mode démonstration ............................. 42
Ausstellungs-Modus .............................. 52

5
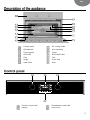
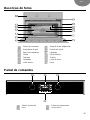
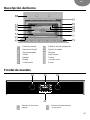
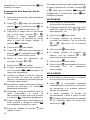
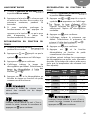
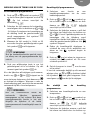
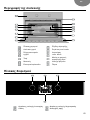
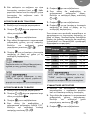
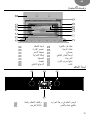
EN
Control panel
Air cooling outlet
Grill element
Unit mounting
Tray supports
Lamp
Grid shelf
Back Wall Panel
Tray
Fan
Hinge
Oven Seal
Inner Glass
Door
Function control dial
Temperature control dial
Display
Touch keys

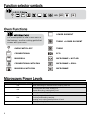
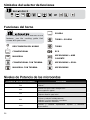
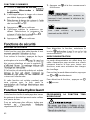
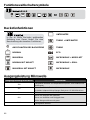
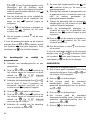
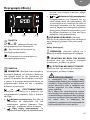
6
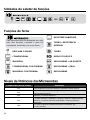
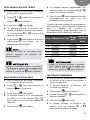
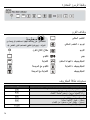
LOWER ELEMENT
TURBO + LOWER ELEMENT
OVEN SWITCH-OFF
TURBO
CONVENTIONAL
ECO
MAXIGRILL
MICROWAVE + HOT AIR
CONVENTIONAL WITH FAN
MICROWAVE + GRILL
MAXIGRILL WITH FAN
MICROWAVE
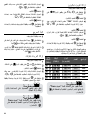
Microwave power output
Foods
200
Slow defrosting for delicate foods; keeping food hot
400
Cooking with little heat; boiling rice
Rapid defrosting, heating baby food
600
Heating and cooking food
800
Cooking vegetables and food
Cooking and heating carefully,
Heating and cooking small portions of food
1000
Rapidly heating liquids
For a description of how to use each of
the features, see the cooking guide that
comes with your oven.

7
EN
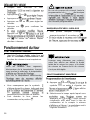
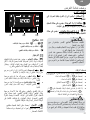
KEYS
, and : Enable you to program the
functions.
: Enable you to start the cooking
functions.
: Enable you to stop the cooking
functions.
SYMBOLS
WARNING TIMER: Lights up when the
clock/timer is selected. Generates an
acoustic signal when the time is up. The
oven does not turn off at the end of the timer
period. This function can also be used while
the oven is cooking.
and PROGRAMING: Lights up to
indicate that the oven is programed (cooking
time, stop time or total).
• Cooking Time: This program allows
you to program the cooking time, after
which the oven will turn off automatically.
• Cooking Stop Time: This setting
allows you to program the time for
cooking to stop, after which the oven will
turn off automatically.
• and Cooking Time and Cooking
Stop Time: This setting allows you to
program the cooking time and cooking
stop time. The oven switches on
automatically at the set time and
operates for the selected cooking time
(Cooking Time). It then switches off
automatically at the indicated time
(Cooking Stop Time).
SAFETY BLOCK: Indicates that the touch
keys are blocked, preventing modifications
by small children.
Other functions
HEATING: Indicates that the oven is
transmitting heat to the food.
DEFROSTING BY TIME: Lights up while
the defrosting by time function is on.
DEFROSTING BY WEIGHT: Lights up
while the defrosting by weight function is on.
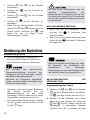
SETTING THE TIME
• When you plug the oven, you will see the
clock flashing 12:00.
• Press or to adjust the hours.
The sensitivity of the touch keys adapts
continually to environmental conditions.
Make sure the surface of the control panel
is clean and free of obstacles when
plugging in the oven.
If the display does not respond correctly
when you touch the keys, unplug the oven
for a few seconds and then plug it in
again. Doing this causes the sensors to
adjust automatically so that they will react
once more to fingertip control.

8
• Press to confirm the hours.
• Press or to adjust the minutes.
• Press to confirm the minutes.
• If you wish to modify the time, press
or until the time starts flashing. Press
and follow the instructions in the
previous points.
HIDING AND UN-HIDING THE CLOCK
• If you wish to hide the clock press for
5 seconds.
• If you wish to see the clock on the
display again, press for 5 seconds.
OVEN FUNCTIONS
• After setting the clock, the oven is ready
for use. Select a cooking function with
the function selector dial and
temperature with the temperature control
dial.
• You will notice that the symbol lights
up during cooking to indicate that heat is
being transmitted to the food. This
symbol disappears when the selected
temperature has been reached.
• Set the controls to to turn off the oven.
OVEN TIMER OPERATION
Programing the buzzer
1. Touch or until the symbol on
the display starts flashing, then press
0_00
display.
2. Select the time after which you want the
alarm to sound by pressing or . You
will hear 2 beeps to confirm that the time
has been set and the clock will start
counting down from the selected time.
The symbol will flash slowly.
3. Once the time has expired, an acoustic
signal will sound for 90 seconds and the
symbol will flash quickly.
In the event of power failure, the clock
settings will be erased and 12:00 will flash
on the clock display. Reset it and program
again.
In models with an electronic temperature
control, when the selector switch is
turned, the display will show the
temperature.
After selecting the temperature, the clock
will automatically reappear.
When a cooking cycle begins, the oven
will automatically display the total the
time for the cycle progress, if the cooking
time or cooking stop time have not been
set.

9
EN
4. Touch any key to stop the alarm. The
symbol will then disappear.
If you wish to modify the time on the buzzer,
press or until the flash and the
hours are not flashing; then press and
repeat the steps shown. Upon entering the
timer control, the time currently remaining will
appear which you will be able to adjust.
Programing Cooking Time
1. Select a function and a cooking
temperature using the oven commands.
2. Press or until the symbol on the
display starts flashing, then press . The
0_00
display.
3. Select the time after which you want the
alarm to sound by pressing or .
4. Press to select the option. You will
hear 2 beeps to confirm that the time has
been set and the clock will start counting
down from the selected time. The
symbol will flash slowly.
5. Once the cooking time is up, the oven will
turn off, an alarm will sound and the
symbol will flash.
6. Press to stop the alarm and turn off
the symbol. The oven will switch on
again.
7. Set the controls to position to turn off
the oven.
You can change the remaining cooking time
at any time by touching or until the
symbol starts to flash quickly. Press
to change the time.
Programing the Cooking Stop Time
1. Select a cooking function and a
temperature.
2. Press or until the symbol on the
display starts flashing, then press .
The current time will appear on the
display.
3. Select the time after which you want the
alarm to sound by pressing or .
4. Press to confirm. You will hear 2
beeps to confirm that the time has been
set and the selected cooking stop time
appears on the display. The symbol
will flash slowly.
5. When the cycle is finished, the oven will
turn itself off, an alarm will sound and the
symbol will flash quickly.
6 Press to stop the alarm and turn off
the symbol. The oven will switch on
again.
7. Set the controls to position to turn off
the oven.
You can change the remaining cooking time
at any time by touching or until the
symbol starts to flash quickly. Press
to change the time.
With the Buzzer function, the oven will not
turn off when the time expires.
With the Buzzer function, the remaining
time will show permanently on the
display. With this programed function, it is
not possible to view the time or the total
programed cooking time.

10
Programing the Cooking Time and
Cooking Stop Time
1. Select a cooking function and a
temperature.
2. Press or until the symbol on the
display starts flashing, then press .
0_00
display.
3. Select the cooking time by touching or
. You will hear 2 beeps, the remaining
time will appear on the display and the
symbol will flash.
4. Press to select the option.
5. Press or until the symbol on the
display starts flashing, then press .
The current time will appear on the
display.
6. Select the cooking end time by pressing
or .
7. Press to select the option.
8. The oven will remain disconnected with
the and symbols lit up. The oven
is now programed.
9. When it is time to start cooking, the oven
will turn on and will operate for the
programed time.
10. While cooking, the remaining cooking
time will be displayed and the symbol
will flash.
11. When the cooking time is up, the oven will
turn off, a buzzer will sound, and the
symbol will flash.
12. Press any key to stop the buzzer and turn
off the symbol. The oven will switch
on again.
13. Set the controls to position to turn off
the oven.
You can change the remaining cooking time
at any time by touching or until the
symbol starts to flash quickly. Press to
change the time.
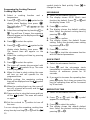
MICROWAVE
1. Select the microwave function.
2. The display shows 00:30 (Quick start
function) by default. Press or until
the display shows 1:00.
3. Press to confirm.
4. The display shows the default cooking
time. Select the desired cooking time by
pressing or .
5. Press to confirm.
6. The display shows the default Power
setting. Select the desired power setting
by pressing or .
7. Press to confirm.
8. Press to start the microwave function
with the desired parameters.
QUICK START
1. Select the microwave function.
2. Press and the microwave starts
immediately to operate in the Microwave
function at maximum power for 30
seconds.
3. If you want to increase the operating time
press again. Each time you press this
key the operating time will be increased
by 30 seconds.
DEFROST BY TIME
1. Select the microwave function.
2. Press or until the symbol
appears on the display.
3. Press to select the option.
4. The display shows the default defrost
time. Select the desired cooking time by
pressing or .

11
EN
5. Press to start the defrost by time
function with the desired parameters.
DEFROST BY WEIGHT
1. Select the microwave function.
2. Press or until the symbol
appears on the display.
3. Press to select the option.
4. The display F01 as
default. Select the desired defrost option
by pressing or .
5. Press to confirm.
6. The display shows default weight blinking.
Select the desired weight by pressing
or .
7. Press to confirm.
8. Press to start the defrost by weight
function with the desired parameters.
The following table shows the defrosting by
weight function programs, indicating weight
intervals, and defrosting and standing times
(in order to ensure the food is of a uniform
temperature):
Prog.
Food
Weight
(kg)
Time
(min)
Standing
time (min)
F01
Meat
0.10 2.00
2:10 43
20 30
Prog.
Food
Weight
(kg)
Time
(min)
Standing
time (min)
F02
Poultry
0.10 2.50
2:20 58
20 30
F03
Fish
0.10 2.00
2 40
20 30
F04
Fruit
0.10 0.50
2:36 13
10 20
F05
Bread
0.10 0.80
2:25 19
10 20
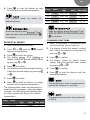
COMBINED FUNCTIONS
1. Select a microwave + conventional oven
function with the function selector.
2. The display shows the default cooking
time. Select the desired cooking time by
pressing or .
3. Press to confirm.
4. The display shows the default Power
setting. Select the desired power setting
by pressing or .
5. Press to confirm.
6. Press to start the function with the
desired parameters.
The temperature can be changed anytime
rotating the temperature control dial.
See Cooking Guide for advice on
defrosting times.
The maximum power that can be selected
is 600 W.
When the display shows
open the door, turn the food and press
to continue.
open the door, turn the food and press
to continue.

12
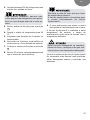
SAFETY BLOCK
This function can be selected at any time
while using the oven.
To activate the function, press for a few
seconds until you hear a beep and the
symbol appears on the display. The oven is
locked.
If the oven is off and you activate the safety
block function, the oven will not work even if
a cooking function is selected.
If this function is activated while you are
cooking, it will only lock the display and
keys.
To deactivate the safety block function,
press for a few seconds until you hear a
beep.
SHOWROOM MODE
The showroom mode is used in showrooms,
to show the clients how the oven works as
activation of the heating loads.
To activate the showroom mode press
and .
To deactivate the function press and
again.
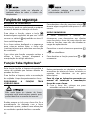
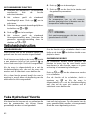
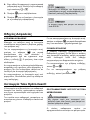
Teka Hydroclean® function
This function makes it easy to remove grease
and other food debris that may have stuck to
the sides of the oven.
For easier cleaning, do not allow dirt to
accumulate. Clean the oven frequently.
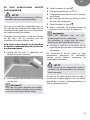
PROGRAMING THE TEKA HYDROCLEAN®
FUNCTION
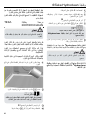
Always run the cycle on a cold oven. The
result could be affected and the varnish
damaged if it is run when the oven is too hot.
First remove the trays and all accessories
from the oven interior, including the tray
supports and telescopic guide rails.
To do this, follow the instructions in the
installation and maintenance guide
accompanying the oven.
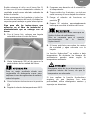
1. With the oven cold, spread a cloth out on
the bottom of the oven.
2. Gently pour 200 ml of water into the
bottom of the oven cavity.
3. Turn the control dial to position .
4. Set the temperature to 90º C.
5. Program a duration of 4 minutes on the
timer.
Do not pour water into a hot oven as this
can damage the enamel of the oven.
For best results, add a teaspoon of mild
washing up detergent to the glass of
water before pouring onto the cloth

13
PT
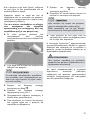
6. After 4 minutes, an alarm will sound and
the oven will stop heating.
7. Turn the control dial to position .
8. Wait for about 20 minutes for the interior
of the oven to cool.
9. Any traces of dirt and excess water can
now be removed from the oven with the
damp cloth.
The Hydroclean® function takes place at a low
temperature. However, cooling times can
vary depending on the room temperature.
If a deeper clean is required after using the
Hydroclean® function, use neutral detergents
and non-abrasive sponges.
Do not open the oven until the cooling
phase is complete.
This is necessary for the Hydroclean®
function to work properly.
Before touching the inside surface of
the oven, make sure that it has cooled
properly.

14
Descrição do forno .................................. 15
Painel de comandos ................................ 15
Símbolos do seletor de funções ............. 16
Funções do forno ..................................... 16
Níveis de Potências das Micro-ondas ... 16
Descrição do visor ................................... 17
Acertar a hora ........................................ 17
Ocultar o relógio .................................... 18
Manuseamento do forno ......................... 18
Funcionamento manual ......................... 18
Funcionamento do temporizador do forno
.............................................................. 18
Microondas ............................................ 20
Inicio rápido ........................................... 20
Descongelação por tempo .................... 21
Descongelação por peso ....................... 21
Funções combinadas ............................ 21
Funções de segurança ............................ 22
Bloqueio de segurança .......................... 22
FUNÇÃO TEKA HYDROCLEAN® ............. 22
programar a função teka Hydroclean® . 22

15
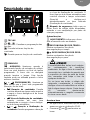
PT
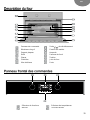
Descrição do forno
Painel de comandos
Saída de ar de refrigeração
Resistência do grill
Fixação ao móvel
Apoio dos tabuleiros
Lâmpada
Grelha
Painel traseiro
Tabuleiro
Turbina
Dobradiça
Junta de forno
Vidro interior
Porta
Painel de comandos
Seletor de funções
Seletor de temperatura
Visor
Teclas touch

16
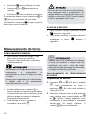
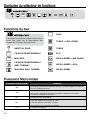
Símbolos do seletor de funções
Funções do forno
RESISTÊNCIA INFERIOR
TURBO + RESISTÊNCIA
INFERIOR
DESLIGAR O FORNO
TURBO
CONVENCIONAL
MODO ECOLÓGICO
MAXIGRILL
MICROONDAS + AR QUENTE
CONVENCIONAL COM TURBINA
MICROONDAS + GRILL
MAXIGRILL COM TURBINA
MICROONDAS
Potência das micro-ondas
Alimentos
200
Descongelação lenta para alimentos delicados; manter quente.
400
Cozinhar com pouco calor; refogar arroz.
Descongelação rápida.
600
Aquecer e cozinhar alimentos.
800
Cozinhar legumes e alimentos. Cozinhar e aquecer cuidadosamente.
Aquecer e cozinhar pequenas quantidades. Aquecer alimentos
delicados.
1000
Cozinhar e aquecer rapidamente líquidos e alimentos pré
confeccionados.
Para uma descrição da utilização de cada
uma das funções, consulte o guia de
cozinhados fornecido com o seu forno.

17
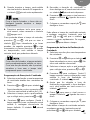
PT
TECLAS
, e : Permitem a programação das
funções.
: Permite iniciar as funções de
cozinhado.
: Permite parar as funções de cozinhado.
SÍMBOLOS
AVISADOR: Ilumina-se quando é
selecionada função de avisador do relógio.
Gera um sinal acústico no final do tempo
programado. O forno não se desligará
quando termina o tempo. Esta função
também pode ser utilizada quando o forno
estiver a cozinhar.
e PROGRAMAÇÃO: Iluminam-se
para indicar que o forno está programado
(duração, fim ou total).
• Duração do cozinhado: Permite
cozinhar durante um tempo selecionado e
a seguir o forno desligar-se-á de forma
automática.
• Hora de finalização do cozinhado:
Permite cozinhar até uma hora
estabelecida e a seguir o forno desligar-
se-á de forma automática.
• e Duração e finalização do
cozinhado: Permite programar a duração
e a hora de finalização do cozinhado. O
forno ligar-se-á de forma automática para
cozinhar durante o tempo selecionado
(Duração) e desligar-se-á
automaticamente na hora indicada
(Finalização do cozinhado).
Bloqueio de segurança: Indica que as
teclas touch do relógio estão bloqueadas,
evitando a sua manipulação por parte de
crianças pequenas.
Outras funções
AQUECIMENTO: Indica que o forno
está a transmitir calor ao alimento.
DESCONGELAÇÃO POR TEMPO:
Ilumina-se durante a função de
descongelação por tempo
DESCONGELAÇÃO POR PESO:
Ilumina-se durante a função de
descongelação por peso.
Acertar a hora
• Ao ligar o forno, observará que no relógio
aparece a piscar a indicação 12:00.
• Pressione ou para acertar as
horas.
A sensibilidade das teclas touch adapta-
se continuamente às condições
ambientais. Ao ligar o forno à corrente, é
necessário ter o cuidado de garantir que
a superfície do vidro da parte da frente
dos comandos está limpa e livre de
qualquer obstáculo.
Se, ao tocar nas teclas, o relógio não
responder corretamente, é necessário
desligar o forno da rede elétrica e voltar a
ligá-lo algum tempo depois. Desta forma
os sensores ajustar-se-ão
automaticamente e reagirão novamente
ao tocar com o dedo.

18
• Pressione para confirmar as horas.
• Pressione ou para ajustar os
minutos.
• Pressione para confirmar os minutos.
Se pretender alterar a hora, pressione ou
até que a indicação da hora fique
intermitente. Pressione e siga os passos
descritos no ponto anterior.
OCULTAR O RELÓGIO
• Para ocultar o relógio pressione a tecla
durante 5 segundos.
• Para voltar a mostrar o relógio pressione
novamente a tecla durante 5
segundos.
FUNCIONAMENTO MANUAL
• Após acertar a hora do relógio, o seu
forno está pronto para cozinhar.
Selecione uma função de cozinhado e
uma temperatura.
• Poderá verificar que o símbolo se
ilumina durante o cozinhado para indicar
a transmissão de calor ao alimento. Este
símbolo apaga-se quando é atingida a
temperatura selecionada.
• Para desligar o forno, coloque os
comandos na posição .
FUNCIONAMENTO DO TEMPORIZADOR
DO FORNO
Programação do avisador
1. Pressione ou até que o símbolo
fique intermitente no visor e
pressione . No visor será exibida a
indicação 00_00.
2. Selecione o tempo, após o qual pretende
que o relógio avise, pressionando em
ou . Ouvirá 2 beeps seguidos como
confirmação e será exibida a contagem
decrescente do tempo definido. O
símbolo piscará lentamente.
No caso de um corte de corrente elétrica,
será apagada toda a programação do
relógio eletrónico e aparecerá a piscar no
relógio a indicação 12:00. Deverá acertar
a hora e programá-lo de novo.
Em modelos com regulação eletrónica de
temperatura, a temperatura é
apresentada no ecrã do relógio ao rodar
o seletor.
Assim que a temperatura for selecionada,
o relógio volta a ser apresentado
automaticamente no ecrã.
Quando inicia um cozinhado, por defeito
o forno irá mostrar o tempo total do
cozinhado em curso., caso não tenha
sido selecionado um tempo de cozinhado
ou tempo de final de cozinhado.

19
PT
3. Quando terminar o tempo, será emitido
um sinal acústico durante 90 segundos e
o símbolo piscará mais rapidamente.
4. Pressione qualquer tecla para parar o
sinal sonoro, nesse momento o símbolo
apagar-se-á.
Caso pretenda alterar o tempo do avisador,
pressione ou até que no visor o
simbolo fique intermitente e as horas
paradas, de seguida pressione e siga
novamente os passos descritos. Ao aceder
ao temporizador, será exibido o tempo
restante atual, que poderá ser alterado.
Programação da Duração do Cozinhado
1. Selecione uma função e uma temperatura
de cozinhado através dos comandos do
forno.
2. Pressione ou até que o símbolo
fique intermitente no visor e pressione
. No visor será exibida a indicação 0_00.
3. Selecione o tempo, após o qual pretende
que o relógio avise, pressione ou .
4. Pressione para confirmar. Ouvirá 2
beeps seguidos como confirmação e será
exibida a contagem decrescente do
tempo definido. O símbolo piscará
lentamente.
5. Decorrida a duração do cozinhado, o
forno desligar-se-á, soará um sinal sonoro
e o símbolo piscará mais depressa.
6. Pressione para parar o sinal sonoro e
apagar o símbolo ligando de novo o
forno.
7. Coloque os comandos na posição para
desligar o forno.
Pode alterar o tempo de cozinhado restante
a qualquer momento, bastando para tal
premir ou até que o símbolo
comece a piscar rapidamente. De seguida,
pressione para alterar o tempo.
Programação da Hora de Finalização do
Cozinhado
1. Selecione uma função e uma temperatura
de cozinhado.
2. Pressione ou até que o símbolo
fique intermitente no visor e prima . No
visor será exibida a hora atual.
3. Selecione o tempo, após o qual pretende
que o relógio avise, pressione ou .
4. Pressione para confirmar. Ouvirá 2
beeps seguidos como confirmação e será
exibida a hora de finalização do
cozinhado. O símbolo piscará.
5. Assim que for atingida a hora de
finalização programada, o forno desligar-
se-á, será emitido um sinal sonoro e o
símbolo piscará.
6. Prima para parar o sinal sonoro e
apagar o símbolo , ligando de novo o
forno.
7. Coloque os comandos na posição para
desligar o forno.
Pode alterar o tempo de cozinhado restante
a qualquer momento, bastando para tal
pressionar ou até que o símbolo
Com a função Avisador, o forno não se
desligará quando terminar o tempo
programado.
Com a função Avisador, o tempo restante
será permanentemente exibido no visor.
Com esta função ativada, não é possível
visualizar a hora nem o tempo total
programado para o cozinhado.

20
comece a piscar rapidamente. De seguida,
prima para alterar o tempo.
Programação da Duração e Finalização
do Cozinhado
1. Selecione uma função e uma temperatura
de cozinhado.
2. Pressionando ou até que o símbolo
fique intermitente no visor e prima
. No visor será exibida a indicação 0_00.
3. Selecione a duração do cozinhado,
tocando em ou . Posteriormente,
soarão 2 beeps seguidos e será exibido o
tempo restante no visor e o símbolo
piscará lentamente.
4. Pressione para confirmar.
5. Pressione ou até que o símbolo
fique intermitente no visor e prima . No
visor será exibida a hora atual.
6. Selecione a hora de finalização do
cozinhado, premindo ou .
7. Pressione para confirmar.
Posteriormente soarão 2 beeps seguidos,
será mostrada a hora atual no visor.
8. Selecione uma função e uma temperatura
de cozinhado. O forno permanecerá
desligado e com os símbolos e
iluminados. O seu forno está programado.
9. Quando for alcançada a hora de início do
cozinhado, o forno entrará em
funcionamento e o cozinhado decorrerá
durante o tempo selecionado.
10. Durante o cozinhado será exibido o
tempo de cozinhado restante e o símbolo
piscará lentamente.
11. Assim que for atingida a hora de
finalização programada, o forno desligar-
se-á, será emitido um sinal sonoro e o
símbolo piscará mais depressa.
12. Prima para parar o sinal sonoro e
apagar o símbolo , ligando de novo o
forno.
13. Coloque os comandos na posição para
desligar o forno.
Pode alterar o tempo de cozinhado restante
a qualquer momento, bastando para tal
premir ou até que o símbolo
comece a piscar rapidamente. De seguida,
prima para alterar o tempo.
MICROONDAS
1. Rode o seletor de funções para a posição
Micro-ondas.
2. No visor é exibido 0_30 (função de inicio
rápido) por padrão de funcionamento.
Pressione ou até ser exibido 1_00
no visor.
3. Pressione para confirmar.
4. No visor é exibido o tempo padrão de
funcionamento. Com as teclas ou
ajuste a duração desejada.
5. Pressione para confirmar.
6. No visor é exibida a potência padrão de
funcionamento. Com as teclas ou
ajuste a potência desejada.
7. Pressione para confirmar.
8. Pressione para iniciar a função micro-
ondas com os parâmetros desejados.
INICIO RÁPIDO
1. Rode o seletor de funções para a posição
Micro-ondas.
2. Pressione e o forno começa a
funcionar na função Micro-ondas à
potência máxima durante 30 segundos.
3. Caso pretenda aumentar o tempo de
funcionamento pressione novamente a
tecla . Cada vez que esta tecla for
premida o tempo de funcionamento será
aumentado em 30 segundos.
A página está carregando...
A página está carregando...
A página está carregando...
A página está carregando...
A página está carregando...
A página está carregando...
A página está carregando...
A página está carregando...
A página está carregando...
A página está carregando...
A página está carregando...
A página está carregando...
A página está carregando...
A página está carregando...
A página está carregando...
A página está carregando...
A página está carregando...
A página está carregando...
A página está carregando...
A página está carregando...
A página está carregando...
A página está carregando...
A página está carregando...
A página está carregando...
A página está carregando...
A página está carregando...
A página está carregando...
A página está carregando...
A página está carregando...
A página está carregando...
A página está carregando...
A página está carregando...
A página está carregando...
A página está carregando...
A página está carregando...
A página está carregando...
A página está carregando...
A página está carregando...
A página está carregando...
A página está carregando...
A página está carregando...
A página está carregando...
A página está carregando...
A página está carregando...
A página está carregando...
A página está carregando...
A página está carregando...
A página está carregando...
A página está carregando...
A página está carregando...
A página está carregando...
A página está carregando...
A página está carregando...
A página está carregando...
A página está carregando...
A página está carregando...
A página está carregando...
A página está carregando...
A página está carregando...
A página está carregando...
A página está carregando...
A página está carregando...
A página está carregando...
A página está carregando...
-
 1
1
-
 2
2
-
 3
3
-
 4
4
-
 5
5
-
 6
6
-
 7
7
-
 8
8
-
 9
9
-
 10
10
-
 11
11
-
 12
12
-
 13
13
-
 14
14
-
 15
15
-
 16
16
-
 17
17
-
 18
18
-
 19
19
-
 20
20
-
 21
21
-
 22
22
-
 23
23
-
 24
24
-
 25
25
-
 26
26
-
 27
27
-
 28
28
-
 29
29
-
 30
30
-
 31
31
-
 32
32
-
 33
33
-
 34
34
-
 35
35
-
 36
36
-
 37
37
-
 38
38
-
 39
39
-
 40
40
-
 41
41
-
 42
42
-
 43
43
-
 44
44
-
 45
45
-
 46
46
-
 47
47
-
 48
48
-
 49
49
-
 50
50
-
 51
51
-
 52
52
-
 53
53
-
 54
54
-
 55
55
-
 56
56
-
 57
57
-
 58
58
-
 59
59
-
 60
60
-
 61
61
-
 62
62
-
 63
63
-
 64
64
-
 65
65
-
 66
66
-
 67
67
-
 68
68
-
 69
69
-
 70
70
-
 71
71
-
 72
72
-
 73
73
-
 74
74
-
 75
75
-
 76
76
-
 77
77
-
 78
78
-
 79
79
-
 80
80
-
 81
81
-
 82
82
-
 83
83
-
 84
84


Teka HLC 8440 C Manual do usuário
- Categoria
- Fornos
- Tipo
- Manual do usuário
em outras línguas
- español: Teka HLC 8440 C Manual de usuario
- français: Teka HLC 8440 C Manuel utilisateur
- Nederlands: Teka HLC 8440 C Handleiding
- Deutsch: Teka HLC 8440 C Benutzerhandbuch
Artigos relacionados
-
Teka AirFry HLC 8406 BK Manual do usuário
-
-
Teka HLF 840 Manual do usuário
-
Teka HSB 610 Manual do proprietário
-
Teka HLF 940 Manual do usuário
-
Teka HSC 635 P Manual do usuário
-
-
Teka HLB 850 Manual do usuário
-
-
Teka HLC 8400 ST Manual do usuário