Philips GC6102 Manual do proprietário
- Categoria
- Estações de engomar a vapor
- Tipo
- Manual do proprietário

GC6107, GC6106, GC6104, GC6103, GC6102, GC6101

2

3
1

4

GC6107, GC6106, GC6104, GC6103, GC6102, GC6101
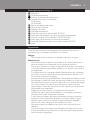
ENGLISH 6
DANSK 15
DEUTSCH 24
33
ESPAÑOL 43
SUOMI 52
FRANÇAIS 60
ITALIANO
69
NEDERLANDS
78
NORSK
87
PORTUGUÊS
96
SVENSKA
105
TÜRKÇE 114

6
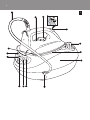
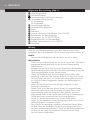
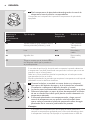
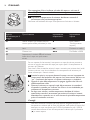
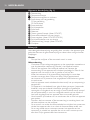
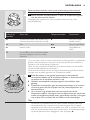
General description (Fig. 1)
A Supply hose
B Temperature light
C Temperature dial and indicator
D Steam activator and lock
D1 Lock
D2 Activator
E Cap of steam tank
F Iron stand
G Steam tank
H Mains cord
I Steam-ready light (GC6107 only)
J Steam tank switch with power-on light
K Steam control (GC6107/GC6104 only)
L Iron switch with power-on light
M ’Steam tank empty’ light (GC6107 only)
N Soleplate
Important
Read this user manual carefully before you use the appliance and save it for
future reference.
Danger
Never immerse the iron or the steam tank in water.
Warning
Check if the voltage indicated on the type plate corresponds to the
local mains voltage before you connect the appliance.
Do not use the appliance if the plug, the mains cord, the supply hose or
the appliance itself shows visible damage, or if the appliance has been
dropped or leaks.
If the mains cord or the supply hose is damaged, you must have it
replaced by Philips, a service centre authorised by Philips or similarly
qualied persons in order to avoid a hazard.
Never leave the appliance unattended when it is connected to the
mains.
This appliance is not intended for use by persons (including children)
with reduced physical, sensory or mental capabilities, or lack of
experience and knowledge, unless they have been given supervision or
instruction concerning use of the appliance by a person responsible for
their safety.
Children should be supervised to ensure that they do not play with the
appliance.
Do not let the mains cord and supply hose come into contact with the
hot soleplate of the iron.
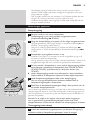
If steam escapes from under the steam tank cap when the appliance
heats up, switch off the appliance and tighten the steam tank cap. If
steam continues to escape when the appliance is heating up, switch
off the appliance and contact a service centre authorised by Philips.
Do not remove the steam tank cap from the steam tank when the
steam tank is still under pressure.
-
-
-
-
-
-
-
-
-
-
-
-
ENGLISH

Do not use any other cap on the steam tank than the cap that has
been supplied with the appliance, as the steam tank cap also functions
as a safety valve.
Caution
Only connect the appliance to an earthed wall socket.
Check the mains cord and the supply hose regularly for possible
damage.
Always place and use the iron and the steam tank on a stable, level and
horizontal surface. Do not put the steam tank on the soft part of the
ironing board.
The iron stand and the soleplate of the iron can become extremely
hot and may cause burns if touched. If you want to move the steam
tank, do not touch the stand.
When you have nished ironing, when you clean the appliance, when
you ll or empty the steam tank and also when you leave the iron even
for a short while: put the iron on the iron stand, set the iron switch and
the steam tank switch to ‘off ’ and remove the mains plug from the wall
socket.
Rinse the steam tank regularly according to the instructions in the
chapter ‘Cleaning and maintenance’.
This appliance is intended for household use only.
This Philips appliance complies with all standards regarding electromagnetic
elds (EMF). If handled properly and according to the instructions in this
user manual, the appliance is safe to use based on scientic evidence
available today.
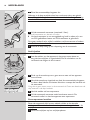
1
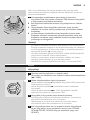
Remove any sticker or protective foil from the soleplate and clean
the soleplate with a soft cloth.
2 Fully unwind the mains cord and supply hose.
3 Place the steam tank on a stable, level surface.
4 Place the iron on the iron stand.
Preparing for use
Filling the steam tank
Never immerse the steam tank in water.
Do not open the cap when the iron and the steam tank are still hot.
1 Remove the mains plug from the wall socket.
-
-
-
-
-
-
-
-
ENGLISH 7

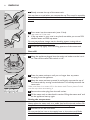
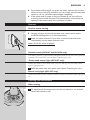
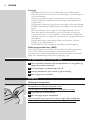
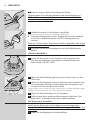
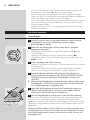
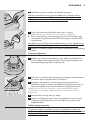
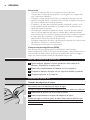
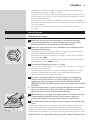
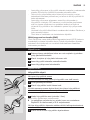
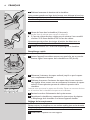
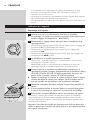
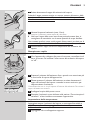
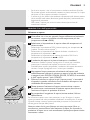
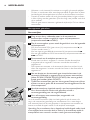
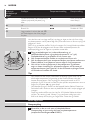
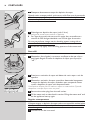
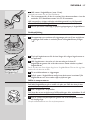
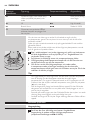
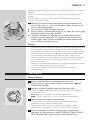
2 Slowly unscrew the cap of the steam tank.
You may hear a sound when you remove the cap. This sound is caused by
the vacuum or residual pressure inside the steam tank and is perfectly
normal.
3 Pour water into the steam tank (max. 1 litre).
Use tap water to ll the tank.
If the tap water in your area is very hard, we advise you to use 50%
distilled water and 50% tap water.
Do not put perfume, vinegar, starch, descaling agents, ironing aids or
other chemicals in the steam tank.
4 Screwthecaptightlyontothellingapertureofthesteamtank.
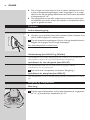
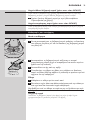
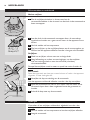
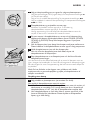
1 Keep the appliance plugged into the mains and make sure the iron is
on. Then set the steam tank switch to ‘off’.
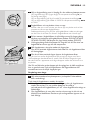
2 Press the steam activator until you no longer hear any steam
escaping from the appliance.
3 Keep the steam activator pressed in and slowly unscrew the cap of
the steam tank by turning it anticlockwise. This will depressurise the
steam tank.
Make sure there is no steam left in the steam tank. Place a piece of cloth
over the cap when unscrewing it.
4 Remove the mains plug from the wall socket.
5 Fill the steam tank as described in section ‘Filling the steam tank’ and
let the appliance heat up again.
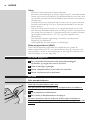
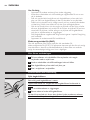
Setting the temperature
Always place the steam tank on a stable, level and horizontal surface. Do
not put the steam tank on the soft part of the ironing board.
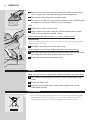
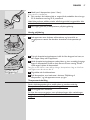
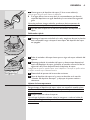
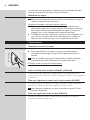
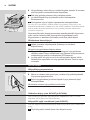
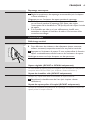
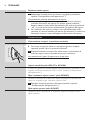
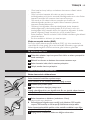
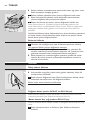
1 Put the iron on the iron stand.
Do not put the hot iron on the supply hose or the mains cord. Make
sure the cord does not come into contact with the hot soleplate.
,
ENGLISH8

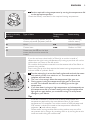
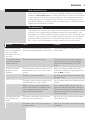
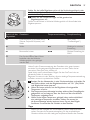
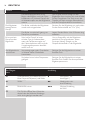
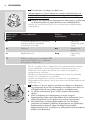
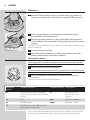
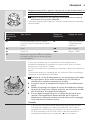
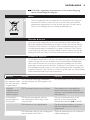
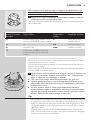
2 Set the required ironing temperature by turning the temperature dial
to the appropriate position.
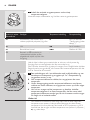
Check the laundry care label for the required ironing temperature:
Symbol on laundry
care label
Type of fabric Temperature
setting
Steam setting
B Synthetic fabrics (e.g. acetate, acrylic,
viscose, polyamide, polyester) and silk
1 MIN (see ‘Ironing
without steam’)
C Wool 2 Low to medium
D Cotton, linen 3 Medium to MAX
Z Please note that Z on the label
means that the article cannot be
ironed.
- -
If you do not know what kind(s) of fabric(s) an article is made of,
determine the right ironing temperature by ironing a part that will not be
visible when you wear or use the article.
Silk, woollen and synthetic materials: iron the reverse side of the fabric to
prevent shiny patches.
Start ironing the articles that require the lowest ironing temperature, such
as those made of synthetic bres.
3 Put the mains plug in an earthed wall socket and set both the steam
tank switch and the iron switch to ‘on’. The steam tank and the
soleplate will now heat up.
The iron is hot enough when the temperature light goes out.
During steam ironing the temperature light goes on from time
to time. This indicates that the iron is heating up to the right
temperature.
If you have been ironing at a high temperature and subsequently set
the temperature dial to a lower setting, wait until the temperature
light goes on again before you continue ironing. This will prevent
damage to your fabrics.
Tips
If the fabric consists of various kinds of bres, always select the
temperature required by the most delicate bre, i.e. the lowest
temperature. For example: if an article consists of 60% polyester and
40% cotton, it should be ironed at the temperature indicated for
polyester ( 1) and without steam.
When steam ironing woollen fabrics, shiny patches may occur. You
can prevent this by using a dry pressing cloth or by turning the article
inside out and ironing the reverse side.
,
,
,
-
-
ENGLISH 9

Velvet and other fabrics that tend to acquire shiny patches should be
ironed in one direction only (along with the nap) while applying very
little pressure.
Do not use steam when you are ironing coloured silk. This could cause
stains.
Using the appliance
Steam ironing
1 Make sure that there is enough water in the steam tank.
Steam ironing is only possible at higher ironing temperatures
(temperature settings 2 to MAX).
2 Select a steam setting suitable for the selected ironing temperature:
Select steam setting MIN (no steam) for temperature setting 1 (see
‘Ironing without steam’).
Select a low to medium steam setting for temperature setting 2.
Select a medium to MAX steam setting for temperature settings 3
to MAX.
3 The steam tank and the soleplate will now heat up.
Cold start: the soleplate takes approximately 2 minutes to heat up and
the steam tank takes approximately 8 minutes to heat up.
Quick reheat: if you rell the steam tank during the ironing process, the
water in the steam tank will take approximately 6 minutes to heat up.
4 As soon as the water in the steam tank is hot enough for steam
ironing, the steam tank power-on light goes out (GC6106, GC6104,
GC6103, GC6102 only). The steam-ready light goes on (GC6107
only).
During steam ironing the steam-ready light goes on from time to
time. This indicates that the steam tank is being heated up to the
right temperature.
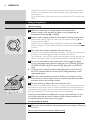
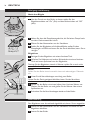
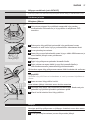
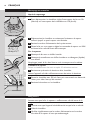
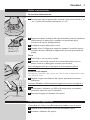
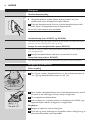
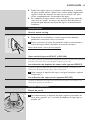
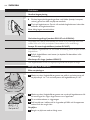
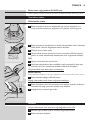
5 Keep the steam activator pressed in while you are steam ironing.
If you want to use the steam function continuously, slide the steam
activator lock to the locking position.
6 To stop steaming, release the steam activator lock.
If you have not used the steam function for some time, the steam that was
still present in the supply hose will have condensed into water. When you
start steam ironing again, this may cause some spluttering in the appliance
and a few droplets of water may escape from the soleplate.
Note: To prevent droplets from falling onto your garments, hold the iron over
an old cloth and press the steam activator until the steam production has
normalised before you start steam ironing again.
Ironing without steam
1 Select the recommended ironing temperature (see chapter ‘Preparing
for use’).
Do not press the steam activator while ironing.
-
-
,
-
-
-
-
-
,
,
ENGLISH10

Some steam will escape if you press the steam activator by accident
while you are ironing. To avoid this, you can simply set the steam tank
switch to ‘off’ to cut off the steam supply completely.
If the steam tank is empty or has not heated up yet, you will hear
a clicking sound inside the tank. This phenomenon is caused by the
opening of the steam valve and is perfectly harmless.
Features
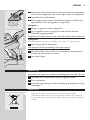
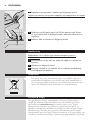
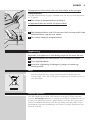
Vertical steam ironing
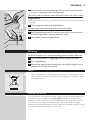
Hanging curtains and clothes (jackets, suits, coats) can be steam
ironed by holding the iron in vertical position.
1 Press the steam activator. If you want to use the steam function
continuously, use the steam activator lock.
Never direct the steam at people.
Variable steam (GC6107 and GC6104 only)
The steam control is continuously adjustable and can be set to any position
between MIN and MAX (see chapter ‘Preparing for use’).
’Steam tank empty’ light (GC6107 only)
When the water in the steam tank runs out during use, the ‘steam tank
empty’ light goes on.
1 Rellthesteamtankwithwater(seechapter‘Preparingforuse’).
Steam-ready light (GC6107 only)
When the steam tank is ready for steam ironing, the steam-ready light goes
on.
Cleaning and maintenance
After ironing
1 To depressurise the steam tank, set the iron switch to ‘on’ and the
steam tank switch to ‘off’.
,
,
,
ENGLISH 11

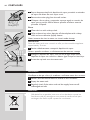
2 Depressurise the steam tank by pressing the steam activator until
you no longer hear any steam escaping from the appliance.
3 Remove the mains plug from the wall socket.
4 Put the iron on the iron stand, set the steam control to MIN and let
the appliance cool down before you start cleaning it.
Iron
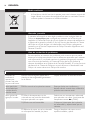
1 Clean the iron with a damp cloth.
2 Wipe scale and any other deposits off the soleplate with a damp
cloth and a non-abrasive (liquid) cleaner.
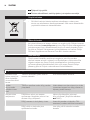
Never immerse the iron in water nor rinse it under the tap.
Steam tank
Rinse the steam tank once a month or after you have used the appliance
approximately 10 times.
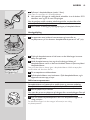
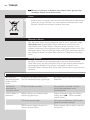
1 Carefully remove the cap of the steam tank.
Lettheappliancecooldownsufcientlybeforeremovingthecap.
2 Rinse the steam tank with 500 ml of fresh water. Pour out the water
by holding the steam tank upside down over the sink.
3 Screw the cap back onto the steam tank.
Storage
Makesuretheironhascooleddownsufcientlybeforeyouputitaway.
1 Remove the mains plug from the wall socket and let the iron cool
down.
2 Empty the steam tank.
3 Regularly check if the mains cord and the supply hose are still
undamaged and safe.
Environment
Do not throw away the appliance with the normal household waste
at the end of its life, but hand it in at an ofcial collection point for
recycling. By doing this, you help to preserve the environment.
-
ENGLISH12

Guarantee & service
If you need information or if you have a problem, please visit the Philips
website at www.philips.com or contact the Philips Customer Care Centre
in your country (you nd its phone number in the worldwide guarantee
leaet). If there is no Customer Care Centre in your country, go to your
local Philips dealer or contact the Service Department of Philips Domestic
Appliances and Personal Care BV.
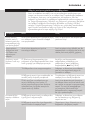
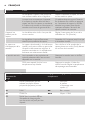
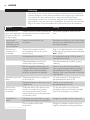
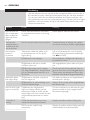
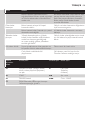
Troubleshooting
This chapter summarises the most common problems you could encounter
with your iron. Please read the different sections for more details. If you
are unable to solve the problem, please contact the Philips Customer Care
Centre in your country (you will nd its phone number in the worldwide
guarantee leaet). If there is no Customer Care Centre in your country,
turn to your local Philips dealer or the nearest Philips service centre.
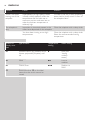
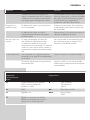
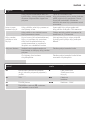
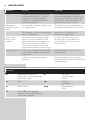
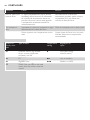
Problem Cause Solution
Some smoke comes
out of the appliance
after it has been
switched on for the
rst time.
This is normal. Some parts of the iron
have been greased lightly in the factory.
This phenomenon will cease after a
short while.
Dirt particles come
out of the soleplate
of the new iron.
This is normal with a new iron. These particles are harmless and they
will stop coming out of the soleplate
when you have used the iron a few
times.
Droplets of water
escape from the
soleplate.
The temperature dial has been set to a
temperature that is too low for steam
ironing.
Select an ironing temperature that is
suitable for steam ironing (temperature
settings 2 to MAX).
The iron is not switched on. Set the iron switch to ‘on’ and wait until
the iron is hot.
The steam tank has been placed on an
unstable and/or uneven surface.
Put the steam tank on a stable and even
surface.
When you start steam ironing, the
hose is cold. Steam condenses in the
hose, causing droplets of water to
escape from the soleplate.
This is normal. Hold the iron over an
old cloth and press the steam activator.
The cloth will absorb the drops. After a
few seconds the steam production will
have normalised.
The appliance does
not produce any
steam.
The steam tank and/or the iron has/
have not been switched on.
Set both the iron switch and the steam
tank switch to ‘on’.
The steam tank is not hot enough to
produce steam.
Wait 6 to 8 minutes for the steam tank
to heat up.
ENGLISH 13

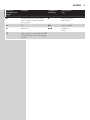
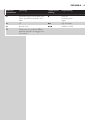
Problem Cause Solution
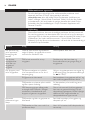
There is no steam
coming out of the
soleplate.
Superheated (i.e. high-quality) steam
is hardly visible, especially when the
temperature dial has been set to
maximum position and even less so
when the ambient temperature is
relatively high.
To check if the iron is really producing
steam, hold a (cold) mirror in front of
the soleplate vents.
The soleplate is
dirty.
Impurities or chemicals present in the
water have deposited on the soleplate.
Clean the soleplate with a damp cloth.
You have been ironing at too high
temperatures.
Clean the soleplate with a damp cloth.
Select the recommended ironing
temperature.
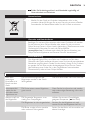
Symbol on
laundry care
label
Type of fabric Temperature
setting
Steam setting
B Synthetic fabrics (e.g. acetate, acrylic,
viscose, polyamide, polyester) and
silk
1 MIN (see
‘Ironing
without
steam’)
C Wool 2 Low to
medium
D Cotton, linen 3 Medium to
MAX
Z Please note that Z on the label
means that the article cannot be
ironed.
ENGLISH14

15
A Dampslange
B Temperaturindikator med lys
C Temperaturvælger og indikator
D Dampaktiveringsknap med lås
D1 Lås
D2 Aktiveringsknap
E Låg til damptank
F Holder til strygejernet
G Damptank
H Netledning
I Lysindikator for damp klar (kun GC6107)
J Kontakt til damptank (lyser når tændt)
K Dampkontrol (kun GC6107/GC6104)
L Kontakt til strygejern (lyser når tændt)
M Lysindikator for tom damptank (kun GC6107)
N Strygesål
Vigtigt
Læs denne brugsvejledning omhyggeligt igennem, inden apparatet tages i
brug, og gem den til eventuelt senere brug.
Fare
Hverken strygejern eller damptank må kommes ned i vand.
Advarsel
Kontrollér, om spændingsangivelsen på typeskiltet svarer til den lokale
netspænding, før du tilslutter apparatet.
Brug ikke apparatet, hvis stik, netledning, dampslange eller selve
apparatet viser tegn på beskadigelse, eller hvis apparatet er blevet tabt,
eller det er utæt.
Hvis ledningen eller dampslangen beskadiges, må de kun udskiftes af
Philips, et autoriseret Philips-serviceværksted eller af en kvaliceret
fagmand for at undgå enhver risiko ved efterfølgende brug.
Hold altid apparatet under opsyn, når det er sluttet til lysnettet.
Dette apparat er ikke beregnet til at blive brugt af personer (herunder
børn) med nedsatte fysiske og mentale evner, nedsat følesans eller
manglende erfaring og viden, medmindre de er blevet vejledt eller
instrueret i apparatets anvendelse af en person, der er ansvarlig for
deres sikkerhed.
Apparatet bør holdes uden for børns rækkevidde for at sikre, at de ikke
kan komme til at lege med det.
Lad ikke netledningen og dampslangen komme i kontakt med den
varme strygesål på strygejernet.
Hvis der slipper damp ud under låget til damptanken, mens
apparatet varmer op, skal du slukke for apparatet og stramme låget
til damptanken. Slipper der fortsat damp ud, mens apparatet varmer
op, skal du slukke for apparatet og kontakte din Philips-forhandler for
eventuelt eftersyn/reparation.
Tag aldrig låget af damptanken, mens damptanken er under tryk.
Brug kun det medfølgende låg til damptanken, da det samtidig fungerer
som sikkerhedsventil.
-
-
-
-
-
-
-
-
-
-
-
-
-
DANSK

Forsigtig
Apparatet må kun sluttes til en stikkontakt med jordforbindelse.
Kontrollér med jævne mellemrum, at netledningen og dampslangen er
hel og ubeskadiget.
Placér og brug altid strygejern og damptank på et stabilt, plant og
vandret underlag. Damptanken må ikke stilles på den bløde del af
strygebrættet.
Strygejernets holder og strygesål kan blive meget varme og forårsage
brandsår ved berøring. Undgå berøring af holderen, hvis damptanken
yttes.
Når du er færdig med at stryge, når du rengør apparatet, når du
fylder eller tømmer damptanken, og når du forlader strygejernet
– selv om det kun er i et kort øjeblik – skal du placere strygejernet i
standeren, slukke for strygejernet og damptanken og tage stikket ud af
stikkontakten.
Rengør damptanken regelmæssigt ifølge anvisningerne i afsnittet
‘Rengøring og vedligeholdelse’.
Dette apparat er kun beregnet til almindelig husholdningsbrug.
Elektromagnetiske felter (EMF)
Dette Philips-apparat overholder alle standarder for elektromagnetiske
felter (EMF). Ved korrekt anvendelse i overensstemmelse med
instruktionerne i denne brugsvejleding, er apparatet sikkert at anvende,
ifølge den videnskabelige viden, der er tilgængelig i dag.
Før apparatet tages i brug første gang
1
Fjerneventuellemærkaterellerbeskyttelseslmfrastrygesålen,og
rengør den med en blød klud.
2 Rul netledningen og dampslangen helt ud.
3 Anbringdamptankenpåetstabiltogplantunderlag.
4 Sæt strygejernet i standeren.
Klargøring
Fyldning af damptanken
Damptankenmåaldrigkommesnedivand.
Tagikkelågetaf,sålængestrygejernogdamptankervarme.
1 Tag stikket ud af stikkontakten.
2 Skruforsigtigtlågetafdamptanken.
Derkanforekommeenlyd,nårdufjernerlåget.Lydenskyldesdet
vakuum eller resttryk, der er i damptanken, og er helt normal.
-
-
-
-
-
-
-
DANSK16

3 Hæld vand i damptanken (max. 1 liter).
Brug vand fra vandhanen.
Hvisvandetiditlokalområdeermegethårdt,anbefalesdetatbruge
50 % destilleret vand og 50 % postevand.
Hæld ikke parfume, eddike, stivelse, afkalkningsmiddel, strygemidler eller
andre kemikalier i damptanken.
4 Skrulågetgodtfastpådamptankenspåfyldningsåbning.
Hurtig påfyldning
1 Lad apparatet være tilsluttet stikkontakten, og kontrollér, at
strygejernetertændt.Sætderefterkontaktentildamptankenpå
“off”.
2 Trykpådampaktiveringsknappen,indtilduikkelængerekanhøre,at
der slipper damp ud fra apparatet.
3 Hold dampaktiveringsknappen nedtrykket, og skru samtidig forsigtigt
lågettildamptankenafvedatdrejedetmoduretsretning.Påden
mådetagestrykketafdamptanken.
Sørg for, at der ikke er mere damp tilbage i damptanken. Læg en klud hen
over låget, mens du skruer det af.
4 Tag stikket ud af stikkontakten.
5 Fylddamptankensombeskrevetiafsnittet“Påfyldningaf
damptanken”, og lad apparatet varme op igen.
Temperaturindstilling
Placéraltiddamptankenpåetstabilt,plantogvandretunderlag.
Damptankenmåikkestillespåselvestrygebrættet.
1 Stil strygejernet i holderen.
Stilikkedetvarmestrygejernovenpådampslangenellernetledningen.
Sørg for, at netledningen ikke kommer i kontakt med den varme
strygesål.
,
DANSK 17

2 Indstil den ønskede strygetemperatur ved at dreje
temperaturvælgeren.
Kontrollér tøjets vaskemærke, og nd den rette strygetemperatur.
Symbolpåtøjets
vaskemærke
Stoftype Temperaturindstilling Dampindstilling
B Kunststoffer (f.eks. acetat, acryl,
viskose, polyamid, polyester) og silke
1 MIN (se afsnittet
“Tørstrygning (uden
damp)”)
C Uld 2 Lav til medium
D Bomuld, hør, linned 3 Medium til MAX
Z Bemærk, at Z-symbolet på
vaskemærket betyder, at det
pågældende stykke tøj ikke tåler
strygning.
- -
Ved du ikke, hvilken type materiale der er tale om, må du prøve dig
forsigtigt frem et sted på tøjet, der ikke ses under brug.
Silke, uld eller kunststof: Stryg tøjet på vrangen for at undgå blanke skjolder.
Begynd med at stryge det tøj, som kræver den laveste temperatur, dvs. det,
som er fremstillet af kunststof.
3 Sæt netledningens stik i en stikkontakt med jordforbindelse, og sæt
kontakternetildamptankogstrygejernpå“on”.Damptankenog
strygesålenvarmernuop.
Nårtemperaturindikatorenslukker,harstrygejernetdenrette
temperatur.
Under dampstrygning tænder temperaturindikatoren med jævne
mellemrum. Dette indikerer, at strygejernet varmer op til den valgte
temperatur.
Hvis du har strøget ved høj temperatur og derefter indstiller
temperaturvælgeren til en lavere temperatur, skal du vente, indtil
temperaturindikatoren tænder igen, før du fortsætter med at stryge.
Såundgårduatbeskadestoffet.
Gode råd
Hvis stoffet er fremstillet af ere slags bre, skal du altid vælge den
temperatur, som passer til den sarteste bertype, dvs. den laveste
temperatur. Hvis et stykke tøj f.eks. består af 60 % polyester og 40 %
bomuld, bør det stryges ved den temperatur, som passer til polyester (
1), og uden damp.
,
,
,
-
DANSK18

Ved dampstrygning af uld kan du risikere, at der kommer blanke
skjolder. Dette undgås ved enten at lægge et strygestykke over eller
stryge tøjet på vrangen.
Fløjl og andre stoffer, som har tendens til at få blanke skjolder, bør kun
stryges i én retning (med luven) og kun med et let tryk.
Undlad at bruge damp ved strygning af indfarvede silkestoffer, da det
kan give skjolder på tøjet.
Sådan bruges apparatet
Dampstrygning
1 Sørg for, at der er nok vand i damptanken.
Dampstrygning er kun mulig ved høje strygetemperaturer
(temperaturindstilling 2 til MAX).
2 Vælg den dampindstilling, som passer til den valgte strygetemperatur:
Vælg dampindstilling MIN (ingen damp) til temperaturindstilling 1 (se
afsnittet “Tørstrygning (uden damp)”).
Vælg lav til medium dampindstilling til temperaturindstillingen 2.
Vælg medium til MAX dampindstilling til temperaturindstillinger 3
til MAX.
3 Damptankenogstrygesålenvarmernuop.
Koldstart: Det tager ca. 2 minutter at varme strygesålen op, og ca. 8
minutter at opvarme damptanken.
Hurtig genopvarmning: Hvis du fylder vand på damptanken i løbet af en
strygeproces, tager det ca. 6 minutter at genopvarme damptanken.
4 Såsnartvandetidamptankenervarmtnoktildampstrygning,slukker
kontrollampen i kontakten til damptanken (kun GC6106, GC6104,
GC6103, GC6102). Lysindikatoren for damp klar tænder (kun
GC6107).
Under dampstrygning tænder kontrollampen for damp indimellem.
Dette indikerer, at damptanken opvarmes til den valgte temperatur.
5 Hold dampaktiveringsknappen nede under dampstrygning.
Hvisduvilbrugedampfunktionenkonstant,skubbeslåsentil
dampaktiveringsknappenilåseposition.
6 Skublåsentildampaktiveringsknappentilbageiåbenposition,nårdu
vil standse dampproduktionen.
Har du ikke brugt dampfunktionen i et stykke tid, er den resterende damp
i dampslangen fortættet til vand. Når du begynder at dampstryge igen, kan
det få strygejernet til at sprutte, og der kan dryppe et par vanddråber ud
igennem strygesålen.
Bemærk: For at undgå at der drypper vand på tøjet, holdes strygejernet
over en gammel klud og dampaktiveringsknappen holdes nede, indtil
dampproduktionen er blevet normal. Herefter kan dampstrygningen fortsættes.
Tørstrygning (uden damp)
1 Indstil den anbefalede strygetemperatur (se afsnittet “Klargøring”).
Undladattrykkepådampaktiveringsknappen,mensdustryger.
-
-
-
,
-
-
-
-
-
,
,
DANSK 19

Der vil slippe en smule damp ud, hvis du ved et uheld kommer til at
trykkepådampaktiveringsknappenunderstrygningen.Foratundgå
dette kan du afbryde dampproduktionen helt ved at sætte kontakten
tildamptankenpå“off”.
Hvis damptanken er tom eller endnu ikke er varmet op, vil du høre
enklikkendelydindefratanken.Detskyldes,atdampventilenåbnes,
og det er ganske harmløst.
Funktioner
Lodret dampstrygning
Gardinerogtøjpåbøjle(f.eks.jakker,habitter,frakker)dampesnemt
ved at holde strygejernet i lodret position.
1 Trykpådampaktiveringsknappen.Hvisduvilbrugedampfunktioneni
længeretidadgangen,skaldubrugelåseknappen.
Retaldrigdampstrålenmodpersoner.
Variabel damp (kun GC6107 og GC6104)
Dampvælgeren har trinløs regulering og kan indstilles til en hvilken som
helst position mellem MIN og MAX (se afsnittet “Klargøring”).
Lysindikator for tom damptank (kun GC6107)
Når damptanken løber tør for vand under strygningen, tænder
lysindikatoren for tom damptank.
1 Fyld mere vand i damptanken (se afsnittet “Klargøring”).
Lysindikator for damp klar (kun GC6107)
Når damptanken er klar til dampstrygning, tænder lysindikatoren for damp
klar.
Rengøring og vedligeholdelse
Efter brug
1 Trykkettagesafdamptankenvedatsættekontaktenpåstrygejernet
på“on”ogkontaktenpådamptankenpå“off”.
,
,
,
DANSK20
A página está carregando...
A página está carregando...
A página está carregando...
A página está carregando...
A página está carregando...
A página está carregando...
A página está carregando...
A página está carregando...
A página está carregando...
A página está carregando...
A página está carregando...
A página está carregando...
A página está carregando...
A página está carregando...
A página está carregando...
A página está carregando...
A página está carregando...
A página está carregando...
A página está carregando...
A página está carregando...
A página está carregando...
A página está carregando...
A página está carregando...
A página está carregando...
A página está carregando...
A página está carregando...
A página está carregando...
A página está carregando...
A página está carregando...
A página está carregando...
A página está carregando...
A página está carregando...
A página está carregando...
A página está carregando...
A página está carregando...
A página está carregando...
A página está carregando...
A página está carregando...
A página está carregando...
A página está carregando...
A página está carregando...
A página está carregando...
A página está carregando...
A página está carregando...
A página está carregando...
A página está carregando...
A página está carregando...
A página está carregando...
A página está carregando...
A página está carregando...
A página está carregando...
A página está carregando...
A página está carregando...
A página está carregando...
A página está carregando...
A página está carregando...
A página está carregando...
A página está carregando...
A página está carregando...
A página está carregando...
A página está carregando...
A página está carregando...
A página está carregando...
A página está carregando...
A página está carregando...
A página está carregando...
A página está carregando...
A página está carregando...
A página está carregando...
A página está carregando...
A página está carregando...
A página está carregando...
A página está carregando...
A página está carregando...
A página está carregando...
A página está carregando...
A página está carregando...
A página está carregando...
A página está carregando...
A página está carregando...
A página está carregando...
A página está carregando...
A página está carregando...
A página está carregando...
A página está carregando...
A página está carregando...
A página está carregando...
A página está carregando...
A página está carregando...
A página está carregando...
A página está carregando...
A página está carregando...
A página está carregando...
A página está carregando...
A página está carregando...
A página está carregando...
A página está carregando...
A página está carregando...
A página está carregando...
A página está carregando...
A página está carregando...
A página está carregando...
-
 1
1
-
 2
2
-
 3
3
-
 4
4
-
 5
5
-
 6
6
-
 7
7
-
 8
8
-
 9
9
-
 10
10
-
 11
11
-
 12
12
-
 13
13
-
 14
14
-
 15
15
-
 16
16
-
 17
17
-
 18
18
-
 19
19
-
 20
20
-
 21
21
-
 22
22
-
 23
23
-
 24
24
-
 25
25
-
 26
26
-
 27
27
-
 28
28
-
 29
29
-
 30
30
-
 31
31
-
 32
32
-
 33
33
-
 34
34
-
 35
35
-
 36
36
-
 37
37
-
 38
38
-
 39
39
-
 40
40
-
 41
41
-
 42
42
-
 43
43
-
 44
44
-
 45
45
-
 46
46
-
 47
47
-
 48
48
-
 49
49
-
 50
50
-
 51
51
-
 52
52
-
 53
53
-
 54
54
-
 55
55
-
 56
56
-
 57
57
-
 58
58
-
 59
59
-
 60
60
-
 61
61
-
 62
62
-
 63
63
-
 64
64
-
 65
65
-
 66
66
-
 67
67
-
 68
68
-
 69
69
-
 70
70
-
 71
71
-
 72
72
-
 73
73
-
 74
74
-
 75
75
-
 76
76
-
 77
77
-
 78
78
-
 79
79
-
 80
80
-
 81
81
-
 82
82
-
 83
83
-
 84
84
-
 85
85
-
 86
86
-
 87
87
-
 88
88
-
 89
89
-
 90
90
-
 91
91
-
 92
92
-
 93
93
-
 94
94
-
 95
95
-
 96
96
-
 97
97
-
 98
98
-
 99
99
-
 100
100
-
 101
101
-
 102
102
-
 103
103
-
 104
104
-
 105
105
-
 106
106
-
 107
107
-
 108
108
-
 109
109
-
 110
110
-
 111
111
-
 112
112
-
 113
113
-
 114
114
-
 115
115
-
 116
116
-
 117
117
-
 118
118
-
 119
119
-
 120
120
-
 121
121
-
 122
122


Philips GC6102 Manual do proprietário
- Categoria
- Estações de engomar a vapor
- Tipo
- Manual do proprietário
em outras línguas
- español: Philips GC6102 El manual del propietario
- français: Philips GC6102 Le manuel du propriétaire
- italiano: Philips GC6102 Manuale del proprietario
- English: Philips GC6102 Owner's manual
- Nederlands: Philips GC6102 de handleiding
- Deutsch: Philips GC6102 Bedienungsanleitung
- dansk: Philips GC6102 Brugervejledning
- svenska: Philips GC6102 Bruksanvisning
- Türkçe: Philips GC6102 El kitabı
- suomi: Philips GC6102 Omistajan opas
Artigos relacionados
-
Philips gc6104 Manual do usuário
-
Philips GC 6340 Manual do usuário
-
Philips GC6320 Manual do usuário
-
Philips GC6028 Manual do proprietário
-
Philips gc7320 02 Manual do usuário
-
Philips GC7240 Manual do proprietário
-
-
Philips GC6405 Manual do usuário
-
-
Philips GC6315/01 Manual do usuário