D-Link DCS-8010LH Guia de instalação
- Categoria
- Roteadores
- Tipo
- Guia de instalação
Este manual também é adequado para

QUICK
INSTALLATION
GUIDE
HD WI-FI CAMERA
DCS-8010LH
INSTALLATIONSANLEITUNG
GUIDE D’INSTALLATION
GUÍA DE INSTALACIÓN
GUIDA DI INSTALLAZIONE
INSTALLATIEHANDLEIDING
INSTRUKCJA INSTALACJI
INSTALAČNÍ PŘÍRUČKA
TELEPÍTÉSI SEGÉDLET
INSTALLASJONSVEILEDNING
INSTALLATIONSVEJLEDNING
ASENNUSOPAS
INSTALLATIONSGUIDE
GUIA DE INSTALAÇÃO
ΟΔΗΓΟΣ ΓΡΗΓΟΡΗΣ ΕΓΚΑΤΑΣΤΑΣΗΣ
VODIČ ZA BRZU INSTALACIJU
KRATKA NAVODILA ZA UPORABO
GHID DE INSTALARE RAPIDĂ

DCS-8010LH
2
ENGLISH
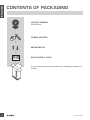
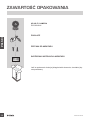
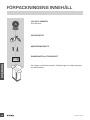
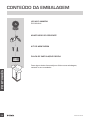
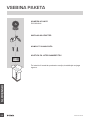
CONTENTS OF PACKAGING
HD WI-FI CAMERA
DCS-8010LH
MOUNTING KIT
POWER ADAPTER
If any of these items are missing from your packaging, contact your
reseller.
QUICK INSTALL CARD

DCS-8010LH 3
ENGLISH
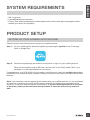
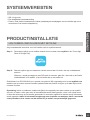
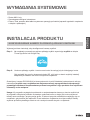
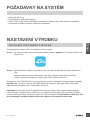
SYSTEM REQUIREMENTS
• 802.11n/g router
• A broadband Internet connection
• iPhone, iPad, Android smartphone or tablet (please refer to the mobile app's store page to check
whether your device is compatible)
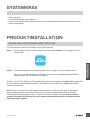
Please follow the instructions below to set up your mydlink camera.
Congratulations, your DCS-8010LH is now ready to use! Be sure to check the mydlink.com website
periodically for the latest rmware updates to keep your product secure and up to date with the latest
features.
Note: If you experience issues registering this camera with your mydlink account, or if you purchased
an open box or resold unit, perform a hard reset by pressing and holding the reset button on the
device for 10 seconds while the device is powered on. If you are returning the device to the place
of purchase, please perform the hard reset procedure to clear the device of any personal
data.
Step 1: On your mobile device, download mydlink by searching for mydlink in the iTunes App
Store or Google Play.
Step 2: Launch the mydlink app and create a new account or sign in to your existing account.
When you are asked to scan a QR code, use the code on the Quick Install Card in your
package, or on the label attached to your device.
PRODUCT SETUP
SETTING UP YOUR CAMERA WITH MYDLINK

DCS-8010LH
4
ENGLISH
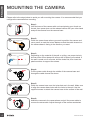
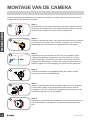
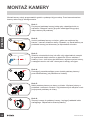
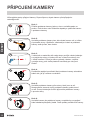
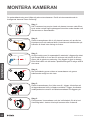
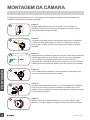
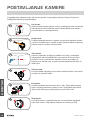
MOUNTING THE CAMERA
Please refer to the steps below to assist you with mounting the camera. It is recommended that you
congure the camera before mounting.
1Step 1:
Hold the base of the camera with one hand placing your thumb on
the tab, then press down on the release buttons with your other hand
and pull the camera from the camera base.
Step 6:
Attach the camera to the camera base and pull the power cable to
remove the extra cable. Adjust the angle of the camera as desired.
6
Step 4:
Pull the power cable through the middle of the camera base and
through the cable channel as shown.
4
Step 2:
Place the camera base where you want to position the camera and
use a pencil to mark the holes. Make sure that the cable channel on
the camera base is facing in the direction you want.
2
Step 3:
Depending on the material of the wall or ceiling, use proper tools to
drill two holes 25mm deep with a 6mm drill bit where you marked. If
the wall is made out of concrete, drill the holes rst, then insert the
plastic anchors to support the screws.
3
Step 5:
Place the camera base over the holes that are in the wall. Make sure
to align the camera base holes with the holes in the wall. Use the
supplied screws to attach the camera base to the surface of the wall.
5

DCS-8010LH 5
ENGLISH
TROUBLESHOOTING
SETUP AND CONFIGURATION PROBLEMS
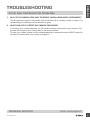
1. WHY IS THE CAMERA VIEW HAZY OR BRIGHT WHEN USING NIGHT VISION MODE?
The IR night vision lights on the camera may be reecting off of a nearby surface or window. Try
repositioning your camera to avoid reections or glare.
2. WHAT CAN I DO IF I FORGET MY CAMERA PASSWORD?
If you forget your camera password, you will need to perform a hard reset of your camera. This
process will change all your settings back to the factory defaults.
To reset your camera, please use an unfolded paperclip to press and hold the RESET button for
at least 10 seconds while your camera is plugged in.
TECHNICAL SUPPORT dlink.com/support

DCS-8010LH
6
DEUTSCH
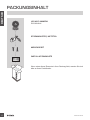
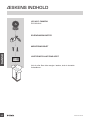
PACKUNGSINHALT
HD WI-FI-KAMERA
DCS-8010LH
MONTAGESET
STROMADAPTER/NETZTEIL
Wenn eines dieser Elemente in Ihrer Packung fehlt, wenden Sie sich
bitte an Ihren Fachhändler.
INSTALLATIONSKARTE

DCS-8010LH 7
DEUTSCH
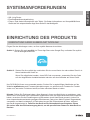
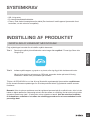
SYSTEMANFORDERUNGEN
• 802.11n/g Router
• Eine Breitbandinternetverbindung
• iPhone, iPad, Android Smartphone oder Tablet - Sie nden Informationen zur Kompatibilität Ihres
Geräts auf der entsprechenden App Store-Seite für das Mobilgerät.
Folgen Sie den Anleitungen unten, um Ihre mydlink Kamera einzurichten.
Ihre DCS-8010LH kann nun verwendet werden. Suchen Sie in regelmäßigen Abständen auf der
Website mydlink.com nach Firmware-Aktualisierungen, um anhand neuer Firmware Ihr Produkt
sicher und, was seine Funktionen betrifft, auf dem neuesten Stand zu halten.
Hinweis: Sollten Sie Probleme haben, diese Kamera in Ihrem mydlink-Konto zu registrieren, oder
wenn Sie ein nicht direkt vom Fachhändler angebotenes oder ein weiterverkauftes Gerät erworben
haben, versuchen Sie die Einstellungen zurückzusetzen (auch Hard Reset genannt), indem Sie
eine entsprechend auseinander gezogene Büroklammer (oder einen ähnlich spitzen Gegenstand)
verwenden und damit mindestens 10 Sekunden lang auf die Rücksetztaste drücken, während
das Gerät eingeschaltet ist. Falls Sie das Gerät an die Verkaufsstelle zurückgeben, führen
Sie vorher bitte den Rücksetzvorgang durch, um alle persönlichen Daten von dem Gerät zu
löschen.
Schritt 1: Suchen Sie nach mydlink im iTunes App Store oder Google Play und laden Sie mydlink
auf Ihr Mobilgerät herunter.
Schritt 2: Starten Sie die mydlink App und richten Sie ein neues Konto ein oder melden Sie sich in
Ihrem bestehenden Konto an.
Wenn Sie aufgefordert werden, einen QR-Code zu scannen, verwenden Sie den Code
auf der mitgelieferten Installationskarte oder den auf dem Aufkleber auf Ihrem Gerät.
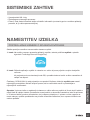
EINRICHTUNG DES PRODUKTS
EINRICHTUNG IHRER KAMERA MIT MYDLINK

DCS-8010LH
8
DEUTSCH
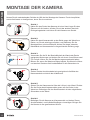
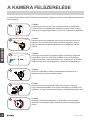
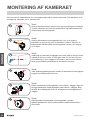
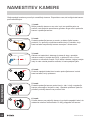
MONTAGE DER KAMERA
Nutzen Sie die nachstehenden Schritte als Hilfe bei der Montage der Kamera. Es wird empfohlen,
zuerst die Kamera zu kongurieren, bevor Sie sie montieren.
1Schritt 1:
Halten Sie den Sockel der Kamera mit einer Hand, legen Sie den
Daumen auf die Lasche, drücken Sie mit der anderen Hand die
Entriegelungstasten und ziehen Sie die Kamera vom Sockel.
Schritt 6:
Befestigen Sie die Kamera am Kamerasockel und ziehen Sie am
Anschlusskabel, um die Kabelüberlänge zu beseitigen. Bringen Sie
die Kamera in den gewünschten Winkel.
6
Schritt 4:
Ziehen Sie das Anschlusskabel wie gezeigt durch die Mitte des
Kamerasockels und durch den Kabelkanal.
4
Schritt 2:
Halten Sie den Kamerasockel an der Stelle gegen die Wand bzw.
Decke, wo Sie sie anbringen möchten, und markieren Sie die
Montagelöcher mit einem Bleistift. Achten Sie darauf, dass der
Kabelkanal am Kamerasockel in die gewünschte Richtung zeigt.
2
Schritt 3:
Verwenden Sie die für die Beschaffenheit der Wand oder Decke
geeigneten Werkzeuge und bohren Sie mit einem 6-mm-Bohrer zwei
2,5 cm tiefe Löcher, wo Sie die Markierungen angebracht haben.
Bohren Sie, wenn die Wand aus Beton besteht, zunächst die Löcher
und stecken Sie dann die Kunststoffdübel für die Schrauben ein.
3
Schritt 5:
Setzen Sie den Kamerasockel über die Löcher in der Wand. Richten
Sie die Löcher des Kamerasockels genau auf die Löcher in der
Wand aus. Befestigen Sie den Kamerasockel mit den mitgelieferten
Schrauben an der Wand.
5

DCS-8010LH 9
DEUTSCH
FEHLERBEHEBUNG
EINRICHTUNGS- UND KONFIGURATIONSPROBLEME
1. WARUM IST BEI VERWENDUNG DES NACHTSICHTMODUS DIE SICHT DER KAMERA
TRÜB ODER SEHR HELL?
Möglicherweise werden die IR-Nachtsichtleuchten auf der Kamera von einer Oberäche in der
Nähe reektiert. Versuchen Sie, die Kamera neu aufzustellen und auszurichten, um Blendlicht
oder Reexionen zu vermeiden.
2. WAS TUN, WENN ICH MEIN KAMERAKENNWORT VERGESSEN HABE?
Wenn Sie Ihr Kamerakennwort vergessen haben, müssen Sie alle Einstellungen Ihrer Kamera
zurücksetzen (auch Hard Reset genannt). Dieser Vorgang setzt alle Ihre Einstellungen auf die
werkseitigen Standardeinstellungen zurück.
Um die Einstellungen Ihrer Kamera zurückzusetzen, verwenden Sie eine entsprechend
auseinander gezogene Büroklammer (oder einen ähnlich spitzen Gegenstand) und drücken
und halten Sie die RESET-Taste mindestens 10 Sekunden lang, während Ihre Kamera
angeschlossen ist.
TECHNICAL SUPPORT dlink.com/support

DCS-8010LH
10
FRANÇAIS
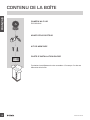
CONTENU DE LA BOÎTE
CAMÉRA WI-FI HD
DCS-8010LH
KIT DE MONTAGE
ADAPTATEUR SECTEUR
Contactez immédiatement votre revendeur s’il manque l’un de ces
éléments de la boîte.
CARTE D’INSTALLATION RAPIDE

DCS-8010LH 11
FRANÇAIS
CONFIGURATION SYSTÈME
REQUISE
• Routeur 802.11 n/g
• Une connexion Internet haut débit
• iPhone, iPad, ou smartphone ou tablette Android (veuillez vous reporter à la page de l'application
mobile pour vérier si votre appareil est compatible)
Veuillez suivre les instructions ci-dessous pour congurer votre caméra mydlink.
Félicitations, votre DCS-8010LH est maintenant prêt à l'emploi ! N'oubliez pas de visiter
régulièrement le site Web mydlink.com pour rechercher les dernières mises à jour du
microprogramme an de préserver la sécurité de votre produit et de rester à jour avec les dernières
fonctions.
Remarque : Si vous rencontrez des problèmes pour enregistrer cette caméra sur votre compte
mydlink ou si vous avez acheté une boîte ouverte ou un périphérique de seconde main, effectuez
une réinitialisation matérielle en appuyant sur le bouton de réinitialisation du périphérique pendant
10 secondes alors qu'il est sous tension. Si vous devez renvoyer le périphérique au lieu d'achat,
veuillez suivre la procédure de réinitialisation matérielle pour effacer toutes les données
personnelles du périphérique.
Étape 1 : Téléchargez mydlink sur votre appareil mobile en recherchant mydlink dans l'iTunes App
Store ou Google Play.
Étape 2 : Lancez l'application mydlink et créez un compte ou connectez-vous à votre compte
existant.
Lorsque l'on vous demande de scanner un code QR, utilisez le code qui se trouve sur la
carte d'installation rapide incluse, ou sur l'étiquette apposée sur votre périphérique.
CONFIGURATION DU PRODUIT
CONFIGURATION DE VOTRE CAMÉRA AVEC MYDLINK

DCS-8010LH
12
FRANÇAIS
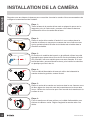
INSTALLATION DE LA CAMÉRA
Reportez-vous aux étapes ci-dessous pour vous aider à monter la caméra. Nous recommandons de
congurer la caméra avant de l'installer.
1Étape 1 :
Tenez la base de la caméra d'une main en plaçant le pouce sur la
languette, puis, de l'autre main, poussez vers le bas les boutons
relâchement et tirez la caméra de sa base.
Étape 6 :
Fixez la caméra sur la base et tirez sur le câble d'alimentation pour
éliminer le câble en excès. Réglez l'angle de la caméra selon vos
désirs.
6
Étape 4 :
Tirez le câble d'alimentation à travers le milieu de la base de la
caméra et dans la goulotte, comme illustré.
4
Étape 2 :
Placez le socle de la caméra à l'endroit où vous voulez placer la
caméra et utilisez un crayon pour marquer les trous. Assurez-vous
que la goulotte située à la base de la caméra est orientée dans la
direction souhaitée.
2
Étape 3 :
En fonction du matériau de la paroi ou du plafond, utilisez les outils
appropriés pour percer deux trous de 25 mm de profondeur à l'aide
d'un foret de 6 mm aux endroits que vous avez marqués. Si le mur
est fait de béton, percez d'abord les trous, puis insérez les chevilles
en plastique pour tenir les vis.
3
Étape 5 :
Placez le socle de la caméra sur les trous dans le mur. Assurez-vous
de bien aligner les trous du socle de la caméra avec les trous dans
le mur. Utilisez les vis fournies pour xer le socle de la caméra sur la
surface du mur.
5

DCS-8010LH 13
FRANÇAIS
ASSISTANCE TECHNIQUE dlink.com/support
RÉSOLUTION DES PROBLÈMES
PROBLÈMES D'INSTALLATION ET DE CONFIGURATION
1. POURQUOI LA VUE DE LA CAMÉRA EST-ELLE BRUMEUSE OU LUMINEUSE LORS DE
L'UTILISATION DU MODE DE VISION NOCTURNE ?
Les lumières infrarouges pour vision nocturne de la caméra peuvent être rééchies par une
surface ou une fenêtre proche. Essayez de repositionner votre caméra pour éviter les réexions
ou l'éblouissement.
2. QUE PUIS-JE FAIRE SI J'OUBLIE LE MOT DE PASSE DE MA CAMÉRA ?
Si vous oubliez le mot de passe de votre caméra, vous devrez réaliser une réinitialisation
matérielle de votre appareil. Cette procédure réinitialise tous vos paramètres.
Pour réinitialiser votre caméra, utilisez un trombone déplié et appuyez sur le bouton
RÉINITIALISATION pendant au moins 10 secondes alors que la caméra est branchée.

DCS-8010LH
14
ESPAÑOL
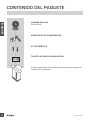
CONTENIDO DEL PAQUETE
CÁMARA WI-FI HD
DCS-8010LH
KIT DE MONTAJE
ADAPTADOR DE ALIMENTACIÓN
Si falta cualquiera de estos componentes del paquete, póngase en
contacto con el proveedor.
TARJETA DE INSTALACIÓN RÁPIDA

DCS-8010LH 15
ESPAÑOL
REQUISITOS DEL SISTEMA
• Router 802.11n/g
• Una conexión a Internet de banda ancha
• Teléfono inteligente o tableta iPhone, iPad, Android (consulte la página del almacén de aplicaciones
móviles para comprobar si el dispositivo es compatible)
Siga las instrucciones que aparecen a continuación para congurar la cámara mydlink.
Felicidades, la DCS-8010LH ya esta lista para su uso. Asegúrese de consultar el sitio web mydlink.
com periódicamente para buscar las últimas actualizaciones de rmware y así mantener el
producto seguro y actualizado con las últimas características.
Nota: Si tiene problemas para registrar esta cámara con su cuenta de mydlink o si ha adquirido
una unidad abierta o de segunda mano, lleve a cabo una reinicialización completa pulsando y
manteniendo pulsado el botón de reinicio del dispositivo durante 10 segundos mientras éste está
encendido. Si va a devolver el dispositivo al lugar en el que realizó la adquisición, lleve a cabo
una reinicialización completa para borrar los datos personales del dispositivo.
Paso 1: En su dispositivo móvil, descargue mydlink buscando mydlink en el almacén de
aplicaciones de iTunes o en el almacén de Google.
Paso 2: Inicie la aplicación mydlink y cree una nueva cuenta o inicie sesión en su cuenta existente.
Cuando se le pida que analice un código QR, utilice el código que se encuentra en la
Tarjeta de instalación rápida de la caja o en la etiqueta adherida al dispositivo.
CONFIGURACIÓN DEL PRODUCTO
CONFIGURACIÓN DE LA CÁMARA CON MYDLINK

DCS-8010LH
16
ESPAÑOL
MONTAJE DE LA CÁMARA
Consulte los pasos siguientes para que le ayuden con el montaje de la cámara. Se recomienda
congurar la cámara antes de montarla.
1Paso 1:
Sostenga la base de la cámara con una mano, colocando el pulgar
sobre la pestaña, presione hacia abajo en los botones de liberación
con la otra mano y tire de la cámara desde su base.
Paso 6:
Acople la cámara a la base de la cámara y tire del cable de
alimentación para retirar el sobrante. Ajuste el ángulo de la cámara
como desee.
6
Paso 4:
Pase el cable de alimentación a través del centro de la base de la
cámara y a través del canal del cable, como se muestra.
4
Paso 2:
Coloque la base de la cámara en el lugar en el que desee colocar la
cámara y utilice un lápiz para marcar los oricios. Asegúrese de que
el canal del cable en la base de la cámara mira en la dirección que
desee.
2
Paso 3:
En función del material de la pared o el techo, utilice las
herramientas adecuadas para taladrar dos agujeros con una
broca de 6 mm a una profundidad de 25 mm donde ha marcado.
Si la pared es de hormigón, taladre primero los agujeros y, a
continuación, introduzca los tacos de plástico para sujetar los
tornillos.
3
Paso 5:
Coloque la base de la cámara sobre los oricios realizados en la
pared. Asegúrese de alinear los oricios de la base de la cámara
con los oricios de la pared. Utilice los tornillos suministrados para
acoplar la base de la cámara a la supercie de la pared.
5

DCS-8010LH 17
ESPAÑOL
SOLUCIÓN DE PROBLEMAS
PROBLEMAS CON LA INSTALACIÓN Y LA CONFIGURACIÓN
1. ¿POR QUÉ ESTÁ BORROSA O BRILLANTE LA VISTA DE LA CÁMARA CUANDO SE
UTILIZA EL MODO DE VISIÓN NOCTURNA?
Es posible que las luces IR de visión nocturna de la cámara se estén reejando en una
supercie o ventana cercana. Cambie la posición de la cámara para evitar reejos o brillos.
2. ¿QUÉ PUEDO HACER SI ME OLVIDO DE LA CONTRASEÑA DE MI CÁMARA?
Si no recuerda la contraseña de la cámara, deberá realizar una reinicialización completa de la
cámara. Este proceso devolverá todos los parámetros a los valores predeterminados de fábrica.
Para restablecer la cámara, mantenga pulsado el botón RESET (Reiniciar) con el extremo de
un clip durante al menos diez segundos mientras la cámara está enchufada.
ASISTENCIA TÉCNICA dlink.com/support

DCS-8010LH
18
ITALIANO
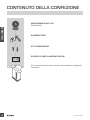
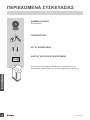
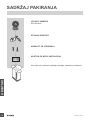
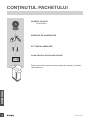
CONTENUTO DELLA CONFEZIONE
VIDEOCAMERA WI-FI HD
DCS-8010LH
KIT DI MONTAGGIO
ALIMENTATORE
Se uno di questi articoli non è incluso nella confezione, rivolgersi al
rivenditore.
SCHEDA DI INSTALLAZIONE RAPIDA

DCS-8010LH 19
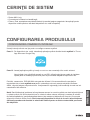
ITALIANO
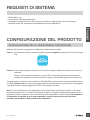
REQUISITI DI SISTEMA
• Router 802.11n/g
• Connessione Internet a banda larga
• Smartphone o tablet iPhone, iPad o Android (consultare la pagina dello store con le app per
dispositivi mobili per controllare la compatibilità del proprio dispositivo)
Attenersi alle istruzioni seguenti per congurare la videocamera mydlink.
Congratulazioni, a questo punto il dispositivo DCS-8010LH è pronto all'uso! Visitare periodicamente il
sito Web mydlink.com per scaricare gli aggiornamenti del rmware che consentiranno di proteggere
il prodotto e tenerlo sempre aggiornato con le funzionalità più recenti.
Nota: in caso di problemi con la registrazione della videocamera nell'account mydlink o se è stata
acquistata un'open box o un'unità ricondizionata eseguire un ripristino hardware tenendo premuto il
pulsante di reset sul dispositivo per 10 secondi quando il dispositivo è acceso. Se si sta riportando
il dispositivo al negozio dove è stato acquistato, eseguire una procedura di ripristino
hardware per eliminare i dati personali dal dispositivo.
Passo 1: Sul dispositivo mobile, scaricare mydlink cercando mydlink nell'App Store iTunes o Google
Play.
Passo 2: avviare l'app mydlink e creare un nuovo account oppure effettuare l'accesso con l'account
esistente.
Quando viene chiesto di acquisire un codice QR, usare quello riportato sulla scheda di
installazione rapida inclusa nella confezione oppure sull'etichetta applicata sul dispositivo.
CONFIGURAZIONE DEL PRODOTTO
CONFIGURAZIONE DELLA VIDEOCAMERA CON MYDLINK

DCS-8010LH
20
ITALIANO
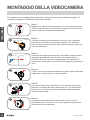
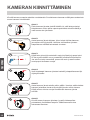
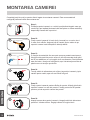
MONTAGGIO DELLA VIDEOCAMERA
Per assistenza nel montaggio della videocamera, consultare la procedura riportata di seguito. Si
consiglia di congurare la videocamera prima di montarla.
1Fase 1:
Mantenere la base della videocamera con una mano posizionando
il pollice sulal scheda, quindi premere sui pulsanti di rilascio con la
mano e sollevare la videocamera dalla base.
Fase 6:
Collegare la videocamera alla relativa base e tirare il cavo di
alimentazione per rimuovere il cavo extra. Regolare l'angolo della
videocamera come desiderato.
6
Fase 4:
Tirare il cavo di alimentazione attraverso la parte centrale della base
e attraverso il canale del cavo, come mostrato.
4
Fase 2:
Collocare la base della videocamera nel punto in cui si desidera
posizionarla e utilizzare una matita per segnare i fori. Vericare
che il canale del caso sulla base della videocamera sia rivolto sulla
direzione desiderata.
2
Fase 3:
A seconda del materiale della parete o del softto, usare strumenti
appropriati per effettuare due fori da 25 mm di profondità con
una punta da 6 mm nel punto contrassegnato. Se la parete è di
calcestruzzo, forare prima, quindi inserire dei supporti di plastica per
le viti.
3
Fase 5:
Collocare la base della videocamera sui fori praticati sulla parete.
Allineare i fori della base della videocamera con i fori sulla parete.
Utilizzare le viti fornite per ssare la base della videocamera alla
supercie della parete.
5
A página está carregando...
A página está carregando...
A página está carregando...
A página está carregando...
A página está carregando...
A página está carregando...
A página está carregando...
A página está carregando...
A página está carregando...
A página está carregando...
A página está carregando...
A página está carregando...
A página está carregando...
A página está carregando...
A página está carregando...
A página está carregando...
A página está carregando...
A página está carregando...
A página está carregando...
A página está carregando...
A página está carregando...
A página está carregando...
A página está carregando...
A página está carregando...
A página está carregando...
A página está carregando...
A página está carregando...
A página está carregando...
A página está carregando...
A página está carregando...
A página está carregando...
A página está carregando...
A página está carregando...
A página está carregando...
A página está carregando...
A página está carregando...
A página está carregando...
A página está carregando...
A página está carregando...
A página está carregando...
A página está carregando...
A página está carregando...
A página está carregando...
A página está carregando...
A página está carregando...
A página está carregando...
A página está carregando...
A página está carregando...
A página está carregando...
A página está carregando...
A página está carregando...
A página está carregando...
A página está carregando...
A página está carregando...
-
 1
1
-
 2
2
-
 3
3
-
 4
4
-
 5
5
-
 6
6
-
 7
7
-
 8
8
-
 9
9
-
 10
10
-
 11
11
-
 12
12
-
 13
13
-
 14
14
-
 15
15
-
 16
16
-
 17
17
-
 18
18
-
 19
19
-
 20
20
-
 21
21
-
 22
22
-
 23
23
-
 24
24
-
 25
25
-
 26
26
-
 27
27
-
 28
28
-
 29
29
-
 30
30
-
 31
31
-
 32
32
-
 33
33
-
 34
34
-
 35
35
-
 36
36
-
 37
37
-
 38
38
-
 39
39
-
 40
40
-
 41
41
-
 42
42
-
 43
43
-
 44
44
-
 45
45
-
 46
46
-
 47
47
-
 48
48
-
 49
49
-
 50
50
-
 51
51
-
 52
52
-
 53
53
-
 54
54
-
 55
55
-
 56
56
-
 57
57
-
 58
58
-
 59
59
-
 60
60
-
 61
61
-
 62
62
-
 63
63
-
 64
64
-
 65
65
-
 66
66
-
 67
67
-
 68
68
-
 69
69
-
 70
70
-
 71
71
-
 72
72
-
 73
73
-
 74
74


D-Link DCS-8010LH Guia de instalação
- Categoria
- Roteadores
- Tipo
- Guia de instalação
- Este manual também é adequado para
em outras línguas
- français: D-Link DCS-8010LH Guide d'installation
- italiano: D-Link DCS-8010LH Guida d'installazione
- română: D-Link DCS-8010LH Ghid de instalare
Artigos relacionados
-
D-Link DCS-8525LH Quick Installation Manual
-
D-Link Mydlink DCS-8200LH Quick Installation Manual
-
D-Link DCS-800L Guia de usuario
-
-
D-Link DCS-942L Guia de instalação
-
D-Link DCS-932L Manual do usuário
-
D-Link DIR-818LW Quick Installation Manual
-
-
-