Hama 00179803 Manual do usuário
- Categoria
- Controles remotos
- Tipo
- Manual do usuário

179803
Big ZapperUniversal Fernbedienung
Universal Remote Control 2in1
E
F
GB
I
P
NL
H
PL
Bedienungsanleitung
Operating Instructions
Mode d‘emploi
Instrucciones de uso
Istruzioni per l‘uso
Gebruiksaanwijzing
Instrukcja obsługi
Használati útmutató
Manual de instruções
D


AA
2in1
Art.Nr.: 00179803
Exit
Menu AV
2
8
3
4
6
7
12
11
10
9
1
5

2
DBedienungsanleitung
Universal-Fernbedienung
Danke, dass Sie sich für den Kauf eines Hama-Produkts entschieden haben.
Nehmen Sie sich die Zeit, und lesen Sie die folgenden Anweisungen und
Informationen vollständig durch. Bitte bewahren Sie diese Anleitung zum
späteren Nachschlagen an einem sicheren Platz auf.
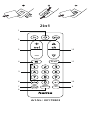
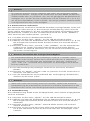
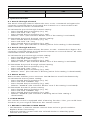
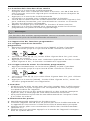
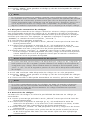
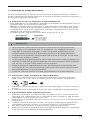
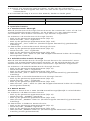
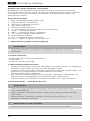
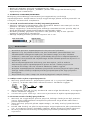
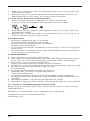
Funktionstasten
1. EIN/AUS / LED Indikator
2. Tasten zur Geräteauswahl
3. Vol+/Vol-: Lautstärkeregulierung
4. Stummschalter
5. Zifferntasten 0-9
6. -/-- Zu zweistelligen Sendernummern wechseln
7. Setup – Einstellungen der Fernbedienung
8. Menu – Gerätemenü öffnen
9. AV – externe AV Quelle wählen
10. Auswahl bestätigen
11. Exit – Auswahl bestätigen
12. CH +/- - Programmauswahl
1. Erläuterung des Hinweissymbols
Hinweis
•Dieses Symbol deutet auf zusätzliche Informationen oder wichtige Hinweise
hin.
2. Lieferumfang
- Universal-Fernbedienung
- Codeliste
- Diese Bedienungsanleitung
3. Sicherheitshinweise
• Verwenden Sie die Universal-Fernbedienung nicht in feuchten Umge-
bungen, und vermeiden Sie Kontakt mit Spritzwasser.
• Halten Sie die Universal-Fernbedienung von Wärmequellen fern, und
setzen Sie sie keinem direkten Sonnenlicht aus.
• Lassen Sie die Universal-Fernbedienung nicht fallen.
• Öffnen Sie die Universal-Fernbedienung nicht. Sie enthält keine vom
Benutzer zu wartenden Teile.
• Die Universal-Fernbedienung gehört wie alle elektrischen Geräte nicht in
Kinderhände.
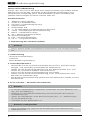
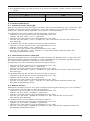
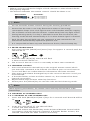
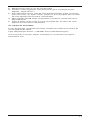
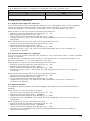
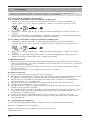
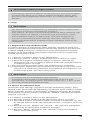
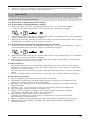
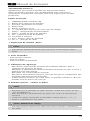
4. Erste Schritte – Einsetzen der Batterien
Hinweis
•Es werden Alkalibatterien empfohlen. Verwenden Sie zwei Batterien vom
Typ „AA” (LR 6/Mignon).
•Entfernen Sie die Batteriefachabdeckung auf der Rückseite der Universal-
Fernbedienung (A).
•Setzen Sie die Batterien unter Berücksichtigung der „+/-”-Markierungen
für die Polarität ein (B).
•Schließen Sie das Batteriefach (C).
Hinweis: Codespeicher
•Diese Fernbedienung speichert die Einstellungen auch während eines
Batteriewechsels.

3
Hinweis: Energiesparfunktion
•Die Fernbedienung schaltet sich automatisch aus, wenn eine Taste länger
als 15 Sekunden gedrückt wird. Dies verlängert die Lebensdauer der Batte-
rien, sollte die Fernbedienung an einer Stelle feststecken, an der die Tasten
dauerhaft gedrückt werden, z. B. zwischen Sofakissen.
5. Setup
Hinweis
•Halten Sie die Fernbedienung für eine ordnungsgemäße Infrarotübertra-
gung immer in die ungefähre Richtung des zu bedienenden Geräts.
•Falls innerhalb von 30 Sekunden keine Eingabe erfolgt, wird der SETUP-
Mode automatisch beendet. Die LED blinkt sechsmal und geht dann aus.
•Sie können mit der Universal-Fernbedienung kein Gerät bedienen, solange
sich diese im Setup-Modus bendet. Verlassen Sie den Setup-Modus, und
wählen Sie das zu bedienende Gerät über die Tasten zur Geräteauswahl aus.
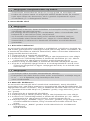
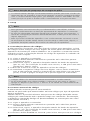
5.1 Direkte Codeeingabe
Im Lieferumfang der Universal-Fernbedienung ist eine Codeliste enthalten.
Die Codeliste zeigt fünfstellige Codes der meisten TV/STB-Gerätehersteller in
alphabetischer Reihenfolge an. Wenn das zu bedienende Gerät in der Codeliste
enthalten ist, ist die direkte Codeeingabe die einfachste Eingabemethode.
5.1.1 Schalten Sie das zu bedienende Gerät ein.
5.1.2 Drücken Sie die Taste „SETUP”, bis die LED dauerhaft leuchtet.
5.1.3 Wählen Sie über die Gerätetaste das zu bedienende Gerät aus (z. B. TV).
Bei erfolgreicher Auswahl blinkt die LED einmal und leuchtet danach
dauerhaft.
5.1.4
Suchen Sie in der Codeliste nach Marke und Typ des zu bedienenden Geräts.
5.1.5 Geben Sie den entsprechenden fünfstelligen Code über die Zifferntasten
0-9 ein. Die LED bestätigt die Eingabe der einzelnen Ziffern jeweils mit
einem kurzen Blinken und erlischt nach der fünften Ziffer.
Hinweis
•Ein gültiger Code wird automatisch gespeichert.
•Bei einem ungültigem Code blinkt die LED sechsmal und erlischt anschlie-
ßend. Wiederholen Sie die Schritte 5.1.1 bis 5.1.5, oder verwenden Sie eine
andere Methode zur Codeeingabe.
5.2 Manuelle Codesuche
Die Universal-Fernbedienung verfügt über einen internen Speicher, in dem
bereits bis zu 350 Codes pro Gerätetyp für die gängigsten TV/STB-Geräte ent-
halten sind. Sie können diese Codes durchgehen, bis das zu bedienende Gerät
eine Reaktion zeigt. Beispielsweise schaltet sich das zu bedienende Gerät aus
(Taste „POWER”) oder wechselt den Sender (Taste „CH+/CH-”).
5.2.1 Schalten Sie das zu bedienende Gerät ein.
5.2.2 Drücken Sie die SETUP-Taste, bis die LED dauerhaft leuchtet.
5.2.3 Wählen Sie über die Gerätetaste das zu bedienende Gerät aus (z. B. TV).
Bei erfolgreicher Auswahl blinkt die LED einmal und leuchtet danach
dauerhaft.
5.2.4 Drücken Sie die Taste „POWER” oder
„CH+/CH-”, um durch die voreingestellten Codes zu blättern, bis das zu
bedienende Gerät eine Reaktion zeigt.
5.2.5 Drücken Sie „MUTE”, um den Code zu speichern und die Codesuche zu
verlassen. Die LED erlischt.

4
Hinweis
•Im internen Speicher können maximal 350 Codes der gängigsten Geräte
gespeichert werden. Aufgrund der zahlreichen auf dem Markt erhältlichen
TV/STB-Geräte kann es passieren, dass nur die gängigsten Hauptfunktionen
verfügbar sind. Ist dies der Fall, wiederholen Sie die Schritte 5.2.1 bis 5.2.5,
um einen kompatibleren Code zu nden. Für einige spezielle Gerätemodelle
ist möglicherweise kein Code verfügbar.
5.3 Automatische Codesuche
Die automatische Codesuche verwendet dieselben voreingestellten Codes wie
die manuelle Codesuche (5.2). Die Universal-Fernbedienung durchsucht die
Codes jedoch automatisch, bis das zu bedienende Gerät eine Reaktion zeigt.
Beispielsweise schaltet sich das zu bedienende Gerät aus (Taste „POWER”)
oder wechselt den Sender (Tasten „CH+/CH-”).
5.3.1 Schalten Sie das zu bedienende Gerät ein.
5.3.2 Drücken Sie die Taste „SETUP”, bis die LED dauerhaft leuchtet.
5.3.3 Wählen Sie über die Gerätetaste das zu bedienende Gerät aus (z. B. TV).
Bei erfolgreicher Auswahl blinkt die LED einmal und leuchtet danach
dauerhaft.
5.3.4 Drücken Sie die Taste „CH+/CH-” oder „POWER”, um die automatische
Codesuche zu starten. Die LED blinkt einmal und leuchtet danach
dauerhaft. Es dauert 6 Sekunden, bis die Universal-Fernbedienung mit
der ersten Suche beginnt.
Hinweis: Einstellen der Suchgeschwindigkeit
•Die Standardeinstellung für die Suchzeit pro Code ist 1 Sekunde. Wenn
Ihnen dies nicht zusagt, können Sie zu einer Suchzeit von 3 Sekunden pro
Code wechseln. Um zwischen den Suchzeiten zu wechseln, drücken Sie
„CH+” oder „CH-” innerhalb der 6 Sekunden vor dem Beginn der automa-
tischen Codesuche.
5.3.5 Die LED bestätigt die jeweiligen Codesuchen mit einem einzelnen
Blinken.
5.3.6 Drücken Sie „MUTE”, um den Code zu speichern und die Codesuche zu
verlassen. Die LED erlischt.
5.3.7 Um die automatische Suche während des Suchvorgangs abzubrechen,
drücken Sie die Taste „EXIT”.
Hinweis
•Wenn alle Codes ohne Erfolg durchsucht wurden, verlässt die Universal-
Fernbedienung die automatische Codesuche und kehrt automatisch in den
Betriebsmodus zurück. Der aktuell gespeicherte Code bleibt unverändert.
5.4 Codeerkennung
Die Codeerkennung bietet Ihnen die Möglichkeit, einen bereits eingegebenen
Code zu ermitteln.
5.4.1 Drücken Sie die Taste „SETUP”, bis die LED dauerhaft leuchtet.
5.4.2 Wählen Sie über die Gerätetaste das zu bedienende Gerät aus (z. B. TV).
Bei erfolgreicher Auswahl blinkt die LED einmal und leuchtet danach
dauerhaft.
5.4.3 Drücken Sie die Taste „SETUP”. Die LED blinkt einmal und leuchtet
danach dauerhaft.
5.4.4 Drücken Sie zur Suche der ersten Ziffer eine der Nummerntasten von 0
bis 9. Die LED blinkt einmal für die erste Ziffer der fünfstelligen Code-
nummer.

5
5.4.5 Wiederholen Sie den Schritt 5.4.4 für die zweite, dritte, vierte und fünfte
Ziffer.
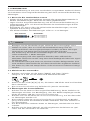
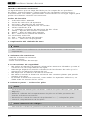
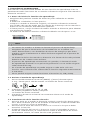
CODES
TV SAT
6. Sonderfunktionen
6.1 Sender-Punch-Through
Mit der Sender-Punch-Through-Funktion können die Befehle CH+ oder CH- das
aktuell gesteuerte Gerät umgehen, und die Sender eines zweiten Gerätes
wechseln. Alle anderen Befehle sind davon nicht betroffen.
So aktivieren Sie die Sender-Punch-Through-Funktion:
• Drücken Sie die gewünschte Gerätetaste (z.B. TV).
• Halten Sie die Taste „CH+” gedrückt.
• Drücken Sie die gewünschte Gerätetaste (z.B. SAT).
• Lassen Sie die Taste „CH+” wieder los (die LED blinkt einmal bei aktivierter
Einstellung).
So deaktivieren Sie die Sender-Punch-Through-Funktion:
• Drücken Sie die gewünschte Gerätetaste (z.B. TV).
• Halten Sie die Taste „CH-” gedrückt.
• Drücken Sie die gewünschte Gerätetaste (z.B. SAT).
• Lassen Sie die Taste „CH-” wieder los (die LED
blinkt zweimal wenn die
Einstellung deaktiviert wird).
6.2 Lautstärke-Punch-Through
Mit der Lautstärke-Punch-Through-Funktion können die Befehle VOL + oder VOL- das
aktuell gesteuerte Gerät umgehen, und die Lautstärke eines zweiten Gerätes einstel-
len. Alle anderen Befehle sind davon nicht betroffen.
So aktivieren Sie die Lautstärke-Punch-Through-Funktion:
• Drücken Sie die gewünschte Gerätetaste (z.B. TV).
• Halten Sie die Taste „VOL+” gedrückt.
• Drücken Sie die gewünschte Gerätetaste (z.B. SAT).
• Lassen Sie die Taste „VOL+” wieder los (die LED blinkt einmal bei aktivierter
Einstellung).
So deaktivieren Sie die Sender-Punch-Through-Funktion:
• Drücken Sie die gewünschte Gerätetaste (z.B. TV).
• Halten Sie die Taste „VOL-” gedrückt.
• Drücken Sie die gewünschte Gerätetaste (z.B. SAT).
• Lassen Sie die Taste „VOL-” wieder los (die LED
blinkt zweimal wenn die
Einstellung deaktiviert wird).
6.3 Macro Power
Mit Macro Power können Sie zwei TV/STB-Geräte gleichzeitig ein-/ausschalten.
So aktivieren Sie die Macro Power-Funktion:
• Drücken Sie die gewünschte Gerätetaste (z.B. TV).
• Halten Sie die Taste „POWER” gedrückt.
• Drücken Sie die gewünschte Gerätetaste (z.B. SAT).
• Lassen Sie die Taste „POWER” wieder los (die LED blinkt einmal bei
aktivierter Einstellung).
So deaktivieren Sie die Macro Power-Funktion:
• Drücken Sie die gewünschte Gerätetaste (z.B. TV).
• Halten Sie die Taste „POWER” gedrückt.
• Drücken Sie die gewünschte Gerätetaste (z.B. SAT).
• Lassen Sie die Taste „POWER” wieder los (die LED
blinkt zweimal wenn die
Einstellung deaktiviert wird)

6
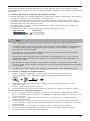
7. LERNFUNKTION
Diese Fernbedienung ist mit einer Lernfunktion ausgestattet. Dadurch können
Sie Funktionen Ihrer Originalfernbedienung auf diese Universalfernbedienung
übertragen.
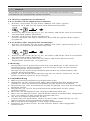
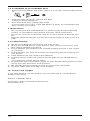
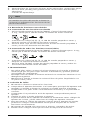
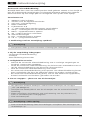
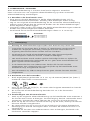
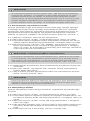
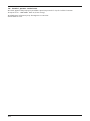
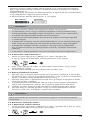
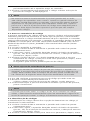
7.1 Bevor Sie die Lernfunktion starten
• Achten Sie auf einen einwandfreien Zustand aller verwendeten Batterien in
beiden Fernbedienungen. Wechseln Sie diese gegebenenfalls.
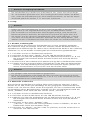
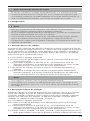
• Legen Sie Ihre Originalfernbedienung und die Universalfernbedienung so
nebeneinander, dass sich die Infrarotdioden der Fernbedienungen direkt
gegenüberliegen.
• Korrigieren Sie, wenn nötig, die Höhe beider Fernbedienungen, um eine
optimale Ausrichtung zu erzielen.
• Der Abstand beider Fernbedienungen sollte ca. 3 cm betragen.
Hinweis
• Bewegen Sie die Fernbedienungen während des Lernvorgangs nicht.
• Stellen Sie sicher, dass es sich bei der Raumbeleuchtung nicht um
Leuchtstoffröhren oder Energiesparlampen handelt, da diese Störungen
verursachen und damit den Lernvorgang behindern könnten.
• Die Entfernung der beiden Fernbedienungen zur nächsten Lichtquelle
sollte mindestens 1 Meter betragen.
• Der Lernvorgang wird ohne Speichern beendet, wenn während des
aktivierten Lernmodus 30 Sek. lang keine Taste betätigt wird oder kein Signal
empfangen wird.
• Im Lernmodus kann jede Taste nur mit einer Funktion belegt werden. Eine
neue Funktion überschreibt die auf dieser Taste bisher angelernte Funktion.
• Die Tasten TV, STB und Setup können nicht mit neuen Funktionen belegt
werden.
7.2 Aktivieren des Lernmodus
1. Drücken und halten Sie die Tasten [MUTE] und [VOL+] gleich-
zeitig für ca. 3 Sek. bis die Status-LED dauerhaft leuchtet.
2. Geben Sie den Code [9] [8] [0] ein, die Status-LED blinkt 2mal und leuchtet
dann dauerhaft.
3. Die Universal-Fernbedienung bendet sich jetzt im Lernmodus.
7.3 Übertragen der Tastenfunktion
1. Drücken Sie die Taste auf der Originalfernbedienung, deren Funktion Sie
übertragen möchten. Zur Bestätigung, dass der Befehl empfangen wurde,
blinkt die Status-LED der Universal-Fernbedienung.
2. Drücken Sie nun die Taste der Universal-Fernbedienung, auf die die Funkti-
on übertragen werden soll.
3. Die Funktions-LED der Universal-Fernbedienung blinkt 3mal zur Bestäti-
gung und leuchtet anschließend wieder dauerhaft. Die neue Funktion ist
nun gespeichert.
4. Um die Funktionen weiterer Tasten zu übertragen, wiederholen Sie diese
Schritte.
5. Drücken Sie die Taste [SETUP], um alle angelernten Funktionen zu spei-
chern und den Lernmodus zu verlassen.
BIG ZAPPER
ca. 3 cm
ORIGINAL

7
Hinweis
Beim Wechsel der Batterien der Universal-fernbedienung bleiben die
Funktionen der angelernten Tasten erhalten.
7.4 Löschen angelernter Funktionen
7.4.1 Löschen einer angelernten Funktion
1. Drücken und halten Sie die Tasten [MUTE] und [VOL+] gleich-
zeitig für ca. 3 Sek. bis die Status-LED dauerhaft leuchtet.
2. Geben Sie den Code [9] [8] [1] ein, die Status-LED blinkt 2mal und leuchtet
anschließend wieder dauerhaft.
3.
Drücken Sie die Taste, deren Funktion Sie
löschen möchten. Die Status-LED blinkt 3mal und die gewünschte Funktion
ist gelöscht.
7.4.2 Löschen aller angelernten Funktionen
1. Drücken und halten Sie die Tasten [MUTE] und [VOL+] gleichzeitig für ca. 3
Sek. bis die Status-LED dauerhaft leuchtet.
2. Geben Sie den Code [9] [8] [2] ein, die Status-LED blinkt 2mal und leuchtet
anschließend wieder dauerhaft.
3. Drücken Sie die Taste [SETUP], die Status-LED blinkt 3mal und alle
angelernten Funktionen sind gelöscht.
8. Wartung
• Verwenden Sie nie gleichzeitig alte und neue Batterien in der Universal-
Fernbedienung, da alte Batterien zum Auslaufen neigen und zu einem
Leistungsverlust führen können.
•
Reinigen Sie die Universal-Fernbedienung keinesfalls mit Scheuermitteln oder
scharfen Reinigungsmitteln.
• Halten Sie die Universal-Fernbedienung frei von Staub, indem Sie sie mit
einem trockenen weichen Tuch reinigen.
9. Fehlerbehebung
F.
Meine Universal-Fernbedienung funktioniert nicht!
A.
Überprüfen Sie das
TV/STB
-Gerät. Wenn der Hauptschalter des Geräts ausge-
schaltet ist, kann die Universal-Fernbedienung das Gerät nicht bedienen.
A. Überprüfen Sie, dass die Batterien korrekt eingesetzt sind und die Polarität
beachtet wurde.
A. Überprüfen Sie, ob Sie die entsprechende Gerätetaste für das Gerät
gedrückt haben.
A. Tauschen Sie die Batterien bei niedrigem Batteriestand aus.
F. Wenn für die Marke meines TV/STB-Geräts mehrere Gerätecodes aufgelistet
sind, wie wähle ich den korrekten Gerätecode aus?
A. Um den korrekten Gerätecode für das
TV/STB-Gerät zu bestimmen, testen Sie die Codes nacheinander, bis die
meisten Tasten ordnungsgemäß funktionieren.
F. Mein TV/STB-Gerät reagiert nur auf einige Tastenbefehle.
A. Probieren Sie andere Codes, bis die meisten Tasten ordnungsgemäß
funktionieren.

8
10. Service und Support
Bitte wenden Sie sich bei Fragen zum Produkt gerne an die Hama-Produktbe-
ratung.
Hotline: +49 9091 502-0 (Deu/Eng)
Weitere Supportinformationen nden sie hier:
www.hama.com

9
GOperating instruction
Universal Remote Control
Thank you for your decision for a Hama product.
Take your time and read the following instructions and information
completely. Please keep these instructions in a safe place for future reference.
Function buttons
1. ON/OFF / LED Indicator
2. Device selection keys
3. Vol +/- Volume settings
4. Mute
5. Number keys 0-9
6. -/-- switch to two-digit channel numbers
7. Setup – Remote control settings
8. Menu – to enter On-screen menu
9. AV – Select external AV source
10. To confirm a selection
11. Exit – to exit on-screen Menu
12. CH +/- - Channel Selection
1. Explanation of the Note symbol
Note
•This symbol is used to indicate additional information or important notes.
2. Package Contents
- Universal Remote Control (URC)
- Code List
- This operating instructions
3. Safety notes
• Do not use the Universal Remote Control in moist or wet environments and
avoid spray-water contact.
•
Do not expose the Universal Remote Control to heat sources or direct sunlight.
• Do not drop the Universal Remote Control.
• Never open the Universal Remote Control.
It contains no user-serviceable parts.
• As with all electrical devices, keep the Universal Remote Control away
from children.
4. Getting started – installing the Batteries
Note
•Alkaline batteries are recommended. Use 2 „AA“ (LR 6/Mignon) type
batteries.
•Remove the battery compartment lid on the back of your URC (A).
•Check the required battery polarity and insert batteries according to the
“+/–” marks inside the compartment (B).
•Close battery compartment lid (C).
Note: Code saver
•This remote control saves the settings during battery change.

10
Note: Battery saving function
•The remote control switches off automatically when a button is pressed
down for more than 15 seconds. This conserves battery power if the remote
control gets stuck in a position where the buttons are continually pressed
down, such as between sofa cushions.
5. Setup
Note
•To obtain a proper infrared (IR) transmission,
allways point your Remote
control in the approximate direction of the device you want to control.
•No entry for approx. 30 seconds will time out the Setup mode. The LED
indicator shows six ashes and turns off.
•If you want to control a device , it´s not possible while the Universal Remote
Control is in the Setup Mode. Exit the Setup mode and select the device you
want to control using the device selection keys.
5.1 Direct Code Entry
Your Universal Remote Control Package contains a code list. The code list
displays ve-digit codes for most TV/STB device manufacturers in alphabetical
order. If the device you want to control is covered by the code list, the Direct
Code Entry is the most convenient entry method.
5.1.1 Turn on the device you want to control
5.1.2 Press the SETUP key until the LED indicator is permanently lit.
5.1.3 Select the device you want to control using the device key (e.g. TV). A
successful selection is indicated by the LED with one ash followed by
permanent light.
5.1.4 Check code list for brand and type of the device you want to control.
5.1.5 Enter the corresponding ve-digit code using the number buttons 0-9.
The LED conrms the entry of each digit with a short ash and goes out
after the fth digit.
Note
•If the code is valid, it is saved automatically.
•If code is invalid, the LED indicator ashes six times and then turns off.
Repeat steps 5.1.1 to 5.1.5 or use a different code entry method.
5.2 Manual code search
Your Universal Remote Control is equipped with an internal memory, which is
preloaded with up to
350 codes per device type for the most common
TV/STB devices. You can zap through these codes until the device you want to
control shows a
reaction. This might be that the device you want to control switches off
(POWER key) or changes the channel (CH+/CH- keys).
5.2.1 Turn on the device you want to control
5.2.2 Press the SETUP key until the LED indicator
is permanently lit.
5.2.3 Select the device you want to control using the device key (e.g. TV). A
successful selection is indicated by the LED with one ash followed by
permanent light.
5.2.4 Press the “POWER” or the CH+/CH- key to zap through the preloaded
codes until the device you want to control reacts.

11
5.2.5 Press MUTE to save the code and exit the code search. The LED indicator
turns off.
Note
•Internal memory limitations allow only up to 350 most common device codes to
be preloaded. Due to the extensive number of different available TV/STB devices
on the market, it may be possible that only the most common main functions are
available. If so, repeat steps 5.2.1 to 5.2.5 to nd a more compatible code. No
code may be available for some special device models.
5.3 Auto Code Search
Auto Code Search uses the same preloaded codes as the Manual Code
Search (5.2) but your Universal Remote Control scanns through the codes
automatically until the device you want to control shows a reaction. This might
be that the device you want to control switches off (POWER key) or changes
the channel (CH+/CH- keys).
5.3.1 Turn on the device you want to control
5.3.2 Press the SETUP key until the LED indicator is permanently lit.
5.3.3 Select the device you want to control using the device key (e.g. TV). A
successful selection is indicated by the LED with one ash followed by
permanent light.
5.3.4 Press the CH+/CH- keys or POWER to start the Auto Code Search. The
LED indicator ashes once followed by permanent light. The Universal
Remote Control has a latency of 6 seconds before the rst scan starts.
Note: Scan Speed Settings
•Scan Speed Settings can be set at either 1 or 3 seconds. The default setting
for the scan time per single code is 1 sec. If this feels uncomfortable , you
can switch to 3 sec. scan time per single code. To switch between the scan
times, press CH+ or CH- during the
6 sec. latency before Auto Code Search starts scanning.
5.3.5 The LED indicator conrms each single code scan with a single ash.
5.3.6 Press MUTE to save the code and exit the code search. The LED indicator
turns off.
5.3.7 To stop the Auto Code Search during the scan process, press the EXIT
key.
Note
•When all codes are searched without success, the Universal Remote Control
exits Auto Code Search and returns to operational mode automatically.
Currently stored code is not changed.
5.4 Code Identification
The Code identication offers you the possibility, to determine an already
entered code.
5.4.1 Press the SETUP key until the LED indicator is permanently lit.
5.4.2 Select the device you want to control using the device key (e.g. TV). A
successful selection is indicated by the LED with one ash followed by
permanent light.
5.4.3 Press SETUP key. The LED indicator ashes once followed by permanent
light.
5.4.4 To nd the rst digit, press the numeric keys from 0 to 9. The LED ashes
once for the rst digit of the ve-digit code number.
5.4.5 Repeat step 5.4.4 for the second, third, fourth and fth digits
respectively.

12
CODES
TV SAT
6. Special Functions
6.1 Punch Through Channel
The Punch Through Channel allows the CH+ or CH- commands to bypass the
currently controlled device and switch the channels on a second device.All
other commands remain uninuenced.
To activate the punch through channel setting:
• Press desired device mode key (e.g. TV).
• Press and hold “CH+” key.
• Press desired device mode key (e.g. SAT).
• Release “CH+” (the indicator ashes once if the setting is activated).
To deactivate the punch through channel setting:
• Press desired device mode key (e.g. TV).
• Press and hold “CH-” key.
• Press desired device mode key (e.g. SAT).
• Release “CH-” (the indicator is ashing twice if the setting is deactivated).
6.2 Punch Through Volume
The Punch Through Volume allows the VOL+ or VOL- commands to bypass the
currently controlled device and adjust the volume on a second device. All other
commands remain uninuenced.
To activate the punch through volume setting:
• Press desired device mode key (e.g. TV).
• Press and hold “VOL+” key.
• Press desired device mode key (e.g. SAT).
• Release “VOL+” (the indicator ashes once if the setting is activated).
To deactivate the punch through volume setting:
• Press desired device mode key (e.g. TV).
• Press and hold “VOL-” key.
• Press desired device mode key (e.g. SAT).
• Release “VOL-” (the indicator is ashing twice if the setting is deactivated).
6.3 Macro Power
Macro Power enables you to turn two TV/STB devices on/off simultaneously.
To activate the macro power setting:
• Press desired device mode key (e.g. TV).
• Press and hold “POWER” key.
• Press desired device mode key (e.g. SAT).
• Release “POWER” (the indicator ashes once if the setting is activated).
To deactivate the macro power setting:
• Press desired device mode key (e.g. TV).
• Press and hold “POWER” key.
• Press desired device mode key (e.g. SAT).
• Release “POWER” (the indicator is ashing twice if the setting is
deactivated).
7. LEARN MODE
This remote control is equipped with a learning function. Thus, you could learn
functions of your original remote to this remote control.
7.1 BEFORE STARTING LEARN MODE
• The batteries in the two remote controls have to be in good condition.
Replace them if necessary.
• Place the remote controls with the infrared diodes so that they point
towards each other.

13
• Where necessary adjust the height of both remotes so that infrared diodes
are properly aligned.
• The distance between the remote controls should be about 3 cm.
ca. 3 cm
ROC1117GRU ORIGINAL
Note
• Do not move the remote controls during the learning procedure.
• Ensure that the room is not lit by uorescents tubes or low energy
consumption lamps since such light sources could interfere with the copying.
• The 2 remote controls must be at least 1 meter away from any light source.
• During learning mode, if no key is selected for more than 30 seconds, the
learning mode will exit automatically or if no other remote signal is received.
• Each function key will hold only one command. A new command to be
learned will automatically replace the previous one.
• It is not possible to learn any new functions to the TV, STB and Setup key.
7.2 ENTER LEARN MODE
1. Press and hold the [MUTE] and [VOL+] keys for approx. 3 seconds until the
LED will be lit.
2. Enter the code [9] [8] [0], the LED will ash
2 times and then remain on.
3. The Universal Remote Control is now ready to learn new commands.
7.3 LEARNING OF KEYS
1. Press and release the desired key on the original remote control which
you want the command to be learned. The LED at your Universal Remote
Control will ash to conrm that the information has been received.
2. Then press and release the target key on the Universal Remote Control you
want learned.
3. If the LED ashes 3 times and then remain on, the command has been
learned successfully.
4. Repeat these steps to learn other key functions.
5. Please press the [SETUP] key to save the code and exit learning mode.
Note
While replacing the batteries, the remote control will keep the functions of the
learned keys.
7.4 CLEARING OF LEARNED KEYS
7.4.1 CLEARING OF ONE LEARNED KEY
1. Press and hold [MUTE] and [VOL+] keys for 3 seconds until the LED will be
lit.
2. Enter the code [9] [8] [1], the LED will ash
2 times and then remain on.
3. Press and release the desired key at the Universal Remote Control which
you want to clear the learned command. If the LED ashes 3 times, the
learned command has been cleared successfully.
BIG ZAPPER

14
7.4.2 CLEARING OF ALL LEARNED KEYS
1. Press and hold [MUTE] and [VOL+] keys for 3 seconds until the LED will be
lit.
2. Enter the code [9] [8] [2], the LED will ash
2 times and then remain on.
3. Press and release the [SETUP] key at the
Universal Remote Control. If the LED ashes 3 times, all commands have
been cleared successfully.
8. Maintenance
• Do not mix new and used batteries for powering the Universal Remote
Control, as old batteries tend to leak and may cause power drain.
• Do not use corrosive or abrasive cleaners on your Universal Remote Con-
trol.
• Keep the Universal Remote Control dust free by wiping it with a soft, dry
cloth.
9. Troubleshooting
Q. My Universal Remote Control does not work at all!
A. Check your TV/STB device. If the device’s main switch is turned off, your
URC cannot operate your device.
A. Check whether your batteries are inserted properly and are in the correct
+/- position.
A. Check whether you have pressed the corresponding device mode key for
your device.
A. If the batteries are low, replace the batteries.
Q. If several Device Codes are listed under the brand of my TV/STB device,
how
can I select the correct Device Code?
A. To determine the correct Device Code for your TV/STB device, test the codes
one by one until most keys work properly.
Q. My TV/STB equipment responds only to some of the commands.
A. Try other codes until most keys work properly.
10. Service and Support
If you have questions on the product, you are welcome to contact Hama
Product Consulting.
Hotline: +49 9091 502-0
For further support information please visit:
www.hama.com

15
FMode d‘emploi
Télécommande universelle
Nous vous remercions d’avoir choisi un produit Hama.
Veuillez prendre le temps de lire l'ensemble des consignes et informations
suivantes. Veuillez conserver ces instructions dans un endroit sûr afin de
pouvoir les consulter en cas de besoin.
Touches de fonction
1. Témoin LED ON/OFF
2. Touches de sélection de l’appareil
3. Vol+ / Vol- : réglage du volume
4. Commutateur sourdine
5. Bloc numérique 0-9
6. -/-- Sélection de numéros de stations à deux chiffres
7. Setup – paramètres de la télécommande
8. Menu – ouverture du menu de l’appareil
9. AV –
sélection de la source AV externe
10. Confirmer la sélection
11. Exit – quitter le menu de l’appareil
12. CH +/- - sélection du programme
1. Explication des symboles
Remarque
•Ce symbole est utilisé pour indiquer des informations supplémentaires ou des
remarques importantes.
2. Matériel livré
- Télécommande universelle
- Liste de codes
- Mode d‘emploi
3. Consignes de sécurité
• N‘utilisez pas la télécommande universelle dans un environnement humide
et évitez toute projection d‘eau.
• Protégez votre télécommande universelle de toute source de chaleur et ne
l‘exposez pas aux rayons directs du soleil.
• Ne laissez pas votre télécommande tomber par terre.
• N‘ouvrez pas votre télécommande ; elle ne comprend aucune pièce néces-
sitant un entretien.
• Cette télécommande universelle, comme tout autre appareil électrique, ne
doit pas se trouver à portée des enfants.
4. Premiers pas - insertion des piles
Remarque
•Nous vous recommandons d‘utiliser des piles alcalines. Utilisez 2 piles
(AA / LR 6 /Mignon).
•Ouvrez le couvercle du compartiment à piles sur la face arrière de la
télécommande.
•Insérez deux piles dans le logement en respectant les indications de
polarité (+/-).
•Refermez le compartiment à piles.
Remarque: mémoire des codes
•Cette télécommande conserve les paramètres programmés, même lors
d’un remplacement des piles.

16
Remarque: Fonction d‘économie des piles
•La télécommande se met automatiquement hors service lorsque vous
appuyez sur une touche pendant plus de 15 secondes. Cette fonction
permet de ne pas vider les piles de votre télécommande si cette dernière
est coincée (entre les coussins d‘un divan, par exemple) et qu‘une touche
reste enfoncée.
5. Configuration
Remarque
•Pointez la télécommande en direction de l‘appareil que vous désirez piloter
an de garantir une excellente transmission infrarouge.
•Le mode de conguration s‘interrompt automatiquement lorsque vous
n‘appuyez sur au cune touche pendant plus de 30 secondes. La LED
clignote six fois, puis s’éteint.
•Vous ne pouvez pas piloter un appareil à l‘aide de la télécommande
lorsqu‘il se trouve en mode de conguration. Vous pouvez quitter le mode
de conguration et sélectionner l‘appareil que vous désirez piloter à l‘aide
des touches de sélection de l’appareil.
5.1 Saisie directe du code
Une liste de codes fait partie des éléments fournis avec la télécommande. La
liste des codes ache les codes à cinq chiffres de la plupart des fabricants de
téléviseurs/décodeurs dans l’ordre alphabétique. La saisie directe du code est
la méthode la plus simple dans le cas où le code de votre appareil est compris
dans la liste.
5.1.1 Mettez l’appareil que vous désirez utiliser sous tension.
5.1.2 Appuyez sur la touche « SETUP » jusqu‘à ce que la LED s‘allume en
permanence.
5.1.3 Sélectionnez l’appareil que vous désirez piloter (TV, etc.) à l‘aide de la
touche de l‘appareil. La LED clignote une fois, puis s‘allume en perma-
nence en cas de sélection correcte.
5.1.4 Recherchez le code de l’appareil que vous désirez utiliser à l’aide de la
liste des codes par marque et par type.
5.1.5 Saisissez le code correspondant à cinq chiffres à l’aide des touches
numériques de 0 à 9. La LED conrme la saisie des différents chiffres par
un bref clignotement et s’éteint après le cinquième chiffre.
Remarque
•Un code valide est sauvegardé automatiquement.
•En cas de code erroné, la LED clignote six fois, puis s‘éteint. Répétez les
étapes 5.1.1 à 5.1.5 ou utilisez une autre méthode pour la saisie du code.
5.2 Recherche manuelle du code
La télécommande dispose d‘une mémoire interne contenant jusqu‘à 350 codes
par type d‘appareil adaptés à tous les appareils TV / STB courants. Vous pouvez
passer tous ces codes en revue jusqu‘à ce que l‘appareil que vous désirez utili-
ser réagisse ; l‘appareil se met, par exemple, hors tension (touche « POWER »)
ou change de station (touche « CH+ / CH- »).
5.2.1 Mettez l’appareil que vous désirez utiliser sous tension.
5.2.2 Appuyez sur la touche « SETUP » jusqu‘à ce que la LED s‘allume en
permanence.
5.2.3 Sélectionnez l’appareil que vous désirez piloter (TV, etc.) à l‘aide de la
touche de l‘appareil. La LED clignote une fois, puis s‘allume en perma-
nence en cas de sélection correcte.

17
5.2.4 Appuyez sur la touche « POWER » ou « CH+ / CH- » an de faire déler les
codes présélectionnés jusqu‘à ce que l‘appareil que vous désirez utiliser
réagisse.
5.2.5 Appuyez sur la touche « MUTE » an de sauvegarder le code et quitter la
recherche du code ; la LED s’éteint.
Remarque
•La télécommande dispose d‘une mémoire interne contenant 350 codes
adaptés aux appareils TV/STB courants. En raison de la quantité d‘appareils
TV/STB disponibles sur le marché, il est possible que seules les fonctions
principales soient disponibles. Si tel est le cas, répétez les étapes 5.2.1 à
5.2.5 an de trouver un code compatible. Il est possible qu‘aucun code ne
fonctionne pour certains modèles spéciaux.
5.3 Recherche automatique du code
La recherche automatique du code utilise les mêmes codes présélectionnés que
ceux de la recherche manuelle (5.2). La télécommande universelle recherche
automatiquement le code jusqu‘à ce que l‘appareil que vous désirez utiliser
réagisse ; l‘appareil se met, par exemple, hors tension (touche « POWER ») ou
change de station (touches «
CH
+ /
CH
- »).
5.3.1 Mettez l’appareil que vous désirez utiliser sous tension.
5.3.2 Appuyez sur la touche « SETUP » jusqu‘à ce que la LED s‘allume en vert
en permanence.
5.3.3 Sélectionnez l’appareil que vous désirez piloter (TV, etc.) à l‘aide de la
touche de l‘appareil. La LED clignote une fois, puis s‘allume en perma-
nence en cas de sélection correcte.
5.3.4 Appuyez sur la touche «
CH
+ /
CH
- » ou
« POWER » an de lancer une recherche automatique de code. La LED
clignote une fois, puis s‘allume en permanence.
La télécommande universelle commence la première recherche après
6 secondes.
Remarque : réglage de la vitesse de recherche
•Le réglage par défaut de la vitesse de recherche par code est de 1 seconde. Vous
pouvez modier ce réglage et congurer une vitesse de 3 secondes par code.
Appuyez sur la touche «
CH
+ /
CH
- » pendant les 6 secondes précédent le début
de la recherche automatique.
5.3.5 La LED conrme la recherche du code à l‘aide d‘un clignotement unique.
5.3.6 Appuyez sur la touche « MUTE » an de sauvegarder le code et quitter la
recherche du code ; la LED s’éteint.
5.3.7 Appuyez sur la touche « EXIT » an d‘interrompre la recherche automa-
tique.
Remarque
•La télécommande universelle quitte le mode de recherche automatique et
retourne en mode de fonctionnement normal si elle ne détecte aucun code
adapté. Le code sauvegardé actuellement ne change pas.
5.4 Reconnaissance de code
La reconnaissance de code vous permet de rechercher un code déjà attribué.
5.4.1 Appuyez sur la touche « SETUP » jusqu‘à ce que la LED s‘allume en vert
en permanence.
5.4.2
Sélectionnez l’appareil que vous désirez piloter (TV, etc.) à l‘aide de la
touche de l‘appareil. La LED clignote une fois, puis s‘allume en perma-
nence en cas de sélection correcte.

18
5.4.3 Appuyez sur la touche « SETUP ». La LED clignote une fois, puis s‘allume
en permanence.
5.4.4 Appuyez sur une des touches numériques de 0 à 9 an de lancer la
recherche du premier chiffre. La LED clignote une fois pour le premier
chiffre du numéro de code à cinq chiffres.
5.4.5 Répétez les étapes 5.4.4 pour le deuxième, le troisième et le quatrième
chiffre.
CODES
TV SAT
6. Fonctions spéciales
6.1 Recherche de stations en maintenant la
touche enfoncée (« punch through »)
La fonction de recherche de Chaînes en maintenant la touche enfoncée («
punch through ») vous permet de contourner les commandes
CH
+ ou
CH
- de
l‘appareil utilisé actuellement et piloter un deuxième appareil. Les autres
commandes ne sont pas affectées.
Activadon de la fonction de recherche de chaînes
(« punch through »):
• Appuyez sur la touche de l‘appareil désiré (TV, etc.).
• Maintenez la touche « CH+ » enfoncée.
• Appuyez sur la touche de l‘appareil désiré (SAT, etc.).
• Relâchez la touche « CH+ » (la LED clignote une fois en cas d‘activation du
paramètre).
Désactivadon de la fonction de recherche de chaînes
(« punch through »):
• Appuyez sur la touche de l‘appareil désiré (TV, etc.).
• Maintenez la touche « CH- » enfoncée.
• Appuyez sur la touche de l‘appareil désiré (SAT, etc.).
• Relâchez la touche « CH- » (la LED clignote deux fois en cas de désactivation
du paramètre).
6.2 Réglage du volurne en maintenant la touche enfoncée (« punch
through »)
La fonction de réglage du volume en maintenant la touche enfoncée (« punch
through ») vous permet de contourner les commandes VOL+ ou VOL- de
l‘appareil utilisé actuellement et régler Ie volume d‘un deuxième appareil. Les
autres commandes ne sont pas affectées.
Activation de la fonction de réglage du volume par touche enfoncée « punch
through »:
• Appuyez sur la touche de l‘appareil désiré (TV, etc.).
• Maintenez la touche « VOL+ » enfoncée.
• Appuyez sur la touche de l‘appareil désiré (SAT, etc.).
• Relâchez la touche « VOL+ » (la LED clignote une fois en cas d‘activation du
paramètre).
Désactivation de la fonction de réglage du volume par touche enfoncée « punch
through »:
• Appuyez sur la touche de l‘appareil désiré (TV, etc.).
• Maintenez la touche « VOL- » enfoncée.
• Appuyez sur la touche de l‘appareil désiré (SAT, etc.).
• Relâchez la touche « VOL- » (la LED clignote deux fois en cas de désactivation
du paramètre).
6.3 Macro Power
La fonction MACRO POWER vous permet de mettre deux appareils TV / STB
simultanément sous/hors tension.
Activation de la fonction MACRO POWER:
A página está carregando...
A página está carregando...
A página está carregando...
A página está carregando...
A página está carregando...
A página está carregando...
A página está carregando...
A página está carregando...
A página está carregando...
A página está carregando...
A página está carregando...
A página está carregando...
A página está carregando...
A página está carregando...
A página está carregando...
A página está carregando...
A página está carregando...
A página está carregando...
A página está carregando...
A página está carregando...
A página está carregando...
A página está carregando...
A página está carregando...
A página está carregando...
A página está carregando...
A página está carregando...
A página está carregando...
A página está carregando...
A página está carregando...
A página está carregando...
A página está carregando...
A página está carregando...
A página está carregando...
A página está carregando...
A página está carregando...
A página está carregando...
A página está carregando...
A página está carregando...
A página está carregando...
A página está carregando...
A página está carregando...
A página está carregando...
A página está carregando...
A página está carregando...
-
 1
1
-
 2
2
-
 3
3
-
 4
4
-
 5
5
-
 6
6
-
 7
7
-
 8
8
-
 9
9
-
 10
10
-
 11
11
-
 12
12
-
 13
13
-
 14
14
-
 15
15
-
 16
16
-
 17
17
-
 18
18
-
 19
19
-
 20
20
-
 21
21
-
 22
22
-
 23
23
-
 24
24
-
 25
25
-
 26
26
-
 27
27
-
 28
28
-
 29
29
-
 30
30
-
 31
31
-
 32
32
-
 33
33
-
 34
34
-
 35
35
-
 36
36
-
 37
37
-
 38
38
-
 39
39
-
 40
40
-
 41
41
-
 42
42
-
 43
43
-
 44
44
-
 45
45
-
 46
46
-
 47
47
-
 48
48
-
 49
49
-
 50
50
-
 51
51
-
 52
52
-
 53
53
-
 54
54
-
 55
55
-
 56
56
-
 57
57
-
 58
58
-
 59
59
-
 60
60
-
 61
61
-
 62
62
-
 63
63
-
 64
64


Hama 00179803 Manual do usuário
- Categoria
- Controles remotos
- Tipo
- Manual do usuário
em outras línguas
- español: Hama 00179803 Manual de usuario
- français: Hama 00179803 Manuel utilisateur
- italiano: Hama 00179803 Manuale utente
- Nederlands: Hama 00179803 Handleiding
- Deutsch: Hama 00179803 Benutzerhandbuch
- polski: Hama 00179803 Instrukcja obsługi