

2
PSS-A50
SPECIAL MESSAGE SECTION
This product utilizes batteries or an external power supply
(adapter). DO NOT connect this product to any power supply or
adapter other than one described in the manual, on the name
plate, or specifically recommended by Yamaha.
WARNING: Do not place this product in a position where any-
one could walk on, trip over, or roll anything over power or con-
necting cords of any kind. The use of an extension cord is not
recommended! If you must use an extension cord, the minimum
wire size for a 25’ cord (or less) is 18 AWG. NOTE: The smaller
the AWG number, the larger the current handling capacity. For
longer extension cords, consult a local electrician.
This product should be used only with the components supplied
or; a cart, rack, or stand that is recommended by Yamaha. If a
cart, etc., is used, please observe all safety markings and instruc-
tions that accompany the accessory product.
SPECIFICATIONS SUBJECT TO CHANGE:
The information contained in this manual is believed to be correct
at the time of printing. However, Yamaha reserves the right to
change or modify any of the specifications without notice or obli-
gation to update existing units.
This product, either alone or in combination with an amplifier and
headphones or speaker/s, may be capable of producing sound
levels that could cause permanent hearing loss. DO NOT operate
for long periods of time at a high volume level or at a level that is
uncomfortable. If you experience any hearing loss or ringing in
the ears, you should consult an audiologist.
IMPORTANT: The louder the sound, the shorter the time period
before damage occurs.
Some Yamaha products may have benches and / or accessory
mounting fixtures that are either supplied with the product or as
optional accessories. Some of these items are designed to be
dealer assembled or installed. Please make sure that benches
are stable and any optional fixtures (where applicable) are well
secured BEFORE using.
Benches supplied by Yamaha are designed for seating only. No
other uses are recommended.
NOTICE:
Service charges incurred due to a lack of knowledge relating to
how a function or effect works (when the unit is operating as
designed) are not covered by the manufacturer’s warranty, and
are therefore the owners responsibility. Please study this manual
carefully and consult your dealer before requesting service.
ENVIRONMENTAL ISSUES:
Yamaha strives to produce products that are both user safe and
environmentally friendly. We sincerely believe that our products
and the production methods used to produce them, meet these
goals. In keeping with both the letter and the spirit of the law, we
want you to be aware of the following:
Battery Notice:
This product MAY contain a small non-rechargeable battery which
(if applicable) is soldered in place. The average life span of this type
of battery is approximately five years. When replacement becomes
necessary, contact a qualified service representative to perform the
replacement.
This product may also use “household” type batteries. Some of
these may be rechargeable. Make sure that the battery being
charged is a rechargeable type and that the charger is intended for
the battery being charged.
When installing batteries, never mix old batteries with new ones,
and never mix different types of batteries. Batteries MUST be
installed correctly. Mismatches or incorrect installation may result in
overheating and battery case rupture.
Warning:
Do not attempt to disassemble, or incinerate any battery. Keep all
batteries away from children. Dispose of used batteries promptly
and as regulated by the laws in your area. Note: Check with any
retailer of household type batteries in your area for battery dis-
posal information.
Disposal Notice:
Should this product become damaged beyond repair, or for some
reason its useful life is considered to be at an end, please
observe all local, state, and federal regulations that relate to the
disposal of products that contain lead, batteries, plastics, etc. If
your dealer is unable to assist you, please contact Yamaha
directly.
NAME PLATE LOCATION:
The name plate is located on the bottom of the product. The
model number, serial number, power requirements, etc., are
located on this plate. You should record the model number, serial
number, and the date of purchase in the spaces provided below
and retain this manual as a permanent record of your purchase.
Model
Serial No.
Purchase Date
PLEASE KEEP THIS MANUAL
92-BP (bottom)

3
PSS-A50
1. IMPORTANT NOTICE: DO NOT MODIFY THIS UNIT!
This product, when installed as indicated in the instructions
contained in this manual, meets FCC requirements. Modifica-
tions not expressly approved by Yamaha may void your author-
ity, granted by the FCC, to use the product.
2. IMPORTANT: When connecting this product to accessories
and/or another product use only high quality shielded cables.
Cable/s supplied with this product MUST be used. Follow all
installation instructions. Failure to follow instructions could void
your FCC authorization to use this product in the USA.
3. NOTE: This product has been tested and found to comply with
the requirements listed in FCC Regulations, Part 15 for Class
“B” digital devices. Compliance with these requirements pro-
vides a reasonable level of assurance that your use of this
product in a residential environment will not result in harmful
interference with other electronic devices. This equipment gen-
erates/uses radio frequencies and, if not installed and used
according to the instructions found in the users manual, may
cause interference harmful to the operation of other electronic
devices. Compliance with FCC regulations does not guarantee
that interference will not occur in all installations. If this product
is found to be the source of interference, which can be deter-
mined by turning the unit “OFF” and “ON”, please try to elimi-
nate the problem by using one of the following measures:
Relocate either this product or the device that is being affected
by the interference.
Utilize power outlets that are on different branch (circuit breaker
or fuse) circuits or install AC line filter/s.
In the case of radio or TV interference, relocate/reorient the
antenna. If the antenna lead-in is 300 ohm ribbon lead, change
the lead-in to co-axial type cable.
If these corrective measures do not produce satisfactory
results, please contact the local retailer authorized to distribute
this type of product. If you can not locate the appropriate
retailer, please contact Yamaha Corporation of America, Elec-
tronic Service Division, 6600 Orangethorpe Ave, Buena Park,
CA90620
The above statements apply ONLY to those products distrib-
uted by Yamaha Corporation of America or its subsidiaries.
* This applies only to products distributed by YAMAHA CORPORATION OF AMERICA. (class B)
FCC INFORMATION (U.S.A.)
COMPLIANCE INFORMATION STATEMENT
(Supplier’s declaration of conformity procedure)
Responsible Party : Yamaha Corporation of America
Address : 6600 Orangethorpe Ave., Buena Park, Calif. 90620
Telephone : 714-522-9011
Type of Equipment : Digital Keyboard
Model Name : PSS-A50
This device complies with Part 15 of the FCC Rules.
Operation is subject to the following two conditions:
1) this device may not cause harmful interference, and
2) this device must accept any interference received including interference
that may cause undesired operation.
* This applies only to products distributed by
Yamaha Corporation of America.
(FCC SDoC)

4
PSS-A50 Owner’s Manual
PRECAUTIONS
PLEASE READ CAREFULLY BEFORE PROCEEDING
Please keep this manual in a safe and handy place for future reference.
WARNING
Always follow the basic precautions listed below to avoid the possibility of serious injury or even death from electrical
shock, short-circuiting, damages, fire or other hazards. These precautions include, but are not limited to, the
following:
• Do not place the USB cable near heat sources such as heaters or
radiators. Also, do not excessively bend or otherwise damage the
cable, or place heavy objects on it.
• Only use the voltage specified as correct for the instrument. The
required voltage is printed on the name plate of the instrument.
• Included USB cable is designed for use with only this instrument. Do
not use for any other instrument.
• Check the plug periodically and remove any dirt or dust which may
have accumulated on it.
• This instrument contains no user-serviceable parts. Do not open the
instrument or attempt to disassemble or modify the internal
components in any way. If it should appear to be malfunctioning,
discontinue use immediately and have it inspected by qualified
Yamaha service personnel.
• Do not expose the instrument to rain, use it near water or in damp or
wet conditions, or place on it any containers (such as vases, bottles or
glasses) containing liquids which might spill into any openings. If any
liquid such as water seeps into the instrument, turn off the power
immediately and disconnect the plug from the AC outlet. Then have the
instrument inspected by qualified Yamaha service personnel.
• Never insert or remove a plug with wet hands.
• Do not put burning items, such as candles, on the unit. A burning item
may fall over and cause a fire.
• Magnetism may affect electro-medical devices.
- Do not use this product near medical devices or inside areas in
which the use of radio waves is restricted.
- Do not use this product within 15cm (6 in.) of persons with a heart
pacemaker or defibrillator implant.
• Follow the precautions below. Failure to do so might result in
explosion, fire, overheating or battery fluid leakage.
- Do not tamper with or disassemble batteries.
- Do not dispose of batteries in fire.
- Do not attempt to recharge batteries that are not designed to be
charged.
- Keep the batteries separate from metallic objects such as necklaces,
hairpins, coins, and keys.
- Use the specified battery type (page 13) only.
- Use new batteries, all of which are the same type, same model, and
made by the same manufacturer.
- Always make sure all batteries are inserted in conformity with the +/-
polarity markings.
- When the batteries run out, or if the instrument is not to be used for a
long time, remove the batteries from the instrument.
- When using Ni-MH batteries, follow the instructions that came with
the batteries. Use only the specified charger device when charging.
• Keep batteries away from small children who might accidentally
swallow them.
• If the batteries do leak, avoid contact with the leaked fluid. If the battery
fluid should come in contact with your eyes, mouth, or skin, wash
immediately with water and consult a doctor. Battery fluid is corrosive
and may possibly cause loss of sight or chemical burns.
• When one of the following problems occur, immediately turn off the
power switch and disconnect the plug from the outlet. (If you are using
batteries, remove all batteries from the instrument.) Then have the
device inspected by Yamaha service personnel.
- The USB cable or plug becomes frayed or damaged.
- It emits unusual smells or smoke.
- Some object has been dropped into the instrument.
- There is a sudden loss of sound during use of the instrument.
- If any cracks or breakages exist on the instrument.
Power supply
Do not open
Water warning
Fire warning
Influences on electro-medical devices
Battery
If you notice any abnormality
DMI-7 1/2

5
PSS-A50 Owner’s Manual
CAUTION
Always follow the basic precautions listed below to avoid the possibility of physical injury to you or others, or damage
to the instrument or other property. These precautions include, but are not limited to, the following:
• Use the specified USB power adaptor (page 7) only. Using the wrong
adaptor can result in damage to the instrument or overheating.
• Do not connect the instrument to an electrical outlet using a multiple-
connector. Doing so can result in lower sound quality, or possibly
cause overheating in the outlet.
• When removing the plug from the instrument or an outlet, always hold
the plug itself and not the USB cable. Pulling by the cable can damage
it.
• Remove the plug from the outlet when the instrument is not to be used
for extended periods of time, or during electrical storms.
• Do not place the instrument in an unstable position where it might
accidentally fall over.
• Before moving the instrument, remove all connected cables, to prevent
damage to the cables or injury to anyone who might trip over them.
• When setting up the product, make sure that the AC outlet you are
using is easily accessible. If some trouble or malfunction occurs,
immediately turn off the power switch and disconnect the plug from the
outlet. Even when the power switch is turned off, electricity is still
flowing to the product at the minimum level. When you are not using
the product for a long time, make sure to disconnect the plug from the
wall AC outlet.
• Before connecting the instrument to other electronic components, turn
off the power for all components. Before turning the power on or off for
all components, set all volume levels to minimum.
• Be sure to set the volumes of all components at their minimum levels
and gradually raise the volume controls while playing the instrument to
set the desired listening level.
• Do not insert a finger or hand in any gaps on the instrument.
• Never insert or drop paper, metallic, or other objects into the gaps on
the panel or keyboard. This could cause physical injury to you or
others, damage to the instrument or other property, or operational
failure.
• Do not rest your weight on, or place heavy objects on the instrument,
and do not use excessive force on the buttons, switches or connectors.
• Do not use the instrument/device or headphones for a long period of
time at a high or uncomfortable volume level, since this can cause
permanent hearing loss. If you experience any hearing loss or ringing
in the ears, consult a physician.
Always turn the power off when the instrument is not in use.
Even when the [ ] (Standby/On) switch is in standby status (display is off), electricity is still flowing to the instrument at the minimum level.
When you are not using the instrument for a long time, make sure you disconnect the plug from the wall AC outlet.
Make sure to discard used batteries according to local regulations.
DMI-7
2/2
NOTICE
To avoid the possibility of malfunction/ damage to the
product, damage to data, or damage to other property, fol-
low the notices below.
Handling
• Do not use the instrument in the vicinity of a TV, radio, stereo
equipment, mobile phone, or other electric devices. Otherwise, the
instrument, TV, or radio may generate noise.
• Do not expose the instrument to excessive dust or vibrations, or
extreme cold or heat (such as in direct sunlight, near a heater, or in a
car during the day) to prevent the possibility of panel disfiguration,
damage to the internal components or unstable operation. (Verified
operating temperature range: 5° – 40°C, or 41° – 104°F.)
• Do not place vinyl, plastic or rubber objects on the instrument, since
this might discolor the panel or keyboard.
Maintenance
• When cleaning the instrument, use a soft and dry cloth. Do not use
paint thinners, solvents, alcohol, cleaning fluids, or chemical-
impregnated wiping cloths.
Saving data
• Some of the data of this instrument (page 13) are retained when the
power is turned off. However, the saved data may be lost due to some
failure, an operation mistake, etc.
Information
About copyrights
• Copying of the commercially available musical data including but not
limited to MIDI data and/or audio data is strictly prohibited except for
your personal use.
• This product incorporates and bundles contents in which Yamaha owns
copyrights or with respect to which Yamaha has license to use others'
copyrights. Due to copyright laws and other relevant laws, you are NOT
allowed to distribute media in which these contents are saved or
recorded and remain virtually the same or very similar to those in the
product.
* The contents described above include a computer program, Accompaniment
Style data, MIDI data, WAVE data, voice recording data, a score, score data, etc.
* You are allowed to distribute medium in which your performance or music
production using these contents is recorded, and the permission of Yamaha
Corporation is not required in such cases.
About this manual
• The illustrations and displays as shown in this manual are for
instructional purposes only, and may appear somewhat different from
those on your instrument.
• The company names and product names in this manual are the
trademarks or registered trademarks of their respective companies.
Power supply
Location
Connections
Handling caution
Yamaha cannot be held responsible for damage caused by improper use or modifications to the instrument, or data that is lost or destroyed.

6
PSS-A50 Owner’s Manual
Thank you for purchasing this Yamaha Digital Keyboard!
This instrument provides powerful performance features including versatile effects and sounds enjoyable
even for beginners. We recommend that you read this manual carefully so that you can fully take advantage
of the advanced and convenient functions of the instrument.
We also recommend that you keep this manual in a safe and handy place for future reference.
About the Manuals
In addition to this Owner’s Manual, the following
Online document (PDF file) is available.
MIDI Reference
Contains MIDI-related information, such as
the MIDI Implementation Chart.
To obtain this document, access the Yamaha
Downloads website, then enter the model name for
searching the desired files.
Yamaha Downloads
http://download.yamaha.com/
Included Accessories
• Owner’s Manual (this book) (1)
• USB cable (1)
• Online Member Product Registration (1)
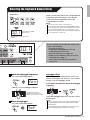
Setting Up
Depending on how you are powering your instru-
ment, follow one of the three power supply instruc-
tions below. The PSS-A50 does not include power
supply accessories (with the exception of the USB
cable), so make sure to purchase them separately
as required.
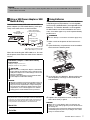
Using USB Bus Power
Connect the included USB cable in the order
shown in the illustration.
When disconnecting the USB cable, first turn off
the power, then follow the order shown above in
reverse.
USB bus power
This instrument is a bus-powered type device which can be
powered by a computer connected via the USB cable.
1
1
2
Computer
5V DC/
USB TO HOST jack
(USB micro B)
USB cable
Rear
PHONES/OUTPUT Jack
For connecting a set of stereo headphones with a
stereo mini plug. This jack also functions as an
external output for sending the audio signal of this
instrument to external audio equipment.
The speakers of the instrument are automatically
shut off when a headphones plug, etc. is inserted
into this jack.
• Before using the headphones, be sure to set the volume of the instrument at the minimum level. Then gradually raise the
volume while playing the instrument, for your ear comfort and safety.
CAUTION
Rear
• Do not use the instrument or headphones for a long
period of time at a high or uncomfortable volume level,
since this can cause permanent hearing loss.
• Before connecting the instrument to other electronic com-
ponents, make sure to set all volume levels to minimum,
then turn off the power off all the components. Otherwise,
damage to the components or electrical shock may occur.
• To avoid possible damage to the external device, first turn
on the power to the instrument, then to the external
device. When turning off the power, do so in reverse
order: first turn off the power to the external device, then
to the instrument.
CAUTION
NOTICE

7
PSS-A50 Owner’s Manual
Using a USB Power Adaptor or USB
Mobile Battery
Connect the included USB cable and the USB
power adaptor (or USB mobile battery) sold sepa-
rately in the order shown in the illustration.
When disconnecting the USB cable or so, first turn
off the power, then follow the order shown above in
reverse.
Using Batteries
This instrument requires four “AA” size, Alkaline
(LR6)/Manganese (R6) batteries, or rechargeable
nickel-metal hydride batteries (rechargeable Ni-MH
batteries). The Alkaline batteries or rechargeable
Ni-MH batteries are recommended for this instru-
ment, since other types may result in poorer battery
performance.
1 Make sure that the power of the instrument is
off.
2 Open the battery compartment cover located on
the instrument’s bottom panel.
3 Insert the four new batteries, being careful to fol-
low the polarity markings on the inside of the
compartment.
4 Replace the compartment cover, making sure
that it locks firmly in place.
2
1
2
2
3
or
USB cable
AC Outlet
USB mobile battery
(commercially available)
USB power adap-
tor (commercially
available)
5V DC/
USB TO HOST jack
(USB micro B)
The shape of the plug and outlet
differs depending on your locale.
Rear
USB Power adaptor / USB mobile battery
requirements
• Output voltage: 4.8 V to 5.2 V
• Output current: 0.5 A or greater
• Make sure to use a USB power adaptor or USB mobile
battery with the specifications above. Using the wrong
USB power adaptor can result in damage to the instru-
ment or overheating.
Read the safety precautions for your particular USB
power adaptor or USB mobile battery.
• When the instrument is turned on and power turns off
suddenly and unexpectedly, your USB power adaptor
may not meet the requirements or may be damaged.
Try using another USB power adaptor that meets the
requirements, etc. If it should appear to be malfunc-
tioning, please consult Yamaha service personnel.
CAUTION
NOTICE
• See the “Battery” section in the Precautions (pages 4–5).
• Make sure to set the Battery Type correctly (page 12).
Failure to set the battery type may shorten the amount of
the battery life.
• Connecting or disconnecting the USB cable with batteries
installed may turn the power off, resulting in loss of data
being recorded at the time.
3
WARNING
NOTICE
The model number, serial number, power requirements, etc.,
may be found on or near the name plate, which is at the bottom
of the unit. You should note this serial number in the space pro-
vided below and retain this manual as a permanent record of
your purchase to aid identification in the event of theft.
Model No.
Serial No.
(bottom_en_01)
• Use a USB cable of less than 3 meters. If the sound is degraded, make sure to use the included USB cable or turn down the
master volume as needed.
NOTICE

1
2 3
8
PSS-A50 Owner’s Manual
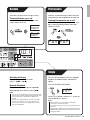
Turning the Power On/
Standby
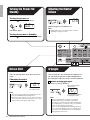
Turning the power on
Press the [ ](Standby/On) switch.
The display lights.
Turning the power to Standby
Press the [ ](Standby/On) switch for a second.
0.01
Adjusting the Master
Volume
Volume range: 00–15 (default: 13)
NOTE
• Volume will be reset to the default value of 13 when
“Initialization” (page 13) is done.
05
Decreases Increases
Octave Shift
You can shift the pitch up or down in octave
steps.
Changing the pitch
NOTE
• To reset the octave setting to the default value of “00,”
press the OCTAVE buttons simultaneously.
• When the Octave setting is -03, -04, +03 or +04, some
Voice sounds too soft to hear, or the pitch in one octave
sounds same as other (up or down) octave.
01
Down Up
Octave value “-04” –
“04” will be shown.
Arpeggio
This function lets you automatically trigger musi-
cal and rhythmic phrases and backing patterns
by simply pressing a key or keys on the keyboard.
Select an Arpeggio type.
Use the [-] and [+] buttons.
NOTE
• Refer to the Arpeggio category list on the panel.
• Holding down the [-] or [+] button continuously
decreases or increases the value. While holding down
the [SHIFT] button, each press of the [-] or [+] button
jumps to each Arpeggio category top.
• No. 117–138 are drum patterns. Play with a Drum Kit
Voice and “Hold” (page 9) to use it as a rhythm track.
• Selecting a Voice automatically selects the optimum
Arpeggio type for the Voice.
1
00.1
Selected type number
will be shown.
This dot lights to indicate
an Arpeggio number.

0.0.1
1
23
9
PSS-A50 Owner’s Manual
Arpeggio Hold
The Arpeggio cycles automatically, even if you
release your fingers from the keys. You can play
the keys over the Arpeggio sound.
Press [ARP. HOLD] button while the Arpeggio
is playing.
To disable Arpeggio Hold, press the [ARP. HOLD]
button again.
NOTE
• During Arpeggio Hold, you can change Arpeggio phrases
by pressing desired keys while holding down the [ARP.
HOLD] button.
• When Arpeggio Hold is disabled, the last Voice selected
before entering Arpeggio Hold will be called up.
Start the Arpeggio sequence.
Press the [ARPEGGIO] button.
Hold keys to start Arpeggio sequence.
Turn off Arpeggio
Press the [ARPEGGIO] button.
2
Aon
(on)
The Arpeggio sequence
changes in response to the
actual notes or chords you play.
3
AoF
If you can’t hear any sound or the sound is too
soft, try the following.
• Increase the volume.
• Disconnect the headphones from the
PHONES/OUTPUT terminal.
• Set Local Control to On (page 12.)
• Replace all the batteries with new ones or
recharged ones (page 7.)
• Reset the Octave setting to the default
value of 00.
Selecting the Keyboard Sound (Voice)
Various instrumental Voices are categorized and
assigned to the Voice buttons. Pressing the
same Voice button repeatedly selects the
assigned Voices in order.
NOTE
0.01
VOICE buttons
Selected Voice number
will be shown.
This dot lights to indicate a Voice
number.
• For specific Voice names, refer to page 14.
• Voice numbers 039 and 040 in the [DRUM/PERC.] button
are Drum Kit Voice. Various drum and percussion sounds
are assigned to individual keys, from which they can be
played. For details on the instruments and key assignments
of each Drum Kit, see page 16.

13
4
10
PSS-A50 Owner’s Manual
Recording/Playing
You can record your performance (Phrase Recording). Note that the previously recorded data will be
erased since only one recording is available.
Recording
Standby
Press [REC].
To exit from Record-
ing Standby mode,
press [REC] again.
Start recording
Play the keyboard to
start recording.
You can also start
recording by press-
ing [/].
Stop recording
Press [REC].
Playback
Press [/].
1
rEC
(Recording Standby)
2
rEC.
(Dot flashes with beat)
3
4
[SHIFT] button
• Sets the various setting of the instru-
ment (page 12: keyboard settings)
• Selects the function boxed. (TYPE of
Motion Effect; , PORTA-
MENTO; )
NOTE
• When recording capacity becomes full during recording, a “FUL” message appears on the display and recording is stopped.
• You can start a Phrase at a desired speed by simply tapping the [TEMPO/TAP] button four times for time signatures in 4 (such as
4/4) or three times for time signatures in 3 (such as 3/4).
Time Signature
When recording the Phrase used for Repeat Playback (page
11), set the Time Signature during the Recording Standby
mode (“rEC” indication.) If you recorded with a wrong Time
Signature, unwanted silence may be inserted during the
repeats since the Phrase is repeated in measures. The Time
Signature can be set from “Metronome” on page 12. (The
default setting is 4/4.) You can use the metronome while
recording, but the metronome will not be recorded.
Motion Effect
While holding down the [MOTION EFFECT] but-
ton, Motion Effect applies to the notes you play.
Motion Effect has three types A, B and C, and
correspondingly changes the Filter, Pitch, and/or
Modulation of the sound over time. Each type
has around 10 variations.
Selecting a Desired Type
While holding down the [SHIFT] button, each
press of the [MOTION EFFECT] button selects
the type in order (A01, A02, etc.).
NOTE
• To jump to the top of the A, B or C type in order, hold
down the [MOTION EFFECT] button while holding
down the [SHIFT] button.
• Certain combinations of a specific Voice, octave and
type may generate noise.
A01
Selected type and number will
be shown.

0.0.1
1 3
4
11
PSS-A50 Owner’s Manual
Portamento
Create a smooth transition in pitch from one
note played on the keyboard to the next one.
Turning Portamento on or off.
While holding down the [SHIFT] button, each
press of the [SUSTAIN] button alternately
selects on or off.
pon
poF
(On) (Off)
Deleting a Phrase
Press the buttons below in order:
[REC] [/] [/]
Repeat Playback
Play back the recorded phrase repeatedly.
While holding down [SHIFT], press [/].
NOTE
• You can record the Arpeggio and your performance for
a few measures and then play it back repeatedly, add-
ing your performance along with the playback as
desired.
• From the 2nd repeat playback, the Voice may differ
from the recording Voice. This is because the last
selected Voice during the recording will be used for
from the 2nd playback.
Tempo
You can set the tempo for Phrase, Arpeggio
playback and Motion Effect, Metronome
speed.
Press the [TEMPO/TAP] button.
Use the [+]/[-] buttons while “tEP” or the cur-
rent tempo value is shown.
NOTE
• Holding down the [-] or [+] button continuously
decreases or increases the value.
• To reset the tempo, press the [-] and [+] buttons simul-
taneously.
• While a Phrase or Metronome is playing back, press the
[TEMPO/TAP] button just twice at the desired tempo to
change the tempo.
tEp
Sustain
The notes you play have a longer sustain.
Turning Sustain on or off.
Each press of the [SUSTAIN] button alter-
nately selects on or off.
Son
SoF
(On)
(Off)

12
PSS-A50 Owner’s Manual
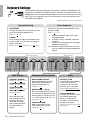
Keyboard Settings
These detailed settings provide extra convenience and enhanced operation. To
change them, hold down the [SHIFT] button, and then simultaneously press the
appropriate key on the keyboard (repeatedly if necessary) as indicated. Use the [+]
and [-] keys to change the value, or the Default key to call up the default value
(indicated with underline).
* Display indications are shown in parentheses.
TRANSPOSE
Changes the pitch of the instrument in semi-
tones, for playing in different keys.
Range: -12 – 00 – 12
TUNING
Finely changes the pitch of the entire instru-
ment in roughly 0.2 Hz steps, for tuning to
other instruments.
Settings: 427.0 – 440.0 – 453.0 Hz (27.0 – 40.0 – 53.0)
Transpose/Tuning
Determines how the sound responds to your
playing strength.
Range: 1 / 2 / 3 / oFF
1: Produces relatively high volume even
with light playing
2: Produces a fairly “standard” keyboard
response.
3: The keys must be played very strongly to
generate loud volume.
oFF: All notes are produced at the same vol-
ume no matter how hard the keyboard is
played.
Touch Response
METRONOME ON/OFF
Sets the Metronome on or off.
Change the speed with the
Tempo control (page 11).
Settings: on / oFF
METRONOME -+ (Beat)
Sets the number of beats (clicks)
in a measure for Metronome and
Phrase (page 10). Set this to 4 for
a 4/4 time signature; or 3 for 3/4.
Settings: 00 – 04 – 16
PHRASE VOLUME
Adjusts the volume of the
Phrase/Metronome sound.
Settings: 00 – 12 – 15
Metronome/Phrase Volume
BATTERY TYPE
Changes the type of battery
to be used. Be sure to
change this to match the
batteries you’ve installed.
Settings: Alkaline/Manganese (AL) or
Rechargeable (n|)
AUTO POWER OFF
Changes the amount of time
that elapses before the
power is automatically
turned off. The Off setting
disables this feature.
Settings: oFF / 005 / 010 / 015 / 030 /
060 / 120 min
Utility
CONTROL CHANGE
Settings: on / oFF (Con / CoF)
PROGRAM CHANGE
Settings: on / oFF (Pon / PoF)
LOCAL CONTROL
Settings: on / oFF (Lon / LoF)
MIDI OUT CHANNEL
Settings: 01–16, oFF
Set as desired when
transmitting/receiving
MIDI data to/from a
computer. For details,
refer to the MIDI Refer-
ence described on
page 6.
MIDI Settings
C2 C3 C4
Default
Default
Default
Default
Default

13
PSS-A50 Owner’s Manual
Creating Music with MIDI
By connecting this instrument to a computer via
USB cable, you can record performances on this
instrument as a MIDI Song to music production
software on computer, or use this instrument as a
master keyboard to enter data on music produc-
tion software. These features greatly expand your
music creation and performance possibilities. For
details on MIDI, refer to the online PDF manual
“MIDI basics” on the Yamaha website.
Supported OS
• Windows 7, 8.1, 10
• Mac OSX 10.12, 10.13, 10.14
1 Turn off Local Control (page 12; MIDI settings)
as needed.
2 Connect this instrument and the computer with
the USB cable. For connection, see page 6.
NOTE
3 Start recording to the music production soft-
ware and play this instrument.
NOTE
• Windows is a registered trademark of Microsoft
®
Cor-
poration in the United States and other countries.
• Mac is trademark of Apple Inc., registered in the U.S.
and other countries.
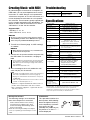
Troubleshooting
Specifications
* The contents of this manual apply to the latest specifications as of the
publishing date. To obtain the latest manual, access the Yamaha
website then download the manual file. Since specifications,
equipment or separately sold accessories may not be the same in
every locale, please check with your Yamaha dealer.
• Be sure to read “Precautions when Using the [5V DC/
USB TO HOST] Terminal” in the MIDI Reference (page 6)
before using the [5V DC/USB TO HOST] terminal.
• When turning Local Control to off, sound will not be
produced from the keyboard.
• If your computer is having difficulty communicating with
the instrument, download the standard Yamaha USB-
MIDI driver from the following web page and install it on
your computer.
http://download.yamaha.com/
• For details on the MIDI transmit channel of the performance
data, refer to the MIDI Reference document (page 6).
• Playing a recorded Phrase will transmit the correspond-
ing MIDI data.
• If the velocity parameter doesn’t reach a value of 127 as
needed, set Touch Response to “1.”
NOTICE
NOTICE
Problem Solution
No sound, too soft
sound or choppy sound
See the text in the
on pages 7 and 9.
Product name Digital keyboard
Keyboard 37 HQ (High Quality) Mini Keys
Touch Response Soft, Medium, Hard, Fixed
Voices
Preset: 40 Voices + 2 Drum Kits
Polyphony (Max.): 32 notes
Octave Button
Yes (-04 – +04)
Arpeggio
138 types
Effects
Motion Effect, Portamento, Sustain
Function
Metronome: Yes, Tempo: 11 – 280,
Transpose: -12 – +12,
Tuning: 427.0 – 440.0 – 453.0 Hz
(approx. 0.2 Hz increments)
Recording
(MIDI data only; audio not
supported.)
• Number of Phrases: 1 (approx. 700
notes; fewer when recording using effects
such as Motion Effect)
Display LED display
Connectivity
Headphones/Output (stereo mini),
5V DC/USB TO HOST (USB micro B)
Amplifiers 1.4 W
Speakers 8 cm x 1
Power Supply
• USB bus power 5V/500mA
• USB power adaptor 5V/500mA
• Four “AA” size alkaline (LR6),
manganese (R6) or Ni-MH
rechargeable (HR6) batteries
Power Consumption 1.5 W
Auto Power Off Yes
Dimensions
(W x D x H)
506 mm x 201 mm x 54 mm
(19-15/16” x 7-15/16” x 2-1/8”)
Weight
1.2 kg (2 lb, 10 oz)
(not including batteries)
Included Accessories
Owner’s Manual, USB cable,
Online Member Product Registration
Separately Sold
Accessories
(May not be available
depending on your area.)
Headphones
(HPH-50/HPH-100/HPH-150)
shaded box
Backup Parameters
The following settings are maintained
even when the power is turned off.
Phrase, Master Volume Level, Tuning,
Touch Response, Battery Type, Auto
Power Off setting, MIDI Settings (other
than Local Control)
When disconnecting the USB power adaptor,
or low (or no) battery power, backup is not exe-
cuted.
Initialization
This operation initializes the
backup data. While holding
down the highest white key
on the keyboard, simultane-
ously press the [ ]
(Standby/On) switch to turn
the power on so that “CLr”
will be displayed.

14
PSS-A50
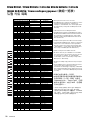
Voice List / Voice-Liste / Liste des sonorités / Lista de voces /
Список тембров / /
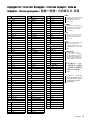
Voice
No.
MSB
(0-127)
LSB
(0-127)
MIDI Program
Change No.
(1-128)
Voice Name
PIANO
10 0 1 Grand Piano
20 0 5 Electric Piano 1
30 0 6 Electric Piano 2
40 0 3
Electric Grand Piano
ORGAN
5 0 0 17 Drawbar Organ
6 0 0 19 Rock Organ
70 0 22 Accordion
80 0 23 Harmonica
GUITAR
90 0 25 Nylon Guitar
10 0 0 26 Steel Guitar
11 0 0 27 Jazz Guitar
12 0 0 28 Clean Guitar
13 0 0 30 Overdriven Guitar
BASS
14 0 0 33 Acoustic Bass
15 0 0 34 Finger Bass
16 0 0 37 Slap Bass
17 0 0 39 Synth Bass
STRINGS
18 0 0 49 Strings
19 0 0 46 Pizzicato Strings
20 0 0 41 Violin
21 0 0 43 Cello
22 0 0 47 Orchestral Harp
WOODWIND
23 0 0 69 Oboe
24 0 0 72 Clarinet
25 0 0 74 Flute
26 0 0 67 Tenor Sax
BRASS
27 0 0 62 Brass Section
28 0 0 57 Trumpet
29 0 0 58 Trombone
Voice
No.
MSB
(0-127)
LSB
(0-127)
MIDI Program
Change No.
(1-128)
Voice Name
30 0 0 61 French Horn
31 0 0 63 Synth Brass
SYNTH LEAD
32 0 0 83 Gemini
33 0 0 85 Punchy Chordz
34 0 0 81 Square Lead
35 0 0 82 Sawtooth Lead
SYNTH PAD
36 0 0 89 New Age Pad
37 0 0 90 Warm Pad
38 0 0 101 Brightness
DRUM KIT/PERCUSSION
39 127 0 1 Standard Kit
40 127 0 28 Dance Kit
41 0 0 12 Vibraphone
42 0 0 13 Marimba
Voice
No.
MSB
(0-127)
LSB
(0-127)
MIDI Program
Change No.
(1-128)
Voice Name
Maximum Polyphony
The instrument has 32-note maximum polyphony. This means that it can play a maximum of up to 32 notes at once, regardless of what
functions are used. Arpeggio and Phrase playback use a number of the available notes, so when Arpeggio and Phrase playback are used
the total number of available notes for playing on the keyboard is correspondingly reduced. If the maximum polyphony is exceeded, earlier
played notes will be cut off and the most recent notes have priority (last note priority).
NOTE
Maximale Polyphonie
Das Instrument verfügt über eine maximale Polyphonie von 32 Noten. Dies bedeutet, dass das Instrument unabhängig von den aktivierten
Funktionen maximal 32 Noten gleichzeitig spielen kann. Eine bestimmte Anzahl der verfügbaren Noten wird von den Funktionen Arpeggio
und Phrasenwiedergabe belegt; bei deren Einsatz verringert sich somit die Anzahl der für das Spiel auf der Tastatur verfügbaren Noten
entsprechend. Wenn die maximale Polyphonie überschritten wird, werden die am frühesten gespielten Noten ausgeschaltet und die zuletzt
gespielten Noten haben Vorrang (Last Note Priority).
HINWEIS
Polyphonie maximale
L'instrument dispose d'une polyphonie maximale de 32 notes. Cela signifie que l'instrument peut reproduire un nombre maximal de 32 voix
à la fois, indépendamment des fonctions utilisées. L'arpège et le mode de lecture Phrase font appel à un certain nombre de notes
disponibles. Il s'ensuit que lorsque l'arpège et le mode de lecture Phrase sont utilisés, le nombre total de notes disponibles pour
l'interprétation au clavier est réduit en conséquence. Lorsque la polyphonie maximale est dépassée, les notes jouées en premier ne
produisent aucun son et seules les notes interprétées en dernier sont audibles (priorité à la dernière note).
NOTE
• The Voice List includes MIDI program change numbers for each voice. Use these program change numbers when playing the
instrument via MIDI from an external device.
• Program change numbers are often specified as numbers “0–127. ” For these cases, it is necessary to subtract 1 from the intended
program change number to select the appropriate sound, because this list uses a “1–128” numbering system. For example, to select
program change number 39 in the list, transmit program change number 38.
• In der Voice-Liste sind die MIDI-Programmwechselnummern für jede Voice aufgeführt. Verwenden Sie diese
Programmwechselnummern, wenn Sie das Instrument über MIDI von einem externen Gerät aus spielen/ansteuern.
• Die Programmwechselnummern werden häufig als „0–127“ angegeben. Da diese Liste das Nummerierungssystem „1–128“ verwendet,
muss in diesen Fällen von den gesendeten Programmwechselnummern die Zahl 1 abgezogen werden, um den gewünschten Sound zu
erhalten. Wenn Sie z. B. aus der nachstehenden Liste das Programm Nr. 39 auswählen möchten, senden Sie die
Programmwechselnummer 38.
• La liste des voix comporte des numéros de modification de programmes MIDI pour chaque voix. Utilisez ces derniers lorsque vous jouez de
l'instrument via MIDI à partir d'un périphérique externe.
• Les numéros de changement de programme sont souvent spécifiés comme étant de « 0 à 127 ». « Dans ces cas-là, il est nécessaire de soustraire
1 du numéro de changement de programme prévu afin de sélectionner le son approprié, car cette liste utilise un système de numérotation allant
de « 1 à 128 ». Par exemple, pour sélectionner le changement de programme n° 39 dans la liste, il faut transmettre le changement de programme
n° 38.

15
PSS-A50
Polifonía máxima
El instrumento tiene una polifonía máxima de 32 notas. Esto significa que puede tocar un máximo de 32 notas a la vez,
independientemente de las funciones que se usen. En la reproducción de arpegios y frases se utiliza una parte de las notas disponibles, así
que cuando se utilizan arpegios y frases, el número de notas disponibles se reduce en consecuencia. Si se excede la polifonía máxima, las
notas tocadas con anterioridad se cortan y se da prioridad a las notas más recientes (prioridad de la última nota).
NOTA
Максимальная полифония
Максимальная полифония данного инструмента — 32 ноты. Это значит, что независимо от используемых функций инструмент
может одновременно проигрывать не более 32 нот. Часть нот используется для воспроизведения фраз и арпеджио; таким
образом, при включенном воспроизведении фраз и арпеджио общее количество нот, доступных для игры на клавиатуре,
сокращается. В случае превышения максимальной полифонии ранее сыгранные ноты отсекаются, а ноты, сыгранные
последними, обладают более высоким приоритетом (приоритет последней ноты).
ПРИМЕЧАНИЕ
最大同时发音数
本乐器的最大同时发音数是32个音符。这表示不管使用哪些功能,最多可同时奏出32个音符。琶音和乐
句播放会用到许多可用音符,因此在使用琶音和乐句播放时,能在键盘上演奏的可用音符总数会相应地减
少。如果超过最大同时发音数,先前演奏的音符会被删除掉,最近演奏的音符具有较高优先级 (音符越靠
后,优先级越高)。
注
• La lista de voces incluye números de cambio de programa MIDI para cada sonido. Utilice estos números de cambio de programa
cuando toque el instrumento a través del MIDI desde un dispositivo externo.
• Los números de cambio de programa se especifican a menudo como “0 a 127”. En estos casos, se debe restar 1 del número de
cambio de programa deseado para seleccionar el sonido adecuado, porque esta lista utiliza un sistema de numeración de “1 a 128”.
Por ejemplo, para seleccionar el número de cambio de programa 39 en la lista, transmita el número de cambio de programa 38.
• В список тембров включены номера изменения MIDI-программ для каждого тембра. Эти номера используются при воспроизведении
на инструменте с внешнего устройства через интерфейс MIDI.
• Номера изменения программ часто представляются в виде чисел «0–127». В подобных случаях необходимо вычитать 1 из желаемого
номера изменения программы для выбора необходимого звука, поскольку в этом списке используется система нумерации «1–128».
Например, для выбора номера изменения программы 39 в списке передайте номер изменения программы 38.
•
音色一览表包括每种音色的
MIDI
程序变更编号。从外接设备通过
MIDI
使用本乐器进行演奏时,会使用
这些程序变更编号。
•
程序变更编号通常指定为编号
“0-127”
。
127.
因为此一览表使用的是
“1-128”
编号系统,因此需要从所用程序变更编号减去
1
以选择正确的音色。
例如,若要在列表中选择编号
39
,则传送程序变更编号
38
。
Voice List / Voice-Liste / Liste des sonorités / Lista de voces /
Список тембров / 音色一览表 /

16
PSS-A50
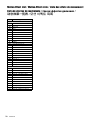
Drum Kit List / Drum Kit-Liste / Liste des kits de batterie / Lista de
juegos de batería / Список наборов ударных / /
Voice No. 39 40
MSB (0–127) / LSB (0–127) / PC (1–128)
127/000/001 127/000/28
Keyboard MIDI
Standard Kit Dance Kit
Note# Note Note# Note
25 C# 013C# -1 Surdo Mute Surdo Mute
26 D 0 14 D -1 Surdo Open Surdo Open
27 D# 015D# -1 Hi Q Hi Q
28 E 0 16 E -1 Whip Slap Whip Slap
29 F 0 17 F -1 Scratch H Scratch H
30 F# 018F# -1 Scratch L Scratch L
31 G 0 19 G -1 Finger Snap Finger Snap
32 G# 020G# -1 Click Noise Click Noise
33 A 0 21 A -1 Metronome Click Metronome Click
34 A# 022A# -1 Metronome Bell Metronome Bell
35 B 0 23 B -1 Seq Click L Seq Click L
36 C 1 24 C 0 Seq Click H Seq Click H
37 C# 125C# 0 Brush Tap Brush Tap
38 D 1 26 D 0 Brush Swirl Brush Swirl
39 D# 127D# 0 Brush Slap Brush Slap
40 E 1 28 E 0 Brush Tap Swirl Reverse Cymbal
41 F 1 29 F 0 Snare Roll Snare Roll
42 F# 130F# 0Castanet Hi Q 2
43 G 1 31 G 0 Snare Soft Snare Techno
44 G# 132G# 0Sticks Sticks
45 A 1 33 A 0 Bass Drum Soft Kick Techno Q
46 A# 134A# 0 Open Rim Shot Rim Gate
47 B 1 35 B 0 Bass Drum Hard Kick Techno L
48 C 2 36 C 1 Bass Drum Kick Techno
49 C# 237C# 1 Side Stick Side Stick Analog
50 D 2 38 D 1 Snare Snare Clap
51 D# 239D# 1 Hand Clap Hand Clap
52 E 2 40 E 1 Snare Tight Snare Dry
53 F 2 41 F 1 Floor Tom L Tom Analog 1
54 F# 242F# 1 Hi-Hat Closed Hi-Hat Close Analog 1
55 G 2 43 G 1 Floor Tom H Tom Analog 2
56 G# 244G# 1 Hi-Hat Pedal Hi-Hat Close Analog 2
57 A 2 45 A 1 Low Tom Tom Analog 3
58 A# 246A# 1 Hi-Hat Open Hi-Hat Open Analog
59 B 2 47 B 1 Mid Tom L Tom Analog 4
60 C 3 48 C 2 Mid Tom H Tom Analog 5
61 C# 349C# 2 Crash Cymbal 1 Cymbal Analog
62 D 3 50 D 2 High Tom Tom Analog 6
63 D# 351D# 2 Ride Cymbal 1 Ride Cymbal 1
64 E 3 52 E 2 Chinese Cymbal Chinese Cymbal
65 F 3 53 F 2 Ride Cymbal Cup Ride Cymbal Cup
66 F# 354F# 2 Tambourine Tambourine
67 G 3 55 G 2 Splash Cymbal Splash Cymbal
68 G# 356G# 2 Cowbell Cowbell Analog
69 A 3 57 A 2 Crash Cymbal 2 Crash Cymbal 2
70 A# 358A# 2 Vibraslap Vibraslap
71 B 3 59 B 2 Ride Cymbal 2 Ride Cymbal 2
72 C 4 60 C 3 Bongo H Bongo H
73 C# 461C# 3 Bongo L Bongo L
74 D 4 62 D 3 Conga H Mute Conga Analog H
75 D# 463D# 3 Conga H Open Conga Analog M
76 E 4 64 E 3 Conga L Conga Analog L
77 F 4 65 F 3 Timbale H Timbale H
78 F# 466F# 3 Timbale L Timbale L
79 G 4 67 G 3 Agogo H Agogo H
80 G# 468G# 3 Agogo L Agogo L
81 A 4 69 A 3 Cabasa Cabasa
82 A# 470A# 3 Maracas Maracas 2
83 B 4 71 B 3 Samba Whistle H Samba Whistle H
84 C 5 72 C 4 Samba Whistle L Samba Whistle L
85 C# 573C# 4 Guiro Short Guiro Short
86 D 5 74 D 4 Guiro Long Guiro Long
87 D# 575D# 4 Claves Claves 2
88 E 5 76 E 4 Wood Block H Wood Block H
89 F 5 77 F 4 Wood Block L Wood Block L
90 F# 578F# 4 Cuica Mute Scratch H
91 G 5 79 G 4 Cuica Open Scratch L
92 G# 580G# 4 Triangle Mute Triangle Mute
93 A 5 81 A 4 Triangle Open Triangle Open
94 A# 582A# 4 Shaker Shaker
95 B 5 83 B 4 Jingle Bells Jingle Bells
96 C 6 84 C 5 Bell Tree Bell Tree
E2
F2
F#2
G2
G#2
A2
A#2
B2
C2
D#2
D2
C#2
E3
F3
F#3
G3
G#3
A3
A#3
B3
C3
D#3
D3
C#3
E4
F4
F#4
G4
G#4
A4
A#4
B4
C4
D#4
D4
C#4
C5
• Each percussion Voice uses one note.
• The MIDI Note No. and Note are actually one octave
lower than keyboard Note No. and Note. For
example, in “Standard Kit,” the “Snare Tight” (Note
No.52/Note E2) corresponds to MIDI (Note No.40/
Note E1).
• Jede Percussion-Voice belegt eine Note.
• Die MIDI-Notennummer und die MIDI-Note sind in
Wirklichkeit eine Oktave tiefer als auf der Tastatur. Z.
B. entspricht im „Standard Kit“ die „Snare Tight“
(Note Nr. 52/Note E2) der MIDI-Notennummer 40
bzw. der Note E1.
• Chaque voix de percussion utilise une note unique.
• Les paramètres MIDI Note No. et Note se situent en
réalité à une octave inférieure à leurs équivalents
Note No. et Note sur le clavier. Par exemple, dans
« Standard Kit », « Snare Tight » (Note No.52/Note
E2) correspond à MIDI (Note No.40/Note E1).
• Cada voz de percusión utiliza una nota.
• El número de nota y la nota MIDI son en realidad
una octava menos que el número de nota y la nota
en el teclado. Por ejemplo, en “Standard Kit”,
“Snare Tight” (nota n.º 52/nota E2) corresponde a
MIDI (nota n.º 40/nota E1).
• В каждом тембре перкуссии используется одна
нота.
• Номер MIDI-ноты и нота в действительности на
одну октаву ниже номера ноты и ноты,
указанных на клавиатуре. Например, в Standard
Kit (стандартный набор) Snare Tight (номер ноты
52 / нота E2) соответствует MIDI (номер ноты 40 /
нота E1).
• 每种打击音色使用一个音符。
•MIDI音符编号和音符比键盘音符编号和
音符实际低一个八度。例如,在音色
“Standard Kit”中, “Snare Tight” (音符
编号52/音符E2)对应于MIDI (音符编
号40/音符E1)。

17
PSS-A50
Arpeggio List / Liste der Arpeggios / Liste des arpèges / Lista de
arpegios / Список арпеджио / /
NOTE
HINWEIS
NOTE
NOTA
ПРИМЕЧАНИЕ
注
No. Type Name
ACOUSTIC PIANO
1PfArp1
2PfArp2
3PfArp3
4PfArp4
5 PfClub1
6 PfClub2
7 PfBallad
8PfChd8th
9 PfShufle
10 PfRock
11 RocknPf
12 70RockPf
13 SlowflPf
14 SoulPf
15 LatinRck
16 Salsa1
17 Salsa2
18 6/8R&B
KEYBOARD
19 EPArp
20 BalladEP
21 ChordUp
22 ChdDance
23 Clavi1
24 Clavi2
25 Gospel
26 Reggae1
27 Reggae2
28 Reggae3
GUITAR CHORD
29 Strum1
30 Strum2
31 Strum3
32 Strum4
33 Funky
34 GtrChrd1
35 GtrChrd2
36 GtrChrd3
37 CleanGtr
38 Samba1
39 Samba2
40 Spanish1
41 Spanish2
GUITAR ARPEGGIO
42 Pickin1
43 Pickin2
44 GtrArp
45 FngrPck1
46 FngrPck2
47 Slowfl
BASS
48 FngrBas1
49 FngrBas2
50 FngrBas3
51 CoolFunk
52 SlapBass
53 AcidBas1
54 AcidBas2
55 FunkyBas
56 CmbJazB1
57 CmbJazB2
58 CmbJazB3
59 NewR&BBs
60 HipHopBs
61 SmoothBs
62 DreamBas
63 TranceBs
64 LatinBas
STRINGS
65 Strings1
66 Strings2
67 Strings3
68 Strings4
69 StrngDwn
70 StrngUp
71 OrcheStr
72 Jupiter
73 Pizz1
74 Pizz2
HARP
75 Harp1
76 Harp2
BRASS
77 BrasSec1
78 BrasSec2
79 BrasSec3
80 FunkBras
81 SoulReed
CHROMATIC PERC.
82 PercArp
83 Trill
84 Cresendo
85 DiscoCP
SYNTH SEQUENCE
86 UpOct
87 DownOct
88 UpDwnOct
89 SynArp1
90 SynArp2
91 SynArp3
92 SynArp4
No. Type Name
93 SyncEcho
94 PulsLine
95 StepLine
96 Random
97 Down&Up
98 SuperArp
99 AcidLine
100 TekEcho
101 VelGruv
102 Planet
103 Trance1
104 Trance2
105 Trance3
106 DiscoLd
SYNTH CHORD
107 ChordAlt
108 SynChrd1
109 SynChrd2
110 Syncopa
111 Hybrid1
112 Hybrid2
113 Hybrid3
114 Hybrid4
115 Hybrid5
116 SmoothPd
DRUMS
117 Funk1
118 Funk2
119 Funk3
120 Soul
121 ClscHip
122 Smooth
123 NewGospl
124 CmbJazz1
125 Bebop
126 JazzHop
127 FolkRock
128 Unpluggd
129 Dream
130 2 Step
131 ClubHs1
132 ClubHs2
133 House
134 Ibiza2
135 Ibiza3
136 Garage
137 Samba
138 African
No. Typ e Name
• For Nos. 117 – 138, play with
a Drum Kit Voice (No. 39
Standard Kit or No. 40
Dance Kit).
• Bei Nrn. 117–138 spielen Sie
eine Drum-Kit-Voice (Nr. 39
Standard Kit oder Nr. 40
Dance Kit).
• Pour les n° 117 à 138, jouez
une voix de kit de percussion
(Standard Kit n°39 ou Dance
Kit n°40).
• Para los números 117 – 138,
toque con una voz de
conjunto de batería (n.º 39
Standard Kit o n.º 40 Dance
Kit).
• Для номеров 117–138
следует играть с тембром
набора ударных (номер 39 в
Standard Kit (стандартный
набор) номер 40 в Dance Kit
(танцевальная установка)).
•
对于编号
117 – 138
,
与鼓组音色一起演奏
(
Standard Kit
编号
39
或
Dance Kit
编号
40
)。

18
PSS-A50
Motion Effect List / Motion-Effect-Liste / Liste des effets de mouvement /
Lista de efectos de movimiento / Список эффектов движения /
/
No. Type Na me
A FILTER
A01 Filter 1
A02 FIlter 2
A03 Filter Wah
A04 Filter 3
A05 Filter 4
A06 Filter 5
A07 Filter 6
A08 Filter 7
A09 Filter + Modulation 1
A10 Filter + Modulation 2
B PITCH
B01 Pitch Whole-Note Up
B02 Pitch Half-Note Up
B03 Pitch Whole-Note Down
B04 Pitch Half-Note Down
B05 Choking Up
B06 Choking Down
B07 Pitch Down 1
B08 Pitch Down 2
B09 Pitch Up 1
B10 Pitch Up 2
B11 Pitch Up + Modulation
B12 Pitch Up 3
C MODULATION
C01 Modulation On 1
C02 Modulation On 2
C03 Pitch Up + Modulation On 1
C04 Pitch Up + Modulation On 2
C05 Expression Slice 1
C06 Expression Slice 2
C07 Expression Slice + Filter 1
C08 Expression Slice + Filter 2
C09 Pitch Up + Expression Slice 1
C10 Pitch Up + Expression Slice 2
C11 Pitch Up + Expression Slice 3
C12 Pitch Up + Expression Slice 4

Information for users on collection and disposal of old equipment and used batteries:
These symbols on the products, packaging, and/or accompanying documents mean that used electrical and electronic products and
batteries should not be mixed with general household waste.
For proper treatment, recovery and recycling of old products and used batteries, please take them to applicable collection points, in
accordance with your national legislation.
By disposing of these products and batteries correctly, you will help to save valuable resources and prevent any potential negative
effects on human health and the environment which could otherwise arise from inappropriate waste handling.
For more information about collection and recycling of old products and batteries, please contact your local municipality, your waste
disposal service or the point of sale where you purchased the items.
For business users in the European Union:
If you wish to discard electrical and electronic equipment, please contact your dealer or supplier for further information.
Information on Disposal in other Countries outside the European Union:
These symbols are only valid in the European Union. If you wish to discard these items, please contact your local authorities or
dealer and ask for the correct method of disposal.
Note for the battery symbol (bottom two symbol examples):
This symbol might be used in combination with a chemical symbol. In this case it complies with the requirement set by the EU
Battery Directive for the chemical involved.
(weee_battery_eu_en_02)
Verbraucherinformation zur Sammlung und Entsorgung alter Elektrogeräte und benutzter Batterien
Befinden sich diese Symbole auf den Produkten, der Verpackung und/oder beiliegenden Unterlagen, so sollten benutzte elektrische
Geräte und Batterien nicht mit dem normalen Haushaltsabfall entsorgt werden.
In Übereinstimmung mit Ihren nationalen Bestimmungen bringen Sie alte Geräte und benutzte Batterien bitte zur fachgerechten
Entsorgung, Wiederaufbereitung und Wiederverwendung zu den entsprechenden Sammelstellen.
Durch die fachgerechte Entsorgung der Elektrogeräte und Batterien helfen Sie, wertvolle Ressourcen zu schützen, und verhindern
mögliche negative Auswirkungen auf die menschliche Gesundheit und die Umwelt, die andernfalls durch unsachgerechte
Müllentsorgung auftreten könnten.
Für weitere Informationen zum Sammeln und Wiederaufbereiten alter Elektrogeräte und Batterien kontaktieren Sie bitte Ihre örtliche
Stadt- oder Gemeindeverwaltung, Ihren Abfallentsorgungsdienst oder die Verkaufsstelle der Artikel.
Information für geschäftliche Anwender in der Europäischen Union:
Wenn Sie Elektrogeräte ausrangieren möchten, kontaktieren Sie bitte Ihren Händler oder Zulieferer für weitere Informationen.
Entsorgungsinformation für Länder außerhalb der Europäischen Union:
Diese Symbole gelten nur innerhalb der Europäischen Union. Wenn Sie solche Artikel ausrangieren möchten, kontaktieren Sie bitte
Ihre örtlichen Behörden oder Ihren Händler und fragen Sie nach der sachgerechten Entsorgungsmethode.
Anmerkung zum Batteriesymbol (untere zwei Symbolbeispiele):
Dieses Symbol kann auch in Kombination mit einem chemischen Symbol verwendet werden. In diesem Fall entspricht dies den
Anforderungen der EU-Batterierichtlinie zur Verwendung chemischer Stoffe.
(weee_battery_eu_de_02)
Informations concernant la collecte et le traitement des piles usagées et des déchets d’équipements électriques et
électroniques
Les symboles sur les produits, l'emballage et/ou les documents joints signifient que les produits électriques ou électroniques usagés
ainsi que les piles usagées ne doivent pas être mélangés avec les déchets domestiques habituels.
Pour un traitement, une récupération et un recyclage appropriés des déchets d’équipements électriques et électroniques et des piles
usagées, veuillez les déposer aux points de collecte prévus à cet effet, conformément à la réglementation nationale.
En vous débarrassant correctement des déchets d’équipements électriques et électroniques et des piles usagées, vous contribuerez
à la sauvegarde de précieuses ressources et à la prévention de potentiels effets négatifs sur la santé humaine qui pourraient advenir
lors d'un traitement inapproprié des déchets.
Pour plus d'informations à propos de la collecte et du recyclage des déchets d’équipements électriques et électroniques et des piles
usagées, veuillez contacter votre municipalité, votre service de traitement des déchets ou le point de vente où vous avez acheté les
produits.
Pour les professionnels dans l'Union européenne :
Si vous souhaitez vous débarrasser des déchets d’équipements électriques et électroniques, veuillez contacter votre vendeur ou
fournisseur pour plus d'informations.
Informations sur la mise au rebut dans d'autres pays en dehors de l'Union européenne :
Ces symboles sont seulement valables dans l'Union européenne. Si vous souhaitez vous débarrasser de déchets d’équipements
électriques et électroniques ou de piles usagées, veuillez contacter les autorités locales ou votre fournisseur et demander la
méthode de traitement appropriée.
Note pour le symbole « pile » (deux exemples de symbole ci-dessous) :
Ce symbole peut être utilisé en combinaison avec un symbole chimique. Dans ce cas, il respecte les exigences établies par la
directive européenne relative aux piles pour le produit chimique en question.
(weee_battery_eu_fr_02)

Información para usuarios sobre la recogida y eliminación de los equipos antiguos y las pilas usadas
Estos símbolos en los productos, embalajes y documentos anexos significan que los productos eléctricos y electrónicos y sus pilas
no deben mezclarse con los desperdicios domésticos normales.
Para el tratamiento, recuperación y reciclaje apropiados de los productos antiguos y las pilas usadas, llévelos a puntos de reciclaje
correspondientes, de acuerdo con la legislación nacional.
Al deshacerse de estos productos y pilas de forma correcta, ayudará a ahorrar recursos valiosos y a impedir los posibles efectos
desfavorables en la salud humana y en el entorno que de otro modo se producirían si se trataran los desperdicios de modo
inapropiado.
Para obtener más información acerca de la recogida y el reciclaje de los productos antiguos y las pilas, póngase en contacto con las
autoridades locales, con el servicio de eliminación de basuras o con el punto de venta donde adquirió los artículos.
Para los usuarios empresariales de la Unión Europea:
Si desea desechar equipos eléctricos y electrónicos, póngase en contacto con su vendedor o proveedor para obtener más
información.
Información sobre la eliminación en otros países fuera de la Unión Europea:
Estos símbolos solamente son válidos en la Unión Europea. Si desea desechar estos artículos, póngase en contacto con las
autoridades locales o con el vendedor y pregúnteles el método correcto.
Nota sobre el símbolo de pila (dos ejemplos de símbolos en la parte inferior):
Este símbolo se puede utilizar en combinación con un símbolo químico. En este caso, cumple el requisito establecido por la
Directiva de la UE sobre pilas correspondiente a la sustancia química utilizada.
(weee_battery_eu_es_02)
(This product conforms to the RoHS regulations in the EU.)
(Dieses Produkt entspricht der RoHS-Richtlinie der EU.)
(Ce produit est conforme aux réglementations RoHS de l'UE.)
(Este producto cumple con los requisitos de la directiva RoHS en la UE.)
A página está carregando...
A página está carregando...
A página está carregando...
A página está carregando...
-
 1
1
-
 2
2
-
 3
3
-
 4
4
-
 5
5
-
 6
6
-
 7
7
-
 8
8
-
 9
9
-
 10
10
-
 11
11
-
 12
12
-
 13
13
-
 14
14
-
 15
15
-
 16
16
-
 17
17
-
 18
18
-
 19
19
-
 20
20
-
 21
21
-
 22
22
-
 23
23
-
 24
24


em outras línguas
- español: Yamaha PSS-A50 El manual del propietario
- français: Yamaha PSS-A50 Le manuel du propriétaire
- italiano: Yamaha PSS-A50 Manuale del proprietario
- English: Yamaha PSS-A50 Owner's manual
- русский: Yamaha PSS-A50 Инструкция по применению
- Nederlands: Yamaha PSS-A50 de handleiding
- Deutsch: Yamaha PSS-A50 Bedienungsanleitung
- dansk: Yamaha PSS-A50 Brugervejledning
- čeština: Yamaha PSS-A50 Návod k obsluze
- svenska: Yamaha PSS-A50 Bruksanvisning
- polski: Yamaha PSS-A50 Instrukcja obsługi
- Türkçe: Yamaha PSS-A50 El kitabı
- suomi: Yamaha PSS-A50 Omistajan opas
- română: Yamaha PSS-A50 Manualul proprietarului
Artigos relacionados
-
Yamaha HD-200 Manual do proprietário
-
-
Yamaha YPT-370 Manual do proprietário
-
Yamaha EZ300 61 Full-Size Lighted Touch Sensitive Keyboard Manual do proprietário
-
Yamaha PSS-F30 Manual do proprietário
-
-
Yamaha PSR-E423 Manual do proprietário
-
Yamaha PSR-E453 Manual do usuário
-
-