
RL
OWNER'S MANUAL
MANUAL DE INSTRUCCIONES
NS-P440/
NS-P446
HOME CINEMA 5.1CH SPEAKER PACKAGE/
HOME CINEMA 6.1CH SPEAKER PACKAGE
(NS-P440/NS-P446: NX-E440 + NX-C440 +SW-P440)
000_EN_book_NS-P440_446_RTL.book Page 1 Wednesday, November 30, 2005 6:58 PM

CAUTION: READ THIS BEFORE OPERATING YOUR UNIT.
1 To assure the finest performance, please read this manual
carefully. Keep it in a safe place for future reference.
2 Install the speakers in a cool, dry, clean place – away from
windows, sources of heat, sources of excessive vibration,
dust, moisture or cold. Avoid sources of electrical humming
(e.g., transformers and motors). To prevent fire or electric
shock, do not expose the speakers to rain or water.
3 To prevent the enclosure from warping or discoloring, do not
expose the speakers to direct sunlight or excessive humidity.
4 Avoid installing the speakers where foreign objects may fall
onto them and/or where they may be exposed to liquid
dripping or splashing.
5 Do not place the following objects on top of the speakers:
– Other components, as they might damage or discolor the
surface of the speakers.
– Burning objects (e.g., candles), as they might cause fire,
damage to the speakers or personal injury.
– Containers of liquid, as they might spill and cause electric
shock to the user or damage to the speakers.
6 Do not place the speakers where they are liable to be knocked
over or struck by falling objects. Stable placement will also
ensure better sound.
7 Placing the speakers on the same shelf or rack as the
turntable can result in feedback.
8
Secure placement or installation is the owner’s responsibility.
YA M A H A
is not liable for accidents caused by improper
placement or installation of speakers.
9 If you note distortion, reduce the volume control on your
amplifier. Do not drive your amplifier to the point of
“clipping”. Otherwise, the speakers may be damaged.
10 When using an amplifier with a rated output power higher
than the nominal input power of the speakers, care should be
taken not to exceed the maximum input of the speakers.
11 Do not clean the speakers with chemical solvents as this
might damage the finish. Use a clean, dry cloth.
12 Do not attempt to modify or fix the speakers. Contact
qualified YAMAHA service personnel when service is
needed. Do not open the cabinet under any circumstances.
13 Please read the “Troubleshooting” section regarding common
operating errors before concluding that the speakers are
faulty.
For SW-P440
1 Do not operate this unit upside down. It may overheat, possibly
causing damage.
2 Do not use excessive force on switches, controls or connection
wires. When moving this unit, first disconnect the power plug
and the wires connected to other equipment. Never pull the wires
themselves.
3 Since this unit has a built-in power amplifier, heat radiates from
the rear panel. Place the unit away from walls, allowing at least
20 cm of space above, behind and on both sides of the unit to
prevent fire or damage. Furthermore, do not position the unit
with the rear panel facing down on the floor or other surfaces.
4 When using a humidifier, be sure to avoid condensation
inside this unit by allowing enough space around the unit and
avoiding excess humidification. Condensation might cause
fire, damage to the unit, and/or electric shock.
5 Do not cover the rear panel of this unit with a newspaper,
tablecloth, curtain, etc. to avoid obstructing heat radiation. If
the temperature inside the unit rises, it may cause fire,
damage to the unit, or personal injury.
6 Do not plug this unit into a wall outlet until all connections
are complete.
7 The voltage to be used must match that specified on the rear
panel. Using this unit with a voltage higher than specified is
dangerous and may cause fire, damage to the unit, and/or
personal injury. YAMAHA is not responsible for damage
resulting from use of this unit with a voltage other than
specified.
8 Super-bass sound reproduced by this unit may cause a
turntable to generate audio feedback. In this case, move the
unit away from the turntable.
9 This unit may be damaged if certain sounds are continuously
output at high volume level. For example, if 20Hz–50Hz sine
waves from a test disc or bass sounds from an electronic
instrument, etc. are continuously output, or if a turntable
stylus touches the surface of a disc, reduce the volume level
to prevent the unit from being damaged.
10 If you hear distorted noise (i.e., unnatural, intermittent
“rapping” or “hammering” sounds) from this unit, reduce the
volume level. Extremely loud movie soundtrack low
frequency, bass-heavy sounds, or similarly loud popular
music passages can damage this unit.
11 Vibration generated by super-bass sound may distort images
on a TV. In this case, move the unit away from the TV set.
12 When disconnecting the power cord from the wall outlet,
grasp the plug; do not pull the cord.
13 When you plan not to use this unit for a long period of time
(i.e. vacation, etc.), disconnect the AC power plug from the
wall outlet.
14 Install this unit near the wall outlet and where the AC power
plug can be reached easily.
CAUTION: READ THIS BEFORE OPERATING YOUR UNIT.
This unit features a magnetically shielded design, but there is
still a chance that placing it too close to a TV set might impair
picture color. Should this happen, move this unit away from
the TV set.
As long as this unit is connected to the AC wall outlet, it is
not disconnected from the AC power source even if you turn
off this unit by POWER.
000_EN_book_NS-P440_446_RTL.book Page i Wednesday, November 30, 2005 6:58 PM

CONTENTS
1
English
GETTING STARTED . . . . . . . . . . . . . . . . . . . . . . . . . . . . . . . . . . . . . . . . . . . . . . . . 2
Supplied accessories . . . . . . . . . . . . . . . . . . . . . . . . . . . . . . . . . . . . . . . . . . . . . . . . . . . 2
SETTING UP THE SPEAKERS . . . . . . . . . . . . . . . . . . . . . . . . . . . . . . . . . . . . . . . 3
Placing speakers. . . . . . . . . . . . . . . . . . . . . . . . . . . . . . . . . . . . . . . . . . . . . . . . . . . . . . . 3
Mounting the speakers on the wall (NX-E440) . . . . . . . . . . . . . . . . . . . . . . . . . . . . . . . . 4
Installing the speakers on wall/ceiling brackets or speaker stands (NX-E440) . . . . . . . . 5
Placing the speaker (NX-C440) . . . . . . . . . . . . . . . . . . . . . . . . . . . . . . . . . . . . . . . . . . . 5
Placing the subwoofer (SW-P440) . . . . . . . . . . . . . . . . . . . . . . . . . . . . . . . . . . . . . . . . . 5
CONNECTIONS . . . . . . . . . . . . . . . . . . . . . . . . . . . . . . . . . . . . . . . . . . . . . . . . . . . 6
An example of connections. . . . . . . . . . . . . . . . . . . . . . . . . . . . . . . . . . . . . . . . . . . . . . . 6
Connecting the speaker cables and the subwoofer cable. . . . . . . . . . . . . . . . . . . . . . . . 7
USING THE SUBWOOFER (SW-P440) . . . . . . . . . . . . . . . . . . . . . . . . . . . . . . . . . 8
Controls and their functions . . . . . . . . . . . . . . . . . . . . . . . . . . . . . . . . . . . . . . . . . . . . . . 8
Adjusting the subwoofer . . . . . . . . . . . . . . . . . . . . . . . . . . . . . . . . . . . . . . . . . . . . . . . . . 8
Advanced Yamaha Active Servo Technology II. . . . . . . . . . . . . . . . . . . . . . . . . . . . . . . . . . . . . . . . 9
QD-BASS TECHNOLOGY . . . . . . . . . . . . . . . . . . . . . . . . . . . . . . . . . . . . . . . . . . . . . . . . . . . . . . . 9
TROUBLESHOOTING . . . . . . . . . . . . . . . . . . . . . . . . . . . . . . . . . . . . . . . . . . . . . . 10
SPECIFICATIONS. . . . . . . . . . . . . . . . . . . . . . . . . . . . . . . . . . . . . . . . . . . . . . . . . . 11
VOLTAGE SELECTOR
(For Asia and General models only)
The voltage selector switch on the rear panel of this unit must be set for your local main voltage BEFORE plugging this unit into
the AC main supply.
Voltages are 110-120/220-240 V AC, 50/60 Hz
CONTENTS
■ About this manual
• This manual is printed prior to production. Design and specifications are subject to change in part for the reason of
the improvements, etc. In this case, the product has priority.
• Some of the illustrations and names of the package contents, etc. written in this manual may differ from the actual
products and the names written on the package, etc.
000_EN_book_NS-P440_446_RTL.book Page 1 Wednesday, November 30, 2005 6:58 PM

GETTING STARTED
2
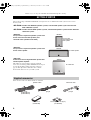
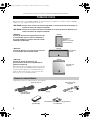
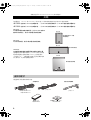
Thank you for selecting this YAM A H A NS-P440/NS-P446 Speaker Package.
The speaker package “NS-P440 and NS-P446” is designed for use in a multi-channel audio system such as a home
theater system.
<NS-P440> includes four NX-E440 speaker systems, one NX-C440 speaker system and one SW-
P440 subwoofer system.
<NS-P446> includes five NX-E440 speaker systems, one NX-C440 speaker system and one SW-P440
subwoofer system.
<NX-E440>
2-way acoustic-suspension speaker system used
for the front and surround speakers (and
surround center speaker for NS-P446)
<NX-C440>
2-way acoustic-suspension speaker system used
for the center speaker
<SW-P440>
Active Servo Processing Subwoofer System with
a built-in power amplifier
This subwoofer system employs Advanced Yamaha
Active Servo Technology which YAMAHA has developed
for reproducing higher quality super-bass sound (see
page 9). This super-bass sound adds a more realistic,
theater-in-the-home effect to your audio system.
Please check to make sure all listed items are included.
GETTING STARTED
NX-E440
NX-C440
SW-P440
For front and
surround/surround
back speaker
For center speake
r
For subwoofer
Supplied accessories
Speaker cables Subwoofer cable
[4 m] x3
[5 m] x1
Non-skid pad x 1 set (4 pcs)
(for SW-P440)
Fasteners x2
(for NX-C440)
[15 m]
(for NS-P440 x2)
(for NS-P446 x3)
000_EN_book_NS-P440_446_RTL.book Page 2 Wednesday, November 30, 2005 6:58 PM

SETTING UP THE SPEAKERS
3
English
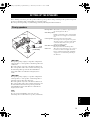
•
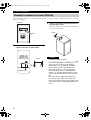
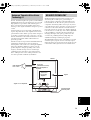
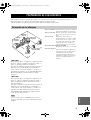
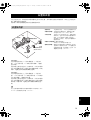
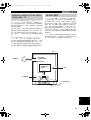
Before making connections, place all speakers in their respective positions. The positioning of the speakers is important
because it controls the whole sound quality of your audio system.
Place the speakers depending on your listening position by following the instructions below.
<NS-P440>
This speaker package employs a 6 speaker configuration:
2 front speakers, a center speaker, 2 surround speakers and
a subwoofer.
The front speakers carry most of the music/sound effects.
The center speaker emits center sound such as dialog, and
the surround speakers provide the surround/ambient
effects. The subwoofer adds the low-frequency bass
sound.
<NS-P446>
This speaker package employs a 7 speaker configuration:
2 front speakers, a center speaker, 2 surround speakers, a
surround center speaker and a subwoofer.
The front speakers carry most of the music/sound effects.
The center speaker emits center sound such as dialog, and
the surround and surround center speakers provide the
surround/ambient effects. The subwoofer adds the low-
frequency bass sound.
The same speakers (NX-E440) are used for the front and
surround speakers and surround center speakers (for NS-P446).
Front speakers: On both sides of your TV set. Approximately at
the same height as the TV set.
Surround speakers:
Behind your listening position, facing slightly
inward. About 1.8 m (approx. 6 feet) from the
floor.
Center speaker: Precisely between the front speakers.
You can place the center speaker on top of the
TV if the top is flat, on the floor under the TV,
or inside the TV rack. Be sure to place the
speaker in a stable position.
Surround center speaker (for NS-P446):
Precisely between the surround speakers.
Subwoofer: The position of the subwoofer is not so critical
because bass sound is not highly directional.
Refer to “Placing the subwoofer (SW-P440)”
on page 5 for a recommended positioning of
the subwoofer.
SETTING UP THE SPEAKERS
Placing speakers
Note
Front R
Center
Front L
Subwoofer
Surround center
(for NS-P446)
TV set
Surround L
Surround R
000_EN_book_NS-P440_446_RTL.book Page 3 Wednesday, November 30, 2005 6:58 PM

4
SETTING UP THE SPEAKERS
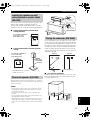
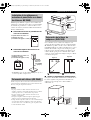
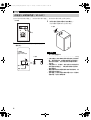
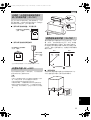
You can mount the speakers on a wall. To mount the speakers on a wall, use the holes of the brackets attached on the back
panels of the speakers.
1 Fasten two screws into a firm wall or wall
support at the interval shown below.
2 Hang the speaker by mounting the holes on
the protruding screws.
Make sure that the screws are securely affixed by the
narrow parts of the holes.
• Each speaker weighs as follows
........................................................................... 1.4 kg
• Do not mount the speakers on thin plywood or a
wall composed of a soft surface material. If
mounted, the screws may pull out of the flimsy
surface and the speakers may fall. This may
damage the speakers or cause personal injury.
• Do not affix the speakers to a wall using nails,
adhesives, or any other unstable hardware. Long-
term use and vibrations may cause the speakers to
fall.
• To avoid accidents resulting from tripping over
loose speaker cables, fix the cables to the wall.
• Select an appropriate position on the wall to mount
the speaker so that no one will injure his/her head
or face.
Mounting the speakers on the wall (NX-E440)
Rear view
Holes
Tapping screw
(Available at the
hardware store)
Diam. 3.5 to 4 mm
Min. 20 mm
Wall/Wall support
40 mm
4 mm
Caution
40 mm
000_EN_book_NS-P440_446_RTL.book Page 4 Wednesday, November 30, 2005 6:58 PM

5
SETTING UP THE SPEAKERS
English
You can also use the screw holes on the rear panel or the
bottom of the speakers to install the speakers on
commercially available wall/ceiling brackets or speaker
stands (if you do not use the attached mounting brackets).
■ Using commercially available wall/
ceiling brackets
■ Using commercially available speaker
stands
*
The YAMAHA speaker stand SPS-30MMS may not be
available in some areas.
When placing the speaker on top of the TV rack, etc., attach the
provided fasteners at two points on the bottom of the speaker and
on the top of the TV.
• Do not place the center speaker on top of a TV whose area is
smaller than the bottom of the speaker. If placed, the speaker
may fall and cause injury.
• Do not place the center speaker on top of a TV if the top is
inclined.
• Do not touch the adhesive surface after peeling off the seal as
this will waken its adhesive strength.
• Thoroughly wipe clean the surface where the fastener is to be
applied. Note that adhesive strength is weakened if the surface
is dirty, oily or wet and that this may cause the center speaker to
fall.
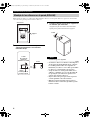
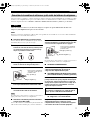
It is recommended to place the subwoofer on the outside
of either the right or the left front speaker (figure A). The
placement shown in figure B is also possible, however, if
the subwoofer is placed directly facing the wall, the bass
sound may lessen because the sound from the subwoofer
and the sound reflected by the wall may cancel out each
other. To prevent this from happening, face the subwoofer
obliquely to the wall.
■ Use the non-skid pads
Put the provided non-skid pads at the four corners on the
bottom of the subwoofer to prevent the subwoofer from
moving by vibrations, etc.
Installing the speakers on wall/
ceiling brackets or speaker stands
(NX-E440)
Placing the speaker (NX-C440)
Notes
A screw with a diameter of
6 mm can be used.
(Hole depth: 15 mm)
60 mm
Rear view
YAMAHA
Speaker stand
SPS-30MMS
(example)
A screw with a diameter of
4 mm can be used.
(Hole depth: 9 mm)
60 mm
Bottom view
Placing the subwoofer (SW-P440)
Peel off
the seal
Peel off
the seal
( : Subwoofer, : Front speakers)
Figure A
Figure B
000_EN_book_NS-P440_446_RTL.book Page 5 Wednesday, November 30, 2005 6:58 PM

CONNECTIONS
6
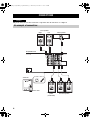
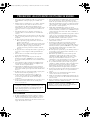
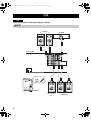
Plug in the subwoofer and other audio/video components after all connections are completed.
CONNECTIONS
Caution
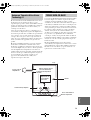
An example of connections
SPEAKERS
MAIN
OUTPUT
SUB
WOOFER
CENTER
REAR CENTER
L
R
L
R
L
R
A
—
—
+
+
—
+
—
+
—
+
B
REAR
(SURROUND)
0 10
110V
–
120V 220V
–
240V
VOLTAGE
SELECTOR
VOLUME
INPUT
I
NPU
T
0 10
VOLUME
C
E
N
T
E
R
C
E
N
T
E
R
F
R
O
N
T
R
F
R
O
N
T
R
F
R
O
N
T
L
F
R
O
N
T
L
R
E
A
R
L
R
E
A
R
L
R
E
A
R R
R
E
A
R R
R
E
A
R
C
R
E
A
R
C
Amplifier/Receiver
Subwoofer
To AC outlet
Center speaker
Surround center
speaker
(for NS-P446)
Right
Left
Front speakers
Right
Left
Surround speakers
000_EN_book_NS-P440_446_RTL.book Page 6 Wednesday, November 30, 2005 6:58 PM

7
CONNECTIONS
English
Connect the front, center and surround speakers (and surround center speaker for NS-P446) to the speaker output
terminals of your amplifier/receiver with the provided speaker cables. The provided speaker cables have labels marked
FRONT L, FRONT R, CENTER, REAR L, REAR R (and REAR C for NS-P446).
Before connecting the speakers and the subwoofer, make sure that the power of the subwoofer and the amplifier/
receiver is turned off.
For connections, keep the speaker cables as short as possible. Do not bundle or roll up the excess part of the cables. If the
connections are faulty, no sound will be heard from the speakers.
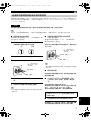
■ Front speakers and Center speaker
Use the provided speaker cables (4 m). One side of the
speaker cable is red and the other side is black.
1 Remove approximately 10 mm of insulation
from the end of each speaker cable and twist
the exposed wires of the cable together to
eliminate the risk of a short-circuit.
2 Press and hold the tab of the terminal, as
shown in the figure of step 3.
3 Insert the bare wire.
4 Release your finger from the tab to allow it to
lock securely on the wire end of the cable.
5 Test the firmness of the connection by
pulling lightly on the cable at the terminal.
Do not let the bare speaker wires touch each other as this could
damage the speaker and/or the amplifier.
■ Surround speakers and Surround center
speaker (for NS-P446)
Use the provided speaker cables (15 m). One side of the
speaker cable has a gray line and the other side has no line.
The connection method is the same with Front
speakers and Center speaker. Read from 1 to 5
on left column on this page.
Do not let the bare speaker wires touch each other as this could
damage the speaker and/or the amplifier.
■ SUBWOOFER
Connect the subwoofer to the subwoofer pre out
jack of the amplifier/receiver.
■ VOLTAGE SELECTOR switch
(For Asia and General models)
This unit has a voltage selector switch on the rear
panel. If the preset setting of the switch is incorrect,
set the switch to the proper voltage range (220 V–
240 V or 110 V–120 V) of your area. Consult your
dealer if you are unsure of the correct setting.
■ Connecting components and the
subwoofer to AC plug
After you complete the connection, plug the amplifier/
receiver, TV or other outlet component and the
subwoofer into an AC outlet of appropriate voltage.
Connecting the speaker cables and the subwoofer cable
Caution
Note
Note
G
ood
Not good
2
3
Red: positive (+)
Black: negative (–)
Note: Do not insert the
insulation coating into
the hole. The sound
may not be produced.
Note
WARNING
Do not plug the subwoofer to the AC outlet
before setting the VOLTAGE SELECTOR.
2
3
Gray line: positive (+)
No line: negative (–)
Note: Do not insert the
insulation coating into
the hole. The sound
may not be produced.
000_EN_book_NS-P440_446_RTL.book Page 7 Wednesday, November 30, 2005 6:58 PM

USING THE SUBWOOFER (SW-P440)
8
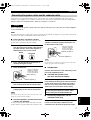
1 VOLUME control
Adjusts the volume level. Turn the control clockwise to
increase the volume and counterclockwise to decrease the
volume.
2 INPUT jack
Used to input unamplified bass signals from the amplifier/
receiver (see “An example of connections” on page
page 6).
3 POWER indicator
Lights up while the subwoofer is turned on and goes off
when the subwoofer is turned off.
4 POWER switch
Press inward to the ON position to turn on the power of
the subwoofer. Press again to release it outward to the
OFF position to turn off the subwoofer.
5 VOLTAGE SELECTOR switch
(For Asia and General models)
If the preset setting of the switch is incorrect, set the
switch to the proper voltage range (110 V-120 V or
220 V-240 V) of your area.
Be sure to unplug the subwoofer before setting the
VOLTAGE SELECTOR switch.
Before using the subwoofer, adjust the subwoofer to
obtain the optimum volume balance between the
subwoofer and the other speakers by following the
procedures described below.
1 Rotate the VOLUME control
counterclockwise to the 0 position.
2 Turn on the power of all the other
components.
3 Press the POWER switch inward to the ON
position.
The POWER indicator lights up.
4 Play a source that contains bass signal and
adjust the volume control of the amplifier/
receiver to the desired listening level.
5 Rotate the VOLUME control gradually to
adjust the volume balance between the
subwoofer and the other speakers.
Once the volume balance between the subwoofer and the other
speakers is adjusted, you can adjust the volume of your whole
audio system by using the volume control of the amplifier/
receiver.
However, if you change the speakers or the system configuration,
you must make this adjustment again.
USING THE SUBWOOFER (SW-P440)
0 10
110V
–
120V 220V
–
240V
VOLTAGE
SELECTOR
VOLUME
INPUT
P
O
W
E
R
O
N
O
FF
0 10
VOLUME INPUT
110V
–
120V 220V
–
240V
VOLTAGE
SELECTOR
12 3
4
5
Rear panel (General model)
To AC outlet
Controls and their functions
Caution
Adjusting the subwoofer
Note
000_EN_book_NS-P440_446_RTL.book Page 8 Wednesday, November 30, 2005 6:58 PM

9
USING THE SUBWOOFER (SW-P440)
English
In 1988, Yamaha brought to the speaker systems utilizing
YST (Yamaha Active Servo Technology) to give powerful,
high quality bass reproduction. This technology uses a
direct connection between the amplifier and speaker,
allowing accurate signal transmission and precise speaker
control.
As this technology uses speaker units controlled by the
negative impedance drive of the amplifier and resonance
generated between the cabinet capacity volume and port, it
creates more resonant energy (the “air woofer” concept)
than the standard bass reflex method. This allows for bass
reproduction from much smaller cabinets than was
previously possible.
Yamaha’s newly developed Advanced YST II adds many
refinements to Yamaha Active Servo Technology,
allowing better control of the forces driving the amplifier
and speaker. From the amplifier’s point of view, the
speaker impedance changes depending on the sound
frequency. Yamaha developed a new circuit design
combining negative-impedance and constant-current
drives, which provides a more stable performance and
clear bass reproduction without any murkiness.
QD-BASS (Quatre Dispersion Bass) technology uses
down-firing drivers with square, pyramid-shaped
reflective plates to radiate the sound efficiently in four
horizontal directions. The reflective plates (not used in
competitors' down-firing subwoofers) negate any effects
caused by the floor surface and reduce resonance between
sound waves reflected from the floor and the unit. Also,
most other systems use circular cones, but by radiating in
four directions to avoid the legs of the cabinet, QD-BASS
reduces turbulence caused by reflection from the legs.
Changing the height of the square pyramid varies the
acoustic load, permitting relatively simple high-cut
adjustment and improved band pass properties.
The QD-BASS system provides extraordinary power and
smooth frequency response from an extremely compact
unit. It also allows greater freedom of placement, since the
sound radiates with equal effectiveness in all directions.
Advanced Yamaha Active Servo
Technology II
QD-BASS TECHNOLOGY
High-amplitude
bass sound
Port
Air woofer
(Helmholtz resonator)
Active Servo
Processing
Amplifier
Cabinet
Signals
Signals of low amplitude
Advanced Impedance
Converter
Pyramid-shaped
reflective plates
000_EN_book_NS-P440_446_RTL.book Page 9 Wednesday, November 30, 2005 6:58 PM

TROUBLESHOOTING
10
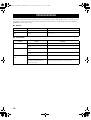
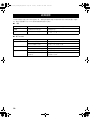
Refer to the chart below when this speaker package does not function properly. If the problem you are experiencing is not
listed below or if the instructions given below do not help, disconnect the AC power plug and contact your authorized
YAMAHA dealer or service center.
■ General
■ For
SW-P440
TROUBLESHOOTING
Problem Cause Remedy
No sound. Speaker cables are not connected securely. Connect them securely.
Sound level is too
low.
Speaker cables are not connected
correctly.
Connect them correctly, that is L (left) to L, R (right) to R, “+” to
“+” and “–” to “–”.
Problem Cause Remedy
Power is not supplied. The power plug is not connected securely. Connect it securely.
The POWER switch is set to the OFF
position.
Press the POWER switch inward to the ON position.
No sound. The VOLUME control is set to the 0
position.
Rotate the VOLUME control clockwise.
The subwoofer cables is not connected
securely.
Connect it securely.
Sound level is too
low.
A source that contains few bass signal is
played.
Play a source that contains bass signal.
“Standing waves” have been developed
between two parallel walls and they
cancel the bass sound.
Face the subwoofer obliquely to the wall or break up the parallel
surface by placing bookshelves, etc. along the walls.
000_EN_book_NS-P440_446_RTL.book Page 10 Wednesday, November 30, 2005 6:58 PM

SPECIFICATIONS
11
English
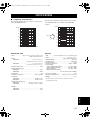
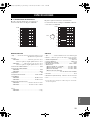
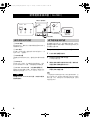
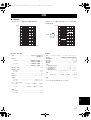
■ Frequency characteristics
The following graph displays the frequency characteristics
of the SW-P440 subwoofer.
The following graph displays the frequency characteristics
of the SW-P440 subwoofer combined with NX-E440
speakers.
NX-E440
, NX-C440
• Type ...................... 2-way acoustic-suspension speaker system
Magnetically shielded type
•Driver
<NX-E440> ......................................... 8 cm cone woofer x 1
2.5 cm balanced-dome tweeter x 1
<NX-C440>...........................................7 cm cone woofer x 2
2.5 cm balanced-dome tweeter x 1
• Nominal Input Power ................................................ 40 W
• Maximum Input Power
<NX-E440> ................................................................... 80 W
<NX-C440> ................................................................. 100 W
• Impedance .......................................................................... 6 Ω
• Frequency Response ................................... 65 Hz to 40 kHz
• Sensitivity
<NX-E440> .................................................. 80 dB/2.83 V/m
<NX-C440> .................................................. 82 dB/2.83 V/m
• Dimensions (W x H x D)
<NX-E440> ............................ 118 mm x 198 mm x 137 mm
<NX-C440> .............................. 285 mm x 99 mm x 130 mm
• Weight
<NX-E440> ................................................................. 1.4 kg
<NX-C440> ................................................................. 1.9 kg
SW-P440
• Type ............. Advanced Yamaha Active Servo Technology II
• Driver ................................................... 16 cm cone woofer
Magnetically shielded type
• Amplifier Output ................................................. 50 W/5 Ω
• Dynamic Power................................................. 100 W/5 Ω
• Input Impedance.............................................................12 KΩ
• Frequency Response ................................... 30 Hz to 180 Hz
• Power Supply
[U.S.A. and Canada models] .................. AC 120 V, 60 Hz
[U.K. and Europe models] ....................... AC 230 V, 50 Hz
[Australia model] ....................................... AC 240 V, 50 Hz
[Asia and General models]
........................................ AC 110-120/220-240 V, 50/60 Hz
• Power Consumption ....................................................... 45 W
• Dimensions (W x H x D) ......... 280 mm x 325 mm x 296 mm
• Weight ..................................................................... 8.2 kg
* Specifications are subject to change without notice due to
product improvements.
SPECIFICATIONS
20 50 100 200 500 Hz
40
50
60
70
80
90
100 dB
20 50 100 200 500 Hz
40
50
60
70
80
90
100 dB
SW-P440
NX-E440
V
O
L
UM
E
000_EN_book_NS-P440_446_RTL.book Page 11 Wednesday, November 30, 2005 6:58 PM

1 Para asegurar el mejor rendimiento posible, lea con atención este
manual. Guárdelo en un lugar seguro para consultarlo en el
futuro.
2 Instale los altavoces en un lugar fresco, seco y limpio: alejados de
ventanas, fuentes de calor, fuentes de vibraciones excesivas,
polvo, humedad o frío. Evite fuentes de zumbido eléctrico
(transformadores y motores por ejemplo). Para impedir incendios
o descargas eléctricas, no exponga los altavoces a la lluvia o al
agua.
3 Para impedir que las cajas se deformen o pierdan color, no
exponga los altavoces a la luz solar directa o a una humedad
excesiva.
4 Evite instalar los altavoces donde puedan caer sobre ellos objetos
extraños, y/o donde puedan estar expuestos al goteo o salpicadura
de líquidos.
5 No ponga los objetos siguientes encima de los altavoces:
– Otros componentes, porque pueden dañar o descolorar la
superficie de los altavoces.
– Objetos con fuego (velas por ejemplo) porque pueden causar
un incendio, daños en los altavoces o lesiones a las personas.
– Recipientes de líquidos, porque pueden derramar su
contenido y dar descargas eléctricas al usuario o dañar los
altavoces.
6 No ponga los altavoces donde puedan ser tirados o golpeados por
objetos que se caen. Los lugares estables garantizan un mejor
sonido.
7 Poner los altavoces en la misma estantería que un giradiscos
puede causar realimentación.
8 El propietario es el responsable de que la colocación o la
instalación sean seguras. YAMAHA no se hace responsable de
los accidentes debidos a una mala colocación o instalación de los
altavoces.
9 Si nota distorsión, reduzca el volumen en su amplificador. No
haga funcionar su amplificador al límite de “amplitud”. De lo
contrario, los altavoces podrían dañarse.
10 Cuando utilice un amplificador con una potencia nominal de
salida superior a la potencia nominal de entrada de los altavoces,
deberá tenerse cuidado para no superar la entrada máxima de los
altavoces.
11 No limpie los altavoces con disolventes químicos porque podría
dañar el acabado. Utilice un paño limpio y seco.
12 No intente modificar o arreglar los altavoces. Póngase en
contacto con el personal de servicio de YAMAHA cuando
necesite hacer reparaciones. No abra la caja bajo ninguna
circunstancia.
13 Lea la sección “Solución de Problemas” para conocer los errores
de funcionamiento más comunes antes de concluir que los
altavoces tienen defectos.
Para el SW-P440
1 No utilice esta unidad al revés. Puede recalentarse y dañarse.
2 No utilice demasiada fuerza con los conmutadores, controles o
cables de conexión. Cuando traslade esta unidad, desconecte
primero la clavija de alimentación y los cables conectados a otro
equipo. No tire nunca de los cables.
3 Como esta unidad tiene un amplificador de potencia incorporado
sale calor del panel trasero. Aleje la unidad de las paredes,
dejando un espacio mínimo de 20 cm por encima, por detrás y a
ambos lados de launidad para evitar que se produzca un incendio
o daños. Además, no ponga la unidad con el panel trasero hacia
abajo en el suelo o en otras superficies.
4 Cuando utilice un humidificador, asegúrese de evitar la
condensación dentro de esta unidad dejando un espacio suficiente
alrededor de la misma y evitando el exceso de humidificación. La
condensación puede causar un incendio, daños en la unidad y/o
descargas eléctricas.
5 No tape el panel trasero de esta unidad con un periódico, mantel,
cortina, etc. para evitar obstruir la salida del calor. Si sube la
temperatura dentro de la unidad se puede producir un incendio
que dañará la unidad o causará lesiones a personas.
6 No enchufe esta unidad a una toma de corriente hasta terminar
todas las demás conexiones.
7 La tensión que se utilice deberá ser la indicada en el panel
trasero. Utilizar esta unidad con una tensión superior a la
especificada es peligroso y puede causar un incendido, daños en
la unidad y/o lesiones a personas. YAMAHA no es responsable
de los daños debido a la utilización de esta unidad con una
tensión diferente de la especificada.
8 El sonido superbajos reproducidos por esta unidad pueden hacer
que el giradiscos genere realimentación de audio. En este caso,
separe la unidad del giradiscos.
9 Esta unidad se puede dañar si hay ciertos sonidos que salen
continuamente con un nivel alto. Por ejemplo, si las ondas
sinusoidales de 20 Hz–50 Hz de un disco de prueba o de los
sonidos graves de un instrumento electrónico, etc. salen
continuamente, o si la aguja del giradiscos toca la superficie del
disco, reduzca el volumen para impedir que se dañe la unidad.
10 Si oye sonido distorsionado (es decir, sonido de “golpeteo” o
“martilleo” no natural o intermitente, reduzca el nivel del sonido.
Las frecuencias bajas de las pistas de sonido de películas
demasiado altas, los sonidos de graves fuertes o los pasajes de
música popular demasiado altos pueden dañar esta unidad.
11 La vibración generada por el sonido superbajo puede distorsionar
la imagen de un televisor. En este caso, separe la unidad del
televisor.
12 Cuando desconecte el cable de alimentación de la toma de
corriente, sujete la clavija; no tire del cable.
13 Cuando no piense utilizar esta unidad durante mucho tiempo (en
vacaciones, etc.) desconecte el cable de alimentación de CA de la
toma de corriente.
14 Instale esta unidad cerca de la toma de CA, donde se pueda llegar
fácilmente a la clavija de alimentación de CA.
PRECAUCIÓN: LEA ESTO ANTES DE UTILIZAR SU UNIDAD.
Esta unidad dispone de un diseño a prueba de interferen-
cias magnéticas, aunque existe la posibilidad de que, en el
caso de colocarlo demasiado cerca de un aparato de TV, el
color de la imagen pueda verse afectado. En este caso,
aleje el sistema del televisor.
Aunque usted apague esta unidad con POWER, esta
unidad no se desconectará de la fuente de alimentación de
CA mientras esté conectada a la toma de CA.
050_ES_Book_NS-P440_446_G.book Page 1 Wednesday, November 30, 2005 11:44 AM

1
Español
PRIMEROS PASOS . . . . . . . . . . . . . . . . . . . . . . . . . . . . . . . . . . . . . . . . . . . . . . . . 2
Accesorios suministrados . . . . . . . . . . . . . . . . . . . . . . . . . . . . . . . . . . . . . . . . . . . . . . . . 2
PREPARACIÓN DE LOS ALTAVOCES. . . . . . . . . . . . . . . . . . . . . . . . . . . . . . . . . 3
Colocación de los altavoces . . . . . . . . . . . . . . . . . . . . . . . . . . . . . . . . . . . . . . . . . . . . . . 3
Montaje de los altavoces en la pared (NX-E440) . . . . . . . . . . . . . . . . . . . . . . . . . . . . . . 4
Instalación de los altavoces en ménsulas de pared/techo o en bases
de altavoces NX-E440). . . . . . . . . . . . . . . . . . . . . . . . . . . . . . . . . . . . . . . . . . . . . 5
Colocación del altavoz (NX-C440) . . . . . . . . . . . . . . . . . . . . . . . . . . . . . . . . . . . . . . . . . 5
Colocación del altavoz de subgraves (SW-P440). . . . . . . . . . . . . . . . . . . . . . . . . . . . . . 5
CONEXIONES. . . . . . . . . . . . . . . . . . . . . . . . . . . . . . . . . . . . . . . . . . . . . . . . . . . . . 6
Un ejemplo de conexiones . . . . . . . . . . . . . . . . . . . . . . . . . . . . . . . . . . . . . . . . . . . . . . . 6
Conexión de los cables de altavoces y del cable del altavoz de subgraves. . . . . . . . . . 7
USO DEL ALTAVOZ DE SUBGRAVES (SW-P440) . . . . . . . . . . . . . . . . . . . . . . . 8
Controles y sus funciones. . . . . . . . . . . . . . . . . . . . . . . . . . . . . . . . . . . . . . . . . . . . . . . . 8
Ajuste del altavoz de subgraves . . . . . . . . . . . . . . . . . . . . . . . . . . . . . . . . . . . . . . . . . . . 8
Advanced Yamaha Active Servo Technology II . . . . . . . . . . . . . . . . . . . . . . . . . . . . . . . 9
TECNOLOGÍA QD-BASS . . . . . . . . . . . . . . . . . . . . . . . . . . . . . . . . . . . . . . . . . . . . . . . . 9
SOLUCIÓN DE PROBLEMAS . . . . . . . . . . . . . . . . . . . . . . . . . . . . . . . . . . . . . . . . 10
ESPECIFICACIONES . . . . . . . . . . . . . . . . . . . . . . . . . . . . . . . . . . . . . . . . . . . . . . . 11
VOLTAGE SELECTOR (SELECTOR DE TENSIÓN)
(Para Asia y modelos generales solamente)
El selector de tensión, en el panel posterior de esta unidad, deberá ponerse en la posición correspondiente a la tensión de su
localidad ANTES de enchufar la unidad a la red de CA.
Las tensiones son de 110-120/220-240 V CA, 50/60 Hz.
ÍNDICE
■ Acerca de este manual
• Este manual se imprime antes de terminar de fabricar el producto. El diseño y las especificaciones están sujetos a
cambios por motivos de mejoras, etc. En este caso, el producto siempre tiene prioridad.
• Algunas de las ilustraciones y nombres del contenido del paquete, etc. que aparecen escritos en este manual pueden
ser diferentes de los productos y de los nombres reales escritos en el paquete, etc.
050_ES_Book_NS-P440_446_G.book Page 1 Wednesday, November 30, 2005 11:44 AM

PRIMEROS PASOS
2
Gracias por haber elegido este paquete de altavoces YAMAHA NS-P440/NS-P446.
El paquete de altavoces “NS-P440 y NS-P446” ha sido diseñado para ser utilizado con sistemas de audio de múltiples
canales como, por ejemplo, un sistema de cine en casa.
<NS-P440> incluye cuatro sistemas de altavoces NX-E440, un sistema de altavoces NX-C440 y un
sistema de altavoz de subgraves SW-P440.
<NS-P446> incluye cinco sistemas de altavoces NX-E440, un sistema de altavoces NX-C440 y un
sistema de altavoz de subgraves SW-P440.
<NX-E440>
Sistema de altavoces de suspensión acústica de
2 vías utilizados para los altavoces delanteros y
de sonido ambiental (y altavoz central de sonido
ambiental para NS-P446)
<NX-C440>
Sistema de altavoces de suspensión acústica de
2 vías utilizados para el altavoz central
<SW-P440>
Sistema de altavoz de subgraves con
procesamiento servoactivo y amplificador de
potencia incorporado
Este sistema de altavoz de subgraves emplea la Tecnología
Servoactiva Avanzada que YAMAHA ha desarrollado para
reproducir sonidos supergraves de calidad más alta (vea
página 9). Este sonido supergrave agrega un efecto más
real de cine en casa a su sistema de audio.
Compruebe que todos los elementos listados estén incluidos.
PRIMEROS PASOS
NX-E440
NX-C440
SW-P440
Para altavoces
delanteros y
altavoces surround/
surround traseros
Para altavoz
central
Para altavoz de
subgraves
Accesorios suministrados
Cables de altavoces Cable de altavoz de
subgraves
[4 m] x3
[5 m] x1
Almohadillas antideslizantes x 1 juego (4 piezas)
(para SW-P440)
Fiadores x2
(para NX-C440)
[15 m]
(para NS-P440 x2)
(para NS-P446 x3)
050_ES_Book_NS-P440_446_G.book Page 2 Wednesday, November 30, 2005 11:44 AM

PREPARACIÓN DE LOS ALTAVOCES
3
Español
•
Antes de hacer conexiones, ponga todos los altavoces en sus posiciones respectivas. La posición de los altavoces es
importante porque ésta controla toda la calidad del sonido de su sistema de audio.
Coloque los altavoces según su posición de escucha siguiendo las instrucciones de abajo.
<NS-P440>
Este paquete de altavoces emplea una configuración de 6
altavoces: 2 altavoces delanteros, un altavoz central, 2
altavoces surround y un altavoz de subgraves.
Los altavoces delanteros reproducen la mayor parte de la
música/efectos de sonido. El altavoz central emite el
sonido central, como el de los diálogos, y los altavoces
surround proporcionan los efectos surround/ambientales.
El altavoz de subgraves añade sonido grave de baja
frecuencia.
<NS-P446>
Este paquete de altavoces emplea una configuración de 7
altavoces: 2 altavoces delanteros, un altavoz central, 2
altavoces surround, un altavoz surround central y un
altavoz de subgraves.
Los altavoces delanteros reproducen la mayor parte de la
música/efectos de sonido. El altavoz central emite el
sonido central, como el de los diálogos, y los altavoces
surround y surround central proporcionan los efectos
surround/ambientales. El altavoz de subgraves añade
sonido grave de baja frecuencia.
Se usan los mismos altavoces (NX-E440) para los altavoces
delanteros y
surround y para el altavoz surround central (para
NS-P446).
Altavoces delanteros:A ambos lados de su televisor. A la misma
altura aproximadamente que el televisor.
Altavoces surround: Detrás de la posición de escucha, mirando
un poco hacia adentro A unos 1,8 m del
suelo.
Altavoz central: Exactamente entre los altavoces
delanteros. Puede poner el altavoz central
encima del televisor si esa parte es plana,
en el suelo debajo del televisor o dentro
del mueble del televisor. Asegúrese de
poner el altavoz en una posición estable.
Altavoz surround central (para NS-P446):
Exactamente entre los altavoces surround.
Altavoz de subgraves:
La posición del altavoz de subgraves no es
tan importante porque el sonido grave no
es altamente direccional. Consulte
“Colocación del altavoz de subgraves
(SW-P440)” en página 5 para conocer la
posición recomendada del altavoz de
subgraves.
PREPARACIÓN DE LOS ALTAVOCES
Colocación de los altavoces
Nota
Delantero
derecho
Central
Altavoz de
subgraves
Surround central
(para NS-P446)
Televisor
Surround
izquierdo
Surround
derecho
Delantero
izquierdo
050_ES_Book_NS-P440_446_G.book Page 3 Wednesday, November 30, 2005 11:44 AM

4
PREPARACIÓN DE LOS ALTAVOCES
Puede montar los altavoces en una pared. Para montar los altavoces en una pared, utilice los agujeros de las ménsulas
colocadas en los paneles posteriores de los altavoces.
1 Apriete los dos tornillos en una pared o
soporte de pared firme a los intervalos
mostrados abajo.
2 Cuelgue el altavoz colocando los agujeros en
los tornillos que sobresalen.
Asegúrese de que los tornillos estén firmemente
fijados por las partes estrechas de los agujeros.
• Cada altavoz pesa lo siguiente
........................................................................... 1,4 kg
• No monte los altavoces en madera contrachapada o
en una pared de material blando. De lo contrario,
los tornillos podrían salirse de la superficie de
instalación y los altavoces caerse. Esto podrá dañar
los altavoces o causar heridas a las personas.
• No fije los altavoces en una pared usando clavos,
adhesivos o cualquier otro accesorio inestable. El
uso prolongado y las vibraciones pueden ser la
causa de que caigan los altavoces.
• Fije los cables en la pared para evitar tropezarse
con ellos pudiendo causar un accidente.
• Elija una posición apropiada en la pared para
montar los altavoces de forma que nadie se pueda
lesionar con ellos.
Montaje de los altavoces en la pared (NX-E440)
Vista trasera
Agujeros
Tornillo
(A la venta en
ferreterías)
Diámetro 3,5 a 4 mm
20 mm
mínimo
Pared/Soporte de
montaje en pared
40 mm
4 mm
Aviso
40 mm
050_ES_Book_NS-P440_446_G.book Page 4 Wednesday, November 30, 2005 11:44 AM

5
PREPARACIÓN DE LOS ALTAVOCES
Español
También puede utilizar los agujeros de los tornillos del
panel trasero o del fondo de los altavoces para instalarlos
en ménsulas de pared/techo o en bases de altavoces de
venta en el comercio (si usted no utiliza las ménsulas de
montaje suministradas).
■ Utilizando ménsulas de pared/techo de
venta en el comercio
■ Utilizando soportes de altavoces de
venta en el comercio
*
El YAMAHA soporte de altavoz SPS-30MMS puede que no se
encuentre disponible en algunas zonas.
Cuando coloque el altavoz encima de la estantería del televisor,
coloque los fiadores suministrados en dos puntos del fondo del
altavoz y en la parte superior del televisor.
• No ponga el altavoz central encima de un televisor si su
superficie es inferior a la del fondo del altavoz. De lo contrario,
el altavoz podrá caerse y causar heridas a las personas.
• No ponga el altavoz central encima de un televisor si su
superficie está inclinada.
• No toque la superficie adhesiva después de quitar el papel
adhesivo porque se reducirá la fuerza de adhesión.
• Limpie a fondo la superficie donde va a colocar el fiador. Tenga
en cuenta que la fuerza de adhesión se reduce si la superficie
está sucia, tiene aceite o está húmeda, y que esto puede causar
la caida del altavoz central.
Se recomienda colocar el altavoz de subgraves en el
exterior del altavoz delantero derecho o izquierdo (figura
A). También es posible colocarlo como se muestra en la
figura B, sin embargo, si el altavoz de subgraves se coloca
mirando directamente a la pared, el sonido grave podrá
reducirse porque el sonido del altavoz de subgraves y el
sonido reflejado por la pared se anularán entre sí. Para
evitar esto, ponga el altavoz de subgraves un poco oblicuo
con relación a la pared.
■ Utilice las almohadillas antideslizantes
Coloque las almohadillas antideslizantes suministradas en
las cuatro esquinas de la parte inferior del altavoz de
subgraves para evitar que éste se mueva debido a
vibraciones, etc.
Instalación de los altavoces en
ménsulas de pared/techo o en bases
de altavoces NX-E440)
Colocación del altavoz (NX-C440)
Notas
Se puede utilizar un tornillo con
un diámetro de 6 mm.
(Profundidad del agujero: 15 mm)
60 mm
Vista trasera
YAMAHA
Soporte de
altavoces
SPS-30MMS
(ejemplo)
Se puede utilizar un tornillo con
un diámetro de 4 mm.
(Profundidad del agujero: 9 mm)
60 mm
Vista inferior
Colocación del altavoz de
subgraves (SW-P440)
Quite el papel
adhesivo
Quite el papel
adhesivo
( : Altavoz de subgraves, : Altavoces delantero)
Figura A
Figura B
050_ES_Book_NS-P440_446_G.book Page 5 Wednesday, November 30, 2005 11:44 AM

CONEXIONES
6
Enchufe el altavoz de subgraves y demás componentes de audio/vídeo después de completar todas las conexiones.
CONEXIONES
Aviso
Un ejemplo de conexiones
SPEAKERS
MAIN
OUTPUT
SUB
WOOFER
CENTER
REAR CENTER
L
R
L
R
L
R
A
—
—
+
+
—
+
—
+
—
+
B
REAR
(SURROUND)
0 10
110V
–
120V 220V
–
240V
VOLTAGE
SELECTOR
VOLUME
INPUT
I
NPU
T
0 10
VOLUME
C
E
N
T
E
R
C
E
N
T
E
R
F
R
O
N
T
R
F
R
O
N
T
R
F
R
O
N
T
L
F
R
O
N
T
L
R
E
A
R
L
R
E
A
R
L
R
E
A
R R
R
E
A
R R
R
E
A
R
C
R
E
A
R
C
Amplificador/Receptor
Altavoz de
subgraves
A una toma de CA
Altavoz central
Altavoz
surround central
(para NS-P446)
Derecha
Izquierda
Altavoces delantero
Derecha
Izquierda
Altavoces surround
050_ES_Book_NS-P440_446_G.book Page 6 Wednesday, November 30, 2005 11:44 AM
A página está carregando ...
A página está carregando ...
A página está carregando ...
A página está carregando ...
A página está carregando ...
A página está carregando ...
A página está carregando ...
A página está carregando ...
A página está carregando ...
A página está carregando ...
A página está carregando ...
A página está carregando ...
A página está carregando ...
A página está carregando ...
A página está carregando ...
A página está carregando ...
A página está carregando ...
A página está carregando ...
A página está carregando ...
A página está carregando ...
-
 1
1
-
 2
2
-
 3
3
-
 4
4
-
 5
5
-
 6
6
-
 7
7
-
 8
8
-
 9
9
-
 10
10
-
 11
11
-
 12
12
-
 13
13
-
 14
14
-
 15
15
-
 16
16
-
 17
17
-
 18
18
-
 19
19
-
 20
20
-
 21
21
-
 22
22
-
 23
23
-
 24
24
-
 25
25
-
 26
26
-
 27
27
-
 28
28
-
 29
29
-
 30
30
-
 31
31
-
 32
32
-
 33
33
-
 34
34
-
 35
35
-
 36
36
-
 37
37
-
 38
38
-
 39
39
-
 40
40


Yamaha NS-P440 Manual do proprietário
- Tipo
- Manual do proprietário
- Este manual também é adequado para
em outros idiomas
- español: Yamaha NS-P440 El manual del propietario
- English: Yamaha NS-P440 Owner's manual
Artigos relacionados
-
Yamaha NX-C430 Manual do proprietário
-
Yamaha DVXS303 Manual do usuário
-
Yamaha NS-P210 Manual do proprietário
-
-
-
-
-
-
-
Yamaha NS-P320 Manual do usuário