Samsung LE26R81B Manual do usuário
- Categoria
- TVs LCD
- Tipo
- Manual do usuário

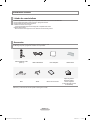
Owner’s
Instructions
Register your product at www.samsung.com/global/register
Record your Model and Serial number here for future reference.
· Model __________ · Serial No. ____________
TFT-LCD TELEVISION
LN23R81B
LN26R81B
LN32R81B
LN40R81B
Contact SAMSUNG WORLD-WIDE
If you have any questions or comments relating to Samsung products,
please contact the SAMSUNG customer care center.
Contacte con SAMSUNG WORLD-WIDE
Si tiene alguna pregunta o comentario referente a nuestros productos,
por favor contacte con nuestro Servicio de Atención al Cliente.
Contate a SAMSUNG EM TODO O MUNDO
Caso tenha dúvidas ou comentários sobre os produtos da Samsung,
entre em contato com o centro de atendimento ao cliente da SAMSUNG.
Country
Customer Care Center
Web Site
ARGENTINE 0800-333-3733 www.samsung.com/ar
BRAZIL 4004-0000 www.samsung.com/br
CHILE 800-726-7864 (SAMSUNG) www.samsung.com/cl
COLOMBIA 01 8000 112 112 www.samsung.com/co
COSTA RICA 0-800-507-7267 www.samsung.com/latin
ECUADOR 1-800-10-7267 www.samsung.com/latin
EL SALVADOR 800-6225 www.samsung.com/latin
GUATEMALA 1-800-299-0013 www.samsung.com/latin
JAMAICA 1-800-234-7267 www.samsung.com/latin
MEXICO 01-800-SAMSUNG (7267864) www.samsung.com/mx
PANAMA 800-7267 www.samsung.com/latin
PUERTO RICO 1-800-682-3180 www.samsung.com/latin
REP.DOMINICANA 1-800-751-2676 www.samsung.com/latin
TRINIDAD &TOBAGO 1-800-7267-864 www.samsung.com/latin
VENEZUELA 1-800-100-5303 www.samsung.com/latin
IMPORTADO POR:SAMSUNG ELECTRONICS MÉXICO.S.A.de C.V.
Vía Lopez Portillo No.6,
Col.San Fco.Chilpan
Tultitlán,Estado de México,C.P.54940
TEL.01-55-5747-5100 / 01-800-726-7864
EXPORTADO POR:Samsung Electronics CO.,LTD.
416,Mae tan-3dong,Yeongtong -gu,
Suwon City,Gyeonggi-do Korea
BN68-01156A-00
BN68-01156A-00-Cover.indd 1 2007-03-06 �� 7:27:46
A página está carregando...
A página está carregando...
A página está carregando...
A página está carregando...
A página está carregando...
A página está carregando...
A página está carregando...
A página está carregando...
A página está carregando...
A página está carregando...
A página está carregando...
A página está carregando...
A página está carregando...
A página está carregando...
A página está carregando...
A página está carregando...
A página está carregando...
A página está carregando...

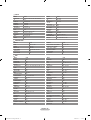
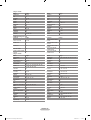
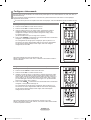
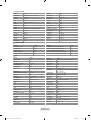
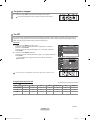
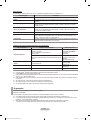
English - 18
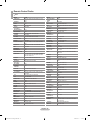
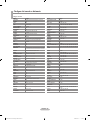
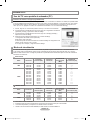
VCR
Remote Control Codes
Brand Code
SAMSUNG 000 001 002 003 004 005 077 078
079
ADMIRAL 020
AIWA 025
AKAI 004 027 032
AUDIO
DYNAMICS
007 026
BELL&HOWELL 018
BROKSONIC 022
CANDLE 002 003 006 008 015 055
CANON 021 056
CITIZEN 002 003 006 008 015 055
COLORTYME 007
CRAIG 002 024
CURTIS MATHES 002 007 008 017 021 025 056 064
066
DAEWOO 003 010 011 012 013 014 015 016
DB 007 026
DIMENSIA 017
DYNATECH 025
ELECTROHOME 034
EMERSON 001 003 006 021 022 025 030 032
034 040 047 050 052 060 063 065
066 067 069 073
FISHER 018 024 028 029 048 051 061
FUNAI 025
GENERAL
ELECTRIC
002 005 017 021 056
GO VIDEO 002
HARMAN
KARDON
007
HITACHI 019 025 041 042 074
INSTANT REPLAY 021
JC PENNEY 002 007 018 019 021 026 037 041
054 056
JCL 007 008 018 021 026 037
JVC 081 082 083
KENWOOD 007 008 018 021 026 037
KLH 070
KONIA 036
LG(Goldstar) 006 007 008 009 010
LIOYD 025
LOGIK 038
LXI 025
MAGNAVOX 021 056 059
MARANTZ 007 008 018 021 026 037 062
MARTA 006
MEI 021
MEMOREX 006 021 024 025
MGA 034
MIDLAND 005
MINOLTA 019 041 075
MITSUBISHI 019 034 041 046
Brand Code
MONTGOMERY
WARD
020
MTC 002 025
MULTITECH 002 005 025 038
NEC 007 008 018 026 037 062 064
OPTIMUS 020
ORION 073 074 075 076
PANASONIC 021 056 071 072
PENTAX 019 041 075
PENTEX
RESEARCH+
008
PHILCO 021 056 059
PHILIPS 021 080
PIONEER 019 026 039 053
PORTLAND 015 049 055
PROSCAN 017
QUARTZ 018
QUASAR 021 056
RADIO SHACK/
REALISTIC
006 018 020 021 024 025 029 034
048 056
RCA 002 017 019 021 035 041 043 057
068 076
SANSUI 026
SANYO 018 024
SCOTT 003 047 052 067
SEARS 006 018 019 024 028 029 041 048
051
SHARP 020 034 045 015
SHIMTOM 027 033 038 058
SIGNATURE 025
SONY 027 033 044
SYLVANIA 021 025 056 059
SYMPHONIC 025
TANDY 018 025
TASHIKA 006
TATUNG 037
TEAC 025 037 068
TECHNICS 021
TEKNIKA 006 021 025 031
TMK 066
TOSHIBA 003 019 029 051 052
TOTEVISION 002 006
UNITECH 002
VECTOR
RESEARCH
007 026
VICTOR 026
VIDEO
CONCEPTS
007 026
VIDEOSONIC 002
WARDS 002 003 006 019 020 021 024 025
034 038 041
YAMAHA 007 008 018 026 037
ZENITH 023 027 033
BN68-01156A-X6Eng-0306.indd 18 2007-03-06 �� 7:23:25

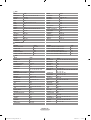
English - 19
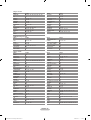
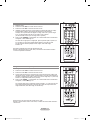
CABLE
Brand Code
SAMSUNG 000 001 002 003 004 005 006 007
GI 041
HAMLIN 003 024 031
HITACHI 025 030
JERROLD 038 039
MACOM 025 030
MAGNAVOX 019 023 028
OAK 026
PANASONIC 003 022 027 037 044
PHILIPS 019 021 023 028
PIONEER 004 018 020 044
RCA 014 022 040
REGAL 003
SAMSUNG DVD
Product Code
DVD 000 001 002
DVDR 003 004
BD Record 005 006
VCR COMBO 007 008 009 010 011
VCR Record 012
DHR COMBO 013
DVD
Brand Code
ANAM 030
AUDIOVOX 075
AUDIOLOGIC 085
ANABA 072
APEX DIGITAL 070 071 074 086 083 084 088 111 112
AIWA 114
BROKSONIC 062
BLAUPUNKT 074
B&K 122 123
CURTIS MATHES 027
CYBER HOME 077 078 079 082
CLARION 080 125
CIRRUS 081
CYBER HOME 065
CINEVISION 095
DAEWOO 066
DENON 146
FARENHEIT 067 068
FISHER 090
GPX 060
GO VIDEO 061 089 133 135
GE 069 074
GREENHILL 074
HITACHI 064 113
HITEKER 071
HOYO 073
HARMAN / KARDON 091 110
IRT 089
Brand Code
REGENCY 015 023
SA 042 043
SCIENTIFIC
ATLAN
042 043
SPRUCER 022
STARGATE 2000 036
SYLVANIA 016
TEXSCAN 016
TOCOM 032
UNIVERSAL 033 034
VIEWSTAR 019 021 023 028
WARNER AMEX 046
ZENITH 017 029 035 037 045
Product Code
Home Theater VCR COMBO 014 015 016
HDD Recorder COMBO 017
TWIN TRAY COMBO 018
STB DVD COMBO 019
DVD Receiver 020
AV Receiver 021
Brand Code
INTEGRA 092
JBL 091
JVC 022 033 115 116
JATON 073
KENWOOD 051 108 109
KISS 073
KONKA 059 100 106 107
KLH 074 075
LG(Goldstar) 025 031
LOEWE 057
LASONIC 058
MOBILE AUTHORITY 054
MEMOREX 055
MALATA 056
MAGNAVOX 076 093
MINTEK 074 094
MONYKA 073
NORCENT 048 049 050
NEXT BASE 052
NEC 053
NANTAUS 144
NESA 074
OPTOMEDIA ELECTRONICS 105
OPTIVIEW 072
ONKYO 076 092 119
PHILCO 044 045
PRINCETON 046 047
PROSCAN 023
BN68-01156A-X6Eng-0306.indd 19 2007-03-06 �� 7:23:25

English - 20
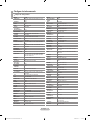
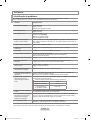
DVD
Brand Code
PANASONIC 024 034 124 134 136 137 138
PHILIPS 036 076
ROTEL 117 118
RIO 120
RCA 023 035 074 075 131 132
RAITE 073
ROWA 038
SAMPO 104
SONY 026 029 126 127 128 129 130 141
SHERWOOD 039 041
SVA 042
SYLVANIA 043 093
SHARP 140
SANSUI 062
SANYO 062 090
SHINSONIC 094
SAMSUNG STB
Product Code
Ground wave STB 001 002
Satellite STB 003
CABLE STB 004
STB DVD COMBO 008
Satellite STB HDD COMBO Standard 009
STB
Brand Code
ALPHASTAR 023
ANAM 043
CHANNEL MASTER 018 034
CROSSDIGITAL 019
CHAPARRAL 035
DIRECT TV
015 016 017 019 022 045 060
061 062 065 066 067 068
DAEWOO 074
DISH NETWORK SYSTEM 069 070
DISHPRO 069
DRAKE 018 024 032
DX ANTENNA 027
ECHOSTAR 025 069 070 071
EXPRESSVU 069
GOI 069
GE 065
GENERAL INSTRUMENT 046 047 048 063 064
HTS 069
HOME CABLE 056
HITACHI 022
HUGHES NETWORK 015 017
IQ 020
IQ PRISM 020
JANEIL 059
JERROID 063
JVC 069 070
LG(Goldstar) 044 073
Brand Code
THOMSON 145
TOSHIBA 028 062 076
TECHNICS 139
TVIEW 072
TOKAI 073
TEAC 096
TECHWOOD 097
TREDEX 098 099 101
URBAN CONCEPTS 076
VENTURER 075
VOCOPRO 102
YAMAHA 032 063
YAMAKAWA 040 073
XWAVE 103
ZENITH 076 121
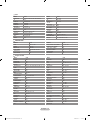
Product Code
Satellite STB HDD COMBO Premium 010
CABLE STB HDD COMBO Standard 011
CABLE STB HDD COMBO Premium 012
Ground wave STB HDD COMBO Standard 013
Ground wave STB HDD COMBO Premium 014
Brand Code
MAGNAVOX 016 021 036 038 039 040 041 042
MEMOREX 016
MOTOROLA 064
MACOM 018
MITSUBISHI 015
NEXT LEVEL 047 048 064
PHILIPS 015 016 017 021 033 036 038 039 040
041 042 067
PRIMESTAR 046 049 050 063
PANASONIC 058 059 061 062
PAYSAT 016
PROSCAN 065 066
RCA 051 052 053 065 066
RADIOSHACK 064
REALISTIC 057
STAR TRAK 026
STS 020 027
SKY 031
SKY LIFE 005 006 007
SHACK 064
STAR CHOICE 064
SONY 054 060
TOSHIBA 015 017 028 029 030 072
ULTIMATE TV 060 066
UNIDEN 016 021 037 055 056 057
ZENITH 024 031 068
BN68-01156A-X6Eng-0306.indd 20 2007-03-06 �� 7:23:26

English - 21
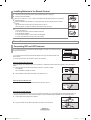
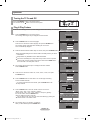
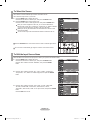
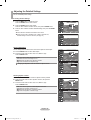
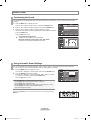
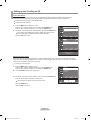
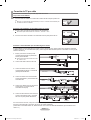
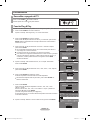
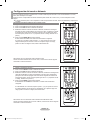
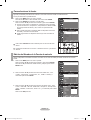
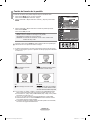
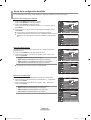
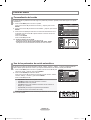
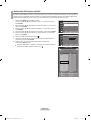
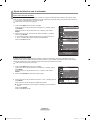
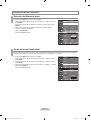
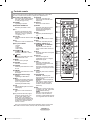
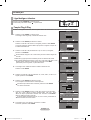
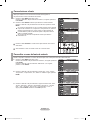
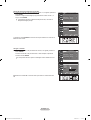
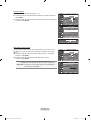
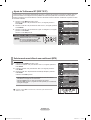
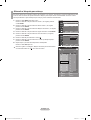
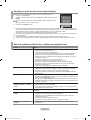
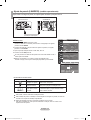
To Select the Source
Use to select TV or other external input sources connected to the TV.
Use to select the input source of your choice.
1. Press the MENU button to display the menu.
Press the▲ or ▼ buttons to select “Input”, then press the ENTER button.
2. Press the ENTER
button to select "Source List".
Press the ▲ or ▼ buttons to select signal source, then press the ENTER
button.
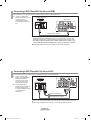
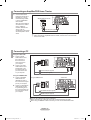
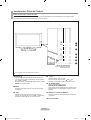
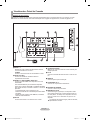
When you connect equipment to the LCD, you can choose between the
following sets of jacks: AV1, Component1, Component2, PC ,HDMI1 or HDMI2
on the TV’s rear panel and AV2, S-Video on the TV’s side panel.
HDMI input can only be selected when the external device is turned on and
connected via HDMI.
You can choose only those external devices that are connected to the TV.
Press the SOURCE button on the remote control to view an external signal source.
You can enter TV mode directly by using the TV button on the remote control.
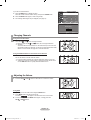
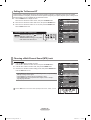
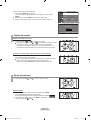
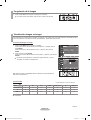
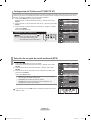
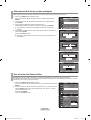
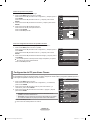
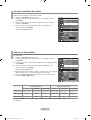
To Edit the Input Source Name
Name the device connected to the input jacks to make your input source selection easier.
1. Press the MENU button to display the menu.
Press the▲ or ▼ buttons to select “Input”, then press the ENTER button.
Press the ▲ or ▼ buttons to select "Edit Name", then press the ENTER
button.
2. Press the ▲ or ▼ buttons to select "AV1", "AV2", "S-Video", "Component1",
"Component2", "PC" ,"HDMI1" or "HDMI2" input jack, then press the ENTER
button.
3. Press the ▲ or ▼ buttons to select "VCR", "DVD", "D-VHS", "Cable STB",
"HD STB", "Satellite STB", "AV Receiver", "DVD Receiver", "Game",
"Camcorder", "DVD Combo", "DHR" or "PC" input source, then press the ENTER
button.
Press the
EXIT button to exit.
Input
Source List : TV ►
Edit Name
►
Anynet+ (HDMI-CEC)
►
TV
Move Enter Return
Source ListTV
Move Enter Return
TV
AV1 : ----
AV2 : ----
S-Video : ----
Component1 : ----
Component2 : ----
PC : ----
HDMl1 : ----
HDMl2 : ----
Input
Source List : TV ►
Edit Name
►
Anynet+ (HDMI-CEC)
►
TV
Move Enter Return
Edit NameTV
Move Enter Return
AV1
: ---- ►
AV2
: ---- ►
S-Video
: ---- ►
Component1
: ---- ►
Component2 : ----
►
PC
: ---- ►
HDMl1
: ---- ►
HDMl2
: ---- ►
Edit NameTV
Move Enter Return
AV1
: ----
AV2
: ----
S-Video
: ----
Component1
: ----
Component2 : ----
PC
: ----
HDMl1
: ----
HDMl2
: ----
----
VCR
DVD
D-VHS
Cable STB
HD STB
Satellite STB
▼
BN68-01156A-X6Eng-0306.indd 21 2007-03-06 �� 7:23:26

English - 22
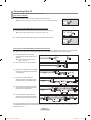
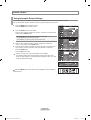
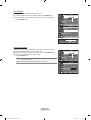
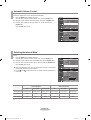
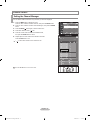
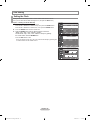
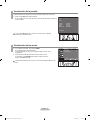
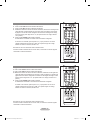
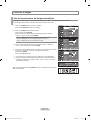
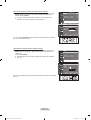
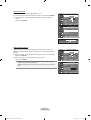
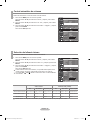
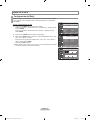
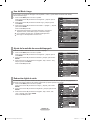
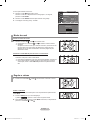
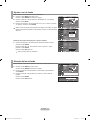
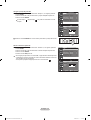
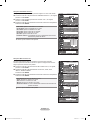
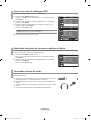
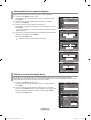
Using Automatic Picture Settings
Your TV has three automatic picture settings ("Dynamic", "Standard" and "Movie") that are preset at the factory.
You can activate either Dynamic, Standard, or Movie by making a selection from the menu.
1. Press the MENU button to display the menu.
Press the ENTER button to select “Picture”.
2. Press the ENTER
button to select "Mode".
Press the ▲ or ▼ buttons to select the "Dynamic", "Standard", or "Movie" picture
setting. Press the ENTER
button.
Choose Dynamic to increase the clarity and sharpness of the picture.
Choose Standard for the standard factory settings.
Choose Movie for a natural Image without picture enhancements.
3. Press the ▲ or ▼ buttons to select "Contrast", "Brightness", "Sharpness",
"Color", or "Tint", then press the ENTER
button.
4. Press the ◄ or ► buttons to decrease or increase the value of a particular item.
For example, if you select "Contrast", pressing the ► button to increases it.
Press the ENTER
button.
Press the
EXIT button to exit.
• When in PC mode, Tint, Color and Sharpness are not available.
• Each adjusted setting will be stored separately according to its input mode.
• When you make changes to Contrast, Brightness, Sharpness, Color, Tint , OSD
will be also adjusted accordingly.
Press the P.MODE button on the remote control repeatedly to select the desired
picture mode.
Picture Control
Move Enter Return
PictureTV
Mode : Dynamic
Contrast 100
Brightness 45
Sharpness 75
Color 55
Tint G 50
R 50
Color Tone : Cool1
Backlight : 10
▼More
Dynamic
Standard
Movie
Mode : Dynamic ►
Contrast 100
Brightness 45
Sharpness 75
Color 55
Tint G 50
R 50
Color Tone : Cool1 ►
Backlight :10
►
▼More
PictureTV
100
▲
Contrast
▼
Move Adjust Return
Move Enter Return
Move Enter Return
Mode : Dynamic
►
Contrast 100
Brightness 45
Sharpness 75
Color 55
Tint G 50
R 50
Color Tone : Cool1
►
Backlight : 10
►
▼More
PictureTV
BN68-01156A-X6Eng-0306.indd 22 2007-03-06 �� 7:23:27

English - 23
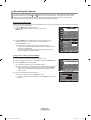
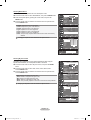
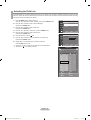
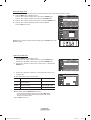
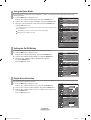
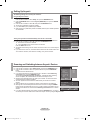
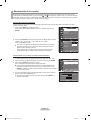
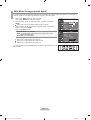
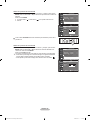
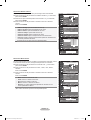
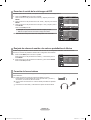
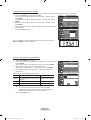
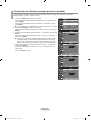
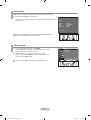
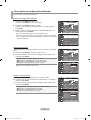
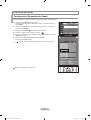
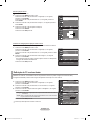
Adjusting the Color Tone
You can change the color of the entire screen according to your preference.
1. Press the MENU button to display the menu.
Press the ENTER button to select “Picture”.
2. Press the ▲ or ▼ buttons to select "Color Tone", then press the ENTER
button.
3. Press the ▲ or ▼ buttons to select "Cool2", "Cool1", "Normal", "Warm1",
or "Warm2".
Press the ENTER
button.
When the picture mode is set to Dynamic or Standard, Warm1 and Warm2
cannot be selected. Movie mode is only available.
Resetting the Picture Settings to the Factory Defaults
1. Press the ▲ or ▼ buttons to select "Reset", then press the ENTER
button.
2. Press the ▲ or ▼ button to select “OK”, or “Cancel”,
then press the ENTER button.
Press the EXIT button to exit.
Each mode can be reset.
Mode : Dynamic ►
Contrast 100
Brightness 45
Sharpness 75
Color 55
Tint G 50
R 50
Color Tone : Cool1
►
Backlight : 10
►
▼More
PictureTV
Activating Backlight
You can adjust the screen brightness by adjusting the LCD backlight brightness. (0~10)
1. Press the MENU button to display the menu.
Press the ENTER button to select “Picture”.
2. Press the ▲ or ▼ button to select “Backlight”, then press the ENTER button.
3. Press the ◄ or ► button to decrease or increase the value of the backlight
brightness.
Press the ENTER button.
Press the
EXIT button to exit.
Mode : Dynamic ►
Contrast 100
Brightness 45
Sharpness 75
Color 55
Tint G 50
R 50
Color Tone : Cool1
►
Backlight : 10
►
▼More
PictureTV
Mode : Dynamic
Contrast 100
Brightness 45
Sharpness 75
Color 55
Tint G 50 R 50
Color Tone : Cool1
Backlight : 10
▼More
PictureTV
5
▲
Backlight
▼
Adjust Return
Move Enter Return
Move Enter Return
Move Enter Return
Cool2
Cool1
Normal
Warm1
Warm2
▲More
Detailed settings
Size : 16 : 9
Digital NR : Low
Active Color : On
DNle : Off
Reset :
PictureTV
Move Enter Return
OK
Cancel
BN68-01156A-X6Eng-0306.indd 23 2007-03-06 �� 7:23:28

English - 24
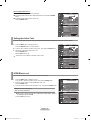
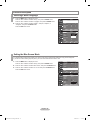
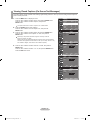
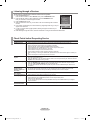
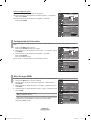
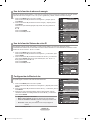
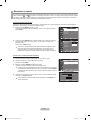
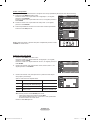
DNIe (Digital Natural Image engine)
Samsung’s new technology brings you more detailed images with contrast, white enhancement and 3D noise reduction.
You can see how DNIe improves the picture by setting DNIe demo mode to On.
1. Press the MENU button to display the menu.
Press the ENTER button to select “Picture”.
2. Press the ▲ or ▼ buttons to select "DNIe", then press the ENTER
button.
This function doesn’t work when the Input Source is PC.
3. Press the ▲ or ▼ buttons to select "On", "Demo" or "Off", then press the ENTER
button.
Press the
EXIT button to exit.
• Off: Switches off the DNIe mode.
• Demo: The screen before applying DNIe appears on the left screen after
applying DNIe appears on the right.
• On: Switches on the DNIe mode.
This function is not available in PC mode.
This function is not available in Movie mode
This function is not available in PIP mode
Press the DNIe button on the remote control repeatedly to select one of the settings.
Mode : Dynamic ►
Contrast 100
Brightness 45
Sharpness 75
Color 55
Tint G 50
R 50
Color Tone : Cool1 ►
Backlight : 10
►
▼More
PictureTV
▲More
Detailed Settings
Size : 16 : 9
Digital NR : Low
Active Color : On
DNIe :
Reset
PictureTV
Off
Demo
On
Move Enter Return
Move Enter Return
BN68-01156A-X6Eng-0306.indd 24 2007-03-06 �� 7:23:29

English - 25
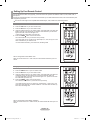
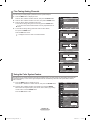
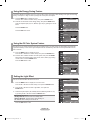
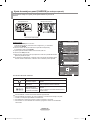
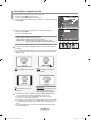
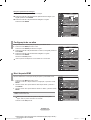
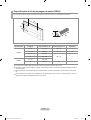
Changing the Screen Size
Screen size selection depends on the type of video input.
1. Press the MENU button to display the menu.
Press the ENTER button to select “Picture”.
2. Press the ▲ or ▼ buttons to select "Size", then press the ENTER
button.
3. Press the ▲ or ▼ buttons to select the screen format you want.
Press the ENTER
button.
Press the
EXIT button to exit.
• 16:9 : Sets the picture to 16:9 wide mode.
• Zoom : Magnifies the size of the picture on the screen.
• 4:3 : Sets the picture to 4:3 normal mode.
• Just Scan : Use the function to see the full image without any cutoff when
HDMI 720p/1080i signals are input.
Alternately, you can press the P.SIZE button on the remote control repeatedly to
change the picture size.
If you watch a still image or the 4:3 mode for a long time (over 2 hours), an
image may be burned onto the screen.
View the TV in 16:9 mode as much as possible.
16:9
Sets the picture to 16:9 wide mode.
Zoom
The screen size when Wide screen is
vertically enlarged.
4:3
Sets the picture to 4:3 normal mode.
Just Scan
Use the function to see the full im-
age without any cutoff when HDMI
720p/1080i signals are input.
•
In TV, VIDEO, S-VIDEO,and all COMPONENT (480i, 480p) modes, all screen
modes can be selected.(16:9 • Zoom • 4:3)
•
In PC, (720p, 1080i), COMPONENT (720p, 1080i) modes, only 16:9 & 4:3
modes can be selected.
•
16:9, 4:3 and Just Scan Mode is available only HDMI mode
•
You must select Zoom with P. SIZE button on the remote control if you want to
move the Zoom picture up or down
•
If you change the picture size when PIP is On, PIP will automatically be turned
16 : 9
Zoom
4 : 3
Just Scan
SizeTV
Mode : Dynamic ►
Contrast 100
Brightness 45
Sharpness 75
Color 55
Tint G 50
R 50
Color Tone : Cool1 ►
Backlight : 10 ►
▼More
PictureTV
Move Enter Return
Move Enter Return
BN68-01156A-X6Eng-0306.indd 25 2007-03-06 �� 7:23:30

English - 26
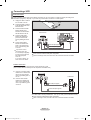
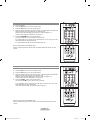
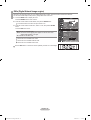
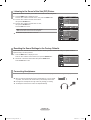
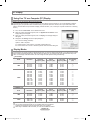
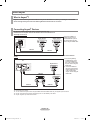
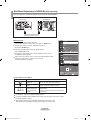
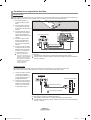
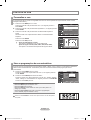
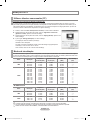
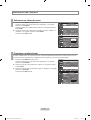
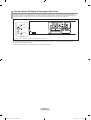
Viewing Picture-in-Picture
This product has one built-in tuner, which does not allow PIP to function in the same mode. For example, you cannot watch one TV
channel in the main screen, and a different one in the PIP screen. Please see ‘PIP Settings’below for details. You can use the PIP
feature to simultaneously watch two video sources.
Activating Picture-in-Picture
1. Press the MENU button to display the menu.
Press the ▲ or ▼ buttons to select "Setup", then press the ENTER
button.
Press the ▲ or ▼ buttons to select "PIP", then press the ENTER
button.
2. Press the ENTER
button again.
Press the ▲ or ▼ buttons to select "On", then press the ENTER
button.
If you turn the TV off while watching in PIP mode and turn it on again, the PIP
window will disappear.
Alternately, you can press the PIP button on the remote control repeatedly to activate or
deactivate the PIP.
PIP Settings
O: PIP operates / X: PIP doesn’t operate
Freezing the Picture
1. Press the STILL button to freeze a moving picture.
Normal sound will still be heard. Press again to cancel.
continued..
PIP :
Source : HDMI1
Size :
Position :
Channel : Cable 3
PIPTV
Off
On
Move Enter Return
TV
Move Enter Return
Setup
TV
▲More
PC ►
Home Theater PC : Off ►
Light Effect : Off
►
Energy Saving : Off ►
HDMI Black Level : Normal ►
AV Color System : Auto ►
PIP ►
Setup
Move Enter Return
This TV has only one tuner and does not allow you to watch one TV channel in the main screen and another channel in PIP screen.
TV AV 1 AV 2 S-Video Component1,2 PC
HDMl1,2
Component1,2
O O O X X X X
PC
O O O X X X X
HDMl1,2
O O O X X X X
TV
MAIN
SUB
BN68-01156A-X6Eng-0306.indd 26 2007-03-06 �� 7:23:31

English - 27
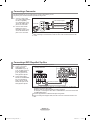
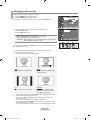
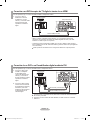
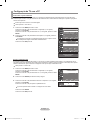
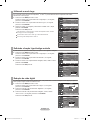
Selecting a Signal Source (External A/V) for PIP.
3. Press the ▲ or ▼ buttons to select "Source", then press the ENTER
button.
Select the source of the sub picture (PIP) by pressing the ▲ or ▼ buttons and
press the ENTER
button.
The sub picture can serve different source selections based on what the main
picture is set to.
Changing the PIP Channel
4. Press the ▲ or ▼ buttons to select "Channel", then press the ENTER
button.
Press the ▲ or ▼ buttons to select the desired channel in the PIP window.
Press the
ENTER
buttons.
The channel can be active when the sub picture is set to TV.
Press the SOURCE button on the remote control to select a signal from an external
source PIP
Press the CH buttons on the remote control to change the channels in the PIP
screen.
PIP : On
Source : HDMI1
Size :
Position :
Channel : Cable 3
PIPTV
PIP : On
Source : TV
Size :
Position :
Channel : Cable 3
PIPTV
▲
8
▼
TV
Move Enter Return
Move Enter Return
Move Enter Return
▲More
PC ►
Home Theater PC : Off ►
Light Effect : Off ►
Energy Saving : Off ►
HDMI Black Level : Normal ►
AV Color System : Auto ►
PIP ►
Setup
TV
Move Enter Return
▲More
PC ►
Home Theater PC : Off ►
Light Effect : Off
►
Energy Saving : Off ►
HDMI Black Level : Normal ►
AV Color System : Auto ►
PIP ►
Setup
Move Enter Return
Move Enter Return
TV
AV1
AV2
BN68-01156A-X6Eng-0306.indd 27 2007-03-06 �� 7:23:32

English - 28
Changing the Position of the PIP Window
5. Press the ▲ or ▼ buttons to select "Position", then press the ENTER
button.
Press the ▲ or ▼ buttons to select the desired PIP window position.
Press the
ENTER
buttons.
The Double ( ), Double Wide ( ) mode cannot be selected in Position
mode.
Changing the Size of the PIP Window
6. Press the ▲ or ▼ buttons to select "Size", then press the ENTER
button.
Press the ▲ or ▼ buttons to select the desired size of the PIP window.
Press the ENTER
button.
Press the
EXIT button to exit.
If main picture is in HDMI mode, Size is available
• You may notice that the picture in the PIP window becomes slightly unnatural
when you use the main screen to view a game or karaoke.
• You can adjust picture position only by using the size menu.
Press the POSITION button on the remote control to change the position of the PIP
screen.
PIP : On
Source : TV
Size :
Position :
Channel : Cable 3
PIPTV
PIP : On
Source : TV
Size :
Position :
Channel : Cable 3
PIPTV
PictureTV
Move Enter Return
Move Enter Return
TV
Move Enter Return
▲More
PC ►
Home Theater PC : Off ►
Light Effect : Off ►
Energy Saving : Off ►
HDMI Black Level : Normal ►
AV Color System : Auto ►
PIP ►
Setup
TV
Move Enter Return
▲More
PC ►
Home Theater PC : Off ►
Light Effect : Off ►
Energy Saving : Off ►
HDMI Black Level : Normal ►
AV Color System : Auto ►
PIP ►
Setup
Move Enter Return
Move Enter Return
BN68-01156A-X6Eng-0306.indd 28 2007-03-06 �� 7:23:33

English - 29
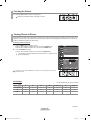
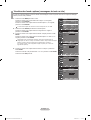
Adjusting the Detailed Settings
You can set detailed picture settings.
1. Press the MENU button to display the menu.
Press the ENTER button to select “Picture”.
2. Press the ENTER button to select “Mode”
Press the ▲ or ▼ buttons to select “Movie”, then press the ENTER button.
3. Press the ▲ or ▼ buttons to select “Detailed Settings”, then press the ENTER
button.
Picture Mode is available in Standard or Movie mode.
When Picture mode is Standard mode, If DNIe is selected “Off”,
Detailed Settings cannot be selected. (See page 24)
▲More
Detailed Settings
►
Size : 16 : 9
►
Digital NR : Low ►
Active Color : On
►
DNIe : Off
►
Reset
PictureTV
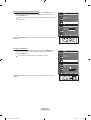
Activating Detailed Settings
Activating Black Adjust
You can directly select the black level on the screen to adjust the screen depth.
4. Press the ENTER button to select “Black Adjust”.
5. Press the ▲ or ▼ button to select “Off”,“Low”,“Medium”,“High”.
Press the ENTER button.
• Off: Turns off the black adjustment function.
• Low: Sets the black color depth to low.
• Medium: Sets the black color depth to medium.
• High: Sets the black color depth to high.
Changing the adjustment value will refresh the adjusted screen.
Black Adjust : Off
Dynamic Contrast : Off
Gamma
: 0
Color space : Auto
White Balance
My Color Control
Edge Enhancement : Off
Detailed SettingsTV
Off
Low
Medium
High
Activating Dynamic contrast
You can adjust the screen contrast so that the optimal contrast is provided.
6. Press the ▲ or ▼ button to select “Dynamic contrast”, then press the
ENTER button.
7. Press the ▲ or ▼ button to select “Off”,“Low”,“Medium”,“High”.
Press the ENTER button.
• Off: Turns off the dynamic contrast adjustment function.
• Low: Sets the dynamic contrast to low.
• Medium: Sets the dynamic contrast to medium.
• High: Sets the dynamic contrast to high.
Black Adjust : Off
Dynamic Contrast : Off
Gamma
: 0
Color space : Auto
White Balance
My Color Control
Edge Enhancement : Off
Detailed SettingsTV
Off
Low
Medium
High
Move Enter Return
Move Enter Return
Move Enter Return
Mode : Movie ►
Contrast 80
Brightness 50
Sharpness 45
Color 55
Tint G 50 R 50
Color Tone : Warm2
►
Backlight : 5 ►
▼More
PictureTV
Move Enter Return
Mode : Movie ►
Contrast 80
Brightness 50
Sharpness 45
Color 55
Tint G 50 R 50
Color Tone : Warm2
►
Backlight : 5 ►
▼More
PictureTV
Move Enter Return
Mode : Movie ►
Contrast 80
Brightness 50
Sharpness 45
Color 55
Tint G 50 R 50
Color Tone : Warm2
►
Backlight : 5 ►
▼More
PictureTV
Move Enter Return
BN68-01156A-X6Eng-0306.indd 29 2007-03-06 �� 7:23:34

English - 30
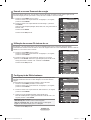
Activating Gamma
You can adjust the middle brightness of pictures. (-3 ~ 3)
8. Press the ▲ or ▼ button to select “Gamma”, then press the
ENTER button.
9. Press the ◄ or ► button to decrease or increase the value of a particular item.
Press the ENTER button.
Black Adjust : Off
Dynamic Contrast : Off
Gamma : 0
Color space : Auto
White Balance
My Color Control
Edge Enhancement : Off
Detailed SettingsTV
Changing the Color Space
Color space is a color matrix composed of red, green, and blue colors. Select your
favorite color space and experience the most natural color.
10. Press the ▲ or ▼ button to select “Color Space”, then press the ENTER button.
11. Press the ▲ or ▼button to select “Auto” or “Wide”.
Press the ENTER button.
• Auto : Auto Color Space automatically adjusts to natural color tone based
on program sources.
• Wide : Wide Color Space offers deep and rich color tone.
Black Adjust : Off
Dynamic Contrast : Off
Gamma
: 0
Color space : Auto
White Balance
My Color Control
Edge Enhancement : Off
Detailed SettingsTV
Auto
Wide
0
Gamma
Adjust Return
Move Enter Return
Move Enter Return
Mode : Movie ►
Contrast 80
Brightness 50
Sharpness 45
Color 55
Tint G 50 R 50
Color Tone : Warm2
►
Backlight : 5 ►
▼More
PictureTV
Move Enter Return
Mode : Movie ►
Contrast 80
Brightness 50
Sharpness 45
Color 55
Tint G 50 R 50
Color Tone : Warm2
►
Backlight : 5 ►
▼More
PictureTV
Move Enter Return
BN68-01156A-X6Eng-0306.indd 30 2007-03-06 �� 7:23:35

English - 31
Activating White Balance
You can adjust the color temperature for more natural picture colors.
12. Press the ▲ or ▼ button to select “White Balance”, then press the ENTER button.
13. Select the required option by pressing the ▲ or ▼ button, then press the
ENTER button.
14. Press the ◄ or ► button to decrease or increase the value of a particular item.
Press the ENTER button.
Black Adjust : Off ►
Dynamic Contrast : Off
►
Gamma : 0
►
Color space : Auto
►
White Balance
►
My Color Control ►
Edge Enhancement : Off ►
Detailed SettingsTV
R_Offset 15
G_Offset 15
B_Offset 15
R_Gain 15
G_Gain 15
B_Gain 15
Reset
White BalanceTV
15
▲
R_Offset
▼
Move Adjust Return
Activating My Color Control
This setting can be adjusted to suit your personal preferences. When using the
My Color Control Feature, the current picture remains in movement.
15. Press the ▲ or ▼ button to select “My Color Control”, then press the ENTER
button.
16. Press the ▲ or ▼ button to select “Pink”,“Green”,“Blue”,“White”,“Reset”.
Press the ENTER button.
17. Press the ◄ or ► button to decrease or increase the value of a particular item.
Press the ENTER button.
• Pink: Darkens or lightens the pink color.
• Green: Darkens or lightens the green color.
• Blue: Darkens or lightens the blue color.
• White: Darkens or lightens the white color.
• Reset: The previously adjusted colors will be reset to the factory defaults.
Changing the adjustment value will refresh the adjusted screen.
Black Adjust : Off ►
Dynamic Contrast : Off
►
Gamma : 0
►
Color space : Auto
►
White Balance
►
My Color Control ►
Edge Enhancement : Off ►
Detailed SettingsTV
Pink 15
Green 15
Blue 15
White 15
Reset
My Color ControlTV
15
▲
Pink
▼
Move Adjust Return
Move Enter Return
Move Enter Return
Move Enter Return
Move Enter Return
Mode : Movie ►
Contrast 100
Brightness 45
Sharpness 75
Color 55
Tint G 50 R 50
Color Tone : Warm2 ►
Backlight : 5 ►
▼More
PictureTV
Move Enter Return
• R offset: Adjusts the red color darkness.
• G offset: Adjusts the green color darkness.
• B offset: Adjusts the blue color darkness.
• R gain: Adjusts the red color brightness
• G gain: Adjusts the green color brightness.
• B gain: Adjusts the blue color brightness.
• Reset: The previously adjusted white balance will be reset to the factory
defaults.
Changing the adjustment value will refresh the adjusted screen.
Mode : Movie ►
Contrast 80
Brightness 50
Sharpness 45
Color 55
Tint G 50 R 50
Color Tone : Warm2
►
Backlight : 5 ►
▼More
PictureTV
Move Enter Return
BN68-01156A-X6Eng-0306.indd 31 2007-03-06 �� 7:23:36

English - 32
Activating Edge Enhancement
You can emphasize object boundaries in the picture.
18. Press the ▲ or ▼ button to select “Edge Enhancement”, then press the ENTER
button.
19. Press the ▲ or ▼ button to select “Off” or “On”.
Press the ENTER button.
Mode : Movie ►
Contrast 100
Brightness 45
Sharpness 75
Color 55
Tint G 50 R 50
Color Tone : Warm2 ►
Backlight : 5
►
▼More
PictureTV
Black Adjust : Off
Dynamic Contrast : Off
Gamma
: 0
Color space : Auto
White Balance
My Color Control
Edge Enhancement :
Detailed SettingsTV
Off
On
Setting the Active Color
If you turn on this option, the colors of the sky and grass will be stronger and clearer for a more vivid on-screen picture.
1. Press the MENU button to display the menu.
Press the ENTER
button to select “Picture”.
2. Press the ▲ or ▼ buttons to select "Active Color", then press the ENTER
button.
3. Press the ▲ or ▼ button to select “Off” or “On”
Press the ENTER button.
Press the
EXIT button to exit.
This function is not available in Standard or Movie mode.
Mode : Dynamic ►
Contrast 100
Brightness 45
Sharpness 75
Color 55
Tint G 50 R 50
Color Tone : Cool1 ►
Backlight : 10
►
▼More
PictureTV
▲More
Detailed settings
Size : 16 : 9
Digital NR : Low
Active Color : On
DNIe : Off
Reset
PictureTV
Off
On
Move Enter Return
Move Enter Return
Move Enter Return
Move Enter Return
HDMI Black Level
1. Press the MENU button to display the menu.
Press the ▲ or ▼ buttons to select “Setup”, then press the ENTER button.
2.
Press the ▲ or ▼ buttons to select "HDMI Black Level", then
press the ENTER
button.
3.
Press the ▲ or ▼ buttons to select “Normal” or “Low”, then press the ENTER
button.
• Normal: The screen gets brighter.
• Low: The screen gets darker.
This function is active only when the an external device (DVD player, STB etc.)
is connected to the TV via HDMI.
Press the EXIT button to exit.
You can select the black level on the screen to adjust the screen depth.
Setup
Plug & Play ►
Language : English
►
Time
►
Caption ►
Game Mode : Off
►
Blue Screen : Off ►
Melody : Off
►
▼More
TV
Move Enter Return
▲More
PC
Home Theater PC : Off
Light Effect : Off
Energy Saving : Off
HDMI Black Level : Normal
AV Color System : Auto
PIP
Setup
Move Enter Return
Normal
Low
BN68-01156A-X6Eng-0306.indd 32 2007-03-06 �� 7:23:37

English - 33
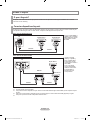
Customizing the Sound
The sound settings can be adjusted to suit your personal preference. (Alternatively, you can use one of the "automatic"
settings.)
1. Press the MENU button to display the menu.
Press the ▲ or ▼ buttons to select "Sound", then press the ENTER
button.
2. Press the ▲ or ▼ buttons to select "Equalizer", then press the ENTER
button.
3. Press the ◄ or ► buttons to select a particular frequency to adjust.
Press the ▲ or ▼ buttons to increase or decrease the level of the particular frequency.
Press the
ENTER
button.
Press the
EXIT button to exit.
• L/R Sound Balance Adjustment :
To adjust the sound balance of the L/R speakers.
• Bandwidth Adjustment (100Hz, 300Hz, 1kHz, 3kHz, 10kHz)
: To adjust the level of different bandwidth frequencies.
Using Automatic Sound Settings
Your TV has automatic sound settings ("Standard", "Music", "Movie", "Speech", and "Custom") that are preset at the factory.
Or, you can select "Custom", which automatically recalls your personalized sound settings.
1. Press the MENU button to display the menu.
Press the
▲ or ▼
buttons to select "Sound", then press the ENTER
button.
2. Press the ENTER
button to select "Mode".
Press the
▲ or ▼
buttons to select "Standard", "Music", "Movie", "Speech",
or "Custom" sound setting, then press the ENTER
button.
Press the
EXIT button to exit.
• Choose Standard for the standard factory settings.
• Choose Music when watching music videos or concerts..
• Choose Movie when watching movies.
• Choose Speech when watching a show that is mostly dialog (i.e., news).
• Choose Custom to recall your personalized settings
(see “Customizing the Sound”).
Press the S.MODE button on the remote control to select one of the standard sound
settings.
Sound Control
Mode : Custom ►
Equalizer
►
SRS TS XT : Off
►
MTS : Stereo
►
Auto Volume : Off
►
Internal Mute : Off
►
Sound Select : Main ►
Reset
SoundTV
EqualizerTV
R
L
100Hz
+
-
0
+
-
0
300Hz 1kHz 3kHz 10kHzBalance
Move Enter Return
Move Adjust Return
Mode : Custom
Equalizer
SRS TS XT : Off
MTS : Stereo
Auto Volume : Off
Internal Mute : Off
Sound Select : Main
Reset
SoundTV
Standard
Music
Movie
Speech
Custom
Move Enter Return
BN68-01156A-X6Eng-0306.indd 33 2007-03-06 �� 7:23:37

English - 34
Setting the TruSurround XT
TruSurround XT is a patented SRS technology that solves the problem of playing 5.1 multichannel content over two speakers.
TruSurround delivers a compelling, virtual surround sound experience through any two-speaker playback system, including internal
television speakers. It is fully compatible with all multichannel formats.
1. Press the MENU button to display the menu.
Press the ▲ or ▼ buttons to select "Sound", then press the ENTER
button.
2. Press the ▲ or ▼ buttons to select "SRS TS XT", then press the ENTER
button.
3. Press the ▲ or ▼ buttons to select "On" or "Off", then press the ENTER
button.
Press the
EXIT button to exit.
TRADEMARK & LABEL LICENSE NOTICE
TruSurround XT, SRS and
Symbol are
trademarks of SRS Labs, Inc.
TruSurround XT technology is incorporated
under license from SRS Labs, Inc.
Mode : Custom ►
Equalizer
►
SRS TS XT : Off
►
MTS : Stereo
►
Auto Volume : Off
►
Internal Mute : Off
►
Sound Select : Main ►
Reset
SoundTV
Move Enter Return
Mode : Custom
Equalizer
SRS TS XT : Off
MTS : Stereo
Auto Volume : Off
Internal Mute : Off
Sound Select : Main
Reset
SoundTV
Off
On
Move Enter Return
1. Press the MENU button to display the menu.
Press the ▲ or ▼ buttons to select "Sound", then press the ENTER
button.
2. Press the ▲ or ▼ buttons to select "MTS", then press the ENTER
button.
3. Press the ▲ or ▼ buttons to select a setting you want, then press the ENTER
button.
Press the
EXIT button to exit.
• Choose Mono for channels that are broadcasting in mono, or if you are having
difficulty receiving a stereo signal.
• Choose Stereo for channels that are broadcasting in stereo.
• Choose SAP to listen to the Separate Audio Program, which is usually a
reign-language translation.
Press the MTS buttons on the remote control repeatedly to select "Mono", "Stereo", or "SAP".
Multi-Track Sound
Choosing a Multi-Channel Sound (MTS) track
Mode : Custom ►
Equalizer
►
SRS TS XT : Off
►
MTS : Stereo
►
Auto Volume : Off
►
Internal Mute : Off
►
Sound Select : Main ►
Reset
SoundTV
Move Enter Return
Mode : Custom
Equalizer
SRS TS XT : Off
MTS : Stereo
Auto Volume : Off
Internal Mute : Off
Sound Select : Main
Reset
SoundTV
Mono
Stereo
SAP
Move Enter Return
BN68-01156A-X6Eng-0306.indd 34 2007-03-06 �� 7:23:38

English - 35
Automatic Volume Control
1. Press the MENU button to display the menu.
Press the ▲ or ▼ buttons to select "Sound", then press the ENTER
button.
2. Press the ▲ or ▼ buttons to select "Auto Volume", then press the ENTER
button.
3. Press the ▲ or ▼ buttons to set Auto Volume "On" or "Off" then press the
ENTER
button.
Press the
EXIT button to exit.
Reduces the differences in volume level among broadcasters.
Mode : Custom ►
Equalizer
►
SRS TS XT : Off
►
MTS : Stereo
►
Auto Volume : Off
►
Internal Mute : Off
►
Sound Select : Main ►
Reset
Sound
TV
Move Enter Return
Mode : Custom
Equalizer
SRS TS XT : Off
MTS : Stereo
Auto Volume : Off
Internal Mute : Off
Sound Select : Main
Reset
Sound
TV
Off
On
Move Enter Return
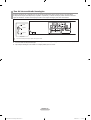
Selecting the Internal Mute
1. Press the MENU button to display the menu.
Press the ▲ or ▼ buttons to select "Sound", then press the ENTER
button.
2. Press the ▲ or ▼ buttons to select "Internal Mute", then press the ENTER
button.
3. Press the ▲ or ▼ buttons to select "On" or "Off", then press the ENTER
button.
Press the
EXIT button to exit.
When "Internal Mute" is set to "On", the Sound menus except for "Sound Select"
(in PIP mode) and MTS cannot be adjusted.
The VOL , VOL
and MUTE buttons do not operate when the Internal Mute is
set to On.
Sound output from the TV speakers is muted. This is useful when you want to listen to audio through your sound system instead of
the TV.
Mode : Custom ►
Equalizer
►
SRS TS XT : Off
►
MTS : Stereo
►
Auto Volume : Off
►
Internal Mute : Off
►
Sound Select : Main ►
Reset
SoundTV
Move Enter Return
Mode : Custom
Equalizer
SRS TS XT : Off
MTS : Stereo
Auto Volume : Off
Internal Mute : Off
Sound Select :
Main
Reset
SoundTV
Off
On
Move Enter Return
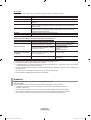
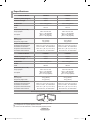
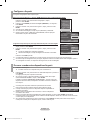
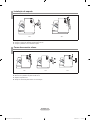
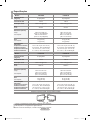
Internal Speakers Audio Out (L/R Out)
RF AV, S-Video
Component, PC, HDMI
RF AV, S-Video
Component, PC, HDMI
Internal Mute Off
Speaker Output Speaker Output Speaker Output Sound Output Sound Output Sound Output
Internal Mute On
Mute Mute Mute Sound Output Sound Output Sound Output
Video No Signal
Mute Mute Mute Mute Mute Mute
When “Internal mute” is set to “On”, Sound menus except “MTS” cannot be adjusted.
BN68-01156A-X6Eng-0306.indd 35 2007-03-06 �� 7:23:39

English - 36
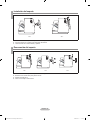
Resetting the Sound Settings to the Factory Defaults
1. Press the MENU button to display the menu.
Press the ▲ or ▼ button to select "Sound", then press the ENTER button.
2. Press the ▲ or ▼ button to select "Reset" then press the ENTER button.
Press the EXIT button to exit.
If Game Mode is On, the Reset Sound function is activated. Selecting the Reset function after setting the equalizer resets the
equalizer setting to the factory defaults.
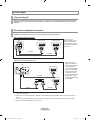
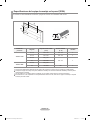
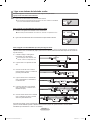
You can connect a set of headphones to your set if you wish to watch a TV program without disturbing the other people in the room.
Connecting Headphones
When you insert the head set jack into the corresponding port, you can operate
only "MTS", "Auto Volume" and "Sound Select" (in PIP mode) in Sound menu.
Prolonged use of headphones at a high volume may damage your hearing.
The headphone volume and TV volume are adjusted differently.
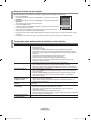
Listening to the Sound of the Sub (PIP) Picture
1. Press the MENU button to display the menu.
Press the ▲ or ▼ buttons to select "Sound", then press the ENTER
button.
2. Press the ▲ or ▼ buttons to select "Sound Select",
then press the ENTER
button.
3. Press the ▲ or ▼ buttons to select "Main" or "Sub",
then press the ENTER
button.
Press the
EXIT button to exit.
Main: Used to listen to the sound of the main picture.
Sub: Used to listen to the sound of the sub picture.
You can select this option when "PIP" is set to "On".
When the PIP feature is activated, you can listen to the sound of the sub (PIP) picture.
Mode : Custom ►
Equalizer
►
SRS TS XT : Off
►
MTS : Stereo
►
Auto Volume : Off
►
Internal Mute : Off
►
Sound Select : Main
►
Reset
SoundTV
Mode : Custom
Equalizer
SRS TS XT : Off
MTS : Stereo
Auto Volume : Off
Internal Mute : Off
Sound Select : Main
Reset
SoundTV
Main
Sub
Mode : Custom ►
Equalizer
►
SRS TS XT : Off
►
MTS : Stereo
►
Auto Volume : Off
►
Internal Mute : Off
►
Sound Select : Main ►
Reset
SoundTV
10
Volume
Move Enter Return
Move Enter Return
Move Enter Return
BN68-01156A-X6Eng-0306.indd 36 2007-03-06 �� 7:23:40
A página está carregando...
A página está carregando...
A página está carregando...
A página está carregando...
A página está carregando...
A página está carregando...
A página está carregando...
A página está carregando...
A página está carregando...
A página está carregando...
A página está carregando...
A página está carregando...
A página está carregando...
A página está carregando...
A página está carregando...
A página está carregando...
A página está carregando...
A página está carregando...
A página está carregando...
A página está carregando...
A página está carregando...
A página está carregando...
A página está carregando...
A página está carregando...
A página está carregando...
A página está carregando...
A página está carregando...
A página está carregando...
A página está carregando...
A página está carregando...
A página está carregando...
A página está carregando...
A página está carregando...
A página está carregando...
A página está carregando...
A página está carregando...
A página está carregando...
A página está carregando...
A página está carregando...
A página está carregando...
A página está carregando...
A página está carregando...
A página está carregando...
A página está carregando...
A página está carregando...
A página está carregando...
A página está carregando...
A página está carregando...
A página está carregando...
A página está carregando...
A página está carregando...
A página está carregando...
A página está carregando...
A página está carregando...
A página está carregando...
A página está carregando...
A página está carregando...
A página está carregando...
A página está carregando...
A página está carregando...
A página está carregando...
A página está carregando...
A página está carregando...
A página está carregando...
A página está carregando...
A página está carregando...
A página está carregando...
A página está carregando...
A página está carregando...
A página está carregando...
A página está carregando...
A página está carregando...
A página está carregando...
A página está carregando...
A página está carregando...
A página está carregando...
A página está carregando...
A página está carregando...
A página está carregando...
A página está carregando...
A página está carregando...
A página está carregando...
A página está carregando...
A página está carregando...
A página está carregando...
A página está carregando...
A página está carregando...
A página está carregando...
A página está carregando...
A página está carregando...
A página está carregando...
A página está carregando...
A página está carregando...
A página está carregando...
A página está carregando...
A página está carregando...
A página está carregando...
A página está carregando...
A página está carregando...
A página está carregando...
A página está carregando...
A página está carregando...
A página está carregando...
A página está carregando...
A página está carregando...
A página está carregando...
A página está carregando...
A página está carregando...
A página está carregando...
A página está carregando...
A página está carregando...
A página está carregando...
A página está carregando...
A página está carregando...
A página está carregando...
A página está carregando...
A página está carregando...
A página está carregando...
A página está carregando...
A página está carregando...
A página está carregando...
A página está carregando...
A página está carregando...
A página está carregando...
A página está carregando...
A página está carregando...
A página está carregando...
A página está carregando...
A página está carregando...
A página está carregando...
A página está carregando...
A página está carregando...
A página está carregando...
A página está carregando...
A página está carregando...
A página está carregando...
A página está carregando...
A página está carregando...
A página está carregando...
A página está carregando...
A página está carregando...
A página está carregando...
A página está carregando...
-
 1
1
-
 2
2
-
 3
3
-
 4
4
-
 5
5
-
 6
6
-
 7
7
-
 8
8
-
 9
9
-
 10
10
-
 11
11
-
 12
12
-
 13
13
-
 14
14
-
 15
15
-
 16
16
-
 17
17
-
 18
18
-
 19
19
-
 20
20
-
 21
21
-
 22
22
-
 23
23
-
 24
24
-
 25
25
-
 26
26
-
 27
27
-
 28
28
-
 29
29
-
 30
30
-
 31
31
-
 32
32
-
 33
33
-
 34
34
-
 35
35
-
 36
36
-
 37
37
-
 38
38
-
 39
39
-
 40
40
-
 41
41
-
 42
42
-
 43
43
-
 44
44
-
 45
45
-
 46
46
-
 47
47
-
 48
48
-
 49
49
-
 50
50
-
 51
51
-
 52
52
-
 53
53
-
 54
54
-
 55
55
-
 56
56
-
 57
57
-
 58
58
-
 59
59
-
 60
60
-
 61
61
-
 62
62
-
 63
63
-
 64
64
-
 65
65
-
 66
66
-
 67
67
-
 68
68
-
 69
69
-
 70
70
-
 71
71
-
 72
72
-
 73
73
-
 74
74
-
 75
75
-
 76
76
-
 77
77
-
 78
78
-
 79
79
-
 80
80
-
 81
81
-
 82
82
-
 83
83
-
 84
84
-
 85
85
-
 86
86
-
 87
87
-
 88
88
-
 89
89
-
 90
90
-
 91
91
-
 92
92
-
 93
93
-
 94
94
-
 95
95
-
 96
96
-
 97
97
-
 98
98
-
 99
99
-
 100
100
-
 101
101
-
 102
102
-
 103
103
-
 104
104
-
 105
105
-
 106
106
-
 107
107
-
 108
108
-
 109
109
-
 110
110
-
 111
111
-
 112
112
-
 113
113
-
 114
114
-
 115
115
-
 116
116
-
 117
117
-
 118
118
-
 119
119
-
 120
120
-
 121
121
-
 122
122
-
 123
123
-
 124
124
-
 125
125
-
 126
126
-
 127
127
-
 128
128
-
 129
129
-
 130
130
-
 131
131
-
 132
132
-
 133
133
-
 134
134
-
 135
135
-
 136
136
-
 137
137
-
 138
138
-
 139
139
-
 140
140
-
 141
141
-
 142
142
-
 143
143
-
 144
144
-
 145
145
-
 146
146
-
 147
147
-
 148
148
-
 149
149
-
 150
150
-
 151
151
-
 152
152
-
 153
153
-
 154
154
-
 155
155
-
 156
156
-
 157
157
-
 158
158
-
 159
159
-
 160
160
-
 161
161
-
 162
162
-
 163
163
-
 164
164
-
 165
165
-
 166
166
-
 167
167
-
 168
168
-
 169
169
-
 170
170
-
 171
171
-
 172
172
-
 173
173
-
 174
174
-
 175
175
-
 176
176
-
 177
177
-
 178
178
-
 179
179
-
 180
180
-
 181
181


Samsung LE26R81B Manual do usuário
- Categoria
- TVs LCD
- Tipo
- Manual do usuário
em outras línguas
- español: Samsung LE26R81B Manual de usuario
- English: Samsung LE26R81B User manual
Artigos relacionados
-
Samsung PL-63P71FD Manual do usuário
-
-
-
-
-
-
-
Samsung LN32R51B Manual do usuário
-
-
Outros documentos
-
Panasonic CT-27SF25 Manual do usuário
-
Philips SDV2210/55 Manual do usuário
-
HP Value 20-inch Displays Guia de usuario
-
Gigabyte GS34WQC Manual do usuário
-
Gigabyte AORUS FO48U Manual do usuário
-
Clarion VMA7194 Manual do usuário
-
 Manhattan Comfort Vanderbilt TV Stand and Cabrini 2.2 Floating Wall TV Panel Assembly Manual
