Walita RI3136/75 Manual do usuário
- Categoria
- Panelas de pressão
- Tipo
- Manual do usuário
Este manual também é adequado para

RI3136
EN User manual PT-BR Manual do usuário
English
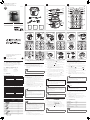
1 Your electric pressure cooker
Congratulations on your purchase, and welcome to Philips!
To fully benet from the support that Philips offers, register your
product at www.Philips.com/welcome.
2 What’s in the box (fig. 1)
Electric pressure cooker main unit
Rice spoon Soup ladle
Measuring cup User manual
Safety leaet Recipe booklet
Warranty card Power cord
3 Overview
Product overview (g. 2)
a
Lid handle
g
Power socket
b
Top lid
h
Heating element
c
Sealing ring
i
Locking pin
d
Water level indication
j
Floater
e
Inner pot
k
Floating valve
f
Control Panel
l
Pressure regulator
Controls overview (g. 3)
m
Pressurize indicator
u
Preset timer button
n
Heating indicator
v
Warm/Off button
o
Power indicator
w
Manual button
p
Hour button
x
Minute button
q
Display screen
y
Preset indicator
r
Start button
z
Keep-warm indicator
s
Pressure-keeping time button
{
Keep-pressure indicator
t
Cooking functions
Functions overview
Cooking function Default pressure-
keeping time
(minute)
Adjustable
pressure-keeping
time (minute)
Beef (
)
30 15-59
Chicken (
)
20 18-25
Chop (
)
30 10-30
Fish (
)
4 4-15
Pudding (
)
14 5-30
Beans (
)
30 20-50
Rice (
)
3 3-20
Vegetable (
)
3 3-15
Potato (
)
15 4-15
Soup (
)
10 5-30
Manual (
)
1 1-59
Specifications are subject to change without notice.
© 2015 Koninklijke Philips N.V.
All rights reserved.
RI3136_UM_PT-BR_v2.0_150820
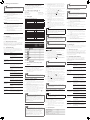
4 Using the electric pressure cooker
Before rst use
1 Remove all packaging materials from the appliance.
2 Take out all the accessories from the inner pot.
3 Clean the parts of the electric pressure cooker thoroughly
before using it for the rst time (see chapter ‘Cleaning and
Maintenance’).
Note
•
Make sure all parts are completely dry before you start using
the electric pressure cooker.
Preparations before cooking
Before using the electric pressure cooker to cook food, you need to
follow below preparations:
1 Hold the lid handle and turn it anti-clockwise until the top lid
cannot move any more, then lift up the top lid. (g. 4)
2 Take out the inner pot from the electric pressure cooker and
put the pre-washed food in the inner pot. (g. 5)
3 Wipe the outside of the inner pot dry and put it back into the
electric pressure cooker. (g. 6)
4 Place the top lid onto the electric pressure cooker and turn
it clockwise. You will hear a “click” sound when the top lid is
properly locked. (g. 7)
5 Turn the pressure control to the sealed position ( ). (g. 8)
6 Put the plug in the power socket. (g. 9)
Note
•
Make sure the sealing ring is properly assembled around the
inside of the top lid.
• Make sure the pressure regulator valve and oating valve are
clean and not blocked.
• Make sure the outside of the inner pot is dry and clean, and
that there is no foreign residue on the heating element.
• Make sure the inner pot is in proper contact with the heating
element.
Cooking food
Note
•
Do not ll the inner pot with less than 1/3 or more than 2/3 full
of food and liquid.
• For food that expands during cooking, do not ll the inner pot
with more than 1/2 full of food and liquid.
• For rice cooking, follow the water level indications on the inside
of the inner pot. You can adjust the water level for different
types of rice and your own preference. Do not exceed the
quantities indicated on the inside of the inner pot.
• Make sure the oater falls down before cooking.
1 Follow the preparation steps in “Preparations before use”.
2 Press the cooking function button to choose the cooking mode
you need. (g. 10)
» The selected cooking mode indicator ashes.
» The default pressure-keeping time displays on the screen.
3 If you want to set a different pressure-keeping time, press the
pressure-keeping time button (
). (g. 11)
» The pressure-keeping time ashes on the screen.
4 Press the minute button ( ) to set the pressure-keeping
time you need. (g. 12)
5 Press the start button ( ) and the electric pressure cooker
starts working in the selected mode. (g. 13)
6 When the electric pressure cooker reaches the working
pressure, the keep-pressure indicator lights up.
» The electric pressure cooker enters pressure-keeping
mode.
7 When the pressure-keeping time has elapsed, the electric
pressure cooker automatically switches to keep-warm mode.
8 Turn the pressure regulator to the steam vent ( ) position.
(g .14)
» The electric pressure cooker starts releasing pressure.
» The oater drops when the pressure is released
sufciently.
9 Hold the top lid handle and turn the lid anti-clockwise until it
cannot move any more, then lift it up. (g. 4)
Caution
•
When cooking soup or viscous liquid, do not release pressure
by turning the pressure regulator valve to the steam vent
position, otherwise liquid might spurt from the pressure control
valve. Wait until the pressure is naturally released and the
oater has dropped to open the top lid.
Note
•
The pressure-keeping timer will start counting down when the
working pressure is reached.
• After the cooking is nished and the pressure is released,
unplug the electric pressure cooker to turn off the keep-warm
function or when not in use.
Tip
•
You can adjust the pressure-keeping time for different types of
food according to your preference.
Using the "Manual ( )" function
You can use the manual function to set the pressure-keeping time
you need.
1 Follow the steps in “Preparations before cooking”.
2 Press the Manual button ( ). (g. 15)
» The pressure-keeping time ashes on the screen.
3 Press the minute button ( ) to set the pressure-keeping
time you need. (g. 12)
4 Press the start button ( ) and the electric pressure cooker
starts working with the chosen pressure-keeping time. (g. 13)
Note
•
The pressure-keeping time is available from 1 to 59 minutes.
Preset time for delayed cooking
You can preset the delayed cooking time for different cooking
functions. The preset timer is available up to 24 hours.
1 Follow the preparation steps in “Using the electric pressure
cooker”.
2 Choose a cooking function you need, and then press the timer
button ( ). (g. 16)
3 Press the hour button ( ) and minute button ( ) to
set the preset time. (g. 17)
4 Once the preset time is set, press the start button ( ) to
enter preset mode. (g. 13)
5 When the preset time has elapsed, the electric pressure cooker
starts working automatically.
6 When the cooking is nished, the rice cooker switches to
keep-warm mode automatically, and the keep-warm indicator
will be on.
Note
•
Do not exceed the volume indicated nor exceed the maximum
water level indicated in the inner pot, as this may cause the
electric pressure cooker to overow.
Assembling and disassembling the pressure
regulator
Caution
•
Do not disassemble the pressure regulator during cooking.
Always unplug the electric pressure cooker and wait until the
pressure has been released sufciently.
To disassemble the pressure regulator:
1 Turn the lower screw anti-clockwise until it becomes loose.
(g. 18)
2 Pull it up and take out the pressure regulator. (g. 19)
To assemble the pressure regulator:
1 Assemble the lower screw back to the regulator, and then
point the regulator to the sealed position and put it back to the
steam valve. (g. 20)
2 Turn the screw clockwise until it is fastened. (g. 21)
4 Specifications
Model Number RI3136
Rated power output 900W
Rated capacity 5.0L
Diameter 22cm
Keep-warm temperature 60-80°C
Note
•
Always unplug the appliance if not used for a longer period.
www.philips.com/welcome
User manual
wwwwww.philips.com/welcome
Safety leaflet
www.philips.com/welcome
Warranty
7
9
65
p
q
m
n
o
{
z
y
r
s
t
a
b
c
d
f
e
g
l
k
h
j
i
x
v
w
u
4
10 11 12
17
13 15
16
19
8
18
14
20
1 2 3
21
Always there to help you
Register your product and get support at
www.philips.com/welcome
Question?
Contact
Philips

5 Cleaning and Maintenance
Note
•
Unplug the electric pressure cooker before starting to clean it.
• Wait until the electric pressure cooker has cooled down
sufciently before cleaning it.
Interior
Inside of the outer lid and the main body:
• Wipe with wrung out and damp cloth.
• Make sure to remove all the food residues stuck to the
electric pressure cooker.
Heating element:
• Wipe with wrung out and damp cloth.
• Remove food residues with wrung out and damp cloth or
toothpicks.
Sealing ring:
• Soak in warm water and clean with sponge.
Exterior
Surface of the outer lid and outside of the main body:
• Wipe with a cloth damped with soap water.
• Only use soft and dry cloth to wipe the control panel.
• Make sure to remove all the food residues around the
pressure regulator valve and oating valve.
Pressure regulator and oating valve:
• Disassemble the pressure control valve, soak it in warm
water, and clean with sponge.
• Remove food residues in the pressure control valve and
oating valve with toothpicks.
Accessories
Rice spoon, soup ladle, and inner pot:
• Soak in hot water and clean with sponge.
6 Recycling
Do not throw away the product with normal household waste at the
end of its life, but hand it in at an ofcial collection point for recycling.
By doing this, you can help to preserve the environment.
7 Guarantee and service
If you need service or information, or if you have a problem, visit the
Philips website at www.philips.com or contact the Philips Customer
Care Center in your country. You can nd its phone number in the
worldwide guarantee leaet. If there is no Customer Care Center in
your country, go to your local Philips dealer.
8 Troubleshooting
If your electric pressure cooker does not function properly or if
the cooking quality is insufcient, consult the table below. If you are
unable to solve the problem, contact a Philips service center or the
Consumer Care Center in your country.
Problem Solution
I have difculties
closing the top lid.
The sealing ring is not well assembled. Make
sure the sealing ring is well assembled around
the inside of the top lid.
The oater blocks the locking pin. Push down
the oater so that it does not block the
locking pin.
I have difculties
opening the top lid
after the pressure is
released.
The oater has not dropped. Push the oater
down.
The food is not
cooked.
Make sure that there is no foreign residue
on the heating element and the outside of
the inner pot before switching the electric
pressure cooker on.
The heating element is damaged, or the inner
pot is deformed. Take the cooker to your
Philips dealer or a service center authorized
by Philips.
Air or steam leaks
from under the lid.
The sealing ring is not well assembled. Make
sure the sealing ring is well assembled around
the inside of the top lid.
There is food residue in the sealing ring. Make
sure the sealing ring is clean.
The top lid is not properly closed. Make sure
the top lid is properly closed.
Air or steam leaks
from the oating
valve.
There is food residue in the rubber ring of
the oating valve. Clean the rubber ring of the
oating valve.
The rubber ring of the oating valve is broken.
Replace the rubber ring.
The oater does
not rise after the
appliance starts
pressurizing.
Make sure there is enough food and water in
the inner pot.
The top lid or the pressure regulator valve
has malfunction. Take the appliance to your
Philips dealer or a service center authorized
by Philips.
E3 is displayed on
the screen.
The temperature inside the inner pot is
too high. Wait until it falls down to room
temperature.
E1, E2, or E4 is
displayed on the
screen.
The electric pressure cooker has malfunction.
Take the appliance to a Philips dealer or a
service center authorised by Philips.
PORTUGUÊS
1 Sua panela de pressão elétrica
Parabéns pela aquisição e seja bem-vindo à Philips!
Para aproveitar o suporte que a Philips oferece, registre seu produto
em www.philips.com/welcome.
2 O que vem na caixa (fig. 1)
Unidade principal da panela de pressão elétrica
Colher de arroz Concha de sopa
Copo medidor Manual do usuário
Folheto de segurança Caderno de receitas
Cartão de garantias Cabo de energia
3 Visão geral
Visão geral do produto (g. 2)
a
Alça da tampa
g
Entrada de energia
b
Tampa superior
h
Resistência de aquecimento
c
Anel de vedação
i
Pino da trava
d
Indicação do nível de água
j
Boia
e
Panela interna
k
Válvula utuante
f
Control Panel
l
Regulador de pressão
Visão geral dos controles (g. 3)
m
Indicador de pressurização
u
Botão de timer pré-
programado
n
Indicador de Aquecimento
v
Botão aquecer/desligar
o
Indicador de alimentação
w
Botão minha receita
p
Botão das horas
x
Botão dos minutos
q
Display
y
Indicador pré-programado
r
Botão de ligar
z
Indicador "manter aquecido"
s
Botão do tempo de
retenção de pressão
{
Indicador de retenção de
pressão
t
Funções de cozinhar
Visão geral das funções
Função de cozinhar Tempo de
retenção
de pressão
padrão
(minutos)
Tempo de
retenção de
pressão ajustável
(minutos)
Carne bovina (
)
30 15-59
Frango (
)
20 18 a 25
Porco (
)
30 10-30
Peixe (
)
4 4-15
Pudim (
)
14 5-30
Feijão (
)
30 20-50
Arroz (
)
3 3-20
Legumes (
)
3 3-15
Batata (
)
15 4-15
Sopa (
)
10 5-30
Minha receita (
)
1 1-59
4 Como usar a panela de pressão
elétrica
Antes da primeira utilização
1 Retire todos os materiais de embalagem do aparelho.
2 Remova todos os acessórios da panela interna.
3 Limpe completamente as partes da panela de pressão elétrica
antes de utilizá-la pela primeira vez (consulte o capítulo
"Limpeza e manutenção").
Nota
•
Certique-se de que todas as peças estejam bem secas antes
de começar a usar o aparelho.
Preparações antes de cozinhar
Antes de utilizar a panela de pressão elétrica para cozinhar alimentos,
você deve seguir a preparação abaixo:
1 Segure a alça da tampa e gire-a no sentido anti-horário até que
a tampa superior não possa mais ser movida e, em seguida,
levante-a. (g. 4)
2 Tire a panela interna da panela de pressão elétrica e coloque os
alimentos pré-lavados dentro dela. (g. 5)
3 Enxugue a parte externa da panela interna e coloque-a de volta
dentro da panela de pressão elétrica. (g. 6)
4 Coloque a tampa superior na panela de pressão elétrica e gire-a
no sentido horário. Você ouvirá um "clique" quando a tampa
superior estiver travada adequadamente. (g. 7)
5 Gire o controle de pressão para a posição fechada ( ). (g. 8)
6 Insira o plugue na tomada elétrica. (g. 9)
Nota
•
Certique-se de que o anel de vedação esteja montado
adequadamente ao redor da parte interna da tampa superior.
• Certique-se de que válvula reguladora de pressão e a válvula
utuante estejam limpas e destravadas.
• Certique-se de que a parte externa da panela interna esteja
seca e limpa, e de que não haja resíduos no elemento de
aquecimento.
• Certique-se de que a panela interna esteja em contato com o
elemento de aquecimento.
Cozinhar alimentos
Nota
•
Não encha a panela interna abaixo de 1/3 nem acima de 2/3
com alimentos e líquido.
• Para alimentos que expandam durante o cozimento, não encha
a panela interna acima da metade com alimentos e líquidos.
• Para cozinhar arroz, siga as indicações de nível de água no
interior da panela interna. Você pode ajustar o nível de
água para diferentes tipos de arroz e de acordo com suas
preferências. Não exceda os limites de quantidade indicados
dentro da panela interna.
• Certique-se de que a boia caia antes de cozinhar.
1 Siga as etapas de preparação em "Preparações antes do uso".
2 Pressione o botão da função de cozinhar para escolher o modo
que você precisa. (g. 10)
» O indicador do modo de cozimento selecionado pisca.
» O tempo de retenção de pressão padrão é exibido na
tela.
3 Se você quiser denir um outro tempo de retenção de pressão,
aperte o botão de retenção pressão (
). (g. 11)
» O tempo de retenção de pressão pisca na tela.
4 Pressione o botão dos minutos ( ) para denir o tempo
de retenção de pressão. (g. 12)
5 Pressione o botão de início ( ) e a panela de pressão elétrica
começa a funcionar no modo selecionado. (g. 13)
6 Quando a panela de pressão elétrica alcança a pressão de
trabalho, o indicador de retenção de pressão acende.
» A panela de pressão elétrica entra no modo de retenção
de pressão.
7 Depois de transcorrido o tempo de retenção de pressão, a
panela de pressão elétrica troca automaticamente o modo
manter quente.
8 Gire o regulador de pressão para a posição de saída de vapor
(
). (g .14)
» A panela de pressão elétrica começa a liberar pressão.
» A boia cai quando a pressão é liberada o suciente.
9 Segure a alça superior da tampa e vire a tampa no sentido anti-
horário até que a tampa superior não possa mais ser movida e,
em seguida, levante-a. (g. 4)
Atenção
•
Ao cozinhar sopa ou líquidos viscosos, não libere pressão
virando a válvula reguladora de pressão para a posição de saída
de vapor, senão, o líquido pode jorrar pela válvula de controle
de pressão. Espere até que a pressão seja liberada naturalmente
e a boia caia para abrir a tampa superior.
Nota
•
O timer de retenção de pressão começará a contagem
regressiva quando a pressão de trabalho for alcançada.
• Depois que o cozimento estiver terminado e a pressão for
liberada, desligue a panela de pressão elétrica para desligar a
função manter quente ou quando não estiver em uso.
Dica
•
Você também pode ajustar o tempo de retenção de pressão
para tipos de alimentos diferentes e de acordo com sua
preferência.
Como usar a função "Minha receita
( )"
Você pode usar a função "Minha receita" para ajustar o tempo de
retenção de pressão que você precisa.
1 Siga as etapas em "Preparação antes de cozinhar".
2 Pressione o botão Minha receita ( ). (g. 15)
» O tempo de retenção de pressão pisca na tela.
3 Pressione o botão dos minutos ( ) para denir o tempo
de retenção de pressão. (g. 12)
4 Pressione o botão de início ( ) e a panela de pressão elétrica
começa a funcionar com o tempo de retenção de pressão
escolhido. (g. 13)
Nota
•
O tempo de retenção de pressão está disponível de 1 a 59
minutos.
Tempo pré-programado para cozimento
atrasado
Você pode predenir o tempo de cozimento atrasado para diferentes
funções de cozimento. O timer pré-programado está disponível em
até 24 horas.
1 Siga os passos de preparação em "Como usar a panela de
pressão elétrica".
2 Escolha a função de cozimento que você precisa e, em seguida,
pressione o botão do timer ( ). (g. 16)
3 Pressione o botão das horas ( ) e o botão dos minutos
( ) para denir o tempo pré-programado. (g. 17)
4 Uma vez denido o tempo pré-programado, pressione o botão
de início ( ) para entrar no modo pré-programado. (g. 13)
5 Quando o tempo pré-programado tiver terminado, a panela de
pressão elétrica começará a funcionar automaticamente.
6 Quando o cozimento estiver concluído, a panela elétrica passa
automaticamente para o modo manter quente, e o indicador
manter quente cará ligado.
Nota
•
Não exceda o volume indicado nem o nível máximo de água
indicado na panela interna, pois isso pode causar vazamento na
panela de pressão elétrica.
Como montar e desmontar o regulador de
pressão
Atenção
•
Não desmonte o regulador de pressão durante o cozimento.
Sempre desligue a panela de pressão elétrica e espere até que a
pressão seja liberada o suciente.
Para desmontar o regulador de pressão:
1 Gire o parafuso inferior no sentido anti-horário até que ele
que solto. (g. 18)
2 Puxe-o para cima e retire o regulador de pressão. (g. 19)
Para montar o regulador de pressão:
1 Coloque o parafuso inferior de volta no regulador e aponte
o regulador para a posição fechada, colocando-o de volta na
válvula de vapor. (g. 20)
2 Gire o parafuso no sentido horário até apertá-lo. (g. 21)
4 Especificações
Número do modelo RI3136
Potência de saída efetiva 900W
Capacidade nominal 5,0 L
Diâmetro 22 cm
Temperatura para manter quente 60-80°C
Nota
•
Desconecte o aparelho da tomada após um longo período de
inatividade.
5 Limpeza e manutenção
Nota
•
Desconecte a panela de pressão elétrica da tomada antes de
limpá-la.
• Espere até que a panela de pressão elétrica tenha esfriado o
suciente para começar a limpá-la.
Luz interna
Dentro da tampa externa e da estrutura principal:
• Limpe com um pano velho e úmido.
• Remova todos os resíduos de alimentos que estiverem
grudados na panela de pressão elétrica.
Elemento de aquecimento:
• Limpe com um pano velho e úmido.
• Remova os resíduos de alimentos com um pano velho e
úmido ou palitos de dente.
Anel de vedação:
• Enxágue em água quente e limpe com uma esponja.
Parte externa
Superfície da tampa externa e da parte externa da estrutura principal:
• Limpe com um pano úmido, detergente e água.
• Use apenas o pano seco e macio para secar o painel de
controle.
• Certique-se de retirar todos os resíduos de alimentos
do redor da válvula reguladora de pressão e da válvula
utuante.
Regulador de pressão e válvula utuante:
• Desmonte a válvula de controle de pressão, coloque-a em
água quente e limpe com esponja.
• Retire resíduos de alimento da válvula de controle de
pressão e da válvula utuante com um palito.
Acessórios
Colher de arroz, concha de sopa, e panela interna:
• Enxágue em água quente e limpe com uma esponja.
6 Reciclagem
Não descarte o aparelho com o lixo doméstico no nal de sua vida
útil. Leve-o a um postode coleta ocial para que possa ser reciclado.
Ao fazer isso, você ajuda a preservar o meio ambiente.
7 Garantia e serviço
Caso você precise de assistência, informações ou tenha um problema,
acesse o site da Philips em www.philips.com ou entre em contato
com a Central de Atendimento ao Cliente Philips do seu país. O
número de telefone encontra-se no folheto da garantia mundial. Caso
não haja uma Central de Atendimento ao Cliente no seu país, vá até
um representante local da Philips.
8 Resolução de Problemas
Se sua panela de pressão elétrica não funciona adequadamente ou
a qualidade do cozimento é insuciente, consulte a tabela abaixo.
Se não for possível resolver o problema, entre em contato com
a assistência técnica Philips ou com a Central de Atendimento ao
Cliente em seu país.
Problema Solução
Tenho diculdades
de fechar a tampa
superior.
O anel de vedação não está bem montado.
Certique-se de que o anel de vedação esteja
bem montado ao redor da parte interna da
tampa superior.
A boia bloqueia o pino de travamento.
Empurre a boia para baixo de forma a não
bloquear o pino de travamento.
Tenho diculdades
em abrir a tampa
superior depois
que a pressão é
liberada.
A boia não caiu. Empurre a boia para baixo.
O alimento não
está cozido.
Verique se não há resíduos no elemento de
aquecimento e na parte externa do recipiente
interno antes de ligar a panela elétrica.
O elemento de aquecimento está com
defeito, ou a panela interna está danicada.
Leve a máquina de fazer arroz a um
representante ou uma assistência técnica
autorizada Philips.
O ar ou vapor vaza
de sob a tampa.
O anel de vedação não está bem montado.
Certique-se de que o anel de vedação esteja
bem montado ao redor da parte interna da
tampa superior.
Há resíduos de alimento no anel de vedação.
Certique-se de que o anel de vedação esteja
limpo.
A tampa superior não está adequadamente
fechada. Certique-se que a tampa superior
esteja adequadamente fechada.
O ar ou vapor vaza
da válvula utuante.
Há resíduos de alimento no anel de borracha
da válvula utuante. Limpe o anel de borracha
da válvula utuante.
O anel de borracha da válvula utuante está
quebrado. Substitua o anel de borracha.
A boia não levanta
depois que o
aparelho começa
pressurizar.
Certique-se de que haja alimentos e água
sucientes na panela interna.
A tampa superior ou a válvula reguladora de
pressão está funcionando mal. Leve o aparelho
a um representante ou uma assistência técnica
autorizada Philips.
E3 é exibido na
tela.
A temperatura no interior da panela é
muito alta. Aguarde até que ela baixe para a
temperatura ambiente.
E1, E2 ou E4 é
exibido na tela.
A panela de pressão elétrica está com
mau funcionamento. Leve o aparelho a um
representante ou uma assistência técnica
autorizada Philips.
-
 1
1
-
 2
2


Walita RI3136/75 Manual do usuário
- Categoria
- Panelas de pressão
- Tipo
- Manual do usuário
- Este manual também é adequado para
em outras línguas
- English: Walita RI3136/75 User manual
Artigos relacionados
Outros documentos
-
CrockPot CSC062X Manual do usuário
-
 Russell Hobbs RHEP6 Manual do usuário
-
 CROCK POT Express programmable 5.6 l CSC051X-01 Manual do proprietário
-
Tefal CY505E30 Manual do usuário
-
-
-
Electrolux PCE10 Manual do usuário
-
-
-
Mellerware 27400A Manual do usuário

